Seite wird geladen ...

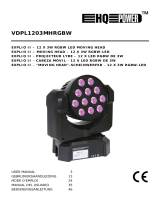
VDPDP134D
6-CHANNEL DMX DIMMER PACK (6 X 10A) WITH LCD
6-KANAALS DMX DIMMERPACK (6 X 10A) MET LCD
UNITÉ DE PUISSANCE 6 CANAUX (6 X 10A) AVEC LCD
DIMMER PACK DMX DE 6 CANALES (6 X 10A) CON PANTALLA LCD
6-KANAL-DMX-DIMMER PACK (6 X 10A) MIT LCD
USER MANUAL 2
GEBRUIKERSHANDLEIDING 8
NOTICE D’EMPLOI 15
MANUAL DEL USUARIO 22
BEDIENUNGSANLEITUNG 29

VDPDP134D
V. 03 – 22/09/2014 2 ©Velleman nv
USER MANUAL
1. Introduction
To all residents of the European Union
Important environmental information about this product
This symbol on the device or the package indicates that disposal of the device after its lifecycle could
harm the environment. Do not dispose of the unit (or batteries) as unsorted municipal waste; it
should be taken to a specialized company for recycling. This device should be returned to your
distributor or to a local recycling service. Respect the local environmental rules.
If in doubt, contact your local waste disposal authorities.
Thank you for choosing HQPower™! Please read the manual thoroughly before bringing this device into service.
If the device was damaged in transit, don't install or use it and contact your dealer.
This device is a 6-channel dimmer pack. It can be used as a stand alone device or as a DMX pack, it can also be
controlled by an analogue signal. In stand alone mode, there are 12 built-in programs with adjustable speed.
When operated as a DMX pack, it can be controlled by 1 to 6 channels with addresses between 001 to 512.
When operated through an analogue signal (DC 0-10V pulse signal), it is controlled by 6 channels. Its features
include: preheating, circuit brake protection, phase compensation, DMX M/S, etc.
2. Safety Instructions
Be very careful during the installation: touching live wires can cause life-threatening electroshocks.
Do not touch the device during operation as the housing heats up.
Keep this device away from rain and moisture.
Always disconnect mains power when device not in use or when servicing or maintenance activities
are performed. Handle the power cord by the plug only.
Often clearing the memory may cause damage to the memory chip, be careful not to initialise your unit
frequency often to avoid this risk.
Only use the recommended AC/DC power adapter.
Keep the original packaging in case you should ever have to return to unit for service.
Do not spill water or liquids in or onto your amplifier.
Make sure that the power outlet voltage matches the voltage of your amplifier.
Do not crimp the power cord and protect it against damage. Have an authorised dealer replace it if
necessary. Avoid the power cord being stepped upon or tripped over.
Never remove the ground prong from the power cord. This prong is used to reduce the risk of electrical
shock in case of an internal short circuit.
Disconnect the device from the mains to clean it or when it is not in use. Handle the power cord by the plug
only.
Never remove the cover. There are no user serviceable parts inside.
This unit is not intended for home use.
Keep the device away from children and unauthorised users.
Do not operate this unit in places with excessive humidity and with temperatures over 45°C/113°F and
under 2°C/35.6°F.
3. General Guidelines
Refer to the Velleman® Service and Quality Warranty on the last pages of this manual.
All modifications of the device are forbidden for safety reasons. All user modifications will void the warranty.
In the unlikely event that the device needs service, contact your dealer.

VDPDP134D
V. 03 – 22/09/2014 3 ©Velleman nv
4. Description
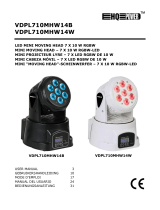
4.1 Front view
1
2 x 8 LC Display
Shows the current activities or menu adjustments.
2
6 Channel LEDs
These LEDs show the activities of the corresponding channels.
3
DMX LED
This LED blinks when a DMX signal is present.
4
6 Channel buttons
These channel buttons are used to change the intensity of the
corresponding channel.
5
Menu button
6
Up button
Press this button to scroll through menus or to increase values.
7
Down button
Press this button to scroll to menus or to decrease values.
8
ESC button
Press this button to go back to the last menu level or to leave the menu
system.
In the initial menu, this button is used to reverse the change direction of
the channel setting.
9
6 x Circuit breaker (10A)
4.2 Rear view
1
Power input
Single-phase input or three-phase output.
2
Schuko socket
3
DMX output
This connector sends a DMX signal to the next DMX device.
4
DMX input
This connector accepts DMX input signals.
5
Analogue input
DC 0-10V pulse signal
5. Connection Scheme
6. Controls and Functions
6.1 START MENU
Apply power to the unit, the display will show the software revision, then the
start menu will be displayed. It consists of a row of dynamic images and
characters, the first row represents the intensity value, the second row
indicates the channel.

VDPDP134D
V. 03 – 22/09/2014 4 ©Velleman nv
TEMPORARILY ADJUSTING THE CHANNEL INTENSITY
Press the channel button to select the desired channel intensity, each press
will change the intensity by one factor.
Pressing the button for two seconds changes the channel intensity quickly.
By pressing the ESC button, the changing direction of the channel intensity
will be reversed.
TEMPORARILY ADJUSTING THE WHOLE INTENSITY
Press the UP/DOWN button to select the desired intensity; each button press
will change the intensity by one step. Holding the button for two seconds, the
channel intensity will change quickly.
6.2 BASIC MENUS
In the start menu, press the menu button to enter the basic menus system.
There are 5 menus: DMX fail, phase correction, DMX address, preheat and
curve.
You can use the UP/DOWN button to scroll through the menus. Press the ESC
button to leave the basic menus system.
DMX FAIL
1. Press the UP/DOWN button to scroll to the DMX fail menu.
2. Press the MENU button, to enter the sub menu system. You can use the
UP/DOWN button to select hold/analog/prog. 1-12.
o Hold]: last received DMX signal is held
o [Analog]: The analogue input is (0-10V) is activated.
o [Progr. 1-12] starts internal programs 1-12.
3. If you select "hold" or "analog", you can press the ESC button to exit.

VDPDP134D
V. 03 – 22/09/2014 5 ©Velleman nv
4. If you select Prog. 1-12, press the ESC button, the speed menu is
activated. You can select the chasing speed from 0.1 to 20 seconds using
the UP/DOWN button. After you've finished your setting, press ESC to
exit.
PHASE CORRECTION
1. Press UP/DOWN to scroll to the phase correction menu.
2. Press the menu button to enter the sub menu system. You can use the
UP/DOWN button to select YES/NO.
o [YES]: Linear dimming is activated
o [NO]: Non-linear dimming is activated.
3. Press ESC to exit.
DMX ADDRESS
1. Press the UP/DOWN button to scroll to the DMX address menu.
2. Press the menu button to enter the submenu system. You can use the
UP/DOWN buttons to select block/single.
o [Block]: The complete dimmer (all 6 channels) has only one start
address.
o [Single]: The DMX address of each channel is selectable, several
channels can select the same DMX addresses.
3. Press the UP/DOWN-button to scroll to block/single menu, and tap menu to enter the block/single.
+

VDPDP134D
V. 03 – 22/09/2014 6 ©Velleman nv
4. In block mode, you can use the up/down button to select the start
address from [001-512].
5. In single mode, press MENU to select between channel and address.
6. When the channel is activated, press the UP/DOWN button to select from
[1-6], when the address is activated, press the UP/DOWN button to select
from [001-512].
7. Press the ESC button to exit.
PREHEAT
1. Press the UP/DOWN button to scroll to the preheat menu.
2. Press the MENU button to enter the submenu system.
3. Press the UP/DOWN button to select between All/Single mode and tap MENU to enter the all/single mode.
+

VDPDP134D
V. 03 – 22/09/2014 7 ©Velleman nv
4. In all mode, press the UP/DOWN button to select the preheat value of all
channels between 000%-050%.
5. In single mode, press the MENU button to select between channel and
preheat value.
6. When the channel is activated, press the UP/DOWN button to select from
[1-6], when preheat is activated, press the UP/DOWN button to select
from [000%-050%].
7. Press the ESC button to exit.
CURVE
1. Press the UP/DOWN button to scroll to the curve menu.
2. Press MENU to enter the submenu system.
3. Press the UP/DOWN button to select from linear / switch / square.

VDPDP134D
V. 03 – 22/09/2014 8 ©Velleman nv
4. Press the ESC button to exit.
5. You can press the ESC button to return to the start menu.
7. Technical Specifications
Power input
AC 230V 50~60Hz
Channel output (single phase)
10A/CH, a total of 60A
Channel output (three phases)
10A/CH, a total of 20A per phase
DMX-output
3-pin female XLR socket
DMX-input
3-pin female XLR socket
Analogue input
0-10V, 8-pin DIN socket
Dimensions
482 x 390 x 90mm
Weight (approx.)
9.0kg
Use this device with original accessories only. Velleman nv cannot be held responsible in the event
of damage or injury resulted from (incorrect) use of this device. For more info concerning this
product and the latest version of this manual, please visit our website www.hqpower.eu. The
information in this manual is subject to change without prior notice.
© COPYRIGHT NOTICE
The copyright to this manual is owned by Velleman nv. All worldwide rights reserved.
No part of this manual may be copied, reproduced, translated or reduced to any electronic medium or otherwise
without the prior written consent of the copyright holder.
GEBRUIKERSHANDLEIDING
1. Inleiding
Aan alle ingezetenen van de Europese Unie
Belangrijke milieu-informatie betreffende dit product
Dit symbool op het toestel of de verpakking geeft aan dat, als het na zijn levenscyclus wordt
weggeworpen, dit toestel schade kan toebrengen aan het milieu. Gooi dit toestel (en eventuele
batterijen) niet bij het gewone huishoudelijke afval; het moet bij een gespecialiseerd bedrijf
terechtkomen voor recyclage. U moet dit toestel naar uw verdeler of naar een lokaal recyclagepunt
brengen. Respecteer de plaatselijke milieuwetgeving.
Hebt u vragen, contacteer dan de plaatselijke autoriteiten betreffend de verwijdering.
Dank u voor uw aankoop! Lees deze handleiding grondig voor u het toestel in gebruik neemt. Werd het toestel
beschadigd tijdens het transport, installeer het dan niet en raadpleeg uw dealer.
De VDPDP134D is een 6-kanaals dimmerpack en kan autonoom, als DMX-pack of via een analoog signaal
bestuurd worden. In autonome modus zijn er 12 ingebouwde programma’s met instelbare snelheid
beschikbaar. Als DMX-pack wordt het bestuurd door 1 tot 6 kanalen met het adres tussen 001 en 512. Met het
analoge signaal (0-10VDC impulssignaal) zijn er 6 kanalen. Kenmerken: voorverwarming, zekering,
fasecompensatie, DMX M/S, enz.

VDPDP134D
V. 03 – 22/09/2014 9 ©Velleman nv
2. Veiligheidsinstructies
Wees voorzichtig bij de installatie: raak geen kabels aan die onder stroom staan om dodelijke
elektroshocks te vermijden.
Raak het toestel niet aan wanneer het in gebruik is: de behuizing wordt warm.
Bescherm dit toestel tegen regen en vochtigheid.
Trek de stekker uit het stopcontact (trek niet aan de kabel!) voordat u het toestel reinigt en als u het
niet gebruikt.
Regelmatig het geheugen wissen kan de geheugenchip beschadigen.
Gebruik enkel een geschikte AC/DC voedingsadapter.
Gebruik de oorspronkelijke verpakking wanneer u het toestel vervoert.
Houd het toestel uit de buurt van water en vloeistoffen.
De beschikbare netspanning mag niet hoger zijn dan de spanning in de specificaties achteraan de
handleiding.
De voedingskabel mag niet omgeplooid of beschadigd zijn. Laat uw dealer zo nodig een nieuwe kabel
plaatsen. Trap niet op de voedingskabel.
Verwijder nooit de aarding uit de voedingskabel. De aarding vermindert het risico op elektroshocks in geval
van een interne kortsluiting.
Trek de stekker uit het stopcontact (trek nooit aan de kabel!) voordat u het toestel reinigt en als u het niet
gebruikt.
Verwijder nooit de behuizing. De gebruiker mag geen onderdelen vervangen.
Dit toestel mag niet thuis worden gebruikt.
Houd dit toestel uit de buurt van kinderen en onbevoegden.
Gebruik dit toestel niet op vochtige plaatsen en daar waar de temperatuur lager is dan 2°C/35.6°F of hoger
is dan 45°C/113°F.
3. Algemene richtlijnen
Raadpleeg de Velleman® service- en kwaliteitsgarantie achteraan deze handleiding.
Om veiligheidsredenen mag de gebruiker geen wijzigingen aanbrengen aan het toestel. Alle wijzigingen
door de gebruiker vallen niet onder de garantie. Neem contact op met uw verdeler voor eventuele
onderhoudswerken.
4. Omschrijving
4.1 Vooraanzicht
1
2 x 8 LCD
Geeft de huidige stand in het menu weer.
2
6 x kanaal-LEDs
Deze LEDs geven de activiteit van de kanalen weer.
3
DMX LED
Deze LEDs knipperen wanneer er een DMX-signaal aanwezig is.
4
6 x kanaalknoppen
Gebruik deze knoppen om de intensiteit van de kanalen te wijzigen.
5
Menuknop
6
UP-knop
Druk op deze knop om door het menu te scrollen of om de waarde te verhogen.
7
DOWN-knop
Druk op deze knop om door het menu te scrollen of om de waarde te verlagen.
8
ESC-knop
Druk op deze knop om naar het vorige menuniveau terug te keren of om het
menu te verlaten.
In het hoofdmenu kunt u met deze knop de richting van de kanaalswijziging
omkeren.
9
6 x zekering (10A)
4.2 Achteraanzicht
1
Voedingsingang
Eenfasige ingang of driefasige uitgang.
2
Schuko-aansluiting
3
DMX-uitgang
Deze aansluiting zendt een DMX-signaal naar het volgende DMX-toestel.

VDPDP134D
V. 03 – 22/09/2014 10 ©Velleman nv
4
DMX-ingang
Deze aansluiting aanvaardt DMX ingangssignalen.
5
Analoge ingang
0-10VDC impulssignaal.
5. Aansluitingsschema
6. Bediening en functies
6.1 STARTMENU
Zet het toestel onder spanning. Na een controle van de software wordt het
startmenu afgebeeld. Het menu bestaat uit een reeks met dynamische
afbeeldingen en karakters. De eerste reeks stelt de intensiteit voor, de tweede
reeks stelt het kanaal voor.
VOORLOPIGE INSTELLING VAN DE KANAALINTENSITEIT
Druk op de kanaalknop en selecteer de gewenste kanaalintensiteit. Elke druk
op de knop wijzigt de intensiteit met een stap.
Blijf op de knop drukken om de waarde sneller te wijzigen.
Druk op de ESC-knop om de richting van de kanaalswijziging om te keren.
VOORLOPIGE INSTELLING VAN DE INTENSITEIT IN HET GEHEEL
Druk op UP/DOWN om de gewenste intensiteit te selecteren. Elke druk op de
knop wijzigt de waarde met een stap. Blijf op de knop drukken om de waarde
sneller te wijzigen.

VDPDP134D
V. 03 – 22/09/2014 11 ©Velleman nv
6.2 BASISMENU’S
In het startmenu drukt u op de menuknop om het basismenu weer te geven.
Er zijn 5 menu’s: DMX-storing, fasecompensatie, DMX-adres, voorverwarming
en curve.
Gebruik UP/DOWN om door het menu te scrollen. Druk op ESC om het
basismenu te verlaten.
DMX-STORING
1. Druk op UP/DOWN om naar het DMX fail-menu te scrollen.
2. Druk op MENU om het submenu weer te geven. Gebruik UP/DOWN om
hold/analog/prog. 1-12 te selecteren.
o [Hold]: Vasthouden van het laatste DMX-signaal.
o [Analog]: Inschakelen van de analoge ingang (0-10V).
o [Progr. 1-12] start de interne programma’s 1-12.
3. Als u Hold of Analog hebt geselecteerd, druk op ESC om te verlaten.
4. Druk op ESC wanneer u Prog. 1-12 hebt geselecteerd. Het SPEED-menu is
nu ingeschakeld. U kunt de chase-snelheid instellen van 0.1 tot 20
seconden met UP/DOWN button. Druk daarna op ESC om te verlaten.
FASECOMPENSATIE
1. Druk op UP/DOWN om naar het fasecompensatiemenu te scrollen.

VDPDP134D
V. 03 – 22/09/2014 12 ©Velleman nv
2. Druk op de menuknop om het submenu weer te geven. Gebruik UP/DOWN
om YES/NO te selecteren.
o [YES]: Inschakelen van de lineaire dimfunctie.
o [NO]: Inschakelen van de niet-lineaire dimfunctie.
3. Druk op ESC om te verlaten.
DMX-ADRES
1. Druk op UP/DOWN om naar het DMX-adresmenu te scrollen.
2. Druk op de menuknop om het submenu weer te geven. Gebruik UP/DOWN
om block/single te selecteren.
o [Block]: De complete dimmer (alle 6 kanalen) heeft een enkel
startadres.
o [Single]: Het DMX-adres voor elk kanaal kan afzonderlijk worden
geselecteerd. Verscheidene kanalen kunnen hetzelfde startadres
hebben.
3. Druk op UP/DOWN om naar het block/single-menu te scrollen. Druk op MENU om de block/single-modus
weer te geven.
+
4. In Block-modus gebruikt u UP/DOWN om het startadres te selecteren
[001-512].
5. In single-modus, druk op MENU om te kiezen tussen het kanaal en het
adres.

VDPDP134D
V. 03 – 22/09/2014 13 ©Velleman nv
6. Is het kanaal ingeschakeld, druk dan op UP/DOWN om [1-6] te
selecteren. Is het adres ingeschakeld, druk dan op UP/DOWN om [001-
512] te selecteren.
7. Druk op ESC om te verlaten.
VOORVERWARMING
1. Druk op UP/DOWN om naar het voorverwarmingsmenu te scrollen.
2. Druk op MENU om het submenu weer te geven.
3. Druk op UP/DOWN om tussen All/Single te kiezen. Druk op MENU om de modus weer te geven.
+
4. Druk nu in om het even welke mode op UP/DOWN om de waarde van
voorverwarming voor alle kanalen te selecteren (tussen 000%-050%).
5. In de single-modus, druk op MENU om te kiezen tussen het kanaal en de
waarde van voorverwarming.

VDPDP134D
V. 03 – 22/09/2014 14 ©Velleman nv
6. Is het kanaal ingeschakeld, druk dan op UP/DOWN om te selecteren
tussen [1-6]. Is de voorverwarming ingeschakeld, druk dan op UP/DOWN
om te selecteren tussen [000%-050%].
7. Druk op ESC om te verlaten.
CURVE
1. Druk op UP/DOWN om naar het curvemenu te scrollen.
2. Druk op MENU om het submenu weer te geven.
3. Druk op UP/DOWN om te kiezen tussen linear / switch / square.
4. Druk op ESC om te verlaten.
5. Druk op ESC om naar het startmenu terug te keren.

VDPDP134D
V. 03 – 22/09/2014 15 ©Velleman nv
7. Technische specificaties
Voeding
230VAC 50~60Hz
Kanaaluitgang (eenfasig)
10A/CH, totaal van 60A
Kanaaluitgang (driefasig)
10A/CH, totaal van 20A per fase
DMX-uitgang
3-pin vrouwelijke XLR
DMX-ingang
3-pin vrouwelijke XLR
Analoge ingang
0-10V, 8-pin DIN
Afmetingen
482 x 390 x 90mm
Gewicht (ong.)
9.0kg
Gebruik dit toestel enkel met originele accessoires. Velleman nv is niet aansprakelijk voor schade of
kwetsuren bij (verkeerd) gebruik van dit toestel. Voor meer informatie over dit product en de
laatste versie van deze handleiding, zie www.hqpower.eu. De informatie in deze handleiding kan te
allen tijde worden gewijzigd zonder voorafgaande kennisgeving.
© AUTEURSRECHT
Velleman nv heeft het auteursrecht voor deze handleiding. Alle wereldwijde rechten voorbehouden.
Het is niet toegestaan om deze handleiding of gedeelten ervan over te nemen, te kopiëren, te vertalen, te
bewerken en op te slaan op een elektronisch medium zonder voorafgaande schriftelijke toestemming van de
rechthebbende.
NOTICE D’EMPLOI
1. Introduction
Aux résidents de l'Union européenne
Des informations environnementales importantes concernant ce produit
Ce symbole sur l'appareil ou l'emballage indique que l’élimination d’un appareil en fin de vie peut
polluer l'environnement. Ne pas jeter un appareil électrique ou électronique (et des piles éventuelles)
parmi les déchets municipaux non sujets au tri sélectif ; une déchèterie traitera l’appareil en question.
Renvoyer les équipements usagés à votre fournisseur ou à un service de recyclage local. Il convient de
respecter la réglementation locale relative à la protection de l’environnement.
En cas de questions, contacter les autorités locales pour élimination.
Nous vous remercions de votre achat ! Lire la présente notice attentivement avant la mise en service de
l’appareil. Si l’appareil a été endommagé pendant le transport, ne pas l’installer et consulter votre revendeur.
La VDPDP134D est une unité de puissance à 6 canaux et peut être utilisée de manière autonome ou en pack
DMX, et se pilote à l’aide d’un signal analogique. Le mode autonome intègre 12 programmes avec vitesse
ajustable. En mode pack DMX, l’appareil est contrôlé par biais de 1 à 6 canaux (adresses entre 001 et 512). Le
signal analogique (signal à impulsions 0-10VCC) se pilote depuis 6 canaux. Quelques caractéristiques :
préchauffage, disjoncteur, compensation de phase, DMX M/S, etc.
2. Consignes de sécurité
Être prudent lors de l’installation : toucher un câble sous tension peut causer des électrochocs
mortels.
Ne pas toucher l’appareil lorsqu’il est en service : le boîtier chauffe !
Protéger l’appareil contre la pluie et l’humidité.
Débrancher l’appareil s’il n’est pas utilisé ou pour le nettoyer. Tirer la fiche pour débrancher
l'appareil ; non pas le câble.

VDPDP134D
V. 03 – 22/09/2014 16 ©Velleman nv
Un effacement régulier de la mémoire peut endommager la puce ; il est inutile de réinitialiser votre appareil
de manière fréquente.
N’utiliser que l’adaptateur secteur CA/CC adapté.
Transporter l’appareil dans son emballage originel.
Éviter les éclaboussures d’eau ou de liquides sur l’appareil.
La tension réseau ne peut pas dépasser la tension mentionnée dans les spécifications à la fin de cette
notice.
Le cordon d’alimentation ne peut pas être replissé ou endommagé. Demander à votre revendeur de
renouveler le cordon d’alimentation si nécessaire. Éviter de marcher sur le cordon.
Ne jamais retirer la broche de la masse sur la fiche. Cette fiche réduit les risques d’électrochocs en cas de
court-circuit interne.
Débrancher l’appareil s’il n’est pas utilisé ou pour le nettoyer. Tirer la fiche pour débrancher l'appareil ; non
pas le câble.
Ne jamais retirer le couvercle. Il n’y a aucune pièce maintenable par l’utilisateur à l’intérieur de l’appareil.
Cet appareil n’est prévu pour une utilisation domestique.
Garder votre VDPDP134D hors de la portée de personnes non qualifiées et de jeunes enfants.
Éviter d’utiliser cet appareil dans un endroit humide et où les températures supérieures à 45°C/113°F ou
inférieures à 2°C/35.6°F.
3. Directives générales
Se référer à la garantie de service et de qualité Velleman® en fin de notice.
Toute modification de l’appareil est interdite pour des raisons de sécurité. Toute modification par
l’utilisateur annulera la garantie. Contacter votre revendeur pour des réparations éventuelles.
4. Description
4.1 Vue de face
1
Écran à cristaux liquides 2 x 8
Affichage des modifications dans le menu.
2
6 x témoin LED pour canal
Ces LEDs indiquent l’activité des canaux.
3
LED DMX
Cette LED clignote lors de la présence d’un signal DMX.
4
6 x bouton pour canal
Utilisés pour modifier l’intensité d’un canal.
5
Bouton du menu
6
Bouton UP
Enfoncer ce bouton pour défiler le menu ou pour augmenter les valeurs.
7
Bouton DOWN
Enfoncer ce bouton pour défiler le menu ou pour diminuer les valeurs.
8
Bouton ESC
Enfoncer ce bouton pour retourner vers le niveau précédent ou pour
quitter le menu.
Dans le menu initial, ce bouton sert à inverser la direction de
modification d’un canal.
9
6 x disjoncteur (10A)
4.2 Vue arrière
1
Entrée
Entrée monophasée ou sortie triphasée.
2
Prise Schuko
3
Sortie DMX
Ce connecteur renvoit le signal DMX vers le prochain appareil DMX.
4
Entrée DMX
Ce connecteur reçoit le signal DMX.
5
Entrée analogique
Signal à impulsions 0-10VCC.

VDPDP134D
V. 03 – 22/09/2014 17 ©Velleman nv
5. Schéma de connexion
6. Contrôles et fonctions
6.1 MENU DE DÉPART
Mettre l’appareil sous tension. Le menu de départ apparaît après un contrôle
du logiciel. Le menu consiste en une rangée d’images et de caractères
dynamiques. La première rangée représente la valeur d’intensité, la seconde
indique le canal.
RÉGLAGE PROVISOIRE DE L’INTENSITÉ D’UN CANAL
Enfoncer le bouton de canal pour sélectionner l’intensité de canal. Chaque
pression modifie l’intensité d’un cran.
Maintenir enfoncé le bouton pendant 2 secondes pour modifier l’intensité de
manière rapide.
Enfoncer le bouton ESC pour inverser la direction de modification de l’intensité
du canal.
RÉGLAGE PROVISOIRE DE LA TOTALITÉ DE L’INTENSITÉ
Enfoncer UP/DOWN pour sélectionner l’intensité ; chaque pression modifie
l’intensité d’un cran. Maintenir enfoncé le bouton pendant 2 secondes pour
modifier l’intensité de manière rapide.
6.2 MENUS DE BASE
Enfoncer le bouton de menu dans le menu de base pour accéder aux menus
de base. Il y a 5 menus : défaillance DMX, correction de phase, adresse DMX,
préchauffage et courbe.
Utiliser les boutons UP/DOWN pour défiler les menus. Enfoncer le bouton ESC
pour quitter les menus de base.

VDPDP134D
V. 03 – 22/09/2014 18 ©Velleman nv
DMX FAIL
1. Enfoncer le bouton UP/DOWN pour défiler vers la menu « DMX fail »
(défaillance du DMX).
2. Enfoncer le bouton MENU pour accéder le sous-menu. Utiliser le bouton
UP/DOWN pour sélectionner hold/analog/prog. 1-12.
o [Hold] : Le dernier signal DMX est figé.
o [Analog] : L’entrée analogique (0-10V) est activée.
o [Progr. 1-12] démarre les programmes internes 1-12.
3. Si vous avez sélectionné « hold » ou « analog », enfoncer ESC pour
quitter.
4. Si vous sélectionnez « Prog. 1-12 », enfoncer ESC. Le menu « vitesse »
est activé. Programmer la vitesse de la poursuite de 0.1 à 20 secondes à
l’aide du bouton UP/DOWN. Après l’entrée, enfoncer ESC pour quitter.
CORRECTION DE PHASE
1. Enfoncer UP/DOWN pour défiler vers le menu de correction de phase.
2. Enfoncer le bouton menu pour accéder le sous-menu. Utiliser le bouton
UP/DOWN pour sélectionner YES/NO.
o [YES] : Activation de la variation linéaire.
o [NO] : Activation de la variation non linéaire.
3. Enfoncer ESC pour quitter.

VDPDP134D
V. 03 – 22/09/2014 19 ©Velleman nv
ADRESSE DMX
1. Enfoncer le bouton UP/DOWN pour défiler vers le menu adresse DMX.
2. Enfoncer le bouton menu pour accéder le sous-menu. Utiliser le bouton
UP/DOWN pour sélectionner « Block single ».
o [Block] : L’appareil (les 6 canaux) ne comporte qu’une seule adresse
de départ.
o [Single] : Il est possible de sélectionner l’adresse DMX de chaque
canal. Plusieurs canaux peuvent sélectionner la même adresse DMX.
3. Enfoncer le bouton UP/DOWN pour défiler vers le menu « block/single ». Enfoncer le bouton MENU pour
accéder le mode « block/single ».
+
4. En mode « block », utiliser le bouton UP/DOWN pour sélectionner
l’adresse de départ de [001-512].
5. En mode « single », enfoncer MENU pour choisir entre le canal et
l’adresse.
6. Lorsque le canal est activé, enfoncer UP/DOWN pour sélectionner de [1-
6]. Lorsque l’adresse est activée, enfoncer UP/DOWN pour sélectionner de
[001-512].
7. Enfoncer le bouton ESC pour quitter.

VDPDP134D
V. 03 – 22/09/2014 20 ©Velleman nv
PRÉCHAUFFAGE
1. Enfoncer UP/DOWN pour défiler vers le menu préchauffage.
2. Enfoncer le bouton MENU pour accéder le sous-menu.
3. Enfoncer UP/DOWN pour choisir entre « All/Single » et enfoncer MENU pour accéder le mode « All/Single ».
+
4. Dans tous les modes, enfoncer UP/DOWN pour sélectionner la valeur de
préchauffage de tous les canaux entre 000%-050%.
5. En mode « single », enfoncer le bouton MENU pour choisir entre la valeur
de canal ou celle du préchauffage.
6. Lorsque le canal est activé, enfoncer le bouton UP/DOWN pour
sélectionner de [1-6]. Lorsque le préchauffage est activé, enfoncer
UP/DOWN pour sélectionner de [000%-050%].
7. Enfoncer le bouton ESC pour quitter.
1/37