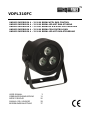
HQ Power VDPL310FC Benutzerhandbuch
- Kategorie
- Stroboskope
- Typ
- Benutzerhandbuch

VDPL310FC
UNILED SUPERSLIM 4 – 3 X 8 W RGBW WITH DMX CONTROL
UNILED SUPERSLIM 4 – 3 X 8 W RGBW-LED MET DMX-STURING
UNILED SUPERSLIM 4 – 3 X LED RGBW DE 8 W AVEC PILOTAGE DMX
UNILED SUPERSLIM 4 – 3 X 8 W RGBW CON CONTROL DMX
UNILED SUPERSLIM 4 – 3 X 8 W RGBW-LED MIT DMX-STEUERUNG
USER MANUAL 3
GEBRUIKERSHANDLEIDING 11
MODE D'EMPLOI 20
MANUAL DEL USUARIO 29
BEDIENUNGSANLEITUNG 37

VDPL310FC
V. 01 – 29/04/2014 2 ©Velleman nv

VDPL310FC
V. 01 – 29/04/2014 3 ©Velleman nv
USER MANUAL
1. Introduction
To all residents of the European Union
Important environmental information about this product
This symbol on the device or the package indicates that disposal of the device after its lifecycle
could harm the environment. Do not dispose of the unit (or batteries) as unsorted municipal
waste; it should be taken to a specialized company for recycling. This device should be
returned to your distributor or to a local recycling service. Respect the local environmental
rules.
If in doubt, contact your local waste disposal authorities.
Thank you for choosing HQPower™! Please read the manual thoroughly before bringing this device into
service. If the device was damaged in transit, don't install or use it and contact your dealer.
2. Safety Instructions
This appliance is not intended for use by persons (including children) with reduced physical,
sensory or mental capabilities, or lack of experience and knowledge, unless they have been
given supervision or instruction concerning use of the appliance by a person responsible for
their safety.
Children shall be supervised to ensure that they do not play with the appliance. Never let the
device run unattended.
Do not crimp the power cord and protect it against damage.
Warning! If the power cord is damaged, it must be replaced by the manufacturer, its service
agent, or similarly qualified persons in order to avoid any hazard.
Make sure that the available voltage does not exceed the voltage stated in the specifications
of this manual.
This device falls under protection class I. It is therefore essential that the device be earthed.
Have a qualified person carry out the electric connection.
Be very careful during the installation: touching live wires can cause life-threatening
electroshocks.
Do not use the device when damage to housing or cables is noticed. Do not attempt to
service the device yourself but contact an authorised dealer or service agent.
Always disconnect mains power when device not in use or when servicing or maintenance
activities are performed. Handle the power cord by the plug only.
Caution: device heats up during use. Do not touch hot surfaces. Let the device cool down
sufficiently after switching off before handling.
Indoor use only. Keep this device away from rain, moisture, splashing and dripping
liquids. Never put objects filled with liquids on top of or close to the device.
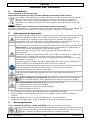
Do not stare directly at the light source, as this may cause
epileptic seizure in sensitive people
temporarily loss of sight (flash blindness)
permanent (irreversible) eye damage.
Use an appropriate safety cable to fix the device (e.g. VDLSC7N or VDLSC8N).
Install the device at a minimal distance of 0.5 m from flammable and explosive objects or
substances.
Respect a minimum distance of 0.5 m between the device’s light output and any illuminated surface.
The maximum ambient temperature is 40 °C. Do not operate the device at higher temperatures.

VDPL310FC
V. 01 – 29/04/2014 4 ©Velleman nv
3. General Guidelines
Refer to the Velleman® Service and Quality Warranty on the last pages of this manual.
Keep this device away from dust and extreme temperatures. Make sure the ventilation
openings are clear at all times. For sufficient air circulation, leave at least 1" (± 2.5 cm)
in front of the openings.
Protect this device from shocks and abuse. Avoid brute force when operating the
device.
Familiarise yourself with the functions of the device before actually using it. Do not allow operation
by unqualified people. Any damage that may occur will most probably be due to unprofessional use
of the device.
All modifications of the device are forbidden for safety reasons. Damage caused by user modifications
to the device is not covered by the warranty.
Only use the device for its intended purpose. All other uses may lead to short circuits, burns,
electroshocks, lamp explosion, crash, etc. Using the device in an unauthorised way will void the
warranty.
Damage caused by disregard of certain guidelines in this manual is not covered by the warranty and
the dealer will not accept responsibility for any ensuing defects or problems.
Mechanical wear and LEDs are not covered by warranty.
A qualified technician shall install and service this device.
Do not switch the device on immediately after it has been exposed to changes in temperature.
Protect the device against damage by leaving it switched off until it has reached room temperature.
This device is designed for professional use on stage, in discos, theatres, etc. The device shall only
be used indoors with an alternating current of 100–240 VAC, 50/60 Hz.
Lighting effects are not designed for permanent operation: regular operation breaks will prolong their
lives.
Keep this manual for future reference.
4. Features
The UNILED 4 is a multi-purpose LED light for every kind of event and installation with powerful RGBW
full-colour LEDs. It features a flat bottom and has signal and power connections on the side, so it is
perfect to use as a wall lighter and other kinds of floor applications.
3 x 8 W RGBW high-power LED, with white colour temperature pre-set (3200 – 10 000 K)
DMX control via 4 or 9 channels for simple or advanced controlling
o 4 channel mode: RGBW
o 9 channel mode: dimmer, RGBW, preset colour, strobe, auto program, dimmer curve
built-in programs with speed adjustment
sound activation via internal microphone with adjustable sensitivity
static colour selection
master/slave mode for synchronized operation of multiple units linked in a chain
flicker-free operation (400 Hz)
with IR remote control.
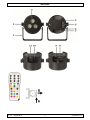
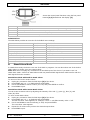
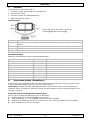
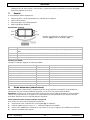
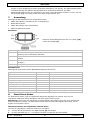
5. Overview
Refer to the illustrations on page 2 of this manual.
1
double bracket
5
display
9
power input + fuse holder
2
hinge
6
control buttons
10
power output
3
IR receiver for remote control
7
safety hook
11
DMX output
4
control buttons
8
DMX input

VDPL310FC
V. 01 – 29/04/2014 5 ©Velleman nv
6. Installation
Choose a suitable mounting spot. Mount the device in the desired angle using the included bracket.
Connect the power cord to the mains. Disconnect after use.
Mounting the Device
Have the device installed by a qualified person, respecting EN 60598-2-17 and all other applicable
norms.
The carrying construction must be able to support 10 times the weight of the device for 1 hour
without deforming.
For truss mounting, use an appropriate clamp (not incl.) and fit an M10 bolt through the centre of the
(folded) bracket.
Adjust the desired inclination angle via the mounting bracket and tighten the bracket screws.
The installation must always be secured with a secondary attachment such as a safety cable
(e.g. VDLSC7N or VDLSC8N). The secondary attachment shall be designed and mounted in such a
way that no part of the device can fall if the primary attachment fails.
Make sure that the safety cables can carry 10 times the weight of the device. Make sure that the
maximum height of drop is limited so that no injuries can occur. If the safety cables are long, wrap
them around the truss multiple times to reduce the height of drop to a safe level.
Never stand directly below the device when it is being mounted, removed or serviced. Have a
qualified technician check the device once a year and once before you bring it into service.
Install the device in a location with few passers-by that is inaccessible to unauthorised persons.
Overhead mounting requires extensive experience: calculating workload limits, determining the
installation material to be used… Have the material and the device itself checked regularly. Do not
attempt to install the device yourself if you lack these qualifications as improper installation may
result in injuries.
Make sure there is no flammable material within a 0.5 m radius of the device.
Have a qualified electrician carry out the electric connection.
Connect the device to the mains with the power plug. All devices must be powered directly off a
grounded switched circuit and cannot be run off a rheostat or dimmer circuit, even if the rheostat or
dimmer channel is used solely for 0 % to 100 % switching.
The device has a power output [10] to supply power to another device. When connecting several
devices in a daisy chain via this output, make sure that the total current does not exceed the power
line’s nominal current. Use power cables with an adequate section.
The installation has to be approved by an expert before the device is taken into service.
DMX-512 Connection
When applicable, connect an XLR cable to the female XLR output of a controller (not incl.) and the
other side to the male XLR input [8] of the device. Multiple devices can be linked through serial
linking. The linking cable shall be a dual core, screened cable with XLR input and output connectors.
Maximum recommended serial data link distance is 500 meters (1640 ft). Maximum recommended
number of devices on a serial data link is 32 devices.
A DMX terminator is recommended for installations where the DMX cable has to run a long distance
or is in an electrically noisy environment (e.g. discos). The terminator prevents corruption of the
digital control signal by electrical noise. The DMX terminator is simply an XLR plug with a 120 Ω
resistor between pins 2 and 3, which is then plugged into the XLR output socket [11] of the last
device in the chain.
7. Operation
The device can be used in the following modes:
stand-alone mode: automatic or sound-activated
master/slave
stand-alone with remote control
with a DMX512 controller.

VDPL310FC
V. 01 – 29/04/2014 6 ©Velleman nv
Control Panel Navigation
Access the control panel functions using the four panel
buttons [4,6] located near the display [5].
Button
Function
MENU
to access the menu, quit the current function without saving the setting, or quit the menu
UP
to scroll upward in a list of functions or options, or increase a value
DOWN
to scroll downward in a list of functions or options, or decrease a value
ENTER
to confirm and save a selected option or value
Default Values
The table below provides an overview of the default menu settings:
Feature
Menu item
Default value
DMX address
4-CH / 9-CH
9-CH, d--1
Built-in static colour
C--
C15 (all LEDs on)
Custom static colour
U--
r255/g255/b255/w255
Built-in program
P--
P1: 4 colours switching
Program speed
S--
100 (fast)
Sound-activated program
Snd
Snd1: 4 colours
Sound sensitivity
SenS
80
Dimmer speed
dIM
OFF: dimmer speed is off
Remote control
SET
On: remote control is enabled
8. Stand-Alone Mode
In stand-alone mode, the device runs one of the built-in programs. You can also select one of the built-in
static colours, or define your own custom colour.
Note: Make sure to unplug any connection from the DMX input of the device if you want to use it in
stand-alone mode. A device in stand-alone mode may transmit DMX signals that could interfere with the
DMX signals from the controller.
Stand-Alone Mode with Built-in Static Colour
To use one of the built-in static colours:
1. Unplug any connection from the DMX input [8] of the device.
2. Press MENU until <C--> is displayed and press ENTER.
3. Use UP and DOWN to select a colour (C1–C15) and press ENTER to confirm.
4. Press MENU to quit.
Stand-Alone Mode with Custom Static Colour
You can create a custom colour by adjusting the intensity of the red (r), green (g), blue (b), and
white (W) LEDs.
To use a custom static colour:
1. Unplug any connection from the DMX input [8] of the device.
2. Press MENU until <U--> is displayed and press ENTER.
The last set colour value appears, for example <r215> = red LEDs intensity value = 215.
3. Use UP and DOWN to set the intensity (0–255) and press ENTER.
The next colour value appears.
4. Repeat for all colours until you have the desired output colour.
5. Press MENU to quit.

VDPL310FC
V. 01 – 29/04/2014 7 ©Velleman nv
Stand-Alone Mode with Built-in Program
To set the device to stand-alone mode with a built-in program:
1. Unplug any connection from the DMX input [8] of the device.
2. Press MENU until <P--> is displayed and press ENTER.
3. Use UP and DOWN to select a built-in program:
o <P1>: 4 colours switching
o <P2>: 4 colours fading
o <P3>: 15 colours switching
o <P4>: 15 colours fading.
4. Press ENTER to confirm.
5. To set the speed of the program, press MENU until <S--> is displayed. Note: do not press ENTER.
6. Use UP and DOWN to set the speed from slow (1) to fast (100) and press ENTER to confirm.
7. Press MENU to quit.
Dimmer Speed
You can choose a dimmer speed to control the colour transitions in the automatic programs (switching
colours only). The dimmer speed has no effect on static colours.
To set the dimmer speed, proceed as follows:
1. Press MENU until <dIM> is displayed and press ENTER.
2. Use UP and DOWN to select the desired setting:
o <OFF>: dimmer off, for abrupt colour transitions.
o <dIM1>–<dIM3>: dimming speeds 1 (fast) to 3 (slow), for smooth colour transitions.
3. Press ENTER to confirm.
After changing the dimmer speed, you have to reactivate the automatic program, as follows:
4. Press MENU until <P--> is displayed and press ENTER.
5. Use UP and DOWN to select the desired program and press ENTER.
6. Press MENU to quit.
Sound Activation
To use an automatic program with sound activation, proceed as follows:
1. Unplug any connection from the DMX input [8] of the device.
2. Press MENU until <Snd> is displayed and press ENTER to confirm.
3. Use UP and DOWN to select the desired setting:
o <Snd1>: 4 colours changing, responding to sound.
o <Snd2>: 15 colours changing, responding to sound.
4. To change the sensitivity of the internal microphone, press MENU until <SenS> is displayed.
Note: do not press ENTER.
5. Use UP or DOWN to set the sensitivity from low (0) to high (100) and press ENTER to confirm.
6. Press MENU to quit.
9. Master/Slave Mode
The master/slave mode allows for connecting several devices to a single master device in a daisy chain.
All slave devices will then work synchronously with the master device. The first device in the daisy chain
functions as the master device.
To set the devices to master/slave mode:
1. Unplug any connection from the DMX input [8] of the master device (the first device in the chain).
2. Connect the DMX input of the first slave device to the DMX output [11] of the master device.
3. Connect the DMX input of the subsequent slave devices to the DMX output of the previous slave
device.
4. Set up the unit as described in Stand-Alone Mode.
5. On each slave device, set the DMX address to 1 as follows: press MENU until <9-CH> is displayed
and press ENTER.
6. Use UP and DOWN to set the DMX starting address to <d--1> and press ENTER.
10. Operation with Remote Control
Note: Make sure to unplug any connection from the DMX input of the device if you want to use it in
stand-alone mode. A device in stand-alone mode may transmit DMX signals that could interfere with the
DMX signals from the controller.

VDPL310FC
V. 01 – 29/04/2014 8 ©Velleman nv
10.1 Inserting/Replacing the Battery
Warning! Do not puncture batteries or throw them in fire as they may explode. Do not
attempt to recharge non-rechargeable batteries (alkaline). Dispose of batteries in accordance
with local regulations. Keep batteries away from children.
To insert/replace the battery in the remote control, proceed as follows:
1. Press on the side of the battery holder [A] and pull [B] to slide it open.
2. Insert a new CR2025 lithium battery in accordance with the polarity markings on the remote
control.
3. Push the battery holder back into the remote until it snaps into place.
10.2 Enable/Disable Remote Control
If you want to prevent (accidental) usage of the remote control, you can disable it via the menu. When
disabled, pressing the buttons on the remote control has no effect. Proceed as follows:
1. Press MENU until <SET> is displayed and press ENTER.
2. Use UP and DOWN to select <Off> and press ENTER.
The remote control is now disabled.
3. To enable the use of the remote control again, select <On>.
10.3 Using the Remote Control
The remote control allows you to:
choose a static colour (built-in or custom)
choose an automatic program with speed adjustment
choose an automatic program with fading colours
run a sound-activated program with sensitivity adjustment
set the overall brightness of the light output (master dimmer)
add a strobe effect with adjustable speed
switch off all LEDs.
Each function is described in detail below.
Built-in Static Colour
To use one of the built-in static colours, press one of the numbered buttons (0–9) on the remote control.
The button colour corresponds with the light colour.
Custom Static Colour
You can create a custom colour by adjusting the intensity of the red (R), green (G), blue (B), and
white (W) LEDs. To use a custom static colour:
1. To adjust the red LEDs, press R and then press + or – to set the desired intensity.
2. To adjust the green LEDs, press G and then press + or – to set the desired intensity.
3. To adjust the blue LEDs, press B and then press + or – to set the desired intensity.
4. To adjust the white LEDs, press W and then press + or – to set the desired intensity.
5. To activate the custom colour, press MANUAL.
Note: The A and UV buttons have no function.
Automatic Program
To use an automatic program, proceed as follows:
1. Press AUTO and then press + or – to select the desired program (P1–P4).
2. To set the speed of the program, press SPEED and then press + or – to adjust.
Fading Colours
To use an automatic program with fading colours, proceed as follows:
1. Press FADE and then press + or – to select the desired program (P2 or P4).
Sound-Activated Program
To use a program with sound activation, proceed as follows:
1. Press SOUND and then press + or – to select the desired program (Snd1/Snd2).
2. To change the sensitivity of the internal microphone, press SENSITIVITY and then press + or – to
adjust.

VDPL310FC
V. 01 – 29/04/2014 9 ©Velleman nv
Master Dimmer
To adjust the overall brightness of the light output, press % and then press + or – to set the desired
brightness.
Adding a Strobe Effect
To add a strobe effect, proceed as follows:
1. Press STROBE and then press + or – to set the desired strobe speed.
2. To switch off the strobe effect, press STROBE again.
Switching Off
To switch off all LEDs, press BLACKOUT. Press BLACKOUT again to switch on.
11. DMX Mode
This mode allows you to control the device by any universal DMX controller.
All DMX-controlled devices need a digital start address so that the correct device responds to the
signals. This digital start address is the channel number from which the device starts to “listen” to
the DMX controller. The same starting address can be used for a whole group of devices or an
individual address can be set for every device.
When all devices have the same address, all the units will “listen” to the control signal on one
particular channel. In other words: changing the settings of one channel will affect all devices
simultaneously. If you set individual addresses, each device will “listen” to a separate channel
number. Changing the settings of one channel will only affect the device in question.
In case of the 4-channel mode, you will have to set the start address of the first unit to 1 (CH1–4),
the second to 5 (1 + 4) (CH5–8), the third to 9 (5 + 4) (CH9–12), and so on. The highest start
address is 509.
In case of the 9-channel mode, you will have to set the start address of the first unit to 1 (CH1–9),
the second to 10 (1 + 9) (CH10–18), the third to 19 (10 + 9) (CH19–27), and so on. The highest
start address is 504.
To set the device to work with a DMX controller:
1. Press MENU until <4-CH> (for the 4-channel mode) or <9-CH> (for the 9-channel mode) is
displayed and press ENTER.
2. Use UP and DOWN to set the DMX starting address (d--1 to d512) and press ENTER.
DMX Channel Values
4 channel mode:
Channel
From
To
Description
1
0
255
Red 0–100 %
2
0
255
Green 0–100 %
3
0
255
Blue 0–100 %
4
0
255
White 0–100 %
9 channel mode:
Channel
From
To
Description
1
0
255
Red 0–100 %
2
0
255
Green 0–100 %
3
0
255
Blue 0–100 %
4
0
255
White 0–100 %
5
0
15
No function
16
255
Selection of predefined fixed colours
6
0
15
No function (if channel 7 is ≤ 31)
16
255
Strobe slow to fast (if channel 7 is ≤ 31)
0
255
Program speed slow to fast (if channel 7 is ≥ 32)

VDPL310FC
V. 01 – 29/04/2014 10 ©Velleman nv
Channel
From
To
Description
7
0
31
No function
32
63
0–100 % (for fixed colour with CH1–4)
64
95
100–0 % (for fixed colour with CH1–4)
96
127
100–0–100 % (for fixed colour with CH1–4)
128
159
Colours fading
160
191
4 colours switching
192
223
15 colours switching
224
255
Sound control
8
0
255
Master dimmer 0–100 %
9
0
51
Dimmer speed as set in menu
52
101
Dimmer speed off
102
152
Dimmer speed 1
153
203
Dimmer speed 2
204
255
Dimmer speed 3
12. Cleaning and Maintenance
All screws shall be tightened and free of corrosion.
The housing, the lenses, the mounting supports and the installation location (e.g. ceiling, suspension,
trussing) shall not be deformed, modified or tampered with; e.g. do not drill extra holes in mounting
supports, do not change the location of the connections…
Mechanically moving parts must not show any signs of wear and tear.
The electric power supply cables must not show any damage. Have a qualified technician maintain
the device.
Disconnect the device from the mains prior to maintenance activities. Let the device cool down.
Wipe the device regularly with a moist, lint-free cloth. Do not use alcohol or solvents.
Do not immerse the device in any liquid.
There are no user-serviceable parts, apart from the fuse.
Contact your dealer for spare parts if necessary.
Replacing the Fuse
Only replace the fuse by a fuse of the same type and rating.
1. Before replacing the fuse, unplug the mains lead.
2. Wedge the fuse holder out of its housing with a flat-head screwdriver.
3. Remove the damaged fuse from its holder and replace with the exact same type of fuse.
4. Insert the fuse holder back in its place and reconnect power.
13. Technical Specifications
power supply
100–240 VAC 50/60 Hz
power consumption
25 W
IP rate
IP44
LEDs
3 x 8 W RGBW/FC high-power LED
beam angle
25°
field angle
44°
dimensions
187 x 152 x 187 mm
weight
1.6 kg
Use this device with original accessories only. Velleman nv cannot be held responsible in the
event of damage or injury resulting from (incorrect) use of this device. For more info
concerning this product and the latest version of this manual, please visit our website
www.hqpower.eu. The information in this manual is subject to change without prior notice.
© COPYRIGHT NOTICE – The copyright to this manual is owned by Velleman nv. All worldwide
rights reserved. No part of this manual may be copied, reproduced, translated or reduced to any
electronic medium or otherwise without the prior written consent of the copyright holder.

VDPL310FC
V. 01 – 29/04/2014 11 ©Velleman nv
GEBRUIKERSHANDLEIDING
1. Inleiding
Aan alle ingezetenen van de Europese Unie
Belangrijke milieu-informatie betreffende dit product
Dit symbool op het toestel of de verpakking geeft aan dat, als het na zijn levenscyclus wordt
weggeworpen, dit toestel schade kan toebrengen aan het milieu. Gooi dit toestel (en eventuele
batterijen) niet bij het gewone huishoudelijke afval; het moet bij een gespecialiseerd bedrijf
terechtkomen voor recyclage. U moet dit toestel naar uw verdeler of naar een lokaal
recyclagepunt brengen. Respecteer de plaatselijke milieuwetgeving.
Hebt u vragen, contacteer dan de plaatselijke autoriteiten betreffende de
verwijdering.
Dank u voor uw aankoop! Lees deze handleiding grondig voor u het toestel in gebruik neemt. Werd het
toestel beschadigd tijdens het transport, installeer het dan niet en raadpleeg uw dealer.
2. Veiligheidsinstructies
Dit toestel is niet geschikt voor gebruik door personen (kinderen inbegrepen) met
verminderde fysieke, zintuiglijke of geestelijke capaciteiten of gebrek aan ervaring en kennis,
tenzij zij onder toezicht staan of instructie hebben gekregen over het gebruik van het toestel
van een persoon die verantwoordelijk is voor hun veiligheid.
Houd toezicht op kinderen om te voorkomen dat ze met het apparaat spelen. Laat een
ingeschakeld toestel nooit onbeheerd achter.
Zorg ervoor dat het stroomsnoer niet gekneld of geplooid is en bescherm het tegen
beschadiging.
Waarschuwing! Indien de voedingskabel beschadigd is, dan moet deze door de fabrikant,
diens servicedienst, of een gelijkwaardig bekwaam persoon vervangen worden om gevaar te
voorkomen.
De beschikbare netspanning mag niet hoger zijn dan de spanning in de specificaties
beschreven in deze handleiding.
Dit toestel valt onder beschermingsklasse I. Het toestel moet dus geaard zijn. Een geschoolde
technicus moet de elektrische aansluiting verzorgen.
Wees voorzichtig bij de installatie: raak geen kabels aan die onder stroom staan om dodelijke
elektrische schokken te vermijden.
Gebruik het toestel niet indien de behuizing of de bekabeling beschadigd is. Probeer in geen
geval het toestel zelf te repareren maar contacteer uw verdeler.
Trek de stekker uit het stopcontact voordat u het toestel reinigt of als u het niet gebruikt.
Houd de voedingskabel altijd vast bij de stekker en niet bij de kabel.
Opgelet: dit toestel wordt zeer warm tijdens het gebruik. Raak geen warme oppervlakken
aan. Laat het toestel na het uitschakelen voldoende afkoelen, voor u deze aanraakt.
Gebruik het toestel enkel binnenshuis. Bescherm dit toestel tegen regen,
vochtigheid en opspattende vloeistoffen. Plaats nooit objecten gevuld met vloeistof op
of naast het toestel.
Kijk niet rechtstreeks in de lichtbron, om het volgende te vermijden:
epilepsieaanvallen bij gevoelige personen
tijdelijke blindheid (flitsblindheid)
permanente en onherroepelijke schade aan de ogen.
Maak het toestel vast met een geschikte veiligheidskabel (bv. VDLSC7N of VDLSC8N).
Installeer het toestel op een minimumafstand van 0,5 m van ontvlambare en explosieve voorwerpen
of stoffen.
Zorg voor een minimumafstand van 0,5 m tussen de lichtuitgang van het toestel en het belichte
oppervlak.
De maximale omgevingstemperatuur bedraagt 40 °C. Gebruik het toestel niet bij hogere
temperaturen.

VDPL310FC
V. 01 – 29/04/2014 12 ©Velleman nv
3. Algemene richtlijnen
Raadpleeg de Velleman® service- en kwaliteitsgarantie achteraan deze handleiding.
Bescherm het toestel tegen stof en extreme temperaturen. Zorg ervoor dat de
verluchtingsopeningen niet verstopt geraken. Voorzie een ruimte van minstens 1"
(± 2,5 cm) tussen het toestel en elk ander object.
Bescherm het toestel tegen schokken. Vermijd brute kracht tijdens de bediening.
Leer eerst de functies van het toestel kennen voor u het gaat gebruiken. Ongeschoolde personen
mogen dit toestel niet gebruiken. Meestal is beschadiging het gevolg van onprofessioneel gebruik.
Om veiligheidsredenen mag u geen wijzigingen aanbrengen aan het toestel. Schade door wijzigingen
die de gebruiker heeft aangebracht aan het toestel, valt niet onder de garantie.
Gebruik het toestel enkel waarvoor het gemaakt is. Andere toepassingen kunnen leiden tot
kortsluitingen, brandwonden, elektrische schokken, enz. De garantie vervalt automatisch bij
ongeoorloofd gebruik.
De garantie geldt niet voor schade door het negeren van bepaalde richtlijnen in deze handleiding en
uw dealer zal de verantwoordelijkheid afwijzen voor defecten of problemen die hier rechtstreeks
verband mee houden.
De leds en mechanische schade vallen niet onder de garantie.
Laat dit toestel installeren en onderhouden door een geschoolde technicus.
Om beschadiging te vermijden, zet u het toestel best niet aan onmiddellijk nadat het werd
blootgesteld aan temperatuurschommelingen. Om beschadiging te vermijden, moet u wachten tot
het toestel kamertemperatuur heeft bereikt.
Dit toestel is ontworpen voor professioneel gebruik op podia, in disco's, enz. Gebruik dit toestel enkel
binnenshuis met een wisselspanning van 100–240 VAC, 50/60 Hz.
Het toestel is niet geschikt voor een continue werking: regelmatige onderbrekingen verlengen de
levensduur.
Bewaar deze handleiding voor verdere raadpleging.
4. Eigenschappen
UNILED 4 is een multifunctioneel ledlicht geschikt voor elke gelegenheid en is uitgerust met krachtige
RGBW-leds. Dankzij de vlakke onderkant en de signaal- en voedingsaansluitingen aan de zijkant, is het
toestel ideaal als muur- of vloerverlichting.
3 x 3 W RGBW-vermogenled, met voorgeprogrammeerde kleurtemperatuur wit (3200 – 10 000 K)
DMX-sturing via 4 of 9 kanalen voor een eenvoudige of geavanceerde aansturing
o 4-kanaalsmodus: RGBW
o 9-kanaalsmodus: dimmer, RGBW, voorgeprogrammeerde kleur, stroboscoop, automatisch
programma, dimcurve
ingebouwde programma's met instelbare snelheid
muzieksturing via ingebouwde microfoon met instelbare gevoeligheid
selectie van een statische kleur
master/slavemodus voor een synchrone werking van meerdere toestellen in een reeks
flikkervrije werking (400 Hz)
met IR-afstandsbediening.
5. Omschrijving
Raadpleeg de afbeeldingen op pagina 2 van deze handleiding.
1
dubbele beugel
5
display
9
voedingsingang + zekering
2
scharnier
6
instelknoppen
10
voedingsuitgang
3
IR-ontvanger voor afstandsbediening
7
veiligheidshaak
11
DMX-uitgang
4
instelknoppen
8
DMX-ingang

VDPL310FC
V. 01 – 29/04/2014 13 ©Velleman nv
6. Installatie
Kies een geschikte montageplaats. Monteer het toestel in de gewenste hoek met de meegeleverde
beugel. Koppel de voedingskabel aan het lichtnet. Ontkoppel na gebruik.
Het toestel monteren
Laat een geschoolde technicus dit toestel installeren conform EN 60598-2-17 en andere toepasselijke
normen.
De draagconstructie waaraan het toestel wordt bevestigd, moet gedurende 1 uur 10 x het gewicht
van dit toestel kunnen dragen zonder te vervormen.
Voor montage op een lichtbrug, gebruik een geschikte klem (niet meegelev.) en draai een M10-bout
doorheen het midden van de (geplooide) beugel.
Regel de gewenste invalshoek door middel van de montagebeugel en draai de regelschroeven stevig
aan.
Maak het toestel ook altijd vast met een veiligheidskabel (bv. VDLSC7N of VDLSC8N). Dit tweede
bevestigingsmiddel moet zo worden aangebracht dat geen enkel onderdeel van het toestel naar
beneden kan vallen bij het loskomen van het eerste bevestigingsmiddel.
Controleer of de veiligheidskabels 10 x het gewicht van het toestel kunnen dragen. Beperk de
maximale valhoogte, om letsels te voorkomen. Als de veiligheidskabels te lang zijn, draai ze dan
enkele keren rond de truss om de valhoogte te beperken.
Sta nooit recht onder het toestel wanneer u het monteert, verwijdert of herstelt. Laat het toestel
controleren door een geschoolde technicus voor u het in gebruik neemt en laat het 1 x per jaar
volledig nakijken.
Installeer dit toestel op een plaats waar weinig mensen voorbijkomen en die niet toegankelijk is voor
onbevoegden.
Het ophangen vereist een degelijke praktijkervaring: u moet de maximumbelasting van de
draagconstructie kunnen berekenen, weten welk constructiemateriaal u kunt gebruiken, … Laat het
materiaal en het toestel regelmatig nakijken. Monteer het toestel niet zelf indien u er geen ervaring
mee heeft. Een slechte montage kan leiden tot verwondingen.
Verwijder alle brandbaar materiaal in een straal van 0,5 m rond het toestel.
Laat het toestel aansluiten door een geschoolde elektricien.
Sluit het toestel via de stekker aan op het lichtnet. Alle toestellen moeten via een geaard stopcontact
gevoed worden en mogen niet via een variabele weerstand of dimcircuit gevoed worden, ook al
gebruikt u de variabele weerstand of het dimcircuit als een 0 % tot 100 % inschakeling.
Het toestel heeft een voedingsuitgang [10] waar een volgend toestel kan op aangesloten worden. Bij
het aansluiten van meerdere toestellen in een reeks via deze uitgang, mag de totale stroom de
nominale stroom van de stroomkring niet overschrijden. Gebruik voedingskabels met een geschikte
diameter.
De installatie moet voor het eerste gebruik gekeurd worden door een expert.
DMX512-aansluiting
Indien van toepassing, sluit een XLR-kabel aan de vrouwelijke XLR-uitgang van een controller (niet
meegelev.) en het andere uiteinde van de mannelijke XLR-ingang [8] van het toestel. U kunt
verscheidene toestellen in serie aan elkaar koppelen. Gebruik daarvoor een 2-aderige afgeschermde
kabel met XLR ingang- en uitgangsaansluitingen.
De maximaal aanbevolen kabellengte is 500 meter. Het aanbevolen maximumaantal toestellen op
eenzelfde aansluiting is 32.
Een DMX-eindweerstand is aanbevolen als de DMX-kabel vrij lang is of wordt gebruikt in een
omgeving met veel elektrische ruis (bv. een discotheek). De eindweerstand voorkomt corruptie van
het digitale controlesignaal door elektrische ruis. De DMX-eindweerstand is niets meer dan een XLR-
stekker met een weerstand van 120 Ω van pin 2 naar 3. Deze XLR-stekker wordt dan aangesloten op
de XLR-uitgang [11] van het laatste toestel in de reeks.

VDPL310FC
V. 01 – 29/04/2014 14 ©Velleman nv
7. Gebruik
Het toestel kan in gebruikt worden in:
autonome modus: automatisch of muziekgestuurd
master/slave-modus
autonome modus met afstandsbediening
DMX512-gestuurde modus.
Controlepaneel
Bedien het paneel met behulp van de vier
toetsen [4,6] naast de display [5].
Knop
Functie
MENU
het menu openen, de huidige functie verlaten zonder de instelling op te slaan, of het menu
verlaten
UP
naar boven scrollen in een lijst met functies of opties of een waarde verhogen
DOWN
naar beneden scrollen in een lijst met functies of opties of een waarde verlagen
ENTER
een geselecteerde optie of waarde bevestigen en opslaan
Standaardwaarden
Raadpleeg de onderstaande lijst met standaardinstellingen:
Functie
Menu-item
Standaardwaarde
DMX-adres
4-CH / 9-CH
9-CH, d--1
Ingebouwde statische kleur
C--
C15 (alle leds aan)
Gepersonaliseerde statische kleur
U--
r255/g255/b255/w255
Ingebouwd programma
P--
P1: kleurwissel: 4 kleuren
Programmasnelheid
S--
100 (snel)
Muziekgestuurd programma
Snd
Snd1: 4 kleuren
Muziekgevoeligheid
Sens
80
Dimsnelheid
dIM
OFF: dimsnelheid uit
Afstandsbediening
SET
On: afstandsbediening is ingeschakeld
8. Autonome modus (standalone)
In autonome modus draait het toestel één van de ingebouwde programma's. U kunt ook kiezen uit één
van de ingebouwde statische kleuren of een eigen kleur creëren.
Opmerking: Ontkoppel alle DMX-ingangsaansluitingen van het toestel indien u het wilt gebruiken in
autonome modus. Een toestel in autonome modus kan DMX-signalen sturen en de DMX-signalen van de
controller verstoren.
Autonome modus met ingebouwde statische kleur
Om één van de ingebouwde statische kleuren te gebruiken:
1. Ontkoppel alle DMX-aansluitingen [8] van het toestel.
2. Druk op MENU tot <C--> op de display verschijnt en druk op ENTER.
3. Gebruik UP en DOWN om een kleur te selecteren (C1–C15) en druk op ENTER om te bevestigen.
4. Druk op MENU om de functie te verlaten.

VDPL310FC
V. 01 – 29/04/2014 15 ©Velleman nv
Autonome modus met gepersonaliseerde statische kleur
U kunt een eigen kleur creëren door de lichtintensiteit van de rode (r), groene (g), blauwe (b) en
witte (W) leds te regelen.
Om een gepersonaliseerde statische kleur te gebruiken:
1. Ontkoppel alle DMX-aansluitingen [8] van het toestel.
2. Druk op MENU tot <U--> op de display verschijnt en druk op ENTER.
De laatst ingestelde kleurwaarde verschijnt, bijvoorbeeld <r215> = intensiteitswaarde van de rode
leds = 215.
3. Gebruik UP en DOWN om de intensiteit (0–255) in te stellen en druk op ENTER.
De volgende kleurwaarde verschijnt.
4. Herhaal deze stappen voor alle kleuren tot u de gewenste kleur hebt bereikt.
5. Druk op MENU om de functie te verlaten.
Autonome modus met ingebouwd programma
Om het toestel in te stellen in autonome modus (standalone) met een ingebouwd programma:
1. Ontkoppel alle DMX-aansluitingen [8] van het toestel.
2. Druk op MENU tot <P--> op de display verschijnt en druk op ENTER.
3. Gebruik UP en DOWN om een ingebouwd programma te selecteren:
o <P1>: kleurwissel: 4 kleuren
o <P2>: kleurovergang: 4 kleuren
o <P3>: kleurwissel: 15 kleuren
o <P4>: kleurovergang: 15 kleuren.
4. Druk op ENTER om te bevestigen.
5. Druk op MENU tot <S--> verschijnt, om de programmasnelheid in te stellen. Opmerking: druk niet
op ENTER.
6. Gebruik UP en DOWN om de snelheid in te stellen van traag (1) naar snel (100) en druk op ENTER
om te bevestigen.
7. Druk op MENU om de functie te verlaten.
Dimsnelheid
Kies een dimsnelheid om de kleurovergang in de automatische programma's aan te sturen (enkel
kleurwissel). De dimsnelheid heeft geen effect op de statische kleuren.
Om de dimsnelheid in te stellen, gaat u als volgt te werk:
1. Druk op MENU tot <dIM> op de display verschijnt en druk op ENTER.
2. Gebruik UP en DOWN om de gewenste instelling te selecteren:
o <OFF>: dimmer uit, voor abrupte kleurovergangen.
o <DIM1>–<DIM3>: dimsnelheden 1 (snel) tot 3 (langzaam), voor zachte kleurovergangen.
3. Druk op ENTER om te bevestigen.
Nadat u de dimsnelheid hebt gewijzigd, moet u het automatische programma opnieuw inschakelen
als volgt:
4. Druk op MENU tot <P--> op de display verschijnt en druk op ENTER.
5. Gebruik UP en DOWN om het gewenste programma te selecteren en druk op ENTER.
6. Druk op MENU om de functie te verlaten.
Muzieksturing
Om een automatisch programma met muzieksturing te gebruiken, gaat u als volgt te werk:
1. Ontkoppel alle DMX-aansluitingen [8] van het toestel.
2. Druk op MENU tot <Snd> op de display verschijnt, druk op ENTER om te bevestigen.
3. Gebruik UP en DOWN om de gewenste instelling te selecteren:
o <Snd1>: kleurwissel, 4 kleuren reageren op muziek.
o <Snd2>: kleurwissel, 15 kleuren reageren op muziek.
4. Druk op MENU tot <SenS> op de display verschijnt, om de gevoeligheid van de ingebouwde
microfoon te wijzigen. Opmerking: druk niet op ENTER.
5. Gebruik UP of DOWN om de gevoeligheid in te stellen van laag (0) tot hoog (100) en druk op ENTER
om te bevestigen.
6. Druk op MENU om de functie te verlaten.

VDPL310FC
V. 01 – 29/04/2014 16 ©Velleman nv
9. Master/slave-modus
In master/slave-modus kunt u meerdere toestellen aansluiten op één toestel in een reeks. Alle
slavetoestellen functioneren synchroon met het mastertoestel. Het eerste toestel in de reeks functioneert
als mastertoestel.
De toestellen in master/slave-modus instellen:
1. Ontkoppel alle DMX-aansluitingen [8] van het mastertoestel (het eerste toestel in de reeks).
2. Sluit de DMX-ingang van het eerste slavetoestel aan op de DMX-uitgang [11] van het
mastertoestel.
3. Sluit de DMX-ingang van de volgende slavetoestellen in de reeks aan op de DMX-uitgang van het
vorige slavetoestel.
4. Stel het toestel in (zie Autonome modus).
5. Stel het DMX-startadres van elk slavetoestel in op 1. Ga als volgt te werk: druk op MENU tot
<9-CH> op de display verschijnt en druk op ENTER.
6. Gebruik UP en DOWN om het DMX-adres in te stellen op <d--1> en druk op ENTER.
10. Gebruik met afstandsbediening
Opmerking: Ontkoppel alle DMX-ingangsaansluitingen van het toestel indien u het wilt gebruiken in
autonome modus. Een toestel in autonome modus kan DMX-signalen sturen en de DMX-signalen van de
controller verstoren.
10.1 De batterij plaatsen/vervangen
Waarschuwing! U mag batterijen nooit doorboren of in het vuur gooien (explosiegevaar).
Herlaad geen alkalinebatterijen. Gooi batterijen weg volgens de plaatselijke milieuwetgeving.
Houd batterijen uit het bereik van kinderen.
Om de batterij in de afstandsbediening te plaatsen/vervangen, gaat u als volgt te werk:
1. Druk op de batterijhouder [A] en trek [B] om open te schuiven.
2. Plaats een nieuwe lithiumbatterij type CR2025 volgens de polariteitaanduidingen op de
afstandsbediening.
3. Duw de houder terug in de afstandsbediening.
10.2 De afstandsbediening in-/uitschakelen
Als u per ongeluk de afstandsbediening inschakelt, dan kunt u deze via het menu uitschakelen. Is de
afstandsbediening uitgeschakeld, dan heeft het indrukken van de knoppen geen effect. Ga als volgt te
werk:
1. Druk op MENU tot <SET> op de display verschijnt en druk op ENTER.
2. Gebruik UP en DOWN om <Off> te selecteren en druk op ENTER.
De afstandsbediening is nu uitgeschakeld.
3. Om de afstandsbediening opnieuw in te schakelen, selecteer <On>.
10.3 De afstandsbediening gebruiken
Met de afstandsbediening kunt u:
een statische kleur kiezen (ingebouwd of gepersonaliseerd)
een automatisch programma met instelbare snelheid kiezen
een automatisch programma met kleurovergang kiezen
een muziekgestuurd programma met instelbare gevoeligheid afspelen
de helderheid van de lichtuitvoer (master-dimmer) instellen
een stroboscoop met instelbare snelheid toevoegen
alle leds uitschakelen.
Elke functie wordt hieronder in detail beschreven.
Ingebouwde statische kleur
Druk op de cijfertoetsen (0–9) van de afstandsbediening, om de ingebouwde statische kleuren te
gebruiken. De kleur van de knop komt overeen met de lichtuitvoer.

VDPL310FC
V. 01 – 29/04/2014 17 ©Velleman nv
Gepersonaliseerde statische kleur
U kunt een eigen kleur creëren door de lichtintensiteit van de rode (R), groene (G), blauwe (B) en
witte (W) leds te regelen. Om een gepersonaliseerde statische kleur te gebruiken:
1. Om de lichtintensiteit van de rode leds te regelen, druk op R en daarna op + of – om de gewenste
intensiteit in te stellen.
2. Om de lichtintensiteit van de groene leds te regelen, druk op G en daarna op + of – om de
gewenste intensiteit in te stellen.
3. Om de lichtintensiteit van de blauwe leds te regelen, druk op B en daarna op + of – om de
gewenste intensiteit in te stellen.
4. Om de lichtintensiteit van de witte leds te regelen, druk op W en daarna op + of – om de gewenste
intensiteit in te stellen.
5. Om de gepersonaliseerde kleur te activeren, druk op MANUAL.
Opmerking: De A- en UV-knoppen hebben geen functie.
Automatisch programma
Om een automatisch programma te gebruiken, gaat u als volgt te werk:
1. Druk op AUTO en daarna op + of – om het gewenste programma te selecteren (P1–P4).
2. Om de snelheid van het programma te regelen, druk op SPEED en daarna op + of – om in te stellen.
Kleurovergang
Om een automatisch programma met kleurovergang te gebruiken, gaat u als volgt te werk:
1. Druk op FADE en daarna op + of – om het gewenste programma te selecteren (P2 of P4).
Muziekgestuurd programma
Om een programma met muzieksturing te gebruiken, gaat u als volgt te werk:
1. Druk op SOUND en daarna op + of – om het gewenste programma te selecteren (Snd1/Snd2).
2. Om de gevoeligheid van de ingebouwde microfoon te wijzigen, druk op SENSITIVITY en daarna op +
of – om in te stellen.
Master-dimmer
Om de helderheid van de lichtuitvoer te regelen, druk op % en daarna op + of – om de gewenste
helderheid in te stellen.
Een stroboscoopeffect toevoegen
Om een stroboscoopeffect toe te voegen, gaat u als volgt te werk:
1. Druk op STROBE en daarna op + of – om de gewenste stroboscoopsnelheid in te stellen.
2. Om het stroboscoopeffect uit te schakelen, druk nogmaals op STROBE.
Uitschakelen
Om alle leds uit te schakelen, druk op BLACKOUT. Druk nogmaals op BLACKOUT om de leds in te
schakelen.
11. DMX-modus
Sturing van het toestel via een universele DMX-controller.
Alle DMX-gestuurde toestellen hebben een digitaal startadres nodig, zodat het juiste toestel reageert
op de signalen. Dit digitale startadres is het kanaalnummer van waarop het toestel luistert naar het
signaal van de DMX-controller. U kunt één enkel startadres gebruiken voor een groep toestellen of u
kunt per toestel een nieuw startadres ingeven.
Wanneer u een enkel startadres instelt, zullen alle toestellen luisteren naar hetzelfde kanaal. Met
andere woorden: wanneer u de instellingen voor 1 kanaal verandert, zullen alle toestellen er tegelijk
op reageren. Wanneer u verschillende adressen instelt, dan luistert elk toestel naar een ander
kanaal. Wanneer u de instellingen van een kanaal verandert, zal enkel het toestel op dat kanaal
reageren.
In het geval van de 4-kanaalsmodus, zult u het startadres van het eerste toestel op 1 (CH1–4)
moeten instellen, van het tweede toestel op 5 (1 + 4) (CH5–8), van het derde op 9 (5 + 4)
(CH9–12), enz. De hoogste startwaarde is 509.
In het geval van de 9-kanaalsmodus, zult u het startadres van het eerste toestel moeten instellen
op 1 (CH1–9), van het tweede toestel op 10 (1 + 9) (CH10–18), van het derde op 19 (10 + 9)
(CH19–27), enz. De hoogste startwaarde is 504.

VDPL310FC
V. 01 – 29/04/2014 18 ©Velleman nv
Het toestel met DMX-sturing instellen:
1. Druk op MENU tot <4-CH> (voor de 4-kanaalsmodus) of <9-CH> (voor de 9-kanaalsmodus) op de
display verschijnt en druk op ENTER.
2. Gebruik UP en DOWN om het DMX-adres (d--1 tot d512) in te stellen en druk op ENTER.
DMX-waarden per kanaal
4-kanaalsmodus:
Kanaal
Van
Tot
Omschrijving
1
0
255
Rood 0–100 %
2
0
255
Groen 0–100 %
3
0
255
Blauw 0–100 %
4
0
255
Wit 0–100 %
9-kanaalsmodus:
Kanaal
Van
Tot
Omschrijving
1
0
255
Rood 0–100 %
2
0
255
Groen 0–100 %
3
0
255
Blauw 0–100 %
4
0
255
Wit 0–100 %
5
0
15
Geen functie
16
255
Voorgeprogrammeerde, vaste kleuren selecteren
6
0
15
Geen functie (als kanaal 7 ≤ 31)
16
255
Stroboscoop van traag naar snel (als kanaal 7 ≤ 31)
0
255
Snelheid automatisch programma traag naar snel (als kanaal 7 ≥ 32)
7
0
31
Geen functie
32
63
0–100 % (voor vaste kleur met CH1–4)
64
95
100–0 % (voor vaste kleur met CH1–4)
96
127
100–0–100 % (voor vaste kleur met CH1–4)
128
159
Kleurovergang
160
191
Kleurwissel: 4 kleuren
192
223
Kleurwissel: 15 kleuren
224
255
Muziekgestuurde modus
8
0
255
Master-dimmer 0–100 %
9
0
51
Dimsnelheid zoals ingesteld in menu
52
101
Dimsnelheid uit
102
152
Dimsnelheid 1
153
203
Dimsnelheid 2
204
255
Dimsnelheid 3
12. Reiniging en onderhoud
Alle gebruikte schroeven moeten goed zijn aangespannen en mogen geen sporen van roest vertonen.
De behuizing, de lenzen, de montagebeugels en de montageplaats (bv. het plafond of het gebinte)
mogen niet vervormd zijn of aangepast worden (geen extra gaten in montagebeugels boren,
aansluitingen niet verplaatsen, enz.).
Mechanisch bewegende delen mogen geen sporen van slijtage vertonen en mogen niet onregelmatig
bewegen.
De voedingskabels mogen niet beschadigd zijn. Laat het toestel onderhouden door een geschoolde
technicus.
Trek de stekker uit het stopcontact voor u aan onderhoudswerkzaamheden begint. Laat het toestel
afkoelen.
Maak het toestel geregeld schoon met een vochtige, niet pluizende doek. Gebruik geen alcohol of
oplosmiddelen.
Dompel het toestel niet onder.

VDPL310FC
V. 01 – 29/04/2014 19 ©Velleman nv
Er zijn geen door de gebruiker vervangbare onderdelen in dit toestel, behalve de zekering.
Bestel eventuele reserveonderdelen bij uw verdeler.
De zekering vervangen
Vervang een gesprongen zekering enkel door een zekering van hetzelfde type.
1. Ontkoppel het toestel van de netspanning voor u de zekering vervangt.
2. Maak de zekeringhouder los met behulp van een schroevendraaier met platte kop.
3. Verwijder de oude zekering en vervang door een zekering van hetzelfde type.
4. Plaats de zekeringhouder terug in het toestel en schakel de stroom weer in.
13. Technische specificaties
voeding
100–240 VAC 50/60 Hz
verbruik
25 W
IP-norm
IP44
leds
3 x 8 W RGBW/FC-vermogenled
stralingshoek
25°
hoek
44°
afmetingen
187 x 152 x 187 mm
gewicht
1,6 kg
Gebruik dit toestel enkel met originele accessoires. Velleman nv is niet aansprakelijk voor
schade of kwetsuren bij (verkeerd) gebruik van dit toestel.
Voor meer informatie over dit product en de laatste versie van deze handleiding, zie
www.hqpower.eu.
De informatie in deze handleiding kan te allen tijde worden gewijzigd zonder voorafgaande
kennisgeving.
© AUTEURSRECHT
Velleman nv heeft het auteursrecht voor deze handleiding. Alle wereldwijde rechten
voorbehouden. Het is niet toegestaan om deze handleiding of gedeelten ervan over te nemen, te
kopiëren, te vertalen, te bewerken en op te slaan op een elektronisch medium zonder voorafgaande
schriftelijke toestemming van de rechthebbende.

VDPL310FC
V. 01 – 29/04/2014 20 ©Velleman nv
MODE D'EMPLOI
1. Introduction
Aux résidents de l'Union européenne
Informations environnementales importantes concernant ce produit
Ce symbole sur l'appareil ou l'emballage indique que l’élimination d’un appareil en fin de vie
peut polluer l'environnement. Ne pas jeter un appareil électrique ou électronique (et des piles
éventuelles) parmi les déchets municipaux non sujets au tri sélectif ; une déchetterie traitera
l’appareil en question. Renvoyer cet appareil à votre fournisseur ou à un service de recyclage
local. Il convient de respecter la réglementation locale relative à la protection de
l’environnement.
En cas de questions, contacter les autorités locales pour élimination.
Nous vous remercions de votre achat ! Lire attentivement le présent mode d'emploi avant la mise en
service de l’appareil. Si l’appareil a été endommagé pendant le transport, ne pas l’installer et consulter
votre revendeur.
2. Consignes de sécurité
Cet appareil ne convient pas aux personnes (y compris enfants) qui possèdent des capacités
physiques, sensorielles ou mentales réduites, ou manquent d’expérience et de connaissances,
sauf si elles ont reçu une supervision ou des instructions concernant l’utilisation de l’appareil
de la part d’une personne responsable de leur sécurité.
Surveiller les enfants pour s’assurer qu’ils ne jouent pas avec l’appareil. Ne jamais laisser
l'appareil sans surveillance lorsqu'il est branché.
Le câble d’alimentation ne peut pas être replissé ou endommagé.
Avertissement ! Un câble d'alimentation endommagé doit être remplacé par le fabricant, un
technicien ou une autre personne qualifiée pour éviter tout danger.
S'assurer que la tension secteur ne dépasse pas la tension indiquée dans les spécifications.
Cet appareil ressort à la classe de protection I, L'appareil doit donc être mis à la terre. La
connexion électrique doit être effectuée par un technicien qualifié.
Être prudent lors de l'installation : toucher un câble sous tension peut causer des
électrochocs mortels.
Ne pas utiliser l'appareil si le boîtier ou le câblage sont endommagés. Ne pas essayer de
réparer soi-même l'appareil, contacter votre revendeur.
Toujours débrancher l’appareil s’il n’est pas utilisé et avant le nettoyage ou l'entretien. Tirer
sur la fiche pour débrancher l'appareil ; non pas sur le câble.
Attention : l'appareil chauffe pendant l’usage. Ne pas toucher les surfaces chaudes. Après
avoir éteint l'appareil, laisser suffisamment refroidir avant de le manier.
Utiliser à l'intérieur uniquement. Protéger l’appareil contre la pluie, l’humidité et les
éclaboussures. Ne jamais placer d’objets contenant du liquide sur ou près de l’appareil.
Ne pas regarder directement dans la source lumineuse, afin d'éviter les risques
de crise d’épilepsie chez les personnes sujettes
d’aveuglement temporaire (aveuglement par éclair)
d’endommagement permanent et irréversible des yeux.
Utiliser un câble de sécurité approprié pour fixer l'appareil (p. ex. VDLSC7N ou VDLSC8N).
Installer l'appareil à une distance minimale de 0,5 m de tout objet ou produit inflammable ou
explosif.
Respecter une distance minimale de 0,5 m entre la sortie lumière de l’appareil et la surface illuminée.
La température ambiante maximale s'élève à 40 °C. Ne pas utiliser l'appareil à des températures plus
élevées.
Seite wird geladen ...
Seite wird geladen ...
Seite wird geladen ...
Seite wird geladen ...
Seite wird geladen ...
Seite wird geladen ...
Seite wird geladen ...
Seite wird geladen ...
Seite wird geladen ...
Seite wird geladen ...
Seite wird geladen ...
Seite wird geladen ...
Seite wird geladen ...
Seite wird geladen ...
Seite wird geladen ...
Seite wird geladen ...
Seite wird geladen ...
Seite wird geladen ...
Seite wird geladen ...
Seite wird geladen ...
Seite wird geladen ...
Seite wird geladen ...
Seite wird geladen ...
Seite wird geladen ...
Seite wird geladen ...
Seite wird geladen ...
Seite wird geladen ...
-
 1
1
-
 2
2
-
 3
3
-
 4
4
-
 5
5
-
 6
6
-
 7
7
-
 8
8
-
 9
9
-
 10
10
-
 11
11
-
 12
12
-
 13
13
-
 14
14
-
 15
15
-
 16
16
-
 17
17
-
 18
18
-
 19
19
-
 20
20
-
 21
21
-
 22
22
-
 23
23
-
 24
24
-
 25
25
-
 26
26
-
 27
27
-
 28
28
-
 29
29
-
 30
30
-
 31
31
-
 32
32
-
 33
33
-
 34
34
-
 35
35
-
 36
36
-
 37
37
-
 38
38
-
 39
39
-
 40
40
-
 41
41
-
 42
42
-
 43
43
-
 44
44
-
 45
45
-
 46
46
-
 47
47


HQ Power VDPL310FC Benutzerhandbuch
- Kategorie
- Stroboskope
- Typ
- Benutzerhandbuch
in anderen Sprachen
- English: HQ Power VDPL310FC User manual
- français: HQ Power VDPL310FC Manuel utilisateur
- español: HQ Power VDPL310FC Manual de usuario
- Nederlands: HQ Power VDPL310FC Handleiding
Verwandte Artikel
-
 HQ Power HQLE10010 Benutzerhandbuch
-
HQ Power VDPLDJBAR7 Benutzerhandbuch
-
 HQ Power VDPLWB Benutzerhandbuch
-
 HQ Power EXPLIO II Spezifikation
-
HQ Power Ellison Benutzerhandbuch
-
 HQ Power VDPL5X5RGB Benutzerhandbuch
-
HQ Power VDPL300LS Benutzerhandbuch
-
 HQ Power HQLE10036 Benutzerhandbuch
-
 HQ Power VDPL710MHW14W Benutzerhandbuch
-
 HQ Power VDPLB408WL Benutzerhandbuch


Andere Dokumente
-
HQ-Power HQLP10001 Benutzerhandbuch
-
HQ-Power HQLE10061 Benutzerhandbuch
-
HQ-Power HQLE10049 Benutzerhandbuch
-
Perel LEDC26 Benutzerhandbuch
-
-
-
Velleman CLP35 Benutzerhandbuch
-
-
Velleman LABPSHH01 Benutzerhandbuch
-
Hama 00096016 Bedienungsanleitung