
DB 75..
d Dampfbügler
g Steam Iron
r Σίδερο ατµού
Gebrauchsanweisung
Operating instructions
Åã÷åéñßäéï ïäçãéþí ÷ñÞóçò
822 949 436_DB75xx_AEG.book Seite 1 Donnerstag, 19. Juni 2008 12:58 12

2
1
23
4
D
H
B
K
L
A
J
F
C
E
G
O, P
M
N
b
30 sec.
30 sec.
15 min.
a
b
c
822 949 436_DB75xx_AEG.book Seite 2 Donnerstag, 19. Juni 2008 12:58 12

3
d
Sehr geehrte Kundin,
sehr geehrter Kunde,
lesen Sie bitte diese Gebrauchsanwei-
sung sorgfältig durch.
Beachten Sie vor allem die Sicherheits-
hinweise auf den ersten Seiten dieser
Gebrauchsanweisung! Bewahren Sie
bitte die Gebrauchsanweisung zum spä-
teren Nachschlagen auf. Geben Sie diese
an eventuelle Nachbesitzer des Gerätes
weiter.
1
Mit dem Warndreieck und/oder durch
Signalwörter (Warnung!, Vorsicht!,
Achtung!) sind Hinweise hervorgeho-
ben, die für Ihre Sicherheit oder für die
Funktionsfähigkeit des Gerätes wichtig
sind. Bitte unbedingt beachten.
0 Dieses Zeichen leitet Sie Schritt für
Schritt beim Bedienen des Gerätes.
3
Nach diesem Zeichen erhalten Sie
ergänzende Informationen zur Bedie-
nung und praktischen Anwendung des
Gerätes.
2
Mit dem Kleeblatt sind Tipps und Hin-
weise zum wirtschaftlichen und
umweltschonenden Einsatz des Gerätes
gekennzeichnet.
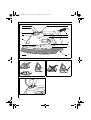
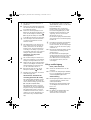
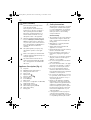
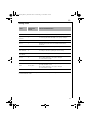
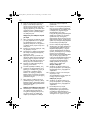
Gerätebeschreibung (Bild 1)
A Bügelsohle
B Markierung für maximale Füllhöhe
C Wassereinfüllöffnung mit Deckel
D Spraydüse
E Taste für Spray-Funktion
F Taste für Dampfstoß-Funktion
G Dampfwähler
H Betriebskontrollleuchte
J Anschlussleitung
K Kontrollleuchte für automatische
Sicherheitsabschaltung
(nicht für DB 7510)
L Temperaturwähler
M Temperatur-Kontrollleuchte
N Wassertank
(Fassungsvermögen 280 ml)
O Kabelaufwicklung
P Typschild
1 Sicherheitshinweise
Die Sicherheit dieses Geräts entspricht
den anerkannten Regeln der Technik.
Dennoch sehen wir uns als Hersteller
veranlasst, Sie mit den nachfolgenden
Sicherheitshinweisen vertraut zu
machen.
Allgemeine Sicherheit
• Die Spannung und Frequenz des
Stromnetzes und des Gerätes müssen
übereinstimmen (siehe Typschild).
• Der Anschluss darf nur an eine vor-
schriftsmäßig installierte und geerdete
Steckdose erfolgen.
• Immer den Netzstecker ziehen, wenn
das Gerät nicht in Gebrauch ist.
• Den Netzstecker nie an der Anschluss-
leitung aus der Steckdose ziehen.
• Vor der Reinigung und im Falle einer
Fehlfunktion zuerst den Netzstecker
aus der Steckdose ziehen!
• Der Dampfbügler darf nicht mehr
benutzt werden, wenn er herunterge-
fallen ist, sichtbare Beschädigungen
aufweist oder undicht ist.
• Das Gerät darf nicht mehr benutzt
werden, wenn die Anschlussleitung
beschädigt ist.
• Lassen Sie die Anschlussleitung des
Gerätes nicht über Kanten hängen oder
heiße Oberflächen berühren.
• Wenn Sie das Gerät mit einem Verlän-
gerungskabel benutzen, muss dieses
durch einen Fachmann überprüft sein.
• Das Gerät nicht auf oder neben eine
heiße Gasflamme, ein elektrisches Bau-
teil oder einen beheizten Ofen stellen.
Nicht auf ein anderes Gerät stellen.
• Reparaturen an diesem Gerät, ein-
schließlich Ersatz der Netzzuleitung,
dürfen nur von Fachkräften durchge-
führt werden. Durch unsachgemäße
Reparaturen können erhebliche Gefah-
ren entstehen. Wenden Sie sich im
Reparaturfall an den Kundendienst
oder an Ihren autorisierten Fachhänd-
ler.
822 949 436_DB75xx_AEG.book Seite 3 Donnerstag, 19. Juni 2008 12:58 12

4
• Der Hersteller haftet nicht für Schäden,
die durch unsachgemäßen oder zweck-
fremden Gebrauch entstanden sind.
• Dieses Gerät ist nicht dazu bestimmt,
von Personen (einschließlich Kinder),
die aufgrund Ihrer Unerfahrenheit oder
Unkenntnis nicht in der Lage sind es
sicher zu bedienen oder von Personen
(einschließlich Kinder) mit einge-
schränkten physischen, sensorischen
oder geistigen Fähigkeiten, benutzt
oder betrieben zu werden, es sei denn
sie wurden durch eine für sie verant-
wortliche Person angewiesen wie das
Gerät sicher zu benutzen ist und
anfänglich von ihr beaufsichtigt.
Sicherheit von Kindern
• Betreiben Sie das Gerät nicht ohne
Aufsicht. Wenn Kinder in Kontakt mit
einem heißen Dampfbügler kommen,
kann das zu schweren Verbrennungen
führen.
• Halten Sie Kinder von Elektrogeräten
fern.
• Verpackungsmaterial, wie z.B. Folien-
beutel, gehören nicht in Kinderhände.
• Kinder müssen beaufsichtigt werden
um sicherzustellen, dass sie nicht mit
dem Gerät spielen.
Sicherheit bei der Benutzung
• Der Dampfbügler muss auf einer stabi-
len Oberfläche benutzt und abgestellt
werden.
• Der Dampfbügler darf nur auf einer
stabilen Oberfläche auf seine Abstell-
fläche abgestellt werden.
• Vorsicht! Während des Betriebes wer-
den Sohle und Haube des Dampfbüg-
lers funktionsbedingt heiß!
• Beim Dampfbügeln strömt Dampf aus
den Öffnungen in der Sohle – Verbren-
nungsgefahr.
• Ein Dampfbügler braucht etwa
30 Minuten um abzukühlen. Den
Dampfbügler erst nach dem Abkühlen
versorgen. Restliches Wasser ausleeren.
• Die Anschlussleitung nicht um den
noch heißen Dampfbügler wickeln.
• Der Netzstecker ist grundsätzlich zu zie-
hen, bevor Wasser nachgefüllt oder ent-
leert wird.
Sicherheit bei Reinigung und
Pflege
• Befolgen Sie die Reinigungsvor-
schriften.
• Vor dem Reinigen Netzstecker ziehen
und den Dampfbügler ganz auskühlen
lassen.
• Das Gerät nie in Wasser oder andere
Flüssigkeiten tauchen.
Bedienung
Vor dem ersten Gebrauch
0 Entfernen Sie Aufkleber, Kunststoffab-
deckungen und Kartonhüllen von der
Dampfsohle.
0 Um alle Kleberückstände zu entfernen,
reiben Sie die Bügelsohle mit einem
mit Spiritus angefeuchteten Tuch ab.
0 Füllen Sie den Wassertank (siehe fol-
gendes Kapitel) und leeren Sie das
Wasser wieder aus. Dadurch werden
eventuell von der Herstellung verblie-
bene Teilchen herausgespült.
3
Nach dem ersten Einschalten kann der
neue Dampfbügler bis zu 10 Minuten
lang Dämpfe abgeben. Dies wird durch
das erstmalige Erhitzen der verwende-
ten Materialien hervorgerufen. Es ist
ungefährlich, beeinträchtigt die Leis-
tung des Dampfbüglers nicht und tritt
später nicht wieder auf.
Dampfbügler mit Wasser füllen
1
Vergewissern Sie sich vor dem Füllen
des Dampfbüglers mit Wasser, dass der
Netzstecker nicht eingesteckt ist.
Wasser kann auch eingefüllt werden,
wenn der Dampfbügler heiß ist.
0 Dampfwähler (Bild 1/G) auf die Posi-
tion für Trockenbügeln („dry“) stellen.
0
Den Dampfbügler auf seine Abstellflä-
che stellen und den Deckel der Wasser-
einfüllöffnung (Bild 1/C) öffnen.
822 949 436_DB75xx_AEG.book Seite 4 Donnerstag, 19. Juni 2008 12:58 12

5
0 Mit dem mitgelieferten Becher lang-
sam Wasser in die Einfüllöffnung fül-
len, bis die Markierung für die
maximale Füllhöhe (Bild 1/B) erreicht
ist. Nicht höher als bis zur Max-Marke
füllen.
0 Den Deckel fest auf die Wassereinfüll-
öffnung drücken, um diese zu ver-
schließen.
3
Durch die Gestaltung der Bügelsohle
können Sie Leitungswasser benutzen,
ohne die Dampfleistung zu beeinträch-
tigen. In Gegenden mit sehr hartem
Wasser empfehlen wir jedoch die Ver-
wendung von destilliertem oder demi-
neralisiertem Wasser.
1
Füllen Sie keine Weichspüler, Wäsche-
stärke oder andere Mittel in den
Dampfbügler, dies würde den Dampf-
erzeuger beschädigen. Verwenden Sie
kein verunreinigtes Wasser.
Dampfbügler benutzen
0 Die Anschlussleitung an eine 220-
240 V Steckdose anschließen.
Die Betriebskontrollleuchte (Bild 1/H,
oben auf dem Handgriff) leuchtet und
zeigt an, dass der Dampfbügler einge-
schaltet ist und aufheizt.
0 Mit dem Temperaturwähler (Bild 1/L)
die gewünschte Einstellung wählen;
dazu den Wähler so drehen, dass die
entsprechende Markierung bei der
Temperaturkontrollleuchte (Bild 1/M)
steht.
Das Leuchten der Temperaturkontroll-
leuchte zeigt an, das der Dampfbügler
auf die eingestellte Temperatur auf-
heizt. Wenn die Temperaturkontroll-
leuchte erlischcht ist die eingestellte
Temperatur erreicht und der Dampf-
bügler ist bügelbereit.
3
Wird während des Bügelns mit dem
Temperaturwähler von einer hohen auf
eine niedrigere Temperatur gewechselt,
erlischt die Temperaturkontrollleuchte
sofort. Dies zeigt an, dass der Dampf-
bügler auf die eingestellte Temperatur
abkühlt. Um sicherzustellen, dass der
Dampfbügler die eingestellte Tempera-
tur erreicht hat und nicht zu heiss ist,
warten Sie mit dem Bügeln bis die
Temperaturkontrollleuchte einschaltet
und dann wieder erlischt.
Trockenbügeln
0 Schliessen Sie den Dampfbügler an das
Stromnetz an und stellen sie die
gewünschte Temperatur wie obenste-
hend beschrieben ein.
0 Stellen Sie den Dampfwähler (Bild 1/G)
auf „dry“.
Dadurch wird der Dampffluss unter-
brochen, falls sich Wasser im Tank
befindet.
Dampfbügeln
0 Schliessen Sie den Dampfbügler an das
Stromnetz an und stellen sie die
gewünschte Temperatur wie obenste-
hend beschrieben ein.
3
Stellen Sie beim Dampfbügeln sicher,
dass sich der Tempeaturwähler auf eine
Temperatur innerhalb des Dampfbe-
reichs engestellt ist, und dass der Tank
mindestens ¼ mit Wasser gefüllt ist.
0 Mit dem Dampfwähler (Bild 1/G) die
gewünschte Dampfmenge wählen.
Spray-Funktion benutzen
Die Spray-Funktion kann beim Dampf-
bügeln und beim Trockenbügeln
benutzt werden, um schwierig zu
bügelnde Stoffe zu befeuchten.
3
Der Wassertank muss mindestens ¼
gefüllt sein.
0 Betätigen Sie während dem Bügeln die
Taste für die Spray-Funktion (Bild
1/E); ein feiner Sprühnebel kommt aus
der Spraydüse (Bild 1/D).
Dampfstoß-Funktion benutzen
Die Dampfstoß-Funktion kann beim
Dampfbügeln und beim Trockenbügeln
benutzt werden, wenn der Temperatur-
wähler auf eine Temperatur innerhalb
des Dampfbereichs oder oberhalb der
Marke (••) eingestellt ist.
822 949 436_DB75xx_AEG.book Seite 5 Donnerstag, 19. Juni 2008 12:58 12

6
3
Der Wassertank muss mindestens ¼
gefüllt sein.
0 Stellen Sie die gewünschte Temperatur
ein und warten Sie, bis die Temperatur-
kontrollleuchte erlischt.
0 Stellen Sie den Dampfbügler auf die
Bügelsohle; betätigen Sie mehrmals die
Taste für die Dampfstoß-Funktion
(Bild 1/F), um die Pumpe zu entlüften.
3
Ist der Wassertank ganz leer geworden,
muss die Pumpe nach dem Auffüllen
von Wasser möglicherweise erneut
entlüftet werden.
3
Der Dampfbügler ist mit einem Tropf-
Stop ausgestattet. Dieses System ver-
hindert, dass Wasser aus der Dampf-
kammer fliesst, wenn die Temperatur
zu niedrig ist um Dampf zu produzie-
ren. Dadurch wird ein Tropfen auch bei
niedrigen Temperaturen verhindert.
Aufdampfen von hängenden
Kleidungsstücken
3
Die vertikale Dampfstoß-Funktion ist
ideal für das Dämpfen von Vorhängen,
Anzügen und empfindlichen Stoffen.
0 Hängen Sie das betreffende Kleidungs-
stück auf einen Bügel und halten Sie
den Dampfbügler in einem Abstand
von 10 - 20 cm über den Stoff.
0 Betätigen Sie nun die Taste für die
Dampfstoß-Funktion (Bild 1/F).
1
Kleidung nicht am Körper auffrischen.
Verbrennungsgefahr!
Automatische Sicherheitsab-
schaltung (nicht für DB 7510)
Für größtmögliche Sicherheit schaltet
sich der Dampfbügler selbständig ab,
wenn er unbeaufsichtigt gelassen wird
(DB 7520, DB 7530, DB 7540).
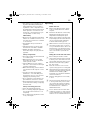
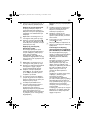
Der Dampfbügler schaltet sich nach
30 Sekunden ab, wenn er in Bügelstel-
lung nicht bewegt wird (siehe Bild 2/a).
Der Dampfbügler schaltet sich nach
15 Minuten automatisch ab, wenn er
senkrecht auf seiner Abstellfläche ste-
hend nicht bewegt wird (siehe Bild
2/b).
Der Dampfbügler schaltet sich nach
30 Sekunden ab, wenn er auf der Seite
liegt (siehe Bild 2/c).
Durch Blinken der roten Kontroll-
leuchte für die automatische Sicher-
heitsabschaltung (Bild 1/K, auf dem
Handgriff) und einen Warnton wird
angezeigt, dass die automatische
Abschaltung erfolgt ist.
Die Stromversorgung des Heizelements
wird unterbrochen und der Dampfbüg-
ler kühlt ab.
3
Nach dem Ausschalten des Dampfbüg-
lers leuchtet die Betriebskontroll-
leuchte weiterhin, da der Dampfbügler
immer noch mit der Stromversorgung
verbunden ist.
0 Bewegen Sie den Dampfbügler, um die
automatische Abschaltung wieder
zurückzusetzen.
Das Heizelement des Dampfbüglers
werden wieder mit Strom versorgt und
der Dampfbügler wird wieder aufge-
heizt. Warten Sie bis die Temperatur-
kontrollleuchte erlischt, be
vor Sie
weiterbügeln
.
Pflege und Reinigung
Nach jedem Gebrauch
0 Ziehen Sie den Netzstecker aus der
Steckdose.
0 Lassen Sie den Dampfbügler abkühlen,
bevor sie das Netzkabel um die Kabel-
aufwicklung (Bild 1/O) wickeln.
Aufbewahrung
0 Den Dampfbügler immer senkrecht auf
seiner Abstellfläche stehend aufbe-
wahren (siehe Bild 3).
Bewahren Sie den Dampfbügler nicht
auf der Bügelsohle stehend oder im
Karton auf.
Reinigung
0 Das Gehäuse des Dampfbüglers mit
einem weichen feuchten Tuch
abwischen und trockenreiben.
822 949 436_DB75xx_AEG.book Seite 6 Donnerstag, 19. Juni 2008 12:58 12

7
1
Verwenden Sie keine scharfen und
scheuernden Reinigungsmittel und
keine chemischen Reiniger oder
Lösungsmittel, da diese die Oberfläche
beschädigen.
Dampfventil reinigen
0 Zum Entfernen des Dampfventils dre-
hen Sie den Dampfwähler gegen den
Uhrzeigersinn auf die Reinigungs-Stel-
lung „clean“. Das Ventil springt heraus
(siehe
Bild 4)
.
0 Reiben sie die Spitze des Ventils sanft
mit einem mit warmem Wasser
befeuchteten Topfreiniger aus verseif-
ter Stahlwolle ab.
0 Das Ventil abspülen und mit einem
sauberen Lappen trocknen.
0 Das Dampfventil wieder einsetzen und
durch Drehen im Uhrzeigersinn verrie-
geln.
Dampföffnungen reinigen
0 Wenn sich Zunder in den Dampföff-
nungen der Bügelsohle gebildet hat
und die Dampfleistung beeinträchtigt,
diesen mit einem mit Spiritus befeuch-
teten Wattestäbchen entfernen.
Bügelsohle reinigen
1
Verwenden Sie für das Reinigen der
Bügelsohle keine Topfreiniger, Schleif-
mittel oder scharfe Reinigungsmittel,
dadurch würde die Oberfläche zer-
kratzt und beschädigt.
0 Zu Entfernen von eingebrannten Abla-
gerungen von der Bügelsohle mit dem
heißen Dampfbügler über ein feuchtes
Tuch bügeln.
DB 7540 (Harteloxierte Bügelsohle)
0 Die Bügelsohle mit einem weichen,
feuchten Lappen abwischen und
trockenreiben.
DB 7530, DB 7520, DB 7510
(Edelstahl-Bügelsohle)
0 Die Bügelsohle mit einem weichen,
feuchten Lappen mit etwas Edelstahl-
oder Metallreiniger abwischen und
trockenreiben.
Bügeltipps
Wahl der richtigen Bügel-
temperatur
0
Beachten Sie immer die Pflegekennzei-
chen auf den Etiketten der Wäsche und
befolgen Sie die Bügelhinweise des Klei-
dungsherstellers. Informieren Sie sich in
der Bügeltabelle auf page 9 über die
richtige Bügeltemperatur.
Hinweise
• Sortieren Sie die Bügelwäsche nach
Gewebeart. Sie müssen dann seltener
die Temperatur für die verschiedenen
Gewebe anpassen.
• Beginnen Sie mit dem Bügeln von
Stoffen, die niedrige Bügeltemperatu-
ren erfordern, und bügeln Sie anschlie-
ßend Stoffe, die jeweils höhere
Temperaturen erfordern.
• Gewebe wie Velours, Wolle, Leinen und
Seide werden am besten mit Hilfe eines
Bügeltuchs gebügelt, um die Entste-
hung von Glanzstellen zu vermeiden.
• Bei Unsicherheit über die Gewebezu-
sammensetzung eines Wäschestücks,
testen Sie zuerst an einer kleinen, nicht
sichtbaren Stelle (z.B. innen am Saum),
vor Sie sichtbare Bereiche bügeln.
Beginnen Sie mit einer niedrigen Tem-
peratur und erhöhen Sie die Tempera-
tur stufenweise, um die beste
Einstellung herauszufinden.
• Wenn Sie die Temperatur zum Bügeln
von empfindlichen Stoffen verringern,
lassen Sie den Dampfbügler etwa
2 Minuten auf die neue Einstellung
abkühlen.
• Reine Wolle (100 % Wolle) kann mit
der Temperatureinstellung „wool“
dampfgebügelt werden. Benutzen Sie
ein Bügeltuch, um die Entstehung von
Glanzstellen zu vermeiden.
• Bügeln Sie nie Bereiche von Kleidungs-
stücken, auf denen Schwitzflecken
sichtbar sind, da diese durch die Hitze
des Dampfbüglers fixiert und dauer-
haft sichtbar gemacht werden.
822 949 436_DB75xx_AEG.book Seite 7 Donnerstag, 19. Juni 2008 12:58 12

8
Technische Daten
Netzspannung: 220 – 240 V / 50 Hz
Leistungsaufnahme
DB 7540, DB 7530: 2020 – 2400 W
DB 7520, DB 7510: 1850 – 2200 W
;
Dieses Gerät erfüllt folgende EC
Normen:
• Niedrig-Spannungs-Norm
2006/95/EC
• EMC Norm 89/336/EEC und Ergän-
zung 92/31/EEC sowie 93/68/EEC
Entsorgung
2
Verpackungsmaterial
Die Verpackungsmaterialien sind
umweltverträglich und wiederverwert-
bar. Die Kunststoffteile sind gekenn-
zeichnet, z. B. >PE<, >PS< etc.
Entsorgen Sie die Verpackungsmateria-
lien entsprechend ihrer Kennzeichnung
bei den kommunalen Entsorgungsstel-
len in den dafür vorgesehenen Sam-
melbehältern.
2
Altgerät
Das Symbol W auf dem Produkt
oder seiner Verpackung weist darauf
hin, dass dieses Produkt nicht als nor-
maler Haushaltsabfall zu behandeln ist,
sondern an einem Sammelpunkt für
das Recycling von elektrischen und
elektronischen Geräten abgegeben
werden muss. Durch Ihren Beitrag zum
korrekten Entsorgen dieses Produkts
schützen Sie die Umwelt und die Ge-
sundheit Ihrer Mitmenschen. Umwelt
und Gesundheit werden durch falsches
Entsorgen gefährdet. Weitere Informa-
tionen über das Recycling dieses Pro-
dukts erhalten Sie von Ihrem Rathaus,
Ihrer Müllabfuhr oder dem Geschäft, in
dem Sie das Produkt gekauft haben.
822 949 436_DB75xx_AEG.book Seite 8 Donnerstag, 19. Juni 2008 12:58 12

9
Bügeltabelle
Wegen unterschiedlicher Bügelgeschwindigkeit, Gewebe-Restfeuchtigkeit usw. kann die optimale Ein-
stellung von der in der Tabelle aufgeführten Empfehlung abweichen!
GEWEBE
TEMPERATUR-
EINSTELLUNG
BÜGELEMPFEHLUNG
Polyacryl • Von links trockenbügeln.
Acetat •
Von links trockenbügeln solange das Gewebe noch feucht ist, oder
mit Spray-Funktion befeuchten.
Nylon &
Polyester
•
Von links bügeln solange das Gewebe noch feucht ist, oder mit
Spray-Funktion befeuchten.
Rayon • Von links bügeln.
Viskose •
Hauptsächlich trockenbügeln. Dampf kann nach Hersteller-
angaben verwendet werden.
Seide ••
Von links bügeln. Bügeltuch verwenden um Glanzstellen zu
vermeiden.
Baumwoll-
Mischgewebe
••
Etikett beachten und Herstellerangaben befolgen.
Einstellung für die empfindlichste Faser benutzen.
Wolle & Woll-
mischgewebe
•• Von links dampfbügeln oder Bügeltuch verwenden.
Baumwolle ••
Von links trockenbügeln solange das Gewebe noch feucht ist, oder
mit Spray-Funktion befeuchten.
Dampf mittel bis hoch verwenden.
Cord ••• Von links dampfbügeln oder Bügeltuch verwenden.
Leinen ••• bis „max“
Von links bügeln oder Bügeltuch verwenden um Glanzstellen zu
vermeiden, vor allem bei dunklen Farben.
Trockenbügeln solange das Gewebe noch feucht ist, oder mit
Spray-Funktion befeuchten.
Dampf mittel bis hoch verwenden.
Jeansstoff ••• bis „max“ Maximalen Dampf verwenden.
822 949 436_DB75xx_AEG.book Seite 9 Donnerstag, 19. Juni 2008 12:58 12

g
10
g
Dear Customer,
please read these operating instruc-
tions through carefully.
Above all please observe the safety
instructions on the first few pages of
these operating instructions! Please
keep these operating instructions for
later reference. Pass them on to any
subsequent owner of the appliance.
1
Using the warning triangle and/or the
key words (Danger!, Caution!, Impor-
tant!), information that is important
for your safety or the correct function-
ing of the appliance is highlighted. It is
essential that this information is
observed.
0 This symbol guides you step by step
through the operation of the appli-
ance.
3
Next to this symbol you will find addi-
tional information and practical tips on
using the appliance.
2
Tips and information about the eco-
nomical and environmentally friendly
use of the appliance are marked with
the clover.
Appliance Description (Fig. 1)
A Soleplate
B Maximum water level indicator
C Filling aperture with cover
D Spray nozzle
E Spray button
F Steam jet button
G Steam selector
H Power ON light
J Mains cable
K Safety auto-off light (not for DB 7510)
L Temperature selector
M Temperature control light
N Water tank (capacity 280 ml)
O Cable wrap facility
P Rating plate
1 Safety Instructions
This appliance corresponds to accepted
technological standards with regards
to safety. Nevertheless, as a manufac-
turer we consider it our obligation to
make you aware of the following
safety information.
General Safety
• The operating voltage of the appliance
and the mains voltage as well as the
type of current must match (see the
rating plate).
• Only plug into a correctly installed
earthed mains socket.
• Always remove the plug when the
appliance is not in use.
• Never pull the plug from the socket by
means of the mains cable!
• Prior to cleaning or in the event of a
malfunction, unplug the appliance
first!
• The iron is not to be used if it has been
dropped, if there are visible signs of
damage or if it is leaking.
• Do not use the appliance if the mains
cable is damaged.
• Do not let the mains cable of an appli-
ance hang over the edge of a table or
bench top or touch any hot surface.
• Do not use the appliance with an
extension cable unless this cable has
been checked and tested by a qualified
technician or service person.
• Do not place an appliance on or near a
hot gas flame, electric element or on a
heated oven. Do not place on top of
any other appliance.
• Repairs to this appliance, including
replacement of the mains cable, may
only be carried out by qualified service
engineers. Considerable danger may
result from improper repairs. If repairs
become necessary, please contact the
Customer Care Department or your
authorised dealer.
• If the appliance is used for purposes
other than those intended or used
incorrectly, no liability can be accepted
for any damage that may be caused.
822 949 436_DB75xx_AEG.book Seite 10 Donnerstag, 19. Juni 2008 12:58 12

g
11
• This appliance is not intended for use
by persons (including children) with
reduced physical, sensory or mental
capabilities or lack of experience and
knowledge unless they have been given
initial supervision or instruction con-
cerning use of the appliance by a per-
son responsible for their safety.
Child Safety
• Never leave the appliance unattended
while in use. If children come into con-
tact with a hot steam iron it could lead
to serious burns.
• Keep children away from electrical
appliances.
• Packaging material, e.g. plastic bags,
should not be accessible to children.
• Children should be supervised to
ensure that they do not play with the
appliance.
Safety in operation
• The steam iron must be used and rested
on a stable surface.
• When placing the iron on its stand,
ensure that the surface on which the
stand is placed is stable.
• Caution! When in use, the soleplate
and cover of the steam iron reach high
operating temperatures.
• When steam ironing, steam is emitted
from the holes in the soleplate – risk of
burns.
• A steam iron takes approximately
30 minutes to cool down. Only store
the appliance once it is cool and after
emptying any remaining water.
• Do not wind the cord around the sole-
plate while the steam iron is still hot.
• Always unplug the steam iron from the
power outlet before filling or emptying
the water tank.
Safety in cleaning and care
• Follow the cleaning instructions.
• Prior to cleaning, unplug the appliance
first and allow the steam iron to cool
completely.
• Do not immerse the appliance in water
or any other liquid.
Operating
Before first use
0 Remove any adhesive stickers, plastic
covers or cardboard sleeves from the
soleplate.
0 Ensure that all adhesive is removed by
rubbing the soleplate with a cloth
dampened with methylated spirits.
0 Fill the water tank (see following chap-
ter) and empty the water. This will rinse
out any foreign particles remaining
from the manufacturing process.
3
When turned on for the first time, your
new steam iron may give off vapours
for up to 10 minutes. This is due to the
initial heating of the materials used. It
is safe, not detrimental to the perform-
ance of the steam iron, and will not
reoccur.
Filling the steam iron with water
1
Before filling the steam iron with
water ensure that the plug is removed
from the power outlet. The steam iron
can be filled with water while it is hot.
0 Turn the steam selector (Fig. 1/G) to
the „dry“ setting.
0
Place the steam iron on its heel and
open the filling aperture cover (Fig.1/C).
0 Using the beaker provided, slowly pour
water into the filling aperture until the
maximum water level (Fig. 1/B) is
reached. Do not exceed the maximum
water level indicator.
0 Push the filling aperture cover firmly
to close.
3
The special soleplate design allows you
to use tap water with your iron with-
out affecting the steam performance.
However, in very hard water areas we
recommend the use of distilled or
demineralised water.
1
Do not fill the steam iron with fabric
conditioner, starches or other solutions
as these will damage the steam mecha-
nism. Do not use contaminated water.
822 949 436_DB75xx_AEG.book Seite 11 Donnerstag, 19. Juni 2008 12:58 12

g
12
Using your steam iron
0 Plug the power cable into a 220-240 V
power outlet.
The power ON light (Fig 1/H, positioned
on top of the handle) will illuminate to
indicate that the steam iron is
switched on and heating.
0 Turn the temperature selector (Fig. 1/L)
to the desired setting by aligning the
setting on the selector with the tem-
perature control light (Fig. 1/M).
The temperature control light will illu-
minate to indicate that the iron is
heating to the selected temperature.
When the temperature control light
goes out the iron is at the selected
temperature and is ready to iron.
3
When the temperature selector is
changed from a high setting to a lower
temperature setting during ironing, the
temperature control light will go out
immediately. This indicates that the
iron is cooling to the selected tempera-
ture. To ensure that the iron has
reached the selected temperature and
is not too hot, wait until the tempera-
ture control light comes on again and
then goes out before ironing.
Dry ironing
0 Connect the steam iron to the mains
and set the desired temperature as
described above.
0 Select „dry“ on the steam selector
(Fig. 1/G).
This will cut off the steam flow if there
is water in the tank.
Steam ironing
0 Connect the steam iron to the mains
and set the desired temperature as
described above.
3
When steam ironing, ensure that the
temperature selector is set to any tem-
perature within the steam band, and
that the tank is at least 1/4 full of
water.
0 Turn the steam selector (Fig. 1/G) to
the desired steam setting.
Using the spray mist
The spray mist can be used when steam
or dry ironing to pre-dampen hard to
iron fabrics.
3
Ensure that the tank is at least ¼ full
of water.
0 Press the spray button (Fig. 1/E)
during ironing to release a fine mist
from the spray nozzle (Fig. 1/D).
Using the steam jet function
The steam jet function can be used
when dry or steam ironing, when the
temperature control is set to any tem-
perature within the steam band or
above the two dot (••) setting.
3
Ensure that the tank is at least ¼ full
of water.
0 Select the desired temperature and
wait until the temperature control
light goes out.
0 Press the steam jet button (Fig. 1/F)
several times with the iron on the sole-
plate to prime the pump.
3
If the water tank has run dry, it may be
necessary to re-prime the pump after
filling the steam iron with water.
3
The steam iron is equipped with a drip-
stop system. This system automatically
stops water flowing to the steam
chamber should the temperature fall
too low to generate steam. This pre-
vents dripping, even at low tempera-
tures.
Steaming hanging items of clothing
3
The vertical steam jet function is ideal
for steaming curtains, suits and deli-
cate fabrics.
0
Hang the article concerned on a hanger
and hold the steam iron at a distance
of 10–20 cm from the material.
0 Now press the steam jet button
(Fig. 1/F).
1
Do not attempt to freshen up clothing
whilst it is still being worn. Risk of
burning!
822 949 436_DB75xx_AEG.book Seite 12 Donnerstag, 19. Juni 2008 12:58 12

g
13
The safety auto-off feature
(not available with DB 7510)
For total safety and peace of mind, the
steam iron will automatically switch
itself off if left unattended (DB 7520,
DB 7530, DB 7540).
It will switch off if left in the ironing
position for 30 seconds (see Fig. 2/a). It
will also switch off if left unattended
in the upright position for 15 minutes
(see Fig. 2/b). The steam iron will also
switch off if it is knocked onto its side
for 30 seconds (see Fig. 2/c).
Should you leave the steam iron unat-
tended, the red safety auto-off light
(Fig. 1/K, positioned on top of the han-
dle) will flash and a warning beep will
sound to alert you that the auto-off
function has been activated.
Power to the steam iron’s heating ele-
ment will be cut and the steam iron
will start to cool.
3
After the iron has cut-out, the power
ON light will remain illuminated, as the
steam iron is still connected to the
power outlet.
0
To reset the safety auto-off feature, sim-
ply move the steam iron.
The power to the steam iron’s element
will then reconnect and it will begin
heating again. Wait until the temperature
control light goes out before recommenc-
ing ironing.
Care and Cleaning
After each use
0 Turn the power off and remove the
plug from the power outlet.
0 Allow the steam iron to cool before
winding the cord around the built-in
cord wrap (Fig. 1/O).
Storage
0 Always store the steam iron on its heel
rest (see Fig. 3).
Do not store the steam iron with the
soleplate facing down, or in the carton.
Cleaning
0 To clean the exterior of the steam iron,
wipe with a damp soft cloth and wipe
dry.
1
Do not use harsh abrasives, chemical
cleaners or solvents, as these will dam-
age the surface.
Cleaning the removable steam
valve
0 To remove the steam valve, turn the
steam selector anticlockwise to the
„clean“ setting so that the steam valve
pops up
(see Fig. 4)
.
0 Gently scrub the tip of the valve with a
steel wool soap pad moistened in warm
water.
0 Rinse and dry with a clean cloth.
0 Replace the steam valve and turn
clockwise to lock into position.
Cleaning the steam holes
0 To remove scale build up in the steam
holes that may affect your iron’s steam
performance, use a cotton wool tip
moistened in methylated spirits.
Cleaning the soleplate
1
Do not use scouring pads, abrasives or
harsh cleaners to clean your soleplate,
as these will scratch and damage the
surface.
0 To remove burnt residue from the sole-
plate, iron over a damp cloth while the
steam iron is hot.
DB 7540 (Hard Anodized soleplate)
0 Wipe the soleplate with a soft damp
cloth and wipe dry.
DB 7530, DB 7520, DB 7510
(Stainless Steal soleplate)
0 Using a stainless steel or metal cleaner,
rub gently with a damp cloth and wipe
dry.
822 949 436_DB75xx_AEG.book Seite 13 Donnerstag, 19. Juni 2008 12:58 12

g
14
Ironing Guide
Selecting the ironing
temperature
0
Always read garment labels and follow
the manufacturer’s ironing instructions.
Refer to the Ironing Chart on page 15
for temperature recommendations.
Hints
• Sort articles to be ironed according to
the type of fabric. This will reduce the
need to adjust the temperature to suit
varying garments.
• Start with garments requiring lower
temperatures and work your way
through to items requiring higher tem-
peratures.
• Fabrics such as velour, wool, linen and
silk are best ironed with an ironing
cloth to prevent shine marks.
• If you are unsure of the fabric content
of a garment, test a small area such as
a seam or inside hem section before
ironing a visible area. Start with a low
temperature and gradually increase the
heat to find the best setting for ironing
the garment.
• When reducing the temperature to iron
sensitive fabrics, allow approximately
2 minutes for the steam iron to cool to
the new setting.
• Pure woollen fabrics (100 % wool) can
be steam ironed with the temperature
dial set to Wool. Use an ironing cloth
to prevent shine marks on the fabric.
• Never iron areas of a garment where
perspiration marks are visible, as the
heat of the steam iron will fix the
stains, making them permanent.
Technical Data
Mains voltage: 220 – 240 V / 50 Hz
Power consumption
DB 7540, DB 7530: 2020 – 2400 W
DB 7520, DB 7510: 1850 – 2200 W
;
This appliance conforms with the fol-
lowing EC Directives:
• Low Voltage Directive 2006/95/EC
• EMC Directive 89/336/EEC with
amendments 92/31/EEC and
93/68/EEC
Disposal
2
Packaging material
The packaging materials are environ-
mentally friendly and can be recycled.
The plastic components are identified
by markings, e.g. >PE<, >PS<, etc.
Please dispose of the packaging materi-
als in the appropriate container at the
community waste disposal facilities.
2
Old appliance
The symbol
W on the product or on
its packaging indicates that this prod-
uct may not be treated as household
waste. Instead it shall be handed over
to the applicable collection point for
the recycling of electrical and elec-
tronic equipment. By ensuring this
product is disposed of correctly, you
will help prevent potential negative
consequences for the environment and
human health, which could otherwise
be caused by inappropriate waste han-
dling of this product. For more detailed
information about recycling of this
product, please contact your local city
office, your household waste disposal
service or the shop where you pur-
chased the product.
822 949 436_DB75xx_AEG.book Seite 14 Donnerstag, 19. Juni 2008 12:58 12

g
15
Ironing Chart
Varied ironing speeds and fabric dampness can mean that the optimal setting can differ from that
recommended in the table!
FABRIC
TEMPERATURE
SETTING
IRONING RECOMMENDATION
Acrylic • Dry iron on wrong side.
Acetate • Dry iron on wrong side while still damp or use spray to dampen.
Nylon &
Polyester
• Iron on wrong side while still damp or use spray to dampen.
Rayon • Iron on wrong side of fabric.
Viscose •
Mainly dry iron. Steam can be used under manufacturer’s
instructions.
Silk •• Iron on wrong side. Use an ironing cloth to prevent shine marks.
Cotton Blends ••
Check label and follow manufacturer’s instructions.
Use setting for the fibre requiring the lowest setting.
Wool &
Wool Blends
•• Steam iron on wrong side or use an ironing cloth.
Cotton ••
Dry iron while still damp or use spray to dampen.
Use steam medium to high.
Corduroy ••• Steam iron on wrong side or use an ironing cloth.
Linen ••• to „max“
Iron on wrong side or use an ironing cloth to prevent shine marks,
especially with dark colours.
Dry iron while still damp or use spray to dampen.
Use steam medium to high.
Denim ••• to „max“ Use maximum steam.
822 949 436_DB75xx_AEG.book Seite 15 Donnerstag, 19. Juni 2008 12:58 12

r
16
r
Αγαπητέ Πελάτη,
σας παρακαλούµε να διαβάσετε
προσεκτικά αυτές τις οδηγίες
λειτουργίας.
Πάνω απ'όλα παρατηρήστε τις
οδηγίες ασφαλείας στις πρώτες
σελίδες αυτών των οδηγιών
λειτουργίας! Κρατήστε αυτές τις
οδηγίες λειτουργίας για µελλοντική
αναφορά. Περάστε τις οδηγίες σε
ακόλουθους ιδιοκτήτες της συσκευής.
1
Χρήση του τρίγωνου
προειδοποίησης και/ή λέξεων κλειδί
(
Κίνδυνο!, Προσοχή!, Σηµαντικό!
),
σηµαντικές πληροφορίες για την
ασφάλεια σας ή τη σωστή χρήση της
συσκευής. Είναι πολύ σηµαντικό να
παρατηρηθούν αυτές οι
πληροφορίες.
0 Το σύµβολο αυτό σας καθοδηγεί
βήµα προς βήµα στη χρήση της
συσκευής.
3
∆ίπλα από το σύµβολο αυτό θα
βρείτε πρόσθετες πληροφορίες και
χρήσιµες συµβουλές για τη χρήση
της συσκευής.
2
Οι συµβουλές και πληροφορίες περί
την οικονοµική και φιλική χρήση
προς το περιβάλλον της συσκευής
έχουν σηµαδευτεί µε τριφύλλι.
Περιγραφή της συσκευής
(εικ. 1)
A Πλάκα
B ∆είκτης µέγιστου επιπέδου νερού
C Άνοιγµα γέµισης µε κάλυµµα
D Στόµιο ψεκασµού
E Κουµπί ψεκασµού
F Κουµπί ψεκασµού ατµού
G Επιλογέας ατµού
H Λυχνία λειτουργίας ON
J Καλώδιο ρεύµατος
K Λειτουργία ασφαλείας αυτόµατης
απενεργοποίησης (όχι για DB 7510)
L Επιλογέας θερµοκρασίας
M Λυχνία ελέγχου θερµοκρασίας
N
∆οχείο νερού (χωρητικότητα 280 ml)
O Ευκολία τυλίγµατος καλωδίου
P Πινακίδα χαρακτηριστικών
1 Οδηγίες ασφαλείας
Αυτή η συσκευή αντιστοιχεί σε
αποδεχόµενα τεχνολογικά πρότυπα
ασφαλείας. Παρόλα αυτά, ως
κατασκευαστές θεωρούµε ευθηνή
µας να σας ενηµερώσοµε για τις
πληροφορίες ασφαλείας που
ακολουθούν.
Γενική ασφάλεια
• Η τάση λειτουργίας συσκευής και η
τάση γενικής παροχής ρεύµατος
πρέπει να είναι ίδιες (δείτε την
πινακίδα χαρακτηριστικών).
• Συνδέστε τη συσκευή µόνο σε µια
γειωµένη πρίζα παροχής ρεύµατος
σωστά εγκαταστηµένη.
• Να βγάζετε πάντα το βύσµα όταν η
συσκευή δεν είναι σε χρήση.
• Μην βγάζετε
ποτέ το βύσµα από τη
πρίζα τραβώντας το καλώδιο
ρεύµατος!
• Πριν το καθαρισµό ή σε περίπτωση
δυσλειτουργίας, να αποσυνδέσετε
πάντα τη συσκευή από το ρεύµα!
• Το σίδερο δεν πρέπει να
χρησιµοποιηθεί αν έχει πέσει, αν
υπάρχουν ορατά σηµάδια φθοράς
ή διαρροή.
• Μην χρησι
µοποιήστε τη συσκευή
αν το καλώδιο ρεύµατος έχει
καταστραφεί.
• Μην αφήνετε το καλώδιο ρεύµατος
της συσκευής να κρέµεται από την
άκρη ενός τραπεζιού ή πάγκο ή να
ακουµπάει ζεστές επιφάνειες.
• Μην χρησιµοποιείτε τη συσκευή µε
µια προέκταση εκτός αν το καλώδιο
έχει ελεγχτεί και δοκιµαστεί από
έναν αρµόδιο τεχνικό ή προσωπικό
συντήρησης.
• Μην τοποθετείτε τη συσκευή πάνω
ή κοντά σε µια θερµή φλόγα αερίου,
ηλεκτρικό στοιχείο ή ζεστό φούρνο.
Μην τοποθετείτε τη συσκευή πάνω
σε καµία άλλη συσκευή.
822 949 436_DB75xx_AEG.book Seite 16 Donnerstag, 19. Juni 2008 12:58 12

r
17
• Η επισκευή της συσκευής,
συµπεριλαµβάνοντας την
αντικατάσταση των καλωδίων
ρεύµατος, µπορεί να εκτελεσθεί
µόνο από αρµόδιους µηχανικούς
επισκευής. Μη κατάλληλες επισκευές
µπορεί να φέρουν ως αποτέλεσµα
σηµαντικό κίνδυνο. Αν η επισκευή
είναι απαραίτητη, παρακαλούµε να
επικοινωνήσετε µε το Τµήµα
Υποστήριξης Πελατών ή τον
εξουσιοδοτηµένο έµπορο σας.
• Αν η συσκευή χρησιµοποιείται για
λόγους στους οποίους δεν
προορίζεται ή χρησιµοποιείται
λανθασµένα, δεν αποδέχεται ευθύνη
για πιθανές ζηµιές που έχουν
υποστεί.
• Αυτή η συσκευή δεν προορίζεται
για χρήση από άτοµο
(συµπεριλαµβάνοντας παιδιά) µε
µειωµένες σωµατικές, αισθητήριες
ή ψυχικές δυνατότητες ή έλλειψη
εµπειρίας και γνώσης εκτός αν έχουν
λάβει αρχική επίβλεψη ή οδηγίες σε
σχέση µε τη χρήση της συσκευής
από ένα άτοµο, υπεύθυνο για την
ασφάλεια τους.
Ασφάλεια παιδιών
• Μην αφήνετε ποτέ τη συσκευή
χωρίς επίβλεψη κατά τη χρήση. Αν
τα παιδιά έρθουν σε επαφή µε ένα
ζεστό σίδερο ατµού, µπορεί να
υποστούν σοβαρά εγκαύµατα.
• Κρατήστε τα παιδιά µακριά από
ηλεκτρικές συσκευές.
• Τα παιδιά δεν πρέπει να έχουν
πρόσβαση στα υλικά συσκευασίας,
π.χ. πλαστικές σακούλες.
•
Τα παιδιά πρέπει να βρίσκονται κάτω
από επίβλεψη για να εξασφαλιστεί
ότι δεν παίζουν µε τη συσκευή.
Ασφάλεια στη λειτουργία
• Το σίδερο ατµού πρέπει να
χρησιµοποιηθεί σε µια σταθερή
επιφάνεια.
•
Όταν τοποθετείτε το σίδερο στη βάση
του, βεβαιωθείτε ότι η επιφάνεια στην
οποία έχει τοποθετηθεί η βάση, είναι
σταθερή.
•
Προσοχή! Κατά τη διάρκεια χρήσης,
η πλάκα και το κάλυµµα του σίδερου
ατµού φτάνουν υψηλές
θερµοκρασίες.
• Κατά το σιδέρωµα µε ατµό, ο ατµός
βγαίνει από τις οπές στη πλάκα -
κίνδυνος εγκαυµάτων.
• Ένα σίδερο ατµού παίρνει περίπου
30 λεπτά να κρυώσει. Αποθηκεύστε
τη συσκευή µόνο όταν έχει κρυώσει
µετά το άδειασµα του νερού που
αποµένει.
• Μην τυλίγετε το καλώδιο γύρο από
τη πλάκα όταν το σίδερο ατµού είναι
ακόµη ζεστό.
• Να βγάζετε πάντα το σίδερο ατµού
από τη πρίζα ρεύµατος πριν γεµίσετε
ή αδειάσετε το δοχείο νερού.
Ασφάλεια στο καθάρισµα
και συντήρηση
• Ακολουθήστε τις οδηγίες
καθαρισµού.
• Πριν το καθάρισµα, βγάλτε πρώτα
τη συσκευή από τη πρίζα και αφήστε
το σίδερο να κρυώσει εντελώς.
• Μην βυθίζετε τη συσκευή σε νερό ή
σε άλλα υγρά.
Λειτουργία
Πριν τη πρώτη χρήση
0 Βγάλτε ότι αυτοκόλλητα, πλαστικά
καλύµµατα ή χαρτόνι από τη πλάκα.
0
Βεβαιωθείτε ότι όλα τα αυτοκόλλητα
έχουν αφαιρεθεί τρίβοντας τη πλάκα
µε ένα βρεγµένο πανί µε
οινοπνεύµατα µεθυλίου.
0 Γεµίστε το δοχείο νερού (δείτε το
επόµενο κεφάλαιο) και αδειάστε το
νερό. Έτσι θα ξεπλύνεται ότι ξένα
αντικείµενα από τη διαδικασία
κατασκευής.
822 949 436_DB75xx_AEG.book Seite 17 Donnerstag, 19. Juni 2008 12:58 12

r
18
3
Όταν το ενεργοποιείτε για πρώτη
φορά, το νέο σίδερο ατµού σας
µπορεί να µην παράγει ατµό για τα
πρώτα 10 λεπτά. Αυτό, λόγο της
αρχικής θέρµανσης του υλικού που
χρησιµοποιείται. Η διαδικασία είναι
ασφαλές και δεν προκαλεί βλάβη
στο σίδερο ατµού.
Πλήρωση του σίδερου ατµού
µε νερό
1
Πριν τη πλήρωση του σίδερου ατµού
µε νερό, βεβαιωθείτε ότι το βύσµα
έχει αφαιρεθεί από τη παροχή
ρεύµατος. Μπορείτε να το γεµίσετε
το σίδερο ατµού µε ζεστό νερό ενώ
είναι ζεστό.
0
Στρέψτε τον επιλογέα ατµού (εικ. 1/G)
στη ρύθµιση "στεγνό".
0
Τοποθετήστε το σίδερο ατµού όρθιο
και ανοίξτε το κάλυµµα ανοίγµατος
γέµισης (εικ. 1/C).
0 Χρησιµοποιώντας τη κούπα που
παρέχεται, βάλτε νερό στο άνοιγµα
γέµισης µέχρι το µέγιστο επίπεδο
νερού (εικ. 1/B). Μην ξεπερνάτε τον
δείκτη µέγιστου επιπέδου νερού.
0 Σπρώξτε το κάλυµµα ανοίγµατος
γέµισης για να κλείσει.
3
Το ειδικό σχεδιασµό πλάκας, σας
επιτρέπει να χρησιµοποιείτε νερό
βρύσης µε το σίδερο σας χωρίς να
επηρεαστεί η απόδοση ατµού.
Ωστόσο, σε περιοχές επάκρων
βαρίου
νερού, συνιστούµε τη χρήση
αποσταγµένου νερού ή νερού χωρίς
µεταλλικά στοιχεία.
1
Μην γεµίζετε το σίδερο ατµού µε
µαλακτικό ρούχων, κόλλες ή άλλες
διαλύσεις διότι ο µηχανισµός ατµού
θα καταστραφεί. Μην χρησιµοποιείτε
µολυσµένο νερό.
Χρήση του σίδερου ατµού σας
0 Τοποθε τ ή στ ε το καλώδιο ρεύµατος
στη πρίζα παροχής 220–240 V.
Η λυχνία λειτουργίας ON (εικ 1/H,
στο πάνω µέρος της λαβής) θα
ανάβει για να δείξει ότι το σίδερο
ατµού έχει ενεργοποιηθεί και
ζεσταίνεται.
0
Στρέψτε τον επιλογέα θερµοκρασίας
(εικ. 1/L) στην επιθυµητή ρύθµιση
ευθυγραµµίζοντας τη ρύθµιση στον
επιλογέα µε τη λυχνία ελέγχου
θερµοκρασίας (εικ. 1/Μ).
Η λυχνία ελέγχου θερµοκρασίας θα
ανάβει για να δείξει ότι το σίδερο
ζεσταίνεται στην επιλεγµένη
θερµοκρασία. Όταν η λυχνία ελέγχου
θερµοκρασίας σβήνει, το σίδερο έχει
φτάσει την επιλεγµένη θερµοκρασία
και είναι έτοιµο για σιδέρωµα.
3
Όταν ο επιλογέας θερµοκρασίας
αλλάζει από µια υψηλή ρύθµιση σε
µια χαµηλότερη ρύθµιση κατά τη
διάρκεια σιδερώµατος, η λυχνία
ελέγχου θερµοκρασίας θα σβήσει
αµέσως. Αυτό δείχνει πως το σίδερο
κρυώνει στην επιλεγµένη
θερµοκρασία.
Για να επιβεβαιωθείτε
πως το σίδερο έχει φτάσει την
επιλεγµένη θερµοκρασία και δεν είναι
πολύ ζεστό, περιµένετε µέχρι η
λυχνία έλεγχου θερµοκρασίας
ανάβει ξανά και στη συνέχεια
σβήνει πριν το σιδέρωµα.
Στεγνό σιδέρωµα
0 Συνδέστε το σίδερο ατµού µε το
ρεύµα και ρυθµίστε την επιθυµητή
θερµοκρασία όπως περιγράφεται
παραπάνω.
0 Επιλέξτε "στεγνό" στον επιλογέα
ατµού (εικ
. 1/G).
Αυτό θα διακόψει τη ροή ατµού αν
υπάρχει νερό στο δοχείο.
Σιδέρωµα µε ατµό
0 Συνδέστε το σίδερο ατµού µε το
ρεύµα και ρυθµίστε την επιθυµητή
θερµοκρασία όπως περιγράφεται
παραπάνω.
3
Όταν σιδερώνετε µε ατµό,
βεβαιωθείτε πως ο επιλογέας
θερµοκρασίας έχει ρυθµιστεί σε
οποιαδήποτε θερµοκρασία στο
εύρος ατµού, και ότι το δοχείο είναι
τουλάχιστον 1/4 γεµάτο µε νερό.
822 949 436_DB75xx_AEG.book Seite 18 Donnerstag, 19. Juni 2008 12:58 12

r
19
0 Στρέψτε τον επιλογέα ατµού (εικ. 1/
G) στη επιθυµητή ρύθµιση ατµού.
Χρήση του ατµού ψεκασµού
Ο ατµός ψεκασµού µπορεί να
χρησιµοποιηθεί όταν ψεκάζετε ή
σιδερώνετε στέγνα τα προ-βρεγµένα
υφάσµατα που είναι δύσκολα για
σιδέρωµα.
3
Βεβαιωθείτε ότι τουλάχιστον το ¼
του δοχείου είναι γεµάτο µε νερό.
0 Πατήστε το κουµπί ψεκασµού
(εικ. 1/E) κατά το σιδέρωµα για να
απελευθερώσετε ατµό από το στόµιο
ψεκασµού (εικ. 1/D).
Χρήση της λειτουργίας
ψεκασµού ατµού
Η λειτουργία ψεκασµού ατµού
µπορεί να χρησιµοποιηθεί κατά το
στεγνό σιδέρωµα ή σιδέρωµα µε
ατµό, όταν ο ρυθµιστής
θερµοκρασίας έχει ρυθµιστεί σε
οποιαδήποτε θερµοκρασία στο εύρος
ατµού ή πάνω από τη ρύθµιση δυο
κουκκίδων (••).
3
Βεβαιωθείτε ότι τουλάχιστον το ¼
του δοχείου είναι γεµάτο µε νερό.
0
Επιλέξτε την επιθυµητή θερµοκρασία
και περιµένετε µέχρι η λυχνία
ελέγχου θερµοκρασίας σβήσει.
0 Πατήστε το κουµπί ψεκασµού
ατµού (εικ.1/F) µερικές φορές
µε το σίδερο στη πλάκα, για να
ετοιµάσετε την αντλία.
3
Αν το δοχείο νερού έχει αδειάσει,
µπορεί να χρειαστεί να ετοιµάσετε
ξανά την αντλία µετά τη γέµιση του
σίδερου ατµού µε νερό.
3
Το σίδερο ατµού διαθέτει ένα
σύστηµα σταµατηµού σταγόνων.
Αυτό το σύστηµα σταµατάει
αυτόµατα τη ροή νερού στο
διαµέρισµα ατµού αν η θερµοκρασία
πέσει πολύ χαµηλά για να τη
δηµιουργία ατµού. Αυτό αποτρέπει
τις σταγόνες και σε πολύ χαµηλές
θερµοκρασίες.
Σιδέρωµα µε ατµό για κρεµασµένα
ρούχα
3
Η κάθετη λειτουργία ψεκασµού µε
ατµό είναι ιδανική για σιδέρωµα
κουρτινών, κοστουµιών και
ευαίσθητων υφασµάτων.
0
Κρεµάστε το ρούχο σε µια
κρεµάστρα
και κρατήστε το σίδερο
ατµού σε µια απόσταση 10–20 cm
από το υλικό.
0
Τώρα πατήστε το κουµπί ψεκασµού
µε ατµό (εικ.1/F).
1
Μην προσπαθήστε να δροσίστε τα
ρούχα ενώ είναι φορεµένα. Κίνδυνος
εγκαυµάτων!
Η λειτουργία αυτόµατης
απενεργοποίησης ασφαλείας
(δεν διατίθεται µε το DB 7510)
Για ολική ασφάλεια και ψυχική
ηρεµία, το σίδερο ατµού θα σβήσει
αυτόµατα αν παρατηθεί χωρίς
επίβλεψη (DB 7520, DB 7530,
DB 7540).
Θα σβήσει αυτοµάτως αν αφεθεί
στη θέση σιδερώµατος για
30 δευτερόλεπτα (εικ. 2/a). Θα
σβήσει επίσης αν αφεθεί χωρίς
επίβλεψη σε όρθια θέση για 15 λεπτά
(εικ. 2/b). Το σίδερο ατµού θα
σβήσει επίσης αν πέσει στη
πλευρά για 30 δευτερόλεπτα
(εικ.2/c).
Αν αφήσετε τον σίδερο ατµού χωρίς
επίβλεψη, η κόκκινη λυχνία
λειτουργίας αυτόµατης
απενεργοποίησης ασφαλείας
(εικ. 1/Κ, στο πάνω µέρος της λαβής)
θα αναβοσβήσει και θα ακουστεί
ένας προειδοποιητικός ήχος για να
ανακοινώσει ότι η λειτουργία
αυτόµατης απενεργοποίησης έχει
ενεργοποιηθεί.
Η παροχή µε ρεύµα για το στοιχείο
θέρµανσης του σίδερου ατµού θα
διακοπεί και το σίδερο ατµού θα
αρχίζει να κρυώνει.
822 949 436_DB75xx_AEG.book Seite 19 Donnerstag, 19. Juni 2008 12:58 12

r
20
3
Μετά τη διακοπή, η λυχνία
λειτουργίας ON θα παραµένει
αναµµένη, επειδή το σίδερο ατµού
θα είναι ακόµη συνδεδεµένο στη
πρίζα ρεύµατος.
0
Για να επανακινήσετε τη λειτουργία
ασφαλείας αυτόµατης
απενεργοποίησης, απλά µετακινήστε
το σίδερο ατµού.
Στη συνέχεια η παροχή ρεύµατος στο
στοιχείο σίδερου ατµού
επανασυνδέεται και το σίδερο αρχίζει
να ζεσταίνεται ξανά. Περιµένετε µέχρι
να σβήσει η λυχνία ελέγχου
θερµοκρασίας πριν επαναρχίσετε το
σιδέρωµα.
Καθάρισµα και συντήρηση
Μετά από κάθε χρήση
0 Σβήστε τη συσκευή και αφαιρέστε
το βύσµα από τη πρίζα παροχής
ρεύµατος.
0
Αφήστε το σίδερο ατµού να κρυώσει
πριν τυλίξετε το καλώδιο γύρο από
το ενσωµατωµένο τύλιγµα καλωδίου
(εικ. 1/O).
Αποθήκευση
0 Να αποθηκεύετε πάντα το σίδερο
ατµού όρθιο (εικ. 3)
Μην αποθηκεύετε το σίδερο ατµού
µε τη πλάκα προς τα κάτω ή στη
συσκευασία.
Καθαρισµός
0 Για να καθαρίσετε το εξωτερικό του
σίδερου ατµού, σκουπίστε το µε ένα
µαλακό βρεγµένο πανί και στεγνώστε
το.
1
Μην χρησιµοποιείτε σκληρά
λειαντικά, χηµικά καθαριστικά ή
διαλυτικά διότι θα καταστρέψουν
την επιφάνεια.
Καθαρισµός της αφαιρούµενης
βαλβίδας ατµού
0
Για να αφαιρέσετε τη βαλβίδα ατµού,
στρέψτε τον επιλογέα ατµού
αριστερόστροφα στη ρύθµιση
"καθαρισµός" ώστε η βαλβίδα ατµού
να εµφανιστεί
(εικ. 4)
.
0
Ξύστε ελαφρά την άκρη της βαλβίδας
µε ένα µάλλινο πανί µε σαπούνι
βρεγµένο σε ζεστό νερό.
0 Ξεπλύνετε και στεγνώστε µε ένα
καθαρό πανί.
0 Επανατοποθετήστε τη βαλβίδα
ατµού και στρέψτε δεξιόστροφα για
να κλειδώσει στη θέση της.
Καθαρισµός των οπών ατµού
0 Για να αφαιρέσετε µαζέµατα
επιπέδων αλάτων στις οπές ατµού
τα οποία µπορεί να επηρεάσουν την
απόδοση του σίδερου ατµού σας,
χρησιµοποιήστε µια βαµβακερή µύτη
βρεγµένη σε οινοπνεύµατα µεθυλίου.
Καθαρισµός πλάκας
1
Μην χρησιµοποιείτε πανιά ξυσίµατος
ή σκληρά καθοριστικά για να
καθαρίσετε τη πλάκα σας, επειδή
αυτά θα γρατσουνίσουν και
καταστρέψουν την επιφάνεια.
0
Για να αφαιρέσετε υπολήµµατα από
τη πλάκα, σιδερώστε πάνω σε ένα
βρεγµένο πανί ενώ το σίδερο είναι
ζεστό.
DB 7540
(Σκληρη αναδυώµενη πλακα)
0 Σκουπίστε τη πλάκα µε ένα µαλακό
βρεγµένο πανί και σκουπίστε το.
DB 7530, DB 7520, DB 7510
(Πλάκα ανοξείδωτου ατσαλιού)
0 Χρησιµοποιήστε ένα καθοριστικό
ανοξείδωτου ατσαλιού ή µετάλλου,
τρίψτε ελαφρά µε ένα βρεγµένο
πανί
και στεγνώστε.
Οδηγός σιδερώµατος
Επιλογή θερµοκρασίας
σιδερώµατος
0
∆ιαβάστε πάντα τις ετικέτες ρούχων
και ακολουθήστε τις οδηγίες
σιδερώµατος του κατασκευαστή.
Αναφερθείτε το ∆ιάγραµµα
822 949 436_DB75xx_AEG.book Seite 20 Donnerstag, 19. Juni 2008 12:58 12
Seite wird geladen ...
Seite wird geladen ...
Seite wird geladen ...
Seite wird geladen ...
-
 1
1
-
 2
2
-
 3
3
-
 4
4
-
 5
5
-
 6
6
-
 7
7
-
 8
8
-
 9
9
-
 10
10
-
 11
11
-
 12
12
-
 13
13
-
 14
14
-
 15
15
-
 16
16
-
 17
17
-
 18
18
-
 19
19
-
 20
20
-
 21
21
-
 22
22
-
 23
23
-
 24
24


Aeg-Electrolux DB7541 Benutzerhandbuch
- Kategorie
- Eisen
- Typ
- Benutzerhandbuch
in anderen Sprachen
- English: Aeg-Electrolux DB7541 User manual
Verwandte Artikel
Andere Dokumente
-
Panasonic NI-W910CMXA Bedienungsanleitung
-
Electrolux edb 8590 Benutzerhandbuch
-
SEVERIN BA 3210 Bedienungsanleitung
-
SEVERIN BA 3245 Bedienungsanleitung
-
SEVERIN BA 3252 Benutzerhandbuch
-
SEVERIN BA 3253 Bedienungsanleitung
-
Fakir steam iron Eye Bedienungsanleitung
-
AEG CompactPower DBS7146GR Instruction book
-