5
6
*
スタンド(MDS-9V またはMDS-Standard)の付属品は、それぞれの取扱説明書を見ながら
確認してください。
* Wenn Sie die Vollständigkeit der beigefügten Einzelteile des Ständers (MDS-9V oder
MDS-Standard) überprüfen, verwenden Sie die entsprechende Anleitung als Referenz.
* Lorsque vous vériez le contenu de l'emballage pour le stand (MDS-9V ou MDS-
Standard), reportez-vous au mode d'emploi correspondant.
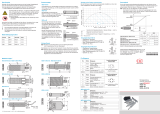
MDS-9V / MDS-Standard
* Assemble the stand (MDS-9V or MDS-Standard) following the procedure given in the
corresponding owner's manual.
*
スタンド(MDS-9V またはMDS-Standard)は、それぞれの取扱説明書の手順に従って組み
立ててください。
* Bauen Sie den Ständer (MDS-9V oder MDS-Standard) nach den Angaben in der
jeweiligen Anleitung auf.
* Assemblez le stand (MDS-9V ou MDS-Standard) en suivant la procédure décrite dans le
mode d'emploi correspondant.
• Cymbal mount
•
シンバル・マウント
• Cymbal-Halterung
• Fixation de cymbale
• Pad mount
•
パッド・マウント
• Pad-Halterung
• Fixation de pad
* Remove the cymbal mount at the right. (It is used when adding a cymbal.)
*
右側のシンバル・マウントは取り外します。(シンバル増設の際に使います。)
* Entfernen Sie die Cymbal-Halterung auf der rechten Seite (diese wird nur für
ein zusätzliches Cymbal-Pad benötigt).
* Retirez la xation de cymbale à droite. (Elle sert lorsque vous ajoutez une
cymbale.)
MDS-Standard
* Use the cymbal nut and felt washer included
with the stand.
*
スタンド付属のシンバル・ナットとフェルト・ワ
ッシャーをお使いください。
* Verwenden Sie dem Ständer beigefügte
Cymbalmutter und Filzscheibe.
* Utilisez l’écrou de la cymbale et la rondelle de
feutre fournis avec le stand.
* Use the wing nut and felt washer included
with the cymbal. Use the drum key included
with the stand.
*
シンバル付属のウィング・ナットとフェルト・ワ
ッシャーをお使いください。スタンド付属のドラ
ム・キーをお使いください。
* Verwenden Sie die dem Cymbal-Pad
beigefügte Flügelmutter und Filzscheibe.
Verwenden Sie den dem Ständer beigefügten
Stimmschlüssel.
* Utilisez l’écrou papillon et la rondelle de feutre
fournis avec la cymbale. Utilisez la clé de
serrage fournie avec le stand.
Stand /
スタンド
/ Ständer / Stand (MDS-9V / MDS-Standard)
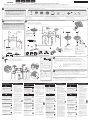
TD-25K
1
2 3
安全上のご注意
警告
指定のスタンドを使用する
不安定な場所に設置しない
注意
指定のスタンドのみ使用する
スタンドを使う前に安全を確認する
移動するときはすべての接続をはずす
指などをはさまないように注意する
小さな部品はお子様の手の届かないとこ
ろに置く
使用上のご注意
修理について
その他の注意について
4 1
2 3
5
CR1
RD
T1 T2
SNR
T3
KIK
HH
TD-25
Check the included items /
同梱物の確認
/ Überprüfen der Einzelteile / Vérication du contenu
Setup Guide /
セットアップ・ガイド
/ Aufbauanleitung / Manuel d’installation Guide
TD-25K
8 KIK (KD-9) 8 HH (VH-11)
8 SNR (PDX-100) 8 T3 (PDX-8)
8 T1 (PDX-6)
8 T2 (PDX-6)
8 TD-25 8 Connection cable 8 AC adaptor
Assemble the stand /
スタンドの組み立て
Zusammenbauen des Ständers / Assemblage du stand
Assemble the kit /
キットの組み立て
/ Zusammenbauen des Drum-Kits / Assemblage du kit
8 CR1 (CY-12C) 8 RD (CY-13R)
* Check to see that all items are included. If anything is missing, please contact your dealer.
* Handle items with care.
* Be careful not to pinch your ngers.
* Stellen Sie sicher, dass alle Einzelteile vollständig vorhanden sind. Falls etwas fehlen sollte,
benachrichtigen Sie Ihren Roland-Vertragspartner.
* Behandeln Sie die Einzelteile mit der notwendigen Sorgfalt.
* Achten Sie darauf, sich nicht Ihre Hände bzw. Finger zu verletzen.
*
すべての部品があるか確認してください。不足している場合は、お買い上げの販売店にお問い
合わせください。
*
部品の取り扱いにご注意ください。
*
指を挟まないようご注意ください。
* When checking the included items for the stand (MDS-9V or MDS-Standard), refer to
the corresponding owner's manual.
* In order to use this stand correctly, carefully read “Using the Unit Safely” and “Important Notes” (“Using the Unit Safely” leaet, TD-25 owner’s manual, MDS-9V owner’s manual or MDS-Standard owner’s manual, and this document). After reading, keep this material nearby for reference when needed.
*
本機を正しくお使いいただくために、ご使用前に「安全上のご注意」と「使用上のご注意」(『安全上のご注意』チラシ、TD-25 取扱説明書、MDS-9V 取扱説明書、またはMDS-Standard 取扱説明書、ならびに本書)をよくお読みください。お読みになったあとは、すぐに見られるところに保管しておいてください。
* Lesen Sie zuerst die Hinweise in den Abschnitten „Sicherheitshinweise” und „Wichtige Hinweise” (im Informationsblatt “Using the Unit Safely”, in der Anleitung des TD-25, des MDS-9V, in der MDS-Standard-Anleitung und in dieser Anleitung). Bewahren Sie die Anleitung zu Referenzzwecken auf.
* Pour utiliser correctement le stand, lisez attentivement les sections « Consignes de sécurité » et « Remarques importantes » (livret « Consignes de sécurité », mode d’emploi du TD-25, mode d’emploi du MDS-9V ou mode d’emploi du MDS-Standard, et le présent document). Après lecture, conservez ces documents pour pouvoir vous y référer dès que nécessaire.
* Vériez que tous les éléments sont inclus. S’il manque un élément, contactez votre
revendeur.
* Manipulez les éléments avec soin.
* Veillez à ne pas vous pincer les doigts.
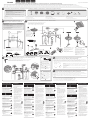
1.2 m
135˚
135˚
135˚
135˚
• Adjust each tuning bolt little by little in the illustrated order so that the head is tensioned evenly.
•
張り具合が均等になるように、各テンション・ボルトを少しずつ、図の順番で締めます。
• Ziehen Sie die Stimmschrauben nacheinander ein wenig an, in der links angegebenen Reihenfolge, so dass
das Fell gleichmäßig gespannt wird.
• Réglez chaque boulon d’accordage petit à petit en suivant l’ordre indiqué an que la peau soit tendue de
manière homogène.
• After making connections, execute the hi-hat oset adjustment from the TD-25. For detail, see the TD-25 owner’s manual.
•
接続が終わったら、TD-25で、ハイハット・オフセットの調節をしてください。詳しくは、TD-25 取扱説明書をご覧ください。
• Nach Verkabeln der Pads müssen Sie im TD-25 Soundmodul den Hi-Hat Oset-Parameter anpassen. Lesen Sie zu diesem Thema die Anleitung des TD-25.
• Une fois les branchements eectués, procédez au réglage du décalage du charleston depuis le TD-25. Pour plus d’informations, consultez le mode
d’emploi du TD-25.
• Please refer to the owner’s manuals (PDF) of the each pad. http://www.roland.com/manuals/
0
TD-25K
•
各パッドの取扱説明書(PDF)も併せてご覧ください。
http://www.roland.co.jp/manuals/
0
TD-25K
• Lesen Sie auch die Anleitungen (PDF) der einzelnen Pads. http://www.roland.com/manuals/
0
TD-25K
• Reportez-vous aux modes d’emploi (PDF) de chaque pad. http://www.roland.com/manuals/
0
TD-25K
PDX-6
2 1
5 3
4
6
PDX-100/PDX-8
* Adjusting the head tension aects only the head response, and does not change the pitch of the sound as it would on an acoustic drum.
*
ヘッドの張り具合の調節は、打感触を調節するもので、アコースティック・ドラムのように音の高さを調節するものではありません。
* Das Spannen des Fells beinusst nur die physische Spannung des Fells und wirkt sich nicht auf die Tonhöhe aus (wie bei akustischen Trommeln).
* Le réglage de la tension de la peau aecte seulement la réponse de la peau et ne modie pas la hauteur du son comme ce serait le cas sur une batterie
acoustique.
* Use commercially available kick pedal and hi-hat stand.
*
市販のキック・ペダル、ハイハット・スタンドをお使いください。
* Verwenden Sie handelsübliche Kick-Pedale bzw. Hi-Hat Ständer.
* Utilisez une pédale de grosse caisse et un stand charleston disponibles dans le commerce.
Carpet/
カーペット
/
Teppich/Moquette
Floor/
フローリング
/
Boden/Plancher
5
4
3
2
English
日本語
Deutsch Français
English
日本語
Deutsch Français
1
• Sponge side up
•
スポンジを上に
• Schaumgummi oben
• Côté éponge vers le haut
• Metal faces down
•
金属面を下に
• Metallscheibe unten
• Côtés métalliques vers le bas
6.0–7.0 mm (0.236”–0.276”)
11.7 mm (1/2”) Max.
• Logo
•
ロゴ
• Logo
• Logo
4
Connect the pads /
パッドの接続
/ Anschließen der Pads / Connexion des pads
• Labels indicating the pad to be connected are attached to the cable.
•
ケーブルには、接続するパッドを示すシールが貼られています。
• Am Kabel ist ein Etikett, welches das entsprechende Pad bezeichnet.
• Les étiquettes indiquant le pad à connecter sont xées au câble.
* Fasten the cables by cable clips or cable ties
at locations marked
.
*
の位置で、ケーブルをケーブル・クリップま
たはケーブル・タイで固定します。
* Befestigen Sie die Kabel mit den Clips oder
Kabelbindern an den mit
bezeichneten
Stellen.
* Attachez les câbles à l’aide de clips pour
câble ou de serre-câbles aux emplacements
indiqués par
.
* Fix the cymbal cables by cable ties at
locations marked
. Leave some slack in
the cables.
*
の位置で、シンバル・ケーブルをケーブル・
タイで固定します。ケーブルはゆとりを持たせ
ておきます。
* Befestigen Sie die Kabel für die Cymbal-
Pads mit den Kabelbindern an den mit
bezeichneten Stellen, so dass Sie die Kabel
noch bewegen können.
* Fixez les câbles de la cymbale à l’aide de
serre-câbles aux emplacements indiqués
par
. Laissez un certain jeu au niveau des
câbles.
HH
HHC
HH
HHC
CR1
RDB
RD
T1
T2
SNR
KIK
T3
RD
RDB
1.
2.
x 6
x 3
USING THE UNIT SAFELY
WARNING
Use only the stand that is recommended
This unit should be used only with a stand
that is recommended by Roland.
Do not place in a location that is unstable
When using the unit with a stand
recommended by Roland, the stand must
be carefully placed so it is level and sure to
remain stable. If not using a stand, you still
need to make sure that any location you choose
for placing the unit provides a level surface that
will properly support the unit, and keep it from
wobbling.
CAUTION
Use only the speci ed stand(s)
This unit is designed to be used in
combination with speci c stands (MDS-
9V / MDS-Standard) manufactured by
Roland. If used in combination with other
stands, you risk sustaining injuries as the result of
this product dropping down or toppling over due
to a lack of stability.
Evaluate safety issues before using stands
Even if you observe the cautions given
in the owner’s manual, certain types of
handling may allow this product to fall
from the stand, or cause the stand to
overturn. Please be mindful of any safety issues
before using this product.
Disconnect all cords/cables before moving the unit
Damage or malfunction may result if you
fail to disconnect all cables before moving
the unit.
Take care so as not to get ngers pinched
When handling the following moving
parts, take care so as not to get ngers,
toes, etc., pinched. Whenever a child uses
the unit, an adult should be on hand to
provide supervision and guidance.
• Stands
• Pedals
Keep small items out of the reach of children
To prevent accidental ingestion of the
parts listed below, always keep them out
of the reach of small children.
• Removable Parts
Screws, Springs, Washers, Nuts, Anchor bolts
IMPORTANT NOTES
Maintenance
• In the interest of product improvement, the
speci cations and/or appearance of this unit
are subject to change without prior notice.
Additional Precautions
• The rubber portion of the striking surface is
treated with a preservative to maintain its
performance. With the passage of time, this
preservative may appear on the surface as a
white stain, or reveal how the pads were struck
during product testing. This does not a ect the
performance or functionality of the product,
and you may continue using it with con dence.
• Continuous playing may cause dis-coloration
of the pad, but this will not a ect the pad’s
function.
• The hi-hat stand is supported by means of a
tripod. When installing the hi-hat, make sure
the legs of the tripod are opened wide enough
to keep the equipment from falling over.
• Do not remove the special VH-11 clutch from
the hi-hat or disassemble the clutch.
• High-precision sensors are located at the
portion of the motion sensor unit indicated by
the arrow in the gure. Take care not
to subject this area to excessive
shock, and do not allow any foreign
objects to enter any gaps.
• When not using the hi-hat for extended
periods, store the hi-hat in the open position
to prevent placing any stress on the motion
sensor unit.
• Over long periods of use, the portion of the
motion sensor unit that comes into contact
with the hi-hat (the damper) may become
worn. Such damper wear may prevent proper
adjustment of the o set and may cause the
hi-hat to swing with an unnatural motion.
If this occurs, replace the damper. For more
information on replacing the damper, contact
Roland Service.
• Striking the head when the head tension is
loose may damage the sensor.
• Do not apply excessive force to the sensor
located below the head of the V-Pad. Doing so
can interfere with accurate detection, and may
damage it.
• Due to the nature of the materials used in
the sensor of the V-Pad, changes in room
temperature may a ect the sensitivity of the
sensor.
CONSIGNES DE SÉCURITÉ
AVERTISSEMENT
Utilisez uniquement le support recommandé
Cet appareil doit uniquement être utilisé
avec un support recommandé par Roland.
Ne placez pas l’appareil à un endroit instable
Lorsque vous utilisez le module avec un
pied, ce dernier doit être installé avec
précaution sur une surface plane sur
laquelle il est assuré de demeurer stable.
Si vous n’utilisez pas de pied, vous devez vous
assurer que l’emplacement choisi o re une surface
su samment plane pour installer correctement
l’appareil et l’empêcher d’osciller.
ATTENTION
Utilisez uniquement le ou les pieds spéci és
Cet appareil a été conçu pour être utilisé
avec des pieds (MDS-9V / MDS-Standard)
spéci ques fabriqués par Roland. S’il est
utilisé avec d’autres types de pieds, vous
risquez de vous blesser sérieusement en cas de
chute ou de
basculement du produit en raison d’un manque
de stabilité..
Tenez compte des questions de sécurité avant
d’utiliser un pied
Même si vous vous conformez aux
précautions données dans le mode
d’emploi, certaines manipulations
peuvent provoquer la chute de l’appareil
ou du pied. Tenez compte des questions de
sécurité avant d’utiliser ce produit.
Débranchez tout avant de déplacer l’appareil
Il peut se produire des dommages ou
des dysfonctionnements si vous ne
débranchez pas tous les câbles avant de
déplacer l’appareil.
Veillez à ne pas vous pincer les doigts
Lorsque vous manipulez les pièces
amovibles suivantes, veillez à ne pas
vous pincer les doigts ou autre. Un adulte
doit toujours être responsable de la
manipulation des pièces suivantes :
• Stands
• Pédales
Gardez les petites pièces de portée des enfants
Pour éviter l’ingestion accidentelle des
pièces ci-dessous, gardez-les toujours
hors de portée des enfants.
• Pièces amovibles
Vis, ressorts, rondelles, écrous,
boulons d’ancrage
REMARQUES IMPORTANTES
Entretien
• En vue d’améliorer le produit, ses
caractéristiques techniques et/ou son aspect
peuvent être modi és sans avis préalable.
Précautions supplémentaires
• La partie en caoutchouc de la surface de frappe
est traitée avec un agent conservateur pour
conserver ses performances. Au l du temps,
cet agent peut former une tache blanche en
surface ou laisser des traces de frappe sur les
pads. Cela ne nuit pas aux performances ou aux
caractéristiques du produit que vous pouvez
continuer à utiliser en toute con ance.
• Jouer en continu peut entraîner une
décoloration du pad, sans toutefois en a ecter
le fonctionnement.
• Le stand charleston est supporté au moyen
d’un trépied. Lors de l’installation du
charleston, véri ez que les branches du trépied
sont ouvertes su samment largement pour
que l’équipement ne bascule pas.
• Ne retirez pas l’embrayage spécial VH-11 du
charleston et ne le démontez pas.
• Des capteurs haute précision se trouvent dans
la partie de l’unité de capteur de mouvement
indiquée par la èche sur
l’illustration. Veillez à ne pas
soumettre cette zone à un choc
excessif, et faites attention à ce
qu’aucun corps étranger ne pénètre
dans les interstices.
• Si vous n’utilisez pas le charleston pendant de
longues périodes, rangez-le en position ouverte
pour éviter d’exercer une quelconque pression
sur l’unité du capteur de mouvement.
• Avec l’usage, la partie de l’unité du capteur
de mouvement qui entre en contact avec le
charleston (la sourdine) peut s’user. L’usure de
la sourdine peut empêcher le réglage correct
du décalage et entraîner un balancement du
charleston avec un mouvement non naturel.
Si cela se produit, remplacez la sourdine. Pour
plus d’informations sur le remplacement de
la sourdine, contactez un centre de service
Roland.
• Le capteur peut être endommagé si vous
frappez sur la peau alors que la tension de la
peau est relâchée.
• N’appliquez pas une force excessive sur le
capteur situé sous la peau du V-Pad. Vous
risquez d’a ecter la précision de la détection et
d’endommager le capteur.
• En raison de la nature des matériaux utilisés
dans le capteur du V-Pad, des changements de
température dans la pièce peuvent a ecter la
sensibilité du capteur.
SICHERER BETRIEB DES GERÄTES
WARNUNG
Nur einen empfohlenen Stativ verwenden
Benutzen Sie nur die von Roland
empfohlenen Stativ.
Nicht auf instabilen Flächen aufstellen
Wenn Sie das Gerät mit einem von Roland
empfohlenen Stativ verwenden, muss
dieses sorgfältig aufgestellt werden, so
dass er gerade und stabil steht. Wenn Sie
kein Stativ verwenden, muss das Gerät auf einer
ebenen Fläche aufgestellt werden, so dass es sicher
steht und nicht wackelt.
VORSICHT
Nur die empfohlenen Stative verwenden
Dieses Gerät ist zur Verwendung mit
bestimmten Stativen von Roland
(MDS-9V / MDS-Standard) vorgesehen.
Bei der Verwendung mit anderen
Stativen besteht Verletzungsgefahr durch
das Herunterfallen oder Umstürzen aufgrund
mangelhafter Stabilität..
Mögliche Sicherheitsprobleme vor der Verwendung
von Stativen prüfen
Selbst bei Beachtung aller vorliegenden
Sicherheitshinweise kann bei
bestimmten Vorgehensweisen des
Bedieners das Gerät vom Stativ fallen
oder das Stativ umkippen. Handhaben Sie das
Gerät stets sorgsam unter Beachtung möglicher
Sicherheitsprobleme.
Vor dem Bewegen des Geräts alle Verbindungen
trennen
Achten Sie darauf, vor dem Transport des
Drum-Kits alle Kabel abzutrennen, um
Fehlfunktionen bzw. Beschädigungen
vorzubeugen.
Nicht die Finger bzw. Hände verletzen
Achten Sie beim Umgang mit den
folgenden beweglichen Teilen
darauf, sich nicht die Finger bzw.
Hände zu verletzen. Kinder sollten
derartige Gegenstände nur unter Aufsicht einer
erwachsenen Person berühren bzw. betätigen.
• Ständer
• Pedale
Kleine Gegenstände außerhalb der Reichweite von
Kindern aufbewahren
Bewahren Sie kleine Gegenstände immer
außerhalb der Reichweite von Kindern
auf, damit diese derartige Gegenstände
nicht versehentlich verschlucken können.
• bewegliche Teile
Schrauben, Federn, Unterlegscheiben,
Muttern, Bolzen
WICHTIGE HINWEISE
Wartung
• Änderungen der technischen Daten und des
Designs sind ohne vorherige Ankündigung
möglich. Für Druckfehler wird keine Haftung
übernommen.
Zusätzliche Vorsichtsmaßnahmen
• Die mit Gummi überzogenen Schlag ächen
der Pads sind mit einem Konservierungssto
behandelt, um eine möglichst lange
Lebensdauer zu erreichen. Nach einem
längeren Zeitraum kann es vorkommen,
dass der Konservierungssto weiße Spuren
hinterlässt oder Pads bereits leichte Rückstände
ab Werk besitzen, da die Pads vor Auslieferung
getestet wurden. Diese Rückstände
beein ussen die Funktionalität der Pads in
keinster Weise.
• Dauerhaftes Spielen der Pads kann zu
Verfärbungen der Pads führen, diese
beein ussen die Funktionalität der Pads aber in
keinster Weise.
• Stellen Sie sicher, dass der Dreifuß des Hi-Hat-
Ständers weit genug ausgezogen ist, so dass
nach Aufsetzen der Hi-Hat der Ständer nicht
umkippen kann.
• Entfernen Sie bei der VH-11 nicht die spezielle
Clutch bzw. bauen Sie diese nicht auseinander.
• An der mit dem Pfeil bezeichneten Position
be ndet sich ein sehr emp ndlicher,
hochau ösender Sensor. Achten Sie
darauf, diesen Bereich keinen
Erschütterungen auszusetzen, und
stellen Sie sicher, dass keine kleine
Gegenstände in die Aussparungen gelangen.
• Wenn Sie die Hi-Hat längere Zeit nicht
verwenden, belassen Sie diese in der o enen
Position, damit die Sensor-Einheit nicht unnötig
belastet wird.
• Nach langer Zeit der Nutzung kann der
Dämpfer des Bewegungssensors durch den
Druck des Hi-Hat Beckens abgenutzt sein.
Dieser Verschleiß des Dämpfers kann eine
korrekte O set-Einstellung verhindern und zu
einem unnatürlichen Schwingungsverhalten
der Hi-Hat führen. Ist dieses der Fall, ersetzen
Sie den Dämpfer. Für weitere Informationen
zum Austausch der Dämpfer kontaktieren Sie
bitte Ihr Roland Service Center.
• Wenn das Fell nicht stark genug gespannt ist
und Sie dann auf das Fell schlagen, kann der
Sensor beschädigt werden.
• Üben Sie keinen übermäßigen Druck auf den
Sensor unterhalb der V-Pad Schlag äche aus,
da ansonsten der Sensor nicht mehr korrekt
funktioniert bzw. beschädigt werden kann.
• Aufgrund der Bescha enheit des Sensor-
Materials des V-Pads kann es vorkommen,
dass durch Temperaturschwankungen die
Emp ndlichkeit des Sensors beeinträchtigt
wird.
Connection
cable
Adjust the hi-hat oset /
ハイハット・オフセットの調節
Einstellen des Hi-Hat Oset-Parameters / Réglage du décalage du charleston
Adjust the head tension /
ヘッドの張り具合の調節
Einstellen der Fellspannung / Réglage de la tension de la peau
* 5 1 0 0 0 6 3 9 2 8 - 0 1 *
MDS-Standard MDS-9V
© 2018 Roland Corporation
Seite wird geladen ...
-
 1
1
-
 2
2


in anderen Sprachen
- English: Roland TD-25K Owner's manual
- français: Roland TD-25K Le manuel du propriétaire
- español: Roland TD-25K El manual del propietario
- italiano: Roland TD-25K Manuale del proprietario
- Nederlands: Roland TD-25K de handleiding
- português: Roland TD-25K Manual do proprietário
- 日本語: Roland TD-25K 取扱説明書
Verwandte Artikel
-
Roland TD-25KVX Bedienungsanleitung
-
-
-
-
Roland TD-17KVX Installationsanleitung
-
Roland TD-27KV Installationsanleitung
-
Roland TD-4 Bedienungsanleitung
-
-
Roland TD-17KV-L Installationsanleitung
-