Panasonic RC6266 Bedienungsanleitung
- Kategorie
- Radios
- Typ
- Bedienungsanleitung

ITALIANO FRANÇAIS
FM-AM Clock Radio
RC-6266
Operating Instructions
Bedienungsanleitung
Istruzioni per l’uso
Mode d’emploi
Instrucciones de
funcionamiento
Gebruiksaanwijzing
Bruksanvisning
Brugsvejledning
The “EB” indication shown on the packing case indicates United
Kingdom.
Before connecting, operating or adjusting this product, please read
these instructions completely. Please keep this manual for future re-
ference.
EB GNEJE
ENGLISH DEUTSCH
Specifications
Radio frequency range:
FM; 87.50–108.00 MHz
AM (MW); 520–1610 kHz
Power requirement:
AC; For Continental Europe 230 V, 50 Hz
For UK, Australia and N.Z. 230–240 V, 50 Hz
Power consumption 5 W
Battery; 9 V
(one 6F22/6LR61,006P
battery)
Power output: 300 mW (RMS…max.)
Speaker; 6.5 cm
Dimensions (WtHtD): 200k67k141 mm
Mass (without battery):
For Continental Europe 650 g
For UK 700 g
For Australia and N.Z. 675 g
Note:
Specifications are subject to change without notice.
Mass and dimensions are approximate.
Matsushita Electric Industrial Co., Ltd. ptuv
Osaka 542-8588, Japan rwsx
RQT5399-1E
F1299KB1020
Caution for AC Mains Lead
(For United Kingdom)
(“EB” area code model only)
For your safety, please read the following text carefully.
This appliance is supplied with a moulded three pin mains plug for
your safety and convenience.
A 5-ampere fuse is fitted in this plug.
Should the fuse need to be replaced please ensure that the replace-
ment fuse has a rating of 5-ampere and that it is approved by ASTA
or BSI to BS1362.
Check for the ASTA mark Ï or the BSI mark Ì on the body of the
fuse.
If the plug contains a removable fuse cover you must ensure that it is
refitted when the fuse is replaced.
If you lose the fuse cover the plug must not be used until a replace-
ment cover is obtained.
A replacement fuse cover can be purchased from your local dealer.
IMPORTANT
The wires in this mains lead are coloured in accordance with the fol-
lowing code:
Blue: Neutral, Brown: Live.
As these colours may not correspond with the coloured markings
identifying the terminals in your plug, proceed as follows:
The wire which is coloured Blue must be connected to the terminal
which is marked with the letter N or coloured Black or Blue.
The wire which is coloured Brown must be connected to the terminal
which is marked with the letter L or coloured Brown or Red.
WARNING: DO NOT CONNECT EITHER WIRE TO THE EARTH
TERMINAL WHICH IS MARKED WITH THE LETTER E, BY THE
EARTH SYMBOL Ó OR COLOURED GREEN OR GREEN/YEL-
LOW.
THIS PLUG IS NOT WATERPROOF—KEEP DRY.
Before use
Remove the connector cover.
CAUTION!
IF THE FITTED MOULDED PLUG IS UNSUITABLE FOR
THE SOCKET OUTLET IN YOUR HOME THEN THE
FUSE SHOULD BE REMOVED AND THE PLUG CUT OFF
AND DISPOSED OF SAFELY.
THERE IS A DANGER OF SEVERE ELECTRICAL
SHOCK IF THE CUT OFF PLUG IS INSERTED INTO ANY
13-AMPERE SOCKET.
If a new plug is to be fitted please observe the wiring code as stated
below.
If in any doubt please consult a qualified electrician.
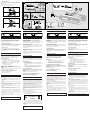
Power supply Stromversorgung
Verwendung des Netzkabels A
Trockenbatterie zur Speichersicherung
(separat erhältlich) B
Diese Batterie erhält die Uhrzeit- und Alarmeinstellungen,
wenn die Stromzufuhr unterbrochen wird.
Wenn die Stromzufuhr unterbrochen wird
Die Zeitanzeige erlischt, bis das Gerät wieder angeschaltet
wird. Die Uhr kann bis zu sechs Minuten vor- oder nachge-
hen, wenn der Strom unterbrochen wurde.
Austausch der Batterie
≥Die Lebensdauer dieser Batterie beträgt etwa ein Jahr.
≥Wenn die Anzeige nach dem Wiedereinschalten nach
einer Stromunterbrechung blinkt, muß die Batterie aus-
getauscht werden.
Einstellen der Zeit C
Drücken und Halten Sie gleichzeitig [TIME SET] und
[HOUR] oder [MIN], um die Zeit einzustellen.
[HOUR]: Erhöht die Zeiteinstellung in 1-Stundenschritten
[MIN]: Erhöht die Zeiteinstellung in 1-Minutenschritten
∫ Zeitanzeige
A 12-Stunden-Anzeige
(Für Großbritannien, Australien und Neuseeland)
Eine p.m.-Anzeige wird nach Mittag angezeigt.
A ≥Vergewissern Sie sich, daß die AM (morgens) oder
PM (abends) Einstellung richtig ist.
B 24-Stunden-Anzeige (für Kontinentaleuropa)
∫ Zum Überprüfen der Sekundenanzeige
Während Sie [DISP/CANCEL, ALARM] drücken,
drücken Sie gleichzeitig auf [SLEEP].
Die Zeitanzeige verändert sich und die letzte Ziffer der
Minuten und die Sekunden werden angezeigt.
∫ Ändern der Helligkeit der Zeitanzeige
[HIGH]: Für ein helles Display.
[LOW]: Für ein verdunkeltes Display.
Vorsichtsmaßregeln
≥Beim Einsetzen der Batterie darauf achten, daß die Pole
(+ und -) richtig ausgerichtet sind.
≥Erhitzen oder zerlegen Sie die Batterien nicht. Lassen
Sie die Batterien nicht mit offenem Feuer oder Wasser in
Berührung kommen.
≥Entnehmen Sie die Batterie, wenn das Gerät über lange
Zeit nicht benutzt wird.
≥Streifen Sie nie den Schutzüberzug der Batterien ab, und
benutzen Sie diese nicht, wenn der Schutzüberzug
abgestreift wurde.
Der falsche Umgang mit der Batterie kann zum Auslaufen
des Elektrolyts führen. Ausgelaufener Elektrolyt kann die
Innenteile, mit denen er in Kontakt kommt, beschädigen
und einen Brand auslösen.
Wenden Sie sich an Ihren Fachhändler, falls Elektrolyt aus
der Batterie ausläuft.
Falls Elektrolyt auf die Haut gelangt, waschen Sie die
entsprechende Stelle sofort gründlich mit Wasser ab.
≥Verbrauchte Batterien sachgerecht entsorgen.
≥Diese Lautsprecherboxen sind nicht mit einer magnetis-
chen Abschirmung ausgestattet. Sie dürfen daher nicht in
der Nähe eines Fernsehgerätes, Personalcomputers
oder anderen Gerätes aufgestellt werden, das für mag-
netische Einstreuungen empfindlich ist.
≥Betrieb und Aufstellung dieses Gerätes in der Nähe von
Wärmequellen sind zu vermeiden.
Alimentazione
Uso del cavo di alimentazione di rete A
Batteria a secco di protezione della memoria
(non fornito) B
Questa batteria salva le impostazioni dell’orologio e della
sveglia nel caso di un’interruzione di corrente.
In caso di interruzione di corrente
Il display dell’ora sparisce fino a quando l’unità non viene
di nuovo accesa. Durante l’interruzione di corrente l’orolo-
gio può guadagnare o perdere fino a sei minuti ogni ora.
Sostituzione della batteria
≥La durata di una batteria è di circa 1 anno.
≥Se, dopo un’interruzione di corrente, il display lampeggia
dopo che si è riaccesa l’unità, è necessario sostituire la
batteria.
Impostazione dell’ora C
Mentre si preme e si tiene premuto [TIME SET] (IM-
POSTAZIONE ORA), premere [HOUR] o [MIN] per im-
postare l’ora.
[HOUR]: Aumenta l’ora indicata per unità di un’ora
[MIN]: Aumenta l’ora indicata per unità di un minuto
∫ Display dell’ora
A Visualizzazione ore in base 12 ore
(Per il Regno Unito, l’Australia e la Nuova Zelanda)
Dopo mezzogiorno viene visualizzato un indicatore
p.m.
A ≥Accertarsi che l’impostazione AM o PM sia corretta.
B Visualizzazione ore in base 24 ore
(per l’Europa continentale)
∫ Per controllare display dei secondi
Tenendo premuto [DISP/CANCEL, ALARM], premere
[SLEEP].
La visualizzazione oraria cambia in modo da visualizzare
l’ultima cifra, per i minuti e per i secondi.
∫ Modifica della luminosità del display dell’ora
[HIGH]: Per un display luminoso.
[LOW]: Per un display scuro.
Precauzioni
≥Nell’inserire la pila, fare attenzione ad allineare i poli (+
e -) correttamente.
≥Non riscaldare o smontare le batterie. Non farle entrare in
contatto con fuoco o acqua.
≥Se non si utilizza l’unità per lungo tempo, rimuovere la
batteria.
≥Non staccare la protezione delle batterie e non usarle se
la protezione è stata staccata.
Utilizzare una pila in modo inappropriato è causa di perdite
di elettrolita che può danneggiare tutto quello con cui viene
a contatto e può essere causa d’incendio.
Se si verifica una perdita di elettrolita dalla pila, consultare
il rivenditore in merito.
Lavare bene con acqua le parti del corpo che venissero a
contatto con l’elettrolita.
≥Questi diffusori non hanno la shcermatura magnetica.
Non metterli vicino al televisore, personal computer od
altri dispositivi facilmente influenzati dal magnetismo.
≥Evitare di usare o di sistemare l’apparecchio vicino a fonti
di calore.
Alimentation électrique
Utilisation du cordon d’alimentation A
Pile sèche de sauvegarde de mémoire (non fournie) B
Cette pile enregistre les paramètres de l’horloge et du
réveil en cas de coupure de courant.
En cas de coupure de courant
L’affichage de l’heure disparaît jusqu’à ce que l’appareil
soit remis sous tension. L’horloge peut gagner ou perdre
jusqu’à six minutes par heure pendant la coupure de
courant.
Substitution de la pile
≥La durée de vie de cette pile est d’environ 1 an.
≥Si, après une coupure de courant, l’affichage clignote
une fois l’appareil remis en marche, la pile a besoin d’être
substituée.
Réglage de l’heure C
Tout en maintenant la touche [TIME SET] enfoncée, ap-
puyez sur [HOUR] ou [MIN] pour régler l’heure.
[HOUR]: avance heure par heure
[MIN]: avance minute par minute
∫ Affichage de l’heure
A Affichage du temps sur 12 heures (Pour le Royaume
Uni, l’Australie et la Nouvelle-Zélande)
Un indicateur d’après-midi (p.m.) est affiché l’après-
midi.
A ≥Assurez-vous que le réglage AM ou PM soit correct.
B Affichage du temps sur 24 heures
(pour l’Europe continentale)
∫ Pour vérifier le second affichage
Appuyez simultanément sur [DISP/CANCEL, ALARM]
et sur [SLEEP].
L’affichage de l’heure change pour indiquer le dernier
chiffre des minutes et des secondes.
∫ Modification de la luminosité de l’affichage de
l’heure
[HIGH]: affichage lumineux.
[LOW]: affichage pâle.
Précautions
≥Aligner correctement les pôles (+ et -) lors de l’inser-
tion de la batterie.
≥Ne chauffez ni ne démontez les piles. Evitez qu’elles
n’entrent en contact avec le feu ou l’eau.
≥Retirez la pile si vous prévoyez de ne pas utiliser l’ap-
pareil pendant un certain temps.
≥N’enlevez pas la protection des piles, ne les utilisez pas
si celle-ci a été retirée.
Une mauvaise manipulation de la batterie peut entraîner
une fuite d’électrolyte qui peut endommager les articles
entrant en contact avec le fluide et peut provoquer un in-
cendie.
Si de l’électrolyte fuit de la batterie, consulter le revendeur.
Bien laver à l’eau toute partie du corps avec laquelle l’ele-
ctrolyte est entrée en contact.
≥Ces enceintes n’ont pas de blindage magnétique. Ne pas
les placer près de téléviseurs, ordinateurs ou autres dis-
positifs dont le fonctionnement peut être facilement af-
fecté par un champ magnétique.
≥Eviter d’utiliser ou de placer l’appareil à proximité d’une
source de chaleur.
Press. Press and hold. Drücken. Gedrückt halten. Premere.
Mantenere
premuto.
Appuyer.
Appuyer et
maintenir
enfoncé.
Das Markierungszeichen befindet sich an der
Unterseite des Produkts.
Il marchio di avvertimento si trova sul pannello inferiore
dell’apparecchio.
Solo per l’Italia
Il produttore “Matsushita Electric Industrial Co., Ltd., 1-4
Matsuo-cho, Kadoma, Osaka 571-8505 Giappone” di
questo modello numero RC-6266, dichiara che esso è con-
forme al D.M. 28/08/1995 Nr. 548, ottemperando alle pre-
scrizioni di cui al D.M. 25/06/1985 (paragrafo 3, Allegato A)
e D.M. 27/08/1987 (paragrafo 3, Allegato I).
Le symbole d’avertissement se trouve sur le fond de
l’appareil.
Marking sign is located on bottom of the unit.
Marking sign is located on the back of the unit.
(For others)
Using AC mains lead A
Dry cell memory back-up battery (not included) B
This battery saves the clock and alarm settings if there is a
power interruption.
If the power is interrupted
The time display clears until the unit is turned on again.
The clock can gain or lose up to six minutes an hour while
the power is interrupted.
Replacing the battery
≥The service life of this battery is approximately 1 year.
≥If, after a power interruption, the display flashes after
turning the unit on again, the battery needs to be re-
placed.
Setting the time C
While pressing and holding [TIME SET], press [HOUR] or
[MIN] to set the time.
[HOUR]: Increases the time by one-hour units.
[MIN]: Increases the time by one-minute units.
∫ Time display
A 12-hour time display (for UK, Australia and N.Z.)
The PM indicator lights after noon.
A ≥Make sure the AM or PM setting is correct.
B 24-hour time display (for Continental Europe)
∫ To check the second display
While pressing [DISP/CANCEL, ALARM], press
[SLEEP].
The time display changes to show the last digit of the minu-
tes and the seconds.
∫ Changing the brightness of the time display
[HIGH]: For a bright display.
[LOW]: For a dim display.
Cautions
≥Align the poles (+ and -) properly when inserting the
battery.
≥Do not heat or disassemble the batteries. Do not allow
them to contact flame or water.
≥Remove the battery if the unit is not to be used for a long
time.
≥Do not peel off the covering on batteries and do not use if
the covering has been peeled off.
Mishandling of battery can cause electrolyte leakage which
can damage items the fluid contacts and may cause a fire.
If electrolyte leaks from the battery, consult your dealer.
Wash thoroughly with water if electrolyte comes in contact
with any part of your body.
≥These speakers do not have magnetic shielding. Do not
place them near televisions, personal computers or other
devices easily influenced by magnetism.
≥Avoid using or placing this unit near sources of heat.
(For UK)
FOR UNITED KINGDOM ONLY
BE SURE TO READ THE CAUTION FOR THE AC
MAINS LEAD BEFORE CONNECTION.
Seite wird geladen ...

ITALIANO
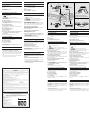
Ascolto della radio D
∫ Per regolare l’antenna
FM–a Allungare e cambiare la direzione del cavo dell’an-
tenna FM.
AM–b
∫ Per spegnere
Posizionare [SELECTOR] su OFF.
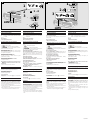
Uso dell’unità come orologio sveglia E
Il suono della sveglia si spegne automaticamente dopo
2 ore.
a : Sveglia con la radio
b : Radio con sveglia con cicalino
Per svegliarsi con l’allarme della suoneria soltanto, posi-
zionare il controllo [VOLUME] su MIN.
∫ Per spegnere la sveglia
Premere [DISP/CANCEL, ALARM]. (La sveglia viene
spenta, ma l’impostazione rimane intatta, per cui la sveglia
si azionerà all’ora impostata anche il giorno seguente.)
∫ Per controllare l’ora della sveglia
Premere [DISP/CANCEL, ALARM].
Mentre si preme [DISP/CANCEL, ALARM] viene visualiz-
zata l’ora della sveglia.
∫ Per cancellare l’impostazione della sveglia
Impostare [SELECTOR] su OFF.
L’indicatore si spegne.
∫ Per sonnecchiare ancora qualche minuto dopo il
suono della sveglia
∫ (suono dalla radio o cicalino)
Premere [DOZE].
La sveglia suona di nuovo dopo 9 minuti.
Uso del timer di spegnimento ritardato F
Si può regolare la radio/orologio in modo da poterla as-
coltare per un massimo di 1 ora e 59 minuti, e che si spen-
ga poi automaticamente.
∫ Per spegnere il timer
Premere [SLEEP CANCEL].
Anche la radio viene spenta.
Per consultazione:
È possibile combinare l’orologio sveglia (E) e il timer di
spegnimento ritardato.
Manutenzione
∫ Se le superfici sono sporche
Per pulire il sistema, strofinarlo con un panno morbido
e asciutto.
Se le superfici sono molto sporche, usare un panno mor-
bido immerso in una soluzione di acqua e sapone o in una
soluzione detergente debole.
≥Per pulire l’apparecchio non si deve mai usare alcol, di-
luenti per vernici o benzina.
≥Prima di usare un panno trattato chimicamente, leggere
con cura le istruzioni che lo accompagnano.
FRANÇAIS
Ecoute de la radio D
∫ Pour régler l’antenne
FM–a Prolongez le cordon de l’antenne FM et modifiez-
en l’orientation.
AM–b
∫ Pour éteindre l’appareil
Régler le sélecteur [SELECTOR] sur OFF.
Utilisation de l’appareil comme réveil E
L’alarme s’arrête automatiquement après 2 heures en-
viron.
a : Radio
b : Radio avec avertisseur sonore
Pour se réveiller avec la sonnerie à avertisseur sonore
uniquement, amener le réglage [VOLUME] sur MIN.
∫ Pour éteindre le réveil
Appuyez sur [DISP/CANCEL, ALARM]. (L’alarme est
désactivée, mais le réglage reste intact et, le jour suivant,
le réveil fonctionnera sur la base de ce réglage.)
∫ Pour vérifier l’heure du réveil
Appuyez sur [DISP/CANCEL, ALARM].
L’heure du réveil s’affiche alors que vous appuyez sur
[DISP/CANCEL, ALARM].
∫ Pour désactiver le réveil
Réglez [SELECTOR] sur OFF.
L’indicateur s’éteint.
∫ Pour dormir encore quelques minutes bien que le
réveil ait sonné (son de la radio ou sonnerie)
Appuyez sur [DOZE].
Le réveil sonne à nouveau 9 minutes plus tard.
Utilisation de la minuterie du sommeil F
On peut faire en sorte que la radio fonctionne pendant en-
viron 1 heure 59 minutes, puis qu’elle se mette hors ser-
vice automatiquement.
∫ Pour désactiver la minuterie
Appuyez sur [SLEEP CANCEL].
La radio s’éteint également.
Pour votre référence:
Vous pouvez associer le réveil (E) et la minuterie du
sommeil.
Entretien
∫ Si les surfaces sont sales
Pour nettoyer l’appareil, l’essuyer avec un chiffon
doux et sec.
Si les surfaces sont très sales, utiliser un chiffon doux
trempé dans une solution d’eau et de savon ou de déter-
gent doux.
≥Ne jamais utiliser d’alcool, diluant pour peinture ni de
benzine pour nettoyer l’appareil.
≥Avant d’utiliser un chiffon imprégné chimiquement, lire at-
tentivement les instructions qui accompagnent le chiffon.
ENGLISH
Listening to the radio D
∫ To adjust antenna
FM–a
AM–b
∫ To turn off
Set [SELECTOR] to OFF.
Using the unit as an alarm clock E
The alarm automatically shuts off in about 2 hours.
a : Radio alarm
b : Radio with buzzer alarm
When waking up with the buzzer alarm only, set
[VOLUME] to MIN.
∫ To shut off the alarm
Press [DISP/CANCEL, ALARM]. (The alarm is turned off
but the setting remains intact so the alarm will operate as
set the next day as well.)
∫ To check the alarm time
Press [DISP/CANCEL, ALARM].
The alarm time is displayed while [DISP/CANCEL,
ALARM] is pressed.
∫ To clear the alarm setting
Set [SELECTOR] to OFF.
The indicator goes off.
∫ To snooze a few more minutes even after the alarm
has sounded (sound of the radio or buzzer)
Press [DOZE].
The alarm sounds again 9 minutes later.
Using the sleep timer F
You can set the clock radio to play up to about 1 hour and
59 minutes, and shut off automatically.
∫ To release the timer
Press [SLEEP CANCEL].
The radio is also turned off.
For your reference:
You can combine the alarm clock (E) and sleep timer.
Maintenance
∫ If the surfaces are dirty
To clean this unit, wipe with a soft, dry cloth.
If the surfaces are extremely dirty, use a soft cloth dipped
in a soap-and-water solution or a weak detergent solution.
≥Never use alcohol, paint thinner or benzine to clean this
unit.
≥Before using chemically treated cloth, read the instruc-
tions that came with the cloth carefully.
DEUTSCH
Radio hören D
∫ Zum Ausrichten der Antenne
UKW–a Verlängern und ändern Sie die Ausrichtung des
UKW-Antennenkabels.
MW–b
∫ Zum Abschalten
[SELECTOR] auf OFF einstellen.
Verwendung des Geräts als Wecker E
Der Alarm schaltet sich nach etwa 2 Stunden selbständig
ab.
a : Radiowecker
b : Radio mit Summer-Weckart
Wenn ausschließlich die Summer-Weckart gewünscht ist,
den [VOLUME]-Regler auf MIN zurückdrehen.
∫ Zum Abschalten des Alarms
Drücken Sie [DISP/CANCEL, ALARM]. (Der Alarm schal-
tet sich ab, aber die Einstellung bleibt erhalten, so daß der
Wecker am nächsten Tag um die selbe Zeit angeht.)
∫ Zum Überprüfen der Weckalarmzeit
Drücken Sie [DISP/CANCEL, ALARM].
Die Weckzeit wird angezeigt, während [DISP/CANCEL,
ALARM] gedrückt wird.
∫ Zum Löschen der Weckzeit-Einstellung
Stellen Sie [SELECTOR] auf OFF.
Die Anzeige erlischt.
∫ Um noch ein paar Minuten zu schlummern, nach-
dem der Wecker bereits angegangen ist
(Radiowiedergabe oder Summer)
Drücken Sie [DOZE].
Der Wecker geht 9 Minuten später wieder an.
Gebrauch des Schlaf-Timers F
Das Uhrenradio kann so eingestellt werden, daß es
während der gewünschten Einschaltdauer (bis zu
1 Stunde 59 Minuten) eingeschaltet bleibt, um sich danach
automatisch auszuschalten.
∫ Um den Timer in Gang zu setzen
Drücken Sie [SLEEP CANCEL].
Das Radio wird dabei ebenfalls abgeschaltet.
Zu Ihrer Information:
Sie können die Weckuhr-Funktion (E) und den Schlaf-
Timer miteinander kombinieren.
Pflege und Instandhaltung
∫ Bei einer Verschmutzung der Außenflächen
Die Außenflächen mit einem weichen, trockenen Tuch
abreiben.
Bei starker Verschmutzung der Außenflächen ein weiches
Tuch in eine neutrale Seifenlösung tauchen.
≥Auf keinen Fall Alkohol, Farbverdünnere oder Benzin
zum Reinigen dieses Gerätes verwenden.
≥Vor Verwendung eines chemisch behandelten Reini-
gungstuch die dem Tuch beiliegende Gebrauchsanwei-
sung sorgfältig durchlesen.
b
a
FM
D
SELECTOR
ALARM
RADIO ON
OFF
RADIO
RADIO/BUZZER
FM AM BAND
MIN
VOLUME
MAX
TUNING
1
4
3
2
AM
ONLY FOR AUSTRALIA/NEW ZEALAND
WARRANTY
1. The product is warranted for labour and parts for twelve (12) months from the date of purchase.
2. This Warranty is for normal domestic use only and excludes any defect or injury caused by or resulting from mi-
suse, abuse, neglect, accidental damage, improper voltage, vermin infestation or any alteration which affects the
reliability or performance of the unit, not attributable to faulty manufacture, parts and labour.
3. This warranty does not cover the following items unless fault or defect being complained of existed at the time
of purchase.
(a) Video or Audio Tapes. (c) Shaver Heads or Cutters.
(b) Video or Audio Heads and Stylus resulting (d) Cabinet parts.
(b) from wear and tear in normal use. (e) Batteries.
4. If warranty service is required you should:
≥Contact your nearest Panasonic Authorised Service Centre.
≥Enclose a copy of your purchase receipt as proof of date of purchase.
≥Send or bring the product to Panasonic Authorised Service Centre. Warranty does not include any freight to and
from the user or insurance so please arrange this yourself.
≥Note that home service is available for following products in the Metropolitan area or the normal operating areas
of the nearest Authorised Service Centres.
≥Television Receivers (screen size greater than 39 cm) Microwave Ovens
≥Electronic Organs or Pianos Washing Machines
≥Refrigerators Air Conditioners
5. Four years additional limited warranty covers compressors in Refrigerators. This additional warranty is limited to
the cost of replacement parts only and does not cover any labour.
6. The warranties hereby conferred do not extend to any costs associated with the delivery, handling, freighting or
transportation of the product or any part thereof or replacement of and do not extend to any damage or loss oc-
curring during, or associated with, transit.
Unless otherwise specified to the consumer the benefits conferred by this express warranty are additional to all
other conditions, warranties, guarantees, rights and remedies expressed or implied by the Trade Practices Act 1974
and similar consumer protection provisions contained in legislation of the States and Territories and all other obliga-
tions and liabilities on the part of the manufacturer or supplier and nothing contained herein shall restrict or modi-
fy such rights, remedies, obligations or liabilities.
THIS WARRANTY CARD SHOULD BE RETAINED BY THE CUSTOMER AT ALL TIMES
IF YOU REQUIRE ASSISTANCE REGARDING WARRANTY CONDITIONS,
OR ANY OTHER ENQUIRIES, PLEASE TELEPHONE:
PANASONIC CUSTOMER CARE CENTRE 132 600
PANASONIC AUSTRALIA PTY. LIMITED OFFICE LOCATIONS:
NEW SOUTH WALES
1 Garigal Road, Belrose, N.S.W. 2085
VICTORIA
1 Caribbean Drive, Scoresby. VIC. 3179
SOUTH AUSTRALIA
125 Port Road, Hindmarsh S.A. 5007
WESTERN AUSTRALIA
37 Kewdale Road, Kewdale. W.A. 6105
QUEENSLAND
494 Nudgee Road, Hendra, QLD. 4011
NEW ZEALAND FISHER & PAYKEL LTD
PANASONIC DIVISION 37 CARBINE ROAD MT WELLINGTON
Extra
Heavy Duty
SIZE
D
Alkaline
SIZE
Heavy Duty
SIZE
D
RADIO
RADIO/BUZZER RADIO
RADIO/BUZZER
RADIO
RADIO/BUZZER
RADIO
RADIO/BUZZER
Radio dial
To household
mains socket
Extend and change the
direction of the FM antenna.
Seite wird geladen ...
-
 1
1
-
 2
2
-
 3
3
-
 4
4


Panasonic RC6266 Bedienungsanleitung
- Kategorie
- Radios
- Typ
- Bedienungsanleitung
in anderen Sprachen
- English: Panasonic RC6266 Operating instructions
- français: Panasonic RC6266 Mode d'emploi
- español: Panasonic RC6266 Instrucciones de operación
- italiano: Panasonic RC6266 Istruzioni per l'uso
- Nederlands: Panasonic RC6266 Handleiding
- dansk: Panasonic RC6266 Betjeningsvejledning
- svenska: Panasonic RC6266 Bruksanvisningar