
IAN 306785
LED-AUFBAULEUCHTE / LED
WALL LIGHT / LAMPE LED POUR
MONTAGE EN SAILLIE
LED-AUFBAULEUCHTE
Montage-, Bedienungs- und Sicherheitshinweise
LED WALL LIGHT
Assembly, operating and safety instructions
LAMPE LED POUR
MONTAGE EN SAILLIE
Instructions de montage, d‘utilisation et
consignes de sécurité
LED-OPBOUWLAMP
Montage-, bedienings- en veiligheidsinstructies
LED SVÍTIDLO
Pokyny k montáži, obsluze a bezpečnostní pokyny
LED SVIETIDLO
Návod na montáž a obsluhu a bezpečnostné pokyny
LAMPA LED
Wskazówki dotyczące montażu, obsługi i bezpieczeństwa

DE / AT / CH Montage-, Bedienungs-
und Sicherheitshinweise Seite 5
GB / IE Assembly, operating
and safety instructions Page 13
FR / BE Instructions de montage,
d‘utilisation et consignes
de sécurité Page 20
NL / BE Montage-, bedienings-
en veiligheidsinstructies Pagina 27
PL Wskazówki dotyczące
montażu, obsługi i
bezpieczeństwa Strona 34
CZ Pokyny pro montáž,
obsluhu a bezpečnost Strana 42
SK Návod na montáž a
obsluhu a bezpečnostné
pokyny Strana 49

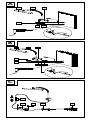
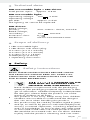
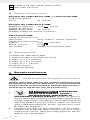
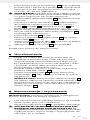
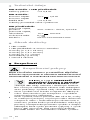
A
1 2 3
45
B
6
1 2 3
8
4 7
6
C
10 12 1311
9


5 DE/AT/CH
Legende der verwendeten
Piktogramme .........................................Seite 6
Einleitung ................................................... Seite 6
Bestimmungsgemäße Verwendung ..............Seite 6
Teilebeschreibung .........................................Seite 6
Technische Daten ..........................................Seite 7
Lieferumfang .................................................. Seite 7
Sicherheit ................................................... Seite 7
Sicherheitshinweise .......................................Seite 7
Vor der Inbetriebnahme ..............Seite 9
Montage .....................................................Seite 9
Produkt an einer Holzwand anbringen .......Seite 9
Produkt auf einer Betonwand anbringen .....Seite 10
Inbetriebnahme ................................... Seite 10
Wartung und Reinigung ...............Seite 10
Entsorgung ...............................................Seite 11
Garantie .....................................................Seite 11

6 DE/AT/CH
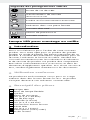
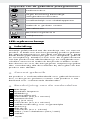
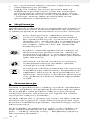
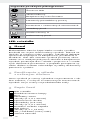
Legende der verwendeten Piktogramme
LED-Lebensdauer
Kurzschlussfester
Sicherheitstransformator
Unabhängiges Betriebsgerät
Gebrauch in geschlossenen Räumen
Wechselstrom
Schutzklasse II
Gleichstrom
LED-Aufbauleuchte
Einleitung
Wir beglückwünschen Sie zum Kauf Ihres neuen Produkts.
Sie haben sich damit für ein hochwertiges Produkt ent-
schieden. Die Bedienungsanleitung ist Teil dieses Pro-
dukts. Sie enthält wichtige Hinweise für Sicherheit,
Gebrauch und Entsorgung. Machen Sie sich vor der
Benutzung des Produkts mit allen Bedien- und Sicher-
heitshinweisen vertraut. Benutzen Sie das Produkt nur
wie beschrieben und für die angegebenen Einsatzbe-
reiche. Händigen Sie alle Unterlagen bei Weitergabe
des Produkts an Dritte mit aus.
Bestimmungsgemäße
Verwendung
Dieses Produkt ist ausschließlich zur Verwendung im
Innenbereich, in trockenen und geschlossenen Räumen
vorgesehen. Das Produkt ist nicht für den gewerblichen
Einsatz bestimmt.
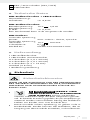
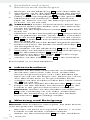
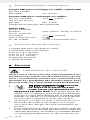
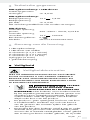
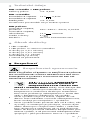
Teilebeschreibung
1 LED-Leuchte
2 Flexibler Lampenarm
3 Abdeckung
4 Montagebügel
5 Schrauben (ø 3,5 x 20 mm)
6 Feststellschraube
7 Dübel (ø 6 mm)
8 Schrauben (ø 3,5 x 25 mm)
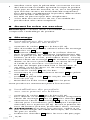
9 Kleinspannungssteckverbindung
10 LED-Treiber
11 Schrauben (ø 3 x 15 mm)

7 DE/AT/CH
12 EIN- / AUS-Schalter (ON / OFF)
13 Netzstecker
Technische Daten
LED-Aufbauleuchte + LED-Treiber
Gesamtleistungs-
aufnahme: ca. 4,8 W
LED-Aufbauleuchte:
Betriebsspannung: 12 V , 3,6 W
Betriebsspannung
je LED: ca. 0,5 W
Das Leuchtmittel kann nicht ausgetauscht werden.
LED-Treiber:
nominale Spannung,
primär: 220–240 V∼ 50 Hz, 0,035 A
nominale Spannung,
sekundär: 12 V , 300 mA
Schutzklasse: II /
Modell-Nr.: GY-CC12V300mA-L-003
Lieferumfang
1 LED-Aufbauleuchte
1 LED-Treiber mit Netzstecker
4 Schrauben (ø 3,5 x 25 mm)
4 Schrauben (ø 3,5 x 20 mm)
2 Schrauben (ø 3 x 15 mm)
4 Dübel (ø 6 mm)
1 Bedienungsanleitung
Sicherheit
Sicherheitshinweise
LESEN SIE DIE ANLEITUNG VOR DER VERWENDUNG
DES ARTIKELS! BEWAHREN SIE ALLE SICHERHEITS-
HINWEISE UND ANWEISUNGEN FÜR DIE ZU-
KUNFT AUF!
LEBENS- UND
UNFALLGEFAHR FÜR KLEINKINDER
UND KINDER! Lassen Sie Kinder
niemals unbeaufsichtigt mit dem Verpackungsmate-
rial. Es besteht Erstickungsgefahr durch Verpacku
ngs-
material. Kinder unterschätzen häufig die Gefahren.
Halten Sie Kinder stets vom Produkt fern.
Dieses Produkt ist kein Spielzeug, es gehört nicht in
Kinderhände. Kinder können die Gefahren, die im
Umgang mit dem Produkt entstehen, nicht erkennen.

8 DE/AT/CH
Dieses Produkt kann von Kindern ab 8 Jahren und
darüber sowie von Personen mit verringerten phy-
sischen, sensorischen oder mentalen Fähigkeiten
oder Mangel an Erfahrung und Wissen benutzt
werden, wenn sie beaufsichtigt oder bezüglich des
sicheren Gebrauchs des Produkts unterwiesen wur-
den und die daraus resultierenden Gefahren ver-
stehen. Kinder dürfen nicht mit dem Produkt spielen.
Reinigung und Benutzerwartung dürfen nicht von
Kindern ohne Beaufsichtigung durchgeführt werden.
Das Produkt ist ausschließlich für den
Betrieb im Innenbereich, in trockenen
und geschlossenen Räumen geeignet.
Das Produkt ist nicht zur Befestigung an röhrenför-
migen Gegenständen geeignet. Andernfalls kann d
as
Produkt herunterfallen. Beschädigungen des Prod
ukts
und / oder Verletzungen können die Folgen sein.
Vermeiden Sie Lebensgefahr
durch elektrischen Schlag!
Vergewissern Sie sich vor der Benutzung, dass die
vorhandene Netzspannung mit der benötigten
Betriebsspannung des Produkts übereinstimmt
(220–240 V∼).
Überprüfen Sie vor jedem Netz anschluss das Pro-
dukt und das Netzanschlusskabel auf etwaige Be-
schädigungen. Ein beschädigtes Produkt bedeutet
Lebensgefahr durch elektrischen Schlag.
Verwenden Sie das Produkt nicht, wenn Sie irgend-
welche Beschädigungen feststellen.
Wenden Sie sich bei Beschädigungen, Reparaturen
oder anderen Problemen am Produkt an eine Elekt-
rofachkraft.
Öffnen Sie niemals eines der elektrischen Betriebs-
mittel oder stecken irgendwelche Gegenstände in
dieselben. Derartige Eingriffe bedeuten Lebensge-
fahr durch elektrischen Schlag.
Vermeiden Sie unbedingt die Berührung des Produkts
mit Wasser oder anderen Flüssigkeiten.
Schützen Sie das Netzanschlusskabel vor scharfen
Kanten, mechanischen Belastungen und heißen
Oberflächen.
Benutzen Sie das Produkt niemals in unmittelbarer
Nähe einer Badewanne, einer Dusche oder eines
Schwimmbeckens.
Blicken Sie nicht in den direkten oder reflektierten
Strahl des Produkts. Richten Sie den Strahl des
Produkts nicht direkt auf Personen. Dies könnte zu
Blendungen führen, durch die Unfälle verursacht
werden.
Falls Sie der direkte oder reflektierte Strahl des
Produkts ins Auge trifft, schließen Sie die Augen
bewusst und bewegen Sie den Kopf sofort aus
dem Strahl.
Betreiben Sie das Produkt nur mit dem mitgelieferten
LED-Treiber. Beachten Sie, dass Beschädigungen

9 DE/AT/CH
durch die Verwendung eines anderen LED-Treibers
von der Garantie ausgeschlossen sind.
Fassen Sie den Netzstecker 13 niemals mit feuchten
oder nassen Händen an.
Wenn Sie das Produkt längere Zeit nicht verwen-
den (z. B. während des Urlaubs), ziehen Sie den
Netzstecker 13 aus der Steckdose.
Die LEDs werden während des Betriebs heiß. Lassen
Sie Produkt und die LEDs abkühlen, bevor Sie sie
berühren.
Beachten Sie, dass der LED-Treiber auch ohne Be-
trieb des Produkts noch eine geringe Leistung auf-
nimmt, solange sich der Netzstecker in der Steckdo
se
befindet. Zum vollständigen Ausschalten des Prod
ukts,
entfernen Sie den Netzstecker aus der Steckdose.
Die LEDs sind nicht austauschbar.
Sollten die LEDs am Ende ihrer Lebensdauer aus-
fallen, muss das ganze Produkt ersetzt werden.
Vor der Inbetriebnahme
Hinweis: Entfernen Sie sämtliches Verpackungsmate-
rial vom Produkt.
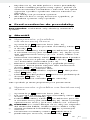
Montage
Produkt an einer
Holzwand anbringen
Bewegen Sie die Abdeckung
3
nach oben (Abb. A).
Um das Produkt zu montieren, verwenden Sie den
Montagebügel 4 und die Schrauben 5.
Halten Sie den Montagebügel
4
an die gewünschte
Oberfläche und markieren Sie die Bohrlöcher
(Abb. A). Bohren Sie nun die Befestigungslöcher
(ø ca. 2 mm, ca. 17 mm tief).
Platzieren Sie den Montagebügel 4 entsprechend
der vorgebohrten Löcher und ziehen Sie die Schrau-
ben
5
mit Hilfe eines Kreuzschlitz-Schraubendreh
ers
fest an (Abb. A).
Der Leuchtenarm kann bei Bedarf festgestellt werden.
Drehen Sie hierzu die beiden Feststellschrauben 6
am Drehgelenk fest.
Verschieben Sie die Abdeckung 3 nach unten.
Verbinden Sie die Kleinspannungssteckverbindung
9 mit dem LED-Treiber 10 (Abb. C).
Montieren Sie den LED-Treiber 10 mit den mitge-
lieferten Schrauben 11 (Abb. C).
Stecken Sie den Netzstecker 13 in die Steckdose.
Ihr Produkt ist nun betriebsbereit.

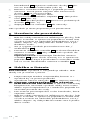
10 DE/AT/CH
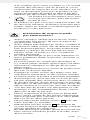
Produkt auf einer
Betonwand anbringen
Bewegen Sie die Abdeckung
3
nach oben (Abb. B)
.
Verwenden Sie für die Wandmontage den Monta-
gebügel 4, die Schrauben 8 und die Dübel 7.
Halten Sie den Montagebügel
4
an die gewünschte
Oberfläche und markieren Sie die Bohrlöcher
(Abb. B). Bohren Sie nun die Befestigungslöcher
(ø 6 mm, ca. 30 mm tief).
VORSICHT! Achten Sie beim Bohren darauf, dass
Sie keine elektrischen Kabel, Gas- oder Wasserlei-
tungen beschädigen.
Führen Sie die mitgelieferten Dübel 7 in die Bohr-
löcher ein.
Platzieren Sie den Montagebügel 4 entsprechend
der vorgebohrten Löcher, setzen Sie die Schrauben
8 in die Dübel 7 ein und ziehen Sie die Schrau-
ben 8 mit Hilfe eines
Kreuzschlitz-Schraubendreh
ers
fest an (Abb. B).
D
er Leuchtenarm kann bei Bedarf festgestellt werden
.
Drehen Sie hierzu die beiden Feststellschrauben 6
am Drehgelenk fest.
Verschieben Sie die Abdeckung 3 nach unten.
Verbinden Sie die Kleinspannungssteckverbindung
9 mit dem LED-Treiber 10 (Abb. C).
Montieren Sie den LED-Treiber 10 mit den mitge-
lieferten Schrauben 11 (Abb. C).
Stecken Sie den Netzstecker 13 in die Steckdose.
Ihre Produkt ist nun betriebsbereit.
Inbetriebnahme
Richten Sie den LED-Strahl niemals auf reflektieren-
de Flächen, Menschen oder Tiere. Andernfalls
können Augenreizungen und / oder Blindheit bei
Mensch und Tier die Folgen sein. Bereits ein schwa-
cher LED-Strahl kann zu Augenschäden führen.
Schalten Sie das Produkt mit dem EIN / AUS-Schal-
ter 12 ein und aus.
Stellen Sie den Winkel der LED-Leuchte 1 ein und
biegen Sie den flexiblen Leuchtenarm 2, um das
Produkt in die gewünschte Position zu bringen.
Hinweis: Drehen Sie den flexiblen Leuchtennarm
2 nicht vollständig um sich selbst. Andernfalls
könnte die Netzleitung im Inneren des flexiblen
Leuchtenarms 2 beschädigt werden.
Wartung und Reinigung
Hinweis: Das Produkt ist wartungsfrei. Die LEDs können
nicht ausgetauscht werden.
Benutzen Sie keine Lösungsmittel, Benzin o. ä. Das
Produkt würde hierbei Schaden nehmen.
Ziehen Sie den Netzstecker 13 aus der Steckdose.

11 DE/AT/CH
VORSICHT! STROMSCHLAGGEFAHR! Aus
Gründen der elektrischen Sicherheit darf das Pro-
dukt niemals mit Wasser oder anderen Flüssigkeiten
gereinigt oder gar in Wasser getaucht werden.
Verwenden Sie zur Reinigung nur ein trockenes,
fusselfreies Tuch.
Richten Sie den LED-Strahl niemals auf reflektierende
Flächen, Menschen oder Tiere. Andernfalls können
Augenreizungen und / oder Blindheit bei Mensch
und Tier die Folgen sein. Bereits ein schwacher
LED-Strahl kann zu Augenschäden führen.
Entsorgung
Die Verpackung besteht aus umweltfreundlichen Mate-
rialien, die Sie über die örtlichen Recyclingstellen ent-
sorgen können.
b
a
Beachten Sie die Kennzeichnung der Verpa-
ckungsmaterialien bei der Abfalltrennung,
diese sind gekennzeichnet mit Abkürzungen
(a) und Nummern (b) mit folgender Bedeu-
tung: 1–7: Kunststoffe / 20–22: Papier und
Pappe / 80–98: Verbundstoffe.
Das Produkt und die Verpackungsmaterialien
sind recycelbar, entsorgen Sie diese getrennt
für eine bessere Abfallbehandlung. Das
Triman-Logo gilt nur für Frankreich.
Möglichkeiten zur Entsorgung des ausge-
dienten Produkts erfahren Sie bei Ihrer
Gemeinde- oder Stadtverwaltung.
Werfen Sie Ihr Produkt, wenn es ausgedient
hat, im Interesse des Umweltschutzes nicht in
den Hausmüll, sondern führen Sie es einer
fachgerechten Entsorgung zu. Über Sammel-
stellen und deren Öffnungszeiten können
Sie sich bei Ihrer zuständigen Verwaltung
informieren.
Garantie
Das Produkt wurde nach strengen Qualitätsrichtlinien
sorgfältig produziert und vor Anlieferung gewissenhaft
geprüft. Im Falle von Mängeln dieses Produkts stehen
Ihnen gegen den Verkäufer des Produkts gesetzliche
Rechte zu. Diese gesetzlichen Rechte werden durch un-
sere im Folgenden dargestellte Garantie nicht einge-
schränkt.
Sie erhalten auf dieses Produkt 3 Jahre Garantie ab
Kaufdatum. Die Garantiefrist beginnt mit dem Kaufda-
tum. Bitte bewahren Sie den Original-Kassenbon gut
auf. Diese Unterlage wird als Nachweis für den Kauf
benötigt.

12 DE/AT/CH
Tritt innerhalb von 3 Jahren ab dem Kaufdatum dieses
Produkts ein Material- oder Fabrikationsfehler auf, wird
das Produkt von uns – nach unserer Wahl – für Sie
kostenlos repariert oder ersetzt. Diese Garantie ver-
fällt, wenn das Produkt beschädigt, nicht sachgemäß
benutzt oder gewartet wurde.
Die Garantieleistung gilt für Material- oder Fabrikations-
fehler. Diese Garantie erstreckt sich nicht auf Produkt-
teile, die normaler Abnutzung ausgesetzt sind (z. B.
Batterien) und daher als Verschleißteile angesehen
werden können oder Beschädigungen an zerbrechli-
chen Teilen, z. B. Schalter, Akkus oder die aus Glas
gefertigt sind.

13 GB/IE
List of pictograms used .................. Page 14
Introduction ............................................. Page 14
Intended use .................................................. Page 14
Parts description ............................................Page 14
Technical data ............................................... Page 15
Scope of delivery ..........................................Page 15
Safety ...........................................................Page 15
Safety instructions ..........................................Page 15
Before use .................................................Page 17
Installation ...............................................Page 17
Mounting the product on wooden wall ....... Page 17
Mounting the product on concrete wall ......Page 17
Start-up .......................................................Page 18
Maintenance and cleaning ......... Page 18
Disposal ......................................................Page 18
Warranty ................................................... Page 19

14 GB/IE
List of pictograms used
LED lifespan
Short-circuit-proof
Safety isolating transformer
Separate control unit
Use indoors
Alternating current
Safety class II
Direct current
LED Wall Lightt
Introduction
We congratulate you on the purchase of your new
product. You have chosen a high quality product. The
instructions for use are part of the product. They con-
tain important information concerning safety, use and
disposal. Before using the product, please familiarise
yourself with all of the safety information and instruc-
tions for use. Only use the product as described and
for the specified applications. If you pass the product
on to anyone else, please ensure that you also pass on
all the documentation with it.
Intended use
This product is intended for indoor use in dry and
enclosed rooms only. The product is not intended for
commercial use.
Parts description
1 LED light
2 Flexible lamp arm
3 Cover
4 Mounting bracket
5 Screws (ø 3.5 x 20 mm)
6 Locking screw
7 Wall plug (ø 6 mm)
8 Screws (ø 3.5 x 25 mm)
9 Low voltage plug connection
10 LED driver
11 Screws (ø 3 x 15 mm)
12 ON / OFF switch
13 Mains plug

15 GB/IE
Technical data
LED mountable light + LED driver
Total power input: approx. 4.8 W
LED mountable light:
Operating voltage: 12V , 3.6 W
Operating voltage
per LED: approx. 0.5 W
The lighting set cannot be replaced.
LED driver:
Rated voltage,
primary: 220–240 V∼ 50 Hz, 0.035 A
Rated voltage,
secondary: 12 V , 300 mA
Protection class: II /
Model no.: GY-CC12V300mA-L-003
Scope of delivery
1 LED mountable light
1 LED driver with mains plug
4 Screws (ø 3.5 x 25 mm)
4 Screws (ø 3.5 x 20 mm)
2 Screws (ø 3 x 15 mm)
4 Wall plugs (ø 6 mm)
1 Operating instructions
Safety
Safety instructions
READ THESE INSTRUCTIONS BEFORE USING
THE PRODUCT! PLEASE KEEP ALL SAFETY IN-
STRUCTIONS AND INSTRUCTIONS FOR USE
FOR FUTURE REFERENCE!
DANGER TO LIFE
AND RISK OF ACCIDENT FOR
INFANTS AND CHILDREN! Never
leave children unsupervised with the packaging
material. The packaging material represents a dan-
ger of suffocation. Children frequently underestimate
the dangers. Please keep the product out of the
reach of children at all times.
This product is not a toy. Keep away from children.
Children are not able to understand the dangers
that can arise when handling this product.
This product may be used by children aged 8 years
and up, as well as by persons with reduced physica
l,
sensory or mental capacities, or lacking experience
and / or knowledge, so long as they are supervised
or instructed in the safe use of the product and un-
derstand the associated risks. Do not allow children
to play with the product. Cleaning and user main-

16 GB/IE
tenance should not be performed by children
without supervision.
This product is solely suitable for use in
dry, closed indoor spaces.
The product is not suitable for attaching to tubular
objects. The product may otherwise fall. This can
result in product damage and / or injuries.
Avoid the danger of
death from electric shock!
Verify the existing mains voltage corresponds to
the required voltage of the product (220–240 V∼)
before using it.
Always check the product and the mains supply
for damage before connecting it to the mains. A
damaged product represents the danger of death
from electric shock.
Do not use the product if you detect any damage.
In the event of damage, repairs or other problems
with the product, please consult an electrician.
Never open any of the components of the electrical
equipment or insert any objects into the same com-
ponents. This will pose a risk of fatal injury from
electric shock.
Never allow the product to come into contact with
water or other liquids.
Protect the power cord from sharp edges, mechanical
strain and hot surfaces.
Never use the product in immediate vicinity of a
bath, shower or swimming pool.
Do not look directly into the light or its reflection.
Do not aim the light directly at people. This could
produce glare, leading to accidents.
I
f direct or reflected light strikes your eyes, close the
m
and immediately move your head out of the light.
Only operate the product with the included LED
driver. Please note that any damage caused by
the use of a different LED driver is excluded from
the warranty.
Never touch the mains plug 13 with damp or wet
hands.
If the product will not be used for extended
periods (e.g. during holidays), unplug the mains
plug 13 from the socket.
The LEDs becomes hot during operation. Allow the
product and LEDs to cool down before you touch them.
Please note, the LED driver will continue to draw a
small amount of electricity even without the product
being operated so long as the mains plug is
plugged into the socket. Unplug from the socket to
switch the product off completely.
The LEDs are not replaceable.
If the LEDs fail at the end of their lives, the entire
product must be replaced.

17 GB/IE
Before use
Note: Remove all packaging materials from the product.
Installation
Mounting the product
on wooden wall
Move the cover 3 upward (Fig. A).
Use the mounting bracket 4 and screws 5 to
mount the product.
Hold the mounting bracket 4
against the desired
surface and mark the drill holes (Fig. A). Now drill
the mounting holes (ø approx. 2 mm, approx.
17 mm deep).
Position the mounting bracket 4
according to the
predrilled holes and tighten the screws 5 by a
cross tip screwdriver (Fig. A).
The lamp arm can be fixed, if desired. To do so,
tighten the two locking screws 6 on the swivel joint.
Move the cover 3 downward.
Connect the low voltage plug connection 9 with
the LED driver 10 (Fig. C).
Mount the LED driver 10
using the included screws
11 (Fig. C).
Plug the mains plug 13 into the mains socket.
Your product is now ready to use.
Mounting the product
on concrete wall
Move the cover 3 upward (Fig. B).
Use the mounting bracket 4, screws 8 and the
wall plugs 7 for wall mounting.
Hold the mounting bracket 4
against the desired
surface and mark the drill holes (Fig. B). Now drill
the mounting holes (ø 6 mm, approx. 30 mm deep).
CAUTION! Ensure that you do not damage any
electrical cables, gas or water pipes when you
drill into the wall.
Insert the included wall plugs 7
into the bores.
Position the mounting bracket 4
according to the
predrilled holes, insert the screws 8
into the wall
plugs 7, and tighten the screws 8 by a cross tip
screwdriver (Fig. B).
The lamp arm can be fixed, if desired. To do so,
tighten the two locking screws 6 on the swivel joint.
Move the cover 3 downward.
Connect the low voltage plug connection 9 with
the LED driver 10 (Fig. C).
Mount the LED driver 10
using the included screws
11 (Fig. C).
Plug the mains plug 13 into the mains socket.
Your product is now ready to use.

18 GB/IE
Start-up
Never aim the LED beam at reflective surfaces,
people or animals. Failure to observe this advice
may result in eye irritation and / or blindness in
humans and animals. Even a weak LED light beam
can cause eye damage.
Switch the product on and off using the ON / OFF
switch 12 .
Adjust the angle of the LED light 1 and bend the
flexible lamp arm 2 to move the product into the
desired position.
Note: Do not fully rotate the flexible lamp arm 2.
Otherwise the mains lead inside the flexible lamp
arm 2 could be damaged.
Maintenance and cleaning
Note: The product requires no maintenance. The LEDs
cannot be replaced.
Do not use solvents, benzene or similar substances.
They could damage the product.
Unplug the mains plug 13 from the socket.
CAUTION! RISK OF ELECTRIC SHOCK! For
electrical safety, never clean the product with water
or other liquids, or immerse it in water.
Only use a dry, lint-free cloth for cleaning.
Never aim the LED beam at reflective surfaces,
people or animals. Failure to observe this advice
may result in eye irritation and / or blindness in
humans and animals. Even a weak LED light beam
can cause eye damage.
Disposal
The packaging is made entirely of recyclable materials,
which you may dispose of at local recycling facilities.
b
a
Observe the marking of the packaging ma-
terials for waste separation, which are marked
with abbreviations (a) and numbers (b) with
following meaning: 1–7: plastics / 20–22:
paper and fibreboard / 80–98: composite
materials.
The product and packaging materials are
recyclable, dispose of it separately for bet-
ter waste treatment. The Triman logo is valid
in France only.
Contact your local refuse disposal authority
for more details of how to dispose of your
worn-out product.

19 GB/IE
To help protect the environment, please dis-
pose of the product properly when it has
reached the end of its useful life and not in
the household waste. Information on collec-
tion points and their opening hours can be
obtained from your local authority.
Warranty
The product has been manufactured to strict quality
guidelines and meticulously examined before delivery.
In the event of product defects you have legal rights
against the retailer of this product. Your legal rights are
not limited in any way by our warranty detailed below.
The warranty for this product is 3 years from the date
of purchase. Should this product show any fault in ma-
terials or manufacture within 3 years from the date of
purchase, we will repair or replace it – at our choice –
free of charge to you.
The warranty period begins on the date of purchase.
Please keep the original sales receipt in a safe location.
This document is required as your proof of purchase.
This warranty becomes void if the product has been
damaged, or used or maintained improperly.
The warranty applies to defects in material or manu-
facture. This warranty does not cover product parts
subject to normal wear, thus possibly considered
consumables (e.g. batteries) or for damage to fragile
parts, e.g. switches, rechargeable batteries or glass
parts.

20 FR/BE
Légende des
pictogrammes utilisés ..................... Page 21
Introduction ............................................. Page 21
Utilisation conforme ......................................Page 21
Descriptif des pièces .....................................Page 21
Caractéristiques techniques ..........................Page 22
Contenu de la livraison .................................Page 22
Sécurité .......................................................Page 22
Indications de sécurité ..................................Page 22
Avant la mise en service ...............Page 24
Montage .....................................................Page 24
Installation du produit sur une
paroi en bois .................................................Page 24
Installation du produit sur une
paroi en béton ...............................................Page 24
Mise en service .....................................Page 25
Entretien et nettoyage....................Page 25
Mise au rebut ......................................... Page 26
Garantie .....................................................Page 26
Seite wird geladen ...
Seite wird geladen ...
Seite wird geladen ...
Seite wird geladen ...
Seite wird geladen ...
Seite wird geladen ...
Seite wird geladen ...
Seite wird geladen ...
Seite wird geladen ...
Seite wird geladen ...
Seite wird geladen ...
Seite wird geladen ...
Seite wird geladen ...
Seite wird geladen ...
Seite wird geladen ...
Seite wird geladen ...
Seite wird geladen ...
Seite wird geladen ...
Seite wird geladen ...
Seite wird geladen ...
Seite wird geladen ...
Seite wird geladen ...
Seite wird geladen ...
Seite wird geladen ...
Seite wird geladen ...
Seite wird geladen ...
Seite wird geladen ...
Seite wird geladen ...
Seite wird geladen ...
Seite wird geladen ...
Seite wird geladen ...
Seite wird geladen ...
Seite wird geladen ...
Seite wird geladen ...
Seite wird geladen ...
Seite wird geladen ...
-
 1
1
-
 2
2
-
 3
3
-
 4
4
-
 5
5
-
 6
6
-
 7
7
-
 8
8
-
 9
9
-
 10
10
-
 11
11
-
 12
12
-
 13
13
-
 14
14
-
 15
15
-
 16
16
-
 17
17
-
 18
18
-
 19
19
-
 20
20
-
 21
21
-
 22
22
-
 23
23
-
 24
24
-
 25
25
-
 26
26
-
 27
27
-
 28
28
-
 29
29
-
 30
30
-
 31
31
-
 32
32
-
 33
33
-
 34
34
-
 35
35
-
 36
36
-
 37
37
-
 38
38
-
 39
39
-
 40
40
-
 41
41
-
 42
42
-
 43
43
-
 44
44
-
 45
45
-
 46
46
-
 47
47
-
 48
48
-
 49
49
-
 50
50
-
 51
51
-
 52
52
-
 53
53
-
 54
54
-
 55
55
-
 56
56


in anderen Sprachen
- français: LIVARNO 306785 Le manuel du propriétaire
- Nederlands: LIVARNO 306785 de handleiding
- slovenčina: LIVARNO 306785 Návod na obsluhu
- polski: LIVARNO 306785 Instrukcja obsługi
Verwandte Artikel
-
LIVARNO 314790 Bedienungsanleitung
-
-
-
-
-
-
-
-
-