
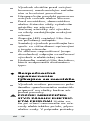
IAN 91935
LED LIGHTSTRIP KIT
LED LIGHTSTRIP KIT
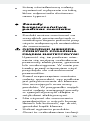
Operation and Safety Notes
LED FÉNYSOR
Kezelési és biztonsági utalások
SADA LED SVĚTELNÝCH LIŠT
Pokyny pro obsluhu a bezpečnostní pokyny
LED-LICHTLEISTEN-SET
Bedienungs- und Sicherheitshinweise
KOMPLET LISTW ŚWIETLNYCH-LED
Wskazówki dotyczące obsługi i bezpieczeństwa
KOMPLET LED SVETILNIH LETEV
Navodila za upravljanje in varnostna opozorila
SÚPRAVA LED SVETELNÝCH LÍŠT
Pokyny pre obsluhu a bezpečnostné pokyny

GB Operation and Safety Notes Page 6
PL Wskazówki dotyczące obsługi i bezpieczeństwa Strona 16
HU Kezelési és biztonsági utalások Oldal 28
SI Navodila za upravljanje in varnostna opozorila Stran 38
CZ Pokyny pro obsluhu a bezpečnostní pokyny Strana 50
SK Pokyny pre obsluhu a bezpečnostné pokyny Strana 60
DE / AT / CH Bedienungs- und Sicherheitshinweise Seite 71

3
B
A
C
1
2

4
D
F
ca./approx. 20 cm
Ø 6 mm
E3 4
5
8
6
7

5
G
8
H
1
MAX.
3x

6 GB
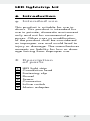
Introduction
Intended use .................. Page 7
Description of parts ....... Page 7
Technical details ............Page 8
Included items ...............Page 8
Safety
information ..............Page 9
Safety advice for
installation ...............Page 12
Installation
Mounting the product
on a cupboard ..............Page 13
Mounting the product
on a wall ........................Page 14
Operation .................Page 14
Cleaning
and care .....................Page 15
Disposal ...................... Page 15

7 GB
LED lightstrip kit
Introduction
Intended use
This product is suitable for use in-
doors. This product is intended for
use in private, domestic enviroment
only and not for commercial pur-
poses. Other uses or modification
of the product shall be considered
as improper use and could lead to
injury or damage. The manufacturer
accepts no liability for loss or dam-
age arising from improper use.
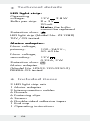
Description
of parts
1 LED light strip
2 Connection lead
3 Fastening clip
4 Dowel
5 Screw
6 Connector
7 In-line switch
8 Mains adapter

8 GB
Technical details
LED light strip:
Operating
voltage: 12 V 2.8 W
Bulbs per strip: 9 x 3 V
20 mA
Note: the bulbs
cannot be replaced
Protection class:
LED light strip (Model No. Z31289)
TÜV / GS tested.
Mains adapter:
Nom. voltage,
primary: 100–240 V∼,
50 - 60 Hz
Nom. voltage,
secondary: 12 V ,
0.25 A, 3 W
Protection class:
Mains adapter
(Model No. LPS03-120-0250-2)
DEKRA GS tested.
Included items
3 LED light strip sets
1 Mains adapter
3 Interconnection cables
6 Dowels
6 Fastening clips
6 Screws
6 Double-sided adhesive tapes
1 End cap
1 Operating instructions

9 GB
Safety
information
In the case of damage resulting
from non-compliance with these
operating instructions the guarantee
claim becomes invalid! No liability
is accepted for consequential dam-
age! In the case of material damage
or personal injury caused by incor-
rect handling or non-compliance with
the safety instructions, no liability is
accepted!
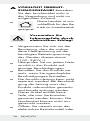
DANGER OF
DEATH AND
ACCIDENTS FOR TODDLERS
AND CHILDREN! Never
leave children unsupervised with
the packaging material. The
packaging material represents
a danger of suffocation. Children
frequently underestimate the
dangers. Please keep children
away from the device at all times.
This device is not a toy and
should not be played with by
children. Children are not able
to understand the dangers that
can occur when handling this
device.
This appliance can be used by
children aged from 8 years and
above and persons with reduced
physical, sensory or mental capa-
bilities or lack of experience and
knowledge if they have been
given supervision or instruction

10 GB
concerning use of the appliance
in a safe way and understand
the hazards involved. Children
shall not play with the appliance.
Cleaning and user maintenance
shall not be made by children
without supervision.
Ensure that the product is in-
stalled by suitably experienced
or qualified persons only.
Check before installation that
the supporting surface is suita-
ble for the fastenings and the
weight of the lighting product.
If you have any questions about
the product or are unsure about
any of its aspects, please seek
the advice of an electrical
equipment specialist.
Do not pull on the product
lead. Ensure that it is positioned
to avoid creating a trip hazard.
The product can be used on all
surfaces officially classified as
being of “normal flammability“.
Do not attach any other objects
to the product.
After use store the light fitting in
its original packaging to avoid
causing unintentional damage.
Ensure that the light fitting does
not present a trip hazard.
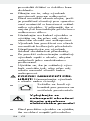
CAUTION! RISK OF OVER-
HEATING! Do not operate
the light fitting while it is still in
the packaging or rolled up.
This lamp is only
intended for use
indoors.

11 GB
Avoid the danger
of death from
electric shock!
Before use, ensure that the
mains voltage available is the
same as the required operating
voltage for the device
(100–240 V∼).
Before connecting to the mains,
always check the product for
any damage.
Never use the product if you
find damage of any kind.
The connecting cable cannot
be repaired! If the cable is
damaged, the product must be
taken out of use and disposed
of in the proper way.
This article does not contain
any parts which can be serviced
by the user. The bulbs cannot
be replaced.
Never open any of the electrical
parts or insert any kind of object
into them.
Protect the product from sharp
edges, mechanical loads and
hot surfaces.
Do not install with sharp
fasteners or nails.
Always remove the mains plug
from the socket before installing,
dismantling or cleaning.
Never touch the mains plug or
the product with moist or wet
hands.
Only connect the light strip to
supply adaptor.

12 GB
Use the lighting product with
only the components described
in these operating instructions.
Disconnect the lighting product
from the mains if you intend not
to use it for an extended period
(e.g. holiday).
LED light strip should only be
replaced with the same type of
light strip which is supplied with
this product.
Safety advice
for installation
The product can be mounted with
the supplied fastenings on to all
surfaces officially classified as
being of “normal flammability”.
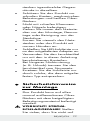
CAUTION! RISK OF
ELECTRIC SHOCK! Ensure
that you do not strike any elec-
trical cables, gas or water
pipes in the vicinity of where
you are drilling. If necessary,
check the area using a suitable
detector before you drill.
Before installation, check
whether the substrate is suitable
for the fastenings and can sup-
port the weight of the product.
If you are unsure about any
aspects of this step, please
seek the advice of an electrical
equipment specialist.
Do not use any sharp and / or
pointed objects, such as wire,

13 GB
nails or clamps, to fasten the
product in place.
Avoid bending the product.
Otherwise the insulation could
be damaged.
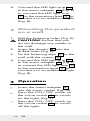
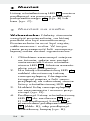
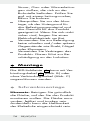
Installation
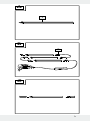
The LED strip light 1 can be con-
nected using a connection cable
2 (Fig. B) or without a connection
cable (Fig. C).
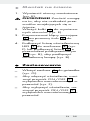
Mounting the product
on a cupboard
Note: Thoroughly clean the surface
on to which you intend to install the
product. The surface must be clean,
dry and free of grease. Otherwise
the self-adhesive foil may not stick
properly.
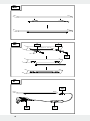
1. Using a pencil, mark the position
on the wall on to which you
intend to attach the LED light
strip 1. If necessary, use a
spirit level as a guide.
2. Stick the double-sided adhesive
tape onto the LED light strip 1.
Then pull the paper from the
self- adhesive foil on the back of
the LED light strip 1.
3. Position the self-adhesive foil on
the markings and press to fix it
firmly into place (Fig. D).

14 GB
4. Connect the LED light strip 1
to the mains adapter 8 (Fig. F)
or connect the LED light strip
1
to the connection lead
2 to
connect it to an additional light
(Fig. B).
Mounting the product
on a wall
1. Drill the fastening holes (Fig. E).
CAUTION! Ensure that you
do not damage any cables in
the wall.
2. Insert the dowels 4 into the
drilled holes (Fig. E).
3. Fix the fastening clips 3 to the
wall with the screws 5.
4. Connect the LED light strip 1
to the mains adapter 8
(Fig. F)
or connect the LED light strip 1
to the connection lead 2 to
connect it to an additional light
(Fig. B).
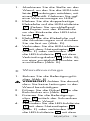
Operation
Insert the mains adapter 8
into the mains socket (Fig. G).
Press the ON / OFF switch on
the in-line switch 7 to switch
on the lights (Fig. F).
Press the ON / OFF switch on
the in-line switch 7 to switch
off the lights.

15 GB
Cleaning and care
CAUTION! RISK OF
ELECTRIC SHOCK!
First remove the mains
plug from the socket.
Do not use any solvents, petrol
or similar items. This would
damage the device.
Only a dry, lint-free cloth
should be used for cleaning.
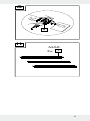
Disposal
The packaging is made
entirely of recyclable
materials, which you
may dispose of at local
recycling facilities.
Contact your local refuse disposal
authority for more details of how to
dispose of your worn-out product.
To help protect the envi-
ronment, please dispose
of the product properly
when it has reached the
end of its useful life and
not in the household
waste. Information on
collection points and
their opening hours can
be obtained from your
local authority.
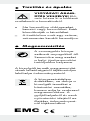
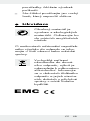
EMC

16 PL
Instrukcja
Użytkowanie
urządzenia zgodne
z przeznaczeniem ...... Strona 17
Opis części ................. Strona 17
Dane techniczne ........ Strona 18
Zawartość zestawu .... Strona 18
Wskazówki
dotyczące
bezpieczeństw
..... Strona 19
Zasady
bezpieczeństwa
podczas
montażu .................. Strona 23
Montaż
Montaż na szafie ....... Strona 24
Montaż na ścianie ..... Strona 25
Zastosowanie ..... Strona 25
Czyszczenie i
pielęgnacja ........... Strona 26
Utylizacja ............... Strona 26

17 PL
Komplet listw
świetlnych-LED
Instrukcja
Użytkowanie
urządzenia zgodne
z przeznaczeniem
Niniejszy produkt nadaje się do za-
stosowania we wnętrzach. Produkt
ten przeznaczony jest do stosowania
jedynie w prywatnych gospodar-
stwach domowych, nie jest przezna-
czony do zastosowań komercyjnych.
Inne zastosowanie lub zmiany pro-
duktu są niezgodne z przeznacze-
niem i mogą prowadzić do ryzyka
zranienia się lub uszkodzenia. Pro-
ducent nie ponosi odpowiedzialności
za szkody powstałe wskutek użycia
produktu niezgodnie z jego prze-
znaczeniem.
Opis części
1 Listwa oświetleniowa LED
2 Przewόd połączeniowy
3 Klips mocujący
4 Kołek rozporowy
5 Śruba
6 Złączka
7 Wyłącznik wmontowany w
przewód
8 Zasilacz

18 PL
Dane techniczne
Listwa oświetleniowa LED:
Napięcie
robocze: 12 V 2,8 W
Żarówek
na listwę
oświetleniową: 9 x 3 V 20 mA
Wskazówka:
Żarόwki nie
nadają się do
wymiany.
Klasa ochrony:
Listwa oświetleniowa LED (nr modelu
Z31289) sprawdzona TÜV / GS.
Zasilacz:
Napięcie
znamionowe
głόwne: 100–240 V∼,
50 - 60 Hz
Napięcie
znamionowe
wtόrne: 12 V , 0,25 A,
3 W
Klasa ochrony:
Zasilacz sieciowy (nr modelu.
LPS03-120-0250-2) sprawdzony
przez DEKRA GS.
Zawartość zestawu
3 listwy oświetleniowe LED
1 zasilacz
3 kabel połączeniowy
6 kołkόw
6 klipsów mocujących
6 śrub

19 PL
6 dwustronnych folii samorzylepnych
1 nakrętka
1 instrukcja obsługi
Wskazówki
dotyczące
bezpieczeństwa
W przypadku szkód, które zostaną
spowodowane nieprzestrzeganiem
niniejszej instrukcji obsługi wygasa
roszczenie gwarancyjne! Nie po-
nosimy żadnej odpowiedzialności
za powstanie szkód pośrednich!
Nie ponosimy odpowiedzialności
za szkody materialne lub osobowe
powstałe wskutek niewłaściwego
posługiwania się urządzeniem lub
nieprzestrzegania wskazówek
dotyczących bezpieczeństwa!
NIEBEZPIECZEŃ-
STWO UTRATY
ŻYCIA LUB ODNIESIENIA
OBRAŻEŃ PRZEZ DZIECI!
W żadnym wypadku nie należy
pozostawiać dzieci z materiałem
opakowaniowym bez nadzoru.
Istnieje niebezpieczeństwo udu-
szenia materiałem
opakowanio-
wym. Dzieci często nie dostrzegają
niebezpieczeństwa. Dzieci nie
powinny mieć dostępu do pro-
duktu.
Niniejsze urządzenie nie jest
zabawką i należy trzymać je z
dala od dzieci. Dzieci nie są

20 PL
świadome niebezpieczeństwa
związanego z użytkowaniem
tego urządzenia.
Niniejsze urządzenie może być
używane przez dzieci od lat 8
oraz przez osoby z obniżonymi
zdolnościami fizycznymi, sen-
sorycznymi lub mentalnymi lub
brakiem doświadczenia i / lub
wiedzy, jeśli pozostają pod
nadzorem lub zostały pouczone
w kwestii bezpiecznego użycia
urządzenia i rozumieją wynika-
jące z niego zagrożenia. Dzieci
nie mogą bawić się urządze-
niem. Czyszczenie i konserwa-
cja przez użytkownika nie mogą
być bez nadzoru przeprowa-
dzane przez dzieci.
Należy uważać na to, aby pro-
dukt był montowany wyłącznie
przez osoby z fachową wiedzą.
Przed rozpoczęciem montażu
należy sprawdzić, czy podłoże
jest przystosowane do elemen-
tów mocujących oraz masy
produktu oświetleniowego. W
przypadku wątpliwości należy
zasięgnąć porady w specjali-
stycznym sklepie z artykułami
elektrycznymi.
Nie ciągnąć produktu za kabel
i poprowadzić kabel w taki
sposób, aby nikt nie mógł na
niego nastąpić ani potknąć się
o niego.
Produkt można użytkować na
wszystkich powierzchniach o
normalnym stopniu palności.
Seite laden ...
Seite laden ...
Seite laden ...
Seite laden ...
Seite laden ...
Seite laden ...
Seite laden ...
Seite laden ...
Seite laden ...
Seite laden ...
Seite laden ...
Seite laden ...
Seite laden ...
Seite laden ...
Seite laden ...
Seite laden ...
Seite laden ...
Seite laden ...
Seite laden ...
Seite laden ...
Seite laden ...
Seite laden ...
Seite laden ...
Seite laden ...
Seite laden ...
Seite laden ...
Seite laden ...
Seite laden ...
Seite laden ...
Seite laden ...
Seite laden ...
Seite laden ...
Seite laden ...
Seite laden ...
Seite laden ...
Seite laden ...
Seite laden ...
Seite laden ...
Seite laden ...
Seite laden ...
Seite laden ...
Seite laden ...
Seite laden ...
Seite laden ...
Seite laden ...
Seite laden ...
Seite laden ...
Seite laden ...
Seite laden ...
Seite laden ...
Seite laden ...
Seite laden ...
Seite laden ...
Seite laden ...
Seite laden ...
Seite laden ...
Seite laden ...
Seite laden ...
Seite laden ...
Seite laden ...
Seite laden ...
Seite laden ...
-
 1
1
-
 2
2
-
 3
3
-
 4
4
-
 5
5
-
 6
6
-
 7
7
-
 8
8
-
 9
9
-
 10
10
-
 11
11
-
 12
12
-
 13
13
-
 14
14
-
 15
15
-
 16
16
-
 17
17
-
 18
18
-
 19
19
-
 20
20
-
 21
21
-
 22
22
-
 23
23
-
 24
24
-
 25
25
-
 26
26
-
 27
27
-
 28
28
-
 29
29
-
 30
30
-
 31
31
-
 32
32
-
 33
33
-
 34
34
-
 35
35
-
 36
36
-
 37
37
-
 38
38
-
 39
39
-
 40
40
-
 41
41
-
 42
42
-
 43
43
-
 44
44
-
 45
45
-
 46
46
-
 47
47
-
 48
48
-
 49
49
-
 50
50
-
 51
51
-
 52
52
-
 53
53
-
 54
54
-
 55
55
-
 56
56
-
 57
57
-
 58
58
-
 59
59
-
 60
60
-
 61
61
-
 62
62
-
 63
63
-
 64
64
-
 65
65
-
 66
66
-
 67
67
-
 68
68
-
 69
69
-
 70
70
-
 71
71
-
 72
72
-
 73
73
-
 74
74
-
 75
75
-
 76
76
-
 77
77
-
 78
78
-
 79
79
-
 80
80
-
 81
81
-
 82
82


in anderen Sprachen
- slovenčina: LIVARNO 91935 Návod na obsluhu
- polski: LIVARNO 91935 Instrukcja obsługi
Verwandte Papiere
-
LIVARNO 100656 Bedienungsanleitung
-
-
-
-
-
-
-
-
-