Campingaz ATTITUDE 2100 EX Benutzerhandbuch
- Kategorie
- Grillen
- Typ
- Benutzerhandbuch
Dieses Handbuch ist auch geeignet für

4010066398 (ECN20071485-C)
APPLICATION DES GAZ - 219, Route de Brignais - BP 55, 69563 Saint Genis Laval - France
Benutzung und Wartung
DE
ATTITUDE 2100 LX /
ATTITUDE 2100 LX Plus
ATTITUDE 2100 EX /
ATTITUDE 2100 EX Plus

2
Attitude 2100 LX/LX Plus Attitude 2100 EX/EX Plus
1
1
2
6
5
4
2
3
5
3
4
11
9
10
8
7
6
13
12
10
12
11
9
7
8
14
19
18
14
15
16
18
17
(1) Deckel
(2) Thermometer
(3) Warmhalterost (*nur LX Plus)
(4) Modularer Grillrosteinsatz
(5) Grillrost
(6) Instaclean
(7) Batterie AA x 1
(8) Elektronischer Zünder
(9) Schlauch
(10) Regler
(11) Gasanschluss
(12) Tragegriff
(13) Standfuß
(14) Gummipolster für Standfuß
(15) Schalter für elektrischen Zünder
(16) Knopf
(17) Zündelektroden
(18) Fettauffangschale
(1) Deckel
(2) Warmhalterost (*nur EX Plus)
(3) Modularer Grillrosteinsatz
(4) Grillrost
(5) Instaclean
(6) Batterie AA x 7
(7) Batteriefach
(8) Schlauch
(9) Regler
(10) Gasanschluss
(11) Tragegriff
(12) Kontrollknopfbeleuchtung
(13) Standfuß
(14) Gummipolster für Standfuß
(15) Digitale Temperaturanzeige
(16) Knopf
(17) Fühler für Thermometer
(18) Zündelektroden
(19) Fettauffangschale
15
16
13
17
EX Plus
LX Plus

3
Abb. 2A
Abb. 2B Abb. 2C
Abb. 1
Abb. 3A
-
+
B
C
A
L > 30 cm
H
D

4
A
B
Abb. 4A Abb. 4B
Abb. 3B
Abb. 4C Abb. 4D

5
A
B
C
Abb. 4E
Abb. 4G
Abb. 4F
Abb. 4H
Abb. 5
B
A
Abb. 6
B
A
Abb. 7

6
Abb. 8
Attitude 2100 LX/LX Plus Attitude 2100 EX/EX Plus
A
B
C

7
Abb. 9
A
B
C
D

8
AA-Batterie, die Sie in der Produktschachtel finden,
mit der +-Seite nach außen ein und schrauben Sie die
Abdeckung wieder fest.
Instastart
®
Zündbatterien (Abb. 3B)
(Modell Attitude 2100 EX/EX Plus)
Das Zünd- und Beleuchtungssystem wird mit
Steuerungsknöpfen (Instastart
®
) bedient und über vier
LR06/AA 1,5V-Batterien betrieben.
Einlegen der Batterien: Entfernen Sie den Deckel des
Gehäuses auf der linken Innenseite des Grills, indem
sie ihn aufschieben. Legen Sie die vier AA-Batterien,
die Sie in der Produktschachtel finden, gemäß der auf
dem Gehäuse angezeigten Polung ein. Schieben Sie die
Abdeckung wieder zurück.
Verwendung des Steuerungsknopfs für die Beleuchtung:
Stellen Sie den EIN-/AUS-Schalter des Batteriegehäuses
auf EIN (Abb. 3B); anschließend drücken und drehen Sie
die Steuerungsknöpfe gegen den Uhrzeigersinn. Nach
einer Vierteldrehung geht das blaue Licht zwischen der
Position Max Flow und der Position Reduced Flow an und
bleibt an.
Batterie für Digitale Temperaturanzeige
(Modell Attitude 2100 EX/EX Plus)
Das Digitale Temperaturanzeige wird durch zwei LR06/AA
1,5V-Batterien angetrieben.
Batterien einlegen:
1. Lösen Sie die Kunststoffschraube unter dem Thermometer
(Abb. 4A).
2. Führen Sie einen Schraubenzieher oder ein spitzes
Werkzeug in den Schlitz unter dem Thermometergehäuse
ein und ziehen Sie das Thermometer zu sich (Abb. 4B).
3. Lösen Sie die Sensorkabel (Abb. 4C).
4. Öffnen Sie die Klappe hinten am Thermometer (Abb. 4D).
5. Legen Sie zwei AA-Batterien, die Sie in der
Produktschachtel finden, gemäß der angezeigten Polung
ein (Abb. 4E).
6. Schließen Sie die Klappe wieder. (Abb. 4E)
7. Verbinden Sie die Sensorkabel wieder (Abb. 4F).
8. Legen Sie das Thermometer in das Gehäuse zurück
(Abb. 4G).
9. Ziehen Sie die Kunststoffschraube an (Abb. 4H).
c) GASFLASCHE
Dieses Gerät ist für die Nutzung mit Propangasbehältern
(6 kg, 9 kg, 11 kg, 13 kg usw.), die mit passendem
Schlauch und Regler ausgestattet sind, ausgelegt. (Regler
und Schlauch sind im Lieferumfang enthalten)
Kategorie: Propan 50 mbar
d) SCHLAUCH
'(bb $7
BENUTZUNG UND WARTUNG
a) ZU IHRER SICHERHEIT
- Installieren Sie Ihr Gerät und die Gasflasche auf einer
geraden, stabilen, nicht entflammbaren Oberfläche.
Wenn Sie Ihr Gerät auf Rasen nutzen, vergewissern
Sie sich, dass dieser nicht zu hoch ist und nicht mit der
Brennerflamme in Kontakt kommt, um das Risiko eines
Brands zu vermeiden.
- Nutzen Sie das Gerät auf einer stabilen, flachen und
horizontalen Auflage, die fest genug ist, um das Gewicht
des Geräts zu tragen (Tisch). Positionieren Sie den
Gaszylinder auf dem Boden.
- Unabhängig von der Höhe H, der Breite oder dem
Durchmesser D des Zylinders (Abb. 1) muss der
Gaszylinder mindestens 30 cm entfernt vom Gerät
platziert werden.
- Kein Benzin, andere brennbare Flüssigkeiten oder
Dämpfe in der Nähe des Gerätes lagern oder benutzen.
Bei Gasgeruch:
1) Den Hahn der Gasflasche schließen.
2) Flammen sofort löschen.
3) Den Deckel öffnen.
4) Wenn der Gasgeruch nicht nachlässt, vgl. Abschnitt
g) “Dichtheitskontrolle” oder sofort bei Ihrem Händler
nachfragen.
- Der Benutzer darf die vom Hersteller oder seinem
Beauftragten geschützten Teilen nicht verändern.
- Gasbehälter nach der Benutzung schließen.
- Dieses Gerät darf nur im Freien verwendet werden.
- VORSICHT: die zugänglichen Teile können sehr heiß
sein. Kleine Kinder fernhalten.
- Zu brennbarem Material muss ein Mindestabstand von
60 cm eingehalten werden.
- Den Grill in heißem Zustand nicht bewegen.
- Das Gerät auf ebenem Boden benutzen.
- Eine Frischluftzufuhr von 2 m³/kW-Stunde vorsehen.
- Einige Teile Ihres Grills können während und direkt nach
der Nutzung heiß werden: der Deckel, der Grillrost, die
Fettauffangschale usw. Tragen Sie stets Handschuhe,
wenn Sie mit dem Grill in Kontakt kommen.
b) MONTAGE
Überprüfen Sie alle Komponenten und nehmen Sie sie
aus dem Karton.
Grillrost Montage (Abb. 2)
Montieren Sie die Roste am Grill: Der kleinere Rost muss
auf der rechten Seite installiert werden. Der größere
Campingaz
®
Culinary Modular-Rost mit Einsatz wird links
installiert. Installieren Sie zuerst den kleineren Grillrost auf
der rechten Seite. Die rechte Seite des Culinary Modular-
Rost deckt die linke Seite des kleineren Rostes ab. Sorgen
Sie dafür, dass beide Teile in Kontakt miteinander sind,
damit eine ebene Kochfläche entsteht.
Batterie für elektronischen Zünder (Abb. 3A)
(Modell Attitude 2100 LX/LX Plus)
Das Zündfunkensystem wird durch eine LR06/AA
1,5V-Batterie angetrieben.
Batterie einlegen: Schrauben Sie die Gehäuseabdeckung
an der rechten Innenseite des Grills ab. Legen Sie die
HINWEIS: Falls nicht anders festgelegt, beziehen sich alle folgenden, in dieser Bedienungsanleitung angeführten
Oberbegriffe „Gerät/Einheit/Produkt/Equipment/Vorrichtung“ auf das Produkt „
Campingaz
®
Attitude 2100 LX/EX
“.
• Vor Gebrauch Bedienungsanleitung lesen.
• Nur im Freien benutzen.
• Keine Holzkohle oder Lavasteine benutzen.
• Keinen verstellbaren Druckregler benutzen. Druckminderer mit fester Einstellung nach der entsprechenden
europäischen Norm verwenden.
• Nur eine von Campingaz
®
hergestellte oder empfohlene Metallplatte auf den Grillrost (oder an deren Stelle) legen.
BEI NICHTBEACHTUNG DIESER GEBRAUCHSANWEISUNG KANN IHR GERÄT ERNSTHAFT BESCHÄDIGT
WERDEN UND IHR ANSPRUCH AUF GRANTIE ERLÖSCHEN.

9
Das Gerät ist ausgestattet mit einem G ¼
Gewindeanschluss für den Gaseinlass und einem
flexiblen Schlauch mit einer auf dem Regler
aufgeschraubten G ¼ Gewindemutter.
1) Verbinden Sie den Regler mit Ihrem Behälter.
2) Dichtheit nach Angaben von Abschnitt f) prüfen.
Am Schlauch nicht ziehen bzw. den Schlauch nicht
durchstechen. Halten Sie sich von allen Teilen des
Geräts fern, die heiß werden können. Überprüfen Sie, ob
sich der flexible Schlauch normal rausziehen lässt, ohne
ihn zu verdrehen oder daran zu ziehen. Der Schlauch
muss ausgewechselt werden, wenn er beschädigt oder
eingerissen ist, wenn es nationale Regelungen erfordern
oder das Ende seiner Lebensdauer erreicht ist.
Dichtigkeit prüfen gemäß Anweisungen in Absatz f).
e) DECKEL
Den Deckel insbesondere bei Gerätebetrieb vorsichtig
handhaben. Sich nicht über die Grillwanne beugen.
f) DICHTIGKEITSPRÜFUNG
1) Die Kontrolle im Freien vornehmen und dabei alle
Gegenstände aus brennbaren Materialien vom Grill
entfernen. Nicht rauchen.
2) Sicherstellen, dass die Schaltknöpfe auf “AUS” (O)
stehen.
3) Schließen Sie den Schlauch gemäß Absatz d) an.
4) Den Druckregler auf die Gasflasche schrauben.
5) Leckstellen niemals mit einer offenen Flamme
suchen, sondern ein geeignetes Lecksuchspray dafür
verwenden.
6) Das Spray auf die Anschlüsse (von Gasflasche/
Druckregler/Schlauch/Gerät) auftragen. Die
Schaltknöpfe müssen auf der “AUS”-Stellung (O)
bleiben. Nur das Ventil der Gasflasche öffnen.
7) Entstehen Luftblasen, so zeigt dies eine undichte
Stelle an.
8) Zur Behebung der undichten Stelle die Muttern
anziehen. Defekte Teile auswechseln. Das Gerät darf
erst wieder in Betrieb genommen werden, wenn keine
undichte Stelle mehr vorhanden ist.
9) Das Ventil der Gasflasche schließen.
WICHTIG: Niemals eine Flamme verwenden, um undichte
Stellen zu suchen!
Die Kontrolle und Suche nach undichten Stellen muss
mindestens einmal im Jahr und jedesmal bei Auswechseln
der Gasflasche vorgenommen werden.
g) VOR DER INBETRIEBNAHME
Nehmen Sie das Gerät nicht in Betrieb, bevor Sie die
Betriebsanleitung sorgfältig gelesen und alle Hinweise
verstanden haben. Sichergehen, dass:
- keine undichten Stellen vorliegen.
- die Brennerrohre nicht verstopft sind (z.B. durch
Spinnweben)
- der Schlauch nicht mit Teilen in Berührung steht, die
heiß werden können.
h) ANZÜNDEN DER BRENNER
Die Punkte 1 bis 5 durchlesen, bevor Sie mit der Zündung
beginnen.
1) DAS GERÄT NIEMALS BEI GESCHLOSSENEM,
SONDERN IMMER BEI GEÖFFNETEM DECKEL
ZÜNDEN.
2) Sich vergewissern, dass die 2 Schaltknöpfe auf “AUS”
(O) stehen.
3) Das Ventil der Gasflasche öffnen.
4) Modell Attitude 2100 LX/LX Plus (Abb. 5)
Drücken und drehen Sie einen der beiden
Steuerungsknöpfe auf VOLLE LEISTUNG (
),
anschließend drücken Sie sofort den Zündschalter (
) bis er klickt. Halten Sie ihn einige Sekunden lang
gedrückt, bis er aufleuchtet.
Wenn der Brenner nicht angeht, drehen Sie den
Steuerungsknopf zurück in die Position „AUS“ (o).
Warten Sie 5 Minuten, bevor Sie den Vorgang
wiederholen.
Modell Attitude 2100 EX/EX Plus (Abb. 6)
Drücken Sie den Steuerungsknopf und drehen ihn
gegen den Uhrzeigersinn in die Zündposition (
).
Halten Sie den Schalter gedrückt, damit die elektrische
Zündung einen Funken generieren kann.
Sobald der Brenner entzündet ist, drehen Sie den
Steuerungsknopf in die Position VOLLE LEISTUNG (
).
HINWEIS : Wenn der Brenner nach ca. 10 Sekunden
nicht angeht, drehen Sie den Steuerungsknopf zurück
in die Position „AUS“ (O) Warten Sie 5 Minuten, bevor
Sie den Vorgang wiederholen.
5) Sobald der Brenner entzündet ist, entzündet sich
der andere Brenner automatisch, nachdem Sie den
zweiten Steuerungsknopf auf die Position VOLLE
LEISTUNG (
) gestellt haben, ohne dass Sie den
automatischen Zündschalter drücken müssen.
WICHTIG:
Wenn sich der Brenner nach dem zweiten Versuch nicht
anzünden lässt, drehen Sie den Schaltknopf zurück
auf die Position “AUS” (O) und überprüfen Sie, die
Auslassdüsen des Brenners sowie die Brennerrohre
nicht verstopft sind. Versichern Sie sich auch dass die
Batterien des Zünders nicht entladen sind.

10
i) ZÜNDEN VON HAND
Sollte die automatische Zündung nicht funktionieren, den
Schaltknopf auf “AUS” (O) stellen.
Einen Grillrost entfernen, damit die Oberfläche der Brenner
gut zugänglich ist. Regelknopf auf VOLLE LEISTUNG
(
) stellen. Ein brennendes Streichholz vor den
entsprechenden Brenner halten.
Setzen Sie den Grillrost wieder ein.
j) AUSSCHALTEN DES GRILLS
Die Schaltknöpfe auf AUS (O) stellen, dann das Ventil der
Gasflasche schließen.
k) AUSWECHSELN DER GASFLASCHE
- Das Auswechseln immer an einem belüfteten Ort
und fern von Flammen, Funken oder Wärmequellen
vornehmen.
- Schaltknöpfe auf Stellung “AUS” (O), dann
Gasflaschenventil schließen.
- Den Druckregler abschrauben; überprüfen, ob die
Dichtung an der Gasflasche vorhanden und in gutem
Zustand ist.
- Die volle Gasflasche unter den Grill stellen, den
Druckregler wieder anschrauben. Darauf achten, dass
der Schlauch nicht belastet wird.
l) GEBRAUCH
Zur Handhabung heißer Teile empfiehlt sich das Tragen
von Schutzhandschuhen.
Vor jedem Grillen das Gerät ca. 10 Min. auf der Stellung
“VOLLE LEISTUNG”
und mit geschlossenem
Deckel vorheizen. Bei Erstbenutzung ca. 20 Minuten
vorheizen, um alle Teile einzubrennen.
Die Gargeschwindigkeit kann je nach Stellung der
Schaltknöpfe reguliert werden: zwischen den Stellungen
voll (
) und minimal ( ).
Vor dem Auflegen der Speisen die Grillroste leicht
mit Speiseöl bestreichen, damit die Grillstücke nicht
hängenbleiben.
Um ein Entflammen des Fetts während des Grillens
zu vermeiden, vorher das überflüssige Fett am Fleisch
entfernen. Nach jedem Grillvorgang das Gerät reinigen,
um eine Fettansammlung zu vermeiden und die
Entflammungsgefahr zu mindern.
Nach dem Grillvorgang schließen Sie den Deckel des
Geräts in der Position VOLLE LEISTUNG (
) und
halten ihn ca. 10 Minuten lang geschlossen, so dass
Lebensmittel- und Fettreste auf dem Rost verbrennen
können (Selbstreinigungseffekt).
Die lokale gelbliche Färbung der Flamme ist normal.
Wichtig:
Falls die Brenner während des Betriebs des Gerätes
ausgehen, sofort die Schaltknöpfe auf “AUS” (O) stellen.
5 Minuten warten, damit das nicht verbrannte Gas
abziehen kann. Erst danach einen neuen Zündvorgang
starten.
Achten Sie darauf, vorher die Fettauffangschale zu
installieren. Kochen Sie niemals ohne Fettauffangschale.
m) Temperaturanzeige
* Attitude 2100 LX/LX PLus :
Die Ofentemperatur bei geschlossenem Deckel wird auf
dem Deckel Ihres Grills angezeigt.
* Attitude 2100 EX/EX Plus :
Das Digitale Temperaturanzeige vorne am Grill zeigt
die Temperatur der Roste und heißen Platten an. Diese
Anzeige ist nur ein Richtwert; die genaue Temperatur
hängt von den externen Nutzungsbedingungen und den
Lebensmitteln ab, die im Kochbereich platziert werden.
Drücken Sie den EIN-/AUS-Schalter. Die LCD-Anzeige
zeigt die Temperatur im rechten Kochbereich rechts
und im linken Kochbereich links an.
Drücken Sie den EIN-/AUS-Schalter erneut. Der LCD-
Bildschirm leuchtet auf. Drücken Sie den Schalter
erneut, um das Licht auszuschalten.
Drücken Sie den Schalter noch einmal, um die
Temperaturanzeige auszuschalten.
Wenn Sie dies vergessen sollten, schaltet sich die
Anzeige automatisch ab, wenn die Temperatur unter
40°C fällt und diese Marke über einen Zeitraum von 1
Stunde nicht wieder übersteigt.
Ihr Thermometer ist mit einem
Batterieentladungsindikator ausgestattet
. Wenn
dieser Indikator aufleuchtet, sind die Batterien entladen.
Tauschen Sie sie aus, um Ihr Thermometer weiter
nutzen zu können.
Wenn Sie die Rückseite Ihres Attitude-Grills gegen
Wind schützen, indem Sie ihn gegen eine Wand
stellen, werden die Leistung und die Genauigkeit
der digitalen Temperaturanzeige verbessert.
Leichte Temperaturunterschiede zwischen
Grillrost und Grillplatte sind normal. Aufgrund ihrer
wärmespeichernden Eigenschaft ist die Grillplatte im
Allgemeinen wärmer als das Grillrost.
Überschreiten Sie möglichst nicht 350° C auf Ihrem
Grill, um die Gefahr von verbrannten Lebensmitteln
zu vermeiden. Verringern Sie die Leistung des Grills,
indem Sie den Knopf gegen den Uhrzeigersinn in
Richtung der kleinen Flamme drehen und den Deckel
öffnen.
Die von der digitalen Temperaturanzeige angezeigte
Temperatur ist genauer, wenn beide Brenner verwendet
werden.
n) REINIGUNG UND WARTUNG
- Das Gerät nie verändern: jede Änderung kann sich als
gefährlich erweisen.
- Um Ihr Gerät in einwandfreiem betriebsfähigem
Zustand zu halten, wird empfohlen, es in regelmäßigen
Abständen zu reinigen (nach 2- bis 3maliger Benutzung).
- Das Gerät vor dem Reinigen völlig abkühlen lassen.
- Die Gasflasche schließen und den Druckregler
abschrauben.
- Den oberen Teil der Brenner mit einem feuchten
Schwamm (Wasser mit Spülmittelzusatz) reinigen.
- Entfernen Sie die Grillroste. Wischen Sie nach jedem
Gebrauch das angesammelte Fett an den Seiten der
Brenner (Abb. 7) mit einem feuchten Schwamm oder
Papiertuch weg.
- Überprüfen, dass die Auslassdüsen der Brenner nicht
verstopft sind und vor Wiederverwendung trocknen
lassen.
- Notfalls eine Stahlbürste benutzen, um die Auslassdüsen
des Brenners zu reinigen.
- Wenn das Gerät mehr als 30 Tage nicht benützt wurde,
sollten Sie auch überprüfen, ob nicht Spinnweben
die Öffnungen des Brennerrohres verstopfen, was zu
verringerter Grillleistung oder zu einer gefährlichen
Entzündung des Gases außerhalb des Brenners führen
kann. Bei Bedarf die Öffnungen des Venturirohres oder
den Brenner reinigen.
- Regelmäßig den Zustand des Schlauchs überprüfen
und ihn auswechseln, wenn er Anzeichen für eine
-Alterung bzw. Risse aufweist oder wenn die nationalen
Vorschriften es erforderlich machen.
Hinweis: Die regelmäßige Wartung der Brenner hält
sie in gutem Zustand für den vielfachen Gebrauch und

11
verhindert die vorzeitige Oxidation. Die Oxidation des
Brenners im Lauf der Zeit ist jedoch ein normaler Vorgang.
Ein oxidierter Brenner, der normal funktioniert, muss nicht
ausgetauscht werden. Der Brenner muss ausgetauscht
werden, wenn er nicht mehr richtig funktioniert, z. B. wenn
er ein Loch hat.
- Grillkörperwände :
Um die Reinigung der Grillkörperwände zu erleichtern,
hat Campingaz
®
, Campingaz InstaClean
®
erfunden;
der Grillkörper kann hier demontiert werden. Dank
Campingaz InstaClean
®
kann das Grill Innenleben ohne
Werkzeug in weniger als 1 Minute entfernt und im
Geschirrspüler gereinigt werden.
Je nach Reinigungsbedarf ist es für eine gründlichere
Reinigung ggf. notwendig, die Teile abzuschrubben,
bevor sie in den Geschirrspüler gegeben werden.
Für die Montage und Demontage dieser Teile siehe Abb. 8.
Zur Remontage nach der Reinigung installieren Sie
zuerst die beiden Seitenwände, dann die Vorder- und
Rückwand.
- Fettauffangschale :
Ihr Grill ist mit einer Fettauffangschale ausgestattet. Es
empfiehlt sich, diese nach jedem Gebrauch zu reinigen.
Reinigen Sie den lackierten Grillgriff mit Seifenwasser.
Verwenden Sie keine aggressiven Produkte, weil diese
den Lack angreifen können.
Zur einfachen Reinigung können Sie die Fettauffangschale
mit Alufolie auslegen.
Nach dem Gebrauch des Grills entfernen Sie die Alufolie.
Sie können auch etwas Sand unten in die Fettauffangschale
geben, der das Grillfett teilweise absorbiert. Nach dem
Gebrauch entsorgen Sie den Sand.
- Roste
Die Roste sind emailliert.
Warten Sie mit der Reinigung, bis sie abgekühlt sind.
Verwenden Sie Campingaz
®
BBQ Cleaner Spray und
Grillbürsten.
Sie sind spülmaschinenfest. Vor dem Spülen im
Geschirrspüler ist es häufig erforderlich, Roste mit
einem Schwamm oder einer Drahtbürste zu reinigen, um
Reste von der Kochfläche zu entfernen.
(Abb. 2C) Um den Rost zu entfernen, schieben Sie
einen Finger in die vorgegebene Öffnung, heben den
Rost an und halten ihn mit der anderen Hand fest.
(Abb. 2C) Um den zweiteiligen Campingaz
®
Culinary
Modular-Rost zu entfernen (siehe den unteren
Abschnitt Zubehör), nehmen Sie zuerst den modularen
Grillrosteinsatz über die vorgegebene Öffnung heraus,
anschließend den Grillrostrahmen.
Gusseisenkochflächen sind emailliert, um sie vor
Korrosion zu schützen. Sie können eine glänzende
oder matte Oberfläche mit feinerer Textur haben. Um
sie in perfektem Zustand zu halten, ist es wichtig, die
matten Oberflächen nach der Reinigung einzuölen. Auf
diese Weise klebt das Grillgut nicht so leicht fest, was
die Reinigung erleichtert und die Gebrauchsdauer der
Kochflächen verlängert.
- Bedienfeld :
Reinigen Sie das Bedienfeld von Zeit zu Zeit mit einem in
Spülmittel getränkten Schwamm. Verwenden Sie keine
aggressiven Reinigungsmittel.
o) AUFBEWAHRUNG
- Das Ventil der Gasflasche nach jedem Gebrauch
schließen.
- Wird der Grill in geschlossenen Räumen aufbewahrt, die
Gasflasche abmontieren. Gasflasche im Freien lagern.
- Wird er draußen aufbewahrt, mit einer Schutzhülle
abdecken.
Setzen Sie das Produkt bei Lagerung keiner direkten
Sonneneinstrahlung aus. Es empfiehlt sich, den Grill an
einem geschützten Ort zu lagern.
Wenn Sie den Grill längere Zeit nicht verwenden, empfiehlt
es sich, ihn an einem trockenen Ort (z. B. einer Garage)
zu lagern. Nach längerer Lagerdauer prüfen Sie den
Zustand der Thermometerbatterien (Attitude 2100 EX/EX
Plus), der Beleuchtungsbatterien (Attitude 2100 EX/EX
Plus) und der elektrischen Zündbatterien (alle Modelle).
Versichern Sie sich, dass der Grill ausreichend abgekühlt
ist, bevor Sie ihn verstauen.
p) ZUBEHÖRTEILE
Ihr Grill ist mit einem Campingaz
®
Culinary Modular-
Rost ausgestattet.
Das Culinary Modular System von Campingaz
®
besteht
aus 2 Teilen:
• dem Grillrostrahmen
• dem modularen Grillrosteinsatz
(Abb. 2B) Das Mittelteil lässt sich abnehmen und durch
ein Zubehörteil ersetzen, das separat von Campingaz
®
bezogen werden kann, zum Beispiel:
• Pizzastein
• Bräter
• Paella-Pfanne
Dank der Modulbauweise des Culinary Modular System
von Campingaz
®
können Sie Ihr Grillgerät in eine echte
Freiluftküche verwandeln und dabei von spezifischen
Grillzubehör Gebrauch machen je nachdem, was Sie
gerade zubereiten.
Einen Wok können Sie jedoch auf Ihrem Grill nicht
verwenden.
Ihr Grill ist standardmäßig mit einem emaillierten
Gusseisenrost ausgestattet.
Campingaz bietet optional eine emaillierte Gusseisenplatte
als Zubehörteil an.
Attitude 2100 EX (Abb. 9):
Falls Sie den rechten Grillrost gegen die wendbare
Gusseisenplatte austauschen möchten, müssen Sie
zuerst den Temperaturfühler darunter absenken.
Dies stellt sicher, dass die richtige Temperatur angezeigt
wird.
Die Fühlerhalterung ist am oberen Anschlag
voreingestellt (Abb. 9A)
Lösen Sie die Schraube etwas (Abb. 9B)
Senken Sie die Fühlerhalterung (Abb. 9C) bis zum
unteren Anschlag (Abb. 9D).
Fixieren Sie die Position des Temperaturfühlers, indem
Sie die Schraube wieder festziehen.
ADG empfiehlt, den Gasgrill stets mit Campingaz
®
Zubehör- und Ersatzteilen zu verwenden. ADG haftet
nicht für Schäden oder Fehlfunktionen, die durch
den Gebrauch von Zubehör- und/oder Erstsatzteilen
anderer Marken entstehen.
q) UMWELTSCHUTZ
Beachten Sie die Umweltschutzvorschriften! Ihr Gerät
besteht aus Materialien, die wieder verwertet oder recycelt
werden können. Beachten Sie bei der Entsorgung vom
Verpackungsmaterial darauf die Wertstoffe zu trennen.
Bei der Entsorgung ihres Gerätes bringen Sie es am
besten zur Abfallsammelstelle Ihrer Gemeinde.
r) EMPFEHLUNGEN ZUR BATTERIE
Dieses Symbol auf den Batterien bedeutet, dass sie
am Ende ihrer Lebensdauer aus dem Gerät
genommen werden und recycelt oder
ordnungsgemäß entsorgt werden müssen. Die Batterien

12
- Verschmutzter Brenner:
reinigen
- Probleme in der
Gaszufuhr
- Regler defekt
- Leitung, Hahn,
Einspritzdüse,
Venturirohre oder
Brennerdüsen verstopft
-
Brennerrohre decken die
Einspritzdüse nicht ab
- Gasflasche leer
- Batterie entladen
- Prüfen, ob Gas vorhanden
ist
- Anschluss der Leitung
prüfen
- Kundendienst
kontaktieren
- Zu hohe Grilltemperatur:
Leistung vermindern
- Falls Ihre Fettauffangschale
oder die Roste/heißen
Platten schmierig sind,
reinigen Sie sie.
- Knopf, Draht oder
Elektrode der
Piezozündung defekt
- Die Anschlüsse des
Zünderdrahtes prüfen
- Den Zustand der
Keramik und des
Verbindungsdrahtes
überprüfen.
FELHERSUCHE
Brenner lässt sich nicht
zünden.
Brenner hat Fehlzündungen
Das Fett entzündet sich
anders als sonst
Der Brenner lässt sich
mit einem Streichholz
anzünden, aber nicht mit der
piezoelektrischen Zündung
VERMUTLICHE
URSACHE-ABHILFE
VERMUTLICHE
URSACHE-ABHILFE
STÖRUNGEN
STÖRUNGEN
Flammen am
Anschlussstutzen
Flammenkranz ungleich
Heizleistung unzureichend
Flammen hinter dem
Schaltknopf
Flammen unter dem
Bedienfeld
- Anschlussstutzen undicht:
Gaszufuhr sofort abstellen
- Kundendienst
kontaktieren
- Brenner defekt oder
verstopft
- Einspritzdüsen verstopft:
Brennerrohre reinigen.
Kundendienst
kontaktieren
- Einspritzdüse oder
Brennerrohre:
Kundendienst
kontaktieren
- Ventil defekt:
Gerät ausschalten
Kundendienst
kontaktieren
- Gerät ausschalten
- Glasflasche schließen
- Kundendienst
kontaktieren
dürfen nicht im Hausmüll entsorgt werden, sondern sie
müssen zu einer Sammelstelle gebracht werden
(Deponie...). Erkundigen Sie sich bei Ihrer Behörde vor
Ort. Niemals in der Natur entsorgen und nicht verbrennen:
das Vorliegen bestimmter Substanzen (Hg, Pb, Cd, Zn, Ni)
in gebrauchten Batterien kann schädlich für die Umwelt
und die Gesundheit des Menschen sein.
s) ELEKTROMÜLL
Dieses Symbol bedeutet, dass dieses Gerät getrennt
entsorgt werden muss. Am Ende seiner Lebensdauer
muss der Grill ordnungsgemäß entsorgt werden.
Das Gerät darf nicht im unsortierten Hausmüll
entsorgt werden. Mülltrennung fördert die
Wiederverwendung, Recycling und andere Formen der
Wiederverwertung recycelbarer Materialien. Bringen Sie
das Gerät zu diesem Zweck zu einer Recyclingstelle
(Deponie). Erkundigen Sie sich bei Ihrer Behörde vor Ort.
Niemals in der Natur entsorgen und nicht verbrennen: Das
Vorliegen bestimmter gefährlicher Substanzen in
elektrischen und elektronischen Geräten kann schädlich
für die Umwelt sein und potenzielle Auswirkungen auf die
Gesundheit des Menschen haben.

13
Instastart
®
ignition batteries (Fig.3B)
(Attitude 2100 EX/EX Plus model)
The ignition and lighting system operated with control
knobs (Instastart
®
) is powered by four LR06/AA 1.5V
batteries.
Inserting the batteries: remove the lid of the case on the
left inside the grill by sliding it off. Insert 4 AA batteries,
which you will find in your product box, according to the
polarity indicated on the case. Put the cover back on.
Using the control knob lighting: Put the battery case ON/
OFF switch in the ON position (Fig. 3B), then push and
turn the control knobs counterclockwise. After a quarter
turn, the blue light will turn on and will stay on between the
Max Flow position and Reduced Flow position.
Battery for digital thermometer
(Attitude 2100 EX/EX Plus model)
The digital thermometer is powered by 2 LR06/AA 1.5V
batteries.
Inserting the batteries:
1. Unscrew the plastic screw under the thermometer (Fig.
4A).
2. Insert a screwdriver or a pointed tool into the slot under
the thermometer casing and push the thermometer
toward you (Fig. 4B).
3. Disconnect the sensor wires (Fig. 4C).
4. Open the flap on the back of the thermometer (Fig. 4D).
5. Insert 2 AA batteries, which you will find in your product
box, according to the polarities indicated (Fig. 4E).
6. Put the flap back in place. (Fig. 4E)
7. Reconnect the sensor wires (Fig. 4F).
8. Put the thermometer back in its casing (Fig. 4G).
9. Tighten the plastic screw (Fig. 4H).
c) GAS CYLINDER
This appliance is designed to be used with propane tanks
(6 kg, 9 kg, 11 kg, 13 kg, etc.) equipped with a suitable
hose and regulator. (It comes with a regulator and hose).
Category: propane 50 mbar
d) HOSE
'(bb $7
The appliance is equipped with a G1/4 threaded gas inlet
connector and a flexible hose with G1/4 threaded nut
screwed on the regulator.
Operation and maintenance
a) FOR YOUR SAFETY
- Install your appliance and the gas cylinder on a flat,
stable and non-flammable surface. If you use your
appliance on grass, check that it is not too high and that
it does not come into contact with the burner flame to
avoid any risk of fire.
- Use the device on a stable, flat and horizontal support
that is rigid enough to support the weight of the device
(table). Position the gas cylinder on the ground.
- Regardless of height H, the width or diameter D of the
cylinder (Fig. 1), the gas cylinder must be placed at least
30 cm away from your appliance.
- Do not store or use petrol and other flammable liquids or
vapours in the vicinity of this barbecue. If you smell gas:
1) Close the valve of the cylinder
2) Extinguish all naked flames
3) Open the lid
4) If the smell continues ,see “g Checking for gas leaks”
or immediately seek advice from your local retailer.
- Parts which are protected by the manufacturer or the
manufacturer’s representative must not be manipulated
by the user.
- Close the gas container after use.
- This barbecue must only be used outdoors.
- CAUTION: accessible parts may get very hot. Keep
young children away.
- There should be no combustible materials within a
radius of approximately 60 cm around the barbecue
- Do not move the barbecue when alight.
- The appliance should be operated on a level surface.
- Estimated air offtake 2 m
3
/kW/h.
- Some parts of your barbecue may be hot during and
immediately after their use: the lid, grill, grease pan, etc.
Wear gloves when handling.
b) ASSEMBLY
Check and remove all components from the box.
Cooking grid assembly (Fig. 2)
Assemble the cooking grid on the grill: The small simple
grid is installed on the right. The larger grid with the
Campingaz
®
Culinary Modular System must be installed
on the left. Install the simple grid on the right grid side first.
The right side of the Culinary Modular Grid will cover the
left end of the simple grid.
Ensure both parts are in contact to achieve an even
cooking surface.
Battery for electronic ignition (Fig.3A)
(Attitude 2100 LX/LX Plus model)
The spark ignition system is powered by 1 LR06/AA 1.5V
battery.
Inserting the battery: Unscrew the case cover on the right
inside the grill. Insert an AA battery that you will find in the
product box, with the + side outward and put the cover
back on.
GB
NOTE: Unless otherwise specified, following generic terms “appliance / unit / product / equipment / device” appeared
in this instruction manual all refer to the product “Campingaz
®
Attitude 2100 LX/EX”.
•IMPORTANT: Read these instructions for use carefully so as to familiarize yourself with the appliance before
connecting it to its gas container. Keep these instructions for future reference.
•Useoutdoorsonly
•Donotusecharcoalorlavarock.
•Donotuseanadjustablelowpressureregulator.UsefixedregulatorsthatcomplywiththeEuropeanstandard
concerning them.
•Neverputametalplate,thathasneitherbeendesignednorrecommendedbyCampingaz
®
, on (or in the place of) the
cooking grids.
Follow these instructions carefully to avoid seriously damaging your barbecue or invalidating your product
warranty.
) is powered by four LR06/AA 1.5V
) is powered by four LR06/AA 1.5V
which you will find in your product box, according to the
polarity indicated on the case. Put the cover back on.
Checking for gas leaks”
- This barbecue must only be used outdoors.
CAUTION
young children away.
- There should be no combustible materials within a
radius of approximately 60 cm around the barbecue
For reference only
The ignition and lighting system operated with control
For reference only
The ignition and lighting system operated with control
) is powered by four LR06/AA 1.5V
For reference only
) is powered by four LR06/AA 1.5V
Inserting the batteries: remove the lid of the case on the
For reference only
Inserting the batteries: remove the lid of the case on the
For reference only
) is powered by four LR06/AA 1.5V
For reference only
) is powered by four LR06/AA 1.5V
Inserting the batteries: remove the lid of the case on the
For reference only
Inserting the batteries: remove the lid of the case on the
left inside the grill by sliding it off. Insert 4 AA batteries,
For reference only
left inside the grill by sliding it off. Insert 4 AA batteries,
which you will find in your product box, according to the
For reference only
which you will find in your product box, according to the
For reference only
) is powered by four LR06/AA 1.5V
For reference only
) is powered by four LR06/AA 1.5V
Inserting the batteries: remove the lid of the case on the
For reference only
Inserting the batteries: remove the lid of the case on the
left inside the grill by sliding it off. Insert 4 AA batteries,
For reference only
left inside the grill by sliding it off. Insert 4 AA batteries,
which you will find in your product box, according to the
For reference only
which you will find in your product box, according to the
For reference only
) is powered by four LR06/AA 1.5V
For reference only
) is powered by four LR06/AA 1.5V
Inserting the batteries: remove the lid of the case on the
For reference only
Inserting the batteries: remove the lid of the case on the
left inside the grill by sliding it off. Insert 4 AA batteries,
For reference only
left inside the grill by sliding it off. Insert 4 AA batteries,
which you will find in your product box, according to the
For reference only
which you will find in your product box, according to the
For reference only
For reference only
Inserting the batteries: remove the lid of the case on the
For reference only
Inserting the batteries: remove the lid of the case on the
left inside the grill by sliding it off. Insert 4 AA batteries,
For reference only
left inside the grill by sliding it off. Insert 4 AA batteries,
which you will find in your product box, according to the
For reference only
which you will find in your product box, according to the
polarity indicated on the case. Put the cover back on.
For reference only
polarity indicated on the case. Put the cover back on.
Using the control knob lighting: Put the battery case ON/
For reference only
Using the control knob lighting: Put the battery case ON/
OFF switch in the ON position (Fig. 3B), then push and
For reference only
OFF switch in the ON position (Fig. 3B), then push and
turn the control knobs counterclockwise. After a quarter
For reference only
turn the control knobs counterclockwise. After a quarter
turn, the blue light will turn on and will stay on between the
For reference only
turn, the blue light will turn on and will stay on between the
Max Flow position and Reduced Flow position.
For reference only
Max Flow position and Reduced Flow position.
Battery for digital thermometer
For reference only
Battery for digital thermometer
For reference only
- Do not store or use petrol and other flammable liquids or
For reference only
- Do not store or use petrol and other flammable liquids or
f you smell gas:
For reference only
f you smell gas:
g
For reference only
g
Checking for gas leaks”
For reference only
Checking for gas leaks”
or immediately seek advice from your local retailer.
For reference only
or immediately seek advice from your local retailer.
- Parts which are protected by the manufacturer or the
For reference only
- Parts which are protected by the manufacturer or the
manufacturer’s representative must not be manipulated
For reference only
manufacturer’s representative must not be manipulated
by the user.
For reference only
by the user.
- Close the gas container after use.
For reference only
- Close the gas container after use.
- This barbecue must only be used outdoors.
For reference only
- This barbecue must only be used outdoors.
CAUTION
For reference only
CAUTION
accessible parts may get very hot.
For reference only
accessible parts may get very hot.
young children away.
For reference only
young children away.
- There should be no combustible materials within a
For reference only
- There should be no combustible materials within a
radius of approximately 60 cm around the barbecue
For reference only
radius of approximately 60 cm around the barbecue
For reference only
Inserting the batteries: remove the lid of the case on the
For reference only
Inserting the batteries: remove the lid of the case on the
left inside the grill by sliding it off. Insert 4 AA batteries,
For reference only
left inside the grill by sliding it off. Insert 4 AA batteries,
which you will find in your product box, according to the
For reference only
which you will find in your product box, according to the
polarity indicated on the case. Put the cover back on.
For reference only
polarity indicated on the case. Put the cover back on.
For reference only
which you will find in your product box, according to the
For reference only
which you will find in your product box, according to the
polarity indicated on the case. Put the cover back on.
For reference only
polarity indicated on the case. Put the cover back on.
Using the control knob lighting: Put the battery case ON/
For reference only
Using the control knob lighting: Put the battery case ON/
For reference only
Using the control knob lighting: Put the battery case ON/
For reference only
Using the control knob lighting: Put the battery case ON/
OFF switch in the ON position (Fig. 3B), then push and
For reference only
OFF switch in the ON position (Fig. 3B), then push and
turn the control knobs counterclockwise. After a quarter
For reference only
turn the control knobs counterclockwise. After a quarter
Using the control knob lighting: Put the battery case ON/
For reference only
Using the control knob lighting: Put the battery case ON/
For reference only
Using the control knob lighting: Put the battery case ON/
For reference only
Using the control knob lighting: Put the battery case ON/
OFF switch in the ON position (Fig. 3B), then push and
For reference only
OFF switch in the ON position (Fig. 3B), then push and
turn the control knobs counterclockwise. After a quarter
For reference only
turn the control knobs counterclockwise. After a quarter
turn, the blue light will turn on and will stay on between the
For reference only
turn, the blue light will turn on and will stay on between the
For reference only
For reference only
turn the control knobs counterclockwise. After a quarter
For reference only
turn the control knobs counterclockwise. After a quarter
turn, the blue light will turn on and will stay on between the
For reference only
turn, the blue light will turn on and will stay on between the
Max Flow position and Reduced Flow position.
For reference only
Max Flow position and Reduced Flow position.
For reference only
For reference only
Checking for gas leaks”
For reference only
Checking for gas leaks”
For reference only
Checking for gas leaks”
For reference only
Checking for gas leaks”
or immediately seek advice from your local retailer.
For reference only
or immediately seek advice from your local retailer.
For reference only
Checking for gas leaks”
For reference only
Checking for gas leaks”
or immediately seek advice from your local retailer.
For reference only
or immediately seek advice from your local retailer.
- Parts which are protected by the manufacturer or the
For reference only
- Parts which are protected by the manufacturer or the
For reference only
Checking for gas leaks”
For reference only
Checking for gas leaks”
or immediately seek advice from your local retailer.
For reference only
or immediately seek advice from your local retailer.
- Parts which are protected by the manufacturer or the
For reference only
- Parts which are protected by the manufacturer or the
manufacturer’s representative must not be manipulated
For reference only
manufacturer’s representative must not be manipulated
For reference only
Checking for gas leaks”
For reference only
Checking for gas leaks”
or immediately seek advice from your local retailer.
For reference only
or immediately seek advice from your local retailer.
For reference only
- Parts which are protected by the manufacturer or the
For reference only
- Parts which are protected by the manufacturer or the
manufacturer’s representative must not be manipulated
For reference only
manufacturer’s representative must not be manipulated
- Close the gas container after use.
For reference only
- Close the gas container after use.
For reference only
manufacturer’s representative must not be manipulated
For reference only
manufacturer’s representative must not be manipulated
For reference only
manufacturer’s representative must not be manipulated
For reference only
manufacturer’s representative must not be manipulated
- Close the gas container after use.
For reference only
- Close the gas container after use.
For reference only
- Close the gas container after use.
For reference only
- Close the gas container after use.
- This barbecue must only be used outdoors.
For reference only
- This barbecue must only be used outdoors.
For reference only
- This barbecue must only be used outdoors.
For reference only
- This barbecue must only be used outdoors.
CAUTION
For reference only
CAUTION
:
For reference only
:
accessible parts may get very hot.
For reference only
accessible parts may get very hot.
young children away.
For reference only
young children away.
For reference only
- This barbecue must only be used outdoors.
For reference only
- This barbecue must only be used outdoors.
CAUTION
For reference only
CAUTION
young children away.
For reference only
young children away.
- There should be no combustible materials within a
For reference only
- There should be no combustible materials within a
For reference only
) is powered by four LR06/AA 1.5V
For reference only
) is powered by four LR06/AA 1.5V
Inserting the batteries: remove the lid of the case on the
For reference only
Inserting the batteries: remove the lid of the case on the
left inside the grill by sliding it off. Insert 4 AA batteries,
For reference only
left inside the grill by sliding it off. Insert 4 AA batteries,
which you will find in your product box, according to the
For reference only
which you will find in your product box, according to the
polarity indicated on the case. Put the cover back on.
For reference only
polarity indicated on the case. Put the cover back on.
For reference only
Inserting the batteries: remove the lid of the case on the
For reference only
Inserting the batteries: remove the lid of the case on the
left inside the grill by sliding it off. Insert 4 AA batteries,
For reference only
left inside the grill by sliding it off. Insert 4 AA batteries,
which you will find in your product box, according to the
For reference only
which you will find in your product box, according to the
polarity indicated on the case. Put the cover back on.
For reference only
polarity indicated on the case. Put the cover back on.
For reference only
which you will find in your product box, according to the
For reference only
which you will find in your product box, according to the
polarity indicated on the case. Put the cover back on.
For reference only
polarity indicated on the case. Put the cover back on.
Using the control knob lighting: Put the battery case ON/
For reference only
Using the control knob lighting: Put the battery case ON/
For reference only
which you will find in your product box, according to the
For reference only
which you will find in your product box, according to the
polarity indicated on the case. Put the cover back on.
For reference only
polarity indicated on the case. Put the cover back on.
For reference only
Using the control knob lighting: Put the battery case ON/
For reference only
Using the control knob lighting: Put the battery case ON/
OFF switch in the ON position (Fig. 3B), then push and
For reference only
OFF switch in the ON position (Fig. 3B), then push and
turn the control knobs counterclockwise. After a quarter
For reference only
turn the control knobs counterclockwise. After a quarter
For reference only
Using the control knob lighting: Put the battery case ON/
For reference only
Using the control knob lighting: Put the battery case ON/
OFF switch in the ON position (Fig. 3B), then push and
For reference only
OFF switch in the ON position (Fig. 3B), then push and
For reference only
Using the control knob lighting: Put the battery case ON/
For reference only
Using the control knob lighting: Put the battery case ON/
OFF switch in the ON position (Fig. 3B), then push and
For reference only
OFF switch in the ON position (Fig. 3B), then push and
turn the control knobs counterclockwise. After a quarter
For reference only
turn the control knobs counterclockwise. After a quarter
turn, the blue light will turn on and will stay on between the
For reference only
turn, the blue light will turn on and will stay on between the
For reference only
For reference only
turn the control knobs counterclockwise. After a quarter
For reference only
turn the control knobs counterclockwise. After a quarter
turn, the blue light will turn on and will stay on between the
For reference only
turn, the blue light will turn on and will stay on between the
Max Flow position and Reduced Flow position.
For reference only
Max Flow position and Reduced Flow position.
For reference only
f you smell gas:
For reference only
f you smell gas:
For reference only
Checking for gas leaks”
For reference only
Checking for gas leaks”
or immediately seek advice from your local retailer.
For reference only
or immediately seek advice from your local retailer.
- Parts which are protected by the manufacturer or the
For reference only
- Parts which are protected by the manufacturer or the
For reference only
Checking for gas leaks”
For reference only
Checking for gas leaks”
or immediately seek advice from your local retailer.
For reference only
or immediately seek advice from your local retailer.
- Parts which are protected by the manufacturer or the
For reference only
- Parts which are protected by the manufacturer or the
manufacturer’s representative must not be manipulated
For reference only
manufacturer’s representative must not be manipulated
For reference only
Checking for gas leaks”
For reference only
Checking for gas leaks”
or immediately seek advice from your local retailer.
For reference only
or immediately seek advice from your local retailer.
- Parts which are protected by the manufacturer or the
For reference only
- Parts which are protected by the manufacturer or the
manufacturer’s representative must not be manipulated
For reference only
manufacturer’s representative must not be manipulated
For reference only
Checking for gas leaks”
For reference only
Checking for gas leaks”
or immediately seek advice from your local retailer.
For reference only
or immediately seek advice from your local retailer.
For reference only
- Parts which are protected by the manufacturer or the
For reference only
- Parts which are protected by the manufacturer or the
manufacturer’s representative must not be manipulated
For reference only
manufacturer’s representative must not be manipulated
- Close the gas container after use.
For reference only
- Close the gas container after use.
For reference only
- Parts which are protected by the manufacturer or the
For reference only
- Parts which are protected by the manufacturer or the
manufacturer’s representative must not be manipulated
For reference only
manufacturer’s representative must not be manipulated
For reference only
- Close the gas container after use.
For reference only
- Close the gas container after use.
- This barbecue must only be used outdoors.
For reference only
- This barbecue must only be used outdoors.
accessible parts may get very hot.
For reference only
accessible parts may get very hot.
For reference only
- This barbecue must only be used outdoors.
For reference only
- This barbecue must only be used outdoors.
CAUTION
For reference only
CAUTION
accessible parts may get very hot.
For reference only
accessible parts may get very hot.
young children away.
For reference only
young children away.
For reference only
- This barbecue must only be used outdoors.
For reference only
- This barbecue must only be used outdoors.
CAUTION
For reference only
CAUTION
young children away.
For reference only
young children away.
- There should be no combustible materials within a
For reference only
- There should be no combustible materials within a
radius of approximately 60 cm around the barbecue
For reference only
radius of approximately 60 cm around the barbecue
For reference only
- This barbecue must only be used outdoors.
For reference only
- This barbecue must only be used outdoors.
:
For reference only
:
accessible parts may get very hot.
For reference only
accessible parts may get very hot.
turn, the blue light will turn on and will stay on between the
Max Flow position and Reduced Flow position.
Inserting the batteries:
1. Unscrew the plastic screw under the thermometer (Fig.
accessible parts may get very hot.
- There should be no combustible materials within a
radius of approximately 60 cm around the barbecue
- Do not move the barbecue when alight.
- The appliance should be operated on a level surface.
Do not print
Do not print
turn the control knobs counterclockwise. After a quarter
Do not print
turn the control knobs counterclockwise. After a quarter
turn, the blue light will turn on and will stay on between the
Do not print
turn, the blue light will turn on and will stay on between the
Max Flow position and Reduced Flow position.
Do not print
Max Flow position and Reduced Flow position.
Battery for digital thermometer
Do not print
Battery for digital thermometer
(Attitude 2100 EX/EX Plus model)
Do not print
(Attitude 2100 EX/EX Plus model)
The digital thermometer is powered by 2 LR06/AA 1.5V
Do not print
The digital thermometer is powered by 2 LR06/AA 1.5V
batteries.
Do not print
batteries.
Inserting the batteries:
Do not print
Inserting the batteries:
1. Unscrew the plastic screw under the thermometer (Fig.
Do not print
1. Unscrew the plastic screw under the thermometer (Fig.
4A).
Do not print
4A).
Do not print
manufacturer’s representative must not be manipulated
Do not print
manufacturer’s representative must not be manipulated
- This barbecue must only be used outdoors.
Do not print
- This barbecue must only be used outdoors.
accessible parts may get very hot.
Do not print
accessible parts may get very hot.
K
Do not print
K
eep
Do not print
eep
- There should be no combustible materials within a
Do not print
- There should be no combustible materials within a
radius of approximately 60 cm around the barbecue
Do not print
radius of approximately 60 cm around the barbecue
- Do not move the barbecue when alight.
Do not print
- Do not move the barbecue when alight.
- The appliance should be operated on a level surface.
Do not print
- The appliance should be operated on a level surface.
Do not print
turn the control knobs counterclockwise. After a quarter
Do not print
turn the control knobs counterclockwise. After a quarter
turn, the blue light will turn on and will stay on between the
Do not print
turn, the blue light will turn on and will stay on between the
Max Flow position and Reduced Flow position.
Do not print
Max Flow position and Reduced Flow position.
Battery for digital thermometer
Do not print
Battery for digital thermometer
Do not print
turn, the blue light will turn on and will stay on between the
Do not print
turn, the blue light will turn on and will stay on between the
Max Flow position and Reduced Flow position.
Do not print
Max Flow position and Reduced Flow position.
Do not print
Max Flow position and Reduced Flow position.
Do not print
Max Flow position and Reduced Flow position.
Battery for digital thermometer
Do not print
Battery for digital thermometer
(Attitude 2100 EX/EX Plus model)
Do not print
(Attitude 2100 EX/EX Plus model)
Do not print
Max Flow position and Reduced Flow position.
Do not print
Max Flow position and Reduced Flow position.
Do not print
Battery for digital thermometer
Do not print
Battery for digital thermometer
(Attitude 2100 EX/EX Plus model)
Do not print
(Attitude 2100 EX/EX Plus model)
The digital thermometer is powered by 2 LR06/AA 1.5V
Do not print
The digital thermometer is powered by 2 LR06/AA 1.5V
Do not print
Battery for digital thermometer
Do not print
Battery for digital thermometer
(Attitude 2100 EX/EX Plus model)
Do not print
(Attitude 2100 EX/EX Plus model)
The digital thermometer is powered by 2 LR06/AA 1.5V
Do not print
The digital thermometer is powered by 2 LR06/AA 1.5V
Do not print
(Attitude 2100 EX/EX Plus model)
Do not print
(Attitude 2100 EX/EX Plus model)
The digital thermometer is powered by 2 LR06/AA 1.5V
Do not print
The digital thermometer is powered by 2 LR06/AA 1.5V
batteries.
Do not print
batteries.
Inserting the batteries:
Do not print
Inserting the batteries:
Do not print
The digital thermometer is powered by 2 LR06/AA 1.5V
Do not print
The digital thermometer is powered by 2 LR06/AA 1.5V
batteries.
Do not print
batteries.
Do not print
Do not print
batteries.
Do not print
batteries.
Inserting the batteries:
Do not print
Inserting the batteries:
1. Unscrew the plastic screw under the thermometer (Fig.
Do not print
1. Unscrew the plastic screw under the thermometer (Fig.
Do not print
Do not print
Do not print
accessible parts may get very hot.
Do not print
accessible parts may get very hot.
K
Do not print
K
Do not print
accessible parts may get very hot.
Do not print
accessible parts may get very hot.
- There should be no combustible materials within a
Do not print
- There should be no combustible materials within a
radius of approximately 60 cm around the barbecue
Do not print
radius of approximately 60 cm around the barbecue
Do not print
- There should be no combustible materials within a
Do not print
- There should be no combustible materials within a
radius of approximately 60 cm around the barbecue
Do not print
radius of approximately 60 cm around the barbecue
- Do not move the barbecue when alight.
Do not print
- Do not move the barbecue when alight.
Do not print
- There should be no combustible materials within a
Do not print
- There should be no combustible materials within a
radius of approximately 60 cm around the barbecue
Do not print
radius of approximately 60 cm around the barbecue
Do not print
turn the control knobs counterclockwise. After a quarter
Do not print
turn the control knobs counterclockwise. After a quarter
turn, the blue light will turn on and will stay on between the
Do not print
turn, the blue light will turn on and will stay on between the
Max Flow position and Reduced Flow position.
Do not print
Max Flow position and Reduced Flow position.
Battery for digital thermometer
Do not print
Battery for digital thermometer
Do not print
Max Flow position and Reduced Flow position.
Do not print
Max Flow position and Reduced Flow position.
Battery for digital thermometer
Do not print
Battery for digital thermometer
(Attitude 2100 EX/EX Plus model)
Do not print
(Attitude 2100 EX/EX Plus model)
The digital thermometer is powered by 2 LR06/AA 1.5V
Do not print
The digital thermometer is powered by 2 LR06/AA 1.5V
Do not print
Max Flow position and Reduced Flow position.
Do not print
Max Flow position and Reduced Flow position.
Do not print
Battery for digital thermometer
Do not print
Battery for digital thermometer
(Attitude 2100 EX/EX Plus model)
Do not print
(Attitude 2100 EX/EX Plus model)
The digital thermometer is powered by 2 LR06/AA 1.5V
Do not print
The digital thermometer is powered by 2 LR06/AA 1.5V
Do not print
Battery for digital thermometer
Do not print
Battery for digital thermometer
(Attitude 2100 EX/EX Plus model)
Do not print
(Attitude 2100 EX/EX Plus model)
The digital thermometer is powered by 2 LR06/AA 1.5V
Do not print
The digital thermometer is powered by 2 LR06/AA 1.5V
Do not print
(Attitude 2100 EX/EX Plus model)
Do not print
(Attitude 2100 EX/EX Plus model)
The digital thermometer is powered by 2 LR06/AA 1.5V
Do not print
The digital thermometer is powered by 2 LR06/AA 1.5V
batteries.
Do not print
batteries.
Inserting the batteries:
Do not print
Inserting the batteries:
1. Unscrew the plastic screw under the thermometer (Fig.
Do not print
1. Unscrew the plastic screw under the thermometer (Fig.
Do not print
The digital thermometer is powered by 2 LR06/AA 1.5V
Do not print
The digital thermometer is powered by 2 LR06/AA 1.5V
batteries.
Do not print
batteries.
Do not print
Do not print
batteries.
Do not print
batteries.
Inserting the batteries:
Do not print
Inserting the batteries:
1. Unscrew the plastic screw under the thermometer (Fig.
Do not print
1. Unscrew the plastic screw under the thermometer (Fig.
Do not print
Do not print
Do not print
Do not print
Do not print
Do not print
- This barbecue must only be used outdoors.
Do not print
- This barbecue must only be used outdoors.
accessible parts may get very hot.
Do not print
accessible parts may get very hot.
K
Do not print
K
eep
Do not print
eep
Do not print
accessible parts may get very hot.
Do not print
accessible parts may get very hot.
- There should be no combustible materials within a
Do not print
- There should be no combustible materials within a
radius of approximately 60 cm around the barbecue
Do not print
radius of approximately 60 cm around the barbecue
Do not print
accessible parts may get very hot.
Do not print
accessible parts may get very hot.
- There should be no combustible materials within a
Do not print
- There should be no combustible materials within a
Do not print
accessible parts may get very hot.
Do not print
accessible parts may get very hot.
- There should be no combustible materials within a
Do not print
- There should be no combustible materials within a
radius of approximately 60 cm around the barbecue
Do not print
radius of approximately 60 cm around the barbecue
- Do not move the barbecue when alight.
Do not print
- Do not move the barbecue when alight.
- The appliance should be operated on a level surface.
Do not print
- The appliance should be operated on a level surface.
Do not print
- There should be no combustible materials within a
Do not print
- There should be no combustible materials within a
radius of approximately 60 cm around the barbecue
Do not print
radius of approximately 60 cm around the barbecue
- Do not move the barbecue when alight.
Do not print
- Do not move the barbecue when alight.
turn, the blue light will turn on and will stay on between the
Inserting the batteries:
1. Unscrew the plastic screw under the thermometer (Fig.
radius of approximately 60 cm around the barbecue
- The appliance should be operated on a level surface.
box, according to the polarities indicated (Fig. 4E).
- Some parts of your barbecue may be hot during and
ASSEMBLY
仅供参考,请勿印刷
仅供参考,请勿印刷
The digital thermometer is powered by 2 LR06/AA 1.5V
仅供参考,请勿印刷
The digital thermometer is powered by 2 LR06/AA 1.5V
Inserting the batteries:
仅供参考,请勿印刷
Inserting the batteries:
1. Unscrew the plastic screw under the thermometer (Fig.
仅供参考,请勿印刷
1. Unscrew the plastic screw under the thermometer (Fig.
4A).
仅供参考,请勿印刷
4A).
2. Insert a screwdriver or a pointed tool into the slot under
仅供参考,请勿印刷
2. Insert a screwdriver or a pointed tool into the slot under
the thermometer casing and push the thermometer
仅供参考,请勿印刷
the thermometer casing and push the thermometer
toward you (Fig. 4B).
仅供参考,请勿印刷
toward you (Fig. 4B).
3. Disconnect the sensor wires (Fig. 4C).
仅供参考,请勿印刷
3. Disconnect the sensor wires (Fig. 4C).
4. Open the flap on the back of the thermometer (Fig. 4D).
仅供参考,请勿印刷
4. Open the flap on the back of the thermometer (Fig. 4D).
5. Insert 2 AA batteries, which you will find in your product
仅供参考,请勿印刷
5. Insert 2 AA batteries, which you will find in your product
box, according to the polarities indicated (Fig. 4E).
仅供参考,请勿印刷
box, according to the polarities indicated (Fig. 4E).
6. Put the flap back in place. (Fig. 4E)
仅供参考,请勿印刷
6. Put the flap back in place. (Fig. 4E)
仅供参考,请勿印刷
- There should be no combustible materials within a
仅供参考,请勿印刷
- There should be no combustible materials within a
radius of approximately 60 cm around the barbecue
仅供参考,请勿印刷
radius of approximately 60 cm around the barbecue
- The appliance should be operated on a level surface.
仅供参考,请勿印刷
- The appliance should be operated on a level surface.
/kW/h.
仅供参考,请勿印刷
/kW/h.
- Some parts of your barbecue may be hot during and
仅供参考,请勿印刷
- Some parts of your barbecue may be hot during and
immediately after their use: the lid, grill, grease pan, etc.
仅供参考,请勿印刷
immediately after their use: the lid, grill, grease pan, etc.
Wear gloves when handling.
仅供参考,请勿印刷
Wear gloves when handling.
Check and remove all components from the box.
仅供参考,请勿印刷
Check and remove all components from the box.
仅供参考,请勿印刷
The digital thermometer is powered by 2 LR06/AA 1.5V
仅供参考,请勿印刷
The digital thermometer is powered by 2 LR06/AA 1.5V
仅供参考,请勿印刷
The digital thermometer is powered by 2 LR06/AA 1.5V
仅供参考,请勿印刷
The digital thermometer is powered by 2 LR06/AA 1.5V
仅供参考,请勿印刷
The digital thermometer is powered by 2 LR06/AA 1.5V
仅供参考,请勿印刷
The digital thermometer is powered by 2 LR06/AA 1.5V
仅供参考,请勿印刷
The digital thermometer is powered by 2 LR06/AA 1.5V
仅供参考,请勿印刷
The digital thermometer is powered by 2 LR06/AA 1.5V
仅供参考,请勿印刷
The digital thermometer is powered by 2 LR06/AA 1.5V
仅供参考,请勿印刷
The digital thermometer is powered by 2 LR06/AA 1.5V
仅供参考,请勿印刷
The digital thermometer is powered by 2 LR06/AA 1.5V
仅供参考,请勿印刷
The digital thermometer is powered by 2 LR06/AA 1.5V
1. Unscrew the plastic screw under the thermometer (Fig.
仅供参考,请勿印刷
1. Unscrew the plastic screw under the thermometer (Fig.
仅供参考,请勿印刷
Inserting the batteries:
仅供参考,请勿印刷
Inserting the batteries:
1. Unscrew the plastic screw under the thermometer (Fig.
仅供参考,请勿印刷
1. Unscrew the plastic screw under the thermometer (Fig.
2. Insert a screwdriver or a pointed tool into the slot under
仅供参考,请勿印刷
2. Insert a screwdriver or a pointed tool into the slot under
仅供参考,请勿印刷
Inserting the batteries:
仅供参考,请勿印刷
Inserting the batteries:
1. Unscrew the plastic screw under the thermometer (Fig.
仅供参考,请勿印刷
1. Unscrew the plastic screw under the thermometer (Fig.
2. Insert a screwdriver or a pointed tool into the slot under
仅供参考,请勿印刷
2. Insert a screwdriver or a pointed tool into the slot under
1. Unscrew the plastic screw under the thermometer (Fig.
仅供参考,请勿印刷
1. Unscrew the plastic screw under the thermometer (Fig.
仅供参考,请勿印刷
2. Insert a screwdriver or a pointed tool into the slot under
仅供参考,请勿印刷
2. Insert a screwdriver or a pointed tool into the slot under
仅供参考,请勿印刷
2. Insert a screwdriver or a pointed tool into the slot under
仅供参考,请勿印刷
2. Insert a screwdriver or a pointed tool into the slot under
the thermometer casing and push the thermometer
仅供参考,请勿印刷
the thermometer casing and push the thermometer
toward you (Fig. 4B).
仅供参考,请勿印刷
toward you (Fig. 4B).
仅供参考,请勿印刷
2. Insert a screwdriver or a pointed tool into the slot under
仅供参考,请勿印刷
2. Insert a screwdriver or a pointed tool into the slot under
仅供参考,请勿印刷
2. Insert a screwdriver or a pointed tool into the slot under
仅供参考,请勿印刷
2. Insert a screwdriver or a pointed tool into the slot under
the thermometer casing and push the thermometer
仅供参考,请勿印刷
the thermometer casing and push the thermometer
toward you (Fig. 4B).
仅供参考,请勿印刷
toward you (Fig. 4B).
3. Disconnect the sensor wires (Fig. 4C).
仅供参考,请勿印刷
3. Disconnect the sensor wires (Fig. 4C).
仅供参考,请勿印刷
2. Insert a screwdriver or a pointed tool into the slot under
仅供参考,请勿印刷
2. Insert a screwdriver or a pointed tool into the slot under
the thermometer casing and push the thermometer
仅供参考,请勿印刷
the thermometer casing and push the thermometer
仅供参考,请勿印刷
仅供参考,请勿印刷
- There should be no combustible materials within a
仅供参考,请勿印刷
- There should be no combustible materials within a
radius of approximately 60 cm around the barbecue
仅供参考,请勿印刷
radius of approximately 60 cm around the barbecue
- The appliance should be operated on a level surface.
仅供参考,请勿印刷
- The appliance should be operated on a level surface.
仅供参考,请勿印刷
radius of approximately 60 cm around the barbecue
仅供参考,请勿印刷
radius of approximately 60 cm around the barbecue
- The appliance should be operated on a level surface.
仅供参考,请勿印刷
- The appliance should be operated on a level surface.
仅供参考,请勿印刷
radius of approximately 60 cm around the barbecue
仅供参考,请勿印刷
radius of approximately 60 cm around the barbecue
仅供参考,请勿印刷
4. Open the flap on the back of the thermometer (Fig. 4D).
仅供参考,请勿印刷
4. Open the flap on the back of the thermometer (Fig. 4D).
5. Insert 2 AA batteries, which you will find in your product
仅供参考,请勿印刷
5. Insert 2 AA batteries, which you will find in your product
box, according to the polarities indicated (Fig. 4E).
仅供参考,请勿印刷
box, according to the polarities indicated (Fig. 4E).
仅供参考,请勿印刷
- The appliance should be operated on a level surface.
仅供参考,请勿印刷
- The appliance should be operated on a level surface.
- Some parts of your barbecue may be hot during and
仅供参考,请勿印刷
- Some parts of your barbecue may be hot during and
immediately after their use: the lid, grill, grease pan, etc.
仅供参考,请勿印刷
immediately after their use: the lid, grill, grease pan, etc.
仅供参考,请勿印刷
- Some parts of your barbecue may be hot during and
仅供参考,请勿印刷
- Some parts of your barbecue may be hot during and
仅供参考,请勿印刷
- Some parts of your barbecue may be hot during and
仅供参考,请勿印刷
- Some parts of your barbecue may be hot during and
immediately after their use: the lid, grill, grease pan, etc.
仅供参考,请勿印刷
immediately after their use: the lid, grill, grease pan, etc.
Wear gloves when handling.
仅供参考,请勿印刷
Wear gloves when handling.
仅供参考,请勿印刷
- Some parts of your barbecue may be hot during and
仅供参考,请勿印刷
- Some parts of your barbecue may be hot during and
immediately after their use: the lid, grill, grease pan, etc.
仅供参考,请勿印刷
immediately after their use: the lid, grill, grease pan, etc.
仅供参考,请勿印刷
- Some parts of your barbecue may be hot during and
仅供参考,请勿印刷
- Some parts of your barbecue may be hot during and
immediately after their use: the lid, grill, grease pan, etc.
仅供参考,请勿印刷
immediately after their use: the lid, grill, grease pan, etc.
仅供参考,请勿印刷
- Some parts of your barbecue may be hot during and
仅供参考,请勿印刷
- Some parts of your barbecue may be hot during and
immediately after their use: the lid, grill, grease pan, etc.
仅供参考,请勿印刷
immediately after their use: the lid, grill, grease pan, etc.
仅供参考,请勿印刷
immediately after their use: the lid, grill, grease pan, etc.
仅供参考,请勿印刷
immediately after their use: the lid, grill, grease pan, etc.
Wear gloves when handling.
仅供参考,请勿印刷
Wear gloves when handling.
仅供参考,请勿印刷
immediately after their use: the lid, grill, grease pan, etc.
仅供参考,请勿印刷
immediately after their use: the lid, grill, grease pan, etc.
仅供参考,请勿印刷
Wear gloves when handling.
仅供参考,请勿印刷
Wear gloves when handling.
Check and remove all components from the box.
仅供参考,请勿印刷
Check and remove all components from the box.
仅供参考,请勿印刷
ASSEMBLY
仅供参考,请勿印刷
ASSEMBLY
仅供参考,请勿印刷
ASSEMBLY
仅供参考,请勿印刷
ASSEMBLY
Check and remove all components from the box.
仅供参考,请勿印刷
Check and remove all components from the box.
仅供参考,请勿印刷
仅供参考,请勿印刷
turn, the blue light will turn on and will stay on between the
仅供参考,请勿印刷
turn, the blue light will turn on and will stay on between the
The digital thermometer is powered by 2 LR06/AA 1.5V
仅供参考,请勿印刷
The digital thermometer is powered by 2 LR06/AA 1.5V
仅供参考,请勿印刷
The digital thermometer is powered by 2 LR06/AA 1.5V
仅供参考,请勿印刷
The digital thermometer is powered by 2 LR06/AA 1.5V
仅供参考,请勿印刷
The digital thermometer is powered by 2 LR06/AA 1.5V
仅供参考,请勿印刷
The digital thermometer is powered by 2 LR06/AA 1.5V
仅供参考,请勿印刷
The digital thermometer is powered by 2 LR06/AA 1.5V
仅供参考,请勿印刷
The digital thermometer is powered by 2 LR06/AA 1.5V
1. Unscrew the plastic screw under the thermometer (Fig.
仅供参考,请勿印刷
1. Unscrew the plastic screw under the thermometer (Fig.
仅供参考,请勿印刷
Inserting the batteries:
仅供参考,请勿印刷
Inserting the batteries:
1. Unscrew the plastic screw under the thermometer (Fig.
仅供参考,请勿印刷
1. Unscrew the plastic screw under the thermometer (Fig.
2. Insert a screwdriver or a pointed tool into the slot under
仅供参考,请勿印刷
2. Insert a screwdriver or a pointed tool into the slot under
the thermometer casing and push the thermometer
仅供参考,请勿印刷
the thermometer casing and push the thermometer
仅供参考,请勿印刷
Inserting the batteries:
仅供参考,请勿印刷
Inserting the batteries:
1. Unscrew the plastic screw under the thermometer (Fig.
仅供参考,请勿印刷
1. Unscrew the plastic screw under the thermometer (Fig.
2. Insert a screwdriver or a pointed tool into the slot under
仅供参考,请勿印刷
2. Insert a screwdriver or a pointed tool into the slot under
the thermometer casing and push the thermometer
仅供参考,请勿印刷
the thermometer casing and push the thermometer
toward you (Fig. 4B).
仅供参考,请勿印刷
toward you (Fig. 4B).
3. Disconnect the sensor wires (Fig. 4C).
仅供参考,请勿印刷
3. Disconnect the sensor wires (Fig. 4C).
仅供参考,请勿印刷
2. Insert a screwdriver or a pointed tool into the slot under
仅供参考,请勿印刷
2. Insert a screwdriver or a pointed tool into the slot under
仅供参考,请勿印刷
2. Insert a screwdriver or a pointed tool into the slot under
仅供参考,请勿印刷
2. Insert a screwdriver or a pointed tool into the slot under
the thermometer casing and push the thermometer
仅供参考,请勿印刷
the thermometer casing and push the thermometer
仅供参考,请勿印刷
2. Insert a screwdriver or a pointed tool into the slot under
仅供参考,请勿印刷
2. Insert a screwdriver or a pointed tool into the slot under
the thermometer casing and push the thermometer
仅供参考,请勿印刷
the thermometer casing and push the thermometer
toward you (Fig. 4B).
仅供参考,请勿印刷
toward you (Fig. 4B).
仅供参考,请勿印刷
仅供参考,请勿印刷
- There should be no combustible materials within a
仅供参考,请勿印刷
- There should be no combustible materials within a
radius of approximately 60 cm around the barbecue
仅供参考,请勿印刷
radius of approximately 60 cm around the barbecue
- The appliance should be operated on a level surface.
仅供参考,请勿印刷
- The appliance should be operated on a level surface.
- Some parts of your barbecue may be hot during and
仅供参考,请勿印刷
- Some parts of your barbecue may be hot during and
immediately after their use: the lid, grill, grease pan, etc.
仅供参考,请勿印刷
immediately after their use: the lid, grill, grease pan, etc.
仅供参考,请勿印刷
4. Open the flap on the back of the thermometer (Fig. 4D).
仅供参考,请勿印刷
4. Open the flap on the back of the thermometer (Fig. 4D).
5. Insert 2 AA batteries, which you will find in your product
仅供参考,请勿印刷
5. Insert 2 AA batteries, which you will find in your product
box, according to the polarities indicated (Fig. 4E).
仅供参考,请勿印刷
box, according to the polarities indicated (Fig. 4E).
仅供参考,请勿印刷
- Some parts of your barbecue may be hot during and
仅供参考,请勿印刷
- Some parts of your barbecue may be hot during and
immediately after their use: the lid, grill, grease pan, etc.
仅供参考,请勿印刷
immediately after their use: the lid, grill, grease pan, etc.
Wear gloves when handling.
仅供参考,请勿印刷
Wear gloves when handling.
仅供参考,请勿印刷
immediately after their use: the lid, grill, grease pan, etc.
仅供参考,请勿印刷
immediately after their use: the lid, grill, grease pan, etc.
仅供参考,请勿印刷
Wear gloves when handling.
仅供参考,请勿印刷
Wear gloves when handling.
ASSEMBLY
仅供参考,请勿印刷
ASSEMBLY
Check and remove all components from the box.
仅供参考,请勿印刷
Check and remove all components from the box.
仅供参考,请勿印刷
Wear gloves when handling.
仅供参考,请勿印刷
Wear gloves when handling.

14
1. Connect the regulator to your cylinder.
2. Check for leaks following the instructions in section f.
Do not pull or pierce the hose. Keep away from any parts
of the appliance that get hot. Check that the flexible hose
stretches out normally, without twisting or pulling. It should
be replaced if it is damaged or cracked, when required by
national regulations or at the end of its lifecycle.
Check for leaks following the instructions in paragraph f.
e) LID
Handle the lid carefully, especially during operation. Do
not lean over the base.
f) CHECKING FOR GAS LEAKS
1) Work outside, away from all sources of ignition. Do not
smoke.
2) Make sure the control knobs are in the “off” (O)
position.
3) Connect the hose according to d) above.
4) Fit the regulator onto the gas cylinder in accordance
with its instructions.
5) Use a gas leak solution to test for leaks. Important:
never use a naked flame to check for gas leaks.
6) Apply the solution to the connections cylinder/ regulator/
hose/ apparatus (the control knobs should remain
closed: “off” position (O). Open the gas cylinder valve.
7) Bubbles in the gas leak solution indicate that there are
gas leaks.
8) The leak can be stopped by tightening any hose
connection or replacing any faulty component. The
barbecue must not be used until the leak is stopped.
9) Close the valve on the gas cylinder.
Important:
Check for leaks at least once per year and each time the
gas cylinder is replaced.
g) PRIOR TO USE
Never use the barbecue until the instructions have been
read carefully and understood. Also, make certain that:
- there are no leaks
- the venturi tubes are not blocked (example: spider
webs)
- the hose does not touch any components which may
get hot.
h) LIGHTING THE GRILL BURNERS
Read steps 1 to 5 before beginning with step 1.
1) Never light the barbecue with the lid closed, only
with the lid open.
2) Make sure the control knobs are in the “off” (O)
position.
3) Open the gas cylinder valve.
4) Model Attitude 2100 LX (Abb. 5)
Press one of the 2 control knobs and turn it to the full
flow (
) position, then immediately press the igniter
button (
) until you hear the click. Hold it down for a
few seconds until it lights up. If the burner fails to light,
turn the control knob to the “off” position (O). Wait 5
minutes before repeating the operation.
Model Attitude 2100 EX (Abb. 6)
Press the control knob and then turn it counterclockwise
to the ignition position(
).
Keep pressing the button for the electronic ignition to
generate a spark.
Once the burner is lit, turn the control knob to the full
flow position (
).
NOTE : NOTE: If the burner does not light after about
10 seconds, put the adjustment knob back in the OFF
(O) position. Wait 5 minutes before repeating the
operation.
5) Once the burner is lit, the other burner ignites
automatically after putting the second control knob in
the full flow position (
) without having to press the
automatic ignition button.
Important:
If the burner fails to light after the 2
nd
attempt, turn the
control knob to the “off” position (O) and check that the
burner outlets and inlet tube are not blocked. Check also
that the ignition battery is not drained.
i) GRILL BURNER-MANUAL LIGHTING
If the automatic ignition should fail to operate, turn the
control knob to the “off” position (O).
Remove the cooking grate.
Light a match and bring it close to a burner, then push in
and turn the corresponding control knob anti-clockwise to
the Full Flow position ( ).
Replace the cooking grate.
j) EXTINGUISHING THE GRILL
Return the control knobs to the “off” position (O), then
close the cylinder valve.
k) REPLACING THE GAS CYLINDER
- Always work in a well ventilated area and never in the
presence of a flame, spark or heat source.
- Return the control knobs in the “off” position (O) then
close the cylinder valve.
- Remove the regulator, check that the sealing joint is in
good condition.
- Put the full cylinder in place, refit the regulator, taking
care not to apply stress to the hose. Check for gas
leaks.
GB
(Abb. 5)
Hold it down for a
f the bur
2) Make sure the control knobs are in the “off” (
never use a naked flame to check for gas leaks.
6)
A
hose/ apparatus (the control knobs should remain
closed: “off” position (
For reference only
(Abb. 5)
For reference only
(Abb. 5)
ress one of the 2 control knobs and turn it to the full
For reference only
ress one of the 2 control knobs and turn it to the full
For reference only
(Abb. 5)
For reference only
(Abb. 5)
ress one of the 2 control knobs and turn it to the full
For reference only
ress one of the 2 control knobs and turn it to the full
) position, then immediately press the igniter
For reference only
) position, then immediately press the igniter
Hold it down for a
For reference only
Hold it down for a
For reference only
ress one of the 2 control knobs and turn it to the full
For reference only
ress one of the 2 control knobs and turn it to the full
) position, then immediately press the igniter
For reference only
) position, then immediately press the igniter
Hold it down for a
For reference only
Hold it down for a
For reference only
(Abb. 5)
For reference only
(Abb. 5)
ress one of the 2 control knobs and turn it to the full
For reference only
ress one of the 2 control knobs and turn it to the full
) position, then immediately press the igniter
For reference only
) position, then immediately press the igniter
) until you hear the click.
For reference only
) until you hear the click.
For reference only
For reference only
For reference only
1) Work outside, away from all sources of ignition.
For reference only
1) Work outside, away from all sources of ignition.
D
For reference only
D
o not
For reference only
o not
2) Make sure the control knobs are in the “off” (
For reference only
2) Make sure the control knobs are in the “off” (
O
For reference only
O
)
For reference only
)
Connect the hose according to d) above.
For reference only
Connect the hose according to d) above.
4) Fit the regulator onto the gas cylinder in accordance
For reference only
4) Fit the regulator onto the gas cylinder in accordance
with its instructions.
For reference only
with its instructions.
5) Use a gas leak solution to test for leaks.
For reference only
5) Use a gas leak solution to test for leaks.
never use a naked flame to check for gas leaks.
For reference only
never use a naked flame to check for gas leaks.
pply the solution to the connections cylinder/ regulator/
For reference only
pply the solution to the connections cylinder/ regulator/
hose/ apparatus (the control knobs should remain
For reference only
hose/ apparatus (the control knobs should remain
closed: “off” position (
For reference only
closed: “off” position (
For reference only
For reference only
For reference only
For reference only
For reference only
For reference only
For reference only
Model Attitude 2100 LX
For reference only
Model Attitude 2100 LX
(Abb. 5)
For reference only
(Abb. 5)
ress one of the 2 control knobs and turn it to the full
For reference only
ress one of the 2 control knobs and turn it to the full
) position, then immediately press the igniter
For reference only
) position, then immediately press the igniter
) until you hear the click.
For reference only
) until you hear the click.
Hold it down for a
For reference only
Hold it down for a
few seconds until it lights up.
For reference only
few seconds until it lights up.
I
For reference only
I
f the bur
For reference only
f the bur
turn the control knob to the “off” position (
For reference only
turn the control knob to the “off” position (
minutes before repeating the operation.
For reference only
minutes before repeating the operation.
Model Attitude 2100 EX
For reference only
Model Attitude 2100 EX
Press the control knob and then turn it counterclockwise
For reference only
Press the control knob and then turn it counterclockwise
to the ignition position(
For reference only
to the ignition position(
Keep pressing the button for the electronic ignition to
For reference only
Keep pressing the button for the electronic ignition to
For reference only
ress one of the 2 control knobs and turn it to the full
For reference only
ress one of the 2 control knobs and turn it to the full
) position, then immediately press the igniter
For reference only
) position, then immediately press the igniter
) until you hear the click.
For reference only
) until you hear the click.
few seconds until it lights up.
For reference only
few seconds until it lights up.
For reference only
) until you hear the click.
For reference only
) until you hear the click.
few seconds until it lights up.
For reference only
few seconds until it lights up.
turn the control knob to the “off” position (
For reference only
turn the control knob to the “off” position (
minutes before repeating the operation.
For reference only
minutes before repeating the operation.
For reference only
turn the control knob to the “off” position (
For reference only
turn the control knob to the “off” position (
minutes before repeating the operation.
For reference only
minutes before repeating the operation.
Model Attitude 2100 EX
For reference only
Model Attitude 2100 EX
minutes before repeating the operation.
For reference only
minutes before repeating the operation.
For reference only
For reference only
minutes before repeating the operation.
For reference only
minutes before repeating the operation.
Model Attitude 2100 EX
For reference only
Model Attitude 2100 EX
Press the control knob and then turn it counterclockwise
For reference only
Press the control knob and then turn it counterclockwise
For reference only
For reference only
For reference only
For reference only
Press the control knob and then turn it counterclockwise
For reference only
Press the control knob and then turn it counterclockwise
For reference only
D
For reference only
D
o not
For reference only
o not
2) Make sure the control knobs are in the “off” (
For reference only
2) Make sure the control knobs are in the “off” (
O
For reference only
O
For reference only
o not
For reference only
o not
For reference only
1) Work outside, away from all sources of ignition.
For reference only
1) Work outside, away from all sources of ignition.
2) Make sure the control knobs are in the “off” (
For reference only
2) Make sure the control knobs are in the “off” (
For reference only
2) Make sure the control knobs are in the “off” (
For reference only
2) Make sure the control knobs are in the “off” (
Connect the hose according to d) above.
For reference only
Connect the hose according to d) above.
For reference only
2) Make sure the control knobs are in the “off” (
For reference only
2) Make sure the control knobs are in the “off” (
Connect the hose according to d) above.
For reference only
Connect the hose according to d) above.
4) Fit the regulator onto the gas cylinder in accordance
For reference only
4) Fit the regulator onto the gas cylinder in accordance
For reference only
2) Make sure the control knobs are in the “off” (
For reference only
2) Make sure the control knobs are in the “off” (
For reference only
Connect the hose according to d) above.
For reference only
Connect the hose according to d) above.
4) Fit the regulator onto the gas cylinder in accordance
For reference only
4) Fit the regulator onto the gas cylinder in accordance
5) Use a gas leak solution to test for leaks.
For reference only
5) Use a gas leak solution to test for leaks.
For reference only
Connect the hose according to d) above.
For reference only
Connect the hose according to d) above.
4) Fit the regulator onto the gas cylinder in accordance
For reference only
4) Fit the regulator onto the gas cylinder in accordance
For reference only
4) Fit the regulator onto the gas cylinder in accordance
For reference only
4) Fit the regulator onto the gas cylinder in accordance
5) Use a gas leak solution to test for leaks.
For reference only
5) Use a gas leak solution to test for leaks.
never use a naked flame to check for gas leaks.
For reference only
never use a naked flame to check for gas leaks.
For reference only
5) Use a gas leak solution to test for leaks.
For reference only
5) Use a gas leak solution to test for leaks.
never use a naked flame to check for gas leaks.
For reference only
never use a naked flame to check for gas leaks.
pply the solution to the connections cylinder/ regulator/
For reference only
pply the solution to the connections cylinder/ regulator/
For reference only
never use a naked flame to check for gas leaks.
For reference only
never use a naked flame to check for gas leaks.
pply the solution to the connections cylinder/ regulator/
For reference only
pply the solution to the connections cylinder/ regulator/
hose/ apparatus (the control knobs should remain
For reference only
hose/ apparatus (the control knobs should remain
closed: “off” position (
For reference only
closed: “off” position (
For reference only
never use a naked flame to check for gas leaks.
For reference only
never use a naked flame to check for gas leaks.
A
For reference only
A
pply the solution to the connections cylinder/ regulator/
For reference only
pply the solution to the connections cylinder/ regulator/
hose/ apparatus (the control knobs should remain
For reference only
hose/ apparatus (the control knobs should remain
closed: “off” position (
For reference only
closed: “off” position (
For reference only
(Abb. 5)
For reference only
(Abb. 5)
ress one of the 2 control knobs and turn it to the full
For reference only
ress one of the 2 control knobs and turn it to the full
) position, then immediately press the igniter
For reference only
) position, then immediately press the igniter
) until you hear the click.
For reference only
) until you hear the click.
Hold it down for a
For reference only
Hold it down for a
f the bur
For reference only
f the bur
For reference only
ress one of the 2 control knobs and turn it to the full
For reference only
ress one of the 2 control knobs and turn it to the full
) position, then immediately press the igniter
For reference only
) position, then immediately press the igniter
) until you hear the click.
For reference only
) until you hear the click.
few seconds until it lights up.
For reference only
few seconds until it lights up.
I
For reference only
I
f the bur
For reference only
f the bur
turn the control knob to the “off” position (
For reference only
turn the control knob to the “off” position (
For reference only
) until you hear the click.
For reference only
) until you hear the click.
few seconds until it lights up.
For reference only
few seconds until it lights up.
turn the control knob to the “off” position (
For reference only
turn the control knob to the “off” position (
minutes before repeating the operation.
For reference only
minutes before repeating the operation.
For reference only
) until you hear the click.
For reference only
) until you hear the click.
few seconds until it lights up.
For reference only
few seconds until it lights up.
turn the control knob to the “off” position (
For reference only
turn the control knob to the “off” position (
For reference only
turn the control knob to the “off” position (
For reference only
turn the control knob to the “off” position (
minutes before repeating the operation.
For reference only
minutes before repeating the operation.
Model Attitude 2100 EX
For reference only
Model Attitude 2100 EX
For reference only
turn the control knob to the “off” position (
For reference only
turn the control knob to the “off” position (
minutes before repeating the operation.
For reference only
minutes before repeating the operation.
For reference only
For reference only
minutes before repeating the operation.
For reference only
minutes before repeating the operation.
Model Attitude 2100 EX
For reference only
Model Attitude 2100 EX
Press the control knob and then turn it counterclockwise
For reference only
Press the control knob and then turn it counterclockwise
For reference only
For reference only
For reference only
Press the control knob and then turn it counterclockwise
For reference only
Press the control knob and then turn it counterclockwise
to the ignition position(
For reference only
to the ignition position(
For reference only
1) Work outside, away from all sources of ignition.
For reference only
1) Work outside, away from all sources of ignition.
D
For reference only
D
o not
For reference only
o not
2) Make sure the control knobs are in the “off” (
For reference only
2) Make sure the control knobs are in the “off” (
O
For reference only
O
)
For reference only
)
For reference only
D
For reference only
D
o not
For reference only
o not
For reference only
2) Make sure the control knobs are in the “off” (
For reference only
2) Make sure the control knobs are in the “off” (
Connect the hose according to d) above.
For reference only
Connect the hose according to d) above.
4) Fit the regulator onto the gas cylinder in accordance
For reference only
4) Fit the regulator onto the gas cylinder in accordance
For reference only
2) Make sure the control knobs are in the “off” (
For reference only
2) Make sure the control knobs are in the “off” (
Connect the hose according to d) above.
For reference only
Connect the hose according to d) above.
4) Fit the regulator onto the gas cylinder in accordance
For reference only
4) Fit the regulator onto the gas cylinder in accordance
For reference only
2) Make sure the control knobs are in the “off” (
For reference only
2) Make sure the control knobs are in the “off” (
For reference only
Connect the hose according to d) above.
For reference only
Connect the hose according to d) above.
4) Fit the regulator onto the gas cylinder in accordance
For reference only
4) Fit the regulator onto the gas cylinder in accordance
5) Use a gas leak solution to test for leaks.
For reference only
5) Use a gas leak solution to test for leaks.
never use a naked flame to check for gas leaks.
For reference only
never use a naked flame to check for gas leaks.
For reference only
Connect the hose according to d) above.
For reference only
Connect the hose according to d) above.
4) Fit the regulator onto the gas cylinder in accordance
For reference only
4) Fit the regulator onto the gas cylinder in accordance
For reference only
with its instructions.
For reference only
with its instructions.
5) Use a gas leak solution to test for leaks.
For reference only
5) Use a gas leak solution to test for leaks.
never use a naked flame to check for gas leaks.
For reference only
never use a naked flame to check for gas leaks.
pply the solution to the connections cylinder/ regulator/
For reference only
pply the solution to the connections cylinder/ regulator/
hose/ apparatus (the control knobs should remain
For reference only
hose/ apparatus (the control knobs should remain
For reference only
never use a naked flame to check for gas leaks.
For reference only
never use a naked flame to check for gas leaks.
pply the solution to the connections cylinder/ regulator/
For reference only
pply the solution to the connections cylinder/ regulator/
hose/ apparatus (the control knobs should remain
For reference only
hose/ apparatus (the control knobs should remain
closed: “off” position (
For reference only
closed: “off” position (
For reference only
never use a naked flame to check for gas leaks.
For reference only
never use a naked flame to check for gas leaks.
6)
For reference only
6)
A
For reference only
A
pply the solution to the connections cylinder/ regulator/
For reference only
pply the solution to the connections cylinder/ regulator/
hose/ apparatus (the control knobs should remain
For reference only
hose/ apparatus (the control knobs should remain
closed: “off” position (
For reference only
closed: “off” position (
For reference only
For reference only
For reference only
never use a naked flame to check for gas leaks.
For reference only
never use a naked flame to check for gas leaks.
pply the solution to the connections cylinder/ regulator/
For reference only
pply the solution to the connections cylinder/ regulator/
hose/ apparatus (the control knobs should remain
For reference only
hose/ apparatus (the control knobs should remain
(Abb. 6)
Press the control knob and then turn it counterclockwise
to the ignition position(
Keep pressing the button for the electronic ignition to
) position. Wait 5 minutes before repeating the
operation.
hose/ apparatus (the control knobs should remain
O
).
O
Do not print
Do not print
Do not print
4) Fit the regulator onto the gas cylinder in accordance
Do not print
4) Fit the regulator onto the gas cylinder in accordance
5) Use a gas leak solution to test for leaks.
Do not print
5) Use a gas leak solution to test for leaks.
Important:
Do not print
Important:
never use a naked flame to check for gas leaks.
Do not print
never use a naked flame to check for gas leaks.
pply the solution to the connections cylinder/ regulator/
Do not print
pply the solution to the connections cylinder/ regulator/
hose/ apparatus (the control knobs should remain
Do not print
hose/ apparatus (the control knobs should remain
pen the gas cylinder valve.
Do not print
pen the gas cylinder valve.
Do not print
Do not print
Do not print
Do not print
Do not print
Model Attitude 2100 EX
Do not print
Model Attitude 2100 EX
(Abb. 6)
Do not print
(Abb. 6)
Press the control knob and then turn it counterclockwise
Do not print
Press the control knob and then turn it counterclockwise
to the ignition position(
Do not print
to the ignition position(
Do not print
Do not print
).
Do not print
).
Keep pressing the button for the electronic ignition to
Do not print
Keep pressing the button for the electronic ignition to
generate a spark.
Do not print
generate a spark.
Once the burner is lit, turn the control knob to the full
Do not print
Once the burner is lit, turn the control knob to the full
flow position (
Do not print
flow position (
Do not print
Once the burner is lit, turn the control knob to the full
Do not print
Once the burner is lit, turn the control knob to the full
Do not print
Do not print
).
Do not print
).
NOTE :
Do not print
NOTE :
NOTE: If the burner does not light after about
Do not print
NOTE: If the burner does not light after about
NOTE: If the burner does not light after about
Do not print
NOTE: If the burner does not light after about
NOTE: If the burner does not light after about
Do not print
NOTE: If the burner does not light after about
10 seconds, put the adjustment knob back in the OFF
Do not print
10 seconds, put the adjustment knob back in the OFF
(
Do not print
(
O
Do not print
O
) position. Wait 5 minutes before repeating the
Do not print
) position. Wait 5 minutes before repeating the
operation.
Do not print
operation.
5
Do not print
5
)
Do not print
)
Once the burner is lit, the other burner ignites
Do not print
Once the burner is lit, the other burner ignites
Do not print
Do not print
Press the control knob and then turn it counterclockwise
Do not print
Press the control knob and then turn it counterclockwise
Do not print
Do not print
).
Do not print
).
Keep pressing the button for the electronic ignition to
Do not print
Keep pressing the button for the electronic ignition to
Do not print
Press the control knob and then turn it counterclockwise
Do not print
Press the control knob and then turn it counterclockwise
Keep pressing the button for the electronic ignition to
Do not print
Keep pressing the button for the electronic ignition to
Do not print
to the ignition position(
Do not print
to the ignition position(
Keep pressing the button for the electronic ignition to
Do not print
Keep pressing the button for the electronic ignition to
Keep pressing the button for the electronic ignition to
Do not print
Keep pressing the button for the electronic ignition to
Keep pressing the button for the electronic ignition to
Do not print
Keep pressing the button for the electronic ignition to
Once the burner is lit, turn the control knob to the full
Do not print
Once the burner is lit, turn the control knob to the full
Do not print
to the ignition position(
Do not print
to the ignition position(
Keep pressing the button for the electronic ignition to
Do not print
Keep pressing the button for the electronic ignition to
Do not print
Keep pressing the button for the electronic ignition to
Do not print
Keep pressing the button for the electronic ignition to
generate a spark.
Do not print
generate a spark.
Once the burner is lit, turn the control knob to the full
Do not print
Once the burner is lit, turn the control knob to the full
).
Do not print
).
Do not print
generate a spark.
Do not print
generate a spark.
Once the burner is lit, turn the control knob to the full
Do not print
Once the burner is lit, turn the control knob to the full
flow position (
Do not print
flow position (
NOTE: If the burner does not light after about
Do not print
NOTE: If the burner does not light after about
Do not print
Once the burner is lit, turn the control knob to the full
Do not print
Once the burner is lit, turn the control knob to the full
flow position (
Do not print
flow position (
Do not print
NOTE :
Do not print
NOTE :
NOTE: If the burner does not light after about
Do not print
NOTE: If the burner does not light after about
10 seconds, put the adjustment knob back in the OFF
Do not print
10 seconds, put the adjustment knob back in the OFF
) position. Wait 5 minutes before repeating the
Do not print
) position. Wait 5 minutes before repeating the
Do not print
flow position (
Do not print
flow position (
Do not print
NOTE :
Do not print
NOTE :
NOTE: If the burner does not light after about
Do not print
NOTE: If the burner does not light after about
Do not print
Do not print
(
Do not print
(
Do not print
Do not print
Important:
Do not print
Important:
pply the solution to the connections cylinder/ regulator/
Do not print
pply the solution to the connections cylinder/ regulator/
Do not print
never use a naked flame to check for gas leaks.
Do not print
never use a naked flame to check for gas leaks.
pply the solution to the connections cylinder/ regulator/
Do not print
pply the solution to the connections cylinder/ regulator/
hose/ apparatus (the control knobs should remain
Do not print
hose/ apparatus (the control knobs should remain
pen the gas cylinder valve.
Do not print
pen the gas cylinder valve.
Do not print
hose/ apparatus (the control knobs should remain
Do not print
hose/ apparatus (the control knobs should remain
pen the gas cylinder valve.
Do not print
pen the gas cylinder valve.
Do not print
Do not print
Do not print
).
Do not print
).
O
Do not print
O
pen the gas cylinder valve.
Do not print
pen the gas cylinder valve.
Do not print
Do not print
Do not print
Do not print
pen the gas cylinder valve.
Do not print
pen the gas cylinder valve.
Do not print
Do not print
Do not print
Do not print
Model Attitude 2100 EX
Do not print
Model Attitude 2100 EX
(Abb. 6)
Do not print
(Abb. 6)
Press the control knob and then turn it counterclockwise
Do not print
Press the control knob and then turn it counterclockwise
to the ignition position(
Do not print
to the ignition position(
Do not print
Press the control knob and then turn it counterclockwise
Do not print
Press the control knob and then turn it counterclockwise
Do not print
).
Do not print
).
Keep pressing the button for the electronic ignition to
Do not print
Keep pressing the button for the electronic ignition to
Do not print
to the ignition position(
Do not print
to the ignition position(
Do not print
Do not print
Keep pressing the button for the electronic ignition to
Do not print
Keep pressing the button for the electronic ignition to
Keep pressing the button for the electronic ignition to
Do not print
Keep pressing the button for the electronic ignition to
Keep pressing the button for the electronic ignition to
Do not print
Keep pressing the button for the electronic ignition to
generate a spark.
Do not print
generate a spark.
Once the burner is lit, turn the control knob to the full
Do not print
Once the burner is lit, turn the control knob to the full
Do not print
to the ignition position(
Do not print
to the ignition position(
Keep pressing the button for the electronic ignition to
Do not print
Keep pressing the button for the electronic ignition to
Do not print
Keep pressing the button for the electronic ignition to
Do not print
Keep pressing the button for the electronic ignition to
generate a spark.
Do not print
generate a spark.
Once the burner is lit, turn the control knob to the full
Do not print
Once the burner is lit, turn the control knob to the full
).
Do not print
).
Do not print
Keep pressing the button for the electronic ignition to
Do not print
Keep pressing the button for the electronic ignition to
generate a spark.
Do not print
generate a spark.
Once the burner is lit, turn the control knob to the full
Do not print
Once the burner is lit, turn the control knob to the full
flow position (
Do not print
flow position (
NOTE: If the burner does not light after about
Do not print
NOTE: If the burner does not light after about
Do not print
Once the burner is lit, turn the control knob to the full
Do not print
Once the burner is lit, turn the control knob to the full
flow position (
Do not print
flow position (
Do not print
NOTE :
Do not print
NOTE :
NOTE: If the burner does not light after about
Do not print
NOTE: If the burner does not light after about
10 seconds, put the adjustment knob back in the OFF
Do not print
10 seconds, put the adjustment knob back in the OFF
) position. Wait 5 minutes before repeating the
Do not print
) position. Wait 5 minutes before repeating the
Do not print
flow position (
Do not print
flow position (
Do not print
NOTE :
Do not print
NOTE :
NOTE: If the burner does not light after about
Do not print
NOTE: If the burner does not light after about
10 seconds, put the adjustment knob back in the OFF
Do not print
10 seconds, put the adjustment knob back in the OFF
Do not print
Do not print
Do not print
(
Do not print
(
O
Do not print
O
operation.
Do not print
operation.
Do not print
Do not print
Important:
Do not print
Important:
pply the solution to the connections cylinder/ regulator/
Do not print
pply the solution to the connections cylinder/ regulator/
Do not print
Do not print
Important:
Do not print
Important:
pply the solution to the connections cylinder/ regulator/
Do not print
pply the solution to the connections cylinder/ regulator/
Do not print
Important:
Do not print
Important:
never use a naked flame to check for gas leaks.
Do not print
never use a naked flame to check for gas leaks.
pply the solution to the connections cylinder/ regulator/
Do not print
pply the solution to the connections cylinder/ regulator/
hose/ apparatus (the control knobs should remain
Do not print
hose/ apparatus (the control knobs should remain
pen the gas cylinder valve.
Do not print
pen the gas cylinder valve.
Do not print
hose/ apparatus (the control knobs should remain
Do not print
hose/ apparatus (the control knobs should remain
pen the gas cylinder valve.
Do not print
pen the gas cylinder valve.
Do not print
Do not print
Do not print
hose/ apparatus (the control knobs should remain
Do not print
hose/ apparatus (the control knobs should remain
pen the gas cylinder valve.
Do not print
pen the gas cylinder valve.
Do not print
hose/ apparatus (the control knobs should remain
Do not print
hose/ apparatus (the control knobs should remain
).
Do not print
).
O
Do not print
O
pen the gas cylinder valve.
Do not print
pen the gas cylinder valve.
Do not print
Do not print
Do not print
Do not print
O
Do not print
O
pen the gas cylinder valve.
Do not print
pen the gas cylinder valve.
Do not print
Do not print
Do not print
Press the control knob and then turn it counterclockwise
Keep pressing the button for the electronic ignition to
Once the burner is lit, turn the control knob to the full
10 seconds, put the adjustment knob back in the OFF
) position. Wait 5 minutes before repeating the
control knob to the “off” position (
ubbles in the gas leak solution indicate that there are
仅供参考,请勿印刷
Keep pressing the button for the electronic ignition to
仅供参考,请勿印刷
Keep pressing the button for the electronic ignition to
Once the burner is lit, turn the control knob to the full
仅供参考,请勿印刷
Once the burner is lit, turn the control knob to the full
仅供参考,请勿印刷
Once the burner is lit, turn the control knob to the full
仅供参考,请勿印刷
Once the burner is lit, turn the control knob to the full
仅供参考,请勿印刷
Once the burner is lit, turn the control knob to the full
仅供参考,请勿印刷
Once the burner is lit, turn the control knob to the full
仅供参考,请勿印刷
Once the burner is lit, turn the control knob to the full
仅供参考,请勿印刷
Once the burner is lit, turn the control knob to the full
仅供参考,请勿印刷
Once the burner is lit, turn the control knob to the full
仅供参考,请勿印刷
Once the burner is lit, turn the control knob to the full
仅供参考,请勿印刷
NOTE: If the burner does not light after about
仅供参考,请勿印刷
NOTE: If the burner does not light after about
10 seconds, put the adjustment knob back in the OFF
仅供参考,请勿印刷
10 seconds, put the adjustment knob back in the OFF
) position. Wait 5 minutes before repeating the
仅供参考,请勿印刷
) position. Wait 5 minutes before repeating the
Once the burner is lit, the other burner ignites
仅供参考,请勿印刷
Once the burner is lit, the other burner ignites
automatically after putting the second control knob in
仅供参考,请勿印刷
automatically after putting the second control knob in
仅供参考,请勿印刷
10 seconds, put the adjustment knob back in the OFF
仅供参考,请勿印刷
10 seconds, put the adjustment knob back in the OFF
) position. Wait 5 minutes before repeating the
仅供参考,请勿印刷
) position. Wait 5 minutes before repeating the
Once the burner is lit, the other burner ignites
仅供参考,请勿印刷
Once the burner is lit, the other burner ignites
automatically after putting the second control knob in
仅供参考,请勿印刷
automatically after putting the second control knob in
the full flow position (
仅供参考,请勿印刷
the full flow position (
仅供参考,请勿印刷
automatically after putting the second control knob in
仅供参考,请勿印刷
automatically after putting the second control knob in
仅供参考,请勿印刷
automatically after putting the second control knob in
仅供参考,请勿印刷
automatically after putting the second control knob in
仅供参考,请勿印刷
仅供参考,请勿印刷
仅供参考,请勿印刷
仅供参考,请勿印刷
仅供参考,请勿印刷
仅供参考,请勿印刷
仅供参考,请勿印刷
仅供参考,请勿印刷
仅供参考,请勿印刷
仅供参考,请勿印刷
仅供参考,请勿印刷
仅供参考,请勿印刷
仅供参考,请勿印刷
仅供参考,请勿印刷
仅供参考,请勿印刷
仅供参考,请勿印刷
仅供参考,请勿印刷
仅供参考,请勿印刷
仅供参考,请勿印刷
ubbles in the gas leak solution indicate that there are
仅供参考,请勿印刷
ubbles in the gas leak solution indicate that there are
8) The leak can be stopped by tightening any hose
仅供参考,请勿印刷
8) The leak can be stopped by tightening any hose
connection or replacing any faulty component.
仅供参考,请勿印刷
connection or replacing any faulty component.
barbecue must not be used until the leak is stopped.
仅供参考,请勿印刷
barbecue must not be used until the leak is stopped.
仅供参考,请勿印刷
operation.
仅供参考,请勿印刷
operation.
Once the burner is lit, the other burner ignites
仅供参考,请勿印刷
Once the burner is lit, the other burner ignites
automatically after putting the second control knob in
仅供参考,请勿印刷
automatically after putting the second control knob in
the full flow position (
仅供参考,请勿印刷
the full flow position (
仅供参考,请勿印刷
the full flow position (
仅供参考,请勿印刷
the full flow position (
仅供参考,请勿印刷
) without having to press the
仅供参考,请勿印刷
) without having to press the
automatic ignition button.
仅供参考,请勿印刷
automatic ignition button.
Important:
仅供参考,请勿印刷
Important:
I
仅供参考,请勿印刷
I
仅供参考,请勿印刷
f the burner fails to light after the 2
仅供参考,请勿印刷
f the burner fails to light after the 2
control knob to the “off” position (
仅供参考,请勿印刷
control knob to the “off” position (
burner outlets and inlet tube are not blocked. Check also
仅供参考,请勿印刷
burner outlets and inlet tube are not blocked. Check also
仅供参考,请勿印刷
Keep pressing the button for the electronic ignition to
仅供参考,请勿印刷
Keep pressing the button for the electronic ignition to
Once the burner is lit, turn the control knob to the full
仅供参考,请勿印刷
Once the burner is lit, turn the control knob to the full
仅供参考,请勿印刷
Keep pressing the button for the electronic ignition to
仅供参考,请勿印刷
Keep pressing the button for the electronic ignition to
Once the burner is lit, turn the control knob to the full
仅供参考,请勿印刷
Once the burner is lit, turn the control knob to the full
仅供参考,请勿印刷
Keep pressing the button for the electronic ignition to
仅供参考,请勿印刷
Keep pressing the button for the electronic ignition to
Once the burner is lit, turn the control knob to the full
仅供参考,请勿印刷
Once the burner is lit, turn the control knob to the full
NOTE: If the burner does not light after about
仅供参考,请勿印刷
NOTE: If the burner does not light after about
仅供参考,请勿印刷
Keep pressing the button for the electronic ignition to
仅供参考,请勿印刷
Keep pressing the button for the electronic ignition to
仅供参考,请勿印刷
Once the burner is lit, turn the control knob to the full
仅供参考,请勿印刷
Once the burner is lit, turn the control knob to the full
仅供参考,请勿印刷
Once the burner is lit, turn the control knob to the full
仅供参考,请勿印刷
Once the burner is lit, turn the control knob to the full
NOTE: If the burner does not light after about
仅供参考,请勿印刷
NOTE: If the burner does not light after about
仅供参考,请勿印刷
Once the burner is lit, turn the control knob to the full
仅供参考,请勿印刷
Once the burner is lit, turn the control knob to the full
仅供参考,请勿印刷
NOTE: If the burner does not light after about
仅供参考,请勿印刷
NOTE: If the burner does not light after about
10 seconds, put the adjustment knob back in the OFF
仅供参考,请勿印刷
10 seconds, put the adjustment knob back in the OFF
) position. Wait 5 minutes before repeating the
仅供参考,请勿印刷
) position. Wait 5 minutes before repeating the
仅供参考,请勿印刷
Once the burner is lit, turn the control knob to the full
仅供参考,请勿印刷
Once the burner is lit, turn the control knob to the full
仅供参考,请勿印刷
Once the burner is lit, turn the control knob to the full
仅供参考,请勿印刷
Once the burner is lit, turn the control knob to the full
仅供参考,请勿印刷
NOTE: If the burner does not light after about
仅供参考,请勿印刷
NOTE: If the burner does not light after about
10 seconds, put the adjustment knob back in the OFF
仅供参考,请勿印刷
10 seconds, put the adjustment knob back in the OFF
) position. Wait 5 minutes before repeating the
仅供参考,请勿印刷
) position. Wait 5 minutes before repeating the
仅供参考,请勿印刷
NOTE: If the burner does not light after about
仅供参考,请勿印刷
NOTE: If the burner does not light after about
10 seconds, put the adjustment knob back in the OFF
仅供参考,请勿印刷
10 seconds, put the adjustment knob back in the OFF
) position. Wait 5 minutes before repeating the
仅供参考,请勿印刷
) position. Wait 5 minutes before repeating the
Once the burner is lit, the other burner ignites
仅供参考,请勿印刷
Once the burner is lit, the other burner ignites
automatically after putting the second control knob in
仅供参考,请勿印刷
automatically after putting the second control knob in
仅供参考,请勿印刷
) position. Wait 5 minutes before repeating the
仅供参考,请勿印刷
) position. Wait 5 minutes before repeating the
Once the burner is lit, the other burner ignites
仅供参考,请勿印刷
Once the burner is lit, the other burner ignites
automatically after putting the second control knob in
仅供参考,请勿印刷
automatically after putting the second control knob in
仅供参考,请勿印刷
Once the burner is lit, the other burner ignites
仅供参考,请勿印刷
Once the burner is lit, the other burner ignites
仅供参考,请勿印刷
Once the burner is lit, the other burner ignites
仅供参考,请勿印刷
Once the burner is lit, the other burner ignites
automatically after putting the second control knob in
仅供参考,请勿印刷
automatically after putting the second control knob in
仅供参考,请勿印刷
Once the burner is lit, the other burner ignites
仅供参考,请勿印刷
Once the burner is lit, the other burner ignites
automatically after putting the second control knob in
仅供参考,请勿印刷
automatically after putting the second control knob in
the full flow position (
仅供参考,请勿印刷
the full flow position (
automatic ignition button.
仅供参考,请勿印刷
automatic ignition button.
automatically after putting the second control knob in
仅供参考,请勿印刷
automatically after putting the second control knob in
仅供参考,请勿印刷
automatically after putting the second control knob in
仅供参考,请勿印刷
automatically after putting the second control knob in
the full flow position (
仅供参考,请勿印刷
the full flow position (
仅供参考,请勿印刷
automatic ignition button.
仅供参考,请勿印刷
automatic ignition button.
仅供参考,请勿印刷
automatically after putting the second control knob in
仅供参考,请勿印刷
automatically after putting the second control knob in
the full flow position (
仅供参考,请勿印刷
the full flow position (
仅供参考,请勿印刷
仅供参考,请勿印刷
仅供参考,请勿印刷
Important:
仅供参考,请勿印刷
Important:
仅供参考,请勿印刷
f the burner fails to light after the 2
仅供参考,请勿印刷
f the burner fails to light after the 2
control knob to the “off” position (
仅供参考,请勿印刷
control knob to the “off” position (
仅供参考,请勿印刷
仅供参考,请勿印刷
仅供参考,请勿印刷
仅供参考,请勿印刷
仅供参考,请勿印刷
仅供参考,请勿印刷
仅供参考,请勿印刷
仅供参考,请勿印刷
仅供参考,请勿印刷
ubbles in the gas leak solution indicate that there are
仅供参考,请勿印刷
ubbles in the gas leak solution indicate that there are
仅供参考,请勿印刷
仅供参考,请勿印刷
仅供参考,请勿印刷
仅供参考,请勿印刷
仅供参考,请勿印刷
仅供参考,请勿印刷
仅供参考,请勿印刷
仅供参考,请勿印刷
ubbles in the gas leak solution indicate that there are
仅供参考,请勿印刷
ubbles in the gas leak solution indicate that there are
仅供参考,请勿印刷
仅供参考,请勿印刷
仅供参考,请勿印刷
仅供参考,请勿印刷
ubbles in the gas leak solution indicate that there are
仅供参考,请勿印刷
ubbles in the gas leak solution indicate that there are
8) The leak can be stopped by tightening any hose
仅供参考,请勿印刷
8) The leak can be stopped by tightening any hose
connection or replacing any faulty component.
仅供参考,请勿印刷
connection or replacing any faulty component.
仅供参考,请勿印刷
ubbles in the gas leak solution indicate that there are
仅供参考,请勿印刷
ubbles in the gas leak solution indicate that there are
仅供参考,请勿印刷
ubbles in the gas leak solution indicate that there are
仅供参考,请勿印刷
ubbles in the gas leak solution indicate that there are
仅供参考,请勿印刷
ubbles in the gas leak solution indicate that there are
仅供参考,请勿印刷
ubbles in the gas leak solution indicate that there are
gas leaks.
仅供参考,请勿印刷
gas leaks.
仅供参考,请勿印刷
ubbles in the gas leak solution indicate that there are
仅供参考,请勿印刷
ubbles in the gas leak solution indicate that there are
8) The leak can be stopped by tightening any hose
仅供参考,请勿印刷
8) The leak can be stopped by tightening any hose
connection or replacing any faulty component.
仅供参考,请勿印刷
connection or replacing any faulty component.
仅供参考,请勿印刷
ubbles in the gas leak solution indicate that there are
仅供参考,请勿印刷
ubbles in the gas leak solution indicate that there are
8) The leak can be stopped by tightening any hose
仅供参考,请勿印刷
8) The leak can be stopped by tightening any hose
connection or replacing any faulty component.
仅供参考,请勿印刷
connection or replacing any faulty component.
仅供参考,请勿印刷
ubbles in the gas leak solution indicate that there are
仅供参考,请勿印刷
ubbles in the gas leak solution indicate that there are
仅供参考,请勿印刷
Press the control knob and then turn it counterclockwise
仅供参考,请勿印刷
Press the control knob and then turn it counterclockwise
Keep pressing the button for the electronic ignition to
仅供参考,请勿印刷
Keep pressing the button for the electronic ignition to
Once the burner is lit, turn the control knob to the full
仅供参考,请勿印刷
Once the burner is lit, turn the control knob to the full
仅供参考,请勿印刷
Keep pressing the button for the electronic ignition to
仅供参考,请勿印刷
Keep pressing the button for the electronic ignition to
Once the burner is lit, turn the control knob to the full
仅供参考,请勿印刷
Once the burner is lit, turn the control knob to the full
仅供参考,请勿印刷
Keep pressing the button for the electronic ignition to
仅供参考,请勿印刷
Keep pressing the button for the electronic ignition to
Once the burner is lit, turn the control knob to the full
仅供参考,请勿印刷
Once the burner is lit, turn the control knob to the full
仅供参考,请勿印刷
Once the burner is lit, turn the control knob to the full
仅供参考,请勿印刷
Once the burner is lit, turn the control knob to the full
仅供参考,请勿印刷
NOTE: If the burner does not light after about
仅供参考,请勿印刷
NOTE: If the burner does not light after about
10 seconds, put the adjustment knob back in the OFF
仅供参考,请勿印刷
10 seconds, put the adjustment knob back in the OFF
仅供参考,请勿印刷
Keep pressing the button for the electronic ignition to
仅供参考,请勿印刷
Keep pressing the button for the electronic ignition to
仅供参考,请勿印刷
Once the burner is lit, turn the control knob to the full
仅供参考,请勿印刷
Once the burner is lit, turn the control knob to the full
仅供参考,请勿印刷
Once the burner is lit, turn the control knob to the full
仅供参考,请勿印刷
Once the burner is lit, turn the control knob to the full
仅供参考,请勿印刷
NOTE: If the burner does not light after about
仅供参考,请勿印刷
NOTE: If the burner does not light after about
10 seconds, put the adjustment knob back in the OFF
仅供参考,请勿印刷
10 seconds, put the adjustment knob back in the OFF
) position. Wait 5 minutes before repeating the
仅供参考,请勿印刷
) position. Wait 5 minutes before repeating the
仅供参考,请勿印刷
NOTE: If the burner does not light after about
仅供参考,请勿印刷
NOTE: If the burner does not light after about
10 seconds, put the adjustment knob back in the OFF
仅供参考,请勿印刷
10 seconds, put the adjustment knob back in the OFF
) position. Wait 5 minutes before repeating the
仅供参考,请勿印刷
) position. Wait 5 minutes before repeating the
Once the burner is lit, the other burner ignites
仅供参考,请勿印刷
Once the burner is lit, the other burner ignites
automatically after putting the second control knob in
仅供参考,请勿印刷
automatically after putting the second control knob in
automatically after putting the second control knob in
仅供参考,请勿印刷
automatically after putting the second control knob in
仅供参考,请勿印刷
) without having to press the
仅供参考,请勿印刷
) without having to press the
NOTE: If the burner does not light after about
仅供参考,请勿印刷
NOTE: If the burner does not light after about
仅供参考,请勿印刷
) position. Wait 5 minutes before repeating the
仅供参考,请勿印刷
) position. Wait 5 minutes before repeating the
operation.
仅供参考,请勿印刷
operation.
Once the burner is lit, the other burner ignites
仅供参考,请勿印刷
Once the burner is lit, the other burner ignites
automatically after putting the second control knob in
仅供参考,请勿印刷
automatically after putting the second control knob in
the full flow position (
仅供参考,请勿印刷
the full flow position (
仅供参考,请勿印刷
automatically after putting the second control knob in
仅供参考,请勿印刷
automatically after putting the second control knob in
the full flow position (
仅供参考,请勿印刷
the full flow position (
仅供参考,请勿印刷
the full flow position (
仅供参考,请勿印刷
the full flow position (
仅供参考,请勿印刷
automatic ignition button.
仅供参考,请勿印刷
automatic ignition button.
仅供参考,请勿印刷
Once the burner is lit, the other burner ignites
仅供参考,请勿印刷
Once the burner is lit, the other burner ignites
automatically after putting the second control knob in
仅供参考,请勿印刷
automatically after putting the second control knob in
Once the burner is lit, the other burner ignites
仅供参考,请勿印刷
Once the burner is lit, the other burner ignites
仅供参考,请勿印刷
Once the burner is lit, the other burner ignites
仅供参考,请勿印刷
Once the burner is lit, the other burner ignites
automatically after putting the second control knob in
仅供参考,请勿印刷
automatically after putting the second control knob in
the full flow position (
仅供参考,请勿印刷
the full flow position (
仅供参考,请勿印刷
automatically after putting the second control knob in
仅供参考,请勿印刷
automatically after putting the second control knob in
the full flow position (
仅供参考,请勿印刷
the full flow position (
仅供参考,请勿印刷
仅供参考,请勿印刷
仅供参考,请勿印刷
仅供参考,请勿印刷
ubbles in the gas leak solution indicate that there are
仅供参考,请勿印刷
ubbles in the gas leak solution indicate that there are
仅供参考,请勿印刷
Important:
仅供参考,请勿印刷
Important:
仅供参考,请勿印刷
f the burner fails to light after the 2
仅供参考,请勿印刷
f the burner fails to light after the 2
control knob to the “off” position (
仅供参考,请勿印刷
control knob to the “off” position (
仅供参考,请勿印刷
仅供参考,请勿印刷
仅供参考,请勿印刷
仅供参考,请勿印刷
仅供参考,请勿印刷
仅供参考,请勿印刷
仅供参考,请勿印刷
仅供参考,请勿印刷
仅供参考,请勿印刷
仅供参考,请勿印刷
仅供参考,请勿印刷
仅供参考,请勿印刷
仅供参考,请勿印刷
仅供参考,请勿印刷
仅供参考,请勿印刷
ubbles in the gas leak solution indicate that there are
仅供参考,请勿印刷
ubbles in the gas leak solution indicate that there are
仅供参考,请勿印刷
仅供参考,请勿印刷
仅供参考,请勿印刷
仅供参考,请勿印刷
仅供参考,请勿印刷
仅供参考,请勿印刷
仅供参考,请勿印刷
仅供参考,请勿印刷
ubbles in the gas leak solution indicate that there are
仅供参考,请勿印刷
ubbles in the gas leak solution indicate that there are
8) The leak can be stopped by tightening any hose
仅供参考,请勿印刷
8) The leak can be stopped by tightening any hose
connection or replacing any faulty component.
仅供参考,请勿印刷
connection or replacing any faulty component.
barbecue must not be used until the leak is stopped.
仅供参考,请勿印刷
barbecue must not be used until the leak is stopped.
仅供参考,请勿印刷
ubbles in the gas leak solution indicate that there are
仅供参考,请勿印刷
ubbles in the gas leak solution indicate that there are

15
l) OPERATION
It’s recommended that protective gloves be worn to
handle components which may be very hot.
Before cooking, preheat the barbecue for about 10
minutes in the full flow (
) position with the lid closed.
When using the barbecue for the first time, preheat for
about 20 minutes in the full flow (
) position, in order
to eliminate the smell of paint from new components.
Cooking speed can be regulated via the adjustment
buttons: between the full flow position (
) and medium
flow position (
).
In order to reduce food from sticking to the grilles, brush
the grilles lightly with cooking oil prior to placing any food
to be grilled.
In order to reduce the amount of grease catching fire
while cooking, remove any surplus fat from the meet prior
to placing it on the grille. Clean the barbecue after each
use to prevent the accumulation of grease and the risk of
it catching fire.
After cooking, close the lid and set the appliance
in the Full flow (
) position for about 10 minutes to allow
the combustion of food or grease residues on the grate
(self-cleaning effect).
It is normal for the colour of the flame to be yellow
locally.
Important:
If the burners go out whilst you are using the
barbecue, move the adjustment buttons to “off”
immediately (O). Wait five minutes to allow the
unburned gas to escape. Only carry out the lighting
steps after this time.
Be sure to install the grease pan before use. Never
cook without the grease pan.
m) Temperature display
* Attitude 2100 LX :
The oven temperature when the lid is closed is displayed
on the lid of your barbecue.
* Attitude 2100 EX :
The digital thermometer on the front of your barbecue
displays the temperature of the grates and hot plates.
This display is only for reference purposes; the precise
temperature depends on the external conditions of use
and the food placed on the cooking area.
Press the ON/OFF button. The LCD display will show
the temperature of the right cooking area on the right
and the left cooking area on the left.
Press the ON/OFF button a second time. The LCD
screen will light up. Press again to turn the lights off.
Press the button one more time to turn off the
temperature display.
If you forget to do this, the display will turn off
automatically when the temperature drops below 40 °C
and stays below that temperature for 1 hour.
Your thermometer is equipped with a battery discharge
indicator
. When this indicator is on, the batteries
have run out. Be sure to replace them for proper use of
your thermometer.
Protecting the back of your Attitude barbecue from
wind, by placing it against a wall, will improve
its performances and the accuracy of digital
temperature display.
Slight temperature differences between the cooking
grid and cooking griddle is normal. Due to it’s heat
retentive feature, the griddle is generally warmer than
the cooking grid.
Do not exceed 350°C on the cooking griddle, to avoid
the risk of burnt food. Reduce the power of your device
by turning the knob in the counterclockwise direction
towards small flame and opening the lid.
The temperature displayed by the digital temperature
display is more accurate when both burners are in use.
n) CLEANING AND MAINTENANCE
- Never modify the barbecue: any modification may prove
dangerous.
- In order to maintain your barbecue in perfect operating
condition, it is recommended to clean it periodically
(after 2 or 3 uses).
- Wait until the barbecue has cooled down before
cleaning.
- Close the gas cylinder.
- The grill burners must be cleaned and checked every
3 months. Remove the entire burners and check that
no dirt or spider webs block the venturi tubes openings,
which may cause the burners to be less efficient or
cause a dangerous gas fire outside the burner.
- Clean the top of the burners, as well as the sides and
base, using a moist sponge (water with washing up
liquid). After each use, wipe the grease accumulated on
the sides of the burners (Fig. 7) with a damp sponge or
paper towel. To achieve this , remove the cooking grids.
- Check that the burner output holes are not blocked and
leave them to dry before you use the barbecue again.
- Check that all burner outlets are clear and let dry before
using again. If necessary, use a wire brush to unclog
the burner outlets.
- Clean the orifices on the venturi jets or the burner if
necessary.
- If you have not used the equipment for over a month,
also check for spiders webs blocking the burner tube
outlets, which could reduce the grill performance or
cause gas to inflame dangerously away from the
burner.
- Periodically check the condition of the hose and replace
it if it shows signs of ageing or cracking or when
required by local regulations.
NOTE: Frequent maintenance of the burners keeps them
in good condition for many uses and prevents their
premature oxidation, particularly due to the acid residues
from the grilling. However, burner oxidation over time is
a normal phenomenon and an oxidized burner that
functions normally should not be replaced. The burner
needs to be replaced if it functions incorrectly, e.g. if
there is a hole in it.
- Firebox wall
To facilitate the cleaning of the firebox wall, Campingaz
®
has invented Campingaz InstaClean
®
, the concept of the
removable firebox. Thanks to Campingaz InstaClean
®
,
all the parts of the firebox are removable in under
one minute without a need for a tool. These parts are
dishwasher safe.
Depending on the degree of dirtiness of these parts, it
may be necessary to brush the parts before putting them
into the dishwasher for a more complete cleaning.
For the assembly and disassembly of these parts, see Fig. 8
For reassembly after cleaning, install the 2 side walls first,
then the front and rear walls.
- Grease collection tray
Your barbecue is equipped with a grease recovery tray. It
is recommendable to clean it after each use.
Clean the painted grill handle with soapy water. Do not
use abrasive products that could damage the paint.
For easy cleaning, you can cover the grease recovery tray
with disposable aluminium foil. After use of the barbecue,
discard the aluminium foil.
To easily absorb cooking grease, you may spread a
handful of sand onto the bottom of the grease collection
tray. Discard the sand after each use.
GB
- Check that the burner output holes are not blocked and
leave them to dry before you use the barbecue again.
leave them to dry before you use the barbecue again.
- Clean the orifices on the venturi jets or the burner if
Be sure to install the grease pan before use. Never
The oven temperature when the lid is closed is displayed
on the lid of your barbecue.
* Attitude 2100 EX :
The digital thermometer on the front of your barbecue
displays the temperature of the grates and hot plates.
For reference only
To achieve this , remove the cooking grids.
For reference only
To achieve this , remove the cooking grids.
- Check that the burner output holes are not blocked and
For reference only
- Check that the burner output holes are not blocked and
leave them to dry before you use the barbecue again.
For reference only
leave them to dry before you use the barbecue again.
heck that all burner outlets are clear and let dry before
For reference only
heck that all burner outlets are clear and let dry before
For reference only
leave them to dry before you use the barbecue again.
For reference only
leave them to dry before you use the barbecue again.
heck that all burner outlets are clear and let dry before
For reference only
heck that all burner outlets are clear and let dry before
f necessary, use a wire brush to unclog
For reference only
f necessary, use a wire brush to unclog
- Clean the orifices on the venturi jets or the burner if
For reference only
- Clean the orifices on the venturi jets or the burner if
For reference only
leave them to dry before you use the barbecue again.
For reference only
leave them to dry before you use the barbecue again.
heck that all burner outlets are clear and let dry before
For reference only
heck that all burner outlets are clear and let dry before
f necessary, use a wire brush to unclog
For reference only
f necessary, use a wire brush to unclog
For reference only
leave them to dry before you use the barbecue again.
For reference only
leave them to dry before you use the barbecue again.
heck that all burner outlets are clear and let dry before
For reference only
heck that all burner outlets are clear and let dry before
f necessary, use a wire brush to unclog
For reference only
f necessary, use a wire brush to unclog
For reference only
For reference only
For reference only
If the burners go out whilst you are using the
For reference only
If the burners go out whilst you are using the
barbecue, move the adjustment buttons to “off”
For reference only
barbecue, move the adjustment buttons to “off”
immediately (O). Wait five minutes to allow the
For reference only
immediately (O). Wait five minutes to allow the
unburned gas to escape. Only carry out the lighting
For reference only
unburned gas to escape. Only carry out the lighting
Be sure to install the grease pan before use. Never
For reference only
Be sure to install the grease pan before use. Never
cook without the grease pan.
For reference only
cook without the grease pan.
m) Temperature display
For reference only
m) Temperature display
* Attitude 2100 LX :
For reference only
* Attitude 2100 LX :
The oven temperature when the lid is closed is displayed
For reference only
The oven temperature when the lid is closed is displayed
on the lid of your barbecue.
For reference only
on the lid of your barbecue.
For reference only
* Attitude 2100 EX :
For reference only
* Attitude 2100 EX :
The digital thermometer on the front of your barbecue
For reference only
The digital thermometer on the front of your barbecue
displays the temperature of the grates and hot plates.
For reference only
displays the temperature of the grates and hot plates.
This display is only for reference purposes; the precise
For reference only
This display is only for reference purposes; the precise
For reference only
For reference only
leave them to dry before you use the barbecue again.
For reference only
leave them to dry before you use the barbecue again.
heck that all burner outlets are clear and let dry before
For reference only
heck that all burner outlets are clear and let dry before
f necessary, use a wire brush to unclog
For reference only
f necessary, use a wire brush to unclog
the burner outlets.
For reference only
the burner outlets.
- Clean the orifices on the venturi jets or the burner if
For reference only
- Clean the orifices on the venturi jets or the burner if
necessary.
For reference only
necessary.
- If you have not used the equipment for over a month,
For reference only
- If you have not used the equipment for over a month,
also check for spiders webs blocking the burner tube
For reference only
also check for spiders webs blocking the burner tube
outlets, which could reduce the grill performance or
For reference only
outlets, which could reduce the grill performance or
cause gas to inflame dangerously away from the
For reference only
cause gas to inflame dangerously away from the
burner.
For reference only
burner.
- Periodically check the condition of the hose and replace
For reference only
- Periodically check the condition of the hose and replace
For reference only
f necessary, use a wire brush to unclog
For reference only
f necessary, use a wire brush to unclog
- Clean the orifices on the venturi jets or the burner if
For reference only
- Clean the orifices on the venturi jets or the burner if
For reference only
- Clean the orifices on the venturi jets or the burner if
For reference only
- Clean the orifices on the venturi jets or the burner if
- If you have not used the equipment for over a month,
For reference only
- If you have not used the equipment for over a month,
For reference only
necessary.
For reference only
necessary.
- If you have not used the equipment for over a month,
For reference only
- If you have not used the equipment for over a month,
also check for spiders webs blocking the burner tube
For reference only
also check for spiders webs blocking the burner tube
outlets, which could reduce the grill performance or
For reference only
outlets, which could reduce the grill performance or
For reference only
- If you have not used the equipment for over a month,
For reference only
- If you have not used the equipment for over a month,
also check for spiders webs blocking the burner tube
For reference only
also check for spiders webs blocking the burner tube
For reference only
also check for spiders webs blocking the burner tube
For reference only
also check for spiders webs blocking the burner tube
outlets, which could reduce the grill performance or
For reference only
outlets, which could reduce the grill performance or
cause gas to inflame dangerously away from the
For reference only
cause gas to inflame dangerously away from the
burner.
For reference only
burner.
For reference only
For reference only
For reference only
barbecue, move the adjustment buttons to “off”
For reference only
barbecue, move the adjustment buttons to “off”
immediately (O). Wait five minutes to allow the
For reference only
immediately (O). Wait five minutes to allow the
unburned gas to escape. Only carry out the lighting
For reference only
unburned gas to escape. Only carry out the lighting
- Periodically check the condition of the hose and replace
For reference only
- Periodically check the condition of the hose and replace
For reference only
immediately (O). Wait five minutes to allow the
For reference only
immediately (O). Wait five minutes to allow the
unburned gas to escape. Only carry out the lighting
For reference only
unburned gas to escape. Only carry out the lighting
Be sure to install the grease pan before use. Never
For reference only
Be sure to install the grease pan before use. Never
unburned gas to escape. Only carry out the lighting
For reference only
unburned gas to escape. Only carry out the lighting
For reference only
unburned gas to escape. Only carry out the lighting
For reference only
unburned gas to escape. Only carry out the lighting
Be sure to install the grease pan before use. Never
For reference only
Be sure to install the grease pan before use. Never
For reference only
Be sure to install the grease pan before use. Never
For reference only
Be sure to install the grease pan before use. Never
For reference only
Be sure to install the grease pan before use. Never
For reference only
Be sure to install the grease pan before use. Never
For reference only
Be sure to install the grease pan before use. Never
For reference only
Be sure to install the grease pan before use. Never
For reference only
m) Temperature display
For reference only
m) Temperature display
For reference only
m) Temperature display
For reference only
m) Temperature display
For reference only
m) Temperature display
For reference only
m) Temperature display
The oven temperature when the lid is closed is displayed
For reference only
The oven temperature when the lid is closed is displayed
For reference only
* Attitude 2100 LX :
For reference only
* Attitude 2100 LX :
The oven temperature when the lid is closed is displayed
For reference only
The oven temperature when the lid is closed is displayed
on the lid of your barbecue.
For reference only
on the lid of your barbecue.
For reference only
The oven temperature when the lid is closed is displayed
For reference only
The oven temperature when the lid is closed is displayed
on the lid of your barbecue.
For reference only
on the lid of your barbecue.
For reference only
* Attitude 2100 EX :
For reference only
* Attitude 2100 EX :
For reference only
For reference only
For reference only
The oven temperature when the lid is closed is displayed
For reference only
The oven temperature when the lid is closed is displayed
on the lid of your barbecue.
For reference only
on the lid of your barbecue.
For reference only
* Attitude 2100 EX :
For reference only
* Attitude 2100 EX :
The digital thermometer on the front of your barbecue
For reference only
The digital thermometer on the front of your barbecue
For reference only
For reference only
For reference only
- Check that the burner output holes are not blocked and
For reference only
- Check that the burner output holes are not blocked and
leave them to dry before you use the barbecue again.
For reference only
leave them to dry before you use the barbecue again.
heck that all burner outlets are clear and let dry before
For reference only
heck that all burner outlets are clear and let dry before
f necessary, use a wire brush to unclog
For reference only
f necessary, use a wire brush to unclog
- Clean the orifices on the venturi jets or the burner if
For reference only
- Clean the orifices on the venturi jets or the burner if
For reference only
heck that all burner outlets are clear and let dry before
For reference only
heck that all burner outlets are clear and let dry before
f necessary, use a wire brush to unclog
For reference only
f necessary, use a wire brush to unclog
- Clean the orifices on the venturi jets or the burner if
For reference only
- Clean the orifices on the venturi jets or the burner if
For reference only
the burner outlets.
For reference only
the burner outlets.
- Clean the orifices on the venturi jets or the burner if
For reference only
- Clean the orifices on the venturi jets or the burner if
- If you have not used the equipment for over a month,
For reference only
- If you have not used the equipment for over a month,
For reference only
- Clean the orifices on the venturi jets or the burner if
For reference only
- Clean the orifices on the venturi jets or the burner if
- If you have not used the equipment for over a month,
For reference only
- If you have not used the equipment for over a month,
For reference only
necessary.
For reference only
necessary.
- If you have not used the equipment for over a month,
For reference only
- If you have not used the equipment for over a month,
also check for spiders webs blocking the burner tube
For reference only
also check for spiders webs blocking the burner tube
outlets, which could reduce the grill performance or
For reference only
outlets, which could reduce the grill performance or
cause gas to inflame dangerously away from the
For reference only
cause gas to inflame dangerously away from the
For reference only
- If you have not used the equipment for over a month,
For reference only
- If you have not used the equipment for over a month,
also check for spiders webs blocking the burner tube
For reference only
also check for spiders webs blocking the burner tube
For reference only
also check for spiders webs blocking the burner tube
For reference only
also check for spiders webs blocking the burner tube
outlets, which could reduce the grill performance or
For reference only
outlets, which could reduce the grill performance or
cause gas to inflame dangerously away from the
For reference only
cause gas to inflame dangerously away from the
burner.
For reference only
burner.
For reference only
For reference only
For reference only
barbecue, move the adjustment buttons to “off”
For reference only
barbecue, move the adjustment buttons to “off”
immediately (O). Wait five minutes to allow the
For reference only
immediately (O). Wait five minutes to allow the
unburned gas to escape. Only carry out the lighting
For reference only
unburned gas to escape. Only carry out the lighting
- Periodically check the condition of the hose and replace
For reference only
- Periodically check the condition of the hose and replace
For reference only
immediately (O). Wait five minutes to allow the
For reference only
immediately (O). Wait five minutes to allow the
unburned gas to escape. Only carry out the lighting
For reference only
unburned gas to escape. Only carry out the lighting
Be sure to install the grease pan before use. Never
For reference only
Be sure to install the grease pan before use. Never
For reference only
immediately (O). Wait five minutes to allow the
For reference only
immediately (O). Wait five minutes to allow the
unburned gas to escape. Only carry out the lighting
For reference only
unburned gas to escape. Only carry out the lighting
For reference only
Be sure to install the grease pan before use. Never
For reference only
Be sure to install the grease pan before use. Never
For reference only
Be sure to install the grease pan before use. Never
For reference only
Be sure to install the grease pan before use. Never
For reference only
Be sure to install the grease pan before use. Never
For reference only
Be sure to install the grease pan before use. Never
For reference only
cook without the grease pan.
For reference only
cook without the grease pan.
m) Temperature display
For reference only
m) Temperature display
The oven temperature when the lid is closed is displayed
For reference only
The oven temperature when the lid is closed is displayed
For reference only
m) Temperature display
For reference only
m) Temperature display
For reference only
* Attitude 2100 LX :
For reference only
* Attitude 2100 LX :
The oven temperature when the lid is closed is displayed
For reference only
The oven temperature when the lid is closed is displayed
on the lid of your barbecue.
For reference only
on the lid of your barbecue.
For reference only
The oven temperature when the lid is closed is displayed
For reference only
The oven temperature when the lid is closed is displayed
on the lid of your barbecue.
For reference only
on the lid of your barbecue.
For reference only
* Attitude 2100 EX :
For reference only
* Attitude 2100 EX :
For reference only
For reference only
For reference only
The oven temperature when the lid is closed is displayed
For reference only
The oven temperature when the lid is closed is displayed
on the lid of your barbecue.
For reference only
on the lid of your barbecue.
For reference only
* Attitude 2100 EX :
For reference only
* Attitude 2100 EX :
The digital thermometer on the front of your barbecue
For reference only
The digital thermometer on the front of your barbecue
displays the temperature of the grates and hot plates.
For reference only
displays the temperature of the grates and hot plates.
For reference only
For reference only
For reference only
The oven temperature when the lid is closed is displayed
For reference only
The oven temperature when the lid is closed is displayed
on the lid of your barbecue.
For reference only
on the lid of your barbecue.
For reference only
For reference only
For reference only
cause gas to inflame dangerously away from the
- Periodically check the condition of the hose and replace
- Periodically check the condition of the hose and replace
it if it shows signs of ageing or cracking or when
premature oxidation, particularly due to the acid residues
The digital thermometer on the front of your barbecue
displays the temperature of the grates and hot plates.
This display is only for reference purposes; the precise
temperature depends on the external conditions of use
Do not print
Do not print
Do not print
The oven temperature when the lid is closed is displayed
Do not print
The oven temperature when the lid is closed is displayed
Do not print
The digital thermometer on the front of your barbecue
Do not print
The digital thermometer on the front of your barbecue
displays the temperature of the grates and hot plates.
Do not print
displays the temperature of the grates and hot plates.
This display is only for reference purposes; the precise
Do not print
This display is only for reference purposes; the precise
temperature depends on the external conditions of use
Do not print
temperature depends on the external conditions of use
and the food placed on the cooking area.
Do not print
and the food placed on the cooking area.
Do not print
Do not print
outlets, which could reduce the grill performance or
Do not print
outlets, which could reduce the grill performance or
cause gas to inflame dangerously away from the
Do not print
cause gas to inflame dangerously away from the
- Periodically check the condition of the hose and replace
Do not print
- Periodically check the condition of the hose and replace
it if it shows signs of ageing or cracking or when
Do not print
it if it shows signs of ageing or cracking or when
required by local regulations.
Do not print
required by local regulations.
NOTE:
Do not print
NOTE:
Frequent maintenance of the burners keeps them
Do not print
Frequent maintenance of the burners keeps them
in good condition for many uses and prevents their
Do not print
in good condition for many uses and prevents their
premature oxidation, particularly due to the acid residues
Do not print
premature oxidation, particularly due to the acid residues
from the grilling. However, burner oxidation over time is
Do not print
from the grilling. However, burner oxidation over time is
Do not print
cause gas to inflame dangerously away from the
Do not print
cause gas to inflame dangerously away from the
- Periodically check the condition of the hose and replace
Do not print
- Periodically check the condition of the hose and replace
it if it shows signs of ageing or cracking or when
Do not print
it if it shows signs of ageing or cracking or when
Do not print
- Periodically check the condition of the hose and replace
Do not print
- Periodically check the condition of the hose and replace
Do not print
- Periodically check the condition of the hose and replace
Do not print
- Periodically check the condition of the hose and replace
it if it shows signs of ageing or cracking or when
Do not print
it if it shows signs of ageing or cracking or when
required by local regulations.
Do not print
required by local regulations.
- Periodically check the condition of the hose and replace
Do not print
- Periodically check the condition of the hose and replace
Do not print
it if it shows signs of ageing or cracking or when
Do not print
it if it shows signs of ageing or cracking or when
required by local regulations.
Do not print
required by local regulations.
Do not print
it if it shows signs of ageing or cracking or when
Do not print
it if it shows signs of ageing or cracking or when
required by local regulations.
Do not print
required by local regulations.
Do not print
NOTE:
Do not print
NOTE:
Frequent maintenance of the burners keeps them
Do not print
Frequent maintenance of the burners keeps them
in good condition for many uses and prevents their
Do not print
in good condition for many uses and prevents their
premature oxidation, particularly due to the acid residues
Do not print
premature oxidation, particularly due to the acid residues
Do not print
NOTE:
Do not print
NOTE:
Frequent maintenance of the burners keeps them
Do not print
Frequent maintenance of the burners keeps them
Do not print
Do not print
Do not print
Do not print
The oven temperature when the lid is closed is displayed
Do not print
The oven temperature when the lid is closed is displayed
Do not print
The oven temperature when the lid is closed is displayed
Do not print
The oven temperature when the lid is closed is displayed
Do not print
Do not print
Do not print
Do not print
Do not print
The digital thermometer on the front of your barbecue
Do not print
The digital thermometer on the front of your barbecue
displays the temperature of the grates and hot plates.
Do not print
displays the temperature of the grates and hot plates.
Do not print
Do not print
Do not print
The digital thermometer on the front of your barbecue
Do not print
The digital thermometer on the front of your barbecue
displays the temperature of the grates and hot plates.
Do not print
displays the temperature of the grates and hot plates.
This display is only for reference purposes; the precise
Do not print
This display is only for reference purposes; the precise
temperature depends on the external conditions of use
Do not print
temperature depends on the external conditions of use
Do not print
The digital thermometer on the front of your barbecue
Do not print
The digital thermometer on the front of your barbecue
displays the temperature of the grates and hot plates.
Do not print
displays the temperature of the grates and hot plates.
This display is only for reference purposes; the precise
Do not print
This display is only for reference purposes; the precise
Do not print
outlets, which could reduce the grill performance or
Do not print
outlets, which could reduce the grill performance or
cause gas to inflame dangerously away from the
Do not print
cause gas to inflame dangerously away from the
- Periodically check the condition of the hose and replace
Do not print
- Periodically check the condition of the hose and replace
it if it shows signs of ageing or cracking or when
Do not print
it if it shows signs of ageing or cracking or when
Do not print
- Periodically check the condition of the hose and replace
Do not print
- Periodically check the condition of the hose and replace
it if it shows signs of ageing or cracking or when
Do not print
it if it shows signs of ageing or cracking or when
required by local regulations.
Do not print
required by local regulations.
Do not print
- Periodically check the condition of the hose and replace
Do not print
- Periodically check the condition of the hose and replace
it if it shows signs of ageing or cracking or when
Do not print
it if it shows signs of ageing or cracking or when
Do not print
- Periodically check the condition of the hose and replace
Do not print
- Periodically check the condition of the hose and replace
it if it shows signs of ageing or cracking or when
Do not print
it if it shows signs of ageing or cracking or when
required by local regulations.
Do not print
required by local regulations.
Do not print
it if it shows signs of ageing or cracking or when
Do not print
it if it shows signs of ageing or cracking or when
required by local regulations.
Do not print
required by local regulations.
Frequent maintenance of the burners keeps them
Do not print
Frequent maintenance of the burners keeps them
Do not print
required by local regulations.
Do not print
required by local regulations.
NOTE:
Do not print
NOTE:
Frequent maintenance of the burners keeps them
Do not print
Frequent maintenance of the burners keeps them
in good condition for many uses and prevents their
Do not print
in good condition for many uses and prevents their
premature oxidation, particularly due to the acid residues
Do not print
premature oxidation, particularly due to the acid residues
Do not print
NOTE:
Do not print
NOTE:
Frequent maintenance of the burners keeps them
Do not print
Frequent maintenance of the burners keeps them
Do not print
Do not print
Do not print
premature oxidation, particularly due to the acid residues
Do not print
premature oxidation, particularly due to the acid residues
Do not print
Do not print
The oven temperature when the lid is closed is displayed
Do not print
The oven temperature when the lid is closed is displayed
Do not print
The oven temperature when the lid is closed is displayed
Do not print
The oven temperature when the lid is closed is displayed
Do not print
The oven temperature when the lid is closed is displayed
Do not print
The oven temperature when the lid is closed is displayed
Do not print
Do not print
Do not print
Do not print
Do not print
The digital thermometer on the front of your barbecue
Do not print
The digital thermometer on the front of your barbecue
displays the temperature of the grates and hot plates.
Do not print
displays the temperature of the grates and hot plates.
Do not print
Do not print
Do not print
The digital thermometer on the front of your barbecue
Do not print
The digital thermometer on the front of your barbecue
Do not print
The digital thermometer on the front of your barbecue
Do not print
The digital thermometer on the front of your barbecue
displays the temperature of the grates and hot plates.
Do not print
displays the temperature of the grates and hot plates.
This display is only for reference purposes; the precise
Do not print
This display is only for reference purposes; the precise
temperature depends on the external conditions of use
Do not print
temperature depends on the external conditions of use
Do not print
The digital thermometer on the front of your barbecue
Do not print
The digital thermometer on the front of your barbecue
displays the temperature of the grates and hot plates.
Do not print
displays the temperature of the grates and hot plates.
This display is only for reference purposes; the precise
Do not print
This display is only for reference purposes; the precise
- Periodically check the condition of the hose and replace
it if it shows signs of ageing or cracking or when
Frequent maintenance of the burners keeps them
premature oxidation, particularly due to the acid residues
displays the temperature of the grates and hot plates.
temperature depends on the external conditions of use
- Firebox wall
the temperature of the right cooking area on the right
screen will light up. Press again to turn the lights off.
temperature display.
If you forget to do this, the display will turn off
仅供参考,请勿印刷
- Periodically check the condition of the hose and replace
仅供参考,请勿印刷
- Periodically check the condition of the hose and replace
it if it shows signs of ageing or cracking or when
仅供参考,请勿印刷
it if it shows signs of ageing or cracking or when
Frequent maintenance of the burners keeps them
仅供参考,请勿印刷
Frequent maintenance of the burners keeps them
in good condition for many uses and prevents their
仅供参考,请勿印刷
in good condition for many uses and prevents their
premature oxidation, particularly due to the acid residues
仅供参考,请勿印刷
premature oxidation, particularly due to the acid residues
from the grilling. However, burner oxidation over time is
仅供参考,请勿印刷
from the grilling. However, burner oxidation over time is
a normal phenomenon and an oxidized burner that
仅供参考,请勿印刷
a normal phenomenon and an oxidized burner that
仅供参考,请勿印刷
Frequent maintenance of the burners keeps them
仅供参考,请勿印刷
Frequent maintenance of the burners keeps them
in good condition for many uses and prevents their
仅供参考,请勿印刷
in good condition for many uses and prevents their
premature oxidation, particularly due to the acid residues
仅供参考,请勿印刷
premature oxidation, particularly due to the acid residues
from the grilling. However, burner oxidation over time is
仅供参考,请勿印刷
from the grilling. However, burner oxidation over time is
a normal phenomenon and an oxidized burner that
仅供参考,请勿印刷
a normal phenomenon and an oxidized burner that
仅供参考,请勿印刷
仅供参考,请勿印刷
仅供参考,请勿印刷
仅供参考,请勿印刷
The digital thermometer on the front of your barbecue
仅供参考,请勿印刷
The digital thermometer on the front of your barbecue
displays the temperature of the grates and hot plates.
仅供参考,请勿印刷
displays the temperature of the grates and hot plates.
This display is only for reference purposes; the precise
仅供参考,请勿印刷
This display is only for reference purposes; the precise
temperature depends on the external conditions of use
仅供参考,请勿印刷
temperature depends on the external conditions of use
and the food placed on the cooking area.
仅供参考,请勿印刷
and the food placed on the cooking area.
Press the ON/OFF button. The LCD display will show
仅供参考,请勿印刷
Press the ON/OFF button. The LCD display will show
the temperature of the right cooking area on the right
仅供参考,请勿印刷
the temperature of the right cooking area on the right
and the left cooking area on the left.
仅供参考,请勿印刷
and the left cooking area on the left.
Press the ON/OFF button a second time. The LCD
仅供参考,请勿印刷
Press the ON/OFF button a second time. The LCD
screen will light up. Press again to turn the lights off.
仅供参考,请勿印刷
screen will light up. Press again to turn the lights off.
Press the button one more time to turn off the
仅供参考,请勿印刷
Press the button one more time to turn off the
temperature display.
仅供参考,请勿印刷
temperature display.
If you forget to do this, the display will turn off
仅供参考,请勿印刷
If you forget to do this, the display will turn off
automatically when the temperature drops below 40 °C
仅供参考,请勿印刷
automatically when the temperature drops below 40 °C
and stays below that temperature for 1 hour.
仅供参考,请勿印刷
and stays below that temperature for 1 hour.
仅供参考,请勿印刷
仅供参考,请勿印刷
premature oxidation, particularly due to the acid residues
仅供参考,请勿印刷
premature oxidation, particularly due to the acid residues
from the grilling. However, burner oxidation over time is
仅供参考,请勿印刷
from the grilling. However, burner oxidation over time is
a normal phenomenon and an oxidized burner that
仅供参考,请勿印刷
a normal phenomenon and an oxidized burner that
仅供参考,请勿印刷
functions normally should not be replaced. The burner
仅供参考,请勿印刷
functions normally should not be replaced. The burner
needs to be replaced if it functions incorrectly, e.g. if
仅供参考,请勿印刷
needs to be replaced if it functions incorrectly, e.g. if
there is a hole in it.
仅供参考,请勿印刷
there is a hole in it.
- Firebox wall
仅供参考,请勿印刷
- Firebox wall
仅供参考,请勿印刷
- Periodically check the condition of the hose and replace
仅供参考,请勿印刷
- Periodically check the condition of the hose and replace
it if it shows signs of ageing or cracking or when
仅供参考,请勿印刷
it if it shows signs of ageing or cracking or when
仅供参考,请勿印刷
- Periodically check the condition of the hose and replace
仅供参考,请勿印刷
- Periodically check the condition of the hose and replace
it if it shows signs of ageing or cracking or when
仅供参考,请勿印刷
it if it shows signs of ageing or cracking or when
仅供参考,请勿印刷
- Periodically check the condition of the hose and replace
仅供参考,请勿印刷
- Periodically check the condition of the hose and replace
it if it shows signs of ageing or cracking or when
仅供参考,请勿印刷
it if it shows signs of ageing or cracking or when
Frequent maintenance of the burners keeps them
仅供参考,请勿印刷
Frequent maintenance of the burners keeps them
仅供参考,请勿印刷
it if it shows signs of ageing or cracking or when
仅供参考,请勿印刷
it if it shows signs of ageing or cracking or when
仅供参考,请勿印刷
Frequent maintenance of the burners keeps them
仅供参考,请勿印刷
Frequent maintenance of the burners keeps them
仅供参考,请勿印刷
Frequent maintenance of the burners keeps them
仅供参考,请勿印刷
Frequent maintenance of the burners keeps them
in good condition for many uses and prevents their
仅供参考,请勿印刷
in good condition for many uses and prevents their
premature oxidation, particularly due to the acid residues
仅供参考,请勿印刷
premature oxidation, particularly due to the acid residues
仅供参考,请勿印刷
Frequent maintenance of the burners keeps them
仅供参考,请勿印刷
Frequent maintenance of the burners keeps them
in good condition for many uses and prevents their
仅供参考,请勿印刷
in good condition for many uses and prevents their
premature oxidation, particularly due to the acid residues
仅供参考,请勿印刷
premature oxidation, particularly due to the acid residues
仅供参考,请勿印刷
Frequent maintenance of the burners keeps them
仅供参考,请勿印刷
Frequent maintenance of the burners keeps them
in good condition for many uses and prevents their
仅供参考,请勿印刷
in good condition for many uses and prevents their
premature oxidation, particularly due to the acid residues
仅供参考,请勿印刷
premature oxidation, particularly due to the acid residues
from the grilling. However, burner oxidation over time is
仅供参考,请勿印刷
from the grilling. However, burner oxidation over time is
a normal phenomenon and an oxidized burner that
仅供参考,请勿印刷
a normal phenomenon and an oxidized burner that
functions normally should not be replaced. The burner
仅供参考,请勿印刷
functions normally should not be replaced. The burner
仅供参考,请勿印刷
premature oxidation, particularly due to the acid residues
仅供参考,请勿印刷
premature oxidation, particularly due to the acid residues
from the grilling. However, burner oxidation over time is
仅供参考,请勿印刷
from the grilling. However, burner oxidation over time is
a normal phenomenon and an oxidized burner that
仅供参考,请勿印刷
a normal phenomenon and an oxidized burner that
仅供参考,请勿印刷
premature oxidation, particularly due to the acid residues
仅供参考,请勿印刷
premature oxidation, particularly due to the acid residues
from the grilling. However, burner oxidation over time is
仅供参考,请勿印刷
from the grilling. However, burner oxidation over time is
仅供参考,请勿印刷
from the grilling. However, burner oxidation over time is
仅供参考,请勿印刷
from the grilling. However, burner oxidation over time is
a normal phenomenon and an oxidized burner that
仅供参考,请勿印刷
a normal phenomenon and an oxidized burner that
仅供参考,请勿印刷
a normal phenomenon and an oxidized burner that
仅供参考,请勿印刷
a normal phenomenon and an oxidized burner that
仅供参考,请勿印刷
a normal phenomenon and an oxidized burner that
仅供参考,请勿印刷
a normal phenomenon and an oxidized burner that
仅供参考,请勿印刷
functions normally should not be replaced. The burner
仅供参考,请勿印刷
functions normally should not be replaced. The burner
needs to be replaced if it functions incorrectly, e.g. if
仅供参考,请勿印刷
needs to be replaced if it functions incorrectly, e.g. if
there is a hole in it.
仅供参考,请勿印刷
there is a hole in it.
仅供参考,请勿印刷
a normal phenomenon and an oxidized burner that
仅供参考,请勿印刷
a normal phenomenon and an oxidized burner that
functions normally should not be replaced. The burner
仅供参考,请勿印刷
functions normally should not be replaced. The burner
仅供参考,请勿印刷
functions normally should not be replaced. The burner
仅供参考,请勿印刷
functions normally should not be replaced. The burner
needs to be replaced if it functions incorrectly, e.g. if
仅供参考,请勿印刷
needs to be replaced if it functions incorrectly, e.g. if
there is a hole in it.
仅供参考,请勿印刷
there is a hole in it.
仅供参考,请勿印刷
functions normally should not be replaced. The burner
仅供参考,请勿印刷
functions normally should not be replaced. The burner
needs to be replaced if it functions incorrectly, e.g. if
仅供参考,请勿印刷
needs to be replaced if it functions incorrectly, e.g. if
仅供参考,请勿印刷
仅供参考,请勿印刷
displays the temperature of the grates and hot plates.
仅供参考,请勿印刷
displays the temperature of the grates and hot plates.
This display is only for reference purposes; the precise
仅供参考,请勿印刷
This display is only for reference purposes; the precise
temperature depends on the external conditions of use
仅供参考,请勿印刷
temperature depends on the external conditions of use
Press the ON/OFF button. The LCD display will show
仅供参考,请勿印刷
Press the ON/OFF button. The LCD display will show
仅供参考,请勿印刷
仅供参考,请勿印刷
仅供参考,请勿印刷
displays the temperature of the grates and hot plates.
仅供参考,请勿印刷
displays the temperature of the grates and hot plates.
This display is only for reference purposes; the precise
仅供参考,请勿印刷
This display is only for reference purposes; the precise
temperature depends on the external conditions of use
仅供参考,请勿印刷
temperature depends on the external conditions of use
and the food placed on the cooking area.
仅供参考,请勿印刷
and the food placed on the cooking area.
Press the ON/OFF button. The LCD display will show
仅供参考,请勿印刷
Press the ON/OFF button. The LCD display will show
仅供参考,请勿印刷
displays the temperature of the grates and hot plates.
仅供参考,请勿印刷
displays the temperature of the grates and hot plates.
This display is only for reference purposes; the precise
仅供参考,请勿印刷
This display is only for reference purposes; the precise
仅供参考,请勿印刷
- Firebox wall
仅供参考,请勿印刷
- Firebox wall
仅供参考,请勿印刷
temperature depends on the external conditions of use
仅供参考,请勿印刷
temperature depends on the external conditions of use
and the food placed on the cooking area.
仅供参考,请勿印刷
and the food placed on the cooking area.
Press the ON/OFF button. The LCD display will show
仅供参考,请勿印刷
Press the ON/OFF button. The LCD display will show
the temperature of the right cooking area on the right
仅供参考,请勿印刷
the temperature of the right cooking area on the right
仅供参考,请勿印刷
and the food placed on the cooking area.
仅供参考,请勿印刷
and the food placed on the cooking area.
Press the ON/OFF button. The LCD display will show
仅供参考,请勿印刷
Press the ON/OFF button. The LCD display will show
仅供参考,请勿印刷
Press the ON/OFF button. The LCD display will show
仅供参考,请勿印刷
Press the ON/OFF button. The LCD display will show
the temperature of the right cooking area on the right
仅供参考,请勿印刷
the temperature of the right cooking area on the right
仅供参考,请勿印刷
Press the ON/OFF button. The LCD display will show
仅供参考,请勿印刷
Press the ON/OFF button. The LCD display will show
the temperature of the right cooking area on the right
仅供参考,请勿印刷
the temperature of the right cooking area on the right
and the left cooking area on the left.
仅供参考,请勿印刷
and the left cooking area on the left.
Press the ON/OFF button a second time. The LCD
仅供参考,请勿印刷
Press the ON/OFF button a second time. The LCD
screen will light up. Press again to turn the lights off.
仅供参考,请勿印刷
screen will light up. Press again to turn the lights off.
仅供参考,请勿印刷
Press the ON/OFF button. The LCD display will show
仅供参考,请勿印刷
Press the ON/OFF button. The LCD display will show
the temperature of the right cooking area on the right
仅供参考,请勿印刷
the temperature of the right cooking area on the right
仅供参考,请勿印刷
the temperature of the right cooking area on the right
仅供参考,请勿印刷
the temperature of the right cooking area on the right
Press the ON/OFF button a second time. The LCD
仅供参考,请勿印刷
Press the ON/OFF button a second time. The LCD
仅供参考,请勿印刷
the temperature of the right cooking area on the right
仅供参考,请勿印刷
the temperature of the right cooking area on the right
Press the ON/OFF button a second time. The LCD
仅供参考,请勿印刷
Press the ON/OFF button a second time. The LCD
仅供参考,请勿印刷
the temperature of the right cooking area on the right
仅供参考,请勿印刷
the temperature of the right cooking area on the right
and the left cooking area on the left.
仅供参考,请勿印刷
and the left cooking area on the left.
Press the ON/OFF button a second time. The LCD
仅供参考,请勿印刷
Press the ON/OFF button a second time. The LCD
screen will light up. Press again to turn the lights off.
仅供参考,请勿印刷
screen will light up. Press again to turn the lights off.
Press the button one more time to turn off the
仅供参考,请勿印刷
Press the button one more time to turn off the
仅供参考,请勿印刷
and the left cooking area on the left.
仅供参考,请勿印刷
and the left cooking area on the left.
Press the ON/OFF button a second time. The LCD
仅供参考,请勿印刷
Press the ON/OFF button a second time. The LCD
仅供参考,请勿印刷
Press the ON/OFF button a second time. The LCD
仅供参考,请勿印刷
Press the ON/OFF button a second time. The LCD
screen will light up. Press again to turn the lights off.
仅供参考,请勿印刷
screen will light up. Press again to turn the lights off.
Press the button one more time to turn off the
仅供参考,请勿印刷
Press the button one more time to turn off the
temperature display.
仅供参考,请勿印刷
temperature display.
If you forget to do this, the display will turn off
仅供参考,请勿印刷
If you forget to do this, the display will turn off
automatically when the temperature drops below 40 °C
仅供参考,请勿印刷
automatically when the temperature drops below 40 °C
仅供参考,请勿印刷
screen will light up. Press again to turn the lights off.
仅供参考,请勿印刷
screen will light up. Press again to turn the lights off.
仅供参考,请勿印刷
screen will light up. Press again to turn the lights off.
仅供参考,请勿印刷
screen will light up. Press again to turn the lights off.
Press the button one more time to turn off the
仅供参考,请勿印刷
Press the button one more time to turn off the
仅供参考,请勿印刷
screen will light up. Press again to turn the lights off.
仅供参考,请勿印刷
screen will light up. Press again to turn the lights off.
Press the button one more time to turn off the
仅供参考,请勿印刷
Press the button one more time to turn off the
temperature display.
仅供参考,请勿印刷
temperature display.
仅供参考,请勿印刷
screen will light up. Press again to turn the lights off.
仅供参考,请勿印刷
screen will light up. Press again to turn the lights off.
Press the button one more time to turn off the
仅供参考,请勿印刷
Press the button one more time to turn off the
temperature display.
仅供参考,请勿印刷
temperature display.
If you forget to do this, the display will turn off
仅供参考,请勿印刷
If you forget to do this, the display will turn off
automatically when the temperature drops below 40 °C
仅供参考,请勿印刷
automatically when the temperature drops below 40 °C
仅供参考,请勿印刷
screen will light up. Press again to turn the lights off.
仅供参考,请勿印刷
screen will light up. Press again to turn the lights off.
Press the button one more time to turn off the
仅供参考,请勿印刷
Press the button one more time to turn off the
temperature display.
仅供参考,请勿印刷
temperature display.
If you forget to do this, the display will turn off
仅供参考,请勿印刷
If you forget to do this, the display will turn off
automatically when the temperature drops below 40 °C
仅供参考,请勿印刷
automatically when the temperature drops below 40 °C
仅供参考,请勿印刷
screen will light up. Press again to turn the lights off.
仅供参考,请勿印刷
screen will light up. Press again to turn the lights off.
Press the button one more time to turn off the
仅供参考,请勿印刷
Press the button one more time to turn off the
仅供参考,请勿印刷
- Periodically check the condition of the hose and replace
仅供参考,请勿印刷
- Periodically check the condition of the hose and replace
it if it shows signs of ageing or cracking or when
仅供参考,请勿印刷
it if it shows signs of ageing or cracking or when
仅供参考,请勿印刷
- Periodically check the condition of the hose and replace
仅供参考,请勿印刷
- Periodically check the condition of the hose and replace
it if it shows signs of ageing or cracking or when
仅供参考,请勿印刷
it if it shows signs of ageing or cracking or when
仅供参考,请勿印刷
- Periodically check the condition of the hose and replace
仅供参考,请勿印刷
- Periodically check the condition of the hose and replace
it if it shows signs of ageing or cracking or when
仅供参考,请勿印刷
it if it shows signs of ageing or cracking or when
Frequent maintenance of the burners keeps them
仅供参考,请勿印刷
Frequent maintenance of the burners keeps them
仅供参考,请勿印刷
- Periodically check the condition of the hose and replace
仅供参考,请勿印刷
- Periodically check the condition of the hose and replace
it if it shows signs of ageing or cracking or when
仅供参考,请勿印刷
it if it shows signs of ageing or cracking or when
仅供参考,请勿印刷
Frequent maintenance of the burners keeps them
仅供参考,请勿印刷
Frequent maintenance of the burners keeps them
in good condition for many uses and prevents their
仅供参考,请勿印刷
in good condition for many uses and prevents their
premature oxidation, particularly due to the acid residues
仅供参考,请勿印刷
premature oxidation, particularly due to the acid residues
仅供参考,请勿印刷
Frequent maintenance of the burners keeps them
仅供参考,请勿印刷
Frequent maintenance of the burners keeps them
in good condition for many uses and prevents their
仅供参考,请勿印刷
in good condition for many uses and prevents their
premature oxidation, particularly due to the acid residues
仅供参考,请勿印刷
premature oxidation, particularly due to the acid residues
from the grilling. However, burner oxidation over time is
仅供参考,请勿印刷
from the grilling. However, burner oxidation over time is
a normal phenomenon and an oxidized burner that
仅供参考,请勿印刷
a normal phenomenon and an oxidized burner that
functions normally should not be replaced. The burner
仅供参考,请勿印刷
functions normally should not be replaced. The burner
Frequent maintenance of the burners keeps them
仅供参考,请勿印刷
Frequent maintenance of the burners keeps them
仅供参考,请勿印刷
in good condition for many uses and prevents their
仅供参考,请勿印刷
in good condition for many uses and prevents their
premature oxidation, particularly due to the acid residues
仅供参考,请勿印刷
premature oxidation, particularly due to the acid residues
from the grilling. However, burner oxidation over time is
仅供参考,请勿印刷
from the grilling. However, burner oxidation over time is
a normal phenomenon and an oxidized burner that
仅供参考,请勿印刷
a normal phenomenon and an oxidized burner that
仅供参考,请勿印刷
a normal phenomenon and an oxidized burner that
仅供参考,请勿印刷
a normal phenomenon and an oxidized burner that
仅供参考,请勿印刷
functions normally should not be replaced. The burner
仅供参考,请勿印刷
functions normally should not be replaced. The burner
needs to be replaced if it functions incorrectly, e.g. if
仅供参考,请勿印刷
needs to be replaced if it functions incorrectly, e.g. if
there is a hole in it.
仅供参考,请勿印刷
there is a hole in it.
仅供参考,请勿印刷
from the grilling. However, burner oxidation over time is
仅供参考,请勿印刷
from the grilling. However, burner oxidation over time is
a normal phenomenon and an oxidized burner that
仅供参考,请勿印刷
a normal phenomenon and an oxidized burner that
仅供参考,请勿印刷
a normal phenomenon and an oxidized burner that
仅供参考,请勿印刷
a normal phenomenon and an oxidized burner that
functions normally should not be replaced. The burner
仅供参考,请勿印刷
functions normally should not be replaced. The burner
仅供参考,请勿印刷
a normal phenomenon and an oxidized burner that
仅供参考,请勿印刷
a normal phenomenon and an oxidized burner that
仅供参考,请勿印刷
functions normally should not be replaced. The burner
仅供参考,请勿印刷
functions normally should not be replaced. The burner
needs to be replaced if it functions incorrectly, e.g. if
仅供参考,请勿印刷
needs to be replaced if it functions incorrectly, e.g. if
仅供参考,请勿印刷
仅供参考,请勿印刷
The digital thermometer on the front of your barbecue
仅供参考,请勿印刷
The digital thermometer on the front of your barbecue
displays the temperature of the grates and hot plates.
仅供参考,请勿印刷
displays the temperature of the grates and hot plates.
This display is only for reference purposes; the precise
仅供参考,请勿印刷
This display is only for reference purposes; the precise
temperature depends on the external conditions of use
仅供参考,请勿印刷
temperature depends on the external conditions of use
and the food placed on the cooking area.
仅供参考,请勿印刷
and the food placed on the cooking area.
Press the ON/OFF button. The LCD display will show
仅供参考,请勿印刷
Press the ON/OFF button. The LCD display will show
the temperature of the right cooking area on the right
仅供参考,请勿印刷
the temperature of the right cooking area on the right
and the left cooking area on the left.
仅供参考,请勿印刷
and the left cooking area on the left.
Press the ON/OFF button a second time. The LCD
仅供参考,请勿印刷
Press the ON/OFF button a second time. The LCD
screen will light up. Press again to turn the lights off.
仅供参考,请勿印刷
screen will light up. Press again to turn the lights off.
仅供参考,请勿印刷
仅供参考,请勿印刷
仅供参考,请勿印刷
- Firebox wall
仅供参考,请勿印刷
- Firebox wall
仅供参考,请勿印刷
仅供参考,请勿印刷
Press the ON/OFF button. The LCD display will show
仅供参考,请勿印刷
Press the ON/OFF button. The LCD display will show
the temperature of the right cooking area on the right
仅供参考,请勿印刷
the temperature of the right cooking area on the right
and the left cooking area on the left.
仅供参考,请勿印刷
and the left cooking area on the left.
Press the ON/OFF button a second time. The LCD
仅供参考,请勿印刷
Press the ON/OFF button a second time. The LCD
screen will light up. Press again to turn the lights off.
仅供参考,请勿印刷
screen will light up. Press again to turn the lights off.
Press the button one more time to turn off the
仅供参考,请勿印刷
Press the button one more time to turn off the
仅供参考,请勿印刷
and the left cooking area on the left.
仅供参考,请勿印刷
and the left cooking area on the left.
Press the ON/OFF button a second time. The LCD
仅供参考,请勿印刷
Press the ON/OFF button a second time. The LCD
仅供参考,请勿印刷
Press the ON/OFF button a second time. The LCD
仅供参考,请勿印刷
Press the ON/OFF button a second time. The LCD
screen will light up. Press again to turn the lights off.
仅供参考,请勿印刷
screen will light up. Press again to turn the lights off.
Press the button one more time to turn off the
仅供参考,请勿印刷
Press the button one more time to turn off the
temperature display.
仅供参考,请勿印刷
temperature display.
If you forget to do this, the display will turn off
仅供参考,请勿印刷
If you forget to do this, the display will turn off
automatically when the temperature drops below 40 °C
仅供参考,请勿印刷
automatically when the temperature drops below 40 °C
and stays below that temperature for 1 hour.
仅供参考,请勿印刷
and stays below that temperature for 1 hour.
仅供参考,请勿印刷
Press the ON/OFF button a second time. The LCD
仅供参考,请勿印刷
Press the ON/OFF button a second time. The LCD
screen will light up. Press again to turn the lights off.
仅供参考,请勿印刷
screen will light up. Press again to turn the lights off.
Press the button one more time to turn off the
仅供参考,请勿印刷
Press the button one more time to turn off the
temperature display.
仅供参考,请勿印刷
temperature display.

16
- Cooking grates
The cooking grates are enamelled.
Wait for them to cool before any cleaning operation. Use
a Campingaz
®
BBQ Cleaner Spray cleaning product and
brushes for barbecues.
You may clean your griddle and grid in the dishwasher.
Before putting them into the dishwasher, it is often
necessary to scrape them with a sponge or a metallic
brush to remove residue that sticks to the cooking surface.
(Fig. 2C) To remove the grate, slide a finger into the hole
indicated, lift it up and hold it up with the other hand.
(Fig. 2C) To remove the 2-part Campingaz
®
Culinary
Modular grate (see paragraph § p. Accessories below),
first remove the central part using the indicated hole, then
remove the edge.
The cast iron cooking surfaces are porcelain enamelled
which protects the cooking surface material from corrosion.
Cast iron cooking surfaces can come in either a shiny and
glossy look or in a thinner textured matt appearance. To
keep them in pristine condition, it is important to oil matt
cast iron surfaces after cleaning. Grilled foods don’t stick
as easily to the surface which aids cleaning and extends
the lifetime of the cooking surface.
- Control panel
Clean the control panel from time to time using a sponge
damped with dish washing liquid. Do not use abrasive
products.
o) STORAGE
- Close the gas cylinder valve after use.
- If you store your barbecue indoors, disconnect the gas
cylinder and store the cylinder outdoors.
- If you store your barbecue outdoors, it is recommended
that a protective cover be used.
Wait for the barbecue to cool down completely before
handling it to return it to its place of storage.
Do not store your product in direct sunlight. It is advisable
to store it in a sheltered place.
For long periods without use, it is recommendable to store
the device in a dry place indoors (e.g. a garage).
After a long storage period, check the condition of the
thermometer batteries (Attitude EX/EX Plus), the lighting
batteries (Attitude EX/EX Plus) and the electronic igniter
batteries (any model).
p) ACCESSORIES
Your barbecue comes with a Campingaz
®
Culinary
Modular grate.
The Campingaz
®
Culinary Modular cooking grid is made
up of 2 parts:
• the contour
• the centre
(Abb. 2B) The centre is removable and may be replaced
by one of the accessories sold separately by Campingaz
®
,
for example:
• Pizza stone
• Roasting pan
• Paella plate
The Campingaz
®
Culinary Modular concept therefore
allows you to transform your barbecue into a true outdoor
kitchen and to use a specific cooking support depending
on what you are preparing.
However, a wok cannot be used on your barbecue.
Your barbecue also comes with a standard enamelled cast
iron grate.
Campingaz provides an optional accessory enamelled
cast iron plate to replace it.
Attitude 2100 EX (Fig 9):
If you replace the right cooking grid with a reversible
griddle accessory, you must first lower the temperature
sensor, underneath it.
This ensures that the correct temperature will be
displayed.
The sensor support is pre-set at the upper endstop (Fig
9A)
Untighten the screw (Fig 9B)
Lower the sensor support (Fig 9C) to its lower endstop
(Fig 9D)
Fix the position of the sensor by retightening the screw.
ADG advises that its gas barbecues should
systematically be used with accessories and
replacement parts from Campingaz
®
. ADG accepts no
responsibility for any damage or malfunction due to
the use of accessories and/or replacement parts from
other brands.
q) PROTECTING THE ENVIRONMENT
Think about protecting the environment! Your equipment
contains materials which can be recovered or recycled.
Hand them in to the waste collection service in your
municipality and sort the packing materials.
r) BATTERY RECOMMENDATIONS
This symbol found on the batteries means that at the
end of their lives, the batteries must be removed
from the unit, and then recycled or properly disposed
of. The batteries should not be thrown into the trash, but
should be brought to a collection point (dump...). Check
with your local authorities. Never dispose of in nature, do
not incinerate: the presence of certain substances (Hg,
Pb, Cd, Zn, Ni) in used batteries may be hazardous to the
environment and human health.
s) ELECTRICAL AND ELECTRONIC WASTE
This symbol means that this unit is the subject of a
separate collection. At the end of its life, the
barbecue must be properly disposed of. The unit
must not be placed with unsorted municipal waste.
Selective collection of waste will encourage reuse,
recycling and other forms of revaluation of recyclable
materials contained in the waste. Put the unit in a waste
recovery center (dump) for this purpose. Check with your
local authorities. Never dispose of in nature, do not
incinerate: the presence of certain hazardous substances
in electrical and electronic equipment can be harmful to
the environment, and have a potential effect on human
health.
GB
the use of accessories and/or replacement parts from
the use of accessories and/or replacement parts from
) PROTECTING THE ENVIRONMENT
that a protective cover be used.
Wait for the barbecue to cool down completely before
handling it to return it to its place of storage.
Do not store your product in direct sunlight. It is advisable
to store it in a sheltered place.
For reference only
responsibility for any damage or malfunction due to
For reference only
responsibility for any damage or malfunction due to
the use of accessories and/or replacement parts from
For reference only
the use of accessories and/or replacement parts from
For reference only
the use of accessories and/or replacement parts from
For reference only
the use of accessories and/or replacement parts from
) PROTECTING THE ENVIRONMENT
For reference only
) PROTECTING THE ENVIRONMENT
For reference only
the use of accessories and/or replacement parts from
For reference only
the use of accessories and/or replacement parts from
) PROTECTING THE ENVIRONMENT
For reference only
) PROTECTING THE ENVIRONMENT
For reference only
) PROTECTING THE ENVIRONMENT
For reference only
) PROTECTING THE ENVIRONMENT
For reference only
) PROTECTING THE ENVIRONMENT
For reference only
) PROTECTING THE ENVIRONMENT
Think about protecting the environment! Your equipment
For reference only
Think about protecting the environment! Your equipment
contains materials which can be recovered or recycled.
For reference only
contains materials which can be recovered or recycled.
Hand them in to the waste collection service in your
For reference only
Hand them in to the waste collection service in your
municipality and sort the packing materials.
For reference only
municipality and sort the packing materials.
r)
For reference only
r)
BATTERY RECOMMENDATIONS
For reference only
BATTERY RECOMMENDATIONS
For reference only
Clean the control panel from time to time using a sponge
For reference only
Clean the control panel from time to time using a sponge
damped with dish washing liquid. Do not use abrasive
For reference only
damped with dish washing liquid. Do not use abrasive
lose the gas cylinder valve after use.
For reference only
lose the gas cylinder valve after use.
f you store your barbecue indoors, disconnect the gas
For reference only
f you store your barbecue indoors, disconnect the gas
cylinder and store the cylinder outdoors.
For reference only
cylinder and store the cylinder outdoors.
f you store your barbecue outdoors, it is recommended
For reference only
f you store your barbecue outdoors, it is recommended
that a protective cover be used.
For reference only
that a protective cover be used.
Wait for the barbecue to cool down completely before
For reference only
Wait for the barbecue to cool down completely before
handling it to return it to its place of storage.
For reference only
handling it to return it to its place of storage.
Do not store your product in direct sunlight. It is advisable
For reference only
Do not store your product in direct sunlight. It is advisable
to store it in a sheltered place.
For reference only
to store it in a sheltered place.
For long periods without use, it is recommendable to store
For reference only
For long periods without use, it is recommendable to store
For reference only
For reference only
For reference only
) PROTECTING THE ENVIRONMENT
For reference only
) PROTECTING THE ENVIRONMENT
Think about protecting the environment! Your equipment
For reference only
Think about protecting the environment! Your equipment
For reference only
) PROTECTING THE ENVIRONMENT
For reference only
) PROTECTING THE ENVIRONMENT
Think about protecting the environment! Your equipment
For reference only
Think about protecting the environment! Your equipment
contains materials which can be recovered or recycled.
For reference only
contains materials which can be recovered or recycled.
For reference only
Think about protecting the environment! Your equipment
For reference only
Think about protecting the environment! Your equipment
contains materials which can be recovered or recycled.
For reference only
contains materials which can be recovered or recycled.
Hand them in to the waste collection service in your
For reference only
Hand them in to the waste collection service in your
municipality and sort the packing materials.
For reference only
municipality and sort the packing materials.
contains materials which can be recovered or recycled.
For reference only
contains materials which can be recovered or recycled.
For reference only
Hand them in to the waste collection service in your
For reference only
Hand them in to the waste collection service in your
municipality and sort the packing materials.
For reference only
municipality and sort the packing materials.
For reference only
damped with dish washing liquid. Do not use abrasive
For reference only
damped with dish washing liquid. Do not use abrasive
For reference only
For reference only
For reference only
For reference only
lose the gas cylinder valve after use.
For reference only
lose the gas cylinder valve after use.
For reference only
lose the gas cylinder valve after use.
For reference only
lose the gas cylinder valve after use.
f you store your barbecue indoors, disconnect the gas
For reference only
f you store your barbecue indoors, disconnect the gas
For reference only
lose the gas cylinder valve after use.
For reference only
lose the gas cylinder valve after use.
f you store your barbecue indoors, disconnect the gas
For reference only
f you store your barbecue indoors, disconnect the gas
cylinder and store the cylinder outdoors.
For reference only
cylinder and store the cylinder outdoors.
f you store your barbecue outdoors, it is recommended
For reference only
f you store your barbecue outdoors, it is recommended
f you store your barbecue indoors, disconnect the gas
For reference only
f you store your barbecue indoors, disconnect the gas
For reference only
f you store your barbecue indoors, disconnect the gas
For reference only
f you store your barbecue indoors, disconnect the gas
cylinder and store the cylinder outdoors.
For reference only
cylinder and store the cylinder outdoors.
f you store your barbecue outdoors, it is recommended
For reference only
f you store your barbecue outdoors, it is recommended
that a protective cover be used.
For reference only
that a protective cover be used.
For reference only
cylinder and store the cylinder outdoors.
For reference only
cylinder and store the cylinder outdoors.
f you store your barbecue outdoors, it is recommended
For reference only
f you store your barbecue outdoors, it is recommended
that a protective cover be used.
For reference only
that a protective cover be used.
Wait for the barbecue to cool down completely before
For reference only
Wait for the barbecue to cool down completely before
For reference only
that a protective cover be used.
For reference only
that a protective cover be used.
Wait for the barbecue to cool down completely before
For reference only
Wait for the barbecue to cool down completely before
handling it to return it to its place of storage.
For reference only
handling it to return it to its place of storage.
For reference only
that a protective cover be used.
For reference only
that a protective cover be used.
Wait for the barbecue to cool down completely before
For reference only
Wait for the barbecue to cool down completely before
handling it to return it to its place of storage.
For reference only
handling it to return it to its place of storage.
Do not store your product in direct sunlight. It is advisable
For reference only
Do not store your product in direct sunlight. It is advisable
to store it in a sheltered place.
For reference only
to store it in a sheltered place.
For reference only
the use of accessories and/or replacement parts from
For reference only
the use of accessories and/or replacement parts from
) PROTECTING THE ENVIRONMENT
For reference only
) PROTECTING THE ENVIRONMENT
For reference only
) PROTECTING THE ENVIRONMENT
For reference only
) PROTECTING THE ENVIRONMENT
Think about protecting the environment! Your equipment
For reference only
Think about protecting the environment! Your equipment
For reference only
) PROTECTING THE ENVIRONMENT
For reference only
) PROTECTING THE ENVIRONMENT
Think about protecting the environment! Your equipment
For reference only
Think about protecting the environment! Your equipment
contains materials which can be recovered or recycled.
For reference only
contains materials which can be recovered or recycled.
For reference only
) PROTECTING THE ENVIRONMENT
For reference only
) PROTECTING THE ENVIRONMENT
Think about protecting the environment! Your equipment
For reference only
Think about protecting the environment! Your equipment
For reference only
Think about protecting the environment! Your equipment
For reference only
Think about protecting the environment! Your equipment
contains materials which can be recovered or recycled.
For reference only
contains materials which can be recovered or recycled.
Hand them in to the waste collection service in your
For reference only
Hand them in to the waste collection service in your
municipality and sort the packing materials.
For reference only
municipality and sort the packing materials.
For reference only
contains materials which can be recovered or recycled.
For reference only
contains materials which can be recovered or recycled.
Hand them in to the waste collection service in your
For reference only
Hand them in to the waste collection service in your
For reference only
contains materials which can be recovered or recycled.
For reference only
contains materials which can be recovered or recycled.
Hand them in to the waste collection service in your
For reference only
Hand them in to the waste collection service in your
municipality and sort the packing materials.
For reference only
municipality and sort the packing materials.
For reference only
damped with dish washing liquid. Do not use abrasive
For reference only
damped with dish washing liquid. Do not use abrasive
For reference only
For reference only
municipality and sort the packing materials.
For reference only
municipality and sort the packing materials.
r)
For reference only
r)
For reference only
For reference only
lose the gas cylinder valve after use.
For reference only
lose the gas cylinder valve after use.
f you store your barbecue indoors, disconnect the gas
For reference only
f you store your barbecue indoors, disconnect the gas
For reference only
lose the gas cylinder valve after use.
For reference only
lose the gas cylinder valve after use.
f you store your barbecue indoors, disconnect the gas
For reference only
f you store your barbecue indoors, disconnect the gas
cylinder and store the cylinder outdoors.
For reference only
cylinder and store the cylinder outdoors.
For reference only
lose the gas cylinder valve after use.
For reference only
lose the gas cylinder valve after use.
f you store your barbecue indoors, disconnect the gas
For reference only
f you store your barbecue indoors, disconnect the gas
cylinder and store the cylinder outdoors.
For reference only
cylinder and store the cylinder outdoors.
f you store your barbecue outdoors, it is recommended
For reference only
f you store your barbecue outdoors, it is recommended
that a protective cover be used.
For reference only
that a protective cover be used.
For reference only
lose the gas cylinder valve after use.
For reference only
lose the gas cylinder valve after use.
f you store your barbecue indoors, disconnect the gas
For reference only
f you store your barbecue indoors, disconnect the gas
For reference only
cylinder and store the cylinder outdoors.
For reference only
cylinder and store the cylinder outdoors.
f you store your barbecue outdoors, it is recommended
For reference only
f you store your barbecue outdoors, it is recommended
that a protective cover be used.
For reference only
that a protective cover be used.
Wait for the barbecue to cool down completely before
For reference only
Wait for the barbecue to cool down completely before
For reference only
that a protective cover be used.
For reference only
that a protective cover be used.
Wait for the barbecue to cool down completely before
For reference only
Wait for the barbecue to cool down completely before
handling it to return it to its place of storage.
For reference only
handling it to return it to its place of storage.
For reference only
that a protective cover be used.
For reference only
that a protective cover be used.
Wait for the barbecue to cool down completely before
For reference only
Wait for the barbecue to cool down completely before
handling it to return it to its place of storage.
For reference only
handling it to return it to its place of storage.
Do not store your product in direct sunlight. It is advisable
For reference only
Do not store your product in direct sunlight. It is advisable
to store it in a sheltered place.
For reference only
to store it in a sheltered place.
For reference only
that a protective cover be used.
For reference only
that a protective cover be used.
Wait for the barbecue to cool down completely before
For reference only
Wait for the barbecue to cool down completely before
BATTERY RECOMMENDATIONS
BATTERY RECOMMENDATIONS
should be brought to a collection point (dump...). Check
with your local authorities. Never dispose of in nature, do
Wait for the barbecue to cool down completely before
handling it to return it to its place of storage.
Do not store your product in direct sunlight. It is advisable
to store it in a sheltered place.
For long periods without use, it is recommendable to store
the device in a dry place indoors (e.g. a garage).
After a long storage period, check the condition of the
Do not print
municipality and sort the packing materials.
Do not print
municipality and sort the packing materials.
BATTERY RECOMMENDATIONS
Do not print
BATTERY RECOMMENDATIONS
Do not print
Do not print
Do not print
BATTERY RECOMMENDATIONS
Do not print
BATTERY RECOMMENDATIONS
Do not print
This symbol found on the batteries means that at the
Do not print
This symbol found on the batteries means that at the
end of their lives, the batteries must be removed
Do not print
end of their lives, the batteries must be removed
from the unit, and then recycled or properly disposed
Do not print
from the unit, and then recycled or properly disposed
of. The batteries should not be thrown into the trash, but
Do not print
of. The batteries should not be thrown into the trash, but
should be brought to a collection point (dump...). Check
Do not print
should be brought to a collection point (dump...). Check
with your local authorities. Never dispose of in nature, do
Do not print
with your local authorities. Never dispose of in nature, do
not incinerate: the presence of certain substances (Hg,
Do not print
not incinerate: the presence of certain substances (Hg,
Do not print
f you store your barbecue indoors, disconnect the gas
Do not print
f you store your barbecue indoors, disconnect the gas
f you store your barbecue outdoors, it is recommended
Do not print
f you store your barbecue outdoors, it is recommended
Wait for the barbecue to cool down completely before
Do not print
Wait for the barbecue to cool down completely before
handling it to return it to its place of storage.
Do not print
handling it to return it to its place of storage.
Do not store your product in direct sunlight. It is advisable
Do not print
Do not store your product in direct sunlight. It is advisable
For long periods without use, it is recommendable to store
Do not print
For long periods without use, it is recommendable to store
the device in a dry place indoors (e.g. a garage).
Do not print
the device in a dry place indoors (e.g. a garage).
After a long storage period, check the condition of the
Do not print
After a long storage period, check the condition of the
Do not print
Do not print
Do not print
BATTERY RECOMMENDATIONS
Do not print
BATTERY RECOMMENDATIONS
Do not print
BATTERY RECOMMENDATIONS
Do not print
BATTERY RECOMMENDATIONS
Do not print
BATTERY RECOMMENDATIONS
Do not print
BATTERY RECOMMENDATIONS
Do not print
This symbol found on the batteries means that at the
Do not print
This symbol found on the batteries means that at the
BATTERY RECOMMENDATIONS
Do not print
BATTERY RECOMMENDATIONS
Do not print
This symbol found on the batteries means that at the
Do not print
This symbol found on the batteries means that at the
end of their lives, the batteries must be removed
Do not print
end of their lives, the batteries must be removed
Do not print
This symbol found on the batteries means that at the
Do not print
This symbol found on the batteries means that at the
end of their lives, the batteries must be removed
Do not print
end of their lives, the batteries must be removed
from the unit, and then recycled or properly disposed
Do not print
from the unit, and then recycled or properly disposed
Do not print
Do not print
Do not print
Do not print
This symbol found on the batteries means that at the
Do not print
This symbol found on the batteries means that at the
end of their lives, the batteries must be removed
Do not print
end of their lives, the batteries must be removed
from the unit, and then recycled or properly disposed
Do not print
from the unit, and then recycled or properly disposed
of. The batteries should not be thrown into the trash, but
Do not print
of. The batteries should not be thrown into the trash, but
should be brought to a collection point (dump...). Check
Do not print
should be brought to a collection point (dump...). Check
with your local authorities. Never dispose of in nature, do
Do not print
with your local authorities. Never dispose of in nature, do
Do not print
end of their lives, the batteries must be removed
Do not print
end of their lives, the batteries must be removed
from the unit, and then recycled or properly disposed
Do not print
from the unit, and then recycled or properly disposed
of. The batteries should not be thrown into the trash, but
Do not print
of. The batteries should not be thrown into the trash, but
Do not print
Do not print
Do not print
should be brought to a collection point (dump...). Check
Do not print
should be brought to a collection point (dump...). Check
with your local authorities. Never dispose of in nature, do
Do not print
with your local authorities. Never dispose of in nature, do
Do not print
Do not print
f you store your barbecue outdoors, it is recommended
Do not print
f you store your barbecue outdoors, it is recommended
Do not print
Wait for the barbecue to cool down completely before
Do not print
Wait for the barbecue to cool down completely before
Do not print
Wait for the barbecue to cool down completely before
Do not print
Wait for the barbecue to cool down completely before
handling it to return it to its place of storage.
Do not print
handling it to return it to its place of storage.
Do not store your product in direct sunlight. It is advisable
Do not print
Do not store your product in direct sunlight. It is advisable
Do not print
handling it to return it to its place of storage.
Do not print
handling it to return it to its place of storage.
Do not store your product in direct sunlight. It is advisable
Do not print
Do not store your product in direct sunlight. It is advisable
to store it in a sheltered place.
Do not print
to store it in a sheltered place.
For long periods without use, it is recommendable to store
Do not print
For long periods without use, it is recommendable to store
the device in a dry place indoors (e.g. a garage).
Do not print
the device in a dry place indoors (e.g. a garage).
Do not print
Do not store your product in direct sunlight. It is advisable
Do not print
Do not store your product in direct sunlight. It is advisable
to store it in a sheltered place.
Do not print
to store it in a sheltered place.
For long periods without use, it is recommendable to store
Do not print
For long periods without use, it is recommendable to store
Do not print
municipality and sort the packing materials.
Do not print
municipality and sort the packing materials.
BATTERY RECOMMENDATIONS
Do not print
BATTERY RECOMMENDATIONS
Do not print
BATTERY RECOMMENDATIONS
Do not print
BATTERY RECOMMENDATIONS
Do not print
BATTERY RECOMMENDATIONS
Do not print
BATTERY RECOMMENDATIONS
Do not print
This symbol found on the batteries means that at the
Do not print
This symbol found on the batteries means that at the
end of their lives, the batteries must be removed
Do not print
end of their lives, the batteries must be removed
Do not print
BATTERY RECOMMENDATIONS
Do not print
BATTERY RECOMMENDATIONS
Do not print
BATTERY RECOMMENDATIONS
Do not print
BATTERY RECOMMENDATIONS
Do not print
This symbol found on the batteries means that at the
Do not print
This symbol found on the batteries means that at the
end of their lives, the batteries must be removed
Do not print
end of their lives, the batteries must be removed
Do not print
This symbol found on the batteries means that at the
Do not print
This symbol found on the batteries means that at the
end of their lives, the batteries must be removed
Do not print
end of their lives, the batteries must be removed
from the unit, and then recycled or properly disposed
Do not print
from the unit, and then recycled or properly disposed
Do not print
Do not print
Do not print
Do not print
This symbol found on the batteries means that at the
Do not print
This symbol found on the batteries means that at the
end of their lives, the batteries must be removed
Do not print
end of their lives, the batteries must be removed
from the unit, and then recycled or properly disposed
Do not print
from the unit, and then recycled or properly disposed
of. The batteries should not be thrown into the trash, but
Do not print
of. The batteries should not be thrown into the trash, but
should be brought to a collection point (dump...). Check
Do not print
should be brought to a collection point (dump...). Check
with your local authorities. Never dispose of in nature, do
Do not print
with your local authorities. Never dispose of in nature, do
Do not print
end of their lives, the batteries must be removed
Do not print
end of their lives, the batteries must be removed
from the unit, and then recycled or properly disposed
Do not print
from the unit, and then recycled or properly disposed
of. The batteries should not be thrown into the trash, but
Do not print
of. The batteries should not be thrown into the trash, but
Do not print
f you store your barbecue indoors, disconnect the gas
Do not print
f you store your barbecue indoors, disconnect the gas
Do not print
Do not print
of. The batteries should not be thrown into the trash, but
Do not print
of. The batteries should not be thrown into the trash, but
should be brought to a collection point (dump...). Check
Do not print
should be brought to a collection point (dump...). Check
with your local authorities. Never dispose of in nature, do
Do not print
with your local authorities. Never dispose of in nature, do
Do not print
Do not print
Do not print
f you store your barbecue outdoors, it is recommended
Do not print
f you store your barbecue outdoors, it is recommended
Do not print
Do not print
f you store your barbecue outdoors, it is recommended
Do not print
f you store your barbecue outdoors, it is recommended
Do not print
f you store your barbecue outdoors, it is recommended
Do not print
f you store your barbecue outdoors, it is recommended
Wait for the barbecue to cool down completely before
Do not print
Wait for the barbecue to cool down completely before
Do not print
Wait for the barbecue to cool down completely before
Do not print
Wait for the barbecue to cool down completely before
handling it to return it to its place of storage.
Do not print
handling it to return it to its place of storage.
Do not store your product in direct sunlight. It is advisable
Do not print
Do not store your product in direct sunlight. It is advisable
Do not print
Wait for the barbecue to cool down completely before
Do not print
Wait for the barbecue to cool down completely before
handling it to return it to its place of storage.
Do not print
handling it to return it to its place of storage.
Do not store your product in direct sunlight. It is advisable
Do not print
Do not store your product in direct sunlight. It is advisable
Do not print
Wait for the barbecue to cool down completely before
Do not print
Wait for the barbecue to cool down completely before
handling it to return it to its place of storage.
Do not print
handling it to return it to its place of storage.
Do not store your product in direct sunlight. It is advisable
Do not print
Do not store your product in direct sunlight. It is advisable
to store it in a sheltered place.
Do not print
to store it in a sheltered place.
For long periods without use, it is recommendable to store
Do not print
For long periods without use, it is recommendable to store
the device in a dry place indoors (e.g. a garage).
Do not print
the device in a dry place indoors (e.g. a garage).
Do not print
handling it to return it to its place of storage.
Do not print
handling it to return it to its place of storage.
Do not store your product in direct sunlight. It is advisable
Do not print
Do not store your product in direct sunlight. It is advisable
to store it in a sheltered place.
Do not print
to store it in a sheltered place.
For long periods without use, it is recommendable to store
Do not print
For long periods without use, it is recommendable to store
This symbol found on the batteries means that at the
end of their lives, the batteries must be removed
This symbol found on the batteries means that at the
of. The batteries should not be thrown into the trash, but
should be brought to a collection point (dump...). Check
with your local authorities. Never dispose of in nature, do
the device in a dry place indoors (e.g. a garage).
After a long storage period, check the condition of the
Your barbecue comes with a
仅供参考,请勿印刷
BATTERY RECOMMENDATIONS
仅供参考,请勿印刷
BATTERY RECOMMENDATIONS
仅供参考,请勿印刷
This symbol found on the batteries means that at the
仅供参考,请勿印刷
This symbol found on the batteries means that at the
end of their lives, the batteries must be removed
仅供参考,请勿印刷
end of their lives, the batteries must be removed
from the unit, and then recycled or properly disposed
仅供参考,请勿印刷
from the unit, and then recycled or properly disposed
of. The batteries should not be thrown into the trash, but
仅供参考,请勿印刷
of. The batteries should not be thrown into the trash, but
should be brought to a collection point (dump...). Check
仅供参考,请勿印刷
should be brought to a collection point (dump...). Check
with your local authorities. Never dispose of in nature, do
仅供参考,请勿印刷
with your local authorities. Never dispose of in nature, do
not incinerate: the presence of certain substances (Hg,
仅供参考,请勿印刷
not incinerate: the presence of certain substances (Hg,
Pb, Cd, Zn, Ni) in used batteries may be hazardous to the
仅供参考,请勿印刷
Pb, Cd, Zn, Ni) in used batteries may be hazardous to the
environment and human health.
仅供参考,请勿印刷
environment and human health.
s)
仅供参考,请勿印刷
s)
ELECTRICAL AND ELECTRONIC WASTE
仅供参考,请勿印刷
ELECTRICAL AND ELECTRONIC WASTE
仅供参考,请勿印刷
仅供参考,请勿印刷
仅供参考,请勿印刷
Do not store your product in direct sunlight. It is advisable
仅供参考,请勿印刷
Do not store your product in direct sunlight. It is advisable
For long periods without use, it is recommendable to store
仅供参考,请勿印刷
For long periods without use, it is recommendable to store
After a long storage period, check the condition of the
仅供参考,请勿印刷
After a long storage period, check the condition of the
thermometer batteries (Attitude EX/EX Plus), the lighting
仅供参考,请勿印刷
thermometer batteries (Attitude EX/EX Plus), the lighting
batteries (Attitude EX/EX Plus) and the electronic igniter
仅供参考,请勿印刷
batteries (Attitude EX/EX Plus) and the electronic igniter
batteries (any model).
仅供参考,请勿印刷
batteries (any model).
ACCESSORIES
仅供参考,请勿印刷
ACCESSORIES
Your barbecue comes with a
仅供参考,请勿印刷
Your barbecue comes with a
grate.
仅供参考,请勿印刷
grate.
Campingaz
仅供参考,请勿印刷
Campingaz
®
仅供参考,请勿印刷
®
Culinary Modular
仅供参考,请勿印刷
Culinary Modular
®
Culinary Modular
®
仅供参考,请勿印刷
®
Culinary Modular
®
仅供参考,请勿印刷
仅供参考,请勿印刷
仅供参考,请勿印刷
This symbol found on the batteries means that at the
仅供参考,请勿印刷
This symbol found on the batteries means that at the
end of their lives, the batteries must be removed
仅供参考,请勿印刷
end of their lives, the batteries must be removed
仅供参考,请勿印刷
This symbol found on the batteries means that at the
仅供参考,请勿印刷
This symbol found on the batteries means that at the
end of their lives, the batteries must be removed
仅供参考,请勿印刷
end of their lives, the batteries must be removed
仅供参考,请勿印刷
This symbol found on the batteries means that at the
仅供参考,请勿印刷
This symbol found on the batteries means that at the
end of their lives, the batteries must be removed
仅供参考,请勿印刷
end of their lives, the batteries must be removed
from the unit, and then recycled or properly disposed
仅供参考,请勿印刷
from the unit, and then recycled or properly disposed
of. The batteries should not be thrown into the trash, but
仅供参考,请勿印刷
of. The batteries should not be thrown into the trash, but
仅供参考,请勿印刷
This symbol found on the batteries means that at the
仅供参考,请勿印刷
This symbol found on the batteries means that at the
仅供参考,请勿印刷
This symbol found on the batteries means that at the
仅供参考,请勿印刷
This symbol found on the batteries means that at the
end of their lives, the batteries must be removed
仅供参考,请勿印刷
end of their lives, the batteries must be removed
from the unit, and then recycled or properly disposed
仅供参考,请勿印刷
from the unit, and then recycled or properly disposed
仅供参考,请勿印刷
This symbol found on the batteries means that at the
仅供参考,请勿印刷
This symbol found on the batteries means that at the
end of their lives, the batteries must be removed
仅供参考,请勿印刷
end of their lives, the batteries must be removed
from the unit, and then recycled or properly disposed
仅供参考,请勿印刷
from the unit, and then recycled or properly disposed
of. The batteries should not be thrown into the trash, but
仅供参考,请勿印刷
of. The batteries should not be thrown into the trash, but
should be brought to a collection point (dump...). Check
仅供参考,请勿印刷
should be brought to a collection point (dump...). Check
仅供参考,请勿印刷
This symbol found on the batteries means that at the
仅供参考,请勿印刷
This symbol found on the batteries means that at the
end of their lives, the batteries must be removed
仅供参考,请勿印刷
end of their lives, the batteries must be removed
仅供参考,请勿印刷
end of their lives, the batteries must be removed
仅供参考,请勿印刷
end of their lives, the batteries must be removed
from the unit, and then recycled or properly disposed
仅供参考,请勿印刷
from the unit, and then recycled or properly disposed
of. The batteries should not be thrown into the trash, but
仅供参考,请勿印刷
of. The batteries should not be thrown into the trash, but
should be brought to a collection point (dump...). Check
仅供参考,请勿印刷
should be brought to a collection point (dump...). Check
with your local authorities. Never dispose of in nature, do
仅供参考,请勿印刷
with your local authorities. Never dispose of in nature, do
仅供参考,请勿印刷
of. The batteries should not be thrown into the trash, but
仅供参考,请勿印刷
of. The batteries should not be thrown into the trash, but
should be brought to a collection point (dump...). Check
仅供参考,请勿印刷
should be brought to a collection point (dump...). Check
with your local authorities. Never dispose of in nature, do
仅供参考,请勿印刷
with your local authorities. Never dispose of in nature, do
not incinerate: the presence of certain substances (Hg,
仅供参考,请勿印刷
not incinerate: the presence of certain substances (Hg,
Pb, Cd, Zn, Ni) in used batteries may be hazardous to the
仅供参考,请勿印刷
Pb, Cd, Zn, Ni) in used batteries may be hazardous to the
仅供参考,请勿印刷
with your local authorities. Never dispose of in nature, do
仅供参考,请勿印刷
with your local authorities. Never dispose of in nature, do
not incinerate: the presence of certain substances (Hg,
仅供参考,请勿印刷
not incinerate: the presence of certain substances (Hg,
Pb, Cd, Zn, Ni) in used batteries may be hazardous to the
仅供参考,请勿印刷
Pb, Cd, Zn, Ni) in used batteries may be hazardous to the
with your local authorities. Never dispose of in nature, do
仅供参考,请勿印刷
with your local authorities. Never dispose of in nature, do
not incinerate: the presence of certain substances (Hg,
仅供参考,请勿印刷
not incinerate: the presence of certain substances (Hg,
仅供参考,请勿印刷
not incinerate: the presence of certain substances (Hg,
仅供参考,请勿印刷
not incinerate: the presence of certain substances (Hg,
Pb, Cd, Zn, Ni) in used batteries may be hazardous to the
仅供参考,请勿印刷
Pb, Cd, Zn, Ni) in used batteries may be hazardous to the
仅供参考,请勿印刷
not incinerate: the presence of certain substances (Hg,
仅供参考,请勿印刷
not incinerate: the presence of certain substances (Hg,
Pb, Cd, Zn, Ni) in used batteries may be hazardous to the
仅供参考,请勿印刷
Pb, Cd, Zn, Ni) in used batteries may be hazardous to the
仅供参考,请勿印刷
Pb, Cd, Zn, Ni) in used batteries may be hazardous to the
仅供参考,请勿印刷
Pb, Cd, Zn, Ni) in used batteries may be hazardous to the
environment and human health.
仅供参考,请勿印刷
environment and human health.
仅供参考,请勿印刷
environment and human health.
仅供参考,请勿印刷
environment and human health.
仅供参考,请勿印刷
environment and human health.
仅供参考,请勿印刷
environment and human health.
仅供参考,请勿印刷
For long periods without use, it is recommendable to store
仅供参考,请勿印刷
For long periods without use, it is recommendable to store
the device in a dry place indoors (e.g. a garage).
仅供参考,请勿印刷
the device in a dry place indoors (e.g. a garage).
After a long storage period, check the condition of the
仅供参考,请勿印刷
After a long storage period, check the condition of the
thermometer batteries (Attitude EX/EX Plus), the lighting
仅供参考,请勿印刷
thermometer batteries (Attitude EX/EX Plus), the lighting
batteries (Attitude EX/EX Plus) and the electronic igniter
仅供参考,请勿印刷
batteries (Attitude EX/EX Plus) and the electronic igniter
仅供参考,请勿印刷
For long periods without use, it is recommendable to store
仅供参考,请勿印刷
For long periods without use, it is recommendable to store
the device in a dry place indoors (e.g. a garage).
仅供参考,请勿印刷
the device in a dry place indoors (e.g. a garage).
After a long storage period, check the condition of the
仅供参考,请勿印刷
After a long storage period, check the condition of the
thermometer batteries (Attitude EX/EX Plus), the lighting
仅供参考,请勿印刷
thermometer batteries (Attitude EX/EX Plus), the lighting
For long periods without use, it is recommendable to store
仅供参考,请勿印刷
For long periods without use, it is recommendable to store
仅供参考,请勿印刷
仅供参考,请勿印刷
仅供参考,请勿印刷
仅供参考,请勿印刷
After a long storage period, check the condition of the
仅供参考,请勿印刷
After a long storage period, check the condition of the
thermometer batteries (Attitude EX/EX Plus), the lighting
仅供参考,请勿印刷
thermometer batteries (Attitude EX/EX Plus), the lighting
batteries (Attitude EX/EX Plus) and the electronic igniter
仅供参考,请勿印刷
batteries (Attitude EX/EX Plus) and the electronic igniter
仅供参考,请勿印刷
After a long storage period, check the condition of the
仅供参考,请勿印刷
After a long storage period, check the condition of the
thermometer batteries (Attitude EX/EX Plus), the lighting
仅供参考,请勿印刷
thermometer batteries (Attitude EX/EX Plus), the lighting
仅供参考,请勿印刷
thermometer batteries (Attitude EX/EX Plus), the lighting
仅供参考,请勿印刷
thermometer batteries (Attitude EX/EX Plus), the lighting
batteries (Attitude EX/EX Plus) and the electronic igniter
仅供参考,请勿印刷
batteries (Attitude EX/EX Plus) and the electronic igniter
仅供参考,请勿印刷
batteries (Attitude EX/EX Plus) and the electronic igniter
仅供参考,请勿印刷
batteries (Attitude EX/EX Plus) and the electronic igniter
仅供参考,请勿印刷
batteries (Attitude EX/EX Plus) and the electronic igniter
仅供参考,请勿印刷
batteries (Attitude EX/EX Plus) and the electronic igniter
仅供参考,请勿印刷
batteries (Attitude EX/EX Plus) and the electronic igniter
仅供参考,请勿印刷
batteries (Attitude EX/EX Plus) and the electronic igniter
仅供参考,请勿印刷
batteries (Attitude EX/EX Plus) and the electronic igniter
仅供参考,请勿印刷
batteries (Attitude EX/EX Plus) and the electronic igniter
仅供参考,请勿印刷
batteries (Attitude EX/EX Plus) and the electronic igniter
仅供参考,请勿印刷
batteries (Attitude EX/EX Plus) and the electronic igniter
仅供参考,请勿印刷
Your barbecue comes with a
仅供参考,请勿印刷
Your barbecue comes with a
仅供参考,请勿印刷
ACCESSORIES
仅供参考,请勿印刷
ACCESSORIES
Your barbecue comes with a
仅供参考,请勿印刷
Your barbecue comes with a
仅供参考,请勿印刷
ACCESSORIES
仅供参考,请勿印刷
ACCESSORIES
仅供参考,请勿印刷
ACCESSORIES
仅供参考,请勿印刷
ACCESSORIES
Your barbecue comes with a
仅供参考,请勿印刷
Your barbecue comes with a
仅供参考,请勿印刷
ACCESSORIES
仅供参考,请勿印刷
ACCESSORIES
Your barbecue comes with a
仅供参考,请勿印刷
Your barbecue comes with a
仅供参考,请勿印刷
ACCESSORIES
仅供参考,请勿印刷
ACCESSORIES
Your barbecue comes with a
仅供参考,请勿印刷
Your barbecue comes with a
仅供参考,请勿印刷
仅供参考,请勿印刷
This symbol found on the batteries means that at the
仅供参考,请勿印刷
This symbol found on the batteries means that at the
end of their lives, the batteries must be removed
仅供参考,请勿印刷
end of their lives, the batteries must be removed
from the unit, and then recycled or properly disposed
仅供参考,请勿印刷
from the unit, and then recycled or properly disposed
仅供参考,请勿印刷
This symbol found on the batteries means that at the
仅供参考,请勿印刷
This symbol found on the batteries means that at the
end of their lives, the batteries must be removed
仅供参考,请勿印刷
end of their lives, the batteries must be removed
仅供参考,请勿印刷
BATTERY RECOMMENDATIONS
仅供参考,请勿印刷
BATTERY RECOMMENDATIONS
仅供参考,请勿印刷
This symbol found on the batteries means that at the
仅供参考,请勿印刷
This symbol found on the batteries means that at the
end of their lives, the batteries must be removed
仅供参考,请勿印刷
end of their lives, the batteries must be removed
from the unit, and then recycled or properly disposed
仅供参考,请勿印刷
from the unit, and then recycled or properly disposed
of. The batteries should not be thrown into the trash, but
仅供参考,请勿印刷
of. The batteries should not be thrown into the trash, but
仅供参考,请勿印刷
This symbol found on the batteries means that at the
仅供参考,请勿印刷
This symbol found on the batteries means that at the
仅供参考,请勿印刷
This symbol found on the batteries means that at the
仅供参考,请勿印刷
This symbol found on the batteries means that at the
end of their lives, the batteries must be removed
仅供参考,请勿印刷
end of their lives, the batteries must be removed
from the unit, and then recycled or properly disposed
仅供参考,请勿印刷
from the unit, and then recycled or properly disposed
of. The batteries should not be thrown into the trash, but
仅供参考,请勿印刷
of. The batteries should not be thrown into the trash, but
should be brought to a collection point (dump...). Check
仅供参考,请勿印刷
should be brought to a collection point (dump...). Check
with your local authorities. Never dispose of in nature, do
仅供参考,请勿印刷
with your local authorities. Never dispose of in nature, do
end of their lives, the batteries must be removed
仅供参考,请勿印刷
end of their lives, the batteries must be removed
仅供参考,请勿印刷
from the unit, and then recycled or properly disposed
仅供参考,请勿印刷
from the unit, and then recycled or properly disposed
of. The batteries should not be thrown into the trash, but
仅供参考,请勿印刷
of. The batteries should not be thrown into the trash, but
should be brought to a collection point (dump...). Check
仅供参考,请勿印刷
should be brought to a collection point (dump...). Check
with your local authorities. Never dispose of in nature, do
仅供参考,请勿印刷
with your local authorities. Never dispose of in nature, do
not incinerate: the presence of certain substances (Hg,
仅供参考,请勿印刷
not incinerate: the presence of certain substances (Hg,
Pb, Cd, Zn, Ni) in used batteries may be hazardous to the
仅供参考,请勿印刷
Pb, Cd, Zn, Ni) in used batteries may be hazardous to the
environment and human health.
仅供参考,请勿印刷
environment and human health.
of. The batteries should not be thrown into the trash, but
仅供参考,请勿印刷
of. The batteries should not be thrown into the trash, but
仅供参考,请勿印刷
should be brought to a collection point (dump...). Check
仅供参考,请勿印刷
should be brought to a collection point (dump...). Check
with your local authorities. Never dispose of in nature, do
仅供参考,请勿印刷
with your local authorities. Never dispose of in nature, do
not incinerate: the presence of certain substances (Hg,
仅供参考,请勿印刷
not incinerate: the presence of certain substances (Hg,
Pb, Cd, Zn, Ni) in used batteries may be hazardous to the
仅供参考,请勿印刷
Pb, Cd, Zn, Ni) in used batteries may be hazardous to the
environment and human health.
仅供参考,请勿印刷
environment and human health.
ELECTRICAL AND ELECTRONIC WASTE
仅供参考,请勿印刷
ELECTRICAL AND ELECTRONIC WASTE
仅供参考,请勿印刷
not incinerate: the presence of certain substances (Hg,
仅供参考,请勿印刷
not incinerate: the presence of certain substances (Hg,
Pb, Cd, Zn, Ni) in used batteries may be hazardous to the
仅供参考,请勿印刷
Pb, Cd, Zn, Ni) in used batteries may be hazardous to the
仅供参考,请勿印刷
Pb, Cd, Zn, Ni) in used batteries may be hazardous to the
仅供参考,请勿印刷
Pb, Cd, Zn, Ni) in used batteries may be hazardous to the
environment and human health.
仅供参考,请勿印刷
environment and human health.
仅供参考,请勿印刷
Pb, Cd, Zn, Ni) in used batteries may be hazardous to the
仅供参考,请勿印刷
Pb, Cd, Zn, Ni) in used batteries may be hazardous to the
environment and human health.
仅供参考,请勿印刷
environment and human health.
仅供参考,请勿印刷
Do not store your product in direct sunlight. It is advisable
仅供参考,请勿印刷
Do not store your product in direct sunlight. It is advisable
For long periods without use, it is recommendable to store
仅供参考,请勿印刷
For long periods without use, it is recommendable to store
the device in a dry place indoors (e.g. a garage).
仅供参考,请勿印刷
the device in a dry place indoors (e.g. a garage).
After a long storage period, check the condition of the
仅供参考,请勿印刷
After a long storage period, check the condition of the
thermometer batteries (Attitude EX/EX Plus), the lighting
仅供参考,请勿印刷
thermometer batteries (Attitude EX/EX Plus), the lighting
batteries (Attitude EX/EX Plus) and the electronic igniter
仅供参考,请勿印刷
batteries (Attitude EX/EX Plus) and the electronic igniter
仅供参考,请勿印刷
仅供参考,请勿印刷
s)
仅供参考,请勿印刷
s)
仅供参考,请勿印刷
仅供参考,请勿印刷
仅供参考,请勿印刷
thermometer batteries (Attitude EX/EX Plus), the lighting
仅供参考,请勿印刷
thermometer batteries (Attitude EX/EX Plus), the lighting
batteries (Attitude EX/EX Plus) and the electronic igniter
仅供参考,请勿印刷
batteries (Attitude EX/EX Plus) and the electronic igniter
Your barbecue comes with a
仅供参考,请勿印刷
Your barbecue comes with a
仅供参考,请勿印刷
ACCESSORIES
仅供参考,请勿印刷
ACCESSORIES
Your barbecue comes with a
仅供参考,请勿印刷
Your barbecue comes with a
grate.
仅供参考,请勿印刷
grate.
®
仅供参考,请勿印刷
®
Culinary Modular
仅供参考,请勿印刷
Culinary Modular
®
Culinary Modular
®
仅供参考,请勿印刷
®
Culinary Modular
®
仅供参考,请勿印刷
ACCESSORIES
仅供参考,请勿印刷
ACCESSORIES
Your barbecue comes with a
仅供参考,请勿印刷
Your barbecue comes with a

17
GB
Burner won’t light
Burner “pops” or blows
itself out
Excessive flare-up
Burner lights with a match,
but not with the “PIEZO”
igniter
Probable causes /
remedies
Probable causes /
remedies
Problems
Problems
- Lack of gas supply
- Regulator does not work
- Hose, valve, jet, venturi
tube or burner openings are
blocked.
- venturi tube not seated over jet
- Check gas supply
- Check hose connections
- Contact the After Sales
Service
- Grill temperature too high:
lower flame
- If your grease pan or
cooking grates / hot plates
are greasy, clean them.
- Faulty igniter, wire or
electrode
- Check igniter cable
connections
- Check condition of electrode
and connection wire
- Contact the After Sales
Service
Fire at any connection
Incomplete flame around
burner
Lack of Heat
Fire behind control knob
Fire under control panel
- Leaking connection
- Turn off gas supply at
cylinder immediately
- Tighten connections and
check for leaks
- Contact After Sales Service
- Defective or clogged
burner: relocate the venturi.
- Clogged jets: clean the
venturi
- Contact After Sales Service
- Clogged jet or venturi tube
- Contact After Sales Service
- Defective tap unit
- Turn off gas supply at
cylinder immediately
- Contact After Sales Service
- Turn off gas supply at
cylinder immediately
- Contact After Sales Service
venturi
- Clogged jet or venturi tube
electrode
For reference only
- Clogged jets: clean the
For reference only
- Clogged jets: clean the
venturi
For reference only
venturi
- Contact After Sales Service
For reference only
- Contact After Sales Service
For reference only
For reference only
- Contact After Sales Service
For reference only
- Contact After Sales Service
- Clogged jet or venturi tube
For reference only
- Clogged jet or venturi tube
For reference only
For reference only
- Contact After Sales Service
For reference only
- Contact After Sales Service
- Clogged jet or venturi tube
For reference only
- Clogged jet or venturi tube
For reference only
For reference only
- Contact After Sales Service
For reference only
- Contact After Sales Service
- Clogged jet or venturi tube
For reference only
- Clogged jet or venturi tube
For reference only
For reference only
For reference only
For reference only
For reference only
For reference only
For reference only
For reference only
For reference only
For reference only
For reference only
For reference only
For reference only
For reference only
For reference only
For reference only
For reference only
- Faulty igniter, wire or
For reference only
- Faulty igniter, wire or
electrode
For reference only
electrode
- Check igniter cable
For reference only
- Check igniter cable
connections
For reference only
connections
- Check condition of electrode
For reference only
- Check condition of electrode
and connection wire
For reference only
and connection wire
- Contact the After Sales
For reference only
- Contact the After Sales
Service
For reference only
Service
Lack of Heat
For reference only
Lack of Heat
Fire behind control knob
For reference only
Fire behind control knob
- Contact After Sales Service
For reference only
- Contact After Sales Service
- Clogged jet or venturi tube
For reference only
- Clogged jet or venturi tube
- Contact After Sales Service
For reference only
- Contact After Sales Service
For reference only
For reference only
For reference only
- Clogged jet or venturi tube
For reference only
- Clogged jet or venturi tube
For reference only
For reference only
For reference only
Fire behind control knob
For reference only
Fire behind control knob
For reference only
For reference only
For reference only
Fire behind control knob
For reference only
Fire behind control knob
For reference only
For reference only
For reference only
For reference only
- Faulty igniter, wire or
For reference only
- Faulty igniter, wire or
For reference only
- Faulty igniter, wire or
For reference only
- Faulty igniter, wire or
- Check igniter cable
For reference only
- Check igniter cable
- Faulty igniter, wire or
For reference only
- Faulty igniter, wire or
For reference only
- Faulty igniter, wire or
For reference only
- Faulty igniter, wire or
- Check igniter cable
For reference only
- Check igniter cable
For reference only
- Check igniter cable
For reference only
- Check igniter cable
connections
For reference only
connections
For reference only
- Check igniter cable
For reference only
- Check igniter cable
connections
For reference only
connections
- Check condition of electrode
For reference only
- Check condition of electrode
- Check igniter cable
For reference only
- Check igniter cable
For reference only
For reference only
For reference only
connections
For reference only
connections
- Check condition of electrode
For reference only
- Check condition of electrode
and connection wire
For reference only
and connection wire
- Check condition of electrode
For reference only
- Check condition of electrode
For reference only
For reference only
For reference only
For reference only
For reference only
For reference only
For reference only
For reference only
For reference only
For reference only
For reference only
For reference only
For reference only
For reference only
venturi
For reference only
venturi
- Contact After Sales Service
For reference only
- Contact After Sales Service
- Clogged jet or venturi tube
For reference only
- Clogged jet or venturi tube
For reference only
For reference only
For reference only
For reference only
- Clogged jet or venturi tube
For reference only
- Clogged jet or venturi tube
For reference only
For reference only
For reference only
For reference only
For reference only
Fire behind control knob
For reference only
Fire behind control knob
For reference only
For reference only
For reference only
For reference only
For reference only
Fire behind control knob
For reference only
Fire behind control knob
For reference only
For reference only
For reference only
For reference only
- Faulty igniter, wire or
For reference only
- Faulty igniter, wire or
Fire behind control knob
For reference only
Fire behind control knob
For reference only
- Faulty igniter, wire or
For reference only
- Faulty igniter, wire or
- Check igniter cable
For reference only
- Check igniter cable
For reference only
- Faulty igniter, wire or
For reference only
- Faulty igniter, wire or
For reference only
- Check igniter cable
For reference only
- Check igniter cable
connections
For reference only
connections
- Check condition of electrode
For reference only
- Check condition of electrode
For reference only
electrode
For reference only
electrode
- Check igniter cable
For reference only
- Check igniter cable
connections
For reference only
connections
- Check condition of electrode
For reference only
- Check condition of electrode
and connection wire
For reference only
and connection wire
For reference only
- Check igniter cable
For reference only
- Check igniter cable
For reference only
For reference only
For reference only
connections
For reference only
connections
- Check condition of electrode
For reference only
- Check condition of electrode
and connection wire
For reference only
and connection wire
- Contact the After Sales
For reference only
- Contact the After Sales
For reference only
- Check condition of electrode
For reference only
- Check condition of electrode
For reference only
For reference only
For reference only
For reference only
For reference only
For reference only
For reference only
For reference only
- Contact After Sales Service
Do not print
Do not print
Do not print
Do not print
Do not print
Do not print
- Check condition of electrode
Do not print
- Check condition of electrode
and connection wire
Do not print
and connection wire
- Contact the After Sales
Do not print
- Contact the After Sales
Service
Do not print
Service
Fire under control panel
Do not print
Fire under control panel
- Turn off gas supply at
Do not print
- Turn off gas supply at
Do not print
Do not print
Do not print
Do not print
Do not print
- Contact After Sales Service
Do not print
- Contact After Sales Service
Do not print
Do not print
Fire under control panel
Do not print
Fire under control panel
Do not print
Do not print
Fire under control panel
Do not print
Fire under control panel
Do not print
Do not print
Do not print
Fire under control panel
Do not print
Fire under control panel
Do not print
Fire under control panel
Do not print
Fire under control panel
Do not print
Fire under control panel
Do not print
Fire under control panel
Do not print
Do not print
Do not print
Do not print
Do not print
- Contact the After Sales
Do not print
- Contact the After Sales
Do not print
Do not print
Do not print
Do not print
Do not print
- Contact After Sales Service
Do not print
- Contact After Sales Service
Do not print
Do not print
Fire under control panel
Do not print
Fire under control panel
Do not print
Do not print
Do not print
Fire under control panel
Do not print
Fire under control panel
Do not print
Do not print
Do not print
Fire under control panel
Do not print
Fire under control panel
Do not print
Fire under control panel
Do not print
Fire under control panel
Do not print
Fire under control panel
Do not print
Fire under control panel
Do not print
Do not print
Do not print
- Check condition of electrode
Do not print
- Check condition of electrode
Do not print
Do not print
- Contact the After Sales
Do not print
- Contact the After Sales
Do not print
- Contact the After Sales
Do not print
- Contact the After Sales
Do not print
Do not print
- Contact the After Sales
Do not print
- Contact the After Sales
Do not print
- Contact After Sales Service
- Turn off gas supply at
仅供参考,请勿印刷
仅供参考,请勿印刷
仅供参考,请勿印刷
仅供参考,请勿印刷
仅供参考,请勿印刷
仅供参考,请勿印刷
仅供参考,请勿印刷
cylinder immediately
仅供参考,请勿印刷
cylinder immediately
- Contact After Sales Service
仅供参考,请勿印刷
- Contact After Sales Service
- Turn off gas supply at
仅供参考,请勿印刷
- Turn off gas supply at
仅供参考,请勿印刷
- Turn off gas supply at
仅供参考,请勿印刷
- Turn off gas supply at
仅供参考,请勿印刷
- Turn off gas supply at
仅供参考,请勿印刷
- Turn off gas supply at
仅供参考,请勿印刷
仅供参考,请勿印刷
仅供参考,请勿印刷
仅供参考,请勿印刷
仅供参考,请勿印刷
cylinder immediately
仅供参考,请勿印刷
cylinder immediately
- Contact After Sales Service
仅供参考,请勿印刷
- Contact After Sales Service
仅供参考,请勿印刷
仅供参考,请勿印刷
仅供参考,请勿印刷
- Contact After Sales Service
仅供参考,请勿印刷
- Contact After Sales Service
- Turn off gas supply at
仅供参考,请勿印刷
- Turn off gas supply at
仅供参考,请勿印刷
仅供参考,请勿印刷
- Contact After Sales Service
仅供参考,请勿印刷
- Contact After Sales Service
- Turn off gas supply at
仅供参考,请勿印刷
- Turn off gas supply at
仅供参考,请勿印刷
仅供参考,请勿印刷
仅供参考,请勿印刷
仅供参考,请勿印刷
仅供参考,请勿印刷
- Contact After Sales Service
仅供参考,请勿印刷
- Contact After Sales Service
- Turn off gas supply at
仅供参考,请勿印刷
- Turn off gas supply at
仅供参考,请勿印刷
cylinder immediately
仅供参考,请勿印刷
cylinder immediately
- Contact After Sales Service
仅供参考,请勿印刷
- Contact After Sales Service
仅供参考,请勿印刷
- Turn off gas supply at
仅供参考,请勿印刷
- Turn off gas supply at
仅供参考,请勿印刷
- Turn off gas supply at
仅供参考,请勿印刷
- Turn off gas supply at
仅供参考,请勿印刷
cylinder immediately
仅供参考,请勿印刷
cylinder immediately
- Contact After Sales Service
仅供参考,请勿印刷
- Contact After Sales Service
仅供参考,请勿印刷
- Turn off gas supply at
仅供参考,请勿印刷
- Turn off gas supply at
仅供参考,请勿印刷
cylinder immediately
仅供参考,请勿印刷
cylinder immediately
- Contact After Sales Service
仅供参考,请勿印刷
- Contact After Sales Service
仅供参考,请勿印刷
- Turn off gas supply at
仅供参考,请勿印刷
- Turn off gas supply at
仅供参考,请勿印刷
cylinder immediately
仅供参考,请勿印刷
cylinder immediately
- Contact After Sales Service
仅供参考,请勿印刷
- Contact After Sales Service
仅供参考,请勿印刷
仅供参考,请勿印刷
仅供参考,请勿印刷
- Contact After Sales Service
仅供参考,请勿印刷
- Contact After Sales Service
仅供参考,请勿印刷
仅供参考,请勿印刷
仅供参考,请勿印刷
仅供参考,请勿印刷
仅供参考,请勿印刷
仅供参考,请勿印刷
仅供参考,请勿印刷
仅供参考,请勿印刷
仅供参考,请勿印刷
仅供参考,请勿印刷
仅供参考,请勿印刷
仅供参考,请勿印刷
- Contact After Sales Service
仅供参考,请勿印刷
- Contact After Sales Service
- Turn off gas supply at
仅供参考,请勿印刷
- Turn off gas supply at
仅供参考,请勿印刷
仅供参考,请勿印刷
仅供参考,请勿印刷
仅供参考,请勿印刷
仅供参考,请勿印刷
- Contact After Sales Service
仅供参考,请勿印刷
- Contact After Sales Service
- Turn off gas supply at
仅供参考,请勿印刷
- Turn off gas supply at
仅供参考,请勿印刷
仅供参考,请勿印刷
仅供参考,请勿印刷
仅供参考,请勿印刷
仅供参考,请勿印刷
仅供参考,请勿印刷
仅供参考,请勿印刷
- Contact After Sales Service
仅供参考,请勿印刷
- Contact After Sales Service
- Turn off gas supply at
仅供参考,请勿印刷
- Turn off gas supply at
仅供参考,请勿印刷
- Turn off gas supply at
仅供参考,请勿印刷
- Turn off gas supply at
仅供参考,请勿印刷
cylinder immediately
仅供参考,请勿印刷
cylinder immediately
- Contact After Sales Service
仅供参考,请勿印刷
- Contact After Sales Service
仅供参考,请勿印刷
仅供参考,请勿印刷
- Contact After Sales Service
仅供参考,请勿印刷
- Contact After Sales Service
- Turn off gas supply at
仅供参考,请勿印刷
- Turn off gas supply at
仅供参考,请勿印刷
仅供参考,请勿印刷
仅供参考,请勿印刷
- Turn off gas supply at
仅供参考,请勿印刷
- Turn off gas supply at
仅供参考,请勿印刷
- Turn off gas supply at
仅供参考,请勿印刷
- Turn off gas supply at
仅供参考,请勿印刷
cylinder immediately
仅供参考,请勿印刷
cylinder immediately
- Contact After Sales Service
仅供参考,请勿印刷
- Contact After Sales Service
仅供参考,请勿印刷
仅供参考,请勿印刷
仅供参考,请勿印刷
- Contact After Sales Service
仅供参考,请勿印刷
- Contact After Sales Service
仅供参考,请勿印刷
仅供参考,请勿印刷
仅供参考,请勿印刷
仅供参考,请勿印刷
仅供参考,请勿印刷
仅供参考,请勿印刷
仅供参考,请勿印刷
-
 1
1
-
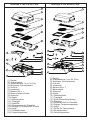 2
2
-
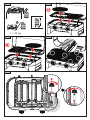 3
3
-
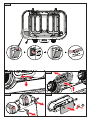 4
4
-
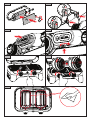 5
5
-
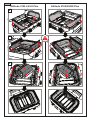 6
6
-
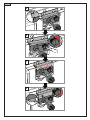 7
7
-
 8
8
-
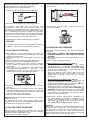 9
9
-
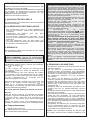 10
10
-
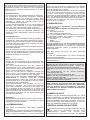 11
11
-
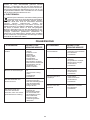 12
12
-
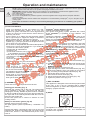 13
13
-
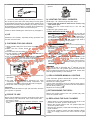 14
14
-
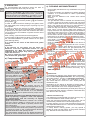 15
15
-
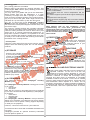 16
16
-
 17
17


Campingaz ATTITUDE 2100 EX Benutzerhandbuch
- Kategorie
- Grillen
- Typ
- Benutzerhandbuch
- Dieses Handbuch ist auch geeignet für
in anderen Sprachen
Verwandte Papiere
-
Campingaz Master 4 Series Classic SBS Instructions For Use Manual
-
Campingaz Classic LXS 4 Series Operation And Maintenance
-
Campingaz 3 Series Classic WL Bedienungsanleitung
-
-
-
-
-
-
-
Campingaz 2 Series Classic LXS LAVA Operation And Maintenance
Sonstige Unterlagen
-
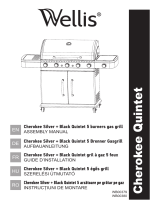 Wellis Cherokee Black Quintet Benutzerhandbuch
-
G21 California Benutzerhandbuch
-
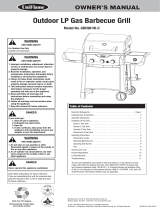 Blue Rhino GBC981W Bedienungsanleitung
-
Sub-Zero ICBSRT484CG Benutzerhandbuch
-
 Blue Rhino 184543 Benutzerhandbuch
-
Sub-Zero Sealed Burner RangeTop Benutzerhandbuch
-
Silvercrest SHTG 2000 A1 Operating And Safety Instructions Manual
-
LANDMANN Elektro-Grillwagen EG-II-590, Silberfarben Bedienungsanleitung
-
Kenyon Grills B70060 Benutzerhandbuch


