HP LASERJET PRO 200 COLOR MFP M276 Installationsanleitung
- Kategorie
- PC / Workstation Barebones
- Typ
- Installationsanleitung
Seite wird geladen ...

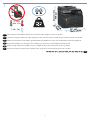
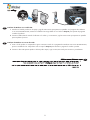
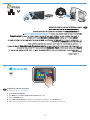
30% - 70%
17 - 25°C
(62.6 - 77°F)
1
1
EN
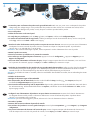
Select a sturdy, well-ventilated, dust-free area, away from direct sunlight to position the product.
Choisissez un support solide et un endroit propre, bien aéré et à l'abri du rayonnement direct du soleil pour placer votre produit.
FR
EN
Stellen Sie das Gerät an einem stabilen, gut durchlüfteten und staubfreien Ort auf, der nicht direktem Sonnenlicht ausgesetzt ist.
DE
Posizionare il prodotto in un'area piana, ben ventilata, priva di polvere e lontana dalla luce diretta del sole.
IT
Busque un lugar sólido, bien ventilado, sin polvo y alejado de la luz solar directa para colocar el producto.
ES
PT
Selecione uma área sem poeira, bem ventilada e rme, longe de luz solar direta para posicionar o produto.
HE
Seite wird geladen ...

3
3
EN
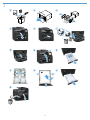
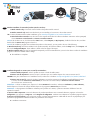
Connect the phone cord for fax. A country/region specic adapter for the RJ11 telephone cord may be required to connect to the
telephone jack.
Connectez le cordon de téléphone au télécopieur. Un adaptateur spécique à votre pays/région pour le cordon de téléphone RJ11 peut
être requis pour la connexion à la prise téléphonique.
FR
Schließen Sie das Telefonkabel für das Fax an. Für den Anschluss an die Telefonbuchse ist möglicherweise für das RJ11-Telefonkabel ein
spezieller Adapter je nach Land/Region erforderlich.
DE
Collegare il cavo telefonico per il fax. È necessario utilizzare un adattatore specico per il paese/regione per collegare il cavo del
telefono RJ11 alla presa telefonica.
IT
Conecte el cable de teléfono para fax. Puede que se requiera un adaptador especíco de país/región para conectar el cable del
teléfono RJ11 a la toma de teléfono.
ES
PT
Conecte o cabo do telefone ao fax. Um adaptador especíco do país/região para o cabo telefônico RJ11 pode ser necessário para a
conexão à tomada telefônica.
HE

2
5
1
3 4
4
4
EN
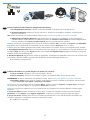
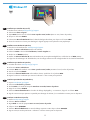
1. Connect the power cord between the product and a grounded AC outlet. Make sure your power source is adequate for the product
voltage rating. The voltage rating is on the product label. The product uses either 100-127 Vac or 220-240 Vac and 50/60 Hz.
CAUTION: To prevent damage to the product, use only the power cord that is provided with the product.
2. Turn on the product.
3. Follow the instructions on the control panel.
4. To verify that your product prints, touch the Setup
button, touch Reports, and then touch Conguration Report.
5. To test the document feeder and the copy function, load the printed report into the document feeder face-up. On the control panel,
touch Copy, and then touch Black or Color to start copying.
1. Branchez le cordon d’alimentation entre le produit et une prise CA avec mise à la terre. Assurez-vous que votre source d'alimentation
est adaptée à la tension nominale du produit. La tension nominale est indiquée sur l'étiquette du produit. Le produit utilise
100-127 volts c.a. ou 220-240 volts c.a. et 50/60 Hz.
ATTENTION : An d’éviter d’endommager le produit, utilisez uniquement le cordon d’alimentation fourni avec le produit.
2. Mettez le produit sous tension.
3. Suivez les instructions qui s’afchent sur le panneau de commande.
4. Pour vérier que votre appareil imprime correctement, appuyez sur la touche Conguration
, Appuyez sur Rapports, puis sur
Rapport de conguration.
5. Pour tester le bac d'alimentation et la fonction de copie, chargez le rapport imprimé dans le bac d'alimentation, recto vers le haut.
Sur le panneau de commande, appuyez sur Copie puis sur Noir ou Couleur pour commencer à copier.
FR
1. Verbinden Sie das Netzkabel mit dem Produkt und einer geerdeten Wechselstromsteckdose. Stellen Sie sicher, dass Ihre Stromquelle
für die Betriebsspannung des Geräts geeignet ist. Die Betriebsspannung nden Sie auf dem Geräteetikett. Das Gerät verwendet
entweder 100 bis 127 Volt Wechselspannung oder 220 bis 240 Volt Wechselspannung und 50/60 Hz.
ACHTUNG: Um Schäden am Gerät zu vermeiden, sollten Sie ausschließlich das Netzkabel verwenden, das im Lieferumfang des Geräts
enthalten ist.
2. Schalten Sie das Gerät ein.
3. Befolgen Sie die Anweisungen auf dem Bedienfeld.
4. Um sicherzustellen, dass Ihr Gerät druckt, berühren Sie die Schaltäche Setup (Einrichtung)
, dann Reports (Berichte) und
anschließend Conguration Report (Kongurationsbericht).
5. Zum Testen des Dokumenteneinzugs und der Kopierfunktion legen Sie den gedruckten Bericht mit der bedruckten Seite nach oben in
den Dokumenteneinzug. Auf dem Bedienfeld berühren Sie Kopieren, und berühren Sie anschließend Schwarz oder Farbe, um den
Kopiervorgang zu starten.
DE
1. Collegare il cavo di alimentazione del prodotto a una presa elettrica con messa a terra. accertarsi che la fonte di alimentazione
sia adeguata alla tensione del prodotto. L'indicazione della tensione si trova sull'etichetta del prodotto. Il prodotto utilizza
100-127 V CA o 220-240 V CA e 50/60 Hz.
ATTENZIONE: per evitare di danneggiare il prodotto, utilizzare solo il cavo di alimentazione fornito in dotazione.
2. Accendere il prodotto.
3. Attenersi alle istruzioni visualizzate sul pannello di controllo.
4. Per vericare che il prodotto in uso sia in grado di stampare, toccare il pulsante Impostazione
, toccare Rapporti, quindi Rapporto
congurazione.
5. Per provare l'alimentatore di documenti e la funzione di copia, caricare il rapporto stampato nell'alimentatore di documenti con
il lato di stampa rivolto verso l'alto. Sul pannello di controllo, toccare Copia, quindi Nero o Colore per avviare la copia.
IT
Seite wird geladen ...

7
8
5
6
6
EN
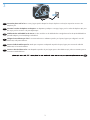
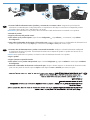
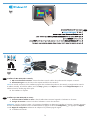
Choose a software install method
Choisissez une méthode d'installation logicielle
FR
Wählen Sie eine Methode für die Software-Installation aus
DE
Scegliere un metodo di installazione del software
IT
Seleccione un método de instalación del software
ES
PT
Escolha um método de instalação de software
HE

7
5
EN
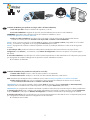
Windows installation when using a USB cable:
1. Insert the product CD into the computer and follow the onscreen instructions. If the installation program does not start
automatically, browse to the CD drive. Double-click the Setup.exe le to run the program and install the product.
2. Connect the USB cable only when the software prompts you, and then follow the on-screen instructions to nish the installation.
Installation sous Windows lors de l'utilisation d'un câble USB :
1. Insérez le CD du produit dans l'ordinateur et suivez les instructions à l'écran. Si le programme d'installation ne démarre pas
automatiquement, parcourez le lecteur CD. Cliquez deux fois sur le chier Setup.exe pour exécuter le programme et installer le
produit.
2. Branchez le câble USB uniquement lorsque le logiciel vous y invite, puis suivez les instructions afchées à l'écran pour terminer
la procédure.
FR
Windows-Installation bei Verwendung eines USB-Kabels:
1. Legen Sie die dem Gerät beiliegende CD in den Computer ein, und folgen Sie den Anweisungen auf dem Bildschirm. Wenn
das Installationsprogramm nicht automatisch gestartet wird, wechseln Sie zum CD-Laufwerk. Doppelklicken Sie auf die Datei
Setup.exe , um das Programm auszuführen und das Gerät zu installieren.
2. Schließen Sie das USB-Kabel nur an, wenn die Software Sie dazu auffordert, und befolgen Sie dann die Anweisungen auf dem
Bildschirm, um den Vorgang abzuschließen.
DE
Installazione su Windows con un cavo USB:
1. Inserire il CD del prodotto nel computer e attenersi alle istruzioni visualizzate sullo schermo. Se il programma di installazione
non viene avviato automaticamente, andare all'unità CD. Fare doppio clic sul le Setup.exe per eseguire il programma di
installazione del prodotto.
2. Collegare il cavo USB solo quando viene richiesto dal software, quindi seguire le istruzioni visualizzate per completare
l'installazione.
IT
Seite wird geladen ...
Seite wird geladen ...

10
Windows-Installation für Netzwerkdrucker (kabelgebunden oder Wireless):
1. Nur kabelgebundene Netzwerke: Schließen Sie das Netzwerkkabel an das Gerät und an das Netzwerk an.
2. Nur Wireless-Netzwerke: Vergewissern Sie sich, dass der PC, auf dem Sie die Installation durchführen, mit dem Wireless-
Netzwerk verbunden ist.
TIPP: Weitere Informationen zur Wireless-Installation nden Sie unter www.hp.com/global/us/en/wireless/index.html.
3. Kabelgebundene und Wireless-Netzwerke: Legen Sie die CD in den Computer ein, und befolgen Sie die Anleitungen zur
Softwareinstallation auf dem Bildschirm. Bei Aufforderungwählen Sie Connect to a wired network (Mit einem kabelgebundenen
Netzwerk verbinden) oder Connect to a wireless network (Mit einem Wireless-Netzwerk verbinden).
HINWEIS: Wird die CD nicht ausgeführt, klicken Sie auf die Windows-Schaltäche Start, und wählen Sie Computer (oder Arbeitsplatz).
Doppelklicken Sie anschließend auf das CD-Laufwerk und dann auf das Programm Autorun.exe, um es zu starten.
HINWEIS: Wenn das Installationsprogramm das Produkt auf dem Netzwerk nicht erkennt, müssen Sie die folgenden Schritte ausführen.
a. Nur kabelgebundene Netzwerke: Geben Sie die IP-Adresse des Geräts manuell ein. Um die IP-Adresse zu ermitteln, berühren Sie die
Schaltäche Setup (Einrichtung), dann Reports (Berichte) und anschließend Conguration Report (Kongurationsbericht). Sie nden die
IP-Adresse auf der ersten Seite des Berichts.
b. Nur Wireless-Netzwerke: Möglicherweise werden Sie aufgefordert, vorübergehend ein USB-Kabel zwischen Ihrem PC und dem Gerät
anzuschließen, damit das Installationsprogramm die erforderlichen Wireless-Einstellungen abrufen kann.
4. Die Installation ist abgeschlossen.
DE
Installazione di Windows per i prodotti collegati in rete (tramite cavo o wireless):
1. Solo per reti cablate: Collegare il cavo di rete al prodotto e alla rete.
2. Solo per reti wireless: Assicurarsi che il computer sul quale si sta installando abbia accesso alla rete wireless.
SUGGERIMENTO: Per ulteriori informazioni sull'installazione wireless, vedere www.hp.com/global/us/en/wireless/index.html.
3. Reti cablate e wireless: Inserire il CD nel computer, quindi seguire le istruzioni di installazione del software. Quando richiesto,
scegliere Connessione a rete cablata o Connessione a rete wireless.
NOTA: Se il CD non viene eseguito, fare clic sul pulsante Start di Windows, selezionare Computer (o Computer locale), fare doppio
clic sull'unità CD, quindi fare doppio clic sul programma Autorun.exe per avviarlo.
NOTA: Se il programma di installazione non trova il prodotto sulla rete, potrebbe essere necessario effettuare una delle seguenti
operazioni:
a. Solo per reti cablate: Immettere manualmente l'indirizzo IP per il prodotto. Per individuare l'indirizzo IP, toccare il pulsante
Impostazione, toccare Rapporti, quindi Rapporto congurazione. L'indirizzo IP è riportato nella prima pagina del rapporto.
b. Solo per reti wireless: Potrebbe essere richiesto di connettere temporaneamente un cavo USB dal computer alla periferica per
consentire al programma di installazione di ottenere le impostazioni wireless.
4. L'installazione è completata.
IT
Seite wird geladen ...
Seite wird geladen ...

13
Installation pour Windows RT (sans l)
1. Rendez-vous à l'adresse www.hp.com/go/support.
2. Sélectionnez Pilotes et logiciel.
3. Tapez M276 dans la zone de recherche Enter a product name/number (Entrer un nom/numéro de produit).
4. Cliquez sur le bouton SEARCH.
5. Sélectionnez Microsoft Windows RT dans la boîte de dialogue déroulante, puis cliquez sur le bouton NEXT.
6. Suivez les instructions à l'écran pour télécharger le logiciel approprié et les pilotes de votre périphérique.
FR
Installation unter Windows RT (Wireless)
1. Besuchen Sie die Website unter www.hp.com/go/support.
2. Wählen Sie Drivers and Software (Treiber und Software).
3. Geben Sie M276 in das Suchfeld Produktname/-nummer eingeben ein.
4. Klicken Sie auf SEARCH (Suchen).
5. Wählen Sie Microsoft Windows RT (Microsoft Windows RT) im Dropdown-Dialogfeld aus, und klicken Sie auf NEXT (Weiter).
6. Folgen Sie den Anleitungen auf dem Bildschirm, um die richtige Software und die richtigen Treiber für Ihr Gerät herunterzuladen.
DE
Installazione per Windows RT (wireless)
1. Accedere all'indirizzo www.hp.com/go/support.
2. Selezionare Drivers and Software.
3. Immettere M276 nella casella di ricerca Enter a product name/number (Immettere il nome/codice del prodotto).
4. Fare clic sul pulsante SEARCH.
5. Selezionare Microsoft Windows RT nella casella a discesa, quindi fare clic sul pulsante NEXT.
6. Seguire le istruzioni visualizzate per scaricare il software e i driver corretti per la periferica.
IT
Instalación para Windows RT (inalámbrica)
1. Vaya a www.hp.com/go/support.
2. Seleccione Controladores y software.
3. Escriba M276 en la casilla de búsqueda Introduzca un nombre/número de producto.
4. Haga clic en el botón SEARCH.
5. Seleccione Microsoft Windows RT en el cuadro de diálogo desplegable y, a continuación, haga clic en el botón NEXT.
6. Siga las instrucciones que aparecen en pantalla para descargar el software y los controladores correctos para su dispositivo.
ES
PT
Instalação no Windows RT (sem o)
1. Acesse www.hp.com/go/support.
2. Selecione Drivers e Software.
3. Digite M276 na caixa de pesquisa Inserir um nome/número de produto.
4. Clique no botão PESQUISAR.
5. Selecione Microsoft Windows RT na caixa de diálogo suspensa e então clique no botão AVANÇAR.
6. Siga as instruções na tela para baixar o software e os drivers corretos para seu dispositivo.
Seite wird geladen ...

9
15
8
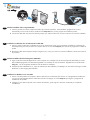
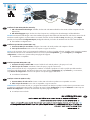
Installation für Mac OS X (USB oder Netzwerk):
1. USB- oder Netzwerkverbindungen: Schließen Sie das USB- oder Netzwerkkabel an das Gerät und den Computer oder das
Netzwerk an.
2. Alle Verbindungstypen: Legen Sie die CD in den Computer ein, und folgen Sie den Anleitungen auf dem Bildschirm.
HINWEIS: Bei Netzwerkverbindungen: Wenn das Installationsprogramm das Produkt auf dem Netzwerk nicht erkennt, müssen Sie die
IP-Adresse manuell eingeben. Um die IP-Adresse zu ermitteln, berühren Sie die Schaltäche Setup (Einrichtung)
, dann Reports
(Berichte) und anschließend Conguration Report (Kongurationsbericht). Sie nden die IP-Adresse auf der ersten Seite des Berichts.
3. Die Installation ist abgeschlossen.
DE
Installazione per Mac OS X (tramite USB o rete):
1. Connessioni USB o per rete cablata: Collegare il cavo USB o di rete al prodotto e al computer o alla rete.
2. Tutti i tipi di connessione: Inserire il CD nel computer e seguire le istruzioni.
NOTA: per le connessioni di rete, se il programma di installazione non rileva il prodotto sulla rete, potrebbe essere necessario immettere
manualmente l’indirizzo IP. Per individuare l’indirizzo IP, toccare il pulsante Impostazione
, toccare Rapporti, quindi Rapporto
congurazione. L’indirizzo IP è riportato nella prima pagina del rapporto.
3. L'installazione è completata.
IT
Instalación para Mac OS X (USB o red):
1. Conexiones de red por cable o USB: conecte el cable de red o USB al producto y al equipo o a la red.
2. Todos los tipos de conexión: introduzca el CD en el equipo y siga las instrucciones.
NOTA: para conexiones de red, si el programa de instalación no detecta el producto en la red, es posible que deba introducir
la dirección IP de forma manual. Para buscar la dirección IP, toque el botón Conguración
, toque Informes y, a continuación,
toque Informe de conguración. La dirección IP aparece en la primera página del informe.
3. La instalación ha nalizado.
ES
IT
Instalação no Mac OS X (USB ou rede):
1. Conexões USB ou de rede com o: Conecte o cabo USB ou de rede ao produto e ao computador ou à rede.
2. Todos os tipos de conexão: Insira o CD no computador e siga as instruções.
OBSERVAÇÃO: Para conexões de rede, se o programa de instalação não detectar o produto na rede, talvez seja necessário inserir
o endereço IP manualmente. Para localizar o endereço IP, toque no botão Conguração
, toque em Relatórios e então toque em
Relatório de Conguração. O endereço IP está listado na primeira página do relatório.
3. A instalação está concluída.
HE

16
9
Setup is complete. If you did not register your product during software installation, go to www.register.hp.com to register now.
The HP Help and Learn Center and other documentation are on the CD that came with the product or in the HP Program folder on your
computer.
The HP Help and Learn Center is a product help tool that provides easy access to product information, HP product Web support,
troubleshooting guidance, and regulatory and safety information.
EN
9
L’installation est terminée. Si vous n'avez pas enregistré votre produit lors de l'installation du logiciel, rendez-vous sur
www.register.hp.com pour le faire dès maintenant.
Le centre d’aide et d’apprentissage HP (HP Help and Learn Center) ainsi que d’autres documents se trouvent sur le CD livré avec
le produit ou dans le dossier dédié aux programmes HP sur votre ordinateur.
Le centre d’aide et d’apprentissage HP est un outil d’aide qui fournit un accès facile aux informations sur le produit, à une assistance
en ligne pour les produits HP, à un guide de dépannage et à des informations relatives à la réglementation et à la sécurité.
FR
9
Die Einrichtung ist abgeschlossen. Falls Sie Ihr Gerät während der Softwareinstallation nicht registriert haben, besuchen Sie die Website
www.register.hp.com, um es jetzt zu registrieren.
Das HP Help and Learn Center sowie weitere Dokumentation benden sich auf der CD, die dem Gerät beiliegt, oder im
HP Programmordner auf Ihrem Computer.
Das HP Help and Learn Center ist eine Produkthilfe für einfachen Zugriff auf Produktinformationen, Web-Support für HP Produkte,
Hinweise zur Fehlerbehebung sowie Zulassungs- und Sicherheitsinformationen.
DE
La congurazione è stata completata. Se durante l'installazione del software non è stata eseguita la registrazione del prodotto, visitare
il sito Web www.register.hp.com per eseguire la registrazione.
HP Help and Learn Center e documentazione aggiuntiva sono disponibili sul CD fornito con il prodotto o nella cartella dei programmi
HP sul computer.
HP Help and Learn Center è uno strumento di assistenza che fornisce accesso facilitato alle informazioni sul prodotto, supporto Web
ai prodotti HP, guida alla risoluzione dei problemi e informazioni relative alla sicurezza e alle normative.
IT
La conguración ha terminado. Si no registró el producto durante la instalación del software, vaya a www.register.hp.com para
registrarlo ahora.
El HP Centro de ayuda y formación se incluye junto con otra documentación en el CD suministrado con el producto o en la carpeta
Programa de HP de su equipo.
El HP Centro de ayuda y formación es una herramienta de ayuda para el producto que permite acceder fácilmente a información del
producto, asistencia Web del producto HP, guía para la solución de problemas e información legal y de seguridad.
ES
A conguração está concluída. Se você não tiver registrado seu produto durante a instalação do software, acesse
www.register.hp.com para se registrar agora.
O HP Help and Learn Center e outras documentações estão no CD que veio com o produto ou na pasta HP Program no seu
computador.
O HP Help and Learn Center é uma ferramenta de ajuda do produto que oferece acesso fácil a informações sobre o produto,
ao suporte da Web ao produto da HP, a orientação para solução de problemas e informações regulatórias e de segurança.
ES
HE
Seite wird geladen ...
-
 1
1
-
 2
2
-
 3
3
-
 4
4
-
 5
5
-
 6
6
-
 7
7
-
 8
8
-
 9
9
-
 10
10
-
 11
11
-
 12
12
-
 13
13
-
 14
14
-
 15
15
-
 16
16
-
 17
17
-
 18
18


HP LASERJET PRO 200 COLOR MFP M276 Installationsanleitung
- Kategorie
- PC / Workstation Barebones
- Typ
- Installationsanleitung
in anderen Sprachen
- English: HP LASERJET PRO 200 COLOR MFP M276 Installation guide
- français: HP LASERJET PRO 200 COLOR MFP M276 Guide d'installation
- español: HP LASERJET PRO 200 COLOR MFP M276 Guía de instalación
- italiano: HP LASERJET PRO 200 COLOR MFP M276 Guida d'installazione
- português: HP LASERJET PRO 200 COLOR MFP M276 Guia de instalação
Verwandte Artikel
-
HP M276nw Bedienungsanleitung
-
-
-
-
-
-
-
-
HP OfficeJet 3834 Bedienungsanleitung
-
HP ENVY 7640 e series Bedienungsanleitung