Lenco DF-241 Bedienungsanleitung
- Kategorie
- Digitale Bilderrahmen
- Typ
- Bedienungsanleitung

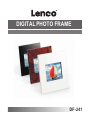
DIGITAL PHOTO FRAME
DF-241

Table of Contents
Table of Contents.......................................................................1
ENGLISH...........................................................................2-11
DEUTSCH..........................................................................12-21
Español..............................................................................22-31
NEDERLANDS....................................................................32-41
FRANCAIS..........................................................................42-51
1

SYSTEM REQUIREMENTS:
INSTALLATION PROCEDURE:
Microsoft OS UserManual ENGLISH
DIGITAL PHOTO FRAME
Windows 98 / 2000 / ME / XP / Vista
Read First
Quick Installation Guide
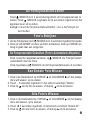
** Important: Install application software before connect device to PC. **
2
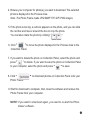
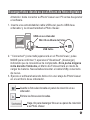
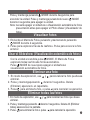
1. Disconnect device USB cable from PC if it is connected.
2. Insert CD and follow the on-screen instruction to install “Photo
Viewer”.
3. After the application software has been successfully installed,
you could connect device to PC with the provided USB cable.
4. Windows OS will set up hardware driver automatically.
5. Launch “Photo Viewer” and enjoy.
NOTE: The software can not initialize with the unit if plugged
in while running in automatic slide show mode.
For Windows 98 SE user, you need to install the driver
software in the CD provided.

Important Safety Instructions
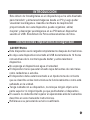
Introduction
This Digital Photo Frame is a stand-alone device that is designed to
transfer and store images from a PC and then display the images. Using
the application software supplied with this device, you can organize,edit,
enhance and download the image in your PC to this device using USB.
WARNING:
This device will be fully charged after two hours charging through USB
cable.
Do not leave the device connected to the USB for longer than 12
consecutive hours otherwise damage and overheating of the device
may occur.
Do not expose this device to water or moisture.
Do not remove cover. No user serviceable parts inside. Refer servicing
to qualified personnel.
The device should be away from sources of high heat such as Radiators
or stoves.
The device should be connected to a power supplyonly of the type
described in the operating instructions or as markedon the unit.
Care should be taken so that objects are not placed on, nor liquids
spilled on or inside the device.
The user should not attempt to service the device beyond those means
described in these operating instructions. All other servicing should be
referred to qualified service personnel. .
3

4
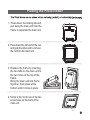
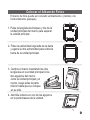
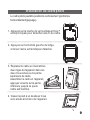
Placing the Photo Viewer
----------------- ---------------------------------------------------
----------------- ---------------------------------------------------
----------------- ---------------------------------------------------
1. Press down the locking tab and
pull away the main unit from the
frame to separate the main unit.
2. Press down the left end of the rod,
and grab the other end to remove
the rod from the main unit.
3. Replace the frame by inserting
the two tabs on the main unit to
the two holes at the top of the
frame.
Bring the main unit and frame
together, then press at the
bottom until it clicks in place.
4. Screw in the rod to one of the two
screw holes on the back of the
main unit.

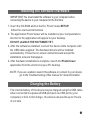
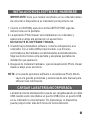
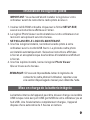
IMPORTANT: You must install the software to your computer before
connecting the device to your computer for the first time.
1. Insert the CD-ROM and run the file Photo Viewer SETUP;
follow the onscreen instructions.
2. The application Photo Viewer will be installed on your computerand a
shortcut to the application will appear on your desktop.
DO NOT LAUNCH THE SOFTWARE YET.
3. After the software is installed, connect the device to the computer with
the USB cable supplied. The hardware drivers will be installed
automatically. Follow the on-screen instructions and accept the
installation screens that appear.
4. After hardware installation is complete, launch the PhotoViewer
application from the shortcut on your PC desktop.
NOTE: If you are unable to launch the software or connect to your device,
go to the Troubleshooting of this manual for more information.
Installing the Software / Hardware
The internal battery of the device may be charged using the USB cable
when connected to a powered USB port(such as USB port on your
computer) or hub. At full charge, the device can provide up to 3 hours
of run time.
5
Charging the Battery

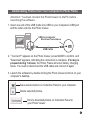
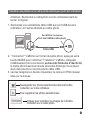
Attention: You must connect the Photo Viewer to the PC before
launching the software.
USB on computer
Mini B on Photo Album
USB Cable
6
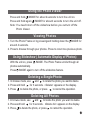
Downloading Photos from Your Computer to Photo Frame
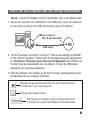
1. Insert one end of the USB Cable into USB on your computer's USB port
and the other end into the Photo Viewer.
2. " Connect?" appears on the Photo Viewer, press MODE to confirm, and
"Download" appears, indicating the connection is complete, If no key is
pressed during 1 minute, the Photo Frame will enter battery charging
mode. You need to disconnect the USB cable and connect it again.
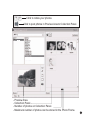
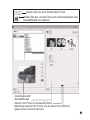
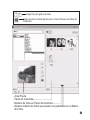
3. Launch the software by double clicking the Photo Viewer shortcut on your
computer's desktop.
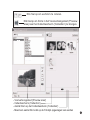
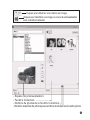
Save selected photo on Collection Panel to your computer.
Delete selected photos.
Click to download photos on Collection Panel to
your Photo Viewer

7
Click to rotate your photos
Click to post photos in Preview Area to Collection Panel.
- Number of photos on Collection Panel.
- Maximum number of photos can be stored in the Photo Frame.
- Preview Area.
- Collection Panel.

8
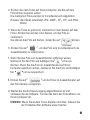
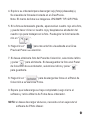
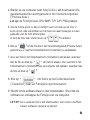
4. Browse your computer for photo(s) you want to download. The selected
photo is displayed in the Preview Area.
Note: The Photo Frame reads JPG/ BMP/ TIF/ GIF/ PNG images.
5. If the photo is too big, a red box appears on the photo, and you can click
the red box and mover around the box to crop the photo.
You can also rotate the photo by clicking" ".
6. Click to move the photo displayed in the Preview Area to the
Collection Panel.
7. If you want to delete the photo on Collection Panel, select the photo and
press to delete. If you want to save the photo on Collection Panel
to your computer, select he photo and press to save.
8. Click to download photos on Collection Panel onto your
Photo Frame.
9. Wait for download to complete, then close the software and remove the
Photo Frame from your computer.
NOTE: If you want to download again, you need to re-start the Photo
Viewer software.

9
1
4
5
3
2
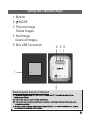
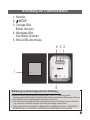
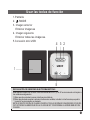
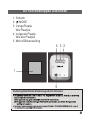
1. Monitor
2. /MODE
3. Previous Image
Delete images
4. Next Image
Delete all Images.
5. Mini USB Connection
Using the Function Keys
Electromagnetic Emissions Statement

10
Press and hold /MODE for about 4 seconds to turn the unit on.
Press and hold again /MODE for about 4 seconds to turn the unit off.
Using the Photo Viewer
Note: You need to turn off the slideshow before you can turn off the
Photo Viewer.
Viewing Photos
1. Turn the Photo Frame on by pressing and holding down the /MODE for
around 4 seconds.
2. Press to browse through your photos. Press to return to a previous photo.
Using Slideshow ( Automatic Display of Photos)
With the unit on, press /MODE. The Photo Frame scrolls through all
photos automatically.
Press /MODE again to turn off the slideshow feature.
1. In browse mode, use and to locate the photo you wantto delete.
2. Press and hold for 3 seconds. Delete appears on the display.
3. Press to delete the photo, or press to cancel the operation.
1. In browse mode, use and to locate the photo you want to delete.
2. Press and hold for 3 seconds. Delete All appears on the display.
3. Press to delete the photo, or press to cancel the operation.
Deleting a Single Photo
Deleting All Photos

11
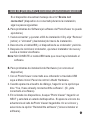
If the device displays error message “Device not connected” during
installation, follow these steps to resolve:
A. For Software issues (Photo Viewer software can not launch)
1. Re-insert and launch the installation CD and choose “Remove” or
“Uninstall” from the Installer Menu.
2. Disconnect the USB cable and device from the computer and restart.
3. After computer has restarted, launch the installer again and reinstall
the software.
Note: DO NOT connect the USB cable until after the software is
installed.
B. For Hardware installation issues (Device not recognized)
1. With the Viewer connected to the computer via USB go to the Start
Menu / Control Panels / Add Hardware.
2. When the Dialog box comes up, click the option that says “Yes, I have
already connectecd the software”.
3. In the list of Devices-Find “Photo Viewer” click NEXT and this will
give the status of the device. If a warning icon appears next to the
Photo Viewer then double click the icon and select the option to
“Reinstall the software”.
Troubleshooting for Installation

SOFTWAREINSTALLATION:
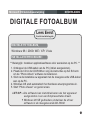
Microsoft OS UserManual DEUTSCH
DIGITALER BILDERRAHMEN
Windows 98 / 2000 / ME / XP/ Vista
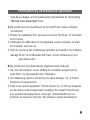
** Wichtig: Installieren Sie die Software, bevor Sie das Gerät an einen
PC anschließen. **
12
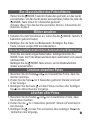
1. Trennen Sie das Gerät vom USB-Kabel ab, wenn es an einen
PC angeschlossen ist.
2. Legen Sie die CD ein und befolgen Sie die
Bildschirmanweisungen zur Installation von “Photo Album”.
3. Nach erfolgreicher Installation der Software können Sie das
Gerät mithilfe des mitgelieferten USB-Kabels an den PC
anschließen.
4. Windows richtet dann die Hardware-Treiber automatisch ein.
5. Starten Sie das Programm und Sie können mit der Benutzung
anfangen.
HINWEIS: Die Software kann nicht initialisiert werden, wenn das Gerät
im Diashowmodus ist.
Windows 98 SE Benutzer, installieren Sie der Treiber Software,
die mitgelieferte CD-ROM enth-lt diese software
Bitte lesen!
Kurzinstallationsanleitung
SYSTEMANFORDERUNGEN

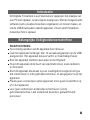
Wichtige Sicherheitshinweise
Einleitung
Dieses digitale Fotoalbum ist ein eigenständiges Gerät, auf das Sie
Bilder vom PC kopieren und dann damit betrachten können. Benutzen
Sie die mitgelieferte Software zum Verwalten, Bearbeiten, Verbessern
und Kopieren der Bilder vom PC auf das Gerät. Dieses Fotoalbum kann
tausende von Fotos speichern
WARNUNG:
Dieses Gerät ist nach zwei Stunden Ladezeit vollständig aufgeladen.
Achten Sie bitte darauf, dass es nicht länger als 12 Stunden am USB-
Port Ihres Computers angeschlossen bleibt, um zu vermeiden, dass
es sich überhitzt und beschädigt wird.
Setzen Sie dieses Gerät niemals Wasser oder Feuchtigkeit aus.
Das Gerät sollte in ausreichender Entfernung zu Hitzequellen wie
z. B. Heizkörpern bzw. Öfen aufgestellt werden.
Das Gerät sollte nur mit einem dafür vorgesehenen Netzteil betrieben
werden.
Achten Sie darauf, dass keine anderen Gegenstände auf das Gerät
gestellt werden und dass keine Flüssigkeiten auf bzw. in das Gerät
gelangen.
Der Benutzer sollte keine Versuche anstellen das Gerät eigenhändig
zu warten, es sei denn es wurde entsprechend in der
Bedienungsanleitung beschrieben. Wenden Sie sich bei weiterem
Wartungsbedarf immer an ausgebildetes Wartungspersonal.
13

14
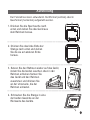
Aufstellung
----------------- ---------------------------------------------------
----------------- ---------------------------------------------------
----------------- ---------------------------------------------------
1. Drücken Sie die Sperrlasche nach
unten und ziehen Sie das Gerät aus
dem Rahmen heraus.
2. Drücken Sie das linke Ende der
Stange nach unten und ziehen
Sie die sie am anderen Ende
heraus.
3. Setzen Sie den Rahmen wieder auf das Gerät,
indem Sie die beiden Laschen oben in den
Rahmen schieben.Setzen Sie
das Gerät und den Rahmen
zusammen und drücken Sie
an der Unterseite, bis der
Rahmen einrastet.
4. Schrauben Sie die Stange in eine
der beiden Gewinde an der
Rückseite des Geräts.
Der Fotorahmen kann entweder im Hochformat (vertikal) oder im
Querformat (horizontal) aufgestellt werden.

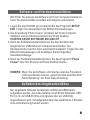
WICHTIG: Sie müssen die Software auf Ihrem Computer installieren,
bevor Sie das Gerät das erste Mal am Computer anschließen.
1. Legen Sie die CD-ROM ein und starten Sie das Programm SETUP.
EXE. Folgen Sie dann einfach den Bildschirmanweisungen.
2. Die Anwendung “Photo Viewer” wird dann auf Ihrem Computer
installiert und ein Shortcut erscheint auf Ihrem Desktop.
STARTEN SIE DIE SOFTWARE NOCH NICHT
3. Nach der Softwareinstallation können Sie das Gerät mit dem
mitgelieferten USB-Kabel am Computer anschließen. Die
Hardwaretreiber werden dann automatisch installiert. Folgen Sie den
Bildschirmanweisungen und bestätigen Sie die folgenden
Installationsdialoge.
4. Nach der Hardwareinstallation können Sie das Programm “Photo
Viewer” über den Shortcut auf Ihrem Desktop starten.
HINWEIS: Wenn Sie die Software nicht starten oder das Fotoalbum
nicht anschließen können, gehen Sie bitte zum Abschnitt“
Fehlerbehebung” am Ende dieser Anleitung.
Software- und Hardwareinstallation
Der eingebaute Akku des Geräts kann mithilfe der USB-Kabels
aufgeladen werden, wenn das Gerät an einen Strom führenden USB-
Port (z. B. der USB-Port Ihres Computers oder ein USB-Hub)
angeschlossen wird. Voll aufgeladen kann das Gerät bis zu 3 Stunden
ohne Unterbrechung benutzt werden.
15
Aufladen des eingebauten Akkus

Achtung: Sie müssen den Fotobetrachter an den PC anschließen,
bevor Sie die Software starten.
USB-Port am Computer
Min i-USB-Port am Fotoalbum
USB Cable
16
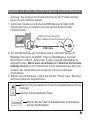
Kopieren von Fotos von Ihrem Computer auf den Fotorahmen
1. Verbinden Sie das eine Ende des USB-Kabels mit dem USB-
Anschluss Ihres Computers und das andere Ende mit dem
Fotobetrachter.
2. Auf dem Bildschirm des Fotobetrachters erscheint “Connect?”.
Betätigen Sie dann die MODE-Taste zur Bestätigung. Auf dem
Bildschirm erscheint „Download“ und der Verbindungsaufbau ist
abgeschlossen. Wenn dann innerhalb von 1 Minuten keine Taste
betätigt wird, geht der Fotorahmen in den Auflademodus über. Sie
müssen das Gerät dann vom Computer trennen und erneut
anschließen.
Speichern Sie die markierten Fotos im Auswahlfenster auf Ihrem
Computer.
Löschen Sie die markierten Fotos.
Klicken Sie die Fotos im Auswahlfenster zum Kopieren
auf den Fotobetrachter.
3. Starten Sie die Software, indem Sie auf den “Photo View”-Shortcut
auf Ihrem Desktop doppelklicken.

17
Klicken Sie hier zum Drehen Ihrer Fotos.
Klicken Sie hier, um die Fotos vom Vorschaubereich zum
Auswahlfenster zu kopieren.
- Anzahl der Fotos im Auswahlfenster
- Maximale Anzahl der Fotos, die auf dem Fotorahmen
gespeichert werden können.
- Vorschaubereich
- Auswahlfenster

18
4. Suchen Sie nach Fotos auf Ihrem Computer, die Sie auf dem
Fotorahmen kopieren wollen.
Die markierten Fotos werden im Vorschaubereich abgebildet.
Hinweis: Das Gerät unterstützt JPG-, BMP-, TIF-, FIF- und PNG-
Bilder.
5. Wenn die Fotos zu groß sind, erscheint ein roter Kasten auf dem
Fotos. Klicken Sie auf den roten Kasten, um das Foto zu
verkleinern.
Sie können das Foto auf drehen, indem Sie auf “ ”klicken.
6. Klicken Sie auf , um das Foto vom Vorschaubereich ins
Auswahlfenster zu verschieben.
7. Wenn Sie das Foto vom Auswahlfenster entfernen wollen,
markieren Sie das Foto und betätigen Sie ,um es zu
löschen. Wenn Sie das Foto im Auswahlfenster auf Ihrem
Computer speichern wollen, markieren Sie das Foto und betätigen
Sie ,um es zu speichern.
8. Klicken Sie auf , um die Fotos im Auswahlfenster auf
den Fotorahmen zu kopieren.
9. Warten Sie bis der Kopiervorgang abgeschlossen ist und
verlassen Sie die Software. Trennen Sie dann den Fotorahmen von
Ihrem Computer ab.
HINWEIS: Wenn Sie weitere Fotos kopieren möchten, müssen Sie
die Fotobetrachter-Software erneut starten.

1
4
5
3
2
1. Monitor
2. /MODE
3. Voriges Bild
Bilder löschen
4. Nächstes Bild
Alle Bilder löschen
5. Mini-USB-Anschluss
Benutzung der Funktionstasten
(1) Das Gerät darf keine schädigenden Störstrahlungen verursachen.
(2) Das Gerät muss alle eingehenden Störstrahlungen tolerieren, einschließlich solcher Störstrahlu
ngen, durch die der Betrieb in ungewollter Weise beeinträchtigt werden könnte.
Dieses Gerät erfüllt die Anforderungen des Paragrafen 15 der FCC-Verordnung und die
Anforderungen des CE-Standards. Zum Betrieb des Geräts müssen folgende Bedingungen erfüllt sein:
THIS CLASS B DIGITAL APPARATUS COMPLIES WITH CANADIAN ICES-003. / CET APPAREIL
NUMÉRIQUE DE LA CLASSE B EST CONFORME À LA NORME NMB -003 DU CANADA.
Erklärung zu elektromagnetischer Strahlung
19
Seite wird geladen ...
Seite wird geladen ...
Seite wird geladen ...
Seite wird geladen ...
Seite wird geladen ...
Seite wird geladen ...
Seite wird geladen ...
Seite wird geladen ...
Seite wird geladen ...
Seite wird geladen ...
Seite wird geladen ...
Seite wird geladen ...
Seite wird geladen ...
Seite wird geladen ...
Seite wird geladen ...
Seite wird geladen ...
Seite wird geladen ...
Seite wird geladen ...
Seite wird geladen ...
Seite wird geladen ...
Seite wird geladen ...
Seite wird geladen ...
Seite wird geladen ...
Seite wird geladen ...
Seite wird geladen ...
Seite wird geladen ...
Seite wird geladen ...
Seite wird geladen ...
Seite wird geladen ...
Seite wird geladen ...
Seite wird geladen ...
Seite wird geladen ...
Seite wird geladen ...
-
 1
1
-
 2
2
-
 3
3
-
 4
4
-
 5
5
-
 6
6
-
 7
7
-
 8
8
-
 9
9
-
 10
10
-
 11
11
-
 12
12
-
 13
13
-
 14
14
-
 15
15
-
 16
16
-
 17
17
-
 18
18
-
 19
19
-
 20
20
-
 21
21
-
 22
22
-
 23
23
-
 24
24
-
 25
25
-
 26
26
-
 27
27
-
 28
28
-
 29
29
-
 30
30
-
 31
31
-
 32
32
-
 33
33
-
 34
34
-
 35
35
-
 36
36
-
 37
37
-
 38
38
-
 39
39
-
 40
40
-
 41
41
-
 42
42
-
 43
43
-
 44
44
-
 45
45
-
 46
46
-
 47
47
-
 48
48
-
 49
49
-
 50
50
-
 51
51
-
 52
52
-
 53
53


Lenco DF-241 Bedienungsanleitung
- Kategorie
- Digitale Bilderrahmen
- Typ
- Bedienungsanleitung
in anderen Sprachen
- English: Lenco DF-241 Owner's manual
- français: Lenco DF-241 Le manuel du propriétaire
- español: Lenco DF-241 El manual del propietario
- Nederlands: Lenco DF-241 de handleiding
Verwandte Artikel
Andere Dokumente
-
Lexibook DKC01 HSM Benutzerhandbuch
-
-
Parrot PHOTO VIEWER 7CC Benutzerhandbuch
-
Coby DP-161 Benutzerhandbuch
-
Belkin F5U229ea Benutzerhandbuch
-
Bushnell 11-9500 Benutzerhandbuch
-
Hama 00095253 Bedienungsanleitung
-
Salora DPF1040ST Benutzerhandbuch
-
Philips SPV3000/12 Benutzerhandbuch