Genexis FiberTwist Quick Installation Manual
- Typ
- Quick Installation Manual

FiberTwist
Network Termination

ii
Quick Installation Guide ....................................................................1
Schnellinstallationsanleitung ............................................................13

FiberTwist
Network Termination
Quick Installation Guide

2
In the box
Model: Fibertwist-X0000
PN: 996160001
SN: Z.000001001
CLASS 1
LASER PRODUCT
+12v 0.5A
2016-05 VER.1.0
Made in India
GPON SN:GNXS01000001
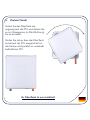
FiberTwist
Active device
(exact appearance differs depending on the model)
Label
Please retain for future reference.
Power Adaptor
Use only the supplied power adaptor.

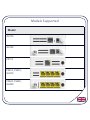
Model
G2110
G2120
P2110
P2410, P3410,
G2410
P2420, P3420,
G2420
Models Supported

4
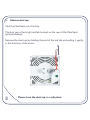
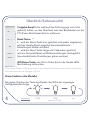
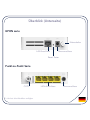
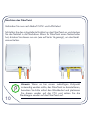
Overview (side)
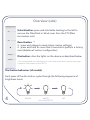
Unlock button: press and hold while twisting to the left to
remove the FiberTwist or blind cover from the FTU (ber
termination unit).
Reset button: *
• press and release to reset (retain custom settings)
• press and hold for more than 5 seconds to perform a factory
reset (deletes all custom conguration)
Dim button: dims the lights on the device as described below.
* On some models, the reset button is on the end of the device next to the power
connector. Not present on the P2110.
Dim button behaviour (all models)
Each press of the dim button cycles through the following sequence of
brightness levels:
fully lit offhalf lit
(not on the P2110)

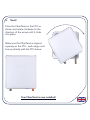
Overview (end)
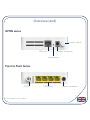
CATV * LAN ports power connector
Point to Point Series
power switch
power connector
reset button
LAN port
GPON series
* not present on all models

6
Installation
1. Preparation
Ensure there is a power socket within 80cm of where the device is being
installed.
Open the FiberTwist box (but don’t yet remove the FiberTwist from the box)
and place the box near where the FiberTwist is to be installed.
Important: It is crucial the following steps all be completed
in one go. Failure to do so could result in damage to the
bre optic connectors, causing a severe degradation of
signal quality.

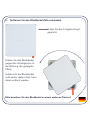
2. Remove the blind cover (if present)
Press and hold the unlock button.
Rotate the blind cover counter-
clockwise (in the direction of
the arrow).
When it won’t rotate any
further, the blind cover can be
removed.
Please store the blind cover in a safe place.

8
3. Remove dust cap
Take the FiberTwist out of its box.
The dust cap is the bright red tab located on the rear of the FiberTwist
(pictured below).
Remove the dust cap by holding the end of the red tab and pulling it gently
in the direction of the arrow.
Please store the dust cap in a safe place.

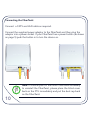
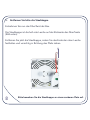
4. Twist!
Place the FiberTwist on the FTU as
shown and rotate clockwise (in the
direction of the arrow) until it clicks
into place.
Make sure the FiberTwist is aligned
squarely on the FTU - each edge must
line up directly with the FTU below.
Your FiberTwist is now installed!

10
Connecting the FiberTwist
Connect a CATV and LAN cable as required.
Connect the supplied power adaptor to the FiberTwist and then plug the
adaptor into a power socket. If your FiberTwist has a power button (as shown
on page 5) push the button in to turn the device on.
Note: If at some point in the future it becomes necessary
to uninstall the FiberTwist, please place the blind cover
back on the FTU immediately and put the dust cap back
on the FiberTwist.

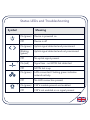
Status LEDs and Troubleshooting
Symbol Meaning
On (green) Device is powered on
Off Device is off
On (green) Uplink signal detected and provisioned
Blinking
(green)
Uplink signal detected and not provisioned
Off No uplink signal present
* On (red) Signal loss - no GPON link detected
Off GPON link is up
On (green) LAN connected. Flashing green indicates
network activity.
Off No LAN connection present
* On (green) CATV module present and enabled
Off CATV not enabled or no signal present

12
• Do not operate the device in temperatures below 0° C or above 40° C
• Never look directly into the end of a bre optic cable.
• Use only the supplied power adaptor.
• Indoor use only.
• Never expose to or immerse in water and make sure no moisture or liquid
enters the device.
• Do not block the air vents (the device will overheat).
• Do not open the housing. There are no user serviceable parts inside.
Please contact your service provider if the device stops operating as
expected.
• Always unplug your device from the power supply before cleaning!
• The device can be cleaned by wiping it over using a soft, dry cloth. Avoid
any abrasive material that might scratch or damage the surface.
• To remove accumulated dirt, a damp cloth may be used.
• Product logos and LED icons will be damaged by the use of strong
cleaning products or ethanol based solutions.
This product must not be disposed of in your normal household
waste. Please take it to your regular electronic waste collection
and recycling location.
Safety and Care

FiberTwist
Netzwerk-Abschluss
Schnellinstallationsanleitung

2
Im Lieferumfang
Model: Fibertwist-X0000
PN: 996160001
SN: Z.000001001
CLASS 1
LASER PRODUCT
+12v 0.5A
2016-05 VER.1.0
Made in India
GPON SN:GNXS01000001
FiberTwist
Aktiv-Einheit
(Ihr Modell kann je nach Typ etwas anders
aussehen)
Produktaufkleber
Bitte für zukünftige Zwecke
aufbewahren.
Netzteil
Bitte nur das mitgelieferte Netzteil
benutzen.

Model
G2110
G2120
P2110
P2410, P3410,
G2410
P2420, P3420,
G2420
Unterstützte Modelle

4
Überblick (Seitenansicht)
Freigabe-Knopf: bitte während des Drehvorgangs nach links
gedrückt halten, um das FiberTwist oder den Blinddeckel von der
FTU (Faser-Abschlusseinheit) zu entfernen.
Reset-Taster: *
• wird der Reset-Taster kurz gedrückt und wieder losgelassen,
wird der Geräte-Reset ausgelöst (benutzerdenierte
Einstellungen bleiben erhalten)
• wird der Reset-Taster länger als 5 Sekunden gedrückt,
wird ein Komplett-Reset auf Werkseinstellungen durchgeführt
(benutzerdenierte Einstellungen gehen verloren)
LED-Dimm-Taster: der Dimm-Taster dimmt die Geräte-LEDs.
Beschreibung siehe unten.
* Bei einigen Geräten ist der Reset-Taster an der Unterseite des Geräts neben dem Stromanschluss.
Der Reset-Taster ist nicht verfügbar im P2110.
Dimm-Funktion (alle Modelle)
Bei jedem Drücken der Taste durchlaufen die LED`s die angezeigte
Helligkeitsstufen-Folge.
100% aus50%
(nicht bei P2110)
Helligkeit:

Überblick (Unterseite)
CATV * LAN-Anschlüsse Stromanschluss
Punkt-zu-Punkt Serie
Netzschalter
Stromanschluss
Reset-Taster
LAN-Anschluss
GPON serie
* nicht bei allen Modellen verfügbar

6
Installation
1. Vorbereitung
Bitte stellen Sie sicher, dass sich eine Steckdose in der Nähe bendet (bis
80cm entfernt), wo das Gerät installiert werden soll.
Öffnen Sie die FiberTwist-Verpackung (aber entnehmen Sie das FiberTwist
noch nicht aus der Box) und platzieren Sie die Box nahe der Position, wo es
das Gerät installiert werden soll.
Wichtig: Es ist von entscheidender Bedeutung, dass die
folgenden Schritte in einem Arbeitsgang durchgeführt
werden. Geschieht dies nicht, könnte es zu einer
Beschädigung der Glasfaser-Steckverbinder kommen bzw.
eine erhebliche Verschlechterung der Signalqualität verursacht
werden.
Seite laden ...
Seite laden ...
Seite laden ...
Seite laden ...
Seite laden ...
Seite laden ...
Seite laden ...
Seite laden ...
-
 1
1
-
 2
2
-
 3
3
-
 4
4
-
 5
5
-
 6
6
-
 7
7
-
 8
8
-
 9
9
-
 10
10
-
 11
11
-
 12
12
-
 13
13
-
 14
14
-
 15
15
-
 16
16
-
 17
17
-
 18
18
-
 19
19
-
 20
20
-
 21
21
-
 22
22
-
 23
23
-
 24
24
-
 25
25
-
 26
26
-
 27
27
-
 28
28


Genexis FiberTwist Quick Installation Manual
- Typ
- Quick Installation Manual
in anderen Sprachen
- English: Genexis FiberTwist