

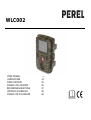
WLC002
V. 01 – 17/06/2020 2 ©Velleman nv

WLC002
V. 01 – 17/06/2020 3 ©Velleman nv

WLC002
V. 01 – 17/06/2020 4 ©Velleman nv
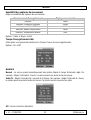
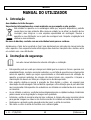
USER MANUAL
1. Introduction
To all residents of the European Union
Important environmental information about this product
This symbol on the device or the package indicates that disposal of the device after its
lifecycle could harm the environment. Do not dispose of the unit (or batteries) as unsorted
municipal waste; it should be taken to a specialized company for recycling. This device
should be returned to your distributor or to a local recycling service. Respect the local
environmental rules.
If in doubt, contact your local waste disposal authorities.
Thank you for choosing Perel! Please read the manual thoroughly before bringing this device into
service. If the device was damaged in transit, do not install or use it and contact your dealer.
2. Safety Instructions
Read and understand this manual and all safety signs before using this appliance.
• This device can be used by children aged from 8 years and above, and persons with reduced
physical, sensory or mental capabilities or lack of experience and knowledge if they have been
given supervision or instruction concerning the use of the device in a safe way and understand
the hazards involved. Children shall not play with the device. Cleaning and user maintenance
shall not be made by children without supervision.
• This device is intended only for recording digital photos and videos, particularly for observing
wildlife. It is not intended for any other use or for uses extending beyond those stated. This
device is not intended for use in commercial or industrial environments.
• When used outdoors, bad weather conditions or rapid changes in the weather could lead to errors
in recording or faulty images.
• Insert the memory card before powering on the camera. The camera has no internal memory
for saving images or videos and will not work if there is no memory card installed.
• Unlock the write protection before inserting the memory card.
• Do not insert or take out the memory card when the camera is switched on.
• It is recommended to format the memory card when used for the first time. Many memory cards
formatted by other cameras have poor compatibility with different brands of cameras.

WLC002
V. 01 – 17/06/2020 5 ©Velleman nv
• When setting up the camera, allow approximately 10 to 20 seconds for the camera to acquire a
signal.
• In setup the camera will shut down automatically after 3 minutes if no operation is done. Please
turn on the power again to re-activate the camera.
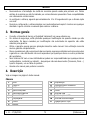
3. General Guidelines
• Refer to the Velleman® Service and Quality Warranty on www.velleman.eu.
• All modifications of the device are forbidden for safety reasons. Damage caused by user
modifications to the device is not covered by the warranty.
• Only use the device for its intended purpose. Using the device in an unauthorised way will void
the warranty.
• Damage caused by disregard of certain guidelines in this manual is not covered by the warranty
and the dealer will not accept responsibility for any ensuing defects or problems.
• Nor Velleman nv nor its dealers can be held responsible for any damage (extraordinary,
incidental or indirect) – of any nature (financial, physical…) arising from the possession, use or
failure of this product.
• Keep this manual for future reference.
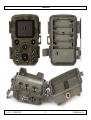
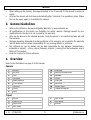
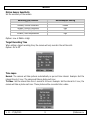
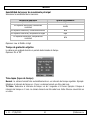
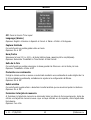
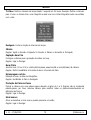
4. Overview
Refer to the illustrations on page 2 of this manual.
Camera
1
display
10
playback
2
IR LEDs
11
battery compartment
3
lens
12
speaker
4
up/video
13
mode
5
down/capture
14
USB jack
6
front sensor
15
card slot
7
OK/shot
16
power input
8
menu
17
tripod connection
9
right
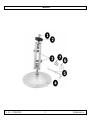
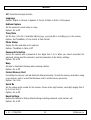
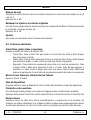
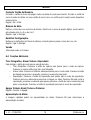
Tripod
1
screw
5
hex screw
2
locking nut
6
wall plugs
3
pivot bolts
7
screws
4
drill holes

WLC002
V. 01 – 17/06/2020 6 ©Velleman nv
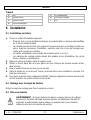
5. Installation
5.1 Mounting on Concrete
1. Choose an appropriate installation location:
o Ensure that there are no electric lines, water or heating pipes installed at the proposed
drilling location.
o The supplied wall plugs are only suitable for mounting on concrete and stone. Before starting
the installation, please check your installation location carefully for its suitability for the
plugs.
o The recommended installation height is between 1 and 2 m above the ground.
o The assembly material used must be suitable for the respective location. If in doubt, consult
a professional.
2. Mark the drill holes using the wall bracket.
3. Use a drill with a 6 mm drill bit to drill the required holes. Insert the wall plugs flush with the
wall.
4. Screw the wall bracket to the wall using the supplied screws.
5. Mount the camera on the tripod screw. Turn the camera in the desired direction and lock it with
the lock nut.
6. To align the camera into its final position, undo the two pivot bolts a little, align the camera and
fix the position by tightening the two pivot bolts.
5.2 Alternate Mounting
Use the included mounting belt to fix the camera around a tree trunk.
5.3 Powering
WARNING – Do not puncture batteries or throw them in fire as they may explode.
Do not attempt to recharge non-rechargeable batteries (alkaline). Dispose of
batteries in accordance with local regulations. Keep batteries away from children.
• Open the camera and remove the battery cover. Install the batteries following to the correct
polarity.
• If the camera is low on power, please connect the camera to a power adapter (not included, see
technical specifications).

WLC002
V. 01 – 17/06/2020 7 ©Velleman nv
5.4 Inserting the Memory Card
Install the memory card before switching on the camera.
Unlock the write protection and insert a formatted memory card into the card slot. Do not force to
avoid damaging the card. We recommend using a TF card, class 6 or higher, max. 32 GB.
At first use, wait for the memory card to reach ambient temperature. Therefore, the camera may
present some delay.
To avoid damage, protect memory card from water, strong vibrations, dust, hot sources and direct
sunlight.
Note that, if the memory card is full, the camera will stop recording automatically and the LEDs will
go out.
6. Operation
6.1 System Setup and Test
1. Slide the mode switch to the TEST position.
2. Press menu to open the setup menu.
3. Press up or down to navigate through the menu or options, and press OK to confirm.
4. Press video or capture to switch between these two modes.
5. Press menu to exit the setup menu.
6.2 Basic Working Mode
Slide the switch to the on position. After 15 seconds the camera will enter the standby mode.
When a motion is detected, the camera take photos or record video automatically according to the
settings.
6.3 Basic Settings
Mode
Slide the mode switch to the on position and select the working mode. In capture mode, the camera
will take pictures only. In video mode, the camera will record. In capture + video mode, the camera
will take a picture first and then record.
Options: Photo → Video → Photo & Video

WLC002
V. 01 – 17/06/2020 8 ©Velleman nv
Photo Resolution
Set the still image resolution.
Options: 12MP → 8MP → 5MP → 3MP → 2MP → 1MP
Photo Series
Set the number of continuous photo capturing. In photo mode, the camera will take photos
continuously.
Options: 1 photo → 2 photos in series → 3 photos in series
Video Resolution
Set the video resolution. The bigger the resolution, the longer the video which can be stored.
Options: 1920x1080P → 1280x720P → 720x480P → 640x480P → 320x240P
TL Video Resolution
Set the time-lapse video resolution.
Options: 2592x1944P → 2048x1536P
Video Length
Set the recording duration of a video clip.
Options: 3 s to 10 min
Audio Recording
Select this option to add audio to a video.
Options: On → Off
Shot Lag
Set the recording delay time after the motion detection. Within the selected time, the camera will not
record any image or video.
Options: 5 s to 60 min
IR Distance
Set the distance of IR induction.
Options: Near → Middle → Far

WLC002
V. 01 – 17/06/2020 9 ©Velleman nv
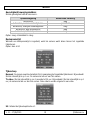
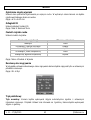
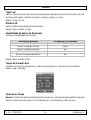
Motion Sensor Sensitivity
Set the sensitivity of the sensors.
Recording environment
Recommended setting
indoor
low
outdoor, normal conditions
middle
outdoor, difficult conditions
high
outdoor, low temperatures
low
outdoor, mild temperatures
high
Options: Low → Middle → High
Target Recording Time
When setting a target recording time, the camera will only record in the set time slot.
Options: On → Off
Time Lapse
Normal: The camera will take pictures automatically as per set time interval. Example: Set the
interval time to 1 hour. The camera will take a photo each hour.
TL Video: Set the interval time from 1 second to 24 hours. Example: Set the interval to 1 hour, the
camera will take a photo each hour. These photos will be converted into a video.

WLC002
V. 01 – 17/06/2020 10 ©Velleman nv
Off: Close the time lapse function.
Language
Options: English → German → Spanish → French → Italian → Dutch → Portuguese
Endless Capture
Set the camera to record video in a loop.
Options: On → Off
Time/Date
Set the time (12 or 24 h) and date (dd/mm/yyyy, yyyy/mm/dd or mm/dd/yyyy) on the camera.
Options: Set Time&Date → Time Format → Date Format
Photo Stamp
Display the time and date on the captures.
Options: Time&Date → Date → Off
Password Protection
Secure the camera with a password of four digits from 0 to 9. When you cannot remember the
password, please reset the camera to reset all parameters to the factory settings.
Options: On → Off
Beep
Activate or deactivate the beep when pressing a button.
Options: On → Off
Format Memory Card
Formatting the memory card will delete all data permanently. Format the memory card before using
a new memory card or a card that has been used in another device previously.
Options: Yes → No
Serial No
Set the unique serial number for the camera. Choose a four-digit number, each digit ranging from 0
to 9 or from A to Z.
Options: On → Off
Reset Settings
Restore the camera to factory default settings including password, serial number, etc.
Options: On → Off

WLC002
V. 01 – 17/06/2020 11 ©Velleman nv
Version
Firmware information of the camera.
6.4 Additional Functions
Taking Photos, Recording Video and Playback
Slide the mode switch to the test position.
o Taking photos: Press the capture button to switch to the capture mode. Press the shot
button to take a picture.
o Recording video: Press the video button to switch to the video mode. Press the shot button
to start recording, press again to stop recording.
o Playback: Press the playback button to switch to the playback mode. Press up or down to
select the picture or video. Press OK to start the playback, press again to pause, press the
menu button again to stop the playback. Press the playback button to exit the playback
mode.
Deleting Current/All File(s)
Options: Cancel → Delete
Slide Show
Captures can be played in a slideshow. Press OK to stop the slideshow.
Write Protection
Lock or unlock the file as desired.
Options: Write-protect Current File → Write-protect All Files → Unlock Current File → Unlock All Files
Night Mode
With insufficient ambient light, the IR LEDs will turn on automatically to provide necessary light.
However, reflective objects such as traffic signs can cause overexposure if they are located within
the recording range. Therefore, pictures taken in night mode may be blurry.
Also, make sure to provide the camera with adequate voltage when recording in night mode. Low
voltage may cause instable recording results.
6.5 Downloading Files onto a Computer
Memory Card
1. Insert the memory card into the card reader of your computer.
2. Open the File Explorer on your computer and double-click on the removable memory card.
3. Copy the files from the memory card to your computer.

WLC002
V. 01 – 17/06/2020 12 ©Velleman nv
Connecting the Camera to your Computer
1. Connect the camera to your computer using the included USB cable. Switch on the camera and
locate the appliance as MSDC.
2. Open the File Explorer on your computer and double-click on the removable appliance. The files
are stored in the DCIM folder.
3. Copy the files from the memory card to your computer.
7. Care and Maintenance
Maintenance
• Be aware of pests nesting in the camera. A camera used outdoors is prone to insects slipping
inside the interior of the camera. These pests might cause damage. Consider spraying the
camera with odourless insecticide before setting up.
• Keep all parts dry. While the camera is made to be waterproof, humidity can still damage the
electronics. It is recommended to install the camera under a shelter.
Cleaning
• Keep the lenses clean for the best results. Occasionally wipe with a damp cloth to keep it looking
new. Do not use harsh chemicals, cleaning solvents or strong detergents.
• Wipe all exterior surfaces of the appliance clean with a soft cloth dampened with a soap and
water solution. Do not immerse or submerge any part of the appliance in water or any other
liquid. Never use solvents or cleaning agents containing petroleum (petrol, kerosene, oil), paint
thinner, turpentine, alcohol, or ammonia.
Storage
• Store the appliance and its accessories in its original package in a clean and dry area.
8. Technical Specifications
power supply
.............................................................................................. 4 x 1.5 V AA/LR6 (not incl.)
............................................................................... external 6 V power supply, min. 1.5 A
image sensor .................................................................................................................. 1 MP
video clip
................................................................................... 1920 x 1080 / 25 fps (interpolated)
......................................................................................................... 1280 x 720 / 30 fps
.......................................................................................................... 720 x 480 / 30 fps
.......................................................................................................... 640 x 480 / 30 fps
.......................................................................................................... 320 x 240 / 30 fps

WLC002
V. 01 – 17/06/2020 13 ©Velleman nv
still image size
12 MP ...................................................................................... 4608 x 2592 (interpolated)
8 MP ........................................................................................ 3840 x 2160 (interpolated)
5 MP ........................................................................................ 3072 x 1728 (interpolated)
3 MP ........................................................................................ 2304 x 1296 (interpolated)
2 MP ........................................................................................ 1920 x 1080 (interpolated)
1 MP ...............................................................................................................1280 x 720
IP rating ......................................................................................................................... IP66
file format .................................................................................................................. JPG/AVI
lens angle ...........................................................f=3.62mm - F/NO2.2 - FOV=50° - auto IR filter
LCD display ................................................................................................................ 1.9" TFT
memory
external ................................................................... TF card, class 6 or higher, max. 32 GB
internal ................................................................................................. 8 MB x 16 SDRAM
IR LEDs ................................................................................................................. 2x 850 nm
IR flash range ................................................................................................................ 20 m
triggering distance .......................................................................................................... 20 m
PIR sensing angle ............................................................................................................. 40°
triggering time .......................................................................................................... 0.4-0.5 s
programmable triggering interval.............................................................................. 5 s-60 min
programmable video length ..................................................................................... 3 s-10 min
shooting distance
daytime ......................................................................................................... 1 m-infinite
nighttime ....................................................................................................... 1.5 m-18 m
adjustable time lapse .................................................................................................. 3 s-24 h
USB port.............................................................................................................. mini USB2.0
operating temperature ................................................................................... -20 °C to +60 °C
storage temperature ...................................................................................... -30 °C to +70 °C
dimensions ............................................................................................... 104 x 74.6 x 43 mm
weight .......................................................................................................................... 125 g
Use this device with original accessories only. Velleman nv cannot be held responsible in the
event of damage or injury resulting from (incorrect) use of this device. For more info
concerning this product and the latest version of this manual, please visit our website
www.velleman.eu. The information in this manual is subject to change without prior notice.
© COPYRIGHT NOTICE
The copyright to this manual is owned by Velleman nv. All worldwide rights reserved. No
part of this manual may be copied, reproduced, translated or reduced to any electronic medium or
otherwise without the prior written consent of the copyright holder.

WLC002
V. 01 – 17/06/2020 14 ©Velleman nv
HANDLEIDING
1. Inleiding
Aan alle ingezetenen van de Europese Unie
Belangrijke milieu-informatie betreffende dit product
Dit symbool op het toestel of de verpakking geeft aan dat, als het na zijn levenscyclus
wordt weggeworpen, dit toestel schade kan toebrengen aan het milieu. Gooi dit toestel
(en eventuele batterijen) niet bij het gewone huishoudelijke afval; het moet bij een
gespecialiseerd bedrijf terechtkomen voor recyclage. U moet dit toestel naar uw verdeler
of naar een lokaal recyclagepunt brengen. Respecteer de plaatselijke milieuwetgeving.
Hebt u vragen, contacteer dan de plaatselijke autoriteiten betreffende de verwijdering.
Bedankt voor uw aankoop! Lees deze handleiding grondig door voor u het toestel in gebruik neemt.
Werd het toestel beschadigd tijdens het transport, installeer het dan niet en raadpleeg uw dealer.
2. Veiligheidsvoorschriften
Lees en begrijp deze handleiding en de veiligheidsinstructies vóór ingebruikname.
• Dit toestel is geschikt voor gebruik door kinderen vanaf 8 jaar, door personen met fysieke,
zintuiglijke of verstandelijke beperkingen, of door personen met gebrek aan ervaring en kennis,
op voorwaarde dat dit onder toezicht gebeurt van een persoon die verantwoordelijk is voor hun
veiligheid of hun aanwijzingen heeft gegeven, hoe zij het toestel moeten gebruiken en zich
bewust zijn van de risico's die het gebruik van het toestel met zich meebrengt. Kinderen mogen
niet met het toestel spelen. De reiniging en het onderhoud van het toestel mogen niet worden
uitgevoerd door kinderen, tenzij ze onder toezicht staan.
• Dit toestel is uitsluitend bestemd voor de opname van digitale foto’s en video’s, in het bijzonder
bij wildobservatie. Elk ander gebruik geldt als niet overeenkomstig de bestemming. Het toestel
is niet bestemd voor gebruik in commerciële of industriële omgevingen.
• Bij gebruik buitenshuis, slechte weersomstandigheden of snelle weersveranderingen kan leiden
tot fouten tijdens het opnemen of foutieve beelden.
• Plaats de geheugenkaart voor het inschakelen van de camera. De camera heeft geen intern
geheugen voor de opslag van foto's of video's en werkt dus niet zonder een geheugenkaart.
• Ontgrendel de schrijfbeveiliging voordat u de geheugenkaart plaatst.
• De geheugenkaart mag niet worden geplaatst of verwijderd wanneer de camera ingeschakeld is.

WLC002
V. 01 – 17/06/2020 15 ©Velleman nv
• Wij raden u aan de geheugenkaart voor het eerste gebruik van de camera te formatteren. Veel
geheugenkaarten die door andere camera's werden geformatteerd, zijn niet compatibel met
andere merken.
• Bij het instellen van de camera duurt het 10 tot 20 seconden om een signaal te ontvangen.
• In instelmodus wordt de camera na 3 minuten inactiviteit automatisch uitgeschakeld. Schakel
de camera opnieuw in om te activeren.
3. Algemene richtlijnen
• Raadpleeg de Velleman® service- en kwaliteitsgarantie op www.velleman.eu.
• Om veiligheidsredenen mag u geen wijzigingen aanbrengen. Schade door wijzigingen die de
gebruiker heeft aangebracht aan het toestel valt niet onder de garantie.
• Gebruik het toestel enkel waarvoor het gemaakt is. De garantie vervalt automatisch bij
ongeoorloofd gebruik.
• De garantie geldt niet voor schade door het negeren van bepaalde richtlijnen in deze handleiding
en uw dealer zal de verantwoordelijkheid afwijzen voor defecten of problemen die hier
rechtstreeks verband mee houden.
• Noch Velleman nv noch zijn verdelers kunnen aansprakelijk gesteld worden voor schade
(buitengewoon, incidenteel of onrechtstreeks) – van welke aard dan ook (financieel, fysisch…)
voortvloeiend uit het bezit, gebruik of falen van dit product.
• Bewaar deze handleiding voor verdere raadpleging.
4. Omschrijving
Raadpleeg de afbeeldingen op pagina 2 van deze handleiding.
Camera
1
display
10
weergave
2
IR-leds
11
batterijvak
3
lens
12
luidspreker
4
bedieningsknop omhoog/video
13
modus
5
bedieningsknop omlaag/opname
14
USB-aansluiting
6
bewegingssensor voorkant
15
kaartslot
7
bedieningsknop OK/foto
16
voedingsingang
8
menu
17
aansluiting driepoot
9
bedieningsknop rechts

WLC002
V. 01 – 17/06/2020 16 ©Velleman nv
Driepoot
1
schroef
5
zeskantschroef
2
borgmoer
6
muurpluggen
3
scharniermoeren
7
schroeven
4
boorgaten
5. Montage
5.1 Montage op beton
1. Kies een geschikte installatieplaats:
o Controleer of er op de plaats waar u wilt boren, geen elektriciteitsleidingen waterleidingen
of verwarmingsbuizen door de wand lopen.
o De meegeleverde pluggen zijn alleen geschikt voor bevestiging in beton en steen.
Controleer voor de montage beslist eerst of de montageplaats geschikt is voor de pluggen.
o De aanbevolen montagehoogte voor de camera is 1 tot 2 m.
o Het montagemateriaal dat u gebruikt, moet geschikt zijn voor de montageplaats. Neem in
geval van twijfel contact op met een vakman.
2. Markeer de boorgaten met behulp van de muurbeugel.
3. Gebruik een boormachine met een 6 mm boortje om de gaten te boren. Druk de muurpluggen
stevig in de gaten totdat ze niet meer uit de muur steken.
4. Bevestig de muurbeugel aan de muur met de meegeleverde schroeven.
5. Zet de camera op de statiefbout. Draai de camera in de gewenste richting en zet deze vast met
de borgmoer.
6. Om de camera in de uiteindelijke positie te plaatsen, draai de beide scharniermoeren voorzichtig
los, richt de camera en fixeer deze positie door de beide scharniermoeren weer vast te draaien.
5.2 Bevestiging met de montageriem
Gebruik de meegeleverde montageriem om de camera aan een boom te bevestigen.
5.3 Stroomvoorziening
WAARSCHUWING - U mag batterijen nooit doorboren of in het vuur gooien
(explosiegevaar). Herlaad geen alkalinebatterijen. Gooi batterijen weg volgens de
plaatselijke milieuwetgeving. Houd batterijen buiten het bereik van kinderen.

WLC002
V. 01 – 17/06/2020 17 ©Velleman nv
• Open de camera en verwijder het batterijdeksel. Plaats de batterijen volgens de aangegeven
polariteit.
• Wanneer de batterijen bijna leeg zijn, sluit de camera aan op een voedingsadapter (niet
meegeleverd, zie technische specificaties).
5.4 Een geheugenkaart plaatsen
Plaats de geheugenkaart voor het inschakelen van de camera.
Ontgrendel de schrijfbeveiliging voordat u de geheugenkaart plaatst. Gebruik geen overmatige kracht
om het kaartje niet te beschadigen. We raden u aan een TF-kaart (klasse 6 of hoger) te gebruiken,
met een capaciteit van max. 32 GB.
Bij het eerste gebruik, wacht tot de geheugenkaart de omgevingstemperatuur heeft bereikt. Daarom
kan de camera enige vertraging vertonen.
Houd de geheugenkaart uit de buurt van vocht en vermijd schokken, stof, hitte en direct zonlicht,
om storingen te voorkomen.
Wanneer de geheugenkaart vol is, stopt de opname automatisch en branden de leds niet meer.
6. Gebruik
6.1 Systeem instellen en testen
1. Schuif de modusschakelaar in de TEST-positie.
2. Druk op menu om het instelmenu te openen.
3. Druk op de navigatieknop omhoog/omlaag om een menuoptie te selecteren en druk op OK om
te bevestigen.
4. Druk op video of foto om tussen deze twee modi te schakelen.
5. Druk op menu om het instelmenu te verlaten.
6.2 Basiswerking
Zet de schakelaar op ON. Na 15 seconden schakelt de camera over naar de stand-bymodus.
Zodra een beweging wordt gedetecteerd, start de camera automatisch met het maken van foto's-
en/of video-opnamen (afhankelijk van de opgegeven instellingen).

WLC002
V. 01 – 17/06/2020 18 ©Velleman nv
6.3 Basisinstellingen
Modus
Schuif de modusschakelaar naar de ON-positie en selecteer de gewenste modus. In fotomodus neemt
de camera alleen foto's. In videomodus maakt de camera video-opnamen. In de modus foto + video
maakt de camera eerst een foto, gevolgd door een video.
Opties: Foto → Video → Foto & Video
Fotoresolutie
Selecteer de gewenste fotoresolutie.
Opties: 12MP → 8MP → 5MP → 3MP → 2MP → 1MP
Serieopname
Selecteer het aantal foto’s dat in reeks moet worden genomen. In fotomodus kan de camera foto's
nemen.
Opties: 1 foto → 2 foto's in reeks → 3 foto's in reeks
Videoresolutie
Selecteer de videoresolutie. Video's met een hogere resolutie vereisen meer geheugenopslag.
Opties: 1920x1080P → 1280x720P → 720x480P → 640x480P → 320x240P
TL-videoresolutie
Stel de videoresolutie voor tijdverloop in.
Opties: 2592x1944P → 2048x1536P
Videolengte
Stel de opnametijd van een vide-opname in.
Opties: 3 s tot 10 min
Audio-opname
Selecteer deze optie om audio aan een video toe te voegen.
Opties: Aan → Uit
Opname-interval
Stel de vertragingstijd voor het vastleggen in wanneer de camera de beweging detecteert. Tijdens
de geselecteerde tijd neemt de camera geen foto's op video op.
Opties: 5 s tot 60 min
IR-bereik
Stel de afstand van de IR-inductie in.
Opties: Near (dichtbij) → Middle (midden) → Far (ver)

WLC002
V. 01 – 17/06/2020 19 ©Velleman nv
Gevoeligheid bewegingsmelders
Stel de gevoeligheid van de sensoren in.
Opnameomgeving
Aanbevolen instelling
binnenshuis
laag
buitenshuis, normale omstandigheden
gemiddeld
buitenshuis, moeilijke omstandigheden
hoog
buitenshuis, lage temperaturen
laag
buitenshuis, milde temperaturen
hoog
Opties: Laag → Gemiddeld → Hoog
Doelopnametijd
Wanneer een doelopnametijd is ingesteld, werkt de camera werkt alleen binnen het ingestelde
tijdsinterval.
Opties: Aan → Uit
Tijdverloop
Normaal: De camera neemt automatisch foto's naargelang het ingestelde tijdsinterval. Bijvoorbeeld:
Stel de intervaltijd in op 1 uur. De camera zal elk uur een foto nemen.
TL-video: Stel de intervaltijd in van 1 seconde tot 24 uur. Bijvoorbeeld: Stel de intervaltijd in op 1
uur, de camera zal elk uur een foto nemen. Deze video's worden omgezet in een video.
Uit: Schakel de tijdverloopfunctie uit.

WLC002
V. 01 – 17/06/2020 20 ©Velleman nv
Taal
Opties: Engels → Duits → Spaans → Frans → Italiaans → Nederlands → Portugees
Oneindige opname:
Stel de camera om video op te nemen in een lus.
Opties: Aan → Uit
Tijd/Datum
Stel de tijd (12/24-formaat) en datum (dd/mm/jjjj, jjjj/mm/dd of mm/dd/jjjj) in op de camera.
Opties: Tijd & datum instellen → Tijdsweergave → Datumweergave
Fotostempel
Geef de datum en tijd weer op de foto's.
Opties: Tijd en datum → Datum → Uit
Wachtwoordbeveiliging
Beveilig de camera met een wachtwoord dat bestaat uit vier cijfers van 0 tot 9. Wanneer u het
wachtwoord bent vergeten, reset de camera om de fabrieksinstellingen te herstellen.
Opties: Aan → Uit
Geluidssignalen
Schakel het geluidssignaal in of uit bij het indrukken van een knop.
Opties: Aan → Uit
Geheugenkaart formatteren
Het formatteren van de geheugenkaart zal alle gegevens permanent verwijderen. Formatteer de
geheugenkaart voordat u een nieuwe geheugenkaart installeert die in een ander apparaat werd
gebruikt.
Opties: Ja → Nee
Serienummer
Stel het unieke serienummer voor de camera in. Kies een nummer dat bestaat uit vier cijfers, telkens
tussen van 0 en 9 of van A tot Z.
Opties: Aan → Uit
Resetinstellingen
Stel de camera opnieuw in op de standaard fabrieksinstellingen, waaronder het wachtwoord,
serienummer, enz.
Opties: Aan → Uit
Versie
Firmware-informatie van de camera.
Seite laden ...
Seite laden ...
Seite laden ...
Seite laden ...
Seite laden ...
Seite laden ...
Seite laden ...
Seite laden ...
Seite laden ...
Seite laden ...
Seite laden ...
Seite laden ...
Seite laden ...
Seite laden ...
Seite laden ...
Seite laden ...
Seite laden ...
Seite laden ...
Seite laden ...
Seite laden ...
Seite laden ...
Seite laden ...
Seite laden ...
Seite laden ...
Seite laden ...
Seite laden ...
Seite laden ...
Seite laden ...
Seite laden ...
Seite laden ...
Seite laden ...
Seite laden ...
Seite laden ...
Seite laden ...
Seite laden ...
Seite laden ...
Seite laden ...
Seite laden ...
Seite laden ...
Seite laden ...
Seite laden ...
Seite laden ...
Seite laden ...
Seite laden ...
Seite laden ...
Seite laden ...
Seite laden ...
Seite laden ...
Seite laden ...
Seite laden ...
Seite laden ...
Seite laden ...
Seite laden ...
Seite laden ...
Seite laden ...
Seite laden ...
Seite laden ...
Seite laden ...
Seite laden ...
Seite laden ...
-
 1
1
-
 2
2
-
 3
3
-
 4
4
-
 5
5
-
 6
6
-
 7
7
-
 8
8
-
 9
9
-
 10
10
-
 11
11
-
 12
12
-
 13
13
-
 14
14
-
 15
15
-
 16
16
-
 17
17
-
 18
18
-
 19
19
-
 20
20
-
 21
21
-
 22
22
-
 23
23
-
 24
24
-
 25
25
-
 26
26
-
 27
27
-
 28
28
-
 29
29
-
 30
30
-
 31
31
-
 32
32
-
 33
33
-
 34
34
-
 35
35
-
 36
36
-
 37
37
-
 38
38
-
 39
39
-
 40
40
-
 41
41
-
 42
42
-
 43
43
-
 44
44
-
 45
45
-
 46
46
-
 47
47
-
 48
48
-
 49
49
-
 50
50
-
 51
51
-
 52
52
-
 53
53
-
 54
54
-
 55
55
-
 56
56
-
 57
57
-
 58
58
-
 59
59
-
 60
60
-
 61
61
-
 62
62
-
 63
63
-
 64
64
-
 65
65
-
 66
66
-
 67
67
-
 68
68
-
 69
69
-
 70
70
-
 71
71
-
 72
72
-
 73
73
-
 74
74
-
 75
75
-
 76
76
-
 77
77
-
 78
78
-
 79
79
-
 80
80


in anderen Sprachen
- français: Perel WLC002 Manuel utilisateur
- español: Perel WLC002 Manual de usuario
- Nederlands: Perel WLC002 Handleiding
- português: Perel WLC002 Manual do usuário
- polski: Perel WLC002 Instrukcja obsługi
Verwandte Papiere
Sonstige Unterlagen
-
Braun Scouting Cam Black 800 Mini Benutzerhandbuch
-
Velleman CAMCOLVC20 Benutzerhandbuch
-
 HQ Power CAMCOLVC26 Benutzerhandbuch
-
-
 Freek Vonk 9820402 Bedienungsanleitung
-
Renkforce RF-HC-100 Bedienungsanleitung
-
 Freek Vonk 9820403 Bedienungsanleitung
-
-
Medion Highzoom-Kamera LIFE X44022 MD 86922 Handleiding MP-superzoomcamera LIFE X44022 MD 86922 Benutzerhandbuch
-


