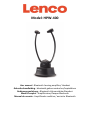
Lenco HPW-400BK Bedienungsanleitung
- Kategorie
- Mobile Headsets
- Typ
- Bedienungsanleitung

Model: HPW-400
User manual - Bluetooth hearing amplifier/ Headset
Gebruikerhandleiding - bluetooth gehoorversterker/koptelefoon
Bedienungsanleitung – Bluetooth-Hörverstärker/Headset
Mode d’emploi - Amplificateur/Casque Bluetooth
Manual de usuario - Amplificador auditivo / auricular Bluetooth

2
Index
English ....................................................................................................................... .. 3
Nederlands ................................................................................................................ 24
Deutsch ..................................................................................................................... 46
Français ..................................................................................................................... 68
Español ...................................................................................................................... 89
Version 1.0

3
English HPW-400
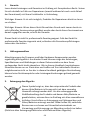
CAUTION:
Usage of controls or adjustments or performance of procedures other than those
specified herein may result in hazardous radiation exposure.
PRECAUTIONS BEFORE USE
KEEP THESE INSTRUCTIONS IN MIND:
1. Do not cover or block any ventilation openings. When placing the device on a
shelf, leave 5 cm (2”) free space around the whole device.
2. Install in accordance with the supplied user manual.
3. Keep the device away from heat sources such as radiators, heaters, stoves,
candles and other heat-generating products or naked flame. The device can
only be used in moderate climates. Extremely cold or warm environments
should be avoided. Working temperature between 0° and 35°C.
4. Avoid using the device near strong magnetic fields.
5. Electrostatic discharge can disturb normal usage of this device. If so, simply
reset and restart the device following the instruction manual. During file
transmission, please handle with care and operate in a static-free
environment.
6. Warning! Never insert an object into the product through the vents or
openings. High voltage flows through the product and inserting an object can
cause electric shock and/or short circuit internal parts. For the same reason,
do not spill water or liquid on the product.
7. Do not use in wet or moist areas such as bathrooms, steamy kitchens or near
swimming pools.
8. The device shall not be exposed to dripping or splashing and make sure that
no objects filled with liquids, such as vases, are placed on or near the
apparatus.
9. Do not use this device when condensation may occur. When the unit is used
in a warm wet room with damp, water droplets or condensation may occur
inside the unit and the unit may not function properly; let the unit stand in
power OFF for 1 or 2 hours before turning on the power: the unit should be
dry before getting any power.
10. Although this device is manufactured with the utmost care and checked
several times before leaving the factory, it is still possible that problems may
occur, as with all electrical appliances. If you notice smoke, an excessive build-
up of heat or any other unexpected phenomena, you should disconnect the
plug from the main power socket immediately.
11. This device must operate on a power source as specified on the specification
label. If you are not sure of the type of power supply used in your home,
consult your dealer or local power company.
12. Keep away from animals. Some animals enjoy biting on power cords.

4
13. To clean the device, use a soft dry cloth. Do not use solvents or petrol based
fluids. To remove severe stains, you may use a damp cloth with dilute
detergent.
14. The supplier is not responsible for damage or lost data caused by malfunction,
misuse, modification of the device or battery replacement.
15. Do not interrupt the connection when the device is formatting or transferring
files. Otherwise, data may be corrupted or lost.
16. If the unit has USB playback function, the USB memory stick should be
plugged into the unit directly. Don’t use an USB extension cable because it
can cause interference resulting in failing of data.
17. The rating label has been marked on the bottom or back panel of the device.
18. This device is not intended for use by people (including children) with physical,
sensory or mental disabilities, or a lack of experience and knowledge, unless
they’re under supervision or have received instructions about the correct use
of the device by the person who is responsible for their safety.
19. This product is intended for non professional use only and not for commercial
or industrial use.
20. Make sure the unit is adjusted to a stable position. Damage caused by using
this product in an unstable position vibrations or shocks or by failure to follow
any other warning or precaution contained within this user manual will not be
covered by warranty.
21. Never remove the casing of this device.
22. Never place this device on other electrical equipment.
23. Do not allow children access to plastic bags.
24. Only use attachments/accessories specified by the manufacturer.
25. Refer all servicing to qualified service personnel. Servicing is required when
the device has been damaged in any way, such as the power supply cord or
the plug, when liquid has been spilled or objects have fallen into the device,
when the device has been exposed to rain or moisture, does not operate
normally, or has been dropped.
26. Long exposure to loud sounds from personal music players may lead to
temporary or permanent hearing loss.
27. If the product is delivered with power cable or AC power adaptor:
If any trouble occur, disconnect the AC power cord and refer servicing to
qualified personnel.
Don’t step on or pinch the power adaptor. Be very careful, particularly
near the plugs and the cable’s exit point. Do not place heavy items on
the power adaptor, which may damage it. Keep the entire device out of
children’s reach! When playing with the power cable, they can seriously
injure themselves.
Unplug this device during lightning storms or when unused for a long
period.
The socket outlet must be installed near the equipment and must be
easily accessible.

5
Do not overload ac outlets or extension cords. Overloading can cause
fire or electric shock.
Devices with class 1 construction should be connected to a main socket
outlet with a protective earthed connection.
Devices with class 2 construction do not require a earthed connection.
Always hold the plug when pulling it out of the main supply socket. Do
not pull the power cord. This can cause a short circuit.
Do not use a damaged power cord or plug or a loose outlet. Doing so
may result in fire or electric shock.
28. If the product contains or is delivered with a remote control containing
coin/cell batteries:
Warning:
“Do not ingest battery, Chemical Burn Hazard” or equivalent working.
[The remote control supplied with] This product contains a coin/button
cell battery. If the battery is swallowed, it can cause severe internal
burns in just 2 hours and can lead to death.
Keep new and used batteries away from children.
If the battery compartment does not close securely, stop using the
product and keep it away from children.
If you think batteries might have been swallowed or placed inside any
part of the body, seek immediate medical attention.
29. Caution about the use of Batteries:
Danger of explosion if battery is incorrectly replaced. Replace only with
the same or equivalent type.
Battery cannot be subjected to high or low extreme temperatures, low
air pressure at high altitude during use, storage or transportation.
Replacement of a battery with an incorrect type that can result in an
explosion or the leakage of flammable liquid or gas.
Disposal of a battery into fire or a hot oven, or mechanically crushing or
cutting of a battery, that can result in an explosion.
Leaving a battery in an extremely high temperature surrounding
environment that can result in an explosion or that leakage of
flammable liquid or gas.
A battery subjected to extremely low air pressure that may result in an
explosion or the leakage of flammable liquid or gas.
Attention should be drawn to the environmental aspects of battery
disposal.
INSTALLATION
• Unpack all parts and remove protective material.
• Do not connect the unit to the mains before checking the mains voltage and
before all other connections have been made.

6
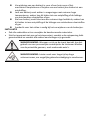
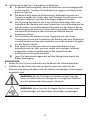
WARNING: When participating in the traffic listening to a
personal music player can make the listener less aware of
potential dangers such as approaching cars.
WARNING: To prevent possible hearing damage, do not listen at
high volume levels for long periods.

7
1. INTRODUCTION
The HPW-400 allows you to privately listen to your favorite music or TV
show without being disturbed and at your own preferred audio volume.
The HPW-400 is supplied with various connecting cables for the connection of
practically any audio source.
The headset is provided with its own built-in microphone which you can
use for additional amplification of conversations in your direct vicinity.
You may also pair the headset with your smart phone to answer incoming calls
and have conversations.
On the headset, you may adjust the volume and the balance between the
left and right speakers and also increase the treble and/or bass.

8
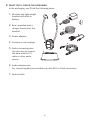
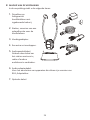
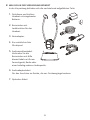
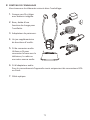
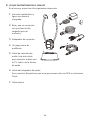
2. WHAT YOU’LL FIND IN THE PACKAGING
In the packaging, you’ll find the following items:
1. Wireless and light-weight
headset with built-in
battery.
2. Base, provided with a
charger function for the
headset.
3. Power adaptor.
4. An extra set of earplugs.
5. Audio connecting wire.
Use this wire to connect
the base with the TV,
radio or other audio
source.
6. Audio adaptor wire.
For connecting devices provided only with RCA or Cinch connectors.
7. Optical cable.

9
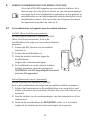
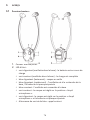
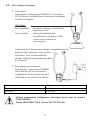
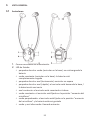
3. OVERVIEW
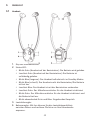
3.1 Headset:
1. Power slider.
2. Status LED:
• flashing green (headset in base): the battery is being charged
• constant green (headset in base): the battery is full
• flashing blue (slowly): headset on standby
• flashing blue (rapidly): headset is searching for the base / the battery
is nearly exhausted
• constant blue: headset is connected with the base
• constant green: the headset is set to the ‘microphone boost’ position
• flashing green: the headset is set to the ‘microphone boost’ position
and the battery is nearly exhausted
• Alternating green & blue: incoming call
3. Volume control.
4. Balance control: This allows you to increase the volume coming
from the left or right ear speaker according to your own preferences.

10
5. Tone push-button, press repeatedly to give the treble or base an
extra boost.
6. This holds the built-in NFC coil for a quick link with your mobile
phone.
7. Push-button for answering an incoming call or for interrupting the
music you’re listening to.
8. Power push-button for the built-in microphone, while also a push-
button for paring the headset.
9. Built-in microphone.
10. Left speaker.
11. Right speaker.
12. Micro USB port to charge the headset directly without having to
place it into the base.
13. Charging contacts, when placing the headset into the base, leave it
sitting on these contacts.
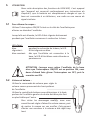
3.2 Base:
1. Charging contacts:
These will charge the headset when the headset is placed into the
base.
2. PAIR button: to pair the headset with the base.

11
3. Status indicator:
• flashing blue (slowly): base is on standby
• flashing blue (rapidly): base is searching for the headset
• constant blue: base is connected to the headset
4. Connection for the supplied power adaptor.
5. Connection for the audio wire.
6. Connection for the optical cable.

12
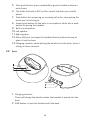
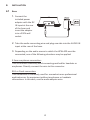
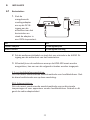
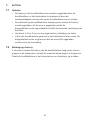
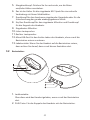
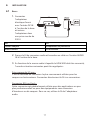
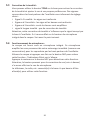
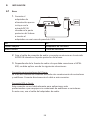
4. INSTALLATION
4.1 Base:
1. Connect the
included power
adaptor with the DC
IN input at the rear
of the base and
insert the adaptor
into a 230V wall
socket.
2. Take the audio connecting wire and plug one side into the AUDIO IN
input at the rear of the base.
3. Depending on the audio source to which the HPW-400 must be
connected, one of the following situations may be applied:
3.5mm earphones connection:
This is the most commonly used connecting method for headsets or
earphones. Directly connect the wire to this connector.
RCA or Cinch connection:
This connection is commonly used for somewhat more professional
applications or for equipment without earphones or headsets
connections. In this case, use the audio adaptor wire.

13

14
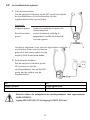
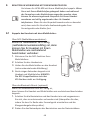
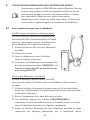
4.2 To charge the headset:
1. Via the base:
Slide the ON/OFF switch to the OFF position and
place the headset into the base to recharge the built-
in battery.
Status LED:
flashing green: while charging, the status LED will
be flashing in a green color
constant green: as soon as the battery is fully
charged, the green status LED will
remain permanently lit
It takes approximately 2 hours to fully charge an empty
battery, however for first time use it’s
recommended to continuously charge
the battery for 4 to 5 hours.
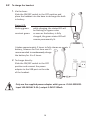
2. To charge directly:
Slide the ON/OFF switch to the OFF
position and connect the power
adaptor to the USB port on the side
of the headset.
Only use the supplied power adaptor with type no. YLJXA-E050055.
Input 100-240VAC 0.5A / output 5.0VDC 550mA

15
5. OPERATION
In this description of the functions of the HPW-400 it’s assumed
that the set is connected according to the instructions in chapter
4, that the battery is fully charged and that the base is connected
to a TV, radio or similar signal source.
5.1 To switch on the headset:
Use the ON/OFF switch on the side of the headset to switch the
headset on or off.
When switched on, the status LED will flash briefly while
the headset starts searching for the base.
Status LED:
flashing blue: while searching for the base, the status
LED flashes in a blue color
constant blue: as soon as the headset is connected to
the base, the blue status LED will remain
permanently lit
ATTENTION: when removing the headset from the base
while the ON/OFF switch is set to the ON position, you’ll
have to first slide the switch to OFF and then back to ON.
5.2 Volume and balance:
Use the volume control to adjust the sound volume
coming from the ear speakers.
Use the balance control to determine whether the left or
right ear speaker must be louder or softer than the other
ear speaker.
To prevent hearing damage we advise you to first
set the volume and then to put the headset on your
ears. This prevents a jolt if the volume was set too
high.

16
5.3 Tone correction:
You may use the TONE push-button on the base to enable the tone
correction and to adjust the sound to your own preferences. Tone signals in
the ear speakers will inform you of the chosen setting:
• 1 tone signal: treble is boosted
• 2 tone signals: treble & bass are boosted
• 3 tone signals: only the bass is boosted
• long tone signal: no tone correction
Attention, this tone correction only influences the signal send via the base
to the headset. It has no effect on the pitch of the microphone build into
the headset. See also the following item.
5.4 Microphone function:
The headset is provided with a built-in microphone. This microphone
amplifies the sounds coming from your immediate vicinity (such as a
conversation) to reproduce them through the ear speakers.
Switch on the headset and 1x press the MIC button to enable this
function; the green status indicator will illuminate.
Press the MIC button again to disable this function. Attention, the push-
button for the tone correction (see above) has no effect on the
microphone sound.
The TV, radio, etc. connected to the base doesn’t need to be switched on to
use this function.

17
6 USE IN COMBINATION WITH A MOBILE PHONE
You may pair the HPW-400 with your telephone. After doing so,
when you’re listening to the radio or TV and you receive an
incoming call, you may use the headset to answer the call and
have your telephone conversation via the headset fully hands-
free. At the end of the conversation, the device will switch back
to the radio or TV.
6.1 To pair the headset with the telephone:
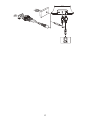
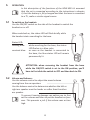
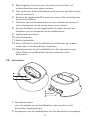
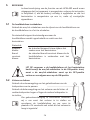
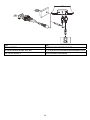
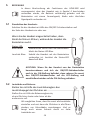
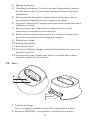
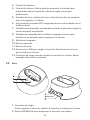
Via NFC (Near Field Communication):
If your mobile phone is provided with the NFC
functionality (Near Field communication), you
may pair the headset with your phone as follows:
1. switch on the NFC function of your mobile
phone
2. switch on the headset
3. hold the phone against the headset
according to the below figure
4. the headset and phone will be paired after
several seconds. NOTE: The NFC pairing
function does not work with IOS devices.
Via the Bluetooth menu: (optional)
If your phone is not provided with NFC,
you may pair the headset with your phone as follows.
1. switch on the base and headset and make sure they are connected
with each other (check this by briefly listening to the sound of your
radio or TV).
2. remove the adaptor of the base from the wall socket.
3. on the headset, press and hold the MIC/PAIR button for approx. 5
seconds until the blue status LED starts flashing rapidly
4. switch on the Bluetooth function of your mobile phone and have the
phone search for available devices. After several seconds, the “Lenco
HPW-400” will be found. Confirmed the pairing of the device.
5. switch off the Bluetooth function of your phone
6. insert the power adaptor of the base back into the wall socket and
wait until the headset is reconnected with the base

18
7. you may now switch the Bluetooth function of your phone back on
again (check whether any profile must be adjusted for telephone
audio)
6.2 Operation:
Receiving an incoming call while listening to the radio or TV:
1. the sound of the radio or TV is interrupted and you’ll hear a tone in
the ear speakers
2. press the button to answer the telephone call
3. you now have your conversation via the microphone and the speakers
of the headset
4. at the end of the conversation the sound of the radio or TV is
enabled again
To listen to music on your phone:
1. remove the adaptor of the base from the wall socket to ensure that
the connection between the headset and the base is interrupted
2. make sure that the Bluetooth music option is enabled on your
phone
3. press the button on the headset to start playing the music
on your phone
If now you’d like to return to the base of the HPW-400, switch off the
Bluetooth function of the phone, insert the adaptor of the base back
into the wall socket, briefly place the headset onto the base and pick it
up again (don’t forget to briefly slide the ON/OFF switch to OFF and
then to ON to switch the headset on again).
After reconnecting the headset with the base, you may switch the
Bluetooth function of the phone back on again.

19
7. BATTERY
7.1 To charge:
• The battery in the headset may be charged by placing the headset into
the base or by connecting the power adapter to the headset directly.
• While the battery is being charged, the status LED on the headset will
be flashing in a green color. When the battery is charged, the trickle
charge function is enabled and the status LED will remain lit in a green
color.
• It takes 1.5 to 2 hours to fully charge an empty battery.
• You may simply leave the headset in the base. The trickle charge
function maintains the battery charge without any risk of
overcharging.
7.2 Empty battery notification:
5 minutes before the Headset battery becomes exhausted, you’ll hear
beeps in the headset while the status LED starts flashing rapidly in the blue
color. Now place the headset onto the base to recharge the battery.

20
8. PROBLEMS AND POSSIBLE SOLUTIONS
Headset doesn’t work / no sound:
• The base isn’t switched on. Check whether the adaptor is connected
and inserted into the wall socket.
• The headset isn’t switched on or the battery is empty. Switch on the
headset by sliding the switch to ON. If the LED still doesn’t
illuminate, then the battery is exhausted. Please charge it
immediately.
• When the headset was set to ON when you took the headset from the
base, you must first slide the switch to OFF and then back to ON to
enable the headset.
• The source that must provide the audio (TV, radio) isn’t switched on or
its volume is set to zero. Switch on the audio source or increase the
volume somewhat.
• The volume of the headset is set to zero. Use the volume control of
the headset to increase the volume.
• You’re out of range from the base. Decrease the distance.
• The headset is paired with the phone and not with the TV or radio. If
necessary, refer to the end of paragraph 6.2 for how to re-register the
headset on the base.
The switch of the headset is set to ON, but the Status LED is not
illuminated:
• The headset was just taken from the base. Briefly slide the switch of
the headset to OFF and back to ON to enable the headset again.
Only one side can be heard:
• The balance control of the headset is turned fully to one side. Turn
this control to the center position to set both ear speakers to the
same volume.
Seite wird geladen ...
Seite wird geladen ...
Seite wird geladen ...
Seite wird geladen ...
Seite wird geladen ...
Seite wird geladen ...
Seite wird geladen ...
Seite wird geladen ...
Seite wird geladen ...
Seite wird geladen ...
Seite wird geladen ...
Seite wird geladen ...
Seite wird geladen ...
Seite wird geladen ...
Seite wird geladen ...
Seite wird geladen ...
Seite wird geladen ...
Seite wird geladen ...
Seite wird geladen ...
Seite wird geladen ...
Seite wird geladen ...
Seite wird geladen ...
Seite wird geladen ...
Seite wird geladen ...
Seite wird geladen ...
Seite wird geladen ...
Seite wird geladen ...
Seite wird geladen ...
Seite wird geladen ...
Seite wird geladen ...
Seite wird geladen ...
Seite wird geladen ...
Seite wird geladen ...
Seite wird geladen ...
Seite wird geladen ...
Seite wird geladen ...
Seite wird geladen ...
Seite wird geladen ...
Seite wird geladen ...
Seite wird geladen ...
Seite wird geladen ...
Seite wird geladen ...
Seite wird geladen ...
Seite wird geladen ...
Seite wird geladen ...
Seite wird geladen ...
Seite wird geladen ...
Seite wird geladen ...
Seite wird geladen ...
Seite wird geladen ...
Seite wird geladen ...
Seite wird geladen ...
Seite wird geladen ...
Seite wird geladen ...
Seite wird geladen ...
Seite wird geladen ...
Seite wird geladen ...
Seite wird geladen ...
Seite wird geladen ...
Seite wird geladen ...
Seite wird geladen ...
Seite wird geladen ...
Seite wird geladen ...
Seite wird geladen ...
Seite wird geladen ...
Seite wird geladen ...
Seite wird geladen ...
Seite wird geladen ...
Seite wird geladen ...
Seite wird geladen ...
Seite wird geladen ...
Seite wird geladen ...
Seite wird geladen ...
Seite wird geladen ...
Seite wird geladen ...
Seite wird geladen ...
Seite wird geladen ...
Seite wird geladen ...
Seite wird geladen ...
Seite wird geladen ...
Seite wird geladen ...
Seite wird geladen ...
Seite wird geladen ...
Seite wird geladen ...
Seite wird geladen ...
Seite wird geladen ...
Seite wird geladen ...
Seite wird geladen ...
Seite wird geladen ...
-
 1
1
-
 2
2
-
 3
3
-
 4
4
-
 5
5
-
 6
6
-
 7
7
-
 8
8
-
 9
9
-
 10
10
-
 11
11
-
 12
12
-
 13
13
-
 14
14
-
 15
15
-
 16
16
-
 17
17
-
 18
18
-
 19
19
-
 20
20
-
 21
21
-
 22
22
-
 23
23
-
 24
24
-
 25
25
-
 26
26
-
 27
27
-
 28
28
-
 29
29
-
 30
30
-
 31
31
-
 32
32
-
 33
33
-
 34
34
-
 35
35
-
 36
36
-
 37
37
-
 38
38
-
 39
39
-
 40
40
-
 41
41
-
 42
42
-
 43
43
-
 44
44
-
 45
45
-
 46
46
-
 47
47
-
 48
48
-
 49
49
-
 50
50
-
 51
51
-
 52
52
-
 53
53
-
 54
54
-
 55
55
-
 56
56
-
 57
57
-
 58
58
-
 59
59
-
 60
60
-
 61
61
-
 62
62
-
 63
63
-
 64
64
-
 65
65
-
 66
66
-
 67
67
-
 68
68
-
 69
69
-
 70
70
-
 71
71
-
 72
72
-
 73
73
-
 74
74
-
 75
75
-
 76
76
-
 77
77
-
 78
78
-
 79
79
-
 80
80
-
 81
81
-
 82
82
-
 83
83
-
 84
84
-
 85
85
-
 86
86
-
 87
87
-
 88
88
-
 89
89
-
 90
90
-
 91
91
-
 92
92
-
 93
93
-
 94
94
-
 95
95
-
 96
96
-
 97
97
-
 98
98
-
 99
99
-
 100
100
-
 101
101
-
 102
102
-
 103
103
-
 104
104
-
 105
105
-
 106
106
-
 107
107
-
 108
108
-
 109
109


Lenco HPW-400BK Bedienungsanleitung
- Kategorie
- Mobile Headsets
- Typ
- Bedienungsanleitung
in anderen Sprachen
- English: Lenco HPW-400BK Owner's manual
- français: Lenco HPW-400BK Le manuel du propriétaire
- español: Lenco HPW-400BK El manual del propietario
- Nederlands: Lenco HPW-400BK de handleiding
Verwandte Artikel
Andere Dokumente
-
Stereoboomm HP600 Benutzerhandbuch
-
Samsung EO-PN900 Benutzerhandbuch
-
SWITEL TV-L2BT Benutzerhandbuch
-
Plantronics 610 Benutzerhandbuch
-
-
Sennheiser MM 100 Bedienungsanleitung
-
Sony XBA-BT75 Bedienungsanleitung
-
Sennheiser VMX 100 Benutzerhandbuch
-
Jabra BT200 - Headset - Over-the-ear Benutzerhandbuch
-
Belkin Bluetooth Headset Benutzerhandbuch