Perfectpro WORKTUBE Bedienungsanleitung
- Kategorie
- Radios
- Typ
- Bedienungsanleitung

GB
NL
GBINSTRUCTION MANUAL
MANUEL DE L'UTILISATEUR
BEDIENUNGSANLEITUNG
F
D
E
GEBRUIKSAANWIJZING NL

CONTENTS
CONTENTS .............................................................................................................................................................................. 1
IMPORTANT SAFETY INSTRUCTIONS .......................................................................................................................................... 4
CONTROLS ........................................................................................................................................................ 5
POWER SUPPLY ....................................................................................................................................................... 7
GENERAL FUNCTIONS ................................................................................................................................................ 10
Usingtheradioforthersttime................................................................................................................................................11
DAB MODE (DAB / DAB+) ................................................................................................................................................................. 11
Operating the radio – DAB ................................................................................................................................................ 11
Selecting a station – DAB ................................................................................................................................................ 11
Displaymodes–DAB................................................................................................................................................12
Findingnewstations–DAB................................................................................................................................................ 12
ManualTuning–DAB................................................................................................................................................12
DynamicRangeControl(DRC)settings–DAB............................................................................................................13
Prunestations–DAB................................................................................................................................................ 13
FM MODE ....................................................................................................................................................................................... 14
Operating the radio – FM seek station ............................................................................................................................ 14
Manual tuning – FM ................................................................................................................................................ 14
RDS station service – FM ................................................................................................................................................ 15
CallingupRDSinformation................................................................................................................................................15
Scan sensitivity setting – FM ................................................................................................................................................ 15
PRESET STATIONS ........................................................................................................................................................................ 16
1
Storing preset stations ................................................................................................................................................ 16
Recalling preset stations ................................................................................................................................................ 16
BLUETOOTH MODE ................................................................................................................................................ 17
PairingBluetoothwithyourmobilephone.....................................................................................................................17
Playingmusicfromyourmobilephone...........................................................................................................................17
Device List – Bluetooth ................................................................................................................................................ 17
Device List – Connect to the paired device ...................................................................................................................... 18
Restart Bluetooth paring .............................................................................................................................................. 18
AUX-IN MODE ................................................................................................................................................ 19
BLUETOOTHSTEREOPAIRINGMODESETUP.........................................................................................................................20
OPERATIONSINBLUETOOTHSTEREOPAIRINGMODE....................................................................................................21
DisconnectfromStereoPairingMode............................................................................................................................21
Bluetoothcapabilities................................................................................................................................................22
VOLUME&SOUND................................................................................................................................................22
360degreessound................................................................................................................................................ 22
MANUALLYSETTINGCLOCK................................................................................................................................................23
TimeFormat................................................................................................................................................23
Timeautoupdate................................................................................................................................................24
EQUALISER..........................................................................................................................................................................25
BACKLIGHT..........................................................................................................................................................................25
LANGUAGE..........................................................................................................................................................................26
SOFTWAREVERSION................................................................................................................................................26
SYSTEMRESET................................................................................................................................................27
2
GB
GB

4
GB
GB
IMPORTANT SAFETY INSTRUCTIONS
1. Read these instructions.
2. Keeptheseinstructions.
3. Heedallwarnings.
4. Follow all instructions.
5. Clean only with dry cloth.
6. Donotblockanyventilationopenings.Installinaccordancewiththeinstructions.
7. Donotinstallnearanyheatsourcessuchasradiators,heatregisters,stovesorotherapparatus(includingampliers)that
produce heat.
8. Onlyuseattachments/accessoriesspeciedbythemanufacturer.
9. Useonlywiththecart,stand,tripod,bracket,ortablespeciedbythemanufacturer,orsoldwiththeapparatus.Whenacartis
used,usecautionwhenmovingthecart/apparatuscombinationtoavoidinjuryfromtip-over.
10. Unplugthisapparatusduringlightningstormsorwhenunusedforlongperiodsoftime.
11. Referallservicingtoqualiedservicepersonnel.Servicingisrequirediftheapparatushasbeendamagedinany,suchas
power-supplycordorplugisdamaged,liquidhasbeenspilledorobjectshavefallenintotheapparatus,theapparatushasbeen
exposedtorainormoisture,doesnotoperatenormally,orhasbeendropped.
12. Toreducetheriskofreorelectricshock,donotexposethisappliancetorainormoisture.
13. Donotremovethecover;therearenouser-serviceablepartsinside.
14. Nonakedamesourcesshallbeplacedontheapparatus.
15. Foroutdoorsuse,toavoidelectricshock,usebatteryonlyduringarainingdayortheweatheriswet.Topreventelectricshock,
iftheradiohasbeenexposedtorainorwater,thepowersupplycordandplugmustbecompletelydriedbeforepluggingintothe
mainssocketoutlet.
16. Thepowerplugshouldbeclosetotheapparatus,andeasytobeapproachedthatduringemergency,todisconnectthepower
fromtheapparatus,justunplugthepowerplugfromtheACpowerslot.
17. Themarkinginformationislocatedatthesideoftheapparatus.
18. This apparatus is provided with protection against splashing water (IP45).
19. Incaseofmalfunctionduetoelectrostaticdischargeorfasttransient(burst),removeandreconnectthepowersupply.
20. Theapparatusmustbeusedinamoderateclimate.
21. UseonlytheAC/DCadaptorwhichisprovidedbythemanufacturer:
ATLmodel:DCL25AF-120200
Input:AC230V50/60Hz
Output:12VDC2A
22.Topreventpossiblehearingdamage,donotlistenathighvolumelevelsforlongperiodorputyourearstooclosetothespeaker.
23.UndertheenvironmentwithConductImmunitydisturbance/RadiatedImmunity,thesamplemaymalfunction.Itwill
automaticallyrecovertonormalwhentheConductedImmunitydisturbance/RadiatedImmunitystopped.
KEYLOCK..........................................................................................................................................................................27
WARRANTY................................................................................................................................................28
SPECIFICATIONS................................................................................................................................................29
INFORMATION................................................................................................................................................30
WARNING ! WARRANTY BECOMES VOID ONCE THE DEVICE CABINET HAS BEEN OPENED OR ANY MODIFICATIONS OR
ALTERATIONS TO THE ORIGINAL DEVICE HAVE BEEN MADE
3

5
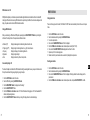
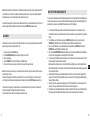
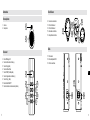
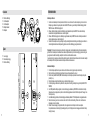
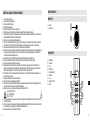
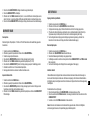
CONTROLS
Top View
1. Antenna
2. Speaker
Front View
3. LCDDisplay
4. VOLUME–button
5. TUNING◄◄button
6. MENU/PRESETbutton
7. ON/OFFbutton
8. VOLUME+button
9. TUNING►►button
10. SELECT/INFO/BTSTbutton
11. SOURCE/LOCKbutton
1
2
3
4
6
5
7
8
10
9
11
6
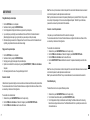
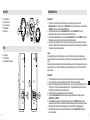
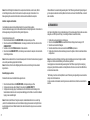
Bottom View
12. Rubbercover
13. Serviceport
14. Service port
15. Battery switch
16. Batterycompartment
Side Views
17. Aux-in
18. DC Adaptor In
19. JackRubberCover
GB
GB
15
16
13
14
12
17
19 18

7
POWER SUPPLY
AC operation
1. BeforepluggingtheAC/DCadaptorintotheACsocket,makesurethevoltageiscorrectandtheBatterychargerswitchissetcorrectly:
ALKALINEOFFforwhenusingnobatteriesorAlkalinebatteries/NiHMONforwhenusingNiMHrechargeablebatteries.
2. IfyouuseAlkalinebatteriesintheradioandtheBatterychargerswitchisonALKALINEOFF,thebatterieswillbedisconnected
automaticallywhenusingACpowersupply.
3. IfyouuserechargeableNiMHbatteriesintheradioandtheBatterychargerswitchisonNiMHON,theNiMHbatterieswillbe
chargedautomaticallywhenusingACpowersupply.
4. NeverusetheAC/DCadaptorinrainyormoistconditionstopreventshortcircuitormoistfromenteringtheradio.Underthose
conditionsonlyusebatterypowerandkeeptherubbercoverclosed.
Note:
InordertodisconnecttheunitfromtheACmainscompletely,theAC/DCadaptorshouldberemovedfromthemainssocket
completelyanditshallremainreadilyoperableandshouldnotbeobstructedduringintendeduse.
Incaseofmalfunctionduetoelectrostaticdischargeorfasttransient(burst),removetheACadaptorfrompowersupplyandremove
thebatteriesthenreinstallthebatteriesandreconnectthepowersupply.
Battery operation
1. Toopenthebatterycompartment,rstremovetherubberfootatthebottomoftheapparatusbyturningitincounterclockwise
direction.
2. Loosenthescrewofthedoorbyunscrewingitinanti-clockwisedirection.
3. Observecorrectpolarityasindicatedontheunit(+and-).InsertAlkalinebatteries(6x1,5VtypeIECLR6/AM3/SizeAA)or
NiMHrechargeablebatteries(6x1,2VPerfectProRechargeableAccu,SizeAA/HR6/2500mAh)withthecorrectpolarityinto
thecompartment.
4. Closethebatterydoorandmakesurethescrewisfastened.
5. SettheBatterychargerswitchinthebatterycompartmentaccordingtothebatterytypetobeused(ALKALINEOFForNiMHON).
6. WhenyouchoosetouseNiMHbatteries,switchtheBatterychargerswitchtoNiMHON.Theradiowillchargethebatteries
whenitisconnectedtoACpower.Whenthebatteryisbeingcharged,thebatterysymbolontheLCDdisplaywillanimate.The
chargingandanimationwillstopautomaticallywhenthebatteriesarefull.
7. WhenyouchoosetouseAlkalinebatteries,switchtheBatterychargerswitchtoALKALINEOFF.Alkalinebatterywillnotbecharged.
8. Closetherubberfootwelltopreventmoistordustfromenteringthecompartmentbyturningitinclockwisedirectionontotheunit.
8
GB
GB
9. Iftheunitisnottobeusedforanyextendedperiodoftime,itisrecommendedthatthebatteriesareremovedfromtheradio.
TheapproximatepowerlevelofthebatteriesisdisplayedontheLCDdisplayoftheradiobythebatterysymbol(4levelsintotal).
Whenthepowerlevelisverylowtheindication“Batterylow”appearsandthebatterysymbolashesonthedisplay.The
batteriesshouldthenberechargedorreplacedsoontocontinuenormaloperationoftheradio.
Warning:
Dangerofexplosionifabatteryisincorrectlyreplaced.Replaceonlywiththesameorequivalenttype.
AlwaysmakesuretheBatterychargerswitchissettothecorrectposition.
AnAlkalinebatteryisnotrechargeable.NeverattemptchargingAlkalinebatteries.
Donotmixupdifferentbatterytypes.
Donotmixupchargedandunchargedbatteries.
Donotexposethebatteriestoexcessiveheatsuchassunshine,reorthelike.
Batteriesshouldnotbedisposedofbyincinerationandwithhouseholdwaste.Disposablebatteriesshouldbetakentoasuitable
recyclingcentreifpossible.
Instructions to prevent reasonably foreseeable misuse
Abatteryincorporatedintheequipmentandabatterytogetherwithitsassociatedcomponents(includingcellsandelectricpower
generators)shallbesoconstructedthatanelectricshockorresafeguardfailure(forexample,ammablechemicalleakagecausing
reorinsulationdamage)isunlikely,takingallreasonablyforeseeableconditionsintoaccount.Ifapplicable,thisshallinclude
extremeconditionsasspeciedbythemanufacturer,suchas:
-highorlowextremetemperaturesthatabatterycanbesubjectedtoduringuse,storageortransportation;and
- low air pressure at high altitude.
Whereprovidingsafetydevicesordesigninabatteryorequipmentisnotreasonablypracticalconsideringthefunctionalnatureof
thebatteryorequipmentcontainingabattery,instructionalsafeguardsinaccordancewithClauseF.5shallbeprovidedtoprotectthe
batteryfromextremeconditionsoruser'sabuse.Examplesthatshallbeconsideredinclude:
- replacementofabatterywithanincorrecttypethatcandefeatasafeguard(forexample,inthecaseofsomelithiumbatterytypes);
- disposalofabatteryintoreorahotoven,ormechanicallycrushingorcuttingofabattery,thatcanresultinanexplosion;
- leavingabatteryinanextremelyhightemperaturesurroundingenvironmentthatcanresultinanexplosionortheleakageof
ammableliquidorgas;
- abatterysubjectedtoextremelylowairpressurethatmayresultinanexplosionortheleakageofammableliquidorgas.

9
IMPORTANT INFORMATION ON CHARGING AND USING RECHARGEABLE BATTERIES
1. Rechargethebatteriesinanycaseatleastevery2months.
2. MakesuretheBatterychargerswitchnexttothebatterycompartmentissettothe“CHARGE/NiMHON”position.
3. Putthebatteriesinthecompartmentwhilstpayingattentiontothecorrectpolarityofthebatteries(+and-).
4. Firstuse:Chargenewbatteriesinonecontinuous,uninterrupted,chargeuntiltheyarefull.Thisrstchargemaytakelonger
thannormal.Forlongerbatterylifeitisadvisedtoalwaysrechargeinonecontinuous,uninterruptedchargeuntilbatteriesare
fullanddonotrechargeagainwhilstthebatteriesarestillfull.
5. Newbatterieswillonlyreachtheirfullcapacityaftersometimeofuse(severalcharge–dischargecycles).
6. Leavethecompletegroupofbatteriesinplaceinsidetheradioanddonotusethesebatteriesorafewofthemforother
purposes.Thiswillresultinamixof(fully)chargedand(partly)emptybatteries.Thiscanseriouslydamagethebatteriesand
radio when recharged.
7. Itisadvisedtoonlychargebatteriesatroomtemperaturesbetween5degreesC–35degreesC.Inlowerorhigher
temperaturesfullchargecannotbeachieved.
8. Dependingonthecapacityofthebatteries,chargingfrom“empty”to“full”cantakeseveralhours.
9. Donotchargebatterieswhentheradioishotorexposedtoheatorheatsources.
10. Itisadvisedtocleanthemetalcontactsofthebatteriesandofthechargerinsidetheradioe.g.withacontact-sprayfromtimeto
time.
11. Donotuseamixofoldandnewrechargeablebatteries.
12. Donotuseamixofrechargeableandnon-rechargeablebatteries.
13. Donotuseamixoffullandemptyrechargeablebatteries.
14. DonotusebatteriesthathaveadifferentmAhcapacity.
15. Donotusedamaged,deformedorleakingbatteries.
16. Batterylevelindicationisanapproximateindicationonlyandcanvarywithbatterytypeused.
17. Batteriescanbecomehotduringcharging.
18. Incoldconditionsthecapacityofbatterieswillbemuchlowerthanwhenusedatnormalroomtemperature
19. Batteries(evenwhensuppliedwiththeradio),asbeingconsumables,donotfallunderthewarrantyconditionsoftheradio.
20. ItisadvisedtousePerfectProrechargeablebatteriesastheradioanditschargerweredevelopedforusewiththesebatteries.
10
GB
GB
GENERAL FUNCTIONS
1. Switching on and off
Press the ON/OFFbuttontoturntheradioonorinstandby.
2. Switching among DAB / FM / BLUETOOTH / AUX-IN modes
Press the SOURCE/LOCKbuttontoswitchbetweenmodes.
3. Tuning the Radio
Tune the radio using the TUNING◄◄or►►button.
4. Adjusting the VOLUME
AdjustthevolumewiththeVOLUME+or-button.
5. Using the BLUETOOTH feature
ConnecttheradiotoaBluetoothdeviceandstreammusicfromthatBluetoothdevice.
6. Using the AUX-IN feature
ConnecttheaudiooutputofanexternalaudiodevicetotheØ3.5mmAUX-INsocketandplaymusicfromtheexternaldevice.
7. Bluetooth Stereo Pairing feature
ConnectoneWorktubetoanotherWorktubebyBluetoothStereoPairingfunction.Afterconnection,thesetwoWorktuberadios
willbesynchronisedtoeachother.Whilestreamingaudio,theradiowithleftspeakericonistheleftaudiochannel;another
radio with right speaker icon is the right audio channel.

11
Using the radio for the rst time
1. Insertbatteriesandplacetheradioonaatsurface.
2. PlugtheAC/DCpoweradaptorintotheACsocketifdesired.
3. Carefullyextendtheantennalocatedatthebackoftheradio.Adjusttheantennasoitisverticallyextendingabovetheradio.
4. TheradiowillstartupandautomaticallyperformascanoftheBandIIIDABchannelsandtheFMband.Thedisplaywillshow
“DAB Scan” in DAB and “FM Scan” in FM.
5. Whenthescaniscompleted,the10strongestFMstationswillbestoredaspresetsandtheavailableDABstationswillbeinthe
listofstations.Theradiowillswitchtostandbywiththeupdatedclockanddateshowingonthedisplay.
6. Ifnosignalsarefound,theclockwillnotbeupdated.Itmaybenecessarytorelocatetheradiotoapositionwithbetterreception.
DAB MODE (DAB / DAB+)
Operating the radio – DAB
1. Carefully extend the antenna. Press the ON/OFF button to switch on the radio.
2. SelecttheDABwavebandbypressingtheSOURCE/LOCK button.
3. Therststationinthelistofstationsfoundwillbeplayed.Thedisplaywillshowthestationname.Iftheradiohasbeenused
before,thelastusedstationwillbeselected.
4. IfnoDABsignalsaredetected,“Nostationsfound”willbedisplayed.Itmaybenecessarytorelocatetheradiotoapositionwith
betterreception.Youshouldthencarryoutanautoscantondstations,pleaserefertothesection“Find new stations - DAB”.
Selecting a station – DAB
1. Press the ON/OFF button to switch on the radio.
2. SelecttheDABwavebandbypressingtheSOURCE/LOCK button.
3. Thedisplayshowsthenameoftheradiostationcurrentlyselected.
4. Press the TUNING ◄◄ or ►► buttonstoscrollthroughthelistofavailablestations.
5. Whenthedesiredstationnameappearsonthedisplay,presstheSELECT/INFO/BT ST button to select the station.
Note: Ifafterselectingastationthedisplayshows“Servicenotavailable”,itmaybenecessarytorelocatetheradiotoaposition
withbetterreception.
12
GB
GB
Display modes – DAB
InDABmode,theradiocandisplayarangeofinformationonthedisplay.
Press the SELECT/INFO/BT ST buttontocyclethroughthevariousmodes.
a. Scrollingtext: Displaysscrollingtextmessagee.g.stationinformation,artist/trackname,phone-
innumber,etc.
b. Programtype: Displaysthetypeofstationbeinglistenedtoe.g.Pop,Classic,News,etc.
c. Signalstrength: Displaysthesignalstrengthofradioreception.Theclearunlledrectangle
indicatesminimumsignallevelrequiredforsatisfactoryreception.
d. Multiplexname,Channel&frequency: Displaysthenameofmultiplextowhichthecurrentstationbelongs.Displaysthe
channelnumberandfrequencyforthecurrentlytunedDABstation.
e. Bitrate&Mono/Stereomode: DisplaysthedigitalaudiobitrateandMono/Stereomode.
f. Date: Displaysthecurrenttimeanddate.
Finding new stations – DAB
Fromtimetotime,newstationsmaybecomeavailable.Youmayproceedtondnewstationsasfollows:
1. InDABmode,presstheMENU/PRESET button and the TUNING ◄◄ or ►► buttons until the LCD display shows “Scan”.
2. PresstheSELECT/INFO/BT ST button,theradiowillperformascanoftheBandIIIDABchannels.Asnewstationsarefound,
thestationcounterontheright-handsideofthedisplaywillincreaseandnewradiostationsfoundwillbeaddedtotheliststored
in the radio.
Manual Tuning – DAB
Manualtuningisanalternativemethodofndingnewstations.InsteadofscanningtheentireBandIIIchannelsautomatically,you
maytunetheradiodirectlytoaknownDABchannelandstoreallthemultiplexinthatchannelintotheavailablestationlist.
1. InDABmode,presstheMENU/PRESET button and the TUNING ◄◄ or ►► buttons until the LCD display shows “Manual
Tune”, then press the SELECT/INFO/BT ST button. The display will show DAB channel and Frequency.
2. PresstheTUNING ◄◄ or ►► buttons to select the desired Channel or Frequency and then the SELECT/INFO/BT ST
button to tune to the chosen frequency.

13
3. WhenDABstationsinthetunedchannelarefound,newradiostationsfoundwillbeaddedtotheliststoredintheradio.
4. Thesignalstrengthdisplayshowsthereceptionofthestation.Thelast3signalbarsindicatetheminimumsignallevelrequired
forsatisfactoryreception.Thesignalstrengthbarswillgoupordownshowingthechangingsignalstrengthasyouadjustthe
antenna or the radio position.
5. Repeat step 1 to 4 for other channels with new stations.
6. Press the MENU/PRESET buttontwicetoexitmanualtuningandreturntonormalDABoperation.
Dynamic Range Control (DRC) settings – DAB
DRCcanmakequietersoundseasiertohearwhenyourradioisusedinanoisyenvironment.
1. InDABmode,presstheMENU/PRESET button and the TUNING ◄◄ or ►► buttons until the display shows “DRC Value”,
then press the SELECT/INFO/BT ST button.
2. PresstheTUNING ◄◄ or ►► buttons to select required DRC setting (default is OFF).
DRCoff DRCisswitchedoff,broadcastDRCwillbeignored.
DRChigh DRCissetassentbybroadcaster.
DRClow DRClevelissetto1/2thatsentbybroadcaster.
3. PresstheSELECT/INFO/BT ST buttontoconrmthesetting.Thedisplaywillreturntonormalradiodisplay.
Note:NotallDABbroadcastsareabletousetheDRCfunction.IfthebroadcastdoesnotsupportDRC,thentheDRCsettinginthe
radio will have no effect.
Prune stations – DAB
Ifyoumovetoadifferentpartofthecountry,someofthestationsthatwerelistedmaynolongerbeavailable.Also,fromtimeto
time,someDABservicesmaystopbroadcasting,ormaychangelocationorfrequency.ThePrunestationsfunctionwilldeletethe
unavailableDABstationsfromyourstationlist.
1. InDABmode,presstheMENU/PRESET button and the TUNING ◄◄ or ►► buttons until the display shows “Prune”, then
press the SELECT/INFO/BT ST button.
2. PresstheTUNING ◄◄ or ►► buttonstoselectbetween“Yes”or“No”(defaultisNo).Select“Yes”toenablethisfunctionif
required, otherwise, select “No”.
3. PresstheSELECT/INFO/BT ST buttontoconrmyoursetting.ThedisplaywillreturntolastmenuandpressMENU/PRESET
togotothenormalradiodisplay.
14
GB
GB
Note:Ifyouhavemovedtheradiotoadifferentpartofthecountry,youshouldalsocarryoutasearchfornewstations(pleasesee
the section “Finding new stations – DAB”).
FM MODE
Operating the radio – FM seek station
1. Press the ON/OFF button to switch on the radio.
2. SelecttheFMradiowavebandbypressingtheSOURCE/LOCK button.
3. IfthisisthersttimetoswitchtoFMmode,thestationinpreset1willbeplayed.Iftheradiohasbeenusedbefore,thelast
listenedstationwillbeplayed.
4. To seek station, press and hold the TUNING ◄◄ or ►► buttons.Thescanstopsautomaticallywhenitndsastationof
sufcientstrength.
5. Afterafewseconds,thedisplaywillupdateandshowstationnameifRDSinformationisbeingreceived.
6. Tondotherstations,pressandholdtheTUNING ◄◄ or ►► buttons again.
7. To seek station in an opposite direction, press the TUNING ►►buttontoscanfromlowfrequencytohighfrequencyorpress
the TUNING ◄◄ buttontoscanfromhighfrequencytolowfrequency.
8. Whenthewavebandendisreached,theradiowillrecommencetuningfromtheoppositewavebandend.
Manual tuning – FM
1. Press the ON/OFF button to switch on the radio.
2. SelecttheFMbandbypressingtheSOURCE/LOCK button.
3. PresstheTUNING ◄◄ or ►► buttons to reach the required FM station. The radio will change the frequency in steps of 50
kHz.
4. Adjusttherubberantennatogetthebestreception.IftheradioistunedtoastationofsufcientsignalstrengthwithRDS
informationpresent,thedisplaymaychangetoshowthestationname.
5. Whenthewavebandendisreached,theradiowillrecommencetuningfromtheoppositewavebandend.

RDS station service – FM
RDS(RadioDataSystem)isaninformationsystemwhichinaudibledigitalinformationistransmittedinadditiontothenormalFM
radioprogram.WhentheradioisreceivingaRDSstationandthereceptionstrengthissufcient,thestationnamewillappearinthe
display.ItmaytakesometimebeforetheRDSinformationisavailable.
Calling up RDS information
WhenyouarelisteningtoaFMstationwithRDSsystem,repeatedlypresstheSELECT/INFO/BT ST button to cycle through the
information.Thiswillonlyfunctionifthereceptionlevelissufcientandclear.
a.Radiotext(RT) Displaysthemessageaboutthestationbeinglistenedtoastickertext.
b.Programtype(PTY) Displaysthetypeofstationbeinglistenedto,e.g.Pop,Classic,News,etc.
c.Frequency Displaysthefrequencyofthestationbeinglistenedto.
d. Signal level Displays the signal strength.
e.Date Displaysthecurrenttime(24hourclock)anddate.
Scan sensitivity setting – FM
TheradiowillnormallyscanallstationsfromFMbroadcastsincludingtheweakersignals.However,youmaywishtheAuto-scanto
ndonlythosestationswithstrongenoughsignalstogivegoodreception.
1. Press the ON/OFF button to switch on the radio.
2. SelecttheFMbandbypressingtheSOURCE/LOCK button.
3. PresstheMENU/PRESET button, the display shows “Scan setting”.
4. Press the SELECT/INFO/BT ST button.
5. Press the TUNING ◄◄ or ►► buttonstoselect“Yes”fortheFMstationswithstrongsignal,or“No”foralltheavailableFM
stations, including weak signal ones.
6. Press the SELECT/INFO/BT ST buttontoconrmyoursetting.Thedisplaywillreturntonormalradiodisplay.
15
PRESET STATIONS
Storing preset stations
Thereare20memorypresetsintheradio,10forDABand10forFM.Presetsarerememberedbytheradiointheeventofapower
failure.
1. Press the ON/OFF button to switch on the radio.
2. SelectthedesiredwavebandbypressingtheSOURCE/LOCK button.
3. Tunetotherequiredstation.
4. Press and hold the MENU/PRESET button until “Preset” is displayed.
5. Press the TUNING ◄◄ or ►► buttonstoselectthedesiredpresetnumber(fromP1toP10).
6. Press and hold the SELECT/INFO/BT ST buttondisplaywillshow“Saved”toconrm.
7. Repeatsteps3to6fortheremainingpresets.
8. Stationsstoredinthepresetmemoriescanbeover-writtenbyfollowingtheaboveprocedure.
Recalling preset stations
1. Press the ON/OFF button to switch on the radio.
2. SelectthedesiredwavebandbypressingtheSOURCE/LOCK button.
3. PressandholdtheMENU/PRESET button until “Preset” is displayed. The display will show the station frequency and the
presetnumber.
4. Press the TUNING ◄◄ or ►► buttons to select the desired preset station, then press SELECT/INFO/BT STtoconrm.
16
GB
GB

BLUETOOTH MODE
Pairing Bluetooth with your mobile phone
1. Press the ON/OFF button to turn on the speaker.
2. SelectBluetoothmodebypressingtheSOURCE/LOCK button.
3. TheLCDdisplaywillshow“Pairing”whenWorktubeisnotyetpairedwithyourmobilephone.
4. InyourmobilephoneopentheSettingmenuandselectBluetooth,thenselect“Worktube”intheBluetoothdeviceslist
(Bluetoothpairinginstructionsmayvarypertypeofmobilephone,pleasecheckyourmobilephonemanual).
5. When Bluetooth pairing is successful, the LCD display will show “Connected” for a few seconds. Then the Bluetooth icon will
stopashing,andyourBluetoothdevicenamewillbeshownondisplay.
Playing music from your mobile phone
1. Press the ON/OFF button to turn on the speaker.
2. SelectBluetoothmodebypressingtheSOURCE/LOCK button.
3. Startplayingmusicbyusingthemediaplayersinthepairedmobilephone.
4. PlaybackcanbecontrolledfromthemobilephoneorbypressingtheSELECT/INFO/BT ST, TUNING ◄◄ or ►► buttons on
the speaker.
5. Aftermusicplaybackstarted,thenameofthesongwillbedisplayedintheLCD.
Device List – Bluetooth
InBluetoothmode,thespeakercandisplaythecurrentconnecteddeviceandthedeviceswhichhadsuccessfullyconnectedbefore.
ThedevicenameswouldbeshownifthenameoftheBluetoothdeviceswereconguredinthemobiledevices.Pleaserefertothe
usermanualofyourmobiledeviceforthecongurations.
Thedevicelistscanbecheckedasbelow:
1. InBluetoothmode,presstheMENU/PRESET buttontoenterthesystemsetting.
2. PresstheTUNING ◄◄ or ►► buttonsuntil“Devicelist”isdisplayed;presstheSELECT/INFO/BT ST button.
3. PresstheTUNING ◄◄ or ►► buttonstoviewthenameofthedevices.
17
Note:Therecanbeupto8devicenamestobestoredinthespeaker.Iftherearemorethan8mobiledeviceshavebeenconnected
andstoredintothespeakers,theearliestpaireddevicenamewillbeerased.
Note:IfyourmobiledevicecannotbeconnectedtothespeakersbyBluetooth,pleasetrytodeletethe"Worktube"fromyourmobile
device,andpairtothisspeakeragain.ForhowtoremovetheexistingBluetoothspeaker-"Worktube"fromyourmobiledevice,
pleasereadtheusermanualofyourmobiledeviceforfurtherassistance.
Device List – Connect to the paired device
Inthespeaker,youcanselecttheBluetoothdevicefromthedevicelisttoconnectagain.
ThedevicenameswouldbeshownifthenameoftheBluetoothdeviceswereconguredinthemobiledevices.Pleaserefertothe
usermanualofyourmobiledeviceforthecongurations.
Thedevicelistscanbecheckedasbelow:
1. InBluetoothmode,presstheMENU/PRESET buttontoenterthesystemsetting.
2. PresstheTUNING ◄◄ or ►► buttonsuntil“Devicelist”isdisplayed;presstheSELECT/INFO/BT ST button.
3. PresstheTUNING ◄◄ or ►► buttonstoviewthenameofthedevices.
4. Press the SELECT/INFO/BT ST buttontostartBluetoothreconnection.Thespeakerwillautomaticallyconnecttothismobile
device.
Note:Therecanbeupto8devicenamestobestoredinthespeaker.Iftherearemorethan8mobiledeviceshavebeenconnected
andstoredintothespeakers,theearliestpaireddevicenamewillbeerased.
Note:Ifyouhaveeverdeletedthe“Worktube”fromyourconnectedmobiledevice,theautoreconnectionwillbeunsuccessful.
Restart Bluetooth paring
TheBluetoothfunctioncanbesettooperateindifferentwaysasbelow:
1. InBluetoothmode,presstheMENU/PRESET buttontoenterthesystemsetting.
2. TheLCDwillshow“BluetoothDiscoverable”,presstheSELECT/INFO/BT ST button.
3. TheLCDdisplaywillshow“Pairing”andtheBluetoothiconwillbeashing.TheWorktubewilldisconnectfromtheexisting
Bluetoothdevice,andplayedadisconnectiontone.ThenWorktube’sBluetoothisfreeforanymobilephoneconnectionasitis
indiscoverablemodenow.
18
GB
GB

Note:“BluetoothDiscoverable”istheoptionthatforcetheBluetoothofthisspeakertodisconnectfromyourmobilephoneandenter
the“discoverablemode”.ThisisthewaytoallowtheBluetoothpairingtoanotherdevice.Ifnonewdeviceispaired,theBluetooth
willautomaticallytrytoconnecttothelastdevicewhenitisswitchedoffandonagain.
TheAuto-PowermanagementfunctionwillbeactivatedinBluetoothmode.IfthereisnosignalfromBluetoothforaperiodofover15
minutes,thespeakerwillautomaticallyswitchtostandbymode.PressingtheON/OFF button will wake up the unit.
AUX-IN MODE
A3.5mmstereoAux-Insocketisprovidedonthesidebehindtherubbercover,forconnectinganexternalaudiodevicesuchasMP3
playerorCDplayer(Auxcablenotincludedwiththisradio).
1. Connect an audio source to the AUX-IN socket.
2. PresstheSOURCE/LOCK button to select AUX input. Display will show “AUX IN”.
3. Playtheexternalplayer.
4. AdjusttheVOLUMEofboththeradioandtheplayerforcomfortablelistening.
5. Afteruse,closetherubbercovertopreventmoistordustfromenteringintothesocketsandradio.
Notes: NeverusetheAux-Insocketinrainyormoistconditionstopreventmoistfromenteringtheradio.Keeptherubbercoverwell
closed under these conditions.
TheAuto-PowermanagementfunctionwillbeactivatedinAUXmode.Ifthereisnosignal*fromtheAux-Insocketforaperiodof
over15minutes,theWorktuberadiowillautomaticallyswitchtostandbymode.PressingtheON/OFF button will wake up the unit.
*Alsowhentheincomingsignalfromtheexternaldeviceistoolowandcannotbedetectedforaperiodofover15minutesbythe
Auto-Powermanagement,theWorktuberadiowillswitchtostandbymode.
Topreventthisraisetheoutputleveloftheexternaldeviceenoughtobedetected.
19
BLUETOOTH STEREO PAIRING MODE SETUP
YoucanconnecttwoWorktuberadiosintoStereoPairingModespeakers.WhenthespeakerspairedintoStereoPairingMode,you
candoublethevolumeandenjoythestereosoundeffectsviaBluetoothstreaming.AfterpairingintoStereoPairingMode,theLeft
speakerwillbetheaudiosource,includingDAB,FM,BluetoothandAux-in,fortheRightspeaker.
1. YoumusthavetwoWorktubeunitsavailabletousetheBluetoothStereoParingfunction.Itisrecommendedtoplaceone
oftheseWorktuberadiosonyourlefthandsideastheleftaudiochannel,anotheroneonyourrighthandsideastherightaudio
channel.
2. FortheWorktubeonyourrighthandside,pleasepresstheON/OFF buttonbrieytoswitchontheunit,thenpressthe
SOURCE buttontoselectBluetoothmode.ThisWorktubeisreadyfortheBluetoothStereoPairingfunction.
3. Now,youcansettheWorktubeonyourlefthandside.PleasealsopressandreleasetheON/OFF button, then press the
SOURCE buttontoswitchthisWorktubetoBluetoothmodetoo.
4. Press and hold the SELECT/INFO/BT ST buttonoftheWorktubeonthelefthandsidetostartBluetoothStereoPairingMode
setup.Atthistime,theparingindicationwillbedisplayedonLCDofthisWorktube.
5. Inafewseconds,bothoftheWorktuberadioswillbetryingtoconnecttoeachother.Oncethepairingissuccessful,theLCDof
bothunitswilldisplayasuccessfulconnectionnotication.
Note:BluetoothStereoPairingconnectioncanbeinterferedbyWiFinetwork,Mobiledevices,oranyotherBluetoothdevices
whichcouldcausepairingfailure.IfbothspeakercannotpairintoBluetoothStereoPairingmodesuccessfully,pleasegobackto
step 4 to reactivate this function.
6. IftheBluetoothStereoPairingmodeissuccessfullyestablished,anoticationonLCDofbothunitswillbedisplayed.Aftera
fewseconds,theLCDofthelefthandsideWorktubewillreturntonormal,buttheLCDoftherighthansideWorktubewillkeep
displayingBTStereonotication.
7. Afterstep6,therewillbealeftspeakericondisplayingontheLCD.ThisleftaudioWorktubecanbeusednormallyforallthe
functions,butitcanonlysoundtheleftaudiochannelonthisunitfromitscurrentplayingsource.
8. TheWorktubeontherightwilldisplaytheBluetoothrightspeakericonandtheBTStereomodeonitsLCD.ThisWorktubewill
bethepassivespeakerintheBluetoothStereoPairingmode,andonlythevolumeandpowerfunctionsareusable.
20
GB
GB

Note:IftheBluetoothaudioontherightspeakerisnotsynchronisedtotheaudiooftheleftspeaker,therecouldbesome
interferencefromtheenvironment.ItisrecommendedtopressbrieytheON/OFF buttononcetoputbothradiosintostandby
mode.ThenpresseachoftheON/OFF buttonsontheradiostoimprovetheaudiosynchronisationagain.
Note:TheaudiofromDAB,FMBluetoothandAuxiliaryInputwillbestreamedtobothofthepairedspeakers.
Note:AfterpairedtwoWorktuberadiosintoStereoPairingMode,theleftspeakerwithiconwillonlyplayleftaudiochannel,andthe
right speaker with icon will play right audio channel only.
Note:ThedistancebetweentheLeftspeakerandtheRightspeakerisrecommendedintwometresforstableaudiostreaming
performance.
Note:InStereoPairingMode,only1speaker(Leftspeaker)canbeseenontheBluetoothdevice.
Note:InStereoPairingMode,onlytheLeftspeakercanbeusedastheAuxinaudiosource.PlugintheAuxinjackontheRight
speaker is ignored.
Note:TheStereoPairingModeaudioisstreamedwirelessly.TherecanbeinterferencesfromWiFi,cellularmobilesignal,
microwaveoven,Bluetoothormore.TheWorktuberadioswilltrytoautomaticallyimprovethequalityofconnection.
OPERATIONS IN BLUETOOTH STEREO PAIRING MODE
InStereoPairingMode,youcanoperatethepairedspeakersoneitheroneofthem.Youcanadjustaudiovolumeandpoweroff
themoneitherLeftorRightradio,anotherpairedspeakerwillfollowyouroperations.
Disconnect from Stereo Pairing Mode
WhentwoWorktuberadiosarepairedintoStereoPairingMode,pressandholdtheSELECT/INFO/BT ST button of either one of
theWorktuberadiostodeactivateStereoPairingMode.
21
Bluetooth capabilities
BluetoothconnectivityperformancemayvarydependingontheconnectedBluetoothdevices.PleaserefertotheBluetooth
capabilitiesofyourdevicebeforeconnectingtoyourspeaker.AllfeaturesmaynotbesupportedonsomepairedBluetoothdevices.
YourspeakersupportsAVRCP(AudioVideoRemoteControlProle)whichallowsyourspeakertocontrolmusicplaybackfromthe
connected device.
Humanbodies,brickandconcretewalls,heavyfurnitureorbookcaseswillallreducetheoperationalrangeofyourBluetoothdevices
toagreaterorlesserextent.Glass,dry-wallorwoodpaneledwallsandofcepartitionsmayhavealessseverebutnoticeable
effect.Metalpipes,foil-linedplasterboard,metalwindowframesanddomesticwiringcanalsohaveaneffect.Youshouldposition
yourBluetoothdevicesclosertoeachotherifyouobservecommunicationdifculties.
WiFinetworksandcordlessphonesgenerallyusesimilarradiofrequenciestoBluetoothandmayinterferewithoneanother.Ifany
interference is noticed, then try relocating the speaker or one of the other devices.
TheBluetoothcapabilitiesofyourspeakerenableittoreceiveaudiofrommanyBluetoothcapabledevicesincludingmobilephones,
personalcomputersandtablets.NormallyonlyoneBluetoothdevicecanbeconnectedtoyourspeakeratatime.
VOLUME & SOUND
Toadjustthevolume,simplypresstheVOLUME – or + buttonwhenplayingtheDAB/FMradio/BLUETOOTH/AUXINmode.
Thelevelofvolume(from00to40theloudest)willbeshownontheLCDDisplay.
Note:Whenplayingonbatteries;iftheenergylevelofthebatteriesistoolow,soundwilldistortonhighervolume.
360 degrees sound
TheuniqueNeodymiumspeakerlocatedontopoftheradioprovidesa360degreessoundimage.
Suggestion:Ifpreferred,placetheradioinacornerorclosetoawallforadditionalsoundreection.
22
GB
GB

MANUALLY SETTING CLOCK
Theclockcanbesetonlywhenitisinradioonmode.
1. Press the ON/OFF button to switch on the radio.
2. PresstheMENU/PRESET buttontodisplaycurrentmenu.
3. PresstheTUNING ◄◄ or ►► buttonstoselect“Systemsettings”andpresstheSELECT/INFO/BT ST button to enter
systemmenu.
4. Then“Equaliser”willbedisplayed,presstheTUNING ◄◄ or ►► buttonstoselect“Time/Date”andpresstheSELECT/INFO/
BT ST buttontoconrm.
5. Select“SetTime/Date”andpresstheSELECT/INFO/BT ST buttontoenterdatetimesettings.
6. Press the SELECT/INFO/BT ST buttontoconrm,thedayashesonthedisplay.
7. Press the TUNING ◄◄ or ►► buttons to set the current day.
8. Press the SELECT/INFO/BT ST buttontoconrm,themonthashes.
9. Press the TUNING ◄◄ or ►► buttonstosetthecurrentmonth.
10. Press the SELECT/INFO/BT ST buttontoconrm,theyearwillthenashonthedisplay.
11. Press the TUNING ◄◄ or ►► buttons to set the current year, then press the SELECT/INFO/BT ST buttontoconrm.
12. PresstheTUNING ◄◄ or ►► buttons to set the hour.
13. PresstheSELECT/INFO/BT ST buttontoconrm,theminutedigitsash.
14. Press the TUNING ◄◄ or ►► buttonstosettheminute.
15. Press the SELECT/INFO/BT ST buttontoconrmandnishtheclocksetting.
Time Format
Thetimeformatcanbeselectandsettoeither12-houror24-hourformat.
1. Press the ON/OFF button to switch on the radio.
2. PresstheMENU/PRESET buttontodisplaycurrentmenu.
3. PresstheTUNING ◄◄ or ►► buttonstoselect“Systemsettings”andpresstheSELECT/INFO/BT ST button to enter
systemmenu.
4. Then“Equaliser”willbedisplayed,presstheTUNING ◄◄ or ►► buttonstoselect“Time/Date”andpresstheknobtoconrm.
23
5. Press the TUNING ◄◄ or ►► buttonstoselect“12/24-hourformat”andpresstheSELECT/INFO/BT ST buttontoconrm.
6. Press the TUNING ◄◄ or ►► buttonstoselect“12”or“24”hourformat,thenpresstheSELECT/INFO/BT ST button to
conrmandnishthesetting.
Time auto update
TheradiocanreceivethelatesttimeinformationfromeitherDABorFMsignal,thensynchronisethecurrentdate/timeoftheradio.
1. Press the ON/OFF button to switch on the radio.
2. PresstheMENU/PRESET buttontodisplaycurrentmenu.
3. PresstheTUNING ◄◄ or ►► buttonstoselect“Systemsettings”andpresstheSELECT/INFO/BT ST button to enter
systemmenu.
4. Then“Equaliser”willbedisplayed,presstheTUNING ◄◄ or ►► buttonstoselect“Time/Date”andpresstheknobtoconrm.
5. Press the TUNING ◄◄ or ►► buttonstoselect“Timeautoupdate”andpresstheSELECT/INFO/BT ST buttontoconrm.
6. Press the TUNING ◄◄ or ►► buttons to select
“UpdatefromDAB” Radiowillautomaticallysynchronisethedate/timefromcurrentDABstation.
“UpdatefromFM” Radiowillautomaticallysynchronisethedate/timefromcurrentFMstation.
“Noupdate” Radiowillstopupdatingdate/timefromanyoftheradiostations.
7. Press the SELECT/INFO/BT ST buttontoconrmandnishthesetting.
Note:Ifreceptionisgoodandyouhaveselectedthe“UpdatefromDAB”or“UpdatefromFM”optionfromthe“TimeAutoUpdate”
option,thetimewillbeautomaticallyupdated.Timesynchronisationcantakeseveralminutes.Theautomatictimesettingisalways
activatedwhentheradioisswitchedfromstandbytolastusedradiomode.
24
GB
GB

EQUALISER
The EQUALISERfunctionenablestheusertoadjustthelowerandhighersoundfrequencies.
1. Press the ON/OFF button to switch on the radio.
2. PresstheMENU/PRESET button, and then the TUNING ◄◄ or ►► buttonsuntilthedisplayshows“Systemsettings”.
3. PresstheSELECT/INFO/BT ST button;thentheTUNING ◄◄ or ►► buttons until the display shows “Equaliser”.
4. Press the SELECT/INFO/BT ST button;thentheTUNING ◄◄ or ►► buttontochoose“Bass”or“Treble”forthesound
frequencies.
5. Tosetlowerfrequencies,youcanadjustbasssetting.PresstheTUNING ◄◄ or ►► button to choose “Bass”, then the
SELECT/INFO/BT ST button;Thedisplaywillshow“Bass:0”.Note: “0” is the default value.
6. Press TUNING ◄◄ or ►► button to set the desire Bass level, then press the SELECT/INFO/BT ST buttontoconrm.
7. Tosethigherfrequencies,youcanadjusttreblesetting.PresstheTUNING ◄◄ or ►► buttontochoose“Treble”,thenthe
SELECT/INFO/BT ST button;Thedisplaywillshow“Treble:0”.Note: “0” is the default value.
8. Press TUNING ◄◄ or ►► button to set the desire Bass level, then press the SELECT/INFO/BT ST buttontoconrm.
9. Press the MENU/PRESET button exit the settings.
BACKLIGHT
ThemenuoftheradiocanbeconguredtoLCDbacklight.
1. Press the ON/OFF button to turn on the radio.
2. PresstheMENU/PRESET button, and the TUNING ◄◄ or ►► buttonsuntilthedisplayshows“Systemsettings”.
3. PresstheSELECT/INFO/BT ST button and the then TUNING ◄◄ or ►► buttons until the display shows “Backlight”.
4. Press the SELECT/INFO/BT ST buttontoentertheLCDbacklightadjustmentmenu.
5. Press the TUNING ◄◄ or ►► buttonstoselect“Radioon”whichisusedtosetupthebacklightbehaviourinradioonmode;
6. Or press the TUNING ◄◄ or ►► buttonstoselect“Radiostandby”tosetupthebacklightbehaviourinradiostandbymode.
7. Press the SELECT/INFO/BT ST buttontoconrmyourchoice.
8. Press the TUNING ◄◄ or ►► buttonstochoosetheoptionsfromHigh/Medium/Low/Off.
9. Press the SELECT/INFO/BT ST buttontoconrmtheselection.
25
LANGUAGE
Themenuoftheradiocanbeconguredtovariouslanguages.
1. Press the ON/OFF button to switch on the radio.
2. PresstheMENU/PRESET button, and then the TUNING ◄◄ or ►► buttonsuntilthedisplayshows“Systemsettings”.
3. PresstheSELECT/INFO/BT ST button;thentheTUNING ◄◄ or ►► buttons until the display shows “Language”.
4. Press the SELECT/INFO/BT ST button;thentheTUNING ◄◄ or ►► button until the desired language appears on the
display (default is English).
5. Press the SELECT/INFO/BT ST buttontoconrmyourchoice.
6. Thedisplaymenuwillthenchangetothechosenlanguage.
SOFTWARE VERSION
Thesoftwaredisplaycannotbealteredandisjustforyourreference.
1. Press the ON/OFF button to switch on the radio.
2. PresstheMENU/PRESET button, and then TUNING ◄◄ or ►► buttonuntilthedisplayshows“Systemsettings”.
3. PresstheSELECT/INFO/BT ST button;thentheTUNING ◄◄ or ►► button until the display shows “SW Version”.
4. Press the SELECT/INFO/BT ST button to view the software version.
5. Press the MENU/PRESET buttonagaintoreturntothenormalradiodisplay.
26
GB
GB

SYSTEM RESET
Iftheradiofailstooperatecorrectly,orsomedigitsonthedisplayaremissingorincomplete,carryoutthefollowingprocedure.
1. Press the ON/OFF button to switch on the radio.
2. PresstheMENU/PRESET button, and then TUNING ◄◄ or ►► buttonuntilthedisplayshows“Systemsettings”.
3. PresstheSELECT/INFO/BT ST button;thentheTUNING ◄◄ or ►► button until the display shows “Factory Reset”.
4. Press the SELECT/INFO/BT ST button.
5. Press the TUNING ◄◄ or ►► button to select “Yes” if you wish to reset the radio, otherwise, select “No” .
6. Press the SELECT/INFO/BT ST buttontoconrmyourchoice.
7. Afullresetwillbeperformed.Allpresetsandthestationlistwillbeerased.Allsettingswillbesettothedefaultvalues.Theradio
willstartupandthedisplaywillshow“PerfectPro”forafewseconds.Thentheradiowillautomaticallyperformanautoscanof
theBandIIIDABchannelsandtheFMband.Thedisplaywillshow“Scanning”inDABand“Auto”inFM.
8. Whenthescaniscompleted,the10strongestFMstationswillbestoredaspreset.Theradiowillswitchtostandbywiththe
updated clock and date showing on the display.
Incaseofmalfunctionduetoelectrostaticdischarge;resettheproductasabovetoresumenormaloperation.Ifyouarenotableto
performtheresetoperationasabove,removeandreconnectallbatteriesandthepowersupply.
UndertheenvironmentwithConductedImmunitydisturbance/RadiatedImmunity,thesamplemaymalfunction.Itwillautomatically
recovertonormalwhentheConductedImmunitydisturbance/RadiatedImmunitystopped.
KEY LOCK
TheradiosupportsKeyLockfunctioninalltheStandby,DAB,FMandAux-inmodes.
1. Pressed and hold SOURCE/LOCK buttonforabout3seconds,theLCDwilldisplay“Locked”.
2. Whenkeysarelocked,thefunctionsoftheradiowillbetemporarydisableduntilithasbeenunlocked.Duringthismoment,the
radiowouldonlybrightenthebacklightforafewsecondsandshowing“Locked”indisplay.
3. PressedandholdtheSOURCE/LOCK buttonfor3secondsagain,theradiowoulddisplay“Unlocked”,andthekeylock
functionwillbedisabled.
Noted:Whentheradioisinstandbyandpoweredbybatteries,someofthebuttonswerenotbeabletobrightentheradio’sbacklight
in order to save energy.
27
WARRANTY
Thisradiohasa2yearlimitedwarranty.
WARNING ! Warranty becomes void once the radio cabinet has been opened or any modications or alterartions to the
radio have been made !
Thetermsofthewarrantyofthisradiodonotcoverthefollowing:
-Damagecausedbymisuse,abuse,neglect,alterations,accidentsorunauthorisedrepair.
-Normalwearandtear.
-Breakingorbendingoftheantenna.
-Batteries,beingconsumables,donotfallunderthewarrantyconditionsoftheradio.
28
GB
GB

SPECIFICATIONS
Power requirements
MainsAC/DCadaptor Input:230V50/60HzAC~,Output:12VDC2A
Batteries 6x1,5V(TypeIECLR6/AM3/sizeAA)
Rechargeablebatteries 6x1,2V(TypeHR06/sizeAA/2500mAhNiMHrechargeablebattery)
BatteriesofPerfectProbrandarehighlyrecommended
Frequency coverage FM87.5–108MHz
DAB174,928–239,200MHz
Circuit features
Loudspeaker 1xØ21/4inch
Output power 1 x 5W
AuxInsocket Ø3.5mm
AC/DC Adaptor
ManufacturerofACAdaptor: ShantouHi-TechZoneArrowPowerMfg.Ltd.,
Address: 13th,KejiWestRoad,Hi-TechZone,Shantou,
Guangdong, China
Model: DCL25AF-120200
InputVoltage: AC230V
InputACfrequency: 50/60Hz
Outputvoltage: DC12V
Outputcurrent: 2.0A
Outputpower: 24W
Averageactiveefciency: ≥86.20%
Efciencyatlowload(10%): 85.71%
No-loadpowerconsumption: <0.1W
29
INFORMATION
Environmental note
Thisproducthasbeenmadefromhigh-qualitypartsandmaterials,whichcanbereusedandrecycled.
Therefore,donotthrowtheproductawaywithnormalhouseholdwasteattheendofitslife.Takeittoacollectionpoint
forrecyclingelectricalandelectronicdevice.Thisisindicatedbythissymbolontheproduct,intheoperatingmanual
and on the packaging.
Pleasendoutaboutcollectionpointsoperatedbyyourlocalauthority.Helpprotecttheenvironmentalbyrecycling
used products.
30
GB
GB

TABLE DES MATIÈRES
TABLE DES MATIÈRES ................................................................................................................................................................ 1
INSTRUCTIONS DE SECURITE IMPORTANTES ................................................................................................ 4
COMMANDES ................................................................................................................................................................ 5
ALIMENTATION ÉLECTRIQUE .................................................................................................................................... 7
FONCTIONS GÉNÉRALES…................................................................................................................................................10
Utilisationdelaradiopourlapremièrefois............................................................................................................11
Mode DAB (DAB / DAB+) ........…………………………........................................................................................ 11
Utilisation de la radio - DAB .................................................................................................................. 11
Sélectiond’unestation-DAB..................................................................................................................12
Modesd’affichage-DAB..................................................................................................................12
Recherchedenouvellesstations–DAB..................................................................................................................13
Syntonisationmanuelle-DAB....................................................................................................................................13
RéglageduniveauduDynamicRangeControl(DRC)-DAB…….….......…………………………………………………...14
Suppression des stations – DAB………………........................................................................……………………………14
MODE FM………………………….......………………………………………........................................................................…………..15
Utilisation de la radio Recherche de stations FM ................................................................................................ 15
Syntonisationmanuelle-FM..............................................................................................................15
Systèmed’informationRDS-FM..............................................................................................................16
ConsultationdesinformationsRDS………….............................................................……………………………16
Réglagedelasensibilitédebalayage-FM……………........................................................................…………………16
PRÉSÉLECTION DE STATIONS…………………………........................................................................……………………..17
1
Mémorisationdesstationsprésélectionnées…………........................................................................………………….17
Rappel des stations présélectionnées……………..............……......................................................………………..…17
MODE BLUETOOTH……………………………...............................................................................……………………………………...18
CouplageBluetoothavecvotretéléphoneportable………....................................................................................……………..18
Écouterdelamusiquedepuisvotretéléphoneportable……….................................................................................…….....18
Liste des appareils – Bluetooth……………………………………...............................................................................………..18
Listedesappareils-Connexionàl'appareiljumelé.......................................................................................................19
RedémarrerlecouplageBluetooth.......................................................................................................20
MODEAUX-IN…………………………………………………...............................................................................………………………..20
CONFIGURATIONDUMODECOUPLAGESTÉRÉOBLUETOOTH............................................................................................…….21
OPÉRATIONSENMODECOUPLAGESTÉRÉOBLUETOOTH………........................................................................…...23
Déconnexiondumodecouplagestéréo…………........................................................................…………………………..23
FonctionsBluetooth……............................................................................……………………………………………….23
VOLUMEETSON…………………………………........................................................................……………………………………24
sonà360degrés……………………………........................................................................…………………………………...24
RÉGLAGEMANUELDEL'HEUREETDELADATE………..........................................................................................……………….24
Formatdel'heureetdeladate……………………........................................................................…………………………...25
Miseàjourautomatiquedel'heureetdeladate…………........................................................................………………..25
EQUALIZER……………………………………………......................................................................................………………………….26
LUMINOSITÉDEL’ÉCRAN……………........................................................................………………………………………..27
SÉLECTIONDELALANGUE……………........................................................................……………………………………….27
VERSIONDULOGICIEL…………………………………........................................................................………………………...28
RÉINITIALISATIONDUSYSTÈME…………………........................................................................………………………….28
2
F

4
F
INSTRUCTIONS DE SECURITE IMPORTANTES
1. Lisezattentivementetcomplètementlemoded’emploidelaradio.
2. Conservezsoigneusementcemoded’emploi.
3. Tenezcomptedetouslesavertissements.
4. Suiveztouteslesinstructions.
5. Nettoyezlaradioexclusivementavecunlingepropreetsec.
6. N’obstruezpaslesouverturesd’aération.Installezlaradioconformémentauxinstructions.
7. N’installezpaslaradioàproximitédesourcesdechaleur(radiateursdechauffage,grillesd’aération,foursetautresappareils
(amplicateurscompris)quigénèrentdelachaleur.
8. Utilisezexclusivementlespiècesetaccessoiresprévusparlefabricant.
9. Utilisezlaradioexclusivementsurunsupportmobile,unprésentoir,untrépied,unsupportmuralouunetablerecommandépar
lefabricantouvenduaveclaradio.Lorsdel’utilisationd’unsupportmobile,soyezprudentendéplaçantl’ensemblesupport/
radio,defaçonàéviterdevousblesserencasdechutedelaradio.
10. Retirezlacheducordond’alimentationdelaradiodelaprisedecourantpendantunorageoulorsquelaradion’estpas
utiliséependantuncertaintemps.
11. Coneztouteréparationoutoutentretienàunpersonnelqualié.Uneréparationouunentretienestnécessairelorsquelaradio,
lecordond’alimentationoulacheaétéendommagé,lorsqu’unliquideaétérenversésurlaradioetapénétrédanscelle-ci,
lorsquedesobjetssonttombéssurlaradioetontpénétrédanscelle-ci,lorsquelaradioaétéexposéeàlapluieouàl’humidité,
lorsquelaradionefonctionnepasnormalementoulorsquelaradioesttombéed’unecertainehauteur.
12. And’évitertoutrisqued’incendieoud’électrocution,n’exposezpaslaradioàlapluieetàl’humidité.
13. Netentezjamaisdedémonterlaradio.Celle-cinecomporteaucunélémentquisoitréparableparl’utilisateur.
14. Neposezjamaissurlaradiodesobjetsdégageantdelachaleurouprésentantuneammenue.
15. Lorsd’uneutilisationàl’airlibrepartempshumideoupluvieux,faitesfonctionnerlaradiosurpilesand’évitertoutrisque
d’électrocution.Andeprévenirlerisqued’électrocutionlorsquelaradioaétéexposéeàl’eauouàlapluie,lecordon
d’alimentationainsiquelachedoiventêtrecomplètementséchésavantd’insérerlacheducordond’alimentationdelaradio
dans une prise de courant.
16. Laprisedecourantdoitêtreprochedelaradioetrestertoujoursaccessible,desortequeseulelacheducordondelaradio
doitêtreretiréedelaprisedecourantencasd’urgence.
17. Lesinformationslégalesconcernantlaradiosetrouventsurlecôtédecelle-ci.
18. Cetteradioestprotégéecontrelapoussièreetlesprojectionsd’eau(IP45).
19. Encasdeperturbationsprovoquéesparunedéchargeélectrostatique,l’adaptateurAC/DCdoitêtreretiréunbrefinstantdela
prise de courant secteur.
20. Utilisezexclusivementl’adaptateurAC/DCfourniaveclaradio:
ModèleATL:DCL25AF-120200
Entrée:AC230V50/60Hz
Sortie:12VDC2A
21. Pouréviterdesdégâtsauditifs,n’écoutezpasàunVolumetropélevépendantdelonguespériodesetn’approchezpasvos
oreillestropprèsduhaut-parleur.
22. Sousl'environnementavecuneperturbationdel'immunitéconduite/Immunitérayonnée,l'échantillonpeutmalfonctionner.Ilse
récupéreraautomatiquementàlanormalelorsquelaperturbationdel'immunitéentraînée/l'immunitérayonnées'estarrêtée.
23. Cetappareildoitêtreutiliséenclimatmodéré.
VERROUILLAGEDESTOUCHESS.........................................................................................................................................29
GARANTIE……………………………………………........................................................................……………………………30
SPÉCIFICATIONS…………………………………………........................................................................……………………...31
INFORMATIONS…………………………........................................................................……………………………………….31
AVERTISSEMENT ! LA GARANTIE EST ANNULÉE LORSQUE LE BOÎTIER DE L’ENCEINTE A ÉTÉ OUVERT OU LORSQUE
DES MODIFICATIONS OU DES ALTÉRATIONS ONT ÉTÉ APPORTÉES À L’ENCEINTE.
3

5
Commandes
Face supérieure
1. Antenne
2. Haut-parleur
Face avant
3. Ecrand’afchageLCD
4. TouchedediminutionduVolume(-)
5. Touche Tuning (◄◄)
6. Touche de Menu-Preset
7. ToucheON/OFF(standby/veille)
8. Touched’augmentationduVolume(+)
9. Touche Tuning (►►)
10. Touche Select/Info/BT ST
11. Touche de sélection de la source audio (Source)
1
2
3
4
6
5
7
8
10
9
11
F
6
Face inférieure
12. Couvercleencaoutchouc
13. Portdebranchement
14. Portdebranchement
15. Commutateurdebatterie
16. Compartimentdebatterie
Côtés
17. Entrée Aux-In
18. Entrée adaptateur AC/DC
19. Coiffe en caoutchouc
15
16
13
14
12
17
19 18

7
ALIMENTATION ELECTRIQUE
Utilisation sur courant secteur
1. Avantd’insérerl’adaptateurAC/DCdansuneprisedecourantsecteur,assurez-vousquelatensionducourantsecteursoit
correcte et que l’interrupteur de sélection du type de pilessetrouvedanslabonneposition:ALKALINE OFFenl’absence
depilesoulorsquevousutilisezdespilesalcalines/NiHM ONlorsquevousutilisezdespilesNiMH.
2. Lorsquevousutilisezdespilesalcalinesetlorsquel’interrupteurdesélectiondutypedepilessetrouvepositionnésur
ALKALINE OFF,lespilesserontdéconnectéesautomatiquementlorsquelaradioestutiliséesurcourantsecteur.
3. LorsquevousutilisezdespilesNiMHetlorsquel’interrupteur de sélection du type de piles se trouve positionné sur NiMH
ON,lespilesserontrechargéesautomatiquementlorsquelaradioestutiliséesurcourantsecteur.
4. N’utilisezjamaisl’adaptateurAC/DCsouslapluieoudansunenvironnementhumide,defaçonàéviteruncourt-circuitoula
pénétrationd’humiditédanslaradio.Utilisezdanscecaslaradiouniquementavecdespilesetconservezlacoiffeen
caoutchoucsoigneusementfermée.
Remarque:Andedéconnecterlaradioducourantsecteur,l’adaptateurAC/DCdoitêtreretiréentièrementdelaprisedecourant
secteur.L’adaptateurAC/DCetlecordond’alimentationdoiventresteraccessiblesàtoutmoment.Encasdeperturbations
provoquéesparunedéchargeélectrostatique,l’adaptateurAC/DCdoitêtreretiréunbrefinstantdelaprisedecourantsecteur.
Utilisation sur piles
1. Pourouvrirlelogementdespiles,enlevezd’abordlepiedencaoutchoucsituéàlabasedelaradio.Tournezàceteffetlepied
encaoutchoucdanslesensinversedesaiguillesd’unemontre.
2. Desserrezensuitelavisducouvercledulogementdespilesàl’aided’untournevisetouvrezlecouvercle.
3. Insérez6piles(formatAM3/AA/LR6)NiMHoualcalinesdanslelogementenrespectantlapolarité(+)et(-).Refermezensuite
lecouvercledulogementetresserrezlavisducouvercle.
4. LorsquevousutilisezdespilesNiMHrechargeables,positionnezl’interrupteurdesélectiondutypedepilessurNiMHON.La
radiorechargeraautomatiquementlespileslorsqu’elleestutiliséesurcourantsecteur.Encoursdechargedespiles,l’icône
“Piles”clignoteraàl’écrand’afchageLCD.
5. Lorsquevousutilisezdespilesalcalines,positionnezl’interrupteurdesélectiondutypedepilessurAlkalineOFF.Lespiles
alcalinesnesontpasrechargeables.
8
F
6. Remontezlepiedencaoutchoucdefaçonàéviterlapénétrationd’humiditéoudepoussièredanslaradio.Tournezàceteffetle
piedencaoutchoucdanslesensdesaiguillesd’unemontre.
7. Lorsquelaradion’estpasutiliséependantuncertaintemps,ilestrecommandéderetirerlespilesdelaradio.
Lacapacitéapproximativedespilesestafchéeàl’écranLCDdelaradioaumoyend’uneicône“Piles”(4niveaux).Lorsquela
capacitédespilesesttrèsfaible,lemessage“Batterylow!”apparaîtraàl’écranetl’icône“Piles”représenteunepilevide.Lespiles
doiventdanscecasêtreremplacéesourechargéessanstarder,defaçonàgarantirlefonctionnementnormaldelaradio.
Avertissement :
Ilexisteunrisqued'explosionlorsquelespilesnesontpasremplacéescorrectement.Remplacezcelles-ciexclusivementpardes
piles de type identique ou équivalent.
Assurez-vousquel’interrupteur de sélection du type de pilessetrouvedanslabonneposition.
Unepilealcalinen’estpasrechargeable.Netentezjamaisderechargerdespilesalcalines.Nemélangezjamaisdifférentstypesde
piles.
Nemélangezjamaisdespileschargéesetdespilesdéchargées.
Evitezd’exposerlespilesàdeschaleursexcessives(soleil,feuousourcedechaleursimilaire).
Lespilesnepeuventjamaisêtredétruitesparincinérationniéliminéesaveclesorduresménagères.Lespilesusagéesdoiventêtre
conéesàuncentrederecyclageagréé.
Instructions visant à prévenir les abus raisonnablement prévisibles
Unebatterieincorporéedansunappareiletunebatterieainsiquesescomposantsassociés(ycomprislespilesetlesgénérateurs
d'électricité)doiventêtreconstruitsdetellesortequ'unedéfaillancedelaprotectioncontreunchocélectriqueouunincendie(par
exemple,unefuitedeproduitschimiquesinammablesprovoquantunincendieoudesdommagesàl'isolation)soientimprobables,
comptetenudetouteslesconditionsraisonnablementprévisibles.Lecaséchéant,celainclutlesconditionsextrêmesspéciéespar
lefabricant,tellesque:
- Températuresextrêmementhautesoubassesauxquellesunebatteriepeutêtresoumisependantl'utilisation,lestockageoule
transport;
- Bassepressionatmosphériqueàhautealtitude.
Lorsquelamiseenplacededispositifsoudedesignssécuritairesd'unebatterieoud'unéquipementn'estpasraisonnablement
pratiquecomptetenudelanaturefonctionnelledelabatterieoudel'équipementcontenantunebatterie,desmesuresde
protectioninstructivesconformesàlaclauseF.5doiventêtreprévuespourprotégerlabatteriecontrelesconditionsextrêmes
oulesabusdel'utilisateur.Lesexemplesàprendreenconsidérationsontlessuivants
Seite laden ...
Seite laden ...
Seite laden ...
Seite laden ...
Seite laden ...
Seite laden ...
Seite laden ...
Seite laden ...
Seite laden ...
Seite laden ...
Seite laden ...
Seite laden ...
Seite laden ...
Seite laden ...
Seite laden ...
Seite laden ...
Seite laden ...
Seite laden ...
Seite laden ...
Seite laden ...
Seite laden ...
Seite laden ...
Seite laden ...
Seite laden ...
Seite laden ...
Seite laden ...
Seite laden ...
Seite laden ...
Seite laden ...
Seite laden ...
Seite laden ...
Seite laden ...
Seite laden ...
Seite laden ...
Seite laden ...
Seite laden ...
Seite laden ...
Seite laden ...
Seite laden ...
Seite laden ...
Seite laden ...
Seite laden ...
Seite laden ...
-
 1
1
-
 2
2
-
 3
3
-
 4
4
-
 5
5
-
 6
6
-
 7
7
-
 8
8
-
 9
9
-
 10
10
-
 11
11
-
 12
12
-
 13
13
-
 14
14
-
 15
15
-
 16
16
-
 17
17
-
 18
18
-
 19
19
-
 20
20
-
 21
21
-
 22
22
-
 23
23
-
 24
24
-
 25
25
-
 26
26
-
 27
27
-
 28
28
-
 29
29
-
 30
30
-
 31
31
-
 32
32
-
 33
33
-
 34
34
-
 35
35
-
 36
36
-
 37
37
-
 38
38
-
 39
39
-
 40
40
-
 41
41
-
 42
42
-
 43
43
-
 44
44
-
 45
45
-
 46
46
-
 47
47
-
 48
48
-
 49
49
-
 50
50
-
 51
51
-
 52
52
-
 53
53
-
 54
54
-
 55
55
-
 56
56
-
 57
57
-
 58
58
-
 59
59
-
 60
60
-
 61
61
-
 62
62
-
 63
63


Perfectpro WORKTUBE Bedienungsanleitung
- Kategorie
- Radios
- Typ
- Bedienungsanleitung
in anderen Sprachen
- English: Perfectpro WORKTUBE Owner's manual
- français: Perfectpro WORKTUBE Le manuel du propriétaire
- Nederlands: Perfectpro WORKTUBE de handleiding
Verwandte Papiere
Sonstige Unterlagen
-
Soundmaster DAB400SI Benutzerhandbuch
-
 Power Dynamics PDC40 Bedienungsanleitung
-
Sangean DCR-200 Bedienungsanleitung
-
Albrecht DR 855 Digitalradio, DAB+/UKW Bedienungsanleitung
-
TEAC R-5DAB Bedienungsanleitung
-
TechniSat DIGITRADIO 370 CD IR BK Bedienungsanleitung
-
TEAC CR-H258i Bedienungsanleitung
-
Sangean MMR-99 Benutzerhandbuch
-
Sangean MMR-99DAB Benutzerhandbuch
-
