
Smoke Alarm GS526
Rauchwarnmelder
00
223842
D
GB
Operating Instructions
Bedienungsanleitung

2
GOperating Instructions
Thank you for choosing a Hama product.
Take your time and read the following instructions
and information completely. Please keep these
instructions in a safe place for future reference. If
you sell the device, please pass these operating
instructions on to the new owner.
1. Explanation of warning symbols and notes
Warning
This symbol is used to indicate safety instructions
or to draw your attention to specic hazards
and risks.
Note
This symbol is used to indicate additional
information or important notes.
2. Package contents
• Photoelectric smoke detector
• Base plate
• Mounting hardware
• 3V battery, type CR123A lithium (permanently
installed)
• These operating instructions
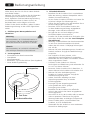
LED indicator light
Loudspeaker
Test button
3. Safety instructions
• Do not use the product in the immediate
vicinity of heaters, other heat sources or in direct
sunlight.
• Do not drop the product and do not expose it to
any major shocks.
• Do not open the device or continue to operate it if
it becomes damaged.
• For correct functioning, observe the assembly and
installation instructions given in these operating
instructions.
• In case of any kind of damage, the smoke
detector must be replaced.
• Draw up an escape plan in case of emergency
(see 6.1. for instructions). The escape plan
(recommendation)).
• Warning of hearing damage! The smoke detector
alarm is very loud. Do not test smoke detectors
directly next to the ear. Alarm signal sound level:
min. 85 dB.
• Do not modify the product in any way. Doing so
voids the warranty.
• The product is intended for private, non-
commercial use only.
• Use the product only for the intended purpose.
• Protect the product from dirt, moisture and
overheating and use it in dry rooms only.
• Do not use the product in areas in which
electronic products are not permitted.
• Do not modify the product in any way. Doing so
voids the warranty.
• Keep the packaging material out of the reach of
children due to the risk of suffocation.
• Dispose of packaging material immediately
in accordance with the locally applicable
regulations.
• Do not operate the product outside the power
limits specied in the technical data.
• Do not attempt to service or repair the product
yourself. Leave any and all service work to
qualied experts.
• As with all electrical products, this device should
be kept out of the reach of children.
• Only use the article under moderate climatic
conditions.
Warning
• Carbon monoxide, ames, heat, gases, etc.
cannot be detected by the smoke detector.

3
Warning
• The installation of smoke detectors neither
prevents res nor can they extinguish them.
Similarly, no protection of life and property is
guaranteed, nor is the need for appropriate
insurance circumvented.
Note
• The battery is permanently integrated and
cannot be removed. Dispose of the product
in its entirety in accordance with legal
regulations.
• The smoke detector does not contain any
radioactive material.
4. Installation
Note
We recommend having the smoke detector
installed by an approved and qualied electrician
(smoke detector specialist). Observe and follow
all local and national electrical and building
regulations for installation.
4.1 General information
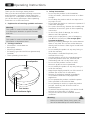
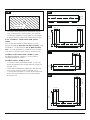
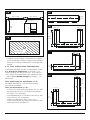
For minimum protection, it is recommended to install
one smoke detector in each bedroom and children's
room as well as in corridors leading to these rooms
and on escape routes.
1a
Kitchen
BedroomLiving room
Child's room
Bath-
room
Corridor
Smoke detector for minimum protection
Smoke detector for optimal protection
Installation locations with restrictions
In buildings with several residential units, smoke
detectors should be installed separately in each
residential unit as well as in the common corridors
and staircases.
• For optimum protection, install smoke detectors in
all rooms, corridors, basements/storerooms, etc.
- consider 4.3.1.Not permitted installation
locations as well as 4.3.2. Installation
locations with restrictions.
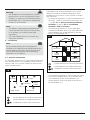
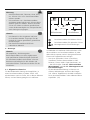
• For minimum protection in houses with open
connections between oors (e.g. open staircase),
the installation of a smoke detector on the top
level is recommended. (1b)
Bedroom Child's
room
Cor-
ri-
dor
Living
room
Kitchen
Cellar Workshop
1b
Smoke detector for minimum protection
Smoke detector for optimal protection
Installation locations with restrictions
• For minimum protection in houses with non-open
connections between oors (e.g. stairwell with
doors between oors), the installation of a
smoke detector on the top level of each oor is
recommended. (1c).

4
Bedroom Child's
room
Living
room
Kitchen
Cellar Workshop
1c
Smoke detector for minimum protection
Smoke detector for optimal protection
Installation locations with restrictions
Note
The alarm signal of the smoke detector is usually
loud enough to warn people. However, there may
be situations in which people cannot hear the
alarm signal (e.g. high noise levels, people with
a very deep sleep and/or hearing impairment,
people under the inuence of drugs or alcohol,
etc.). If you suspect that this applies to people
in your environment, install additional special
smoke detectors.
4.2 Reasons for false alarms
Some rooms and environments may have a tendency
to trigger false alarms due to their typical use. This
includes disruptive factors such as:
• Water, cooking and other vapours
• Welding, soldering, cutting and other hot work
• Sawing and grinding work
• Construction work/ cleaning work with dust
generation
• Strong electromagnetic effects
• Signicant temperature uctuations, which can
lead to condensation of the humidity in the
smoke detector
• etc.
If these disruptive factors only occur temporarily -
such as during renovation - cover the smoke detector
or remove it for the appropriate period (see the
following warning).
If there are frequent false alarms caused by such
triggers - e.g. in the kitchen - adjust the installation
of the smoke detector accordingly if necessary.
Warning - renovation work, work in
the vicinity of the smoke detector
• Dismantle the smoke detector (see 7.5.
Dismantling the smoke detector) or cover
it dust-free before you start renovation work.
• Ideally, keep it in a safe and dust-free place
for the duration of the work.
• Make sure that no paint is applied to the
smoke detector or tape remains on the
housing.
• Dust, paint, adhesive tape or other dirt
can impair the sensitivity of the trigger and
possibly render the smoke detector completely
inoperative and ineffective.
Cor-
ri-
dor

5
Warning - renovation work, work in
the vicinity of the smoke detector
• Reinstall all correctly functioning smoke
detectors in their installation locations and
immediately replace any smoke detectors
that are no longer functioning correctly with
new devices.
• After installation, check all smoke detectors
for their function as described in 7.1. Testing.
4.3 Installation locations and optimal
placement of smoke detectors
Note
The installation locations and positions of the
smoke detectors shown are only examples based
on average apartments and houses and are only
intended as a guide.
4.3.1 Not permitted installation locations
• Do not install smoke detectors in garages - the
combustion residues/exhaust gases produced
when starting a motor vehicle can trigger false
alarms.
• Unsuitable rooms are those in which temperatures
fall below 0°C or rise above 40° C or in which the
humidity is more than 93%.
• Do not attach the smoke detector e.g. to the
ceiling of a caravan or similar rooms. The sun's
rays heat the air quickly here, so that possible
smoke is thereby prevented from reaching the
smoke detector and triggering the alarm.
4.3.2 Installation locations with restrictions
• Also take into account the information in
4.2. Reasons for false alarms.
• Smoke detectors must only be installed in kitchens
and wet rooms (bathrooms) if the restrictions
are observed and at the same time false alarms
caused by kitchen and water vapour can be
excluded.
• When installing the smoke detector near
dishwashers, washing machines, ovens, etc., keep
it at least 3 m away from these areas.
• When installing the smoke detector near ventila-
tion shafts or openings for heat and cold supply,
keep it at least 1 m away from these areas. The
air could blow the smoke away from the smoke
detector and thus interrupt or prevent the alarm.
Make sure that the air movement in such rooms
does not affect the penetration of re smoke into
the smoke detector.
• Perforated ceilings used for ventilation in forcibly
ventilated rooms must be closed within a radius
of 0.5 m around the smoke detector.
• In very dirty, dusty, greasy or insect-infested
areas, smoke detectors can become excessively
contaminated with dust and dirt, resulting in false
alarms or impaired smoke detection.
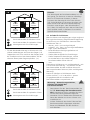
4.3.3 Standard rooms
• Smoke and combustion residues rise upwards
to the ceiling and then spread horizontally. The
ideal installation location is on the ceiling, in the
middle of the room.
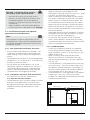
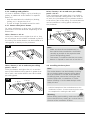
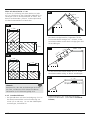
• When installing, make sure that the smoke
detector is at least 0.5 m away from any side
wall and larger furnishings, e.g. high cupboards
(see Fig. 2a).
• A smoke detector is only permitted for room sizes
up to max.60 m2. If the room size exceeds 60m2,
use additional smoke detectors. For example, at
least two smoke detectors should be installed in
rooms between 60 m² and 120 m² in size.
• A smoke detector is only approved for installation
heights up to max. 6 m. If the room height
exceeds 6 m, additional smoke detectors must be
installed at several levels.
max.
6 m
min. 0.5 m
min. 0.5 mmin. 0.5 m
2a

6
max. 60 m2
2b
• For rooms with special room geometries (land-
ings, sloping roofs, corner rooms, etc.) further
installation regulations may apply. It is therefore
essential that you observe the following sections.
4.3.4 Corridors, small rooms and corner
rooms
If an increased number of false alarms is to be
expected (see 4.2. Reasons for false alarms), wall
installation - as described in 4.3.8. Wall installa-
tion - is to be preferred in corridors/rooms smaller
than 6 m² or kitchens that serve as escape routes.
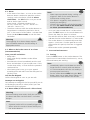
Corridors and rooms with a width ≤1 m:
the ideal installation location is on the ceiling
centrally between the walls.
Corridors with a width ≤3 m:
• in corridors with a maximum width of 3 m, the
distance between two smoke detectors must not
exceed 15 m.
• The distance between the detector and the end
face of the corridor must not exceed 7.5 m.
• It should be noted that in corner and intersection
areas the smoke detector must be mounted in
the mitre line.
max. 7.5m max. 7.5mmax. 15m
max.
3 m
3a
max. 3mmax. 3m
max. 15m
max.
7.5 m
max. 3m
3b
max. 3m
max. 7.5m
max.
7.5 m
max.
3 m
3c
max. 3m
max. 3m
max. 15m
max.
7.5 m
max. 3m
max. 15m max. 7.5m
3d

7
Corridors with a width > 3 m:
in corridors (L-/ U-shaped) with a width of more than
3 m, these should be conceptually along the anks
and seen as individual rooms. The resulting "rooms"
must be equipped with smoke detectors accordingly.
>3m
>3m
4a
>3m
>3m
>3m
4b
Note
Note that the requirements are not only valid for
corridors but also for rooms with these geometries
(e.g. corner rooms).
4.3.5 Standard rooms
• For pitched roofs with a roof pitch >20°, the
smoke detector must be installed at a distance
of at least 0.5 m and max. 1 m from the gable
peak, see Fig. 5a.
0.5 m
0.5 m
>20°
5a
• Note the following for rooms that only have a par-
tial roof slope: if the horizontal ceiling is less than
1 m wide, the smoke detector must be installed
on the roof slope as shown in Figure 5b.
>20°
max. 1m
0.5 m0.5 m
5b
• If the horizontal ceiling is wider than 1 m, the
smoke detector must be mounted centrally on it.
>20°
> 1 m
0.5 m 0.5 m
5c
• Roof pitches ≤20° should be treated as horizon-
tal ceilings. (See 4.3.3.Standard rooms)

8
4.3.6 Landings and galleries
If a room is divided in height, e.g. by a landing or
gallery, an additional smoke detector is required
below it if:
• both the area below the subdivision (landing,
gallery, etc.) is larger than 16 m²
• as well as length and width exceed 2 m each.
4.3.7 Rooms with joists/ beams
For rooms with beams or other joists, the following
specications must be observed - depending on the
dimensions:
Joists / beams < 0.2 m:
If the joists / beams are not higher than 0.2 m, they
are not relevant and should be considered as part of
the ceiling. The smoke detector can be installed on a
ceiling panel or directly on the joist/beam.
max. 0.2m
6a
Joists / beams > 0.2 m and area per ceiling
panel > 36 m²:
If the joists/beams are higher than 0.2 m and the
area of the individual ceiling panels is greater than
36 m² each, one smoke detector must be installed
per ceiling panel.
> 0.2 m
> 36 m2> 36 m2
6b
Joists / beams > 0.2 m and area per ceiling
panel < 36 m²:
If the joists/beams are higher than 0.2 m and the
area of the individual ceiling panels is less than 36
m² each, the joists/beams are not relevant and are
to be seen as part of the ceiling. The smoke detector
can be installed on a ceiling panel or directly on
the joist/beam.
> 0.2 m
< 36 m2< 36 m2
6c
Note
• Make sure that the smoke detector(s) to
be installed is/are nevertheless mounted as
centrally as possible in the respective area
(entire ceiling/ceiling panel).
• Furthermore, it should be noted that one smoke
detector is required for each area of max. 60 m².
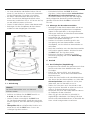
4.4 Installing the base plate
Note
The smoke detector can be locked by a locking
pin on the base plate to prevent it from being
easily unscrewed. To lock the smoke detector
accordingly later, remove the locking pin from
the base plate with a screwdriver or similar
before installing it. Put the detached pin aside
ready to hand.
• Hold the base plate of the smoke detector at the
installation location - the two mounting holes serve
as a template for marking the drill holes.
Warning
Before drilling and installing, make sure that there
are no electrical lines, water, gas or other lines in
the area of the installation location.

9
• On a wooden ceiling or beam, drill approx.
20 mm deep with a 2.5 mm drill bit. Use the
enclosed screws without plugs.
• For concrete or masonry, use a max. 5 mm drill
bit (measure the plugs included beforehand) and
pre-drill approx. 25-30 mm deep to be able to
insert the plugs.
• Insert the plugs (concrete or masonry).
• Fix the base plate of the smoke detector with the
enclosed screws.
Base plate
Locking
pin
Recess for locking pin
7
2 screws
plastic
anchors
holes in the
ceiling or wall
housing
5. Commissioning
5.1 Activation
Note
The smoke detector must be activated before use.
• Press and hold the TEST button for around
3-4 sec until the LED lights up.
• Then immediately release the TEST button. The
smoke detector signals with a short signal tone
that the activation was successful.
• Thencheck the function by pressing the TEST
button. An immediate signal tone must sound.
• If no signal tone sounds when the TESTbutton is
pressed, the smoke detector is not activated!
Repeat the activationuntil the smoke detector
responds correctly to the test.
After successful activation and when functioning prop-
erly, the LED ashes briey approx. every 40 sec.
5.2 Installing the smoke detector
• Attach the smoke detector to the base plate
axed to the installation location by inserting the
latching hooks into the openings provided and
turning the smoke detector clockwise.
• Check that the smoke detector is securely
fastened to the base plate.
• Now insert the locking pin into the recess of the
smoke detector and the base plate to prevent it
from being easily unscrewed.
• After installation, the smoke detector must be
tested for function. To do this, press the TEST
button. A signal tone sounds.
• If no signal tone sounds, repeat the activation
procedure as described in 5.1. Activation.
6. Operation
6.1 The escape plan (recommendation)
• Discuss and draw up an escape plan together
with your family and/or fellow residents.
• If possible, also plan alternative escape routes, as
are can block standard routes.
• Demonstrate the alarm of the smoke detector
to your family and/or fellow residents (see 7.2.
Alarm simulation) and make sure that everyone
knows what to do in the event of an alarm.
• Make sure that your children are also able to
recognise an alarm situation and get themselves
to safety.
• Designate a place outside your home as the
meeting point in case of an alarm.
• If necessary, practise what to do in case of an
alarm at regular intervals. The exercise helps your
family and/or fellow residents to leave the house
quickly and in an orderly manner in the event
of an alarm.

10
6.2 Alarm
• In the event of an alarm - as soon as the smoke
detector detects combustion particles or when
carrying out the simulation (see 7.2. Alarm
simulation)-theLED ashes once per second
and an alarm signal sounds.
Alarm signal: sustained pulsating tone
(BI 0.5s - Pause 0.5s - BI 0.5s - Pause 0.5s -
wBI 0.5s - Pause 1.5s)
• The alarm continues until the smoke detector no
longer detects combustion particles in the air,
you - in the event of a false alarm - activate mute
mode (see 6.4. Mute mode) or end the alarm
simulation.
Warning
The triggering of an alarm always requires
your immediate attention and the taking of
appropriate action!
6.3 What to do in the event of an alarm
(recommendation)
Save yourself and others
• Keep calm!
• Warn other family members and/or fellow
residents!
• Now leave the house immediately and close all
doors and windows of your escape route - if this
can be done safely - to slow down the spread of
smoke and re.
• After leaving the house, go to your agreed
assembly point and make sure that everyone has
left the house.
Call the re brigade
Call the re brigade as soon as you are safe.
Attempts to extinguish
Only attempt to extinguish the re yourself if you do
not endanger yourself (or others) and if you have
suitable extinguishing agents.
6.4 Mute mode (in the case of a false alarm)
Warning
Before activating mute mode, clarify the cause of
the alarm and make sure that there is no further
danger!
Note
• Cigarette smoke will not normally trigger the
alarm unless the smoke is blown directly into
the smoke detector.
Note
• Water vapour produced during cooking can
trigger an alarm if the smoke detector is
located near cooking points.
• If an alarm is triggered, check whether it is
actually an emergency.
• If there is re or smoke, call the re brigade or
act as in 6.3. What to do in the event of
an alarm (recommendation).
• Once you have ensured that it is a false alarm,
press the TEST button on the smoke detector to
silence the alarm for about 10 minutes.
• The red LED will then ash once every 8 seconds to
indicate that the smoke detector is in mute mode.
• The smoke detector is automatically reset after
approx. 10 minutes. If smoke particles are still
present after this period, the alarm is triggered
again.
• Mute mode can be operated repeatedly.
7. Care and maintenance
7.1 Testing
Press the TEST button on the smoke detector. The
signal sound is heard when the electronics, sensor,
siren and battery are working.
Note
• Immediately replace smoke detectors that no
longer function correctly with new devices.
• It is recommended to test the unit weekly to
ensure proper functioning.
• Test the smoke detecto ONLY using the TEST
button. Never use an open ame, lighters, etc.
to simulate an alarm and test the function.

11
7.2 Alarm simulation
Press and hold the TEST button on the smoke detec-
tor to simulate the alarm. As in the case of an alarm,
the LED ashes once per second and an alarm signal
sounds until you release the TEST button again.
7.3 Battery / replacement of the smoke
detector
The operating time of the 3V lithium battery in this
smoke detector is ten years.
When the battery is low, a beep sounds every 40
seconds. The LED continues to ash every 40 seconds.
The low battery indication is given for at least 30
days. Replace the smoke detector with a new device
during this period.
If the smoke detector signals a low battery, you can
interrupt the signal tone for 10 hours by pressing the
TEST button. During this time, the smoke detector
can normally still detect smoke. Make every effort to
replace it with a new unit without delay!
Note
In addition to the life of the battery, the life of
the smoke detector (especially the sensor) is also
limited in time. Therefore, before installing the
smoke detector, observe the date printed on it for
replacement. Replace the smoke detector with a
new unit on this recommended date, even if there
is no indication of a low battery yet.
7.4 Care
Clean the smoke detector regularly (at least once a
month) to remove dust, dirt and debris.
Use a hoover with a soft brush and carefully vacuum
all sides and covers of the smoke detector.
Make sure that the smoke detector does not have
any function-relevant damage (e.g. cracks in the
housing). If this is the case, replace the smoke
detector with a new device.
Ensure that all specications are met according
to the installation location (see 4. Installation).
In the event of structural/recognisable changes,
check whether the existing installation of the smoke
detector device still meets all relevant requirements.
If necessary, adjust the installation accordingly.
Warning
• Check each smoke detector that you dismantle
(see 7.5. Dismantling the smoke detector)
and reinstall or install in a different place for
its function as described in 7.1. Test!
Warning
• Immediately replace smoke detectors that no
longer function correctly with new devices.
7.5 Dismantling the smoke detector
• If necessary, remove the locking pin to be able to
dismantle the smoke detector.
• Turn the smoke detector counterclockwise to
remove it from the base plate.
• Store the smoke detector in a safe and dust-free
place if it is to be dismantled for a short time,
e.g. during renovation work, or replace it with
a new device.
• Now carry out the assembly and function check
- as described in 5.2.Installing the smoke
detector.
8. Warranty disclaimer
Hama GmbH & Co KG assumes no liability and
provides no warranty for damage resulting from
improper installation/mounting, improper use of
the product or from failure to observe the operating
instructions and/or safety notes.
9. Declaration of performance
The declaration of performance for this product can
be found at:
www.hama.com ->00223842 -> Downloads
10.Manufacturer and approval holder
Siterwell Electronics CO., Limited
No. 666 Qingfeng Road, Jiangbei District, Ningbo,
Zhejiang Province, China
Distributed by
Hama GmbH & Co KG
86652 Monheim/Germany
www.hama.com
EN14604:2005 + AC:2008
18
0786
DoP: GS526G-CPR-001

12
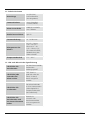
11.Technical data
Battery type
3V (CR123A) lithium
battery
(permanently
installed)
Current
consumption
<8uA (standby),
<70mA (alarm)
Alarm volume 85dB(A) within 3
metres
Detection method Optical
Mute Approx. 10 minutes
Sound pattern of
the alarm
BI 0.5s - pause 0.5s
- BI 0.5s - pause
0.5s - BI 0.5s -
pause 1.5s, with red
LED ash, repetition
of alarm scheme
Temperature range 5°C - 40°C
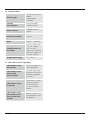
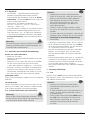
12. LED and acoustic signalling
LED ashes every
40 seconds
The smoke detector is
working properly
LED ashes every
second and
alarm sounds
The TEST button was
pressed or the alarm
has been triggered
by smoke
LED ashes every
8 seconds
The alarm is in mute
mode (see Section
6.4 Mute mode
(in case of a false
alarm))
LED ashes every
40 seconds and a
short alarm tone
sounds
Battery is weak. The
smoke detector must
be replaced.

13
DBedienungsanleitung
Vielen Dank, dass Sie sich für ein Hama Produkt
entschieden haben!
Nehmen Sie sich Zeit und lesen Sie die folgenden
Anweisungen und Hinweise zunächst ganz
durch. Bewahren Sie diese Bedienungsanleitung
anschließend an einem sicheren Ort auf, um
bei Bedarf darin nachschlagen zu können.
Sollten Sie das Gerät veräußern, geben Sie diese
Bedienungsanleitung an den neuen Eigentümer
weiter.
1. Erklärung von Warnsymbolen und
Hinweisen
Warnung
Wird verwendet, um Sicherheitshinweise zu
kennzeichnen oder um Aufmerksamkeit auf
besondere Gefahren und Risiken zu lenken.
Hinweis
Wird verwendet, um zusätzlich Informationen
oder wichtige Hinweise zu kennzeichnen.
2. Packungsinhalt
• Photoelektrischer Rauchwarnmelder
• Grundplatte
• Montagematerial
• Batterie 3V, Typ CR123A Lithium (fest eingebaut)
• Diese Bedienungsanleitung
LED-Kontrollleuchte
Lautsprecher
Test-Taste
3. Sicherheitshinweise
• Betreiben Sie das Produkt nicht in unmittelbarer
Nähe der Heizung, anderer Hitzequellen oder in
direkter Sonneneinstrahlung.
• Lassen Sie das Produkt nicht fallen und setzen Sie
es keinen heftigen Erschütterungen aus.
• Öffnen Sie das Produkt nicht und betreiben Sie es
bei Beschädigungen nicht weiter.
• Beachten Sie für eine korrekte Funktion die
in dieser Bedienungsanleitung angegebenen
Montage- und Installationshinweise.
• Bei jeglicher Art von Beschädigung ist der
Rauchwarnmelder auszutauschen.
• Erstellen Sie für den Notfall einen Fluchtplan (Hin-
weise dazu nden Sie unter 6.1. Der Fluchtplan
(Empfehlung)).
• Warnung vor Hörschäden! Der Rauchwarnmelder
ist sehr laut. Rauchwarnmelder nicht direkt
neben dem Ohr testen. Schallpegel Alarmsignal:
min. 85 dB.
• Nehmen Sie keine Veränderungen am Produkt vor.
Dadurch verlieren Sie jegliche Gewährleistungs-
ansprüche.
• Das Produkt ist für den privaten, nicht-
gewerblichen Haushaltsgebrauch vorgesehen.
• Verwenden Sie das Produkt ausschließlich für den
dazu vorgesehenen Zweck.
• Schützen Sie das Produkt vor Schmutz,
Feuchtigkeit und Überhitzung und verwenden Sie
es nur in trockenen Räumen.
• Benutzen Sie das Produkt nicht in Bereichen, in
denen elektronische Produkte nicht erlaubt sind.
• Nehmen Sie keine Veränderungen am
Produkt vor. Dadurch verlieren Sie jegliche
Gewährleistungsansprüche.
• Halten Sie Kinder unbedingt von dem
Verpackungsmaterial fern, es besteht
Erstickungsgefahr
• Entsorgen Sie das Verpackungsmaterial
sofort gemäß den örtlich gültigen
Entsorgungsvorschriften.
• Betreiben Sie das Produkt nicht außerhalb
seiner in den technischen Daten angegebenen
Leistungsgrenzen.
• Versuchen Sie nicht, das Produkt selbst zu warten
oder zu reparieren. Überlassen Sie jegliche
Wartungsarbeit dem zuständigen Fachpersonal.
• Dieses Produkt gehört, wie alle elektrischen
Produkte, nicht in Kinderhände!
• Verwenden Sie den Artikel nur unter moderaten
klimatischen Bedingungen.

14
Warnung
• Kohlenstoffmonoxid, Flammen, Hitze, Gase,
etc. können nicht vom Rauchwarnmelder
erkannt werden.
• Die Installation von Rauchwarnmeldern
verhindert weder Brände noch können diese
dadurch gelöscht werden. Ebenso wird kein
Schutz von Leben und Besitz gewährleistet
sowie die Notwendigkeit von entsprechenden
Versicherungen umgangen.
Hinweis
• Die Batterie ist fest eingebaut und kann
nicht entfernt werden. Entsorgen Sie das
Produkt als Ganzes gemäß den gesetzlichen
Bestimmungen.
• Der Rauchwarnmelder enthält kein
radioaktives Material.
4. Montage
Hinweis
Wir empfehlen, die Montage des
Rauchwarnmelders von einer zugelassenen
und qualizierten Elektrofachkraft (Fachkraft
für Rauchwarnmelder) durchführen zu lassen.
Beachten und befolgen Sie alle lokalen und
nationalen Elektro- und Bauvorschriften für die
Installation.
4.1 Allgemeine Hinweise
Für die Mindestabsicherung wird empfohlen, je
einen Rauchwarnmelder in jedem Schlaf- und
Kinderzimmer sowie in Fluren, die zu diesen Räumen
führen, und auf Rettungswegen zu installieren.
1a
Küche
SchlafzimmerWohnzimmer
Kinderzimmer
Bad
Flur
Rauchwarnmelder für Mindest-Schutz
Rauchwarnmelder für optimalen Schutz
Montageorte mit Einschränkungen
In Gebäuden mit mehreren Wohneinheiten sollte
die Installation von Rauchwarnmeldern in jeder
Wohneinheit separat sowie in den gemeinsamen
Fluren und Treppenhäusern erfolgen.
• Um einen optimalen Schutz zu erreichen,
installieren Sie Rauchwarnmelder in allen
Räumen, Fluren, Keller-/ Speicherräumen, etc.
– berücksichtigen Sie 4.3.1. Nicht erlaubte
Montageorte sowie 4.3.2. Montageorte mit
Einschränkungen.
• Für die Mindestabsicherung in Häusern mit
offenen Verbindungen zwischen den Etagen
(z.B. offenes Treppenhaus) wird die Installation
eines Rauchwarnmelders in der obersten Ebene
empfohlen. (1b)

15
Schlaf-
zimmer Kinder-
zimmer
Flur
Wohn-
zimmer
Küche
Keller Werkstatt
1b
Rauchwarnmelder für Mindest-Schutz
Rauchwarnmelder für optimalen Schutz
Montageorte mit Einschränkungen
• Für die Mindestabsicherung in Häusern mit nicht
offenen Verbindungen zwischen den Etagen (z.B.
Treppenhaus mit Türen zwischen den Etagen) wird
die Installation eines Rauchwarnmelders auf der
obersten Ebene jeder Etage empfohlen. (1c).
Schlaf-
zimmer Kinder-
zimmer
Flur
Wohn-
zimmer
Küche
Keller Werkstatt
1c
Rauchwarnmelder für Mindest-Schutz
Rauchwarnmelder für optimalen Schutz
Montageorte mit Einschränkungen
Hinweis
Das Alarmsignal des Rauchwarnmelders ist i.d.R.
laut genug, um Personen zu warnen. Allerdings
kann es zu Situationen kommen, in denen
Personen das Alarmsignal nicht hören können
(z.B. hohe Lärmkulisse, Personen mit einem sehr
tiefen Schlaf und/ oder einer Hörbehinderung,
Personen unter Drogen- oder Alkoholeinuss,
etc.). Wenn Sie vermuten, dass dies auf Personen
Ihres Umfelds zutrifft, installieren Sie zusätzlich
spezielle Rauchwarnmelder.
4.2 Gründe für Fehlalarme
Manche Räume und Umgebungen neigen aufgrund
ihrer typischen Nutzung möglicherweise begünstigt
zur Auslösung von Fehlalarmen. Darunter fallen
Störfaktoren wie z.B.:
• Wasser-, Koch- und sonstige Dämpfe
• Schweiß-, Löt-, Trenn- und sonstige Heißarbeiten
• Säge- und Schleifarbeiten
• Baumaßnahmen/ Reinigungsarbeiten mit
Staubentwicklung
• Starke elektromagnetische Einwirkungen
• Starke Temperaturschwankungen, welche
zur Kondensation der Luftfeuchtigkeit im
Rauchwarnmelder führen können
• usw.
Treten diese Störfaktoren nur vorrübergehend – wie
z.B. bei einer Renovierung – auf, decken Sie den
Rauchwarnmelder ab oder entfernen diesen für
den entsprechenden Zeitraum (siehe nachfolgende
Warnung).
Kommt es häuger zu Fehlalarmen durch
solche Auslöser – z.B. in der Küche - passen
Sie gegebenenfalls die Installation des
Rauchwarnmelders entsprechend an.
Warnung – Renovierungsarbeiten,
Arbeiten im Umfeld des
Rauchwarnmelders
• Demontieren Sie den Rauchwarnmelder (sie-
he 7.5. Demontage des Rauchwarnmel-
ders) oder decken Sie ihn staubfrei ab, bevor
Sie mit Renovierungsarbeiten beginnen.
• Verwahren Sie ihn idealerweise während der
Dauer der Arbeiten an einem sicheren und
staubfreien Ort.
• Achten Sie darauf, dass keine Farbe auf den
Rauchwarnmelder aufgetragen wird oder
Reste von Klebeband auf dem Gehäuse
zurückbleiben.

16
Warnung – Renovierungsarbeiten,
Arbeiten im Umfeld des
Rauchwarnmelders
• Staub, Farbe, Klebeband oder sonstige
Verschmutzungen können die Empndlichkeit
der Auslösung beeinträchtigen und mögli-
cherweise den Rauchwarnmelder vollständig
funktions- und wirkungslos machen.
• Montieren Sie alle korrekt funktionierenden
Rauchwarnmelder wieder an ihren Monta-
georten und ersetzen Sie nicht mehr korrekt
funktionierende Rauchwarnmelder sofort
durch neue Geräte.
• Prüfen Sie alle Rauchwarnmelder nach der
Montage auf ihre Funktion wie unter 7.1.
Test beschrieben.
4.3 Montageorte und optimale Platzierung
der Rauchwarnmelder
Hinweis
Die angegebenen Montageorte sowie dargestell-
ten Positionen der Rauchwarnmelder sind nur
beispielhaft auf Grundlage durchschnittlicher
Wohnungen und Häuser erstellt und sollen nur als
Anhaltspunkt dienen.
4.3.1 Nicht erlaubte Montageorte
• Bringen Sie keine Rauchwarnmelder in Garagen
an – die beim Starten eines Kraftfahrzeugs
entstehenden Verbrennungsrückstände/ Abgase
können Fehlalarme auslösen.
• Ungeeignet sind Räume, in denen die Tempera-
turen unter 0°C fallen oder über 40° C steigen
oder in denen die Luftfeuchtigkeit mehr als
93% beträgt.
• Befestigen Sie den Rauchwarnmelder z.B. nicht
an der Decke eines Wohnwagens oder ähnlichen
Räumen. Sonnenstrahlen erwärmen hier die
Luft schnell, so dass möglicher Rauch dadurch
abgehalten wird, an den Rauchwarnmelder zu
gelangen und Alarm auszulösen.
4.3.2 Montageorte mit Einschränkungen
• Berücksichtigen Sie auch die Hinweise unter
4.2. Gründe für Fehlalarme.
• In Küchen und Nassräumen (Badezimmer) sind
Rauchwarnmelder nur dann anzubringen, wenn
die Einschränkungen beachtet und gleichzeitig
Fehlalarme durch Küchen- und Wasserdampf
ausgeschlossen werden können.
• Halten Sie bei der Installation des Rauchwarn-
melders in der Nähe von Geschirrspülern,
Waschmaschinen, Öfen, etc. mindestens 3 m
Abstand von diesen Bereichen.
• Halten Sie bei der Installation des Rauchwarnmel-
ders in der Nähe von Be- und Entlüftungs-
schächten oder Öffnungen für Wärme- und
Kälteversorgung mindestens 1 m Abstand zu
diesen Bereichen. Die Luft könnte den Rauch
vom Rauchwarnmelder wegblasen und somit
den Alarm unterbrechen oder verhindern. Stellen
Sie sicher, dass die Luftbewegung in solchen
Räumen das Eindringen von Brandrauch in den
Rauchwarnmelder nicht beeinträchtigt.
• Perforierte Decken, die der Belüftung in
zwangsbelüfteten Räumen dienen, müssen im
Radius von 0,5 m um den Rauchwarnmelder
geschlossen sein.
• In sehr schmutzigen, staubigen, schmierigen oder
von Insekten befallenen Bereichen können Rauch-
warnmelder übermäßig durch Staub und Schmutz
verunreinigt werden, sodass es zu Fehlalarmen
oder Beeinträchtigungen bei der Raucherkennung
kommen kann.
4.3.3 Standard-Räume
• Rauch und Verbrennungsrückstände steigen nach
oben an die Zimmerdecke und verbreiten sich
dann erst horizontal. Der ideale Montageort ist an
der Decke, in der Mitte des Zimmers.
• Achten Sie bei der Montage darauf, dass der
Rauchwarnmelder mindestens 0,5 m von jeder
Seitenwand und größeren Einrichtungsgegen-
ständen, z.B. hohe Schränke, entfernt ist (siehe
Bild 2a).
• Ein Rauchwarnmelder ist nur für Raumgrößen
bis max. 60 m2zugelassen. Übersteigt die
Raumgröße 60 m2, verwenden Sie zusätzliche
Rauchwarnmelder. So sollten beispielsweise in
Räumen mit einer Größe zwischen 60 m² und
120 m² mindestens zwei Rauchwarnmelder
installiert werden.
• Ein Rauchwarnmelder ist nur für Einbauhöhen bis
max. 6 m zugelassen. Übersteigt die Raumhöhe
6 m, sind zusätzliche Rauchwarnmelder in mehre-
ren Ebenen anzubringen.

17
max.
6 m
min. 0,5 m
min. 0,5 mmin. 0,5 m
2a
max. 60 m2
2b
• Für Räume mit besonderen Raumgeometrien
(Podeste, Dachschrägen, Eckzimmer, etc.) gelten
unter Umständen weitere Installationsvorschriften.
Beachten Sie daher unbedingt die nachfolgenden
Kapitel.
4.3.4 Flure, kleine Räume und Eckzimmer
Ist mit einer erhöhten Anzahl an Fehlalarmen (siehe
4.2. Gründe für Fehlalarme) zu rechnen, ist in
Fluren/ Räumen, die kleiner als 6 m² sind, oder Kü-
chen, die als Fluchtweg dienen, die Wandmontage
– wie in 4.3.8. Wandmontage beschrieben – zu
bevorzugen.
Flure und Räume mit einer Breite ≤1 m:
Der ideale Montageort ist an der Decke mittig
zwischen den Wänden.
Flure mit einer Breite ≤3 m:
• In Fluren mit einer maximalen Breite von 3 m darf
der Abstand zwischen zwei Rauchwarnmeldern
höchstens 15 m betragen.
• Der Melderabstand zur Stirnäche des Flures darf
nicht mehr als 7,5 m betragen.
• Dabei ist zu beachten, dass in Eck- und
Kreuzungsbereichen der Rauchwarnmelder in der
Gehrungslinie zu montieren ist.
max. 7,5 m max. 7,5 mmax. 15 m
max.
3 m
3a
max. 3 mmax. 3 m
max. 15 m
max.
7,5 m
max. 3 m
3b
max. 3 m
max. 7,5 m
max.
7,5 m
max.
3 m
3c
max. 3 m
max. 3 m
max. 15 m
max.
7,5 m
max. 3 m
max. 15 m max. 7,5 m
3d

18
Flure mit einer Breite > 3 m:
In Fluren (L-/ U-förmig) mit einer Breite von mehr
als 3 m sind diese an den Schenkeln gedanklich zu
verlängern und als einzelne Räume zu sehen. Die
daraus resultierenden „Räume“ sind entsprechend
mit Rauchwarnmeldern zu bestücken.
>3m
>3m
4a
>3m
>3m
>3m
4b
Hinweis
Beachten Sie, dass die Anforderungen nicht nur
für Flure, sondern auch für Räume mit diesen
Geometrien (z.B. Eckzimmer) gültig sind.
4.3.5 Standard-Räume
• Bei Spitzdächern mit einer Dachneigung >20° ist
der Rauchwarnmelder in einer Entfernung von
mind. 0,5 m und max. 1 m von der Giebelspitze
anzubringen, siehe Bild 5a.
0,5 m
0,5 m
>20°
5a
• Beachten Sie für Räume, die nur anteilig
eine Dachschräge besitzen, folgendes: Ist die
horizontale Decke weniger als 1 m breit, ist der
Rauchwarnmelder an der Dachschräge gem. Bild
5b anzubringen.
>20°
max. 1 m
0,5 m0,5 m
5b
• Ist die horizontale Decke breiter als 1 m, ist der
Rauchwarnmelder mittig an dieser anzubringen.
>20°
> 1 m
0,5 m 0,5 m
5c
• Dachneigungen ≤20° sind wie horizontale
Decken zu behandeln. (siehe 4.3.3. Standard-
Räume)

19
4.3.6 Podeste und Galerien
Wird ein Raum in der Höhe unterteilt, z.B. durch ein
Podest oder eine Galerie, ist unterhalb davon ein
zusätzlicher Rauchwarnmelder erforderlich, wenn:
• sowohl die Fläche unterhalb der Unterteilung
(Podest, Galerie, etc.) größer als 16 m² ist
• als auch Länge und Breite jeweils 2 m
überschreiten.
4.3.7 Räume mit Unterzügen/ Balken
Für Räume mit Balken oder sonstigen Unterzügen
müssen – je nach Maß – folgende Vorgaben
beachtet werden:
Unterzüge/ Balken < 0,2 m:
Sind die Unterzüge/ Balken nicht höher als 0,2 m,
sind diese nicht relevant und als Bestandteil der
Decke zu sehen. Der Rauchwarnmelder kann auf
einem Deckenfeld oder direkt auf dem Unterzug/
Balken installiert werden.
max. 0,2 m
6a
Unterzüge/ Balken > 0,2 m und Fläche je
Deckenfeld > 36 m²:
Sind die Unterzüge/ Balken höher als 0,2 m und die
Fläche der einzelnen Deckenfelder jeweils größer
als 36 m², ist ein Rauchwarnmelder pro Deckenfeld
zu installieren.
> 0,2 m
> 36 m2> 36 m2
6b
Unterzüge/ Balken > 0,2 m und Fläche je
Deckenfeld < 36 m²:
Sind die Unterzüge/ Balken höher als 0,2 m und die
Fläche der einzelnen Deckenfelder jeweils kleiner als
36 m², sind die Unterzüge/ Balken nicht relevant und
als Bestandteil der Decke zu sehen. Der Rauchwarn-
melder kann auf einem Deckenfeld oder direkt auf
dem Unterzug/ Balken installiert werden.
> 0,2 m
< 36 m2< 36 m2
6c
Hinweis
• Beachten Sie, dass der/ die zu installierende/n
Rauchwarnmelder dennoch möglichst
mittig der jeweiligen Fläche (gesamte Decke/
Deckenfeld) montiert wird/werden.
• Weiterhin ist zu beachten, dass für eine Fläche
von max. 60 m² je ein Rauchwarnmelder
nötig ist.
4.4 Montage der Grundplatte
Hinweis
Der Rauchwarnmelder lässt sich durch einen
Arretierungsstift an der Grundplatte verriegeln,
um so ein einfaches Herausdrehen zu verhindern.
Um den Rauchwarnmelder später entsprechend
zu verriegeln, entfernen Sie den Arretierungsstift
mit einem Schraubendreher oder ähnlichem von
der Grundplatte, bevor Sie diese montieren. Legen
Sie den herausgetrennten Stift griffbereit zur Seite.
• Halten Sie die Grundplatte des Rauchwarnmelders an
die Montagestelle – die beiden Befestigungslö-
cher dienen als Schablone zum Anzeichnen der
Bohrlöcher.
Warnung
Vergewissern Sie sich vor der Bohrung und
Montage, dass sich im Bereich der Montagestelle
keine elektrischen Leitungen, Wasser-, Gas- oder
sonstige Leitungen benden.

20
• An einer Holzdecke oder Balken bohren Sie mit
einem 2,5 mm Bohrer ca. 20 mm tief. Verwenden
Sie die beiliegenden Schrauben ohne Dübel.
• Bei Beton oder Mauerwerk benutzen Sie max.
einen 5 mm Bohrer (beiliegende Dübel vorher
ausmessen) und bohren Sie ca. 25-30 mm tief vor,
um die Dübel einsetzen zu können.
• Setzen Sie die Dübel ein (Beton oder Mauerwerk).
• Befestigen Sie die Grundplatte des Rauchwarn-
melders mit den beigelegten Schrauben.
Grundplatte
Arretierungs-
stift
Aussparung für
Arretierungsstift
7
5. Inbetriebnahme
5.1 Aktivierung
Hinweis
Der Rauchwarnmelder muss vor Gebrauch
aktiviert werden.
• Drücken und halten Sie die TEST-Taste für ca.
3-4 Sek, bis die LED aueuchtet.
• Lassen Sie dann unverzüglich die TEST-Taste
los. Der Rauchwarnmelder signalisiert mit einem
kurzen Signalton, dass die Aktivierung erfolgreich
war.
•Überprüfen Sie anschließend die Funktion mit
einem Druck auf die TEST-Taste. Es muss ein
sofortiger Signalton ertönen.
• Ertönt beim Drücken der TEST-Taste kein
Signalton, ist Rauchwarnmelder nicht aktiviert!
Wiederholen Sie die Aktivierung, bis der
Rauchwarnmelder richtig auf den Test reagiert!
Nach erfolgreicher Aktivierung und bei ordnungs-
gemäßer Funktion blinkt die LED ca. alle 40 Sek.
kurz auf.
5.2 Montage des Rauchwarnmelders
• Befestigen Sie den Rauchwarnmelder auf der an
der Montagestelle angebrachten Grundplatte,
indem Sie die Rasthaken in die vorgesehenen
Öffnungen einführen und den Rauchwarnmelder
im Uhrzeigersinn drehen.
• Kontrollieren Sie, ob der Rauchwarnmelder sicher
auf der Grundplatte befestigt ist.
• Stecken Sie nun den Arretierungsstift in die
Aussparung des Rauchwarnmelders und der
Grundplatte, um ein einfaches Herausdrehen zu
verhindern.
• Nach der Installation muss der Rauchwarnmelder
auf Funktion geprüft werden. Drücken Sie dazu
die TEST-Taste. Ein Signalton ertönt.
• Ertönt kein Signalton, wiederholen Sie den
Aktivierungsvorgang wie in 5.1. Aktivierung
beschrieben.
6. Betrieb
6.1 Der Fluchtplan (Empfehlung)
• Besprechen und erstellen Sie gemeinsam mit Ihrer
Familie und/ oder Ihren Mitbewohnern einen
Fluchtplan.
• Planen Sie, wenn möglich, auch alternative
Fluchtrouten ein, da ein Brand Standardrouten
blockieren kann.
• Führen Sie Ihrer Familie und/ oder Mitbewohnern
den Alarm des Rauchwarnmelders vor (siehe 7.2.
Alarmsimulation) und stellen Sie sicher, dass
jeder weiß, was im Alarmfall zu tun ist.
• Stellen Sie sicher, dass auch Ihre Kinder in der
Lage sind, einen Alarmfall zu erkennen und sich
selbst in Sicherheit bringen zu können.
• Bestimmen Sie einen Ort außerhalb Ihres Hauses
als Treffpunkt für den Alarmfall.
• Üben Sie ggf. das Verhalten im Alarmfall in
regelmäßigen Abständen. Die Übung hilft Ihrer
Familie und/ oder Mitbewohnern im Alarmfall das
Haus schnell und geordnet zu verlassen.
Seite wird geladen ...
Seite wird geladen ...
Seite wird geladen ...
Seite wird geladen ...
-
 1
1
-
 2
2
-
 3
3
-
 4
4
-
 5
5
-
 6
6
-
 7
7
-
 8
8
-
 9
9
-
 10
10
-
 11
11
-
 12
12
-
 13
13
-
 14
14
-
 15
15
-
 16
16
-
 17
17
-
 18
18
-
 19
19
-
 20
20
-
 21
21
-
 22
22
-
 23
23
-
 24
24


in anderen Sprachen
- English: Hama GS526 User manual
Verwandte Artikel
Andere Dokumente
-
JUNG RWM200 Bedienungsanleitung
-
-
Hager TG550A 2 Installationsanleitung
-
Abus HSRM20000 Benutzerhandbuch
-
Me RM-410 Bedienungsanleitung
-
Gira 2330 02 Installation and User Manual
-
Smartwares RM520 10.025.28 Smoke Alarm Benutzerhandbuch
-
-
Smartwares RM175RF Benutzerhandbuch
-
Zenner Smoke alarm EASY PROTECT Radio Installation and Operating Instructions