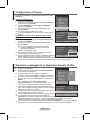
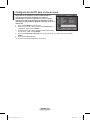
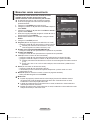
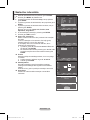
Samsung PS42A411C2 Benutzerhandbuch
- Kategorie
- LCD-Fernseher
- Typ
- Benutzerhandbuch

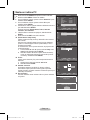
Plasma TV
user manual
BN68-01744A-01
imagine the possibilities
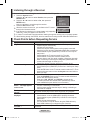
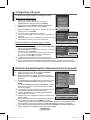
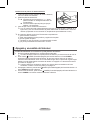
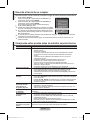
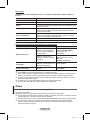
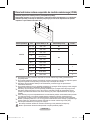
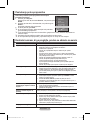
Contact SAMSUNG WORLD-WIDE
If you have any questions or comments relating to Samsung products, please contact the SAMSUNG
customer care centre.
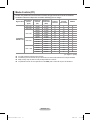
Country
Customer Care Centre
Web Site
AUSTRIA 0800-SAMSUNG(726-7864) www.samsung.com/at
BELGIUM 0032 (0)2 201 24 18 www.samsung.com/be
CZECH REPUBLIC
844 000 844 www.samsung.com/cz
Distributor pro Českou republiku:
Samsung Zrt., česka organizační složka Vyskočilova 4, 14000 Praha 4
DENMARK 70 70 19 70 www.samsung.com/dk
EIRE 0818 717 100 www.samsung.com/ie
ESTONIA 800-7267 www.samsung.ee
FINLAND 030-6227 515 www.samsung.com/fi
FRANCE
"3260 SAMSUNG (€ 0,15/Min)
08 25 08 65 65 (€ 0,15/Min)"
www.samsung.com
GERMANY 01805 - SAMSUNG(726-7864 € 0,14/Min) www.samsung.com
HUNGARY 06-80-SAMSUNG(726-7864) www.samsung.com
ITALIA 800-SAMSUNG(726-7864) www.samsung.com
KAZAKHSTAN 8-10-800-500-55-500 www.samsung.kz
KYRGYZSTAN 00-800-500-55-500 -
LATVIA 800-7267 www.samsung.com/lv
LITHUANIA 8-800-77777 www.samsung.lt
LUXEMBURG 0035 (0)2 261 03 710 www.samsung.com/be
NETHERLANDS 0900-SAMSUNG (726-7864 € 0,10/Min) www.samsung.com/nl
NORWAY 815-56 480 www.samsung.com/no
POLAND
"0 801 801 881
022-607-93-33"
www.samsung.com/pl
PORTUGAL 80820-SAMSUNG(726-7864) www.samsung.com/pt
RUSSIA 8-800-555-55-55 www.samsung.ru
SLOVAKIA 0800-SAMSUNG(726-7864) www.samsung.com/sk
SPAIN 902 10 11 30 www.samsung.com
SWEDEN 0771-400 200 www.samsung.com/se
Switzerland 0800-SAMSUNG(726-7864) www.samsung.com/ch
TURKEY 444 77 11 www.samsung.com
TADJIKISTAN 8-10-800-500-55-500 -
U.K 0845 SAMSUNG (7267864) www.samsung.com
UKRAINE 8-800-502-0000 www.samsung.com
UZBEKISTAN 8-10-800-500-55-500 www.samsung.uz
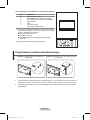
Thank you for purchasing this Samsung product.
To receive more complete service, please
register your product at
www.samsung.com/global/register
Model Serial No.
BN68-01744A.indb 1 2008-08-13 오후 4:15:17
Seite wird geladen ...
Seite wird geladen ...

English - 4
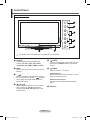
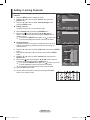
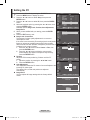
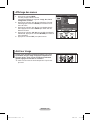
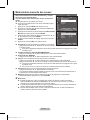
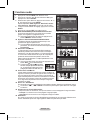
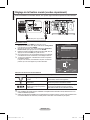
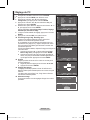
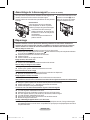
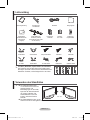
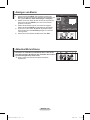
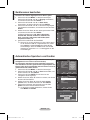
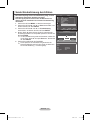
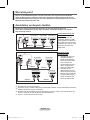
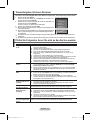
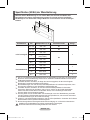
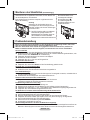
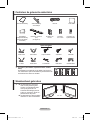
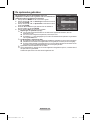
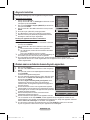
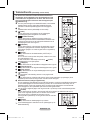
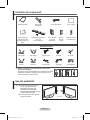
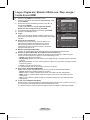
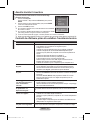
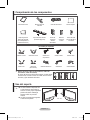
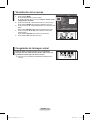
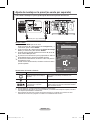
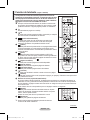
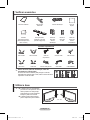
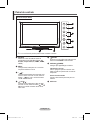
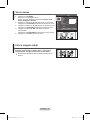
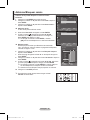
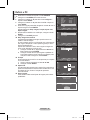
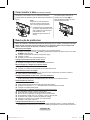
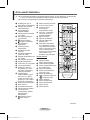
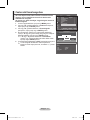
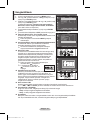
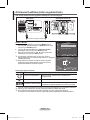
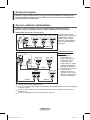
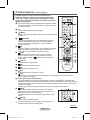
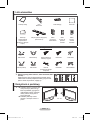
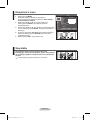
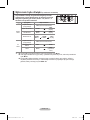
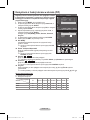
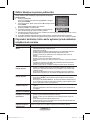
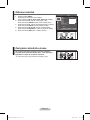
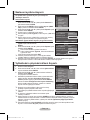
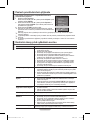
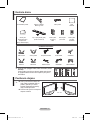
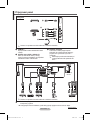
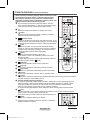
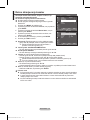
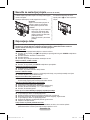
Checking Parts
Owner’s Instructions Remote Control/
AAA Batteries
Power Cord Cloth-Clean
Warranty Card/
Safety Guide Manual
(Not available in all locations)
Cover-Bottom / Screws (2ea)
(Refer to page 46)
Ferrite Core for
Power Cord
Ferrite Core
for S-Video
Ferrite Core for
Headphones Cable
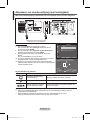
Sold Separately
S-Video Cable Antenna Cable Component Cables Audio Cables Video Cable
PC Cable Scart Cable PC Audio Cable HDMI Cable HDMI/DVI Cable
➢
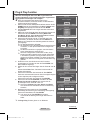
Ferrite Core (Power Cord, Headphones Cable, S-Video Cable)
The ferrite core is used to shield the cable from interference.
When connecting a cable, open the ferrite core and clip it
around the cable.
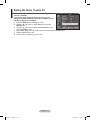
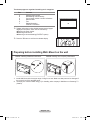
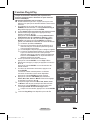
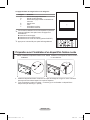
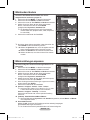
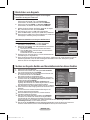
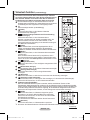
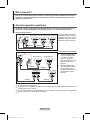
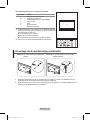
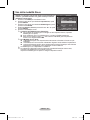
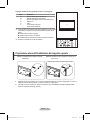
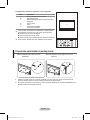
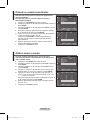
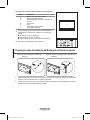
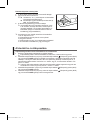
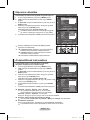
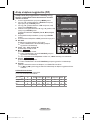
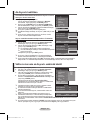
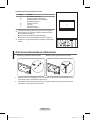
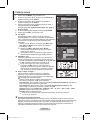
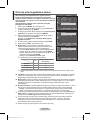
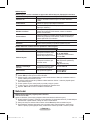
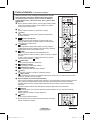
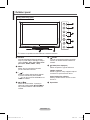
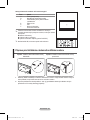
Using the Stand-Base
➢
Two or more people should carry
the PDP. Never lay the PDP on the
floor because of possible damage
to the screen. Always keep the
PDP upright.
The PDP can rotate 20 degrees in
right and left directions.
-20° ~ 20°
BN68-01744A.indb 4 2008-08-13 오후 4:15:19
Seite wird geladen ...
Seite wird geladen ...
Seite wird geladen ...
Seite wird geladen ...
Seite wird geladen ...
Seite wird geladen ...

English - 11
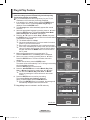
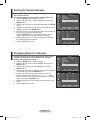
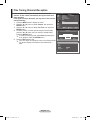
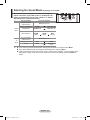
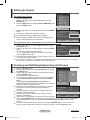
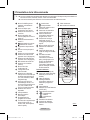
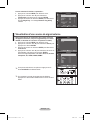
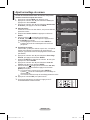
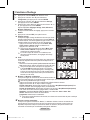
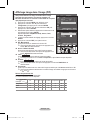
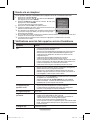
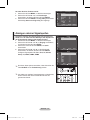
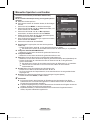
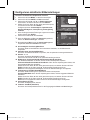
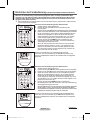
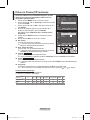
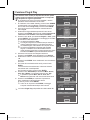
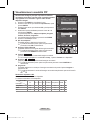
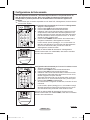
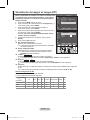
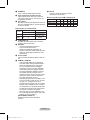
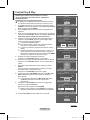
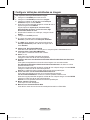
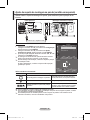
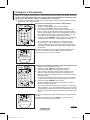
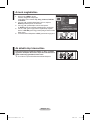
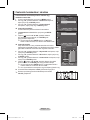
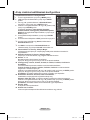
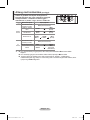
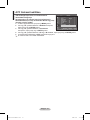
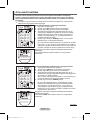
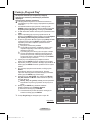
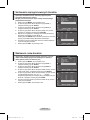
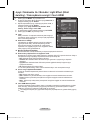
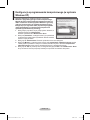
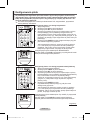
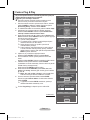
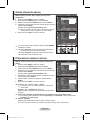
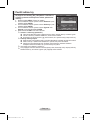
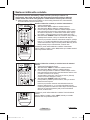
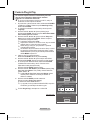
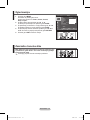
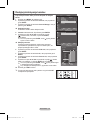
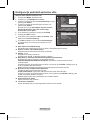
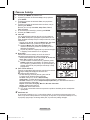
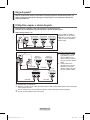
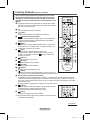
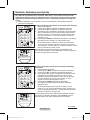
Plug & Play Feature
When the television is initially powered on, several basic
customer settings proceed automatically and subsequently.
The following settings are available.
☛
If you accidentally select the wrong country for your TV, the
characters on the screen may be wrongly displayed.
1 If the television is in standby mode, press the POWER button
on the remote control. The message Start Plug & Play is
displayed. Press the ENTER button.
2 The Language menu will automatically appear after several
seconds.
3 Select the appropriate language by pressing the ▲ or ▼ button.
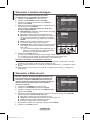
Press the ENTER button. The message Select Home Mode
when installing this TV at home. is displayed.
4 Press the ◄ or ► button to select Shop or Home, then press
the ENTER button. The message to check the connected status
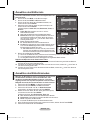
of the antenna is displayed.
➢
The default selection is Home.
➢
We recommend setting the TV to Home mode for the best
picture in your home environment.
➢
Shop mode is only intended for use in retail environments.
➢
If the unit is accidentally set to Shop mode, and you want to
return to Dynamic (Home) mode, press the Volume button
and then hold down the MENU button for five seconds on
the TV panel.
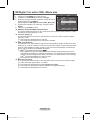
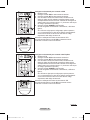
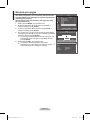
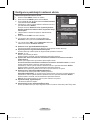
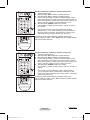
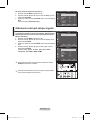
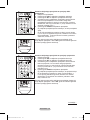
5 Make sure that the antenna is connected to the TV.
Press the ENTER button. The Country menu is displayed.
6 Select your country or area by pressing the ▲ or ▼ button.
Press the ENTER button. The menu to select channels is
displayed.
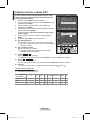
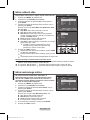
7 To start channel store, press the ENTER button.
The search will end automatically. The TV will begin memorizing
all of the available channels.
Press the ENTER button to set the clock.
8 Press the ◄/►/ENTER button to select Month, Day, Year,
Hour, or Minute. Set these by pressing the ▲ or ▼ button.
➢
You can set the Month, Day, Year, Hour, or Minute
directly by pressing the numeric buttons on the remote
control.
9 Press the ENTER button to confirm your setting.
The message Enjoy your viewing is displayed.
When you have finished, press the ENTER button.
➢
Even if the ENTER button is not pressed, the message will
automatically disappear after several seconds.
➢
Plug & Play feature is available in the TV mode only.
Continued...
Plug & Play
Start Plug & Play.
OK
Enter
Return
Plug & Play
Language
Move
Enter
Skip
English
Deutsch
Français
Italiano
▼
Plug & Play
Select Home Mode
when installing this TV at home.
Move
Enter
Skip
Shop Home
Plug & Play
Country
Move
Enter
Skip
Belgium
France
Germany
Italy
▼
Plug & Play
Auto Store
P 1 C -- 40 MHz
0 %
Enter
Skip
Start
Plug & Play
Check antenna input.
Enter
Skip
OK
OK
Enjoy your viewing
Plug & Play
Adjust
Move
Enter
01 01
2007
12
00
Clock Set
Month Day Year Hour
Minute
BN68-01744A.indb 11 2008-08-13 오후 4:15:24

English - 12
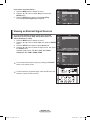
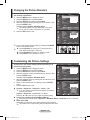
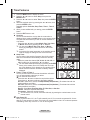
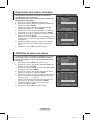
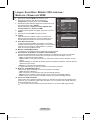
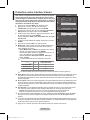
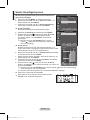
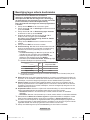
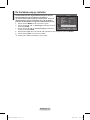
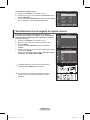
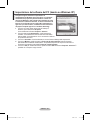
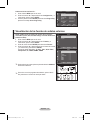
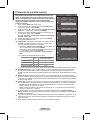
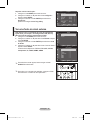
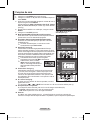
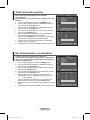
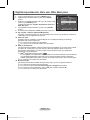
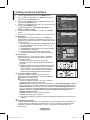
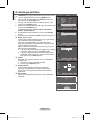
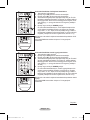
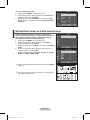
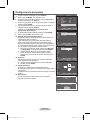
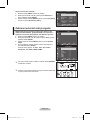
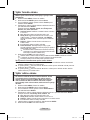
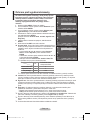
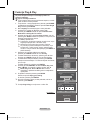
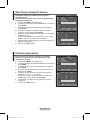
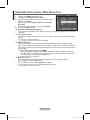
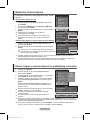
Viewing an External Signal Sources
You can switch between viewing signals from connected
equipment, such as a VCR, DVD, Set-Top Box, and the TV
source (broadcast or cable).
1 Press the MENU button to display the menu.
2 Press the ▲ or ▼ button to select Input, then press the ENTER
button.
3 Press the ENTER button again to select Source List.
4 Press the ▲ or ▼ button to select the signal source, then press
the ENTER button.
Available signal sources:
TV, Ext.1, Ext.2, AV, S-Video,
Component, PC, HDMI1, HDMI2, HDMI3
➢
You can select these options simply by pressing the SOURCE
button on the remote control.
➢
To watch television programme again, press the TV button and
select the channel number required.
If you want to reset this feature …
1
Press the MENU button to display the menu.
2 Press the ▲ or ▼ button to select Setup, then press the
ENTER button.
3 Press the ENTER button again to select Plug & Play.
The message Start Plug & Play is displayed.
Move
Enter
Return
Source List :
TV
Edit Name
Anynet+
Input
T V
Move
Enter
Return
TV
Ext.1 :
−−−−
Ext.2 : −−−−
AV :
−−−−
S-Video : −−−−
Component : −−−−
PC :
−−−−
HDMI1 : −−−−
HDMI2 :
−−−−
HDMI3 : −−−−
Source List
T V
Move
Enter
Return
Plug & Play
Language : English
Time
Game Mode : Off
Blue Screen : Off
Melody : Off
PC
Home Theatre PC : Off
Light Effect : Off
More
Setup
T V
BN68-01744A.indb 12 2008-08-13 오후 4:15:25

English - 13
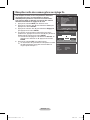
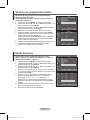
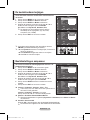
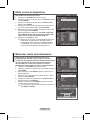
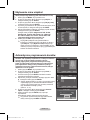
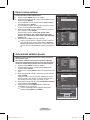
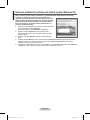
Editing Device Names
You can give a name to the external source.
1 Press the MENU button to display the menu.
2 Press the ▲ or ▼ button to select Input, then press the ENTER
button.
3 Press the ▲ or ▼ button to select Edit Name, then press the
ENTER button.
4 Press the ▲ or ▼ button to select the external source to be
edited, then press the ENTER button.
5 Select the required device by pressing ▲ or ▼, then press the
ENTER button.
Available device names:
VCR, DVD, D-VHS, Cable STB, HD
STB, Satellite STB, AV Receiver, DVD Receiver, Game,
Camcorder, DVD Combo, DHR (DVD HDD Recorder), PC.
6 Press the EXIT button to exit.
➢
When a PC with a resolution of 640 x 480@60Hz is
connected to the HDMI IN 1 port, you should set the HDMI1
mode to PC in the Source List of Input mode. If the HDMI1
mode is not PC, it may work depending on the TV setting.
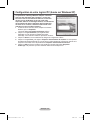
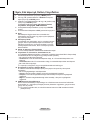
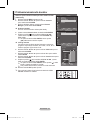
Storing Channels Automatically
You can scan for the frequency ranges available to you
(availability depends on your country).
Automatically allocated programme numbers may not
correspond to actual or desired programme numbers. However
you can sort numbers manually and clear any channels you do
not wish to watch.
1 Press the MENU button to display the menu.
2 Press the ▲ or ▼ button to select Channel, then press the
ENTER button.
3 Press the ENTER button again. The available countries are
listed.
4 Select your country by pressing the ▲ or ▼ button, then press
the ENTER button.
5 Press the ▲ or ▼ button to select Auto Store, then press the
ENTER button.
6 Press the ENTER button again to start the search.
The search will end automatically.
➢
To stop the search before it has finished, press the MENU
or the ENTER button.
Move
Enter
Return
Source List :
TV
Edit Name
Anynet+
Input
T V
Move
Enter
Return
Country :
Belgium
Auto Store
Manual Store
Channel Manager
Sort
Name
Fine Tune
Channel
T V
Move
Enter
Return
Ext.1 :
−−−−
Ext.2 : −−−−
AV : −−−−
S-Video : −−−−
Component : −−−−
PC : −−−−
HDMI1 : −−−−
HDMI2 : −−−−
HDMI3 : −−−−
Edit Name
T V
−−−−
VCR
DVD
D-VHS
Cable STB
HD STB
Satellite STB
▼
Auto Store
P 1 C -- 40 MHz
0 %
Enter
Return
Start
Move
Enter
Return
Country : Belgium
Auto Store
Manual Store
Channel Manager
Sort
Name
Fine Tune
Channel
T V
Belgium
France
Germany
Italy
Netherlands
Spain
▼
BN68-01744A.indb 13 2008-08-13 오후 4:15:25
Seite wird geladen ...

English - 15
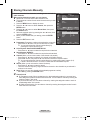
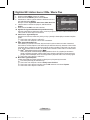
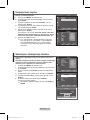
Adding / Locking Channels
Using the Channel Manager, you can conveniently lock or add
channels.
1 Press the MENU button to display the menu.
2 Press the ▲ or ▼ button to select Channel, then press the
ENTER button.
3 Press the ▲ or ▼ button to select Channel Manager, then
press the ENTER button.
Adding channels
Using the Channel List, you can add channels.
4 Select Channel List by pressing the ENTER button.
5 Move to the ( ) field by pressing the ▲/▼/◄/► buttons,
select a channel to be added, and press the ENTER button to
add the channel.
➢
If you press the ENTER button again, the ( ) symbol next
to the channel disappears and the channel is not added.
Locking channels
This feature allows you to prevent unauthorized users, such as
children, from watching unsuitable programmes by muting out
video and audio.
6 Press the ▲ or ▼ button to select Child Lock, then press the ENTER
button.
7 Select On by pressing the ▲ or ▼ button, then press the ENTER
button.
8 Press the ▲ or ▼ button to select Channel List, then press the
ENTER button.
9 Move to the ( ) field by pressing the ▲/▼/◄/► buttons, select a
channel to be locked, and press the ENTER button.
➢
If you press the ENTER button again, the ( ) symbol next to the
channel disappears and the channel lock is canceled.
➢
A blue screen is displayed when Child Lock is activated.
10 Press the EXIT button to exit.
➢
You can select these options simply by pressing the CH LIST
button on the remote control.
Move
Enter
Return
Country :
Belgium
Auto Store
Manual Store
Channel Manager
Sort
Name
Fine Tune
Channel
T V
Move
Enter
Return
Channel List
Child Lock :
Off
Channel Manager
T V
Channel List
P 1 C 4
1 / 10
▲
▼
Prog.
0
C
-
-
1 C 4
2 C 24
3 C 2
4 C 5
5 C 80
6 C 7
7 C 36
8 C 52
9 C 11
Add Lock
Move Enter
Page
Return
BN68-01744A.indb 15 2008-08-13 오후 4:15:27

English - 16
Sorting the Stored Channels
This operation allows you to change the programme numbers
of the stored channels.
This operation may be necessary after using the auto store.
1 Press the MENU button to display the menu.
2 Press the ▲ or ▼ button to select Channel, then press the
ENTER button.
3 Press the ▲ or ▼ button to select Sort, then press the ENTER
button.
4 Select the channel that you wish to move by pressing the ▲ or
▼ button, then press the ENTER button.
5 Select the number of the programme to which the channel is to
be moved by pressing the ▲ or ▼ button.
Press the ENTER button. The channel is moved to its new
position and all other channels are shifted accordingly.
6 Repeat steps 4 to 5 until you have moved all the channels to
the required programme numbers.
7 Press the EXIT button to exit.
Assigning Names to Channels
Channel names will be assigned automatically when channel
information is broadcast. These names can be changed,
allowing you to assign new names.
1 Press the MENU button to display the menu.
2 Press the ▲ or ▼ button to select Channel, then press the
ENTER button.
3 Press the ▲ or ▼ button to select Name, then press the
ENTER button.
4 Press the ▲ or ▼ button to select the channel to be assigned to
a new name, then press the ENTER button.
5 Press the ▲ or ▼ button to select a letter, a number, or a
symbol (Results in this sequence: A~Z, 0~9, +, -, *, /, blank).
Move on to the previous or next letter by pressing the ◄ or ►
button, then press the ENTER button.
6 Repeat steps 4 to 5 for each channel to be assigned to a new
name.
7 Press the EXIT button to exit.
Move
Enter
Return
Country :
Belgium
Auto Store
Manual Store
Channel Manager
Sort
Name
Fine Tune
Channel
T V
Move
Enter
Return
Prog. Ch. Name
0 C−−
1 C76
2 C5
3 C6
4 C7
Sort
T V
Move
Enter
Return
Prog. Ch. Name
0 C−− −−−−−
1 C76 −−−−−
2 C5 −−−−−
3 C6 −−−−−
4 C7 −−−−−
Name
T V
Move
Enter
Return
Country :
Belgium
Auto Store
Manual Store
Channel Manager
Sort
Name
Fine Tune
Channel
T V
BN68-01744A.indb 16 2008-08-13 오후 4:15:27

English - 17
Fine Tuning Channel Reception
If the reception is clear, you do not have to fine tune the
channel, as this is done automatically during the search and
store operation.
If the signal is weak or distorted, you may have to fine tune the
channel manually.
1 Press the MENU button to display the menu.
2 Press the ▲ or ▼ button to select Channel, then press the
ENTER button.
3 Press the ▲ or ▼ button to select Fine Tune, then press the
ENTER button.
4 To obtain a sharp, and clear picture and good sound quality,
press the ◄ or ► button until you reach the optimal setting.
Press the ENTER button.
➢
To reset the fine tuning to 0, select Reset by pressing the
▲ or ▼ button. Press the ENTER button.
5 Press the EXIT button to exit.
➢
Fine Tune Store will change the colour of the Channel OSD
(On Screen Display) from White to Red and add the “*”
mark.
Fine Tune
P 1
+3
Adjust
Save
Return
Reset
P 1 *
Mono
Picture : Dynamic
Sound : Custom
SRS TS XT : Off
−−
:
−−
Move
Enter
Return
Country :
Belgium
Auto Store
Manual Store
Channel Manager
Sort
Name
Fine Tune
Channel
T V
BN68-01744A.indb 17 2008-08-13 오후 4:15:27
Seite wird geladen ...
Seite wird geladen ...
Seite wird geladen ...
Seite wird geladen ...
Seite wird geladen ...

English - 23
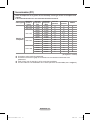
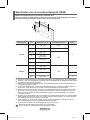
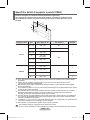
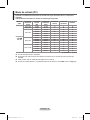
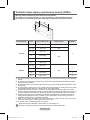
Selecting the Sound Mode (depending on the model)
The DUAL I-II button displays/controls the processing and
output of the audio signal. When power is switched on, the
mode is automatically preset to either “DUAL-I” or “Stereo”,
depending on the current transmission.
Type of broadcast On-screen indication
NICAM
Stereo
Regular broadcast
(Standard audio)
Mono (Normal use)
Regular + NICAM Mono NICAM Mono (Normal)
NICAM Stereo NICAM stereo Mono (Normal)
NICAM DUAL-I/II
NICAM
dual-1
NICAM
dual-2
Mono
(Normal)
A2
Stereo
Regular broadcast
(Standard audio)
Mono (Normal use)
Bilingual or DUAL-I/II Dual I Dual II
Stereo Stereo
Mono (Forced
mono)
➢
If the receiving conditions deteriorate, listening will be easier if the mode is set to Mono.
If the stereo signal is weak and automatic switching occurs, switch to Mono.
When receiving a mono sound in the AV mode, connect to the “AUDIO-L” input connector on the
panel (front or side). If the mono sound comes out only from left speaker, press the DUAL I-II
button.
BN68-01744A.indb 23 2008-08-13 오후 4:15:30
Seite wird geladen ...
Seite wird geladen ...
Seite wird geladen ...
Seite wird geladen ...
Seite wird geladen ...
Seite wird geladen ...
Seite wird geladen ...

English - 31
Input Mode (PC)
Both screen position and size will vary depending on the type of PC monitor and its resolution.
The table below shows all of the display modes that are supported:
Video
Signal
Resolution
(Dot X Line)
Vertical
frequency
(Hz)
Horizontal
frequency
(kHz)
Vertical
polarity
Horizontal
polarity
PS42A411
IBM PC / AT
Compatible
640 x 350 70.086 31.469 N P
✔
720 x 400 70.087 31.469 P N
✔
640 x 480
59.940 31.469 N N
✔
70.000 35.000 N/P N/P
✔
72.809 37.861 N N
✔
75.000 37.500 N N
✔
800 x 600
60.317 37.879 P P
✔
70.000 43.750 N/P N/P
✔
72.188 48.077 P P
✔
75.000 46.875 P P
✔
1024 x 768
60.004 48.363 N N
✔
70.069 56.476 N N
✔
72.000 57.672 N/P N/P
✔
75.029 60.023 P P
✔
(N: Negative / P: Positive)
The interlace mode is not supported.
The television might operate abnormally if a non-standard video format is selected.
480i/p, 576i/p, 720p, or 1080i is not available in PC mode.
For the PS42A411, PC text quality is optimum in XGA mode (1024 x 768@60Hz).
BN68-01744A.indb 31 2008-08-13 오후 4:15:34
Seite wird geladen ...

English - 33
Setting the Home Theatre PC
You can view higher quality pictures by configuring the screen
settings in PC Mode.
If you set the Home Theatre PC function to On, you can
configure the Detailed Settings (when Picture Mode is set to
Standard or Movie) as in PC Mode.
1 Press the MENU button to display the menu.
2 Press the ▲ or ▼ button to select Setup, then press the
ENTER button.
3 Press the ▲ or ▼ button to select Home Theatre PC, then
press the ENTER button.
4 Select Off or On by pressing the ▲ or ▼ button, then press the ENTER button.
5 Press the EXIT button to exit.
➢
This function is available only in PC mode.
Move
Enter
Return
Plug & Play
Language : English
Time
Game Mode : Off
Blue Screen : Off
Melody : Off
PC
Home Theatre PC : Off
Light Effect : Off
More
Setup
T V
BN68-01744A.indb 33 2008-08-13 오후 4:15:35

English - 34
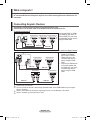
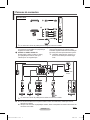
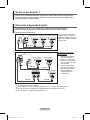
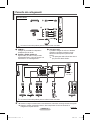
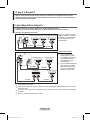
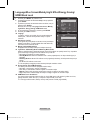
What is Anynet+?
Anynet+ is an AV network system that enables an easy-to-use AV interface for users by controlling
all connected AV devices through the Anynet+ menu when Samsung Electronics AV devices are
connected.
Connecting Anynet+ Devices
The Anynet+ system supports AV devices supporting Anynet+ only.
Check if there is an Anynet+ mark on the AV device to be connected to the TV.
To directly connect to TV
Connect the [HDMI 1], [HDMI
2] or [HDMI 3] jack on the TV
and the HDMI OUT jack of the
corresponding Anynet+ device
using the HDMI cable.
To connect to Home Theater
1 Connect the [HDMI 1],
[HDMI 2] or [HDMI 3]
jack on the TV and the
HDMI OUT jack of the
corresponding Anynet+
device using the HDMI
cable.
2 Connect the HDMI IN jack
of the home theater and
the HDMI OUT jack of the
corresponding Anynet+
device using the HDMI
cable.
➢
Connect only one receiver.
➢
You can connect an Anynet+ device using the HDMI cable. Some HDMI cables may not support
Anynet+ functions.
➢
Anynet+ works when the AV device supporting Anynet+ is in the Standby or On status.
➢
Anynet+ supports up to 8 AV devices in total.
Anynet+ Device 1 Anynet+ Device 2 Anynet+ Device 3
TV
HDMI Cable
HDMI Cable
HDMI Cable
TV
Anynet+ Device 1 Anynet+ Device 2
Anynet+ Device 3
HDMI Cable
HDMI Cable
HDMI Cable
HDMI Cable
Home Theater
BN68-01744A.indb 34 2008-08-13 오후 4:15:35
Seite wird geladen ...
Seite wird geladen ...
Seite wird geladen ...
Seite wird geladen ...
Seite wird geladen ...

English - 40
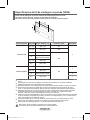
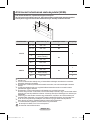
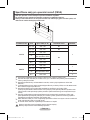
Wall Mount Kit Specifications (VESA)
Install your wall mount on a solid wall perpendicular to the floor.
When attaching to other building materials, please contact your nearest dealer.
If installed on a ceiling or slanted wall, it may fall and result in severe personal injury.
Product Family inch VESA Spec. (A
*
B) Standard Screw Quantity
LCD-TV
23 ~ 26 200
*
100 M4
4
32 ~ 40 200
*
200 M6
46 ~ 52 600
*
400
M8
57
700
*
400
(No VESA)
57 ~ 70 800 * 400
80 ~ 1400 * 800
PDP-TV
42 ~ 50 600
*
400
M8
4
55 ~ 70 800 * 400
63 No VESA 6
80 ~ 1400 * 800 4
➢
We provided the standard dimensions for wall mount kits as shown in the table above.
➢
When purchasing our wall mount kit, a detailed installation manual and all parts necessary for
assembly are provided.
➢
Do not use screws longer than the standard dimension, as they may cause damage to the inside of
the TV set.
➢
For wall mounts that do not comply with the VESA standard screw specifications, the length of the
screws may differ depending on their specifications.
➢
Do not use screws that do not comply with the VESA standard screw specifications.
Do not use fasten the screws too strongly, this may damage the product or cause the product to fall,
leading to personal injury. Samsung is not liable for these kinds of accidents.
➢
Samsung is not liable for product damage or personal injury when a non-VESA or non-specified wall
mount is used or the consumer fails to follow the product installation instructions.
➢
Our 57” and 63” models do not comply with VESA Specifications. Therefore, you should use our
dedicated wall mount kit for this model.
➢
Do not exceed 15 degrees tilt when mounting this TV.
Do not install your Wall Mount Kit while your TV is turned on.
It may result in personal injury due to electric shock.
BN68-01744A.indb 40 2008-08-13 오후 4:15:38
Seite wird geladen ...
Seite wird geladen ...

English - 43
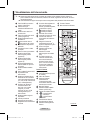
Remote Control Codes
Brand
SAMSUNG
ADMIRAL
AIWA
AKAI
AUDIO DYNAMICS
BELL&HOWELL
BROKSONIC
CANDLE
CANON
CITIZEN
COLORTYME
CRAIG
CURTIS MATHES
DAEWOO
DB
DIMENSIA
DYNATECH
ELECTROHOME
EMERSON
FISHER
FUNAI
GENERAL ELECTRIC
GO VIDEO
LG(Goldstar)
HARMAN KARDON
HITACHI
INSTANT REPLAY
JC PENNEY
JCL
KENWOOD
KLH
LIOYD
LOGIK
LXI
JVC
MAGNAVOX
MARANTZ
MARTA
KONIA
ORION
MEI
MEMOREX
MGA
MIDLAND
MINOLTA
Code
000 001 002 003 004 005 077 078 079
020
025
004 027 032
007 026
018
022
002 003 006 008 015 055
021 056
002 003 006 008 015 055
007
002 024
002 007 008 017 021 025 056 064 066
003 010 011 012 013 014 015 016
007 026
017
025
034
001 003 006 021 022 025 030 032 034
040 047 050 052 060 063 065 066 067
069 073
018 024 028 029 048 051 061
025
002 005 017 021 056
002
006 007 008 009 010
007
019 025 041 042 074
021
002 007 018 019 021 026 037 041
054 056
007 008 018 021 026 037
007 008 018 026 037
070
025
038
025
081 082 083
021 056 059
007 008 018 021 026 037 062
006
036
073 074 075 076
021
006 021 024 025
034
005
019 041 075
Brand
MITSUBISHI
MONTGOMERY WARD
MTC
MULTITECH
NEC
OPTIMUS
PANASONIC
PENTAX
PENTEX RESEARCH+
PHILCO
PHILIPS
PIONEER
PORTLAND
PROSCAN
QUARTZ
QUASAR
RADIO SHACK/
REALISTIC
RCA
SANSUI
SANYO
SCOTT
SEARS
SHARP
SHIMTOM
SIGNATURE
SONY
SYLVANIA
SYMPHONIC
TANDY
TASHIKA
TATUNG
TEAC
TECHNICS
TEKNIKA
TMK
TOSHIBA
TOTEVISION
UNITECH
VECTOR RESEARCH
VICTOR
VIDEO CONCEPTS
VIDEOSONIC
WARDS
YAMAHA
ZENITH
Code
019 034 041 046
020
002 025
002 005 025 038
007 008 018 026 037 062 064
020
021 056 071 072
019 041 075
008
021 056 059
021 080
019 026 039 053
015 049 055
017
018
021 056
006 018 020 021 024 025 029 034
048 056
002 017 019 021 035 041 043 057
068 076
026
018 024
003 047 052 067
006 018 019 024 028 029 041 048 051
020 034 045 015
027 033 038 058
025
027 033 044
021 025 056 059
025
018 025
006
037
025 037 068
021
006 021 025 031
066
003 019 029 051 052
002 006
002
007 026
026
007 026
002
002 003 006 019 020 021 024 025 034
038 041
007 008 018 026 037
023 027 033
VCR
Continued...
BN68-01744A.indb 43 2008-08-13 오후 4:15:40

English - 44
Brand
SAMSUNG
GI
HAMLIN
HITACHI
JERROLD
MACOM
MAGNAVOX
OAK
PANASONIC
PHILIPS
PIONEER
RCA
REGAL
Code
000 001 002 003 004 005 006 007
041
003 024 031
025 030
038 039
025 030
019 023 028
026
003 022 027 037 044
019 021 023 028
004 018 020 044
014 022 040
003
Brand
REGENCY
SA
SCIENTIFIC ATLAN
SPRUCER
STARGATE 2000
SYLVANIA
TEXSCAN
TOCOM
UNIVERSAL
VIEWSTAR
WARNER AMEX
ZENITH
Code
015 023
042 043
042 043
022
036
016
016
032
033 034
019 021 023 028
046
017 029 035 037 045
CABLE BOX
SAMSUNG SET-TOP BOX
Brand
ALPHASTAR
ANAM
CHANNEL MASTER
CROSSDIGITAL
CHAPARRAL
DIRECT TV
DAEWOO
DISH NETWORK SYSTEM
DISHPRO
DRAKE
DX ANTENNA
ECHOSTAR
EXPRESSVU
GOI
GE
GENERAL INSTRUMENT
HTS
HOME CABLE
HITACHI
HUGHES NETWORK
IQ
IQ PRISM
JANEIL
JERROID
JVC
Code
023
043
018 034
019
035
015 016 017 019 022 045 060
061 062 065 066 067 068
074
069 070
069
018 024 032
027
025 069 070 071
069
069
065
046 047 048 063 064
069
056
022
015 017
020
020
059
063
069 070
Brand
LG(Goldstar)
MAGNAVOX
MEMOREX
MOTOROLA
MACOM
MITSUBISHI
NEXT LEVEL
PHILIPS
PRIMESTAR
PANASONIC
PAYSAT
PROSCAN
RCA
RADIOSHACK
REALISTIC
STS
STAR TRAK
SKY
SKY LIFE
SHACK
STAR CHOICE
SONY
TOSHIBA
ULTIMATE TV
UNIDEN
ZENITH
Code
044 073
016 021 036 038 039 040 041 042
016
064
018
015
047 048 064
015 016 017 021 033 036 038 039
040 041 042 067
046 049 050 063
058 059 061 062
016
065 066
051 052 053 065 066
064
057
020 027
026
031
005 006 007
064
064
054 060
015 017 028 029 030 072
060 066
016 021 037 055 056 057
024 031 068
SET-TOP BOX
Continued...
Product
Ground wave STB
CABLE STB
Satellite STB
Code
000 001 002 008 013
000 004 008 013
000 003 008 013
BN68-01744A.indb 44 2008-08-13 오후 4:15:40

English - 45
Product
DVD
DVDR
BD Record
VCR COMBO
VCR Record
DHR COMBO
Code
000 001 002
003 004
005 006
007 008 009 010 011
012
013
Product
Home Theater VCR COMBO
HDD Record COMBO
TWIN TRAY COMBO
STB DVD COMBO
DVD Receiver
AV Receiver
Code
014 015 016
017
018
019
020
021
SAMSUNG DVD
Brand
ANAM
AUDIOVOX
AUDIOLOGIC
ANABA
APEX DIGITAL
AIWA
BROKSONIC
BLAUPUNKT
B&K
CURTIS MATHES
CYBER HOME
CLARION
CIRRUS
CINEVISION
DAEWOO
DENON
FARENHEIT
FISHER
GPX
GO VIDEO
GE
GREENHILL
HITACHI
HITEKER
HOYO
HARMAN / KARDON
IRT
INTEGRA
JBL
JVC
JATON
KENWOOD
KISS
KONKA
KLH
LG(Goldstar)
LOEWE
LASONIC
MOBILE AUTHORITY
MEMOREX
MALATA
MAGNAVOX
MINTEK
MONYKA
Code
030
075
085
072
070 071 074 086 083 084 088
111 112
114
062
074
122 123
027
065 077 078 079 082
080 125
081
095
066
146
067 068
090
060
061 089 133 135
069 074
074
064 113
071
073
091 110
089
092
091
022 033 115 116
073
051 108 109
073
059 100 106 107
074 075
025 031
057
058
054
055
056
076 093
074 094
073
Brand
NORCENT
NEXT BASE
NEC
NANTAUS
NESA
OPTOMEDIA ELECTRONICS
OPTIVIEW
ONKYO
PHILCO
PRINCETON
PROSCAN
PANASONIC
PHILIPS
ROTEL
RIO
RCA
RAITE
ROWA
SAMPO
SONY
SHERWOOD
SVA
SYLVANIA
SHARP
SANSUI
SANYO
SHINSONIC
SANYO
THOMSON
TOSHIBA
TECHNICS
TVIEW
TOKAI
TEAC
TECHWOOD
TREDEX
URBAN CONCEPTS
VENTURER
VOCOPRO
YAMAHA
YAMAKAWA
XWAVE
ZENITH
Code
048 049 050
052
053
144
074
105
072
076 092 119
044 045
046 047
023
024 034 124 134 136 137 138
036 076
117 118
120
023 035 074 075 131 132
073
038
104
026 029 126 127 128 129
130 141
039 041
042
043 093
140
062
062
094
090
145
028 062 076
139
072
073
096
097
098 099 101
076
075
102
032 063
040 073
103
076 121
DVD
BN68-01744A.indb 45 2008-08-13 오후 4:15:41
Seite wird geladen ...

English - 47
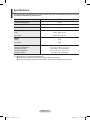
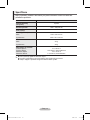
Specifications
The descriptions and characteristics in this booklet are given for information purposes only and
are subject to modification without notice.
Model Name PS42A411
Screen Size (Diagonal) 42 inch
PC Resolution 1024 x 768 @ 60 Hz
Sound (Output) 10 W x 2
Dimension (WxHxD)
Body
With stand
1055 x 700 x 95 mm
1055 x 759 x 316 mm
Weight
Body
With stand
31 kg
34 kg
Environmental Considerations
Operating Temperature
Operating Humidity
Storage Temperature
Storage Humidity
10 °C to 40 °C (50 °F to 104 °F)
10% to 80%, non-condensing
-20 °C to 45 °C (-4 °F to 113 °F)
5% to 95%, non-condensing
➢
This device is a Class B digital apparatus.
Design and specifications are subject to change without prior notice.
For the power supply and Power Consumption, refer to the label attached to the product.
BN68-01744A.indb 47 2008-08-13 오후 4:15:43

This page is intentionally
left blank.
BN68-01744A.indb 48 2008-08-13 오후 4:15:43
Seite wird geladen ...
Seite wird geladen ...
Seite wird geladen ...
Seite wird geladen ...

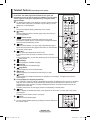
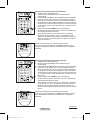
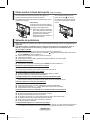
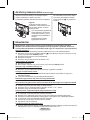
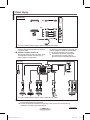
Français - 5
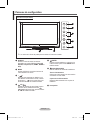
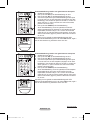
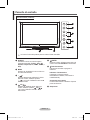
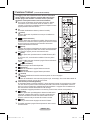
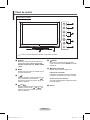
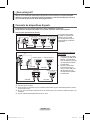
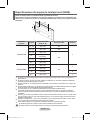
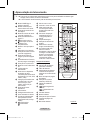
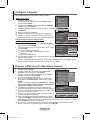
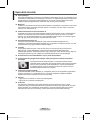
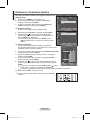
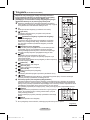
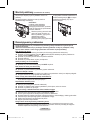
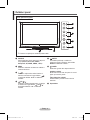
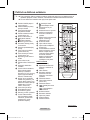
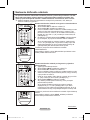
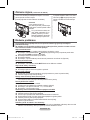
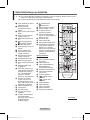
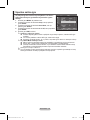
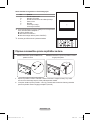
Panneau de configuration
➢
La couleur et la forme du produit peuvent varier en fonction du modèle.
1
SOURCE
Afche un menu de toutes les sources
disponibles en entrée (TV, Ext.1, Ext.2, AV,
S-Vidéo, Composant, PC, HDMI1, HDMI2
et
DTV).
2
MENU
Permet d’afcher le menu des fonctions de
votre téléviseur sur l’écran.
3
– +
Appuyez pour augmenter ou réduire le vol
-
ume.Dans le menu afché à l’écran, utilisez
les boutons
– + de la même façon que
les boutons ◄ et ► de la télécommande.
4
C/P.
Permet de changer de canal. Dans le menu
afché à l’écran, utilisez les boutons
C/P. de la même façon que les boutons
▲ et ▼ de la télécommande.
5
ENTER
Dans le menu du téléviseur, ce bouton a la
même fonction que le bouton
ENTER de la
télécommande.
6
Bouton (Marche/Arrêt)
Permet d’allumer et d’éteindre le téléviseur.
Témoin d’alimentation
Clignote et s’éteint lorsqu’il est sous tension
et s’allume en mode Veille.
Capteur de la télécommande
Dirigez la télécommande vers ce point du
téléviseur.
7
Haut-parleur
Panneau avant (ou latéral)
BN68-01744A-00Fre.indd 5 2008-8-13 15:35:39
Seite wird geladen ...
Seite wird geladen ...
Seite wird geladen ...
Seite wird geladen ...
Seite wird geladen ...

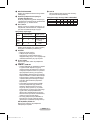
Français - 11
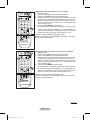
Fonction Plug & Play
Lorsque vous allumez le téléviseur pour la première fois,
plusieurs réglages de base s’effectuent l’un après l’autre de
manière automatique.
Les réglages disponibles sont les suivants :
☛
Si vous sélectionnez par erreur un pays incorrect pour votre
téléviseur, il se peut que les caractères affichés à l’écran soient
incorrects.
1 Si le téléviseur est en mode Veille, appuyez sur le bouton
POWER de la télécommande. Le message Démarrer Plug &
Play s’affiche Appuyez sur le bouton ENTER.
2 Le menu Langue s’affiche automatiquement après quelques secondes.
3 Sélectionnez la langue appropriée en appuyant de façon
répétée sur le bouton ▲ ou ▼.
Appuyez sur le bouton
ENTER. Le message Sélectionnez le
mode Domicile lors de l’installation à domicile. s’affiche.
4 Appuyez sur le bouton ◄ ou ► pour sélectionner Magasin ou
Domicile, puis appuyez sur le bouton ENTER. Un message
s’affiche, vous demandant de vérifier l’état de connexion de l’antenne.
➢
La sélection par défaut est Domicile.
➢
Nous vous recommandons de régler le téléviseur sur le
mode Domicile pour une meilleure qualité d’image dans
votre environnement personnel.
➢
Le mode Magasin n’est prévu que pour un usage en magasins.
➢
Si l’unité est accidentellement définie sur le mode Magasin
et que vous souhaitez revenir au mode Dynamique
(Domicile), appuyez sur le bouton Volume puis maintenez
enfoncé le bouton
MENU situé sur le panneau latéral du
téléviseur pendant cinq secondes.
5 avvous que l’antenne est branchée au téléviseur.
Appuyez sur le bouton
ENTER. Le menu Pays s’affiche.
6 Sélectionnez votre pays (ou région) en appuyant sur le bouton
▲ ou ▼.
Appuyez sur le bouton
ENTER. Le menu de sélection des
chaînes s’affiche.
7 Pour lancer la mémorisation des chaînes, appuyez sur le
bouton
ENTER.
La recherche s’arrête automatiquement. Le téléviseur
commence à mémoriser tous les canaux disponibles.
Appuyez sur le bouton
ENTER pour régler l’horloge.
8 Appuyez sur le bouton ◄/►/ENTER pour sélectionner
Année, Mois, Date, Heure ou Minute. Effectuez les réglages
en appuyant sur le bouton ◄ ou ►.
➢
Vous pouvez régler directement Mois, Date, Année, Heure
ou
Minute à l’aide du pavé numérique de la télécommande.
9 Appuyez sur le bouton ENTER pour confirmer votre choix.
Le message
Profitez de votre visionnage s’affiche.
➢
Lorsque vous avez terminé, appuyez sur le bouton ENTER.
➢
La fonction Plug & Play n’est disponible qu’en mode TV.
Plug & Play
Mémorisation Auto
P 1 C -- 40 MHz
0 %
Entrer
Ignorer
Démarrer
Plug & Play
Régler
Déplacer
Entrer
01 01
2007
12
00
Réglage Horloge
Mois Date Année Heure
Minute
OK
Profitez de votre visionnage
Plug & Play
Démarrer Plug & Play
OK
Entrer
Retour
Plug & Play
Langue
Déplacer
Entrer
Ignorer
English
Deutsch
Français
Italiano
▼
Plug & Play
Sélectionnez le mode Domicile lors de
l’installation à domicile.
Déplacer
Entrer
Ignorer
Magasin Domicile
Plug & Play
Pays
Déplacer
Entrer
Ignorer
Belgique
France
Allemagne
Italie
▼
Plug & Play
Vérifier l’entrée de l’antenne.
Entrer
Ignorer
OK
Suite…
BN68-01744A-00Fre.indd 11 2008-8-13 15:35:43
Seite wird geladen ...
Seite wird geladen ...
Seite wird geladen ...
Seite wird geladen ...
Seite wird geladen ...
Seite wird geladen ...
Seite wird geladen ...
Seite wird geladen ...
Seite wird geladen ...
Seite wird geladen ...
Seite wird geladen ...
Seite wird geladen ...
Seite wird geladen ...
Seite wird geladen ...
Seite wird geladen ...
Seite wird geladen ...
Seite wird geladen ...
Seite wird geladen ...
Seite wird geladen ...
Seite wird geladen ...
Seite wird geladen ...
Seite wird geladen ...
Seite wird geladen ...
Seite wird geladen ...
Seite wird geladen ...
Seite wird geladen ...
Seite wird geladen ...
Seite wird geladen ...
Seite wird geladen ...
Seite wird geladen ...
Seite wird geladen ...
Seite wird geladen ...
Seite wird geladen ...
Seite wird geladen ...
Seite wird geladen ...
Seite wird geladen ...
Seite wird geladen ...
Seite wird geladen ...
Seite wird geladen ...
Seite wird geladen ...
Seite wird geladen ...
Seite wird geladen ...
Seite wird geladen ...
Seite wird geladen ...
Seite wird geladen ...
Seite wird geladen ...
Seite wird geladen ...
Seite wird geladen ...
Seite wird geladen ...
Seite wird geladen ...
Seite wird geladen ...
Seite wird geladen ...
Seite wird geladen ...
Seite wird geladen ...
Seite wird geladen ...
Seite wird geladen ...
Seite wird geladen ...
Seite wird geladen ...
Seite wird geladen ...
Seite wird geladen ...
Seite wird geladen ...
Seite wird geladen ...
Seite wird geladen ...
Seite wird geladen ...
Seite wird geladen ...
Seite wird geladen ...
Seite wird geladen ...
Seite wird geladen ...
Seite wird geladen ...
Seite wird geladen ...
Seite wird geladen ...
Seite wird geladen ...
Seite wird geladen ...
Seite wird geladen ...
Seite wird geladen ...
Seite wird geladen ...
Seite wird geladen ...
Seite wird geladen ...
Seite wird geladen ...
Seite wird geladen ...
Seite wird geladen ...
Seite wird geladen ...
Seite wird geladen ...
Seite wird geladen ...
Seite wird geladen ...
Seite wird geladen ...
Seite wird geladen ...
Seite wird geladen ...
Seite wird geladen ...
Seite wird geladen ...
Seite wird geladen ...
Seite wird geladen ...
Seite wird geladen ...
Seite wird geladen ...
Seite wird geladen ...
Seite wird geladen ...
Seite wird geladen ...
Seite wird geladen ...
Seite wird geladen ...
Seite wird geladen ...
Seite wird geladen ...
Seite wird geladen ...
Seite wird geladen ...
Seite wird geladen ...
Seite wird geladen ...
Seite wird geladen ...
Seite wird geladen ...
Seite wird geladen ...
Seite wird geladen ...
Seite wird geladen ...
Seite wird geladen ...
Seite wird geladen ...
Seite wird geladen ...
Seite wird geladen ...
Seite wird geladen ...
Seite wird geladen ...
Seite wird geladen ...
Seite wird geladen ...
Seite wird geladen ...
Seite wird geladen ...
Seite wird geladen ...
Seite wird geladen ...
Seite wird geladen ...
Seite wird geladen ...
Seite wird geladen ...
Seite wird geladen ...
Seite wird geladen ...
Seite wird geladen ...
Seite wird geladen ...
Seite wird geladen ...
Seite wird geladen ...
Seite wird geladen ...
Seite wird geladen ...
Seite wird geladen ...
Seite wird geladen ...
Seite wird geladen ...
Seite wird geladen ...
Seite wird geladen ...
Seite wird geladen ...
Seite wird geladen ...
Seite wird geladen ...
Seite wird geladen ...
Seite wird geladen ...
Seite wird geladen ...
Seite wird geladen ...
Seite wird geladen ...
Seite wird geladen ...
Seite wird geladen ...
Seite wird geladen ...
Seite wird geladen ...
Seite wird geladen ...
Seite wird geladen ...
Seite wird geladen ...
Seite wird geladen ...
Seite wird geladen ...
Seite wird geladen ...
Seite wird geladen ...
Seite wird geladen ...
Seite wird geladen ...
Seite wird geladen ...
Seite wird geladen ...
Seite wird geladen ...
Seite wird geladen ...
Seite wird geladen ...
Seite wird geladen ...
Seite wird geladen ...
Seite wird geladen ...
Seite wird geladen ...
Seite wird geladen ...
Seite wird geladen ...
Seite wird geladen ...
Seite wird geladen ...
Seite wird geladen ...
Seite wird geladen ...
Seite wird geladen ...
Seite wird geladen ...
Seite wird geladen ...
Seite wird geladen ...
Seite wird geladen ...
Seite wird geladen ...
Seite wird geladen ...
Seite wird geladen ...
Seite wird geladen ...
Seite wird geladen ...
Seite wird geladen ...
Seite wird geladen ...
Seite wird geladen ...
Seite wird geladen ...
Seite wird geladen ...
Seite wird geladen ...
Seite wird geladen ...
Seite wird geladen ...
Seite wird geladen ...
Seite wird geladen ...
Seite wird geladen ...
Seite wird geladen ...
Seite wird geladen ...
Seite wird geladen ...
Seite wird geladen ...
Seite wird geladen ...
Seite wird geladen ...
Seite wird geladen ...
Seite wird geladen ...
Seite wird geladen ...
Seite wird geladen ...
Seite wird geladen ...
Seite wird geladen ...
Seite wird geladen ...
Seite wird geladen ...
Seite wird geladen ...
Seite wird geladen ...
Seite wird geladen ...
Seite wird geladen ...
Seite wird geladen ...
Seite wird geladen ...
Seite wird geladen ...
Seite wird geladen ...
Seite wird geladen ...
Seite wird geladen ...
Seite wird geladen ...
Seite wird geladen ...
Seite wird geladen ...
Seite wird geladen ...
Seite wird geladen ...
Seite wird geladen ...
Seite wird geladen ...
Seite wird geladen ...
Seite wird geladen ...
Seite wird geladen ...
Seite wird geladen ...
Seite wird geladen ...
Seite wird geladen ...
Seite wird geladen ...
Seite wird geladen ...
Seite wird geladen ...
Seite wird geladen ...
Seite wird geladen ...
Seite wird geladen ...
Seite wird geladen ...
Seite wird geladen ...
Seite wird geladen ...
Seite wird geladen ...
Seite wird geladen ...
Seite wird geladen ...
Seite wird geladen ...
Seite wird geladen ...
Seite wird geladen ...
Seite wird geladen ...
Seite wird geladen ...
Seite wird geladen ...
Seite wird geladen ...
Seite wird geladen ...
Seite wird geladen ...
Seite wird geladen ...
Seite wird geladen ...
Seite wird geladen ...
Seite wird geladen ...
Seite wird geladen ...
Seite wird geladen ...
Seite wird geladen ...
Seite wird geladen ...
Seite wird geladen ...
Seite wird geladen ...
Seite wird geladen ...
Seite wird geladen ...
Seite wird geladen ...
Seite wird geladen ...
Seite wird geladen ...
Seite wird geladen ...
Seite wird geladen ...
Seite wird geladen ...
Seite wird geladen ...
Seite wird geladen ...
Seite wird geladen ...
Seite wird geladen ...
Seite wird geladen ...
Seite wird geladen ...
Seite wird geladen ...
Seite wird geladen ...
Seite wird geladen ...
Seite wird geladen ...
Seite wird geladen ...
Seite wird geladen ...
Seite wird geladen ...
Seite wird geladen ...
Seite wird geladen ...
Seite wird geladen ...
Seite wird geladen ...
Seite wird geladen ...
Seite wird geladen ...
Seite wird geladen ...
Seite wird geladen ...
Seite wird geladen ...
Seite wird geladen ...
Seite wird geladen ...
Seite wird geladen ...
Seite wird geladen ...
Seite wird geladen ...
Seite wird geladen ...
Seite wird geladen ...
Seite wird geladen ...
Seite wird geladen ...
Seite wird geladen ...
Seite wird geladen ...
Seite wird geladen ...
Seite wird geladen ...
Seite wird geladen ...
Seite wird geladen ...
Seite wird geladen ...
Seite wird geladen ...
Seite wird geladen ...
Seite wird geladen ...
Seite wird geladen ...
Seite wird geladen ...
Seite wird geladen ...
Seite wird geladen ...
Seite wird geladen ...
Seite wird geladen ...
Seite wird geladen ...
Seite wird geladen ...
Seite wird geladen ...
Seite wird geladen ...
Seite wird geladen ...
Seite wird geladen ...
Seite wird geladen ...
Seite wird geladen ...
Seite wird geladen ...
Seite wird geladen ...
Seite wird geladen ...
Seite wird geladen ...
Seite wird geladen ...
Seite wird geladen ...
Seite wird geladen ...
Seite wird geladen ...
Seite wird geladen ...
Seite wird geladen ...
Seite wird geladen ...
Seite wird geladen ...
Seite wird geladen ...
Seite wird geladen ...
Seite wird geladen ...
Seite wird geladen ...
Seite wird geladen ...
Seite wird geladen ...
Seite wird geladen ...
Seite wird geladen ...
Seite wird geladen ...
Seite wird geladen ...
Seite wird geladen ...
Seite wird geladen ...
Seite wird geladen ...
Seite wird geladen ...
Seite wird geladen ...
Seite wird geladen ...
Seite wird geladen ...
Seite wird geladen ...
Seite wird geladen ...
Seite wird geladen ...
Seite wird geladen ...
Seite wird geladen ...
Seite wird geladen ...
Seite wird geladen ...
Seite wird geladen ...
Seite wird geladen ...
Seite wird geladen ...
Seite wird geladen ...
Seite wird geladen ...
Seite wird geladen ...
Seite wird geladen ...
Seite wird geladen ...
Seite wird geladen ...
Seite wird geladen ...
Seite wird geladen ...
Seite wird geladen ...
Seite wird geladen ...
Seite wird geladen ...
Seite wird geladen ...
Seite wird geladen ...
Seite wird geladen ...
Seite wird geladen ...
Seite wird geladen ...
Seite wird geladen ...
Seite wird geladen ...
Seite wird geladen ...
Seite wird geladen ...
Seite wird geladen ...
Seite wird geladen ...
Seite wird geladen ...
Seite wird geladen ...
Seite wird geladen ...
Seite wird geladen ...
Seite wird geladen ...
Seite wird geladen ...
Seite wird geladen ...
Seite wird geladen ...
Seite wird geladen ...
Seite wird geladen ...
Seite wird geladen ...
Seite wird geladen ...
Seite wird geladen ...
Seite wird geladen ...
Seite wird geladen ...
Seite wird geladen ...
Seite wird geladen ...
Seite wird geladen ...
Seite wird geladen ...
Seite wird geladen ...
Seite wird geladen ...
Seite wird geladen ...
Seite wird geladen ...
Seite wird geladen ...
Seite wird geladen ...
Seite wird geladen ...
Seite wird geladen ...
Seite wird geladen ...
Seite wird geladen ...
Seite wird geladen ...
Seite wird geladen ...
Seite wird geladen ...
Seite wird geladen ...
Seite wird geladen ...
Seite wird geladen ...
Seite wird geladen ...
Seite wird geladen ...
Seite wird geladen ...
Seite wird geladen ...
Seite wird geladen ...
Seite wird geladen ...
Seite wird geladen ...
Seite wird geladen ...
Seite wird geladen ...
Seite wird geladen ...
Seite wird geladen ...
Seite wird geladen ...
Seite wird geladen ...
Seite wird geladen ...
Seite wird geladen ...
Seite wird geladen ...
Seite wird geladen ...
Seite wird geladen ...
Seite wird geladen ...
Seite wird geladen ...
Seite wird geladen ...
Seite wird geladen ...
Seite wird geladen ...
Seite wird geladen ...
Seite wird geladen ...
Seite wird geladen ...
Seite wird geladen ...
Seite wird geladen ...
Seite wird geladen ...
Seite wird geladen ...
Seite wird geladen ...
Seite wird geladen ...
Seite wird geladen ...
Seite wird geladen ...
Seite wird geladen ...
Seite wird geladen ...
Seite wird geladen ...
Seite wird geladen ...
Seite wird geladen ...
Seite wird geladen ...
Seite wird geladen ...
Seite wird geladen ...
Seite wird geladen ...
Seite wird geladen ...
Seite wird geladen ...
Seite wird geladen ...
Seite wird geladen ...
Seite wird geladen ...
Seite wird geladen ...
Seite wird geladen ...
Seite wird geladen ...
Seite wird geladen ...
Seite wird geladen ...
Seite wird geladen ...
Seite wird geladen ...
Seite wird geladen ...
Seite wird geladen ...
Seite wird geladen ...
Seite wird geladen ...
Seite wird geladen ...
Seite wird geladen ...
Seite wird geladen ...
Seite wird geladen ...
Seite wird geladen ...
Seite wird geladen ...
Seite wird geladen ...
Seite wird geladen ...
Seite wird geladen ...
Seite wird geladen ...
Seite wird geladen ...
Seite wird geladen ...
Seite wird geladen ...
Seite wird geladen ...
Seite wird geladen ...
Seite wird geladen ...
Seite wird geladen ...
Seite wird geladen ...
Seite wird geladen ...
Seite wird geladen ...
Seite wird geladen ...
Seite wird geladen ...
Seite wird geladen ...
Seite wird geladen ...
Seite wird geladen ...
Seite wird geladen ...
Seite wird geladen ...
Seite wird geladen ...
-
 1
1
-
 2
2
-
 3
3
-
 4
4
-
 5
5
-
 6
6
-
 7
7
-
 8
8
-
 9
9
-
 10
10
-
 11
11
-
 12
12
-
 13
13
-
 14
14
-
 15
15
-
 16
16
-
 17
17
-
 18
18
-
 19
19
-
 20
20
-
 21
21
-
 22
22
-
 23
23
-
 24
24
-
 25
25
-
 26
26
-
 27
27
-
 28
28
-
 29
29
-
 30
30
-
 31
31
-
 32
32
-
 33
33
-
 34
34
-
 35
35
-
 36
36
-
 37
37
-
 38
38
-
 39
39
-
 40
40
-
 41
41
-
 42
42
-
 43
43
-
 44
44
-
 45
45
-
 46
46
-
 47
47
-
 48
48
-
 49
49
-
 50
50
-
 51
51
-
 52
52
-
 53
53
-
 54
54
-
 55
55
-
 56
56
-
 57
57
-
 58
58
-
 59
59
-
 60
60
-
 61
61
-
 62
62
-
 63
63
-
 64
64
-
 65
65
-
 66
66
-
 67
67
-
 68
68
-
 69
69
-
 70
70
-
 71
71
-
 72
72
-
 73
73
-
 74
74
-
 75
75
-
 76
76
-
 77
77
-
 78
78
-
 79
79
-
 80
80
-
 81
81
-
 82
82
-
 83
83
-
 84
84
-
 85
85
-
 86
86
-
 87
87
-
 88
88
-
 89
89
-
 90
90
-
 91
91
-
 92
92
-
 93
93
-
 94
94
-
 95
95
-
 96
96
-
 97
97
-
 98
98
-
 99
99
-
 100
100
-
 101
101
-
 102
102
-
 103
103
-
 104
104
-
 105
105
-
 106
106
-
 107
107
-
 108
108
-
 109
109
-
 110
110
-
 111
111
-
 112
112
-
 113
113
-
 114
114
-
 115
115
-
 116
116
-
 117
117
-
 118
118
-
 119
119
-
 120
120
-
 121
121
-
 122
122
-
 123
123
-
 124
124
-
 125
125
-
 126
126
-
 127
127
-
 128
128
-
 129
129
-
 130
130
-
 131
131
-
 132
132
-
 133
133
-
 134
134
-
 135
135
-
 136
136
-
 137
137
-
 138
138
-
 139
139
-
 140
140
-
 141
141
-
 142
142
-
 143
143
-
 144
144
-
 145
145
-
 146
146
-
 147
147
-
 148
148
-
 149
149
-
 150
150
-
 151
151
-
 152
152
-
 153
153
-
 154
154
-
 155
155
-
 156
156
-
 157
157
-
 158
158
-
 159
159
-
 160
160
-
 161
161
-
 162
162
-
 163
163
-
 164
164
-
 165
165
-
 166
166
-
 167
167
-
 168
168
-
 169
169
-
 170
170
-
 171
171
-
 172
172
-
 173
173
-
 174
174
-
 175
175
-
 176
176
-
 177
177
-
 178
178
-
 179
179
-
 180
180
-
 181
181
-
 182
182
-
 183
183
-
 184
184
-
 185
185
-
 186
186
-
 187
187
-
 188
188
-
 189
189
-
 190
190
-
 191
191
-
 192
192
-
 193
193
-
 194
194
-
 195
195
-
 196
196
-
 197
197
-
 198
198
-
 199
199
-
 200
200
-
 201
201
-
 202
202
-
 203
203
-
 204
204
-
 205
205
-
 206
206
-
 207
207
-
 208
208
-
 209
209
-
 210
210
-
 211
211
-
 212
212
-
 213
213
-
 214
214
-
 215
215
-
 216
216
-
 217
217
-
 218
218
-
 219
219
-
 220
220
-
 221
221
-
 222
222
-
 223
223
-
 224
224
-
 225
225
-
 226
226
-
 227
227
-
 228
228
-
 229
229
-
 230
230
-
 231
231
-
 232
232
-
 233
233
-
 234
234
-
 235
235
-
 236
236
-
 237
237
-
 238
238
-
 239
239
-
 240
240
-
 241
241
-
 242
242
-
 243
243
-
 244
244
-
 245
245
-
 246
246
-
 247
247
-
 248
248
-
 249
249
-
 250
250
-
 251
251
-
 252
252
-
 253
253
-
 254
254
-
 255
255
-
 256
256
-
 257
257
-
 258
258
-
 259
259
-
 260
260
-
 261
261
-
 262
262
-
 263
263
-
 264
264
-
 265
265
-
 266
266
-
 267
267
-
 268
268
-
 269
269
-
 270
270
-
 271
271
-
 272
272
-
 273
273
-
 274
274
-
 275
275
-
 276
276
-
 277
277
-
 278
278
-
 279
279
-
 280
280
-
 281
281
-
 282
282
-
 283
283
-
 284
284
-
 285
285
-
 286
286
-
 287
287
-
 288
288
-
 289
289
-
 290
290
-
 291
291
-
 292
292
-
 293
293
-
 294
294
-
 295
295
-
 296
296
-
 297
297
-
 298
298
-
 299
299
-
 300
300
-
 301
301
-
 302
302
-
 303
303
-
 304
304
-
 305
305
-
 306
306
-
 307
307
-
 308
308
-
 309
309
-
 310
310
-
 311
311
-
 312
312
-
 313
313
-
 314
314
-
 315
315
-
 316
316
-
 317
317
-
 318
318
-
 319
319
-
 320
320
-
 321
321
-
 322
322
-
 323
323
-
 324
324
-
 325
325
-
 326
326
-
 327
327
-
 328
328
-
 329
329
-
 330
330
-
 331
331
-
 332
332
-
 333
333
-
 334
334
-
 335
335
-
 336
336
-
 337
337
-
 338
338
-
 339
339
-
 340
340
-
 341
341
-
 342
342
-
 343
343
-
 344
344
-
 345
345
-
 346
346
-
 347
347
-
 348
348
-
 349
349
-
 350
350
-
 351
351
-
 352
352
-
 353
353
-
 354
354
-
 355
355
-
 356
356
-
 357
357
-
 358
358
-
 359
359
-
 360
360
-
 361
361
-
 362
362
-
 363
363
-
 364
364
-
 365
365
-
 366
366
-
 367
367
-
 368
368
-
 369
369
-
 370
370
-
 371
371
-
 372
372
-
 373
373
-
 374
374
-
 375
375
-
 376
376
-
 377
377
-
 378
378
-
 379
379
-
 380
380
-
 381
381
-
 382
382
-
 383
383
-
 384
384
-
 385
385
-
 386
386
-
 387
387
-
 388
388
-
 389
389
-
 390
390
-
 391
391
-
 392
392
-
 393
393
-
 394
394
-
 395
395
-
 396
396
-
 397
397
-
 398
398
-
 399
399
-
 400
400
-
 401
401
-
 402
402
-
 403
403
-
 404
404
-
 405
405
-
 406
406
-
 407
407
-
 408
408
-
 409
409
-
 410
410
-
 411
411
-
 412
412
-
 413
413
-
 414
414
-
 415
415
-
 416
416
-
 417
417
-
 418
418
-
 419
419
-
 420
420
-
 421
421
-
 422
422
-
 423
423
-
 424
424
-
 425
425
-
 426
426
-
 427
427
-
 428
428
-
 429
429
-
 430
430
-
 431
431
-
 432
432
-
 433
433
-
 434
434
-
 435
435
-
 436
436
-
 437
437
-
 438
438
-
 439
439
-
 440
440
-
 441
441
-
 442
442
-
 443
443
-
 444
444
-
 445
445
-
 446
446
-
 447
447
-
 448
448
-
 449
449
-
 450
450
-
 451
451
-
 452
452
-
 453
453
-
 454
454
-
 455
455
-
 456
456
-
 457
457
-
 458
458
-
 459
459
-
 460
460
-
 461
461
-
 462
462
-
 463
463
-
 464
464
-
 465
465
-
 466
466
-
 467
467
-
 468
468
-
 469
469
-
 470
470
-
 471
471
-
 472
472
-
 473
473
-
 474
474
-
 475
475
-
 476
476
-
 477
477
-
 478
478
-
 479
479
-
 480
480
-
 481
481
-
 482
482
-
 483
483
-
 484
484
-
 485
485
-
 486
486
-
 487
487
-
 488
488
-
 489
489
-
 490
490
-
 491
491
-
 492
492
-
 493
493
-
 494
494
-
 495
495
-
 496
496
-
 497
497
-
 498
498
-
 499
499
-
 500
500
-
 501
501
-
 502
502
-
 503
503
-
 504
504
-
 505
505
-
 506
506
-
 507
507
-
 508
508
-
 509
509
-
 510
510
-
 511
511
-
 512
512
-
 513
513
-
 514
514
-
 515
515
-
 516
516
-
 517
517
-
 518
518
-
 519
519
-
 520
520
-
 521
521
-
 522
522
-
 523
523
-
 524
524
-
 525
525
-
 526
526
-
 527
527
-
 528
528
-
 529
529
-
 530
530
-
 531
531
-
 532
532
-
 533
533
-
 534
534
-
 535
535
-
 536
536
-
 537
537
-
 538
538
-
 539
539
-
 540
540
-
 541
541
-
 542
542
-
 543
543
-
 544
544
-
 545
545
-
 546
546
-
 547
547
-
 548
548
-
 549
549
-
 550
550
-
 551
551
-
 552
552
-
 553
553
-
 554
554
-
 555
555
-
 556
556
-
 557
557
-
 558
558
-
 559
559
-
 560
560
-
 561
561
-
 562
562
-
 563
563
-
 564
564
-
 565
565
-
 566
566
-
 567
567
-
 568
568


Samsung PS42A411C2 Benutzerhandbuch
- Kategorie
- LCD-Fernseher
- Typ
- Benutzerhandbuch
in anderen Sprachen
- English: Samsung PS42A411C2 User manual
- français: Samsung PS42A411C2 Manuel utilisateur
- español: Samsung PS42A411C2 Manual de usuario
- italiano: Samsung PS42A411C2 Manuale utente
- Nederlands: Samsung PS42A411C2 Handleiding
- português: Samsung PS42A411C2 Manual do usuário
- polski: Samsung PS42A411C2 Instrukcja obsługi