Yealink Yealink UVC40 USB Video Conferencing Endpoint (EN, CN, DE, ES, FR) V1.0 Schnellstartanleitung
- Typ
- Schnellstartanleitung

USB Video Conferencing Endpoint
Quick Start Guide(V1.0)
www.yealink.com
UVC40
English | 简体中文 | Deutsch |
Español | Français


Table of Contents
English ........................................... 1
简体中文 ......................................... 8
Deutsch ........................................ 13
Español......................................... 20
Français........................................ 27


1
AAA Battery×2UVC40
VCR20
Remote Control
Cable Tie×5
Quick Start Guide
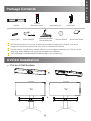
We recommend that you use the accessories provided or approved by Yealink. The use of
unapproved third-party accessories may result in reduced performance.
Use the Yealink original power adapter (48V/0.7A) to charge the endpoint only. The use of the
third-party power adapter may cause the damage to the endpoint.
The USB cable in the MVC400/ZVC400 package is 2.5 meters long.
Mounting Bracket
and Accessories
Power Adapter
×4
×2
×2
Silicone Pad×2
Put on a Flat Surface
Package Contents
7m
USB Cable
TV TV
UVC40 Installation
E
N
G
L
I
S
H

2
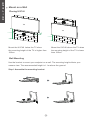
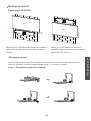
Wall Mounting
Use the bracket to mount your endpoint on a wall. The mounting height affects your
camera view. The recommended height is 1.1m above the ground.
Placing UVC40
Mount the UVC40 below the TV when
the mounting height of the TV is higher than
120cm.
Mount the UVC40 above the TV when
the mounting height of the TV is lower
than 120cm.
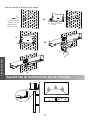
Step1:Assemble the mounting bracket
Mount on a Wall
TV
10cm
TV
H>120cm
H<120cm
E
N
G
L
I
S
H

3
Hole depth: 30mm
Hole diameter: 6mm
118mm
T4×30 screws
15°
15°
Step2:Mount the UVC40 to the wall
Adjusting the Camera Tilt
3
4
5
E
N
G
L
I
S
H

4
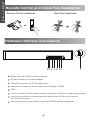
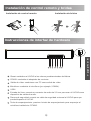
Remote Control Installation Cable Ties Installation
Remote Control and Cable Ties Installation
Hardware Interface Instructions
1
2
4
3
Line In: connect a 3.5mm audio connector to use the UVC40 as an audio output device.
USB: /
Video Out: connect to a PC as video output.
Microphone: connect to the microphone (for exmaple, VCM34).
DC48V: connect to the power adapter.
Reset: reset the UVC40 to factory defaults.
Security slot: connect a universal security cable to the UVC40 so that you can
lock the UVC40 down.
5
6
7
1
2 3 4 5 6 7 8
8
Pairing key: press the pairing key to pair the CPW90 wireless microphone.
E
N
G
L
I
S
H

5
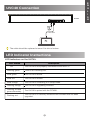
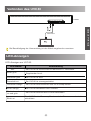
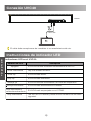
UVC40 Connection
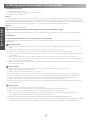
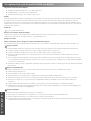
LED Indicator Instructions
LED indicators on the UVC40:
LED Status
Description
Off
Flashing green
The UVC40 is not properly connected to the mini-PC.
Solid green
Flashing orange The UVC40 is upgrading firmware.
There is an incoming call.
The UVC40 is in recovery mode and the firmware has not been
upgraded.
The UVC40 is active.
Flashing red
Solid red The UVC40 is muted.
Flashing red and
green alternately
The UVC40 is paired with the CPW90.
The UVC40 is initializing or in sleep mode.Solid orange
The cable should be replaced at once if its skin is broken.
USB cable
UVC40
E
N
G
L
I
S
H
E
N
G
L
I
S
H

Operating Ambient Temperatures
Operating temperature: +32 to 104°F (0 to 40°C)
Relative humidity: 5% to 90%, noncondensing
Storage temperature: -22 to +160°F (-30 to +70°C)
Warranty
Our product warranty is limited only to the unit itself, when used normally in accordance with the operating instructions and the system
environment. We are not liable for damage or loss resulting from the use of this product, or for any claim from a third party. We are not
liable for problems with Yealink device arising from the use of this product; we are not liable for financial damages, lost profits, claims
from third parties, etc., arising from the use of this product.
DC symbol
is the DC voltage symbol.
Restriction of Hazardous Substances Directive (RoHS)
This device complies with the requirements of the EU RoHS Directive. Statements of compliance can be obtained by contacting
Safety Instructions
Save these instructions. Read these safety instructions before use!
The following basic safety precautions should always be followed to reduce risk of fire, electrical shock, and other personal injury.
General Requirements
Before you install and use the device, read the safety instructions carefully and observe the situation during operation.
During the process of storage, transportation, and operation, please always keep the device dry and clean.
During the process of storage, transportation, and operation, please avoid collision and crash of the device.
Please attempt not to dismantle the device by yourself. In case of any discrepancy, please contact the appointed maintenance
center for repair.
Without prior written consent, no organization or individual is permitted to make any change to the structure or the safety design
of the device. Yealink is under no circumstance liable to consequences or legal issues caused by such changes.
lease refer to the relevant laws and statutes while using the device. Legal rights of others should be respected as well.
Environmental Requirements
Place the device at a well-ventilated place. Do not expose the device under direct sunlight.
Keep the device dry and free of dusts.
Place the device on a stable and level platform.
Please place no heavy objects on the device in case of damageand deformation caused by the heavy load.
Keep at least 10 cm between the device and the closest object for heat dissipation.
Do not place the device on or near any inflammable or fire-vulnerable object, such as rubber-made materials.
Keep the device away from any heat source or bare fire, such as a candle or an electric heater.
Keep the device away from any household appliance with strong magnetic field or electromagnetic field, such as a microwave
oven or a refrigerator.
Operating Requirements
Do not let a child operate the device without guidance.
Do not let a child play with the device or any accessory in case of accidental swallowing.
Please use the accessories provided or authorized by the manufacturer only.
The power supply of the device shall meet the requirements of the input voltage of the device. Pleaseusethe provided surge
protection power socket only.
Before plugging or unplugging any cable, make sure that your hands are completely dry.
Do not spill liquid of any kind on the product or use the equipment near water, for example, near a bathtub, washbowl, kitchen
sink, wet basement or near a swimming pool.
E
N
G
L
I
S
H
Safety instructions
6

ENVIRONMENTAL RECYCLING
Never dispose of the device with domestic waste
Ask your Town Council about how to dispose of it in an environmentally friendly way. The cardboarc
box, plastic packaging and player components may be recycled in accordance with prevailing
recycling regulations in your country.
Always adhere to prevailing regulations
Those who fail to do so may be fined or prosecuted in accordance with the law. The crossed out
garbage can that appears on the device means that when it has reached the end of its useful life, it
should be taken to a special waste disposal centre and treated separately to general urban waste.
Do not tread on, pull, or over-bend any cable in case of malfunction of the device.
During a thunderstorm, stop using the device and disconnect it from the power supply. Unplug the power plug and the
Asymmetric Digital Subscriber Line (ADSL) twisted pair (the radio frequency cable) to avoid lightning strike.
If the device is left unused for a rather long time, disconnect it from the power supply and unplug the power plug.
When there is smoke emitted from the device, or some abnormal noise or smell, disconnect the device from the power supply,
and unplug the power plug immediately. Contact the specified maintenance center for repair.
Do not insert any object into equipment slots that is not part of the product or auxiliary product.
Before connecting a cable, connect the grounding cable of the device first. Do not disconnect the grounding cable until you
disconnect all other cables.
Cleaning Requirements
Before cleaning the device, stop using it and disconnect it from the power supply.
Use a piece of soft, dry and anti-static cloth to clean the device.
Keep the power plug clean and dry. Using a dirty or wet power plug may lead to electric shock or other perils.
Troubleshooting
The unit cannot supply power to Yealink device.
There is a bad connection with the plug.
1. Clean the plug with a dry cloth.
2. Connect it to another wall outlet.
The usage environment is out of operating temperature range.
1. Use in the operating temperature range.
The cable between the unit and the Yealink device is connected incorrectly.
1. Connect the cable correctly.
You cannot connect the cable properly.
1. You may have connected a wrong Yealink device.
2. Use the correct power supply.
Some dust, etc., may be in the port.
1. Clean the port.
Contact your dealer or authorized service facility for any further questions.
Contact Information
YEALINK NETWORK TECHNOLOGY CO.,LTD.
309, 3rd Floor, No.16, Yun Ding North Road, Huli District, Xiamen City, Fujian, P.R.C
YEALINK (EUROPE) NETWORK TECHNOLOGY B.V.
Strawinskylaan 3127, Atrium Building, 8th floor, 1077ZX Amsterdam, The Netherlands
YEALINK (USA) NETWORK TECHNOLOGY CO., LTD.
999 Peachtree Street Suite 2300, Fulton, Atlanta, GA, 30309, USA
Made in China
E
N
G
L
I
S
H
7

8
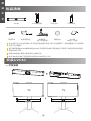
VCR20遥控器 7号电池x2UVC40 7米USB线
束线带x5
此为A级产品。在生活环境中,该产品可能会造成无线电干扰。在这种情况下,可能需要用户对干扰采取
切实可行的措施。
我们推荐使用由Yealink提供或经Yealink认可的配件和线缆,使用未经认可的第三方配件和线缆可能会
导致性能的下降。
使用HDMI线前,请套上磁环用于抗电磁干扰。
MVC400/ZVC400产品组合包中标配的USB线长为2.5米。
UVC40
快速入门指南
支架配件
(用于安装主机)
电源适配器
×4
×2
×2
硅胶垫x2
TV TV

9
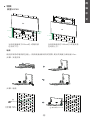
螺丝规格:T4×30
打孔直径: 6mm
打孔深度: 30mm
118mm
步骤1:安装支架
步骤2:墙装
当电视高度高于120cm时,终端安装
在电视下方。
当电视高度低于120cm时,终端安装
在电视上方。
使用支架将终端安装在墙上。 安装高度会影响你的视野,建议的高度为离地面1.1m。
TV
10cm
TV
H>120cm
H<120cm

10
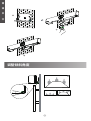
15°
15°
3
4
5

11
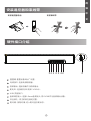
1
2
4
3
5
6
7
音频线性输入: 连接3.5mm音频接头,将UVC40作为音频输出设备。
视频输出: 连接电脑作为视频输出。
USB: 预留接口。
麦克风: 连接麦克风(例如:VCM34)。
电源接口: 连接电源适配器。
重置键:重置设备到出厂设置。
安全锁孔 : 将主机锁在固定位置。
8
配对键: 按配对键,进入配对蓝牙麦状态。
1
2 3 4 5 6 7 8

12
如果使用过程中发现线缆破皮,请立即更换。
UVC40固件更新中。
绿灯闪烁
红灯常亮
关闭
UVC40没有正确连接到mini-PC上或未处于正常工作状态。
来电中状态。
绿灯常亮 UVC40处于工作中状态。
红灯闪烁 UVC40进入恢复模式,还未固件更新。
UVC40处于静音状态。
红绿灯交替 UVC40和CPW90-BT配对状态。
橙色灯常亮 UVC40启动或等待状态。
橙色灯闪烁
USB线
UVC40

13
AAA Batterie×2UVC40
Kabelbinder×5
Kurzanleitung
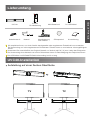
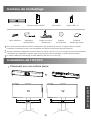
Verwenden Sie ausschließlich das Original-Netzteil von Yealink (48 V/0,7 A) zum Laden des Endpunkts.
Die Verwendung eines Netzteils von einem Drittanbieter kann zur Beschädigung des Endpunkts führen.
Das USB-Kabel im MVC400/ZVC400-Lieferumfang ist 2,5 m lang.
×4
×2
×2
Silikonpad×2
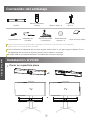
Aufstellung auf einer flachen Oberfläche
Lieferumfang
TV TV
UVC40-Installation
VCR20
Fernbedienung
7 m USB-Kabel
Netzteil
Wandhalterung
und Zubehör
Wir empfehlen Ihnen, nur durch Yealink bereitgestellte oder zugelassene Zubehörteile zu verwenden.
Die Verwendung von nicht zugelassenem Drittanbieter-Zubehör kann zu verminderter Leistungsfähigkeit
führen.
D
E
U
T
S
C
H

14
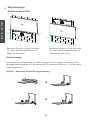
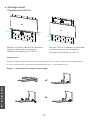
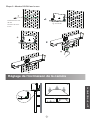
Wandmontage
Verwenden Sie die Halterung, um Ihren Endpunkt an einer Wand zu montieren. Die
Montagehöhe beeinflusst Ihre Kameraansicht. Es wird eine Höhe von 1,1 m über dem
Boden empfohlen.
Platzieren der UVC40
Montieren Sie den UVC40 unter dem
TV, wenn die Montagehöhe des TV
höher als 120 cm ist.
Montieren Sie den UVC40 über dem
TV, wenn die Montagehöhe des TV
niedriger als 120 cm ist.
Schritt1Montieren Sie die Montagehalterung
Wandmontage
TV
10 cm
TV
H>120 cm
H<120 cm
D
E
U
T
S
C
H

15
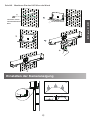
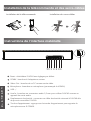
Lochtiefe: 30mm
Lochdurchmesser:
6mm
118 mm
T4×30 Schrauben
15°
15°
Schritt2Montieren Sie den UVC40 an der Wand
Einstellen der Kameraneigung
3
4
5
D
E
U
T
S
C
H

16
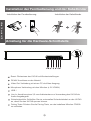
Installation der Fernbedienung Installation der Kabelbinder
Installation der Fernbedienung und der Kabelbinder
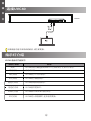
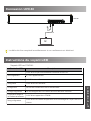
Anleitung für die Hardware-Schnittstelle
1
2
4
3
Line In: Anschluss eines 3,5 mm-Audiosteckers zur Verwendung des UVC40 als
Audio-Ausgabegerät.
USB: /
Video Out: Verbindung mit einem PC als Video-Ausgang.
Microphone: Verbindung mit dem Mikrofon (z. B. VCM34).
DC48V: Anschluss an das Netzteil.
Reset: Rücksetzen des UVC40 auf Werkseinstelllungen.
Sicherheitsschlitz: Schließen Sie ein universelles Sicherheitskabel an den UVC40
an, damit Sie den UVC40 sperren können.
5
6
7
1
2 3 4 5 6 7
8
8
Pairing-Taste: Drücken Sie die Pairing-Taste, um das kabellose Mikrofon CPW90
zu verbinden.
D
E
U
T
S
C
H
Seite wird geladen ...
Seite wird geladen ...
Seite wird geladen ...
Seite wird geladen ...
Seite wird geladen ...
Seite wird geladen ...
Seite wird geladen ...
Seite wird geladen ...
Seite wird geladen ...
Seite wird geladen ...
Seite wird geladen ...
Seite wird geladen ...
Seite wird geladen ...
Seite wird geladen ...
Seite wird geladen ...
Seite wird geladen ...
Seite wird geladen ...
Seite wird geladen ...
Seite wird geladen ...
Seite wird geladen ...
-
 1
1
-
 2
2
-
 3
3
-
 4
4
-
 5
5
-
 6
6
-
 7
7
-
 8
8
-
 9
9
-
 10
10
-
 11
11
-
 12
12
-
 13
13
-
 14
14
-
 15
15
-
 16
16
-
 17
17
-
 18
18
-
 19
19
-
 20
20
-
 21
21
-
 22
22
-
 23
23
-
 24
24
-
 25
25
-
 26
26
-
 27
27
-
 28
28
-
 29
29
-
 30
30
-
 31
31
-
 32
32
-
 33
33
-
 34
34
-
 35
35
-
 36
36
-
 37
37
-
 38
38
-
 39
39
-
 40
40


Yealink Yealink UVC40 USB Video Conferencing Endpoint (EN, CN, DE, ES, FR) V1.0 Schnellstartanleitung
- Typ
- Schnellstartanleitung
in anderen Sprachen
- English: Yealink Yealink UVC40 USB Video Conferencing Endpoint (EN, CN, DE, ES, FR) V1.0 Quick start guide
- français: Yealink Yealink UVC40 USB Video Conferencing Endpoint (EN, CN, DE, ES, FR) V1.0 Guide de démarrage rapide
- español: Yealink Yealink UVC40 USB Video Conferencing Endpoint (EN, CN, DE, ES, FR) V1.0 Guía de inicio rápido
Verwandte Artikel
-
Yealink Panel Benutzerhandbuch
-
Yealink T2C-503 room sensor Benutzerhandbuch
-
-
-
-
-
-
Yealink UVC34 Benutzerhandbuch
-
-