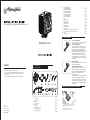
Alpenföhn Alpenföhn Matterhorn Rev.B Installationsanleitung
- Kategorie
- Komponenten für die Computerkühlung
- Typ
- Installationsanleitung
Dieses Handbuch eignet sich auch für

1. All specifications subject to change without notice.
2. Under no condition shall Alpenföhn be liable for any indirect, incidental
or consequential damages arising from any defect or error in this
manual or product.
3. Please ask for professional help if you are not sure of safe installation.
CAUTION:
This installation guide is applicable for Matterhorn rev.B.
Matterhorn rev.B
1 5
87
6
9 10 11
12 13 14 15
2 3 4
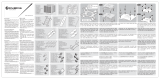
120mm FAN
120mm Lüfter
Backplate
Retention Plate
Halteplatte
Wire Clip
Federstahlbügel
Mounting Bracket(Intel)
Befestigungsteg(Intel)
1 pc
1 Stück
1 pc
1 Stück
1 pc
1 Stück
4 pcs
4 Stück
2 pcs
2 Stück
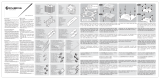
COMPONENTS LIST
Komponentenliste
1)
2)
3)
4)
5)
Mounting Bracket(AMD)
Befestigungssteg(AMD)
Mounting Bracket B(AMD)
Befestigungssteg B(AMD)
Low-noise Adapter(7V)
Low-noise Adapter(7VDC)
Low-noise Adapter(5V)
Low-noise Adapter(5VDC)
Nut
Daumenschraube
Insulation Pillar
Kunststohülsen
Double-screw Bolt
Gewindebolzen
De-Vibration Buckle
Gummipuer
Insulating Washer (Insulation washer for Socket 775)
Isolierscheibe(Unterlagscheibe für Sockel 775)
TIM
Wärmeleitpaste
2 pcs
2 Stück
2 pcs
2 Stück
1 pc
1 Stück
1 pc
1 Stück
4 pcs
4 Stück
4 pcs
4 Stück
4 pcs
4 Stück
4 pcs
4 Stück
1 pc
1 Stück
1 pc
1 Stück
6)
7)
8)
9)
10)
11)
12)
13)
14)
15)
EKL AG
Nadler Str. 8-10
D-88299 Leukirch
www.alpenfoehn.de
MADE IN CHINA
Notes for 2 Adapters
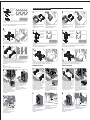
INTEL LGA1366/1156/1155/775 Installation
Evenly apply a thin layer of thermal grease onto the
processor.
Tragen Sie eine gleichmäßige, dünne Schicht
Wärmeleitpaste auf dem Prozessor auf.
5V
7V
2) 4-pin PSU Adapter:
Input voltage will be xed at 7V and CPU fan will run
at corresponding high speed.
4-poliger Netzteil Adapter (7VDC):
Verbinden Sie den kleinen 4-poligen Stecker mit
Ihrem Lüfter; Verbinden Sie den gro?en 4-poligen
Stecker mit Ihrem Netzteil. Hierdurch arbeitet der
Lüfter konstant bei 7 VDC mit der maximal
m?glichen Drehzahl.
Achtung:Durch die Verwendung eines Kabeladapters
kann keine Drehzahlüberwachung des Boards
erfolgen. Meistens wird beim Start des Computers
eine Fehlermeldung mit "CPU Fan error" angezeigt.
In diesem Fall deaktivieren Sie bitte diese Meldung in
Ihrem Bios/UEFI.
1) Low-noise Adapter(5V):
Input voltage will be xed at 5V and CPU fan will run
at corresponding speed with low noise.
Low-noise Adapter (5VDC):
Verbinden Sie den kleinen 4-poligen Stecker mit
Ihrem Lüfter; Verbinden Sie den gro?en 4-poligen
Stecker mit Ihrem Netzteil. Hierdurch arbeitet der
Lüfter konstant bei 5V mit reduzierter Drehzahl.
Achtung:Durch die Verwendung eines Kabeladapters
kann keine Drehzahlüberwachung des Boards
erfolgen. Meistens wird beim Start des Computers
eine Fehlermeldung mit "CPU Fan error" angezeigt.
In diesem Fall deaktivieren Sie bitte diese Meldung in
Ihrem Bios/UEFI.

LGA 1366
LGA 1156/1155 LGA 775
As illustrated, x the insulating washer,De-vibration buckle and double-screw bolt to the mounting holes
of back plate.
Fixieren Sie die Isolierscheibe, die Gummipuer und die Gewindebolzen wie oben abgebildet an den
dafür vorgesehenen Befestigungslöchern der Backplate.
Insulation washer for Socket 775
Unterlagscheibe für Sockel 775
Backplate / Backplate
De-vibration
Gummipuer
Double-screw bolt
Gewindebolzen
Back plate installation (Intel)
Instruktion der Backplate (Intel)
Assemble the double-screw bolt into the mounting holes of motherboard.
Montieren Sie die Gewindebolzen an den Befestigungslöchern des Motherboards.
Front
Vorderseite
Back
Rückseite
Assemble the insulation pillar into double-screw bolt; Place the double-screw bolt at the right places
according to the holes of mounting bracket (INTEL), then fasten by nuts like shown.
Wie die Illustration zeigt, setzen Sie zuerst die Kunststohülsen und anschließend die Befestigungsstege
auf die Gewindebolzen. Danach xieren Sie diese mithilfe der im Lieferumfang enthaltenen
Daumenschrauben.
Achtung:
Bitte stellen Sie sicher, dass bei den
Befestigungsstegen der richtige Lochabstand für Ihren Sockel gewählt wurde.
Mounting holes of mounting bracket (Intel)
Montagelöcher der Befestigungsstege (Intel)
LGA 775
LGA 1366 LGA 1156/1155
Place the heatsink onto
the processor, attach the
retention plate to the
mounting bracket (INTEL) and fasten the
double-screw bolt into corresponding holes by
hand or tools, and secure the heatsink.
Setzen Sie den Kühlkörper auf den Prozessor und
platzieren Sie die Halteplatte. Montieren Sie nun den
Kühlkörper mit den Daumenschrauben an den
Befestigungsstegen.
Attach the fan to the heatsink with wire clips.
Montieren Sie den Wing Boost Lüfter mit den
Federstahlbügeln am Kühlk?rper.
Achtung:
Bitte achten Sie bei dualer Wing Boost
Konguration darauf, dass der Luftstrom beider
Lüfter übereinstimmt.
Attach the fan to the heatsink with wire clips.
Montieren Sie den Wing Boost Lüfter mit den
Federstahlbügeln am Kühlk?rper.
Achtung:
Bitte achten Sie bei dualer Wing Boost Konguration
darauf, dass der Luftstrom beider Lüfter
übereinstimmt.
Attach the fan to the heatsink with wire clips.
Montieren Sie den Wing Boost Lüfter mit den
Federstahlbügeln am Kühlk?rper.
Achtung:
Bitte achten Sie bei dualer Wing Boost Konguration
darauf, dass der Luftstrom beider Lüfter
übereinstimmt.
Finish the installation by connecting the fan cable
to the motherboard.
Zum Abschluss der Installation verbinden Sie nun
den Lüfter mit Ihrem Mainboard.
Finish the installation by connecting the fan cable
to the motherboard.
Zum Abschluss der Installation verbinden Sie nun
den Lüfter mit Ihrem Mainboard.
AM3+/AM3/AM2+/AM2/K8/FM1 Installation
Evenly apply a thin layer of thermal grease onto
the processor.
Tragen Sie eine gleichmäßige, dünne Schicht
Wärmeleitpaste auf dem Prozessor auf.
Remove the original retention frame from the
motherboard.
Entfernen Sie den ursprünglichen Halterahmen
von dem Motherboard.
Assemble the double-screw bolt into the mounting holes of motherboard.
Montieren Sie die Gewindebolzen an den Befestigungslöchern des Motherboards.
Back plate installation (AMD)
Instruktion der Backplate (AMD)
As illustrated, x the insulating washer,De-vibration buckle and double-screw bolt to the mounting holes
of back plate.
Fixieren Sie die Isolierscheibe, die Gummipuer und die Gewindebolzen wie oben abgebildet an den
dafür vorgesehenen Befestigungslöchern der Backplate.
AM3/AM2+/AM2/K8
Backplate / Backplate
De-vibration buckle
Gummipuer
Double-screw bolt
Gewindebolzen
Front
Vorderseite
Back
Rückseite
4
Evenly apply a thin layer of thermal grease onto
the processor.
Tragen Sie eine gleichmäßige, dünne Schicht
Wärmeleitpaste auf dem Prozessor auf.
Remove the original retention frame from the
motherboard.
Entfernen Sie den ursprünglichen Halterahmen
von dem Motherboard.
Assemble the double-screw bolt into the mounting holes of motherboard.
Montieren Sie die Gewindebolzen an den Befestigungslöchern des Motherboards.
Back plate installation (AMD)
Instruktion der Backplate (AMD)
As illustrated, x the insulating washer,De-vibration buckle and double-screw bolt to the mounting holes
of back plate.
Fixieren Sie die Isolierscheibe, die Gummipuer und die Gewindebolzen wie oben abgebildet an den
dafür vorgesehenen Befestigungslöchern der Backplate.
AM3/AM2+/AM2/K8
Backplate / Backplate
De-vibration buckle
Gummipuer
Double-screw bolt
Gewindebolzen
Front
Vorderseite
Back
Rückseite
Insert the insulation pillar to double-screw bolt, and
move the double-screw bolt to corresponding holes
of mounting bracket A (AMD) which is placed as
shown in illustration, then fasten by nuts.
Wie dei Illustration zeigt, setzen Sie zuerst die
Kunststohülsen und anschlie?end die
Befestigungsstege auf die Gewindebolzen. Danach
xieren Sie diese mithilfe der im Lieferumfang
enthaltenen Daumenschrauben.
65
6
Finish the installation by connecting the fan cable
to the motherboard.
Zum Abschluss der Installation verbinden Sie nun
den Lüfter mit Ihrem Mainboard.
Insert the insulation pillar to double-screw bolt,
and move the double-screw bolt to corresponding
holes of mounting bracket B (AMD) which is
placed as shown in illustration, then fasten by nuts.
Wie dei Illustration zeigt, setzen Sie zuerst die
Kunststohülsen und anschlie?end die
Befestigungsstege auf die Gewindebolzen. Danach
xieren Sie diese mithilfe der im Lieferumfang
enthaltenen Daumenschrauben.
Place the heatsink onto the
processor, attach the clip to
the mounting bracket B
(AMD), and thread the
screws into the corresponding holes by hand or
tools and secure the heatsink.
Setzen Sie den Kühlk?rper auf den Prozessor und
platzieren Sie dei Halteplatte. Montieren Sie nun
den Kühlk?rper mit den Daumenschrauben an den
Befestigungsstegen.
5 6
Place the heatsink onto the
processor, attach the clip to
the mounting bracket A
(AMD), and thread the
screws into the corresponding holes by hand or
tools and secure the heatsink.
Setzen Sie den Kühlk?rper auf den Prozessor und
platzieren Sie dei Halteplatte. Montieren Sie nun
den Kühlk?rper mit den Daumenschrauben an den
Befestigungsstegen.
4
AMD INSTALLATION ONE AMD INSTALLATION TWO
4
7 887
6
7
5
-
 1
1
-
 2
2


Alpenföhn Alpenföhn Matterhorn Rev.B Installationsanleitung
- Kategorie
- Komponenten für die Computerkühlung
- Typ
- Installationsanleitung
- Dieses Handbuch eignet sich auch für
in anderen Sprachen
Verwandte Artikel
Andere Dokumente
-
Thermaltake SPIN Q VT Benutzerhandbuch
-
Thermalright Archon SB-E X2 Spezifikation
-
 RAIJINTEK Tisis Benutzerhandbuch
-
Phanteks PH-TC14PE Benutzerhandbuch
-
 RAIJINTEK PallaS Benutzerhandbuch
-
 RAIJINTEK EREBOSS CORE EDITION Benutzerhandbuch
-
-
EK Water Blocks EK-KIT L240 Installationsanleitung
-
Xigmatek Crossbar Benutzerhandbuch
-


