
Installation advice (PCMCIA-F)
The installation of the PCMCIA-F card on a notebook computer should be performed strictly according
to th efollowing sequence description.
1. Install the PDA-software package from CD-ROM by using the installation batch-file (install.bat).
Alternatively, you may also copy the files from the CD-ROM to a dedicated directory (C:\pda) but
don't forget to erase the write protection (read-only attribute) of all related files!
2. Assure that the PDA-Dongle is properly plugged in the serial interface socket.
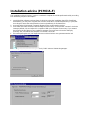
3. Start PDA and select the menu ➥PDA setup ➥System setup. on the filecard "General" check the
interrupt (default: 10) and adjust it in compliance with your computer if necessary. If you started
the PDA for the first time on your notebook computer you now have to leave the dialog by
pressing "OK" and reboot the computer. On the file card "FOB
1. die Interrupt-Eingabe mit „OK“ abgeschlossen und der Rechner neu gestartet werden.und
2. im Register „FOB/PCMCIA setup“ wird bei „FOB-F Adresse“ D0000 eingetragen.

3. Im Menü „PDA Einstellungen“ – „Modul Auswahl“ muß bei „Type“ PADU bzw. SM64 selektiert
werden, bei „Anschaltung“ jeweils FOB-F.
Prüfen sie nun mit Hilfe des PDA-Menüs „Hilfe/Diagnose“ ob sich der Interrupt Zähler mit ca. 1000
counts/s bewegt. Dazu muß der Padu an die PCMCIA-F Karte mit Hilfe des Spiralkabels
angeschlossen sein!
Wenn dies nicht der Fall ist, arbeitet PDA nicht! In diesem Fall testen sie bitte mit IR5 oder
IR11.
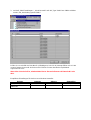
Empfohlene Einstellungen für Rechner verschiedener Hersteller:
Rechner Interrupt Adresse Slotposition
Siemens Mobile 510 AGP IR11 0xDC000
Toshiba Satellite
4080XCDT IR10 0xD0000 oben
-
 1
1
-
 2
2


