
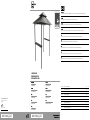
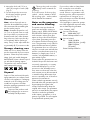
GRILLPAVILLON
BARBECUE PAVILION
PAVILLON POUR GRILL
02.11.2022 / PM 4:09
Klappen Sie vor dem Lesen die Seite mit den Abbildungen aus und machen Sie sich anschließend mit allen Funktionen des Artikels vertraut.
Before reading, fold out the illustration page and get to know all of the functions of your unit.
Dépliez la page avec les illustrations avant la lecture et informez-vous ensuite au sujet des fonctions de l‘appareil.
Klap voor het lezen de pagina met de afbeeldingen open en maak u vervolgens vertrouwd met alle functies van het apparaat.
Przed przeczytaniem należy rozłożyć bok z ilustracjami a następnie zapoznać się ze wszystkimi funkcjami urządzenia.
Před čtením si nejdříve vyklopte stránku s obrázky a seznamte se se všemi funkcemi přístroje.
Skôr než začnete návod čítať, si ho otvorte na strane s obrázkami a oboznámte sa so všetkými funkciami prístroja.
Antes de leer, abra la página con las ilustraciones y familiarícese seguidamente con todas las funciones del aparato.
Klap siden med illustrationerne op inden du læser dem og gør dig efterfølgende fortrolig med alle apparatets funktioner.
DE/AT/CH Aufbau- und Sicherheitshinweise Seite 08
GB/IE Assembly and safety information Page 10
FR/BE Consignes de montage et de sécurité Page 12
NL/BE Montage- en veiligheidstips Pagina 15
PL Wskazówki dot. montażu i bezpieczeństwa Strona 17
CZ Pokyny k sestavení a bezpečnosti Stránky 19
SK Pokyny pre montáž a bezpečnosť Stranu 21
ES Instrucciones de montaje y seguridad Página 23
DK Monterings- og sikkerhedsanvisninger Side 25
GRILLPAVILLON
Aufbauanleitung
PAVILLON POUR GRILL
Notice de montage
PAWILON GRILLOWY
Instrukcja montażu
GRILOVACÍ PAVILON
Návod k sestavení
GRILOVACÍ ALTÁNOK
Montážny návod
BARBECUE PAVILION
Assembly instructions
BARBECUEPAVILJOEN
Montagehandleiding
GRILLPAVILLON
Monteringsvejledning
PÉRGOLA PARA BARBACOA
Instrucciones de montaje
IAN 398442_2107IAN 398442_2107
DELTA-SPORT HANDELSKONTOR GMBH
Wragekamp 6 • DE-22397 Hamburg
GERMANY
12/2021
Delta-Sport-Nr.: GP-10202

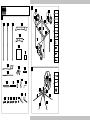
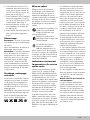
1 x 1 1 x 2 2 x 3 2 x 4
2 x 5
1 x 6
1 x 7
4 x 8
2 x 9
2 x 12 1 x 13
6 x 14 1 x 15
6 x 17 10 x 22
8 x 16
1 x 23 1 x 24
24 x 18 6 x 19 3 x 20 6 x 21
1 x 10 4 x 11
A
8
4x
9
2x
8
8
9
10
8
10
8
9
9
8
10
1x
C
5
14
18
21
24
1
1x
2
1x
3
2x
4
2x
2x
6x
16x
6x
1x
5
5
4
4
14
3
2
1
3
21
14
21
18
18
B

5
17
6x
22
6x
15
1x
19
2x
23
1x
24
1x
17
1
22
19
15
D
18
19
6
1x
11
4x
12
2x
13
1x
8x
4x
22
23
4x
1x
24
1x
7
1x
7
12
12
6
11
22
18
13
20
20
3x
19
18
E

6
16
8x
16
F

7
WICHTIG, FÜR SPÄTERE BEZUGNAHME AUFBEWAHREN:
SORGFÄLTIG LESEN!
IMPORTANT, RETAIN FOR FUTURE REFERENCE:
READ CAREFULLY!
IMPORTANT, À CONSERVER POUR CONSULTATION ULTÉRIEURE :
À LIRE ATTENTIVEMENT !
BELANGRIJK, BEWAREN VOOR LATERE RAADPLEGING:
ZORGVULDIG LEZEN!
WAŻNE, ZACHOWAĆ DO PÓŹNIEJSZEGO UŻYTKU:
UWAŻNIE PRZECZYTAĆ!
DŮLEŽITÉ, UCHOVEJTE PRO POZDĚJŠÍ POUŽITÍ:
PEČLIVĚ SI PŘEČTĚTE!
DÔLEŽITÉ, USCHOVAJTE PRE PRÍPAD POUŽITIA V BUDÚCNOSTI:
DÔKLADNE SI PREČÍTAJTE POKYNY!
IMPORTANTE: CONSERVAR PARA CONSULTAS POSTERIORES:
LEER ATENTAMENTE.
VIGTIGT, SKAL OPBEVARES TIL SENERE BRUG:
SKAL LÆSES OMHYGGELIGT!

8
Herzlichen Glückwunsch!
Mit Ihrem Kauf haben Sie sich für
einen hochwertigen Artikel ent-
schieden. Machen Sie sich vor der
ersten Verwendung mit dem Artikel
vertraut.
Lesen Sie hierzu aufmerk-
sam die nachfolgende
Aufbauanleitung und die
Sicherheitshinweise.
Benutzen Sie den Artikel nur wie be-
schrieben und für die angegebenen
Einsatzbereiche. Bewahren Sie diese
Aufbauanleitung gut auf. Händigen
Sie alle Unterlagen bei Weitergabe
des Artikels an Dritte ebenfalls mit
aus.
Lieferumfang (Abb. A)
4 x Bein (1–3)
2 x Querstange lang (4)
2 x Querstange kurz (5)
1 x Pavillon-Dach (6)
1 x Dachmitte (7)
4 x Dachstange mit Kurzstange (8)
2 x Dachstange (9)
1 x Eckverbindung (10)
4 x Ablagestange (11)
2 x Ablage (12)
1 x Hakenleiste (13)
6 x Dachverbindung (14)
1 x Flaschenöffner (15)
8 x Erdnagel (16)
6 x Schraube, M6x25 (17)
24 x Schraube, M6x20 (18)
6 x Schraube, M6x15 (19)
3 x Schraube, M6x12 (20)
6 x Schraube, M6x10 (21)
10 x Schraubenmutter (22)
1 x Schraubenschlüssel (23)
1 x Innensechskantschlüssel (24)
1 x Aufbauanleitung
Technische Daten
Maße:
ca. 243 x 152 x 260 cm (B x T x H)
Herstellungsdatum
(Monat/Jahr): 12/2021
Bestimmungsgemäße
Verwendung
Der Artikel ist als Sonnenschutz im
Außenbereich konzipiert. Er ist nicht
für eine Dauernutzung im Außenbe-
reich vorgesehen, da er nur bedingt
wetterbeständig ist. Der Artikel ist
nicht für den gewerblichen Ge-
brauch bestimmt.
Sicherheitshinweise
Lesen Sie alle Sicherheitshin-
weise und Anweisungen. Ver-
säumnisse bei der Einhaltung
können schwere Verletzun-
gen verursachen.
• Stellen Sie den Artikel auf einen
ebenerdigen Untergrund. Prüfen
Sie vor jedem Gebrauch, dass alle
Teile sachgerecht montiert wurden.
• Eine nicht korrekt durchgeführte
Montage kann die Sicherheit und
Funktion beeinträchtigen.
Lebensgefahr!
• Lassen Sie Kinder niemals unbeauf-
sichtigt mit dem Verpackungsmaterial.
Es besteht Erstickungsgefahr.
Verletzungsgefahr!
• Der Artikel darf nicht bei widrigen
Wetterbedingungen wie starkem
Wind, Regen oder Schnee ver-
wendet werden.
• Abbau des Pavillions bei zu erwarten-
den Windgeschwindigkeiten größer
als 40 km/h (frischer Wind, größere
Zweige und Bäume bewegen sich
und der Wind ist deutlich hörbar).
• Der Artikel darf nur unter Aufsicht
von Erwachsenen und nicht als
Spielzeug verwendet werden.
• Demontieren Sie den Artikel bei
auffrischendem Wind oder ande-
ren widrigen Wetterbedingungen.
• Kein offenes Feuer, Heizpilze in oder
in der Nähe der Pavillions! Sollte
ein Pavillion trotzdem Feuer fangen,
verlassen Sie ihn sofort! Löschen Sie
den Brand mit einem Feuerlöscher
oder Wasser. Alamieren Sie bei
Bedarf umgehend die Feuerwehr.
• Einzelne Pavillons dürfen nicht
verbunden oder miteinander be-
festigt werden. Zwischen einzelnen
Pavillons muss ein Mindestabstand
von 3 m eingehalten werden.
• Entstehende Wassersäcke sind zu
leeren!
Standortauswahl
Platzieren Sie den Artikel möglichst
an einer windgeschützten Stelle. Der
Boden sollte eben sein und den Erd-
nägeln genügend Festigkeit geben.
Aufbau
Hinweis: Zum Aufbau des Artikels
werden mindestens 2 Personen
benötigt.
Wir empfehlen, den Aufbau mit 4
Personen durchzuführen.
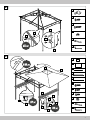
1. Verbinden Sie die Beine (1-3) mit
den Querstangen (4-5), wie in
Abb. B gezeigt, mithilfe der mittle-
ren Schrauben (18).
2. Befestigen Sie auf den Ecken und
den zwei Seiten des Konstrukts
die Dachverbindungen (14)
mit den kurzen Schrauben (21)
(Abb. B).
3. Stecken Sie die Dachstangen (8)
und (9) in die Eckverbindung (10),
wie in Abb. C gezeigt.
4. Setzen Sie das Dachgerüst auf
den Unterbau und befestigen
Sie es mit den langen Schrau-
ben (17) und den Schraubenmut-
tern (22) mithilfe des Innensechs-
kantschlüssels (24) (Abb. D).
5. Schrauben Sie den Flaschen-
öffner (15) mit den kurzen
Schrauben (19) an das Bein (1)
(Abb. D).
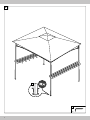
6. Ziehen Sie zuerst das Dach (6)
über die Enden der Dachstan-
gen (8) und (9) und dann die
Dachmitte (7) über die Kurz-
stangen der Dachstangen (8)
(Abb. E).
7. Befestigen Sie die Ablage (12)
mithilfe der Ablagestangen (11)
und den Schrauben (19) und (18)
und den Schraubenmuttern (22),
wie in Abb. E gezeigt.
DE/AT/CH

9DE/AT/CH
8. Montieren Sie an eine Abla-
ge (12) die Hakenleiste (13)
mithilfe der Schrauben (20)
(Abb. E).
9. Fixieren Sie den Artikel mit den
Erdnägeln (16) an einem geeig-
neten ebenen Ort (Abb. F).
Abbau
Hinweis: Zum Abbau des Artikels
werden mindestens 2 Personen
benötigt.
Wir empfehlen, den Abbau mit 4
Personen durchzuführen.
Hinweis: Bauen Sie das Pavillon-
Dach (6–7) möglichst in sauberem
und trockenem Zustand ab, um
Schimmelbildung bzw. Stockflecken
zu vermeiden. Nach einem Abbau
im Regen trocknen Sie das Dach
vollständig, bevor Sie es verpacken.
Führen Sie die beim Aufbau aufge-
führten Schritte (B–F) in umgekehrter
Reihenfolge aus.
Lagerung, Reinigung,
Pflege
Lagern Sie den Artikel bei Nichtbenut-
zung immer trocken und sauber bei
Raumtemperatur. Reinigen Sie den
Artikel mit einem feuchten Tuch und
mit einem milden Reinigungsmittel.
WICHTIG! Nie mit scharfen Reini-
gungsmitteln reinigen.
Das Pavillon-Dach kann mit Impräg-
nierspray behandelt werden.
Hinweise zur
Entsorgung
Entsorgen Sie den Artikel und die
Verpackungsmaterialien entspre-
chend aktueller örtlicher Vorschrif-
ten. Verpackungsmaterialien, wie
z. B. Folienbeutel, gehören nicht in
Kinderhände. Bewahren Sie das
Verpackungsmaterial für Kinder
unerreichbar auf.
Entsorgen Sie den Artikel und
die Verpackung umweltscho-
nend.
Der Recycling-Code dient der
Kennzeichnung verschiedener
Materialien zur Rückführung in
den Wiederverwertungskreislauf
(Recycling). Der Code besteht aus
dem Recyclingsymbol – das den
Verwertungskreislauf widerspiegeln
soll – und einer Nummer, die das
Material kennzeichnet.
Hinweise zur Garantie
und Serviceabwicklung
Der Artikel wurde mit großer Sorg-
falt und unter ständiger Kontrolle
produziert. DELTA-SPORT HAN-
DELSKONTOR GmbH räumt priva-
ten Endkunden auf diesen Artikel
drei Jahre Garantie ab Kaufdatum
(Garantiefrist) nach Maßgabe der
folgenden Bestimmungen ein. Die
Garantie gilt nur für Material- und
Verarbeitungsfehler. Die Garantie
erstreckt sich nicht auf Teile, die der
normalen Abnutzung unterliegen
und deshalb als Verschleißteile an-
zusehen sind (z. B. Batterien) sowie
nicht auf zerbrechliche Teile, z. B.
Schalter, Akkus oder Teile, die aus
Glas gefertigt sind.
Ansprüche aus dieser Garantie sind
ausgeschlossen, wenn der Artikel
unsachgemäß oder missbräuchlich
oder nicht im Rahmen der vorgese-
henen Bestimmung oder des vorge-
sehenen Nutzungsumfangs verwen-
det wurde oder Vorgaben in der
Anleitung/Anweisung nicht beachtet
wurden, es sei denn, der Endkunde
weist nach, dass ein Material- oder
Verarbeitungsfehler vorliegt, der
nicht auf einem der vorgenannten
Umstände beruht.
Ansprüche aus der Garantie können
nur innerhalb der Garantiefrist unter
Vorlage des Originalkassenbelegs
geltend gemacht werden.
Bitte bewahren Sie deshalb den Ori-
ginalkassenbeleg auf. Die Garantie-
frist wird durch etwaige Reparaturen
aufgrund der Garantie, gesetzlicher
Gewährleistung oder Kulanz nicht
verlängert. Dies gilt auch für ersetzte
und reparierte Teile.
Bitte wenden Sie sich bei Beanstan-
dungen zunächst an die untenste-
hende Service-Hotline oder setzen
Sie sich per E-Mail mit uns in Verbin-
dung. Liegt ein Garantiefall vor, wird
der Artikel von uns – nach unserer
Wahl – für Sie kostenlos repariert,
ersetzt oder der Kaufpreis erstattet.
Weitere Rechte aus der Garantie
bestehen nicht.
Ihre gesetzlichen Rechte, insbeson-
dere Gewährleistungsansprüche ge-
genüber dem jeweiligen Verkäufer,
werden durch diese Garantie nicht
eingeschränkt.
IAN: 398442_2107
Kundenservice Deutschland
Tel.: 0800-5435111
E-Mail: deltaspor[email protected]
Service Österreich
Tel.: 0820 201 222
(0,15 EUR/Min.)
E-Mail: deltaspor[email protected]
Service Schweiz
Tel.: 0842 665566
(0,08 CHF/Min.,
Mobilfunk max.
0,40 CHF/Min.)
E-Mail: deltaspor[email protected]

10
Congratulations!
You have chosen to purchase a
high-quality product. Familiarise
yourself with the product before
using it for the first time.
Read the following as-
sembly instructions and
the safety information
carefully.
Use the product only as described
and only for the given areas of
application. Store these assembly
instructions carefully. When pass-
ing the product on to third parties,
please also hand over all accompa-
nying documents.
Package contents
(Fig. A)
4 x leg (1–3)
2 x crosspiece, long (4)
2 x crosspiece, short (5)
1 x pavilion roof (6)
1 x roof centrepiece (7)
4 x roof rod with short rod (8)
2 x roof rod (9)
1 x corner connector (10)
4 x shelf rod (11)
2 x shelf (12)
1 x hook rail (13)
6 x roof connector (14)
1 x bottle opener (15)
8 x ground peg (16)
6 x screw, M6x25 (17)
24 x screw, M6x20 (18)
6 x screw, M6x15 (19)
3 x screw, M6x12 (20)
6 x screw, M6x10 (21)
10 x nut (22)
1 x spanner (23)
1 x hex key (24)
1 x assembly instructions
Technical data
Dimensions:
approx. 243 x 152 x 260cm
(W x D x H)
Date of manufacture
(month/year): 12/2021
Intended use
The product is designed as sun
protection for outdoor use. It is not
intended for permanent outdoor
use, as it is only weatherproof to
a limited extent. The product is not
intended for commercial use.
Safety information
Read all safety information
and instructions. Failure to
adhere to these may result in
severe injury.
• Place the product on an even
surface.
• Check that all parts have been
properly assembled before each
use. Improper installation can
impair the safety and functionality
of the product.
Danger to life!
• Never leave children unattended
with the packaging materials.
There is a risk of suffocation.
Risk of injury!
• The product must not be used in
adverse weather conditions such
as strong winds, rain or snow.
• Take down the pavilion if wind
speeds higher than 40km/h
(strong breeze, larger branches
and trees move, and the wind is
clearly audible) are expected.
• The product may only be used
under adult supervision and must
not be used as a toy.
• Disassemble the product if the
wind picks up or in case of other
adverse weather conditions.
• Keep open flames and patio heat-
ers away from the pavilion! How-
ever, should a pavilion catch fire,
leave it immediately! Extinguish
the blaze with a fire extinguisher
or with water. Immediately alert
the fire brigade if necessary.
• Individual pavilions must not be
connected or attached to one
another. Individual pavilions must
be at least 3m apart from one
another.
• Any pooled water must be emp-
tied!
Selecting a location
Place the product in a spot least sus-
ceptible to wind. The ground should
be even and provide sufficient stabil-
ity for the ground pegs.
Assembly
Note: at least 2 people are re-
quired to assemble the product.
We recommend assembling the
product with 4 people.
1. Connect the legs (1–3) with the
crosspieces (4–5), as shown
in Fig. B, using the medium
screws (18).
2. Attach the roof connectors (14)
at the corners and the two sides
of the structure using the short
screws (21) (Fig. B).
3. Insert the roof rods (8) and (9)
into the corner connectors (10),
as shown in Fig. C.
4. Place the roof frame onto the
base structure and attach it with
the screws (17) and nuts (22)
using the hex key (24) (Fig. D).
5. Screw the bottle opener (15)
to the leg (1) with the short
screws (19) (Fig. D).
6. First pull the roof (6) over the
ends of the roof rods (8) and (9)
and then pull the roof centre-
piece (7) over the short rods of
the roof rods (8) (Fig. E).
7. Attach the shelf (12) using
the shelf rods (11) and the
screws (19) and (18) and the
nuts (22), as shown in Fig. E.
GB/IE

11GB/IE
8. Mount the hook rail (13) to a
shelf (12) using the screws (20)
(Fig. E).
9. Secure the product at a suita-
ble location with the ground
pegs (16) (Fig. F).
Disassembly
Note: at least 2 people are re-
quired to disassemble the product.
We recommend disassembling the
product with 4 people.
Note: dismantle the pavilion roof
(6–7) in as dry and clean a condi-
tion as possible, to prevent mould
formation and stains. After disman-
tling in the rain, let the product dry
out completely before packing it
away. Carry out the steps taken dur-
ing assembly (B–F) in reverse order.
Storage, cleaning, care
When not in use, always store the
product clean and dry at room tem-
perature. Clean the product with a
damp cloth and a mild detergent.
IMPORTANT! Never clean the prod-
uct with harsh cleaning agents.
The pavilion roof can be treated
with waterproofing spray.
Disposal
Dispose of the article and the pack-
aging materials in accordance with
current local regulations. Packaging
materials such as foil bags are not
suitable to be given to children.
Keep the packaging materials out of
the reach of children.
Dispose of the products and
the packaging in an environ-
mentally friendly manner.
The recycling code is used to
identify various materials for
recycling.
The code consists of the recycling
symbol – which is meant to reflect
the recycling cycle – and a number
which identifies the material.
Notes on the guarantee
and service handling
The product was produced with
great care and under continuous
quality control. DELTA-SPORT HAN-
DELSKONTOR GmbH gives private
end customers a three-year guar-
antee on this product from the date
of purchase (guarantee period) in
accordance with the following provi-
sions. The guarantee is only valid for
material and manufacturing defects.
The guarantee does not cover parts
subject to normal wear and tear that
are thus considered wear parts (e.g.
batteries) or fragile parts such as
switches, rechargeable batteries, or
parts made of glass.
Claims under this guarantee are ex-
cluded if the product has been used
incorrectly, improperly, or contrary
to the intended purpose, or if the
provisions in the Assembly instruc-
tions were not observed, unless the
end customer proves that a material
or manufacturing defect exists that
was not caused by one of the afore-
mentioned circumstances.
Claims under the guarantee can only
be made within the guarantee period
by presenting the original sales
receipt. Please therefore keep the
original sales receipt. The guarantee
period is not extended by any repairs
carried out under the guarantee,
under statutory guarantees, or as a
gesture of goodwill. This also applies
to replaced and repaired parts.
If you wish to make a claim please
first contact the service hotline
mentioned below or contact us by
e-mail. If there is a guarantee case,
then the product will be repaired or
replaced free of charge to you or
the purchase price will be refunded,
depending on our choice.
Your legal rights, in particular guaran-
tee claims against the respective seller,
are not limited by this guarantee.
IAN: 398442_2107
Service Great Britain
Tel.: 0800 404 7657
E-Mail: deltasport@lidl.co.uk
Service Ireland
Tel.: 1890 930 034
(0,08 EUR/Min., (peak))
(0,06 EUR/Min.,
(off peak))
E-Mail: deltasport@lidl.ie

12
Félicitations !
Vous venez d’acquérir un article de
grande qualité. Avant la première
utilisation, familiarisez-vous avec
l’article.
Pour cela, veuillez lire
attentivement la notice de
montage suivante et les
consignes de sécurité.
Utilisez l’article uniquement comme
indiqué et pour les domaines
d’utilisation mentionnés. Conservez
cette notice de montage. Si vous
cédez l’article à un tiers, veillez à lui
remettre l’ensemble de la documen-
tation.
Étendue de la livraison
(fig. A)
4 pieds (1 - 3)
2 barres transversales longues (4)
2 barres transversales courtes (5)
1 toit de pavillon (6)
1 partie centrale du toit (7)
4 barres de toit avec barre courte (8)
2 barres de toit (9)
1 raccord d’angle (10)
4 barres de rangement (11)
2 tablettes (12)
1 barre à crochets (13)
6 jonctions de toit (14)
1 décapsuleur (15)
8 piquets (16)
6 vis M6x25 (17)
24 vis M6x20 (18)
6 vis M6x15 (19)
3 vis M6x12 (20)
6 vis M6x10 (21)
10 écrous (22)
1 clé à écrous (23)
1 clé hexagonale (24)
1 notice de montage
Caractéristiques
techniques
Dimensions :
env. 243 x 152 x 260 cm
(La x P x H)
Date de fabrication
(mois/année) : 12/2021
Utilisation conforme à
sa destination
L’article est conçu pour se protéger
du soleil en extérieur. Il n’est pas
destiné à être utilisé en permanence
à l’extérieur, car il n’est résistant
aux intempéries que sous certaines
conditions. L’article n’est pas prévu
pour une utilisation commerciale.
Consignes de sécurité
Lisez toutes les consignes de
sécurité et instructions. Le
non-respect de cette recom-
mandation peut entraîner des
blessures graves.
• Posez l’article sur un sol plan.
• Avant chaque utilisation, vérifiez
que toutes les pièces ont été cor-
rectement assemblées. Un mon-
tage réalisé de manière incorrecte
peut compromettre la sécurité et le
bon fonctionnement.
Danger de mort !
• Ne laissez jamais les enfants
sans surveillance avec le matériel
d’emballage. Il existe un danger
de suffocation.
Risque de blessure !
• L’article ne doit pas être utilisé
dans des conditions météorolo-
giques défavorables telles que le
vent fort, la pluie ou la neige.
• Démontage du pavillon à des
vitesses de vent attendues supé-
rieures à 40 km/h (vent frais,
branches et arbres plus gros en
mouvement et vent clairement
audible).
• L’article ne doit être utilisé que
sous la surveillance d’adultes et
non pas comme un jouet.
• Démontez l’article en cas de vent
violent ou d’autres conditions mé-
téorologiques défavorables.
• Pas de feu ouvert ou de chauffage
de terrasse à l’intérieur ou à proxi-
mité du pavillon ! Si un pavillon
prend feu malgré tout, quittez-le
immédiatement ! Éteignez le feu
avec un extincteur ou de l’eau. Si
nécessaire, alertez immédiatement
les pompiers.
• Des pavillons individuels ne
doivent pas être reliés ou attachés
ensemble. Une distance minimale
de 3 m doit être respectée entre
chaque pavillon.
• Les poches d’eau qui se forment
doivent être vidées !
Choix du site
Si possible, placez l’article dans un
endroit à l’abri du vent. Le sol doit
être plan et donner aux piquets une
résistance suffisante.
Montage
Remarque : au moins 2 personnes
sont nécessaires pour le montage de
l’article.
Nous recommandons de réaliser le
montage à 4 personnes.
1. Reliez les pieds (1 à 3) aux
barres transversales (4 à 5)
comme illustré dans la fig. B à
l’aide des vis moyennes (18).
2. Fixez les jonctions de toit (14)
sur les coins et les deux côtés
de la structure à l’aide des vis
courtes (21) (fig. B).
3. Insérez les barres de toit (8) et (9)
dans le raccord d’angle (10)
comme illustré dans la fig. C.
4. Placez la charpente sur le sup-
port et fixez-la avec les vis (17) et
les écrous (22) à l’aide de la clé
hexagonale (24) (fig. D).
5. Vissez le décapsuleur (15)
au pied (1) à l’aide des vis
courtes (19) (fig. D).
FR/BE

13FR/BE
6. Tirez d’abord le toit (6) sur les
extrémités des barres de toit (8)
et (9), puis la partie centrale du
toit (7) sur les barres courtes des
barres de toit (8) (fig. E).
7. Fixez la tablette (12) à l’aide des
barres de rangement (11) et les
vis (19) et (18) et les écrous (22),
comme illustré dans la fig. E.
8. Montez la barre à crochets (13)
à une tablette (12) à l’aide des
vis (20) (fig. E).
9. Fixez l’article avec les piquets (16)
dans un lieu plat et approprié
(fig. F).
Démontage
Remarque : au moins 2 personnes
sont nécessaires pour le démontage
de l’article.
Nous recommandons de réaliser le
démontage à 4 personnes.
Remarque : si possible, démontez
le toit de pavillon (6 à 7) dans un
état propre et sec pour éviter la for-
mation de moisissure ou des taches
d’humidité. Après un démontage
sous la pluie, il est nécessaire de
sécher entièrement le toit avant de
le ranger. Suivez les étapes mention-
nées lors du montage (B à F) dans
l’ordre inverse.
Stockage, nettoyage,
entretien
Lorsque vous n’utilisez pas l’article,
rangez-le toujours dans un endroit
sec et propre à une température
ambiante. Nettoyez l’article avec
un chiffon humide et un produit de
nettoyage doux.
IMPORTANT ! Ne jamais laver avec
des produits de nettoyage agressifs.
Le toit du pavillon peut être traité
avec un spray d’imprégnation.
Mise au rebut
Éliminez l‘article et le matériel
d‘emballage conformément aux
directives locales en vigueur. Le
matériel d‘emballage tel que les
sachets en plastique par exemple ne
doivent pas arriver dans les mains
des enfants. Conservez le matériel
d‘emballage hors de portée des
enfants.
Ce produit est recyclable. Il est
soumis à la responsabilité
élargie du fabricant et est
collecté séparément.
Éliminez les produits et les
emballages dans le respect de
l‘environnement.
Le code de recyclage est
utilisé pour identifier les
différents matériaux pour le
retour dans le circuit de recyclage.
Le code se compose du symbole de
recyclage, qui doit correspondre au
circuit de recyclage, et d‘un numéro
identifiant le matériau.
Indications concernant
la garantie et le service
après-vente
L’article a été produit avec grand
soin et sous un contrôle constant.
DELTA-SPORT HANDELSKONTOR
GmbH accorde au client final privé
une garantie de trois ans sur cet
article à compter de la date d’achat
(période de garantie) conformément
aux dispositions suivantes. La ga-
rantie ne vaut que pour les défauts
de matériaux et de fabrication. La
garantie ne couvre pas les pièces
soumises à une usure normale,
lesquelles doivent donc être consi-
dérées comme des pièces d’usure
(comme par ex. les piles), de même
qu’elle ne couvre pas les pièces fra-
giles, telles que les interrupteurs, les
batteries ou les pièces fabriquées en
verre.
Les réclamations au titre de cette
garantie sont exclues si l’article a
été utilisé de manière abusive ou
inappropriée, hors du cadre de son
usage ou du champ d’application
prévu ou si les instructions de la
Notice de montage n’ont pas été
respectées, à moins que le client
final ne prouve que l´article présen-
tait un défaut de matériau ou de fa-
brication n´étant pas dû à l’une des
conditions mentionnées ci-dessus.
Les réclamations au titre de la
garantie ne peuvent être adressées
pendant la période de garantie
qu’en présentant le ticket de caisse
original. Veuillez pour cela conser-
ver le ticket de caisse original. Ceci
s’applique également aux pièces
remplacées et réparées.
Si vous avez des plaintes à formuler,
veuillez d’abord contacter le service
d’assistance téléphonique ci-dessous
ou nous contacter par courrier élec-
tronique. Si le cas est couvert par la
garantie, nous nous engageons - à
notre appréciation - à réparer ou
à remplacer l’article gratuitement
pour vous ou à vous rembourser le
prix d’achat. Aucun autre droit ne
découle de la garantie.
Vos droits légaux, en particulier les
droits de garantie contre le vendeur
concerné, ne sont pas limités par
cette garantie.
Article L217-16 du Code de la
consommation
Lorsque l‘acheteur demande au
vendeur, pendant le cours de la
garantie commerciale qui lui a été
consentie lors de l‘acquisition ou
de la réparation d‘un bien meuble,
une remise en état couverte par la
garantie, toute période d‘immobi-
lisation d‘au moins sept jours vient
s‘ajouter à la durée de la garantie
qui restait à courir.

14
Cette période court à compter de la
demande d‘intervention de l‘ache-
teur ou de la mise à disposition pour
réparation du bien en cause, si cette
mise à disposition est postérieure à
la demande d‘intervention.
Indépendamment de la garantie
commerciale souscrite, le vendeur
reste tenu des défauts de conformité
du bien et des vices rédhibitoires
dans les conditions prévues aux
articles L217-4 à L217-13 du Code
de la consommation et aux articles
1641 à 1648 et 2232 du Code
Civil.
Article L217-4 du Code de la
consommation
Le vendeur livre un bien conforme
au contrat et répond des défauts de
conformité existant lors de la déli-
vrance.
Il répond également des défauts de
conformité résultant de l‘emballage,
des instructions de montage ou de
l‘installation lorsque celle-ci a été
mise à sa charge par le contrat ou a
été réalisée sous sa responsabilité.
Article L217-5 du Code de la
consommation
Le bien est conforme au contrat :
1° S´il est propre à l‘usage habi-
tuellement attendu d‘un bien sem-
blable et, le cas échéant :
• s‘il correspond à la description
donnée par le vendeur et pos-
séder les qualités que celui-ci a
présentées à l‘acheteur sous forme
d‘échantillon ou de modèle ;
• s‘il présente les qualités qu‘un
acheteur peut légitimement at-
tendre eu égard aux déclarations
publiques faites par le vendeur,
par le producteur ou par son
représentant, notamment dans la
publicité ou l‘étiquetage ;
2° Ou s‘il présente les caractéris-
tiques définies d‘un commun accord
par les parties ou être propre à tout
usage spécial recherché par l‘ache-
teur, porté à la connaissance du
vendeur et que ce dernier a accep-
té.
Article L217-12 du Code de la
consommation
L‘action résultant du défaut de
conformité se prescrit par deux ans
à compter de la délivrance du bien.
Article 1641 du Code civil
Le vendeur est tenu de la garantie
à raison des défauts cachés de la
chose vendue qui la rendent im-
propre à l‘usage auquel on la des-
tine, ou qui diminuent tellement cet
usage que l‘acheteur ne l‘aurait pas
acquise, ou n‘en aurait donné qu‘un
moindre prix, s‘il les avait connus.
Article 1648 1er alinéa du
Code civil
L‘action résultant des vices rédhibi-
toires doit être intentée par l‘acqué-
reur dans un délai de deux ans à
compter de la découverte du vice.
Les pièces détachées indispensables
à l’utilisation du produit sont dis-
ponibles pendant la durée de la
garantie du produit.
IAN : 398442_2107
Service France
Tel. : 0800 919270
Service Belgique
Tel. : 070 270 171
(0,15 EUR/Min.)
FR/BE

15NL/BE
Gefeliciteerd!
Met uw aankoop hebt u voor een
hoogwaardig artikel gekozen. Zorg
ervoor dat u voor het eerste gebruik
met het artikel vertrouwd raakt.
Lees hiervoor de volgen-
de montagehandleiding
en de veiligheidstips
zorgvuldig door.
Gebruik het artikel alleen zoals om-
schreven en voor het aangegeven
doel. Bewaar deze montagehand-
leiding goed. Geef alle documenten
mee als u het artikel aan iemand
anders geeft.
Leveringsomvang
(afb. A)
4 x poot (1 - 3)
2 x dwarsstang lang (4)
2 x dwarsstang kort (5)
1 x paviljoendak (6)
1 x dakmidden (7)
4 x dakstang met korte stang (8)
2 x dakstang (9)
1 x hoekverbinding (10)
4 x plateaustang (11)
2 x plateau (12)
1 x hakenlijst (13)
6 x dakverbinding (14)
1 x flesopener (15)
8 x grondpen (16)
6 x schroef, M6x25 (17)
24 x schroef, M6x20 (18)
6 x schroef, M6x15 (19)
3 x schroef, M6x12 (20)
6 x schroef, M6x10 (21)
10 x moer (22)
1 x moersleutel (23)
1 x binnenzeskantsleutel (24)
1 x montagehandleiding
Technische gegevens
Afmetingen:
ca. 243 x 152 x 260 cm (b x d x h)
Productiedatum
(maand/jaar): 12/2021
Beoogd gebruik
Het artikel is ontworpen als zonwe-
ring voor gebruik buitenshuis. Het
is niet bedoeld voor permanent
gebruik buitenshuis, omdat het
maar beperkt weerbestendig is. Het
artikel is niet bestemd voor zakelijk
gebruik.
Veiligheidstips
Lees alle veiligheidstips en
aanwijzingen. Indien deze
niet worden opgevolgd, kan
dit ernstig letsel tot gevolg
hebben.
• Plaats het artikel op een horizonta-
le ondergrond.
• Controleer voor elk gebruik of alle
onderdelen juist zijn gemonteerd.
Een onjuist uitgevoerde montage
kan de veiligheid en werking beïn-
vloeden.
Levensgevaar!
• Laat kinderen nooit zonder toe-
zicht alleen met het verpakkings-
materiaal. Er bestaat verstikkings-
gevaar.
Gevaar voor blessures!
• Het artikel mag niet in ongunstige
weersomstandigheden zoals har-
de wind, regen of sneeuw worden
gebruikt.
• Demonteer het paviljoen wanneer
er windsnelheden van meer dan
40 km/h worden verwacht (frisse
wind, grotere takken en bomen
bewegen en de wind is duidelijk
hoorbaar).
• Het artikel mag alleen worden
gebruikt onder toezicht van
volwassenen en mag niet worden
gebruikt als speelobject.
• Demonteer het artikel bij toene-
mende wind of andere ongunstige
weersomstandigheden.
• Gebruik geen open vuur of terras-
verwarmers in of in de buurt van
het paviljoen! Verlaat het pavil-
joen direct als het desondanks in
brand raakt! Blus de brand met
een brandblusser of water. Waar-
schuw indien nodig de brandweer
onmiddellijk.
• Afzonderlijke paviljoenen mogen
niet worden verbonden of aan
elkaar worden bevestigd. Tussen
afzonderlijke paviljoenen moet
een afstand van ten minste 3 m in
acht worden genomen.
• Als er waterzakken ontstaan, moe-
ten deze worden geleegd!
Locatiekeuze
Plaats het artikel zo mogelijk op een
tegen de wind beschutte plaats. De
grond moet vlak zijn en de grond-
pennen moeten voldoende stevig-
heid bieden.
Montage
Aanwijzing: de montage van het
artikel moet door ten minste 2 perso-
nen worden uitgevoerd.
Wij raden aan de montage met
4 personen uit te voeren.
1. Verbind met behulp van de
middellange schroeven (18) de
poten (1 - 3) en de dwarsstan-
gen (4 - 5) met elkaar zoals
getoond in afb. B.
2. Bevestig met de korte schroe-
ven (21) de dakverbindin-
gen (14) op de hoeken en twee
zijden van de constructie (afb. B).
3. Steek de dakstangen (8) en (9)
in de hoekverbinding (10) zoals
getoond in afb. C.
4. Plaats het dakframe op de onder-
bouw en maak het vast met de
schroeven (17) en moeren (22).
Gebruik hiervoor de binnenzes-
kantsleutel (24) (afb. D).

16 NL/BE
5. Schroef de flesopener (15) met
de korte schroeven (19) vast aan
de poot (1) (afb. D).
6. Trek eerst het dak (6) over de
uiteinden van de dakstangen (8)
en (9) en daarna het dakmid-
den (7) over de korte stangen
van de dakstangen (8) (afb. E).
7. Bevestig het plateau (12) met be-
hulp van de plateaustangen (11),
de schroeven (19) en (18) en de
moeren (22) zoals getoond in
afb. E.
8. Monteer aan één plateau (12)
de hakenlijst (13) met behulp van
de schroeven (20) (afb. E).
9. Zet het artikel op een geschikte,
vlakke plaats vast met de grond-
pennen (16) (afb. F).
Demontage
Aanwijzing: de demontage van
het artikel moet door ten minste
2 personen worden uitgevoerd.
Wij raden aan de demontage met
4 personen uit te voeren.
Aanwijzing: demonteer het
paviljoendak (6 - 7) zo mogelijk
in schone en droge toestand om
schimmelvorming resp. vochtvlekken
te voorkomen. Laat na een demon-
tage in de regen het dak volledig
drogen, voordat u het inpakt. Voor
de voor de montage beschreven
stappen (B - F) in omgekeerde volg-
orde uit.
Opslag, reiniging,
onderhoud
Bewaar het artikel wanneer u dit niet
gebruikt altijd droog en schoon op
kamertemperatuur. Reinig het artikel
met een vochtige doek en een mild
schoonmaakmiddel.
BELANGRIJK! Reinig nooit met
agressieve reinigingsmiddelen.
Het paviljoendak kan met impreg-
neerspray worden behandeld.
Afvalverwerking
Voer het artikel en verpakkingsma-
terialen in overeenstemming met
actuele lokale voorschriften af. Ver-
pakkingsmaterialen, zoals bv. folie-
zakjes, horen niet thuis in kinderhan-
den. Berg het verpakkingsmateriaal
buiten het bereik van kinderen op.
Voer de producten en verpak-
kingen op milieuvriendelijke
wijze af.
De recyclingcode dient om
verschillende materialen te
kenmerken ten behoeve van
hergebruik via het recyclingproces.
De code bestaat uit het recy-
clingsymbool, dat het recyclingpro-
ces weerspiegelt, en een getal dat
het materiaal identificeert.
Opmerkingen over
garantie en
serviceafhandeling
Het artikel werd met de grootste
zorgvuldigheid en onder permanent
toezicht geproduceerd. De firma
DELTA-SPORT HANDELSKONTOR
GmbH verleent particuliere
eindklanten op dit artikel drie jaar
garantie, te rekenen vanaf de datum
van aankoop (garantietermijn)
en dit op grond van de volgende
bepalingen. De garantie geldt
alleen voor materiaal- en
verwerkingsfouten. De garantie is
niet van toepassing op onderdelen
die aan een normale slijtage
onderhevig zijn en daarom als niet-
slijtvaste onderdelen te beschouwen
zijn (bv. batterijen) en evenmin
op breekbare onderdelen, bv.
schakelaars, accu’s of onderdelen
die van glas gemaakt zijn.
Uit de garantie voortvloeiende
claims zijn uitgesloten als het artikel
onvakkundig, verkeerd of niet in het
kader van de voorziene bepaling
of in het kader van het voorziene
gebruiksdoeleinde gebruikt werd
of indien richtlijnen in de Montage-
handleiding niet in acht genomen
werden, tenzij de eindklant aantoont
dat er sprake is van een materiaal-
of verwerkingsfout die niet op één
van de hoger vermelde omstandig-
heden gebaseerd is.
Uit de garantie voortvloeiende
claims kunnen alleen tijdens de ga-
rantieperiode op vertoon van de ori-
ginele kassabon ingediend worden.
Gelieve daarom de originele kassa-
bon te bewaren. De garantieperio-
de wordt door eventuele reparaties
op grond van de garantie, wettelijke
waarborg of coulance niet verlengd.
Dit geldt ook voor vervangen en
gerepareerde onderdelen.
Gelieve u bij klachten in eerste
instantie tot de hieronder vermelde
servicehotline te richten of met ons
per e-mail contact op te nemen. Is er
sprake van een garantiegeval, dan
wordt het artikel door ons – naar
onze keuze – voor u gratis gerepa-
reerd, wordt het vervangen of wordt
de aankoopsom terugbetaald.
Verdere rechten op grond van de
garantie bestaan niet.
Uw wettelijke rechten, in het bijzon-
der rechten op garantie tegenover
de betreffende verkoper, worden
door deze garantie niet beperkt.
IAN: 398442_2107
Service België
Tel.: 070 270 171
(0,15 EUR/Min.)
E-Mail: deltaspor[email protected]
Service Nederland
Tel.: 0900 0400223
(0,10 EUR/Min.)
E-Mail: deltaspor[email protected]

17PL
Gratulujemy!
Decydując się na ten produkt,
otrzymują Państwo towar wyso-
kiej jakości. Należy zapoznać się
z produktem przed jego pierwszym
użyciem.
Należy uważnie przeczy-
tać następującą instrukcję
montażu i wskazówki
bezpieczeństwa.
Produkt ten należy użytkować
wyłącznie w opisany sposób
oraz zgodnie ze wskazanym prze-
znaczeniem. Niniejszą instrukcję
montażu należy przechowywać
w bezpiecznym miejscu. Przeka-
zując produkt innej osobie, należy
upewnić się, że otrzyma ona także
całą dokumentację dotyczącą
produktu.
Zakres dostawy (rys. A)
4 x noga (1–3)
2 x rurka poprzeczna długa (4)
2 x rurka poprzeczna krótka (5)
1 x dach pawilonu (6)
1 x środek dachu (7)
4 x rurka dachowa z rurką krót-
ką (8)
2 x rurka dachowa (9)
1 x łącznik narożny (10)
4 x rurka półki (11)
2 x półka (12)
1 x listwa z hakami (13)
6 x łącznik dachowy (14)
1 x otwieracz do butelek (15)
8 x szpilka mocująca (16)
6 x śruba M6x25 (17)
24 x śruba M6x20 (18)
6 x śruba M6x15 (19)
3 x śruba M6x12 (20)
6 x śruba M6x10 (21)
10 x nakrętka (22)
1 x klucz płaski (23)
1 x klucz sześciokątny (24)
1 x instrukcja montażu
Dane techniczne
Wymiary: ok. 243 x 152 x 260 cm
(szer. x gł. x wys.)
Data produkcji
(miesiąc/rok): 12/2021
Użytkowanie zgodne
z przeznaczeniem
Produkt został zaprojektowany
jako zewnętrzna ochrona przeciw-
słoneczna. Nie jest przeznaczony
do stałego użytku na zewnątrz,
ponieważ jest odporny na warunki
atmosferyczne w ograniczonym
stopniu. Produkt ten nie jest przezna-
czony do użytku komercyjnego.
Wskazówki bezpie-
czeństwa
Przeczytać wszystkie wska-
zówki bezpieczeństwa i in-
strukcje. Niezastosowanie
się do tego wymogu może
spowodować poważne obra-
żenia ciała.
• Ustawić produkt na równej po-
wierzchni.
• Przed każdym użyciem należy
sprawdzić, czy wszystkie części
zostały prawidłowo zamontowa-
ne. Nieprawidłowy montaż może
mieć wpływ na bezpieczeństwo
i działanie.
Zagrożenie dla życia!
• Nigdy nie pozwalać, aby dzieci
miały dostęp do opakowania
bez nadzoru. Niebezpieczeństwo
uduszenia.
• Produkt nie może być używany
Ryzyko obrażeń!
• Produkt nie może być używany
w niesprzyjających warunkach po-
godowych, takich jak silny wiatr,
deszcz lub śnieg.
• Pawilon należy zdemontować
w razie oczekiwanych prędkości
wiatru większych niż 40 km/h
(odczuwalny jest świeży wiatr,
większe konary i całe drzewa
poruszają się, a podmuchy są
wyraźnie słyszalne).
• Produkt może być używany
jedynie pod nadzorem dorosłych,
ale nie jako zabawka.
• Produkt należy zdemontować
podczas silnego wiatru lub w in-
nych niesprzyjających warunkach
pogodowych.
• W pobliżu pawilonu lub w sa-
mym pawilonie nie może znajdo-
wać się źródło otwartego ognia
ani źródło ogrzewania! Jeśli mimo
to pawilon się zapali, należy go
natychmiast opuścić! Ugasić ogień
gaśnicą lub wodą. W razie po-
trzeby należy natychmiast powia-
domić straż pożarną.
• Poszczególne pawilony nie mogą
być łączone lub montowane
razem. Między poszczególnymi
pawilonami należy zachować
minimalną odległość 3 m.
• Należy usuwać wodę gromadzą-
cą się na produkcie!
Wybór miejsca
Jeśli to możliwe, umieścić produkt
w miejscu osłoniętym przed wia-
trem. Podłoże powinno być równe
i gwarantować stabilne osadzenie
szpilkom mocującym.
Montaż
Wskazówka: do montażu pro-
duktu potrzebne są co najmniej
2 osoby.
Zalecamy wykonywanie montażu
z udziałem 4 osób.
1. Połączyć nogi (1–3) z rurkami
poprzecznymi (4–5) w sposób
pokazany na rys. B za pomocą
średnich śrub (18).
2. Zamocować na narożnikach
i na dwóch stronach konstrukcji
łączniki dachowe (14), uży-
wając do tego celu krótkich
śrub (21) (rys. B).
3. Włożyć rurki dachowe (8) i (9)
do łączników narożnych (10)
zgodnie z rys. C.
4. Umieścić konstrukcję dachową
na podstawie i zamocować ją
śrubami (17) i nakrętkami (22)
przy pomocy klucza sześciokąt-
nego (24) (rys. D).

18 PL
5. Przykręcić otwieracz do bute-
lek (15) za pomocą krótkich
śrub (19) do nogi (1) (rys. D).
6. Najpierw przeciągnąć dach (6)
przez końce rurek dacho-
wych (8) i (9), a następnie śro-
dek dachu (7) przez krótkie rurki
rurek dachowych (8) (rys. E).
7. Zamocować półkę (12) przy po-
mocy rurek półki (11) i śrub (19)
i (18) oraz nakrętek (22) zgod-
nie z rys. E.
8. Zamocować listwę z hakami (13)
na półce (12) przy pomocy
śrub (20) (rys. E).
9. Zabezpieczyć produkt za po-
mocą szpilek mocujących (16)
w odpowiednim, równym miej-
scu (rys. F).
Demontaż
Wskazówka: do demontażu
produktu potrzebne są co najmniej
2 osoby.
Zalecamy wykonywanie demontażu
z udziałem 4 osób.
Wskazówka: jeśli to możliwe,
należy demontować dach pawilonu
(6–7) w stanie czystym i suchym,
aby uniknąć tworzenia się pleśni
lub powstawania plam z pleśni.
Po zdemontowaniu na deszczu
przed spakowaniem należy całko-
wicie wysuszyć produkt. Należy
przeprowadzić czynności wykonane
podczas montażu (B–F) w odwrot-
nej kolejności.
Przechowywanie,
czyszczenie, pielęgnacja
Podczas nieużywania należy
zawsze przechowywać produkt
w suchym i czystym miejscu, w tem-
peraturze pokojowej. Produkt
należy czyścić przy pomocy wilgot-
nej ściereczki i łagodnego środka
czyszczącego.
WAŻNE! Nie czyścić przy użyciu
ostrych środków czyszczących.
Dach pawilonu można zabezpie-
czyć impregnatem w sprayu.
Uwagi odnośnie
recyklingu
Artykuł oraz materiały opakowanio-
we należy usunąć zgodnie z aktu-
alnymi przepisami obowiązującymi
w danym miejscu. Materiały opa-
kowaniowe, jak np. worki foliowe
nie powinny znaleźć się w rękach
dzieci. Materiał opakowaniowy
należy przechowywać w miejscu
niedostępnym dla dzieci.
Zutylizować produkt i opako-
wanie w sposób przyjazny
dla środowiska.
Kod materiału do recyklingu
służy do oznaczenia różnych
materiałów przeznaczonych do
zwrotu do przetwórstwa wtórnego
(recyklingu).
Kod składa się z symbolu, który
powinien odzwierciedlać cykl od-
zysku, oraz numeru oznaczającego
materiał.
Wskazówki dotyczące
gwarancji i obsługi
serwisowej
Artykuł został wyprodukowany z
najwyższą starannością i pod stałą
kontrolą. DELTA-SPORT HANDEL-
SKONTOR GmbH przyznaje klien-
towi końcowemu na niniejszy artykuł
trzy lata gwarancji od daty zakupu
(okres gwarancyjny) z zastrzeże-
niem poniższych postanowień.
Gwarancja dotyczy wyłącznie
wad materiałowych i wad wyko-
nania. Gwarancja nie obejmuje
części, które podlegają normalnemu
zużyciu i z tego względu należy je
traktować jako części zużywalne
(np. baterie) i nie obejmuje części
kruchych, np. przełączników, akumu-
latorów ani części wykonanych ze
szkła.
Wyklucza się roszczenia z tytułu
niniejszej gwarancji w przypadku
użycia artykułu w sposób nie-
właściwy lub sprzeczny z jego
przeznaczeniem lub w sposób
wykraczający poza przewidziane
przeznaczenie lub poza przewi-
dziany zakres użytkowania lub
jeśli wytyczne zawarte w instrukcji
obsługi nie były przestrzegane,
chyba że klient końcowy udowodni
istnienie wady materiałowej lub
wady wykonania, która nie wynika
z podanych wyżej przyczyn.
Roszczenia z tytułu gwarancji
można zgłaszać wyłącznie w okre-
sie gwarancyjnym za okazaniem
oryginalnego dowodu zakupu. Pro-
simy zatem zachować oryginalny
dowód zakupu!
W przypadku jakichkolwiek rekla-
macji prosimy skontaktować się z
nami najpierw za pośrednictwem
podanej poniżej infolinii serwisowej
lub drogą e-mailową. W przypadku
objętym gwarancją artykuł zostanie
– według naszego uznania – bez-
płatnie naprawiony, wymieniony
lub nastąpi zwrot ceny zakupu. Z
gwarancji nie wynikają żadne inne
prawa.
Niniejsza gwarancja nie ogranicza
Państwa ustawowych praw, w szcze-
gólności roszczeń gwarancyjnych
wobec danego sprzedawcy.
W przypadku wymiany części lub
całego artykułu okres gwarancji
przedłuża się o trzy lata zgodnie
z art. 581 § 1 kodeksu cywilnego.
Po upłynięciu czasu gwarancji
powstałe naprawy są płatne.
IAN: 398442_2107
Serwis Polska
Tel.: 22 397 4996
E-Mail: deltaspor[email protected]

19
Srdečně blahopřejeme!
Svým nákupem jste se rozhodli pro
kvalitní výrobek. Před prvním po-
užitím se prosím seznamte s tímto
výrobkem.
Pozorně si přečtete násle-
dující návod k sestavení
a bezpečnostní pokyny.
Používejte tento výrobek pouze tak,
jak je popsáno, a pro uvedené úče-
ly. Dobře si tento návod k sestavení
uschovejte. Pokud výrobek předáte
třetí osobě, předejte jí i veškerou
dokumentaci.
Obsah balení (obr. A)
4 x noha (1–3)
2 x příčná tyč dlouhá (4)
2 x příčná tyč krátká (5)
1 x střecha pavilonu (6)
1 x střed střechy (7)
4 x střešní tyč s krátkou tyčí (8)
2 x střešní tyč (9)
1 x spojovací díl (10)
4 x tyč pro odkládací plochu (11)
2 x odkládací plocha (12)
1 x lišta s háčky (13)
6 x střešní spojka (14)
1 x otvírák na lahve (15)
8 x kotvicí kolík (16)
6 x šroub, M6x25 (17)
24 x šroub, M6x20 (18)
6 x šroub, M6x15 (19)
3 x šroub, M6x12 (20)
6 x šroub, M6x10 (21)
10 x šroubová matice (22)
1 x klíč na šrouby (23)
1 x šestihranný klíč (24)
1 x návod k sestavení
Technické údaje
Rozměry:
cca 243 x 152 x 260 cm (š x h x v)
Datum výroby
(měsíc/rok): 12/2021
Použití dle určení
Výrobek je určen pro ochranu před
sluncem ve vnějších prostorách.
Není určen pro trvalé použití ve ven-
kovním prostředí, protože je pouze
podmínečně odolný proti povětrnost-
ním vlivům. Výrobek není určen pro
komerční použití.
Bezpečnostní pokyny
Přečtěte si všechny bezpeč-
nostní pokyny a návody.
Opomenutí jejich dodržování
může zapříčinit vážná pora-
nění.
• Postavte výrobek na rovném pod-
loží.
• Zkontrolujte před každým použi-
tím, že byly všechny části správně
namontovány. Nesprávně prove-
dená montáž může vést k pora-
něním, a stejně tak může ovlivnit
bezpečnost a funkčnost.
Ohrožení života!
• Nenechávejte děti bez dozoru
s balicím materiálem. Hrozí nebez-
pečí udušení.
Nebezpečí úrazu!
• Výrobek nesmí být používán
při nepříznivých povětrnostních
podmínkách, jako je silný vítr, déšť
nebo sníh.
• Demontáž pavilonu při předpo-
kládané rychlosti větru vyšší než
40 km/h (čerstvý vítr, větší větve
a stromy se pohybují a vítr je zře-
telně slyšitelný).
• Výrobek se smí používat jen
pod dozorem dospělých, a ne
jako hračka.
• Při silnějším větru nebo nepřízni-
vých povětrnostních podmínkách
výrobek demontujte.
• Žádný otevřený oheň, terasové zá-
řiče v pavilonu nebo jeho blízkos-
ti! Pokud se pavilon přesto vznítí,
ihned jej opusťte! Uhaste požár
hasicím přístrojem nebo vodou.
V případě potřeby ihned zavolejte
hasiče.
• Jednotlivé pavilony se nesmí spo-
jovat nebo vzájemně upevňovat.
Dodržujte mezi pavilony minimální
vzdálenost 3 m.
• Pokud se vytvoří kapsy s vodou,
vyprázdněte je!
Výběr místa
Postavte výrobek pokud možno na
místo chráněné před větrem. Podloží
by mělo být rovné a mělo by kotví-
cím kolíkům poskytovat dostatečnou
pevnost.
Sestavení
Upozornění: Montáž výrobku
musí provádět minimálně 2 osoby.
Doporučujeme provádět montáž
ve 4 osobách.
1. Spojte nohy (1–3) s příčnými ty-
čemi (4–5) podle obr. B, použijte
k tomu střední šrouby (18).
2. S pomocí krátkých šroubů (21)
upevněte na rohy a dvě strany
konstrukce střešní spojky (14)
(obr. B).
3. Zasuňte střešní tyče (8) a (9)
do spojovacích dílů (10) podle
obr. C.
4. Nasaďte střešní konstrukci na
podstavec a upevněte ji šrou-
by (17) a šroubovými matice-
mi (22) s pomocí šestihranného
klíče (24) (obr. D).
5. Krátkými šrouby (19) přišroubujte
otvírák na lahve (15) k noze (1)
(obr. D).
CZ

20 CZ
6. Nejprve přetáhněte střechu (6)
přes konce střešních tyčí (8) a (9)
a potom střed střechy (7) přes
krátké tyče střešních tyčí (8)
(obr. E).
7. S pomocí tyčí pro odkládací
plochu (11) a šroubů (19) a (18)
a šroubových matic (22) upevně-
te odkládací plochu (12) podle
obr. E.
8. Na jednu odkládací plochu (12)
namontujte s pomocí šroubů (20)
lištu s háčky (13) (obr. E).
9. Zajistěte výrobek pomocí kot-
vících kolíků (16) na vhodném
rovném místě (obr. F).
Demontáž
Upozornění: Demontáž výrobku
musí provádět minimálně 2 osoby.
Doporučujeme provádět demontáž
ve 4 osobách.
Upozornění: Demontujte střechu
pavilonu (6–7) pokud možno v čis-
tém a suchém stavu, zabráníte tak
tvorbě plísně nebo skvrnám na látce.
Po demontáži v dešti střechu úplně
vysušte. Potom ji teprve zabalte.
Proveďte kroky uvedené u montáže
(B–F), ale v obráceném pořadí.
Uskladnění, čištění,
péče
Pokud výrobek nepoužíváte, skladuj-
te jej vždy suchý a čistý při pokojo-
vé teplotě. Výrobek čistěte vlhkým
hadříkem a neagresivním čisticím
prostředkem.
DŮLEŽITÉ! K čištění nikdy nepouží-
vejte agresivní čisticí prostředky.
Střechu pavilonu je možné ošetřit
impregnačním sprejem.
Pokyny k likvidaci
Výrobek a obalový materiál likvi-
dujte do odpadu podle aktuálních
místních předpisů.
Obalový materiál, jako např. fóliové
sáčky, nepatří do dětských rukou.
Obalový materiál uchovávejte z
dosahu dětí.
Zlikvidujte produkty a balení
ekologicky.
Recyklační kód identifikuje
různé materiály pro recyklaci.
Kód se skládá z recyklačního
symbolu - který indikuje recyklační
cyklus - a čísla identifikujícího
materiál.
Pokyny k záruce
a průběhu služby
Výrobek byl vyroben s velkou péčí
a za stálé kontroly. DELTA-SPORT
HANDELSKONTOR GmbH poskytu-
je koncovým privátním zákazníkům
na tento výrobek tři roky záruky od
data nákupu (záruční lhůta) podle
následující ustanovení. Záruka se
týká pouze vad materiálu a závad
ve zpracování.
Záruka se nevztahuje na díly, které
podléhají normálnímu opotřebení,
a proto je nutné na ně pohlížet jako
na rychle opotřebitelné díly (např.
baterie), a na křehké díly, např.
vypínače, akumulátory nebo díly
vyrobené ze skla.
Nároky z této záruky jsou vylou-
čeny, pokud výrobek byl používán
neodborně nebo nedovoleným
způsobem nebo nikoli v rámci
stanoveného účelu určení nebo
předpokládaného rozsahu používá-
ní nebo nebyla dodržena zadání v
návodu k obsluze, ledaže by kon-
cový zákazník prokázal, že existuje
vada materiálu nebo došlo k chybě
ve zpracování, které nevyplývají z
některé výše uvedených okolností.
Nároky ze záruky lze uplatnit pouze
v rámci záruční lhůty po předložení
originálního pokladního dokladu.
Proto si prosím uschovejte originál
pokladního dokladu. Doba záruky
se neprodlužuje případnými opra-
vami na základě záruky, zákonné
záruky nebo kulance. Totéž platí
také pro vyměněné a opravené díly.
Při reklamacích se prosím obracejte
na níže uvedenou horkou linku ser-
visu nebo se s námi spojte e-mailem.
Pokud se vyskytne případ reklama-
ce, výrobek Vám – dle naší volby
– bezplatně opravíme, vyměníme
nebo Vám vrátíme kupní cenu. Další
práva ze záruky nevznikají.
Vaše zákonná práva, zejména náro-
ky na zajištění záruky vůči konkrét-
nímu prodejci, nejsou touto zárukou
omezena.
IAN: 398442_2107
Servis Česko
Tel.: 800143873
E-Mail: deltaspor[email protected]

21
Blahoželáme!
Svojím nákupom ste sa rozhodli
pre kvalitný výrobok. Pred prvým
použitím sa s výrobkom dôkladne
oboznámte.
Pozorne si prečítajte
tento montážny návod
a bezpečnostné pokyny.
Výrobok používajte len uvedeným
spôsobom a na uvedený účel. Tento
montážny návod si dobre uschovaj-
te. Pri odovzdávaní výrobku tretej
osobe odovzdajte s výrobkom aj
všetky podklady.
Rozsah dodávky
(obr. A)
4 x noha (1 – 3)
2 x priečna tyč, dlhá (4)
2 x priečna tyč, krátka (5)
1 x strecha altánku (6)
1 x stred strechy (7)
4 x strešná tyč s krátkou tyčou (8)
2 x strešná tyč (9)
1 x rohový spoj (10)
4 x oporná tyč (11)
2 x odkladacia polička (12)
1 x lišta s hákmi (13)
6 x strešná spojka (14)
1 x otvárač na fľaše (15)
8 x kolík do zeme (16)
6 x skrutka, M6x25 (17)
24 x skrutka, M6x20 (18)
6 x skrutka, M6x15(19)
3 x skrutka, M6x12 (20)
6 x skrutka, M6x10 (21)
10 x skrutková matica (22)
1 x kľúč na skrutky (23)
1 x šesťhranný kľúč (24)
1 x montážny návod
Technické údaje
Rozmery:
cca 243 x 152 x 260 cm (š x h x v)
Dátum výroby
(mesiac/rok): 12/2021
Určené použitie
Výrobok je určený ako ochrana
pred slnkom v exteriéri. Nie je urče-
ný na trvalé použitie vo vonkajšom
prostredí, pretože je iba podmiene-
ne odolný voči poveternostným vply-
vom. Tento výrobok nie je určený na
komerčné použitie.
Bezpečnostné pokyny
Prečítajte si všetky bezpeč-
nostné pokyny a inštrukcie.
Ich nerešpektovanie môže
spôsobiť vážne poranenia.
• Výrobok postavte na rovný pod-
klad.
• Pred každým použitím skontrolujte,
či všetky diely boli odborne na-
montované. Nesprávne vykonaná
montáž môže ovplyvniť bezpeč-
nosť a funkčnosť.
Nebezpečenstvo života!
• Nikdy nenechávajte deti bez
dozoru s obalovým materiálom.
Hrozí nebezpečenstvo udusenia.
Nebezpečenstvo
poranenia!
• Výrobok sa nesmie používať pri
nepriaznivých poveternostných
podmienkach, ako je silný vietor,
dážď alebo sneh.
• Demontujte altánok pri očaká-
vanej rýchlosti vetra vyššej ako
40 km/h (čerstvý vietor, väčšie vet-
vy a stromy sa pohybujú a vietor
je zreteľne počuteľný).
• Výrobok sa smie používať iba pod
dozorom dospelej osoby a nikdy
nie ako hračka.
• Pri narastajúcej intenzite vetra
alebo iných nepriaznivých pove-
ternostných podmienkach výrobok
demontujte.
• Žiadny otvorený oheň ani tepel-
né žiariče v blízkosti altánku! Ak
altánok napriek tomu začne ho-
rieť, okamžite ho opustite! Požiar
uhaste hasiacim prístrojom alebo
vodou. V prípade potreby ihneď
zavolajte hasičov.
• Jednotlivé altánky sa nesmú spájať
ani navzájom pripevňovať. Medzi
jednotlivými altánkami treba dodr-
žať minimálnu vzdialenosť 3 m.
• Vzniknuté vodné vaky treba od-
strániť!
Výber stanovišťa
Výrobok umiestnite podľa možností
na miesto chránené pred vetrom.
Zem by mala byť rovná a kolíkom
by mala poskytovať dostatočnú
pevnosť.
Montáž
Upozornenie: Na montáž výrob-
ku sú potrebné minimálne 2 osoby.
Odporúčame, aby montáž vykoná-
vali 4 osoby.
1. Nohy (1 – 3) spojte pomocou
stredne dlhých skrutiek (18) s prieč-
nymi tyčami (4 – 5), ako je znázor-
nené na obr. B.
2. Na rohoch a na dvoch stranách
konštrukcie upevnite strešné spoj-
ky (14) pomocou skrutiek (21)
(obr. B).
3. Strešné tyče (8) a (9) zasuňte
do rohových spojov (10), ako je
znázornené na obr. C.
4. Strešnú konštrukciu osaďte
na spodnú časť a pomocou
šesťhranného kľúča (24) upevni-
te skrutkami (17) a skrutkovými
maticami (22) (obr. D).
5. Naskrutkujte otvárač na fľaše (15)
pomocou krátkych skrutiek (19)
na nohu (1) (obr. D).
SK

22 SK
6. Strechu (6) najprv natiah-
nite nad konce strešných
tyčí (8) a (9) a stred strechy (7)
nad krátke tyče strešných tyčí (8)
(obr. E).
7. Pomocou oporných tyčí (11) a
skrutiek (19) a (18) a skrutkových
matíc (22) upevnite odkladaciu
poličku (12), ako je znázornené
na obr. E.
8. Pomocou skrutiek (20) namontuj-
te lištu s hákmi (13) na odklada-
ciu poličku (12) (obr. E).
9. Výrobok zafixujte zemnými
kolíkmi (16) na vhodnom rovnom
mieste (obr. F).
Demontáž
Upozornenie: Na demontáž
výrobku sú potrebné minimálne
2 osoby.
Odporúčame, aby demontáž vyko-
návali 4 osoby.
Upozornenie: Strechu altánku
(6 – 7) demontujte podľa možností
v čistom a suchom stave, aby ste za-
medzili tvorbe plesní, resp. fľakov na
textílii. Po demontáži v daždi nechaj-
te strechu kompletne vyschnúť, skôr
než ju zbalíte. Pri montáži vykoná-
vajte uvedené kroky (B – F) v opač-
nom poradí.
Skladovanie, čistenie,
ošetrovanie
Pri nepoužívaní skladujte výrobok
vždy suchý a čistý pri izbovej
teplote. Výrobok čistite len vlhkou
handričkou a slabým čistiacim pro-
striedkom.
DÔLEŽITÉ! Výrobok nikdy nečistite
ostrými čistiacimi prostriedkami.
Strechu altánku možno ošetriť im-
pregnačným sprejom.
Pokyny k likvidácii
Výrobok a obalový materiál zlikvi-
dujte v súlade s aktuálnymi miestny-
mi predpismi.
Obalový materiál, ako napr. fóliové
vrecúško nepatrí do rúk detí. Obalo-
vý materiál uschovajte mimo dosahu
detí.
Výrobky a obaly likvidujte
ekologickým spôsobom.
Recyklačný kód slúži na
označenia rôznych materiálov
na navrátenie do obehu opätovné-
ho využitia.
Kód sa skladá z recyklačného
symbolu - ktorý má odzrkadľovať
zhodnotenie recyklačnýého obehu -
a číslo označujúce materiál.
Pokyny k záruke
a priebehu servisu
Výrobok bol vyrobený veľmi starost-
livo a pod stálou kontrolou. Na ten-
to výrobok poskytuje DELTA-SPORT
HANDELSKONTOR GmbH súkrom-
ným koncovým užívateľom trojročnú
záruku odo dňa kúpy (záručná
lehota) po splnení nasledovných
podmienok. Záruka platí len na chy-
by materiálu a spracovania. Záruka
sa netýka dielov, ktoré podliehajú
bežnému opotrebeniu a preto ich
možno považovať za opotrebiteľné
diely (napr. batérie), ako aj kreh-
kých dielov, napr. vypínače, akumu-
látory alebo diely, ktoré sú vyrobené
zo skla.
Nároky z tejto záruky zanikajú, keď
sa výrobok používal neodborne
alebo nesprávne, mimo určenia na
používanie alebo určeného rozsahu
používania alebo neboli dodržané
pokyny návodu na obsluhu, s výnim-
kou, že koncový užívateľ preukáže,
že ide o chybu materiálu alebo
spracovania, ktorá nebola spôso-
bená niektorou z hore uvedených
okolností.
Záruku je možné uplatniť len po-
čas záručnej lehoty po predložení
originálu pokladničného dokladu.
Originál pokladničného dokladu
preto prosím uschovajte. Záručná
doba sa kvôli prípadným záručným
opravám, zákonnej záruke alebo
ako obchodné gesto nepredlžuje.
Platí to aj pre vymenené a opravené
diely.
Pri reklamáciách sa prosím najskôr
obráťte na dole uvedenú Servi-
ce-Hotline alebo sa s nami spojte
prostredníctvom e-mailu. Ak sa
jedná o záručný prípad, výrobok
– podľa našej voľby – bezplatne
opravíme, vymeníme alebo vrátime
kúpnu cenu. Ďalšie práva zo záruky
nevyplývajú. Vaše zákonné práva,
hlavne nároky na záručné plnenie
voči príslušnému predajcovi, nie sú
touto zárukou obmedzené.
IAN: 398442_2107
Servis Slovensko
Tel.: 0850 232001
E-Mail: deltaspor[email protected]
Seite wird geladen ...
Seite wird geladen ...
Seite wird geladen ...
Seite wird geladen ...
Seite wird geladen ...
Seite wird geladen ...
-
 1
1
-
 2
2
-
 3
3
-
 4
4
-
 5
5
-
 6
6
-
 7
7
-
 8
8
-
 9
9
-
 10
10
-
 11
11
-
 12
12
-
 13
13
-
 14
14
-
 15
15
-
 16
16
-
 17
17
-
 18
18
-
 19
19
-
 20
20
-
 21
21
-
 22
22
-
 23
23
-
 24
24
-
 25
25
-
 26
26


in anderen Sprachen
- français: LIVARNO 398442 Le manuel du propriétaire
- español: LIVARNO 398442 El manual del propietario
- Nederlands: LIVARNO 398442 de handleiding
- slovenčina: LIVARNO 398442 Návod na obsluhu
- dansk: LIVARNO 398442 Brugervejledning
- polski: LIVARNO 398442 Instrukcja obsługi
Verwandte Artikel
-
LIVARNO 384177 Bedienungsanleitung
-
-
-
-
-
-
-
-
LIVARNO HA110CH33SCKZANUI Benutzerhandbuch
-
