
Features
Dell
™
Axim
™
X5
NOTICE: Do not connect your
device to the computer until the
instructions prompt you to do so.
1. Install the main battery.
2. Insert the stylus into the backup
battery release and push in and
outward to release the cover.
3. Insert the backup battery with
the positive side (+) facing up.
4. Slide on the cover.
5. Connect the AC adapter and
charge the device for at least 4
hours.
6. After the main battery is
charged, press the power button.
Follow the instructions on the
screen.
REMARQUE : ne connectez pas
l'appareil à l'ordinateur avant
d'être invité à le faire.
1. Installez la batterie principale.
2. Insérez le stylet dans le loquet
de la batterie de secours.
Appuyez et poussez le cache
vers l'avant pour le retirer.
3. Insérez la batterie de secours,
côté plus (+) vers le haut.
4. Remettez le cache en place.
5. Connectez l'adaptateur secteur
et chargez l'appareil pendant
au moins 4 heures.
6. Une fois la batterie principale
chargée, appuyez sur le bouton
d'alimentation. Suivez les
instructions qui s'affichent
à l'écran.
HINWEIS: Schließen Sie Ihr
Gerät erst dann an den Computer
an, wenn Sie dazu aufgefordert
werden.
1. Installieren Sie den Hauptakku.
2. Drücken Sie den Stift in die
Sicherungsbatterie-Auslösung,
um die Abdeckung zu lösen.
3. Setzen Sie die Sicherungs-
batterie mit der positiven Seite
(+) nach oben weisend ein.
4. Bringen Sie die Abdeckung
wieder an.
5. Schließen Sie das Netzteil an,
und laden Sie das Gerät
mindestens 4 Stunden lang auf.
6. Drücken Sie den Betriebs-
schalter, nachdem der
Hauptakku vollständig
geladen ist. Befolgen Sie
die Anweisungen auf
dem Bildschirm.
AVVERTENZA: non collegare il
dispositivo al computer finché le
istruzioni non richiedono di farlo.
1. Installare la batteria principale.
2. Inserire lo stilo nel foro per lo
sblocco della batteria di backup
e premere verso l'esterno per
rilasciare il coperchio.
3. Inserire la batteria di backup
con il lato positivo (+) verso
l'alto.
4. Far scorrere il coperchio
per richiuderlo.
5. Collegare l'adattatore c.a. e
caricare il dispositivo per almeno
4 ore.
6. Dopo che la batteria principale
si è completamente caricata,
premere il pulsante di
alimentazione. Seguire le
istruzioni sullo schermo.
AVISO: no conecte el dispositivo
al ordenador hasta que las
instrucciones se lo indiquen.
1. Instale la batería principal.
2. Inserte el lápiz en el orificio de
la tapa de la batería de reserva
y presione en la tapa hacia fuera
para abrirla.
3. Inserte la batería de reserva con
el polo positivo (+) hacia arriba.
4. Vuelva a colocar la tapa.
5. Conecte el adaptador de CA y
cargue el dispositivo durante
4 horas como mínimo.
6. Una vez cargada la batería
principal, pulse el botón de
alimentación. Siga las
instrucciones que aparecen
en la pantalla.
NOTICE: First
charge the main
battery for at least
4 hours.
REMARQUE :
avant toute
première utilisation,
chargez la batterie
principale pendant
au moins 4 heures.
HINWEIS:
Laden Sie zuerst
den Hauptakku
mindestens 4 Stunden
lang auf.
AVVERTENZA:
prima di
procedere, caricare la
batteria principale
per almeno 4 ore.
AVISO: primero
debe cargar la
batería principal
durante 4 horas como
mínimo.
Caractéristiques | Merkmale | Caratteristiche | Características
Charge the Battery First
Chargez la batterie en premier | Laden Sie zuerst den Akku | Caricare la batteria | Primero cargue la batería
3
21
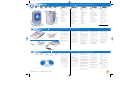
CCAAUUTTIIOONN::
Before you set up and
operate your device, read and
follow the safety instructions in
the System Information Guide.
1. microphone
2. power button
3. stylus (extended)
4. backup battery
5. headphone connector
6. CompactFlash card slot
7. Secure Digital card slot
8. scroll dial
9. record button
10. reset button
11. main battery
12. Home button
13. speaker
14. Inbox button
15. navigator button
16. AC adapter connector
17. Contacts button
18. Calendar button
19. touch screen
AATTTTEENNTTIIOONN ::
avant de configurer
et d'utiliser votre appareil, lisez
attentivement les instructions
dans le Guide des informations
système.
1. Microphone
2. Bouton d'alimentation
3. Stylet (étendu)
4. Batterie de secours
5. Prise du casque
6. Emplacement de la carte
CompactFlash
7. Emplacement de la carte
Secure Digital
8. Bouton de défilement
9. Bouton d'enregistrement
10. Bouton de réinitialisation
11. Batterie principale
12. Bouton Accueil
13. Haut-parleur
14. Bouton Boîte de réception
15. Bouton de navigation
16. Prise de l'adapteur secteur
17. Bouton Contacts
18. Bouton Calendrier
19. Écran tactile
AACCHHTTUUNNGG::
Lesen und befolgen Sie
die Sicherheitsanleitungen im
Systeminformationshandbuch,
bevor Sie das Gerät einrichten
und verwenden.
1. Mikrofon
2. Betriebsschalter
3. Stift (leicht herausgezogen)
4. Sicherungsbatterie
5. Kopfhöreranschluss
6. Steckplatz für
CompactFlash-Karte
7. Steckplatz für Secure
Digital-Karte
8. Scrollrad
9. Aufzeichnungstaste
10. Reset-Taste
11. Hauptakku
12. Home-Taste
13. Lautsprecher
14. Posteingangs-Taste
15. Navigatortaste
16. Netzteilanschluss
17. Kontakte-Taste
18. Kalender-Taste
19. Touchscreen
AATTTTEENNZZIIOONNEE::
prima di configurare e
utilizzare il dispositivo, leggere e
seguire le istruzioni sulla sicurezza
contenute nella guida Informazioni
sul sistema.
1. microfono
2. pulsante di alimentazione
3. stilo (esteso)
4. batteria di backup
5. connettore per cuffie
6. slot per scheda CompactFlash
7. slot per scheda Secure Digital
8. selettore di scorrimento
9. pulsante di registrazione
10. pulsante di reset
11. batteria principale
12. pulsante Home
13. altoparlante
14. pulsante Posta in arrivo
15. pulsante di navigazione
16. connettore per adattatore c.a.
17. pulsante Contatti
18. pulsante Calendario
19. touchscreen
PPRREECCAAUUCCIIÓÓNN::
antes de configurar y utilizar
el dispositivo, lea y siga las
instrucciones de seguridad de la
Guía de información sobre el sistema.
1. micrófono
2. botón de alimentación
3. lápiz (extraído)
4. batería de reserva
5. conector de auriculares
6. ranura de la tarjeta
CompactFlash
7. ranura de la tarjeta Secure
Digital
8. botón de desplazamiento
9. botón de grabación
10. botón de reinicio
11. batería principal
12. botón Home
13. altavoz
14. botón de la bandeja de entrada
15. botón de navegación
16. conector del adaptador de CA
17. botón de contactos
18. botón de la agenda
19. pantalla táctil
0N1064A00
www.dell.com | support.dell.com
4
65
Use Microsoft ActiveSync to
synchronize the data on your device
with the data on your computer.
1. Insert the Dell Companion CD.
2. Click the yellow triangle and click
Start Here.
3. Install and configure Microsoft
Outlook only if it is not already
installed and configured on your
computer and you do not have a
more recent version.
4. Click Install ActiveSync
xx
.
xx
,
click Install, and then follow
the instructions on the screen.
5. When prompted, use the
instructions on the reverse side
to connect your device.
See ActiveSync Help on your
computer for more information.
Utilisez Microsoft ActiveSync pour
synchroniser les données de l'appareil
avec celles de votre ordinateur.
1. Insérez le CD-ROM Dell
Companion.
2. Cliquez sur le triangle jaune,
puis sur Commencer ici.
3. N'installez Microsoft Outlook que
s'il ne l'est pas encore et que vous
n'avez pas de version plus récente.
4. Cliquez sur ActiveSync
xx
.
xx
,
puis sur Installer et suivez les
instructions qui s'affichent à
l'écran.
5. A l'invite, suivez les instructions
qui se trouvent de l'autre côté
pour connecter l'appareil.
Reportez-vous à l'aide sur ActiveSync
sur votre poste pour plus
d'informations.
Verwenden Sie Microsoft
ActiveSync, um die Daten auf Ihrem
Gerät mit den Daten auf Ihrem
Computer zu synchronisieren.
1. Legen Sie die Dell Companion
CD ein.
2. Klicken Sie auf das gelbe Dreieck,
und klicken Sie auf Starten.
3. Installieren Sie Microsoft Outlook
nur dann, wenn diese Anwendung
noch nicht auf Ihrem Computer
installiert ist und wenn Sie keine
neuere Version haben.
4. Klicken Sie auf ActiveSync
xx
.
xx
installieren, klicken Sie auf
Installieren, und folgen Sie
dann den Anleitungen auf dem
Bildschirm.
5. Folgen Sie bei der entsprechenden
Aufforderung den Anleitungen auf
der Rückseite, um Ihr Gerät
anzuschließen.
Weitere Informationen finden Sie
in der ActiveSync Hilfe auf Ihrem
Computer.
Usare Microsoft ActiveSync per
sincronizzare i dati sul dispositivo
con i dati sul computer.
1. Inserire il CD Dell Companion.
2. Selezionare il triangolo giallo
e fare clic su Inizia qui.
3. Installare Microsoft Outlook
solo se non è ancora installato
sul computer e se non si
possiede una versione più
recente.
4. Fare clic su Installazione di
ActiveSync
xx
.
xx
, selezionare
Installa, quindi seguire le
istruzioni visualizzate sullo
schermo.
5. Quando il sistema lo richiede,
collegare il dispositivo seguendo
le istruzioni fornite sul retro.
Consultare la Guida di ActiveSync
sul computer per maggiori
informazioni.
Sincronice los datos del dispositivo
con los datos del ordenador
mediante Microsoft ActiveSync.
1. Introduzca el CD Dell
Companion.
2. Haga clic en el triangulo
amarillo y haga clic en Empezar
aquí.
3. Instale Microsoft Outlook
únicamente si no lo tiene
instalado en el ordenador y
no dispone de una versión
más reciente.
4. Haga clic en Instalar ActiveSync
xx
.
xx
, haga clic en Instalar y siga
las instrucciones que aparecen
en pantalla.
5. Cuando el sistema lo solicite,
conecte el dispositivo siguiendo
las instrucciones del reverso.
Para obtener más información,
consulte la ayuda de ActiveSync
en el ordenador.
NOTICE: Do not
connect your device to
the computer until the
instructions prompt
you to do so.
REMARQUE :
ne connectez pas
l'appareil à l'ordinateur
avant d'être invité à le
faire.
HINWEIS:
Schließen Sie Ihr
Gerät erst dann an
den Computer an,
wenn Sie dazu
aufgefordert werden.
AVVERTENZA:
non collegare il
dispositivo al
computer finché le
istruzioni non
richiedono di farlo.j ,
AVISO: no conecte
el dispositivo al
ordenador hasta que
las instrucciones se lo
indiquen.
12
11
10
13
14
9
7
8
15
16
17
18
19
2
1
Installez Microsoft
®
ActiveSync
®
| Installieren Sie Microsoft
®
ActiveSync
®
| Installare Microsoft
®
ActiveSync
®
| Instale Microsoft
®
ActiveSync
®
Install Microsoft
®
ActiveSync
®
4
2
1
5
3
N1064a00.qxd 6/5/2003 2:38 PM Page 1

Finding
Information
• Dell User's Guide —
Setting up and using
your device.
• Microsoft Pocket PC
Help — Tap Start
→→
Help.
• Dell Companion CD
— Additional
programs that you
can install.
• ActiveSync Help —
Click Help
→→
Microsoft
ActiveSync Help on
your computer.
Recherche des
informations
• Manuel de l'utilisateur
Dell —
Configuration
et utilisation de
l'appareil.
• Aide sur Microsoft
Pocket PC —
Appuyez sur
Démarrer
→→
Aide.
• CD-ROM Dell
Companion —
Programmes
supplémentaires
que vous pouvez
installer.
• Aide sur ActiveSync
— Cliquez sur
Aide
→→
Aide sur
Microsoft
ActiveSync sur
votre ordinateur.
Suchen von
Informationen
• Dell Benutzerhandbuch
— Einrichten und
Verwenden Ihres
Geräts.
• Microsoft Pocket PC
Hilfe — Tippen Sie
auf Start
→→
Hilfe.
• Dell Companion CD
— Zusätzliche
Programme, die Sie
installieren können.
• ActiveSync Hilfe —
Klicken Sie auf
Ihrem Computer auf
Hilfe
→→
Microsoft
ActiveSync Hilfe.
Come reperire
informazioni
• Guida per l'utente
Dell —
Configurazione e
uso del dispositivo.
• Guida di Microsoft
Pocket PC —
Toccare Start
→→
Guida.
• CD Dell Companion
— Programmi
aggiuntivi che
possono essere
installati.
• Guida di ActiveSync
— Fare clic su ?
→→
Guida in linea
Microsoft
ActiveSync sul
computer.
Dónde encontrar
información
• Guía del usuario
de Dell —
configuración y
utilización del
dispositivo.
• Ayuda de Microsoft
Pocket PC —
puntee en Inicio
→→
Ayuda.
• CD Dell Companion
— programas
adicionales que
puede instalar.
• Ayuda de ActiveSync
— haga clic en
Ayuda
→→
Ayuda
de Microsoft
ActiveSync en
el ordenador.
• Rotate the scroll
dial to move the
cursor and press in
to perform actions
similar to pressing
<Enter> on a
keyboard.
• To adjust the
brightness, press
and hold the scroll
dial and press the
top or bottom of
the navigator
button.
• To dim the display,
press and hold the
power button.
Repeat to light
the display.
• Faites tourner
le bouton de
défilement pour
déplacer le curseur.
• Appuyez pour
exécuter des actions
(comme quand vous
appuyez sur la
touche <Entrée>
sur un clavier).
• Pour régler la
luminosité,
maintenez enfoncé
le bouton de
défilement et
appuyez sur la partie
supérieure ou
inférieure du bouton
de navigation.
• Pour assombrir
l'affichage,
maintenez enfoncé
le bouton
d'alimentation.
Répétez l'opération
pour allumer
l'appareil.
• Drehen Sie das
Scrollrad zum
Bewegen des
Cursors, und
drücken Sie es, um
ähnliche Aktionen
durchzuführen wie
beim Drücken der
<Eingabetaste>
auf einer Tastatur.
• Zum Einstellen der
Helligkeit halten
Sie das Scrollrad
gedrückt und
drücken oben oder
unten auf die
Navigatortaste.
• Zum Abblenden
des Displays halten
Sie den Betriebs-
schalter gedrückt.
Wiederholen Sie
den Vorgang, um
das Display wieder
einzuschalten.
• Ruotare il selettore
di scorrimento per
spostare il cursore
e premerlo per
svolgere azioni
simili alla pressione
del tasto <Invio>
di una tastiera.
• Per regolare la
luminosità, tenere
premuto il
selettore di
scorrimento e
premere la parte
superiore o
inferiore del
pulsante di
navigazione.
• Per oscurare il
display, tenere
premuto il
pulsante di
alimentazione.
Ripetere la stessa
operazione per
illuminarlo.
• Mueva el botón de
desplazamiento
para mover el
cursor y púlselo
para realizar
acciones similares
a pulsar <Intro>
en un teclado.
• Para ajustar el
brillo, mantenga
pulsado el botón
de desplazamiento
y pulse la parte
superior o inferior
del botón de
navegación.
• Para atenuar la
pantalla, mantenga
pulsado el botón
de alimentación.
Para restablecer la
pantalla, repita el
proceso.
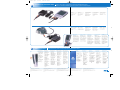
Connect the Sync Cable OR the Cradle
Connectez le câble Sync OU le socle | Schließen Sie das Synchronisationskabel ODER die Ladestation an |
Collegare il cavo di sincronizzazione OPPURE il supporto da tavolo | Conecte el cable de sincronización O el soporte
Information in this document is subject to change without notice.
© 2003 Dell Computer Corporation. All rights reserved.
Reproduction in any manner whatsoever without the written permission of Dell Computer
Corporation is strictly forbidden.
Dell, the DELL logo, and Axim are trademarks of Dell Computer Corporation; Microsoft
and ActiveSync are registered trademarks of Microsoft Corporation. Dell disclaims
proprietary interest in the marks and names of others.
April 2003
Les informations contenues dans ce document peuvent être modifiées à tout moment.
© 2003 Dell Computer Corporation. Tous droits réservés.
Toute reproduction de quelque manière que ce soit sans l'accord écrit de Dell Computer
Corporation est strictement interdite.
Dell, le logo DELL et Axim sont des marques commerciales de Dell Computer
Corporation ; Microsoft et ActiveSync sont des marques déposées de Microsoft
Corporation. Dell décline tout intérêt patrimonial dans les marques et noms des
autres sociétés.
Avril 2003
Die Informationen in diesem Dokument können ohne Ankündigung geändert werden.
© 2003 Dell Computer Corporation. Alle Rechte vorbehalten.
Eine Reproduktion dieses Dokuments in jeglicher Form ist ohne die vorherige schriftliche
Genehmigung der Dell Computer Corporation streng verboten.
Dell, das DELL-Logo und Axim sind Marken der Dell Computer Corporation; Microsoft
und ActiveSync sind registrierte Marken der Microsoft Corporation. Dell verzichtet auf
alle Besitzrechte an Marken und Handelsbezeichnungen, die nicht ihr Eigentum sind.
April 2003
Le informazioni contenute in questo documento sono soggette a modifica senza preavviso.
© 2003 Dell Computer Corporation. Tutti i diritti riservati.
È severamente vietata la riproduzione con qualsiasi mezzo senza l'autorizzazione scritta
di Dell Computer Corporation.
Dell, il logo DELL e Axim sono marchi di Dell Computer Corporation; Microsoft e
ActiveSync sono marchi registrati di Microsoft Corporation. Dell esclude qualsiasi
interesse proprietario per i marchi e i nomi di altre società.
Aprile 2003
La información de este documento está sujeta a cambios sin notificación previa.
© 2003 Dell Computer Corporation. Reservados todos los derechos.
Queda estrictamente prohibido reproducir este documento por cualquier medio sin
el permiso escrito de Dell Computer Corporation.
Dell, el logotipo de DELL y Axim son marcas registradas de Dell Computer Corporation;
Microsoft y ActiveSync son marcas registradas de Microsoft Corporation. Dell renuncia a
cualquier interés sobre la propiedad de marcas y nombres de terceros.
Abril de 2003
Printed in Taiwan.
Docking With
the Cradle
Keep the front of the
device flush with the
front of the cradle, and
lower the device until it
is firmly seated in the
cradle. When the device
is docked, the DELL
logo on the cradle lights
up and the connection
status icon appears on
the command bar.
Charge de l'appareil
sur le socle
Positionnez l'avant de
l'appareil sur l'avant du
socle et abaissez-le
jusqu'à ce qu'il soit bien
posé. Une fois l'appareil
ancré, le logo DELL
s'allume sur le socle et
l'icône d'état de la
connexion s'affiche sur
la barre de commande.
Andocken mit
der Ladestation
Richten Sie die
Vorderseite des Geräts
bündig an der
Vorderseite der
Ladestation aus, und
führen Sie das Gerät
nach unten, bis es fest
in der Ladestation sitzt.
Wenn das Gerät
angedockt ist, leuchtet
das DELL-Logo auf der
Ladestation, und in der
Befehlsleiste wird das
Verbindungsstatus-
Symbol angezeigt.
Aggancio al supporto
da tavolo
Allineare il lato
anteriore del dispositivo
con il lato anteriore del
supporto da tavolo e
abbassare il dispositivo
fino a innestarlo
perfettamente nel
supporto da tavolo.
Quando il dispositivo
è agganciato, il logo
DELL sul supporto da
tavolo si accende e
l'icona dello stato di
connessione compare
sulla barra dei comandi.
Acoplamiento en
el soporte
Sujete el dispositivo
de modo que la parte
frontal esté paralela a la
parte frontal del soporte
y baje el dispositivo
hasta que quede bien
encajado en el soporte.
Cuando el dispositivo
esté acoplado, se
encenderá el logotipo
de DELL del soporte y
aparecerá el icono de
estado de la conexión
en la barra de
comandos.
Sync cable —
Depending on your cable
type, connect to either
the USB or serial
connector on your
computer.
Câble Sync —
en fonction du type de
câble, connectez-vous
sur le port USB ou la
prise série de votre
ordinateur.
Synchronisationskabel —
Je nach Typ Ihres Kabels
schließen Sie es
entweder an den USB-
oder den seriellen
Anschluss an Ihrem
Computer an.
Cavo di sincronizzazione
— A seconda del tipo di
cavo, collegarlo al
connettore USB o al
connettore seriale sul
computer.
Cable de sincronización
— según el tipo de
cable, conéctelo a un
conector USB o serie del
ordenador.
Cradle — Depending on
your cradle type, connect
to either the USB or
serial connector on your
computer.
Socle — en fonction
du type de socle,
connectez-vous sur le
port USB ou la prise
série de votre ordinateur.
Ladestation — Je nach
Typ Ihrer Ladestation
schließen Sie sie
entweder an den USB-
oder den seriellen
Anschluss an Ihrem
Computer an.
Supporto da tavolo —
a seconda del tipo di
supporto da tavolo,
collegarlo al connettore
USB o al connettore
seriale sul computer.
Soporte — según el tipo
de soporte, conéctelo el
a un conector USB o
serie del ordenador.
4
Additional Information
Compléments d'informations | Zusätzliche Informationen | Informazioni aggiuntive | Información adicional
3
N1064a00.qxd 6/5/2003 2:38 PM Page 2
-
 1
1
-
 2
2


in anderen Sprachen
- français: Dell Axim X5 Guide de démarrage rapide
- español: Dell Axim X5 Guía de inicio rápido
- italiano: Dell Axim X5 Guida Rapida
Verwandte Artikel
-
Dell Axim X3 Schnellstartanleitung
-
Dell Axim X50 Schnellstartanleitung
-
-
Dell Axim X30 Schnellstartanleitung
-
-
Dell Axim X5 Benutzerhandbuch
-
Dell Portable Power Companion (12000mAh) PW7015M Benutzerhandbuch
-
-