
Features
Dell
™
Axim
™
X3
1. Install the battery.
2. Connect the AC adapter and
charge the device for at least 8
hours.
3. After the battery is charged, press
the power button. Follow the
instructions on the screen.
1. Legen Sie den Akku ein.
2. Schließen Sie den Netzadapter an
und laden Sie das Gerät
mindestens 8 Stunden lang auf.
3. Drücken Sie den Netzschalter,
nachdem der Akku aufgeladen ist.
Befolgen Sie die Anweisungen auf
dem Bildschirm.
1. Installare la batteria.
2. Collegare l'adattatore c.a. e
caricare il dispositivo per almeno
8 ore.
3. Dopo aver ricaricato la batteria,
premere il pulsante di
alimentazione. Seguire le
istruzioni visualizzate sullo
schermo.
1. Zainstaluj akumulator.
2. Podłącz zasilacz sieciowy i ładuj
urządzenie przez co najmniej
8 godziny.
3. Po naładowaniu akumulatora
naciśnij przycisk zasilania.
Postępuj zgodnie z instrukcjami
wyświetlanymi na ekranie.
NOTICE: First charge the battery for
at least 8 hours.
HINWEIS: Laden Sie den Akku vor dem
erstmaligen Gebrauch mindestens 8
Stunden auf.
AVVISO: Prima di procedere, caricare la
batteria per almeno 8 ore.
OSTRZEŻENIE: Najpierw należy
przez co najmniej 8 godziny ładować
akumulator.
Funktionen | Caratteristiche | Funkcje
Charge the Battery First
Akku zuerst laden | Prima di procedere caricare la batteria | Najpierw należy naładować akumulator
CAUTION:
Before you set up and
operate your device, read and follow
the safety instructions in the System
Information Guide.
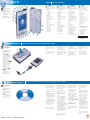
1. scroll dial
2. headphone connector
3. touch screen
4. microphone
5. infrared sensor
6. Secure Digital card slot
7. power button
8. wireless antenna (optional)
9. stylus (extended)
10. battery lock
11. battery
12. reset button
13. speaker
14. wireless or Windows
®
Media
®
Player on/off button
15. Home button
16. Inbox button
17. navigator button
18. Contacts button
19. Calendar button
20. record button
VORSICHT:
Lesen und beachten Sie die
Sicherheitshinweise im System-
informationshandbuch, bevor Sie das
Gerät einrichten und benutzen.
1. Scroll-Rad
2. Kopfhöreranschluss
3. Touchscreen
4. Mikrofon
5. Infrarotsensor
6. Schlitz für Secure Digital-Karte
7. Netzschalter
8. Wireless-Antenne (optional)
9. Stift (ausgezogen)
10. Akkusicherung
11. Akku
12. Reset-Taste
13. Lautsprecher
14. Ein/Aus-Taste für Wireless oder
Windows
®
Media
®
Player
15. Taste "Startseite"
16. Taste "Posteingang"
17. Taste "Navigator"
18. Taste "Kontakte"
19. Taste "Kalender"
20. Aufnahmetaste
ATTENZIONE:
Prima di installare ed
utilizzare il dispositivo, leggere e
seguire le istruzioni di sicurezza nella
Guida di informazione del sistema.
1. selettore di scorrimento
2. connettore della cuffia
3. schermo a sfioramento
4. microfono
5. sensore infrarossi
6. slot della scheda Secure Digital
7. pulsante di alimentazione
8. antenna senza fili (opzionale)
9. stilo (esteso)
10. dispositivo di chiusura della
batteria
11. batteria
12. pulsante Reimposta
13. altoparlante
14. pulsante di attivazione/
disattivazione di Windows
®
Media
®
Player o senza fili
15. Pulsante Pagina iniziale
16. Pulsante Posta in arrivo
17. pulsante di navigazione
18. pulsante Contatti
19. pulsante Calendario
20. pulsante di registrazione
UWAGA:
Zanim zainstalujesz i
uruchomisz urządzenie, zapoznaj
się z instrukcjami dotyczącymi
bezpieczeństwa w Przewodniku z
informacjami o systemie i stosuj je.
1. pokrętło przewijania
2. gniazdo słuchawek
3. ekran dotykowy
4. mikrofon
5. czujnik podczerwieni
6. gniazdo karty Secure Digital
7. przycisk zasilania
8. antena bezprzewodowa (opcjonalnie)
9. pióro (wysuwane)
10. blokada akumulatora
11. akumulator
12. przycisk zerowania
13. głośnik
14. przycisk wł/wył pracy
bezprzewodowej lub programu
Windows
®
Media
®
Player
15. przycisk Strona główna
16. przycisk Skrzynka odbiorcza
17. przycisk Nawigator
18. przycisk Kontakty
19. przycisk Kalendarz
20. przycisk zapisu
0F2376A01
www.dell.com | support.dell.com
Use Microsoft ActiveSync to
synchronize the data on your device
with the data on your computer.
1. Insert the Dell Companion CD.
2. Click the yellow triangle and click
Start Here.
3. Install and configure Microsoft
Outlook only if it is not already
installed and configured on your
computer and you do not have a
more recent version.
4. Click Install ActiveSync
xx
.
xx
,
click Install, and then follow
the instructions on the screen.
5. When prompted, use the
instructions on the reverse side
to connect your device.
See ActiveSync Help on your
computer for more information.
Verwenden Sie Microsoft
ActiveSync, um die Daten auf Ihrem
Gerät mit den Daten auf Ihrem
Computer abzugleichen.
1. Legen Sie die Dell Begleit-
CD ein.
2. Klicken Sie auf das gelbe Dreieck
und anschließend auf Zum
Einstieg.
3. Installieren und konfigurieren Sie
Microsoft Outlook nur dann,
wenn es nicht bereits auf Ihrem
Computer installiert und
konfiguriert ist und Sie keine
neuere Version besitzen.
4. Klicken Sie auf ActiveSync
xx
.
xx
installieren, klicken Sie
anschließend auf Installieren, und
befolgen Sie dann die Anweis-
ungen auf dem Bildschirm.
5. Verwenden Sie die Anweisungen
auf der Rückseite, um Ihr Gerät
anzuschließen, nachdem Sie dazu
aufgefordert wurden.
Weitere Informationen finden Sie in
der ActiveSync-Hilfe auf Ihrem
Computer.
Utilizzare Microsoft ActiveSync per
sincronizzare i dati nel dispositivo in
uso con quelli del computer.
1. Inserire il CD Dell Companion.
2. Fare clic sul triangolo giallo e
quindi su Inizia qui.
3. Installare e configurare Microsoft
Outlook solo se non è stato già
installato e configurato nel
computer e non si dispone di una
versione più recente.
4. Fare clic su Installa ActiveSync
xx
.
xx
,
quindi su Installa, quindi seguire
le istruzioni sullo schermo.
5. Quando richiesto, utilizzare le
istruzioni sul lato opposto per
collegare il dispositivo.
Per ulteriori informazioni, consultare
la Guida in linea di ActiveSync sul
computer.
Skorzystaj z aplikacji Microsoft
ActiveSync, aby zsynchronizować
dane urządzenia z danymi
komputera.
1. Włóż dysk CD Dell Companion.
2. Kliknij żółty trójkąt oraz przycisk
Start Here (Rozpocznij tutaj).
3. Program Microsoft Outlook należy
zainstalować tylko w przypadku,
jeśli nie został on wcześniej
zainstalowany i skonfigurowany w
komputerze i użytkownik nie
posiada jego nowszej wersji.
4. Kliknij przycisk Install
ActiveSync
xx
.
xx
(Instaluj program
ActiveSync), a następnie Install
(Instaluj) i postępuj zgodnie
zinstrukcjami wyświetlanymi na
ekranie.
5. Po wyświetleniu monitu wykonaj
instrukcje umieszczone na tylnej
stronie, aby podłączyć urządzenie.
Więcej informacji można znaleźć w
opcji pomocy programu ActiveSync
w komputerze.
2
1
Microsoft
®
ActiveSync
®
installieren | Installare Microsoft
®
ActiveSync
®
| Zainstaluj aplikację Microsoft
®
ActiveSync
®
Install Microsoft
®
ActiveSync
®
3
2
1
16
15
14
13
17
18
19
20
12
11
10
5
6
7
8
9
4
2
1
NOTICE: While charging your device
for the first time, you
mmuusstt
press the
power button to charge the backup
battery.
NOTICE: Do not connect your device to
the computer until the instructions
prompt you to do so.
HINWEIS: Sie
mmüüsssseenn
beim ersten
Laden des Geräts den Netzschalter
drücken, um die Stützbatterie zu laden.
HINWEIS: Schließen Sie das Gerät erst
an den Computer an, wenn Sie dazu
aufgefordert werden.
AVVISO: Quando si ricarica il
dispositivo per la prima volta, è
nneecceessssaarriioo
premere il pulsante di alimentazione per
caricare la batteria di riserva.
AVVISO: Non collegare il dispositivo al
computer finché le istruzioni non
richiedono di farlo.
OSTRZEŻENIE: Podczas ładowania
urządzenia po raz pierwszy
nnaalleeżżyy
bbeezzwwzzggllęęddnniiee
nacisnąć przycisk
zasilania, aby naładować baterię
zapasową.
OSTRZEŻENIE: Nie podłączaj
urządzenia do komputera, dopóki nie
zostanie wyświetlony odpowiedni
komunikat.
NOTICE: Do not connect your device to
the computer until the instructions
prompt you to do so.
HINWEIS: Schließen Sie das Gerät erst
an den Computer an, wenn Sie dazu
aufgefordert werden.
AVVISO: Non collegare il dispositivo al
computer finché le istruzioni non
richiedono di farlo.
OSTRZEŻENIE: Nie podłączaj
urządzenia do komputera, dopóki nie
zostanie wyświetlony odpowiedni
komunikat.

Finding Information
• Dell User's Guide — Setting
up and using your device.
• Microsoft Pocket PC
Help — Tap Start
→→
Help.
• Dell Companion CD —
Additional programs that
you can install.
• ActiveSync Help — Click
Help
→→
Microsoft
ActiveSync Help on your
computer.
Informationsquellen
• Dell Benutzerhandbuch —
Einrichten und Verwenden
des Geräts.
• Microsoft Pocket PC
Hilfe — Berühren Sie
Start
→→
Hilfe.
• Dell Begleit-CD —
Zusätzliche Programme, die
Sie installieren können.
• ActiveSync Hilfe — Klicken
Sie auf Ihrem Computer
Hilfe
→→
Microsoft
ActiveSync Hilfe.
Ricerca di informazioni
• Guida dell'utente Dell —
Configurazione e uso del
dispositivo.
• Guida di Microsoft Pocket
PC — Toccare Start
→→
Guida.
• CD Dell Companion —
Programmi aggiuntivi che
possono essere installati.
• Guida di ActiveSync — Fare
clic su Guida
→→
Guida in
linea Microsoft ActiveSync
sul computer.
Wyszukiwanie informacji
• Podręcznik użytkownika
urządzeń firmy Dell —
Konfigurowanie i obsługa
urządzenia
• Pomoc Microsoft Pocket PC
— Stuknij przycisk Start
→→
Help (Pomoc).
• Dysk CD Dell Companion
— Dodatkowe programy do
zainstalowania.
• Pomoc programu ActiveSync
— Kliknij przycisk Help
(Pomac)
→→
Microsoft
ActiveSync Help w
komputerze.
• Rotate the scroll dial to
move the cursor and press
in to perform actions
similar to pressing
<Enter> on a keyboard.
• To adjust the brightness,
press and hold the scroll
dial and press the top or
bottom of the navigator
button.
• To dim the display, press
and hold the power
button. Repeat to light
the display.
• Drehen Sie das Scroll-Rad,
um den Cursor zu
bewegen und drücken Sie
darauf, um ähnliche
Vorgänge auszuführen wie
beim Drücken der
<Eingabetaste> auf einer
Tastatur.
• Passen Sie die Helligkeit
an, indem Sie das Scroll-
Rad drücken und gedrückt
halten und gleichzeitig die
Ober- bzw. Unterkante der
Navigatortaste drücken.
• Die Anzeige können Sie
abdunkeln, indem Sie den
Netzschalter drücken und
gedrückt halten. Wieder-
holen Sie diesen Vorgang,
um die Anzeige wieder
auzuhellen.
• Ruotare il selettore di
scorrimento per spostare il
cursore e premerlo per
svolgere azioni simili alla
pressione del tasto
<Invio> di una tastiera.
• Per regolare la luminosità,
tenere premuto il selettore
di scorrimento e premere
la parte superiore o
inferiore del pulsante di
navigazione.
• Per oscurare lo schermo,
tenere premuto il pulsante
di alimentazione. Ripetere
la stessa operazione per
illuminarlo.
• Aby poruszać kursorem,
obracaj pokrętło
przewijania; aby uzyskać
skutek podobny do
wciśnięcia klawisza
<Enter> na klawiaturze
komputera, wciśnij
pokrętło przewijania.
• Aby wyregulować jasność,
wciśnij i przytrzymaj
pokrętło przewijania, a
następnie naciśnij górną
lub dolną część przycisku
nawigacji.
• Aby przyciemnić ekran,
wciśnij i przytrzymaj
przycisk zasilania. Powtórz
tę czynność, aby
rozjaśnićekran.
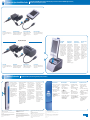
Connect the Sync Cable OR the Cradle
Synchronisationskabel ODER die Dockingstation anschließen | Collegare il cavo di sincronizzazione OPPURE il supporto da tavolo |
Podłącz kabel synchronizujący LUB stację bazową
Information in this document is subject to change without notice.
© 2003–2004 Dell Inc. All rights reserved.
Reproduction in any manner whatsoever without the written permission of Dell Inc. is
strictly forbidden.
Dell, the DELL logo, and Axim are trademarks of Dell Inc.; Microsoft, Windows, Media,
and ActiveSync are registered trademarks of Microsoft Corporation. Dell disclaims
proprietary interest in the marks and names of others.
January 2004
Die in diesem Dokument enthaltenen Information können sich ohne vorherige
Ankündigung ändern.
© 2003-2004 Dell Inc. Alle Rechte vorbehalten.
Die Vervielfältigung oder Wiedergabe in jeglicher Weise ist ohne schriftliche
Genehmigung von Dell Inc. strengstens untersagt.
Dell, das DELL Logo und Axim sind Warenzeichen von Dell Inc.; Microsoft, Windows,
Media und ActiveSync sind eingetragenen Warenzeichen der Microsoft Corporation. Dell
erhebt keinerlei Eigentumsansprüche auf Warenzeichen und Markennamen außer der
eigenen Warenzeichen und Dienstleistungsmarken.
Januar 2004
Le informazioni contenute in questo documento sono soggette a modifica senza
preavviso.
© 2003-2004 Dell Inc. Tutti i diritti riservati.
È severamente vietata la riproduzione con qualsiasi mezzo senza l'autorizzazione scritta di
Dell Inc.
Dell, il logo DELL e Axim sono marchi di Dell Inc.; Microsoft, Windows, Media e
ActiveSync sono marchi registrati di Microsoft Corporation. Dell esclude qualsiasi
interesse proprietario per i marchi e i nomi di altre società.
Gennaio 2004
Informacje zawarte w niniejszym dokumencie mogą ulec zmianie bez uprzedzenia.
© 2003-2004 Dell Inc. Wszelkie prawa zastrzeżone.
Kopiowanie w jakiejkolwiek formie bez pisemnej zgody firmy Dell Inc. jest surowo
zabronione.
Nazwa Dell, logo DELL oraz nazwa Axim są znakami handlowymi firmy Dell Inc.;
Microsoft, Windows, Media oraz ActiveSync są zastrzeżonymi znakami handlowymi
firmy Microsoft Corporation. Firma Dell nie rości sobie praw do znaków i nazw
podmiotów trzecich.
Styczeń 2004
Printed in China.
Sync cable
Connect the USB connector on
the end of the sync cable to your
computer.
Synchronisationskabel
Schließen Sie den USB-Anschluss
am Ende des Synchronisations-
kabel an Ihren Computer an.
Cavo di sincronizzazione
Collegare il connettore USB
sull'estremità del cavo di
sincronizzazione e poi sul
computer.
Kabel synchronizujący
Podłącz złącze USB znajdujące się
na końcu kabla synchronizującego
do komputera.
Cradle cable
Connect the USB connector on
the end of the cradle cable to your
computer.
Dockingstation
Schließen Sie den USB-Anschluss
am Ende des Dockingstations-
kabels an Ihren Computer an.
Supporto da tavolo
Collegare il connettore USB
sull'estremità del supporto da
tavolo e poi sul computer.
Stacja dokująca
Podłącz złącze USB znajdujące się
na końcu przewodu stacji bazowej
do komputera.
4
Additional Information
Zusätzliche Informationen | Informazioni supplementari | Informacje dodatkowe
3
Docking With
the Cradle
Keep the front of the
device flush with the
front of the cradle, and
lower the device until
it is firmly seated in
the cradle. When the
device is docked, the
DELL logo on the
cradle lights up and
the connection status
icon appears on the
command bar.
Einsetzen in die
Dockingstation
Achten Sie darauf,
dass die Vorderseite
des Gerätes mit der
Vorderseite der
Dockingstation
ausgerichtet ist und
schieben Sie dann das
Gerät nach unten, bis
es fest in der
Dockingstation sitzt.
Wenn das Gerät
gedockt ist, leuchtet
das DELL Logo an der
Dockingstation auf
und das Symbol zur
Anzeige des
Verbindungsstatus
wird auf der
Befehlsleiste angezeigt.
Inserimento nel
supporto da tavolo
Allineare il lato
anteriore del
dispositivo con il lato
anteriore del supporto
da tavolo, quindi
abbassare il dispositivo
fino a innestarlo
saldamente nel
supporto da tavolo.
Quando il dispositivo è
agganciato, il logo della
DELL sul supporto da
tavolo si accende e
l'icona di stato della
connessione compare
sulla barra dei
comandi.
Dokowanie wstacji
bazowej
Trzymając urządzenie
w taki sposób, aby jego
przednia część była
ustawiona w tej samej
płaszczyźnie, co przód
stacji dokującej, opuść
je, aż pewnie zaskoczy
na miejsce. Po
zadokowaniu
urządzenia na stacji
dokującej zaświeci się
znak DELL, a na
pasku poleceń pojawi
się ikona stanu
połączenia.
OR | ODER | OPPURE | LUB
-
 1
1
-
 2
2


in anderen Sprachen
- italiano: Dell Axim X3 Guida Rapida
- polski: Dell Axim X3 Skrócona instrukcja obsługi