

0tYlrtPUs
rnll35
,

I
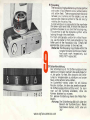
1) Set the
camera to manual
system
Turn
the F stop ring
tc,
move
the
"A" m.:rk
(AUTO)
off
the red line mierked in front of view-
finder.
The Auto
system is
switched to manual
system.
Set any
one
of
the F numbers
to the
red line. The
shutter
can be released freely
re-
gardless
of light
condition.
t) Umschaltung
der Kamera
liiz manuelle Blen-
deneinstellung
Man
dreht den Blendenring
von
der
"A"-Marke
weg.
Damit
wird die Automatik
abgeschaltet
und
man kann
die Blenden
von
Hand einstellen,
indem einfach der
gewtrnschte
Blendenwert
gegen
die
rote
Linie
gestellt
wird. Der
VerschluR
l;iBt sich dabei
ohne Rucksicht
auf die Lichtver.
hiiltnisse
immer ausl6sen
und belichtet l'40".
2)
Open
the rear cover
.
Pullout
the rear
cover lock. The
cover willooen
a uto m at ic
a
lly.
2) Offnen der Rtckwand
Man zieht
die
Ruckwandverriegelung
heraus,
bis die RUckwand
sich
automatisch
6ffnet.
1
www.orphancameras.com

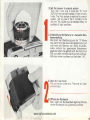
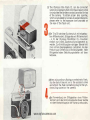
3) Load
the
carneia
with film
Pull up the rewinding knob. Put the film cassette
into
the
film
compartment.
Push
the
rewinding
knob
in.
lf
the
knob cannot
be
pushed
in com-
pletely,
turn it
slightly
clockwise or
counter-
clockwise,
while maintaining
pressure.
4',t
Eneage
the
film
end
with the take-up
spool
not-O
Tne
camera
firmly
with
your
left
hand
and
hold the
film
cassette
with the thumb
of the left
hand.
With the
right hand,
pull
out the
film end
to
such
extent
that it
reaches the
take-up spool.
Insert
the end
of
film
into
any
of the six slots
on the
take-up
spool.
'
Befestigen
des
Filmanfangs an
der Aufwick-
elspule
Man nimmt
die
Kamera in die
linke Hand und
hZilt
dabei
mit
dem
Daumen die
Filmpatrone
fest.
Mit der rechten
Hand
zieht
man
den Film-
anfang
soweit aus
der
Patrone
heraus,
daB er
reichlich
bis an die
Aufwickelspule
geht.
Nun
wird der
Filmanfang einfach in
einen der 6
Schlitze
an der
Aufwickelspule eingesteckt.

5)
Before
closing
the
rear
cover
B;-sure
itrlt
tfr*e
gear
teeth
on
the
spro.cket.spool
ene;J
ifie
perto-rations
of the
both
sides
in the
iir fr."*inoin'e
tf'"
f
ilm
on to
the
take-up
spool'
Close
the
cover.
Vor
dem
Schliel3en
cier
Rr-ickwand
ririio
O"i
f itm
soweit
auf
die
Aufwickel.spule
auf
-
;;;rlt,
Ois
oeiOe
Perforationen
des.Films
sicher
i""fr
;' Zth
;e
aei
rra
nsporttrom
m
el
ei ngreif
en'
il'ui'
*i.]
Oie
Rtick*and
durch
einfaches
An'
drucl<en
geschlossen.
6)
www.orphancameras.com

7)
ASA film
speed
setting
Rotate the ASA setting ring in
f ront
of the
lens
barrel until the
ASA
number
of
the
f ilm being
used appears in the
ASA window.
When using ASA
32 film,
you
may
set at
ASA
40 dot.
7)
Einsteuerung
der
Filmempfindlichkeit
'
Man dreht
den
ASA-E|nstellring vor der
Objek'
tivfassung,
bis
in dem kleinen Fenster
die
erfor'
derliche
ASA-Zahl
sichtbar wird.
(Aus
Griinden
der besseren U
bersichtlichkeit
hat die
Trip 35
nur
eine
ASA-Markierung.
Jede
Filmpackung
triigt
aber neben
der
DIN-Angabe
auch
den
Cnt-
sprEchenden
ASA'Wert,
so daB
dieser
leicht
ubertragen
werden
kann.
Wenn
Sie einen ASA 32 Film
gebrauchen,
konnen
Sie die Filmempfindlichkeit
auf ASA 40
stellen.
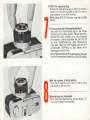
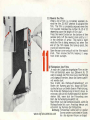
Set
the camera
to Auto
system
:
Turn
the
F stop ring
until the
"A"
mark clicks
and
stops at
the red line.
Einstellung
auf
Automatik
Man
dreht
den
Blendenring,
bis
die Marke
"A"
am
roten
Indexstrich
einrastet.

(the
lower right
hand
side),
in which
the distance
symbol will
appear
as
you
turn the focusing
ring.
This
permits
to set
the distance
symbol
while
looking
through
the viewfinder.
For
flash
photography
andlor for
criticalfocus-
ing,
use the
meter or foot
scale
provided
on
the
lower
part
of
the focussing
ring.
Simply set
appropriate
scale
number to the
red line.
Remarks:
The
focussing
ring rotates within
the
.
range
of distance
symbol
and meter/
foot
scale mark
respectively,
but
DOES NOT
rotate
360..
9) Scharfeinstellung
Der
Schiirfenring
ist
mit
Entfernungssymbolen
(gelbe)
und
2
Skalen
markiert: die weiBe
Skala
f
ur
nr, die
gelbe
frir
feet. Man braucht
die Entfer-
nung nur einigermaBen
zu
schdtzen
und
an der
Skala
entsprechend
einzustellen.
i
lm
Sucherfeld
-
rechts unten
-
ist
ein kleines
Fenster
sichtbar,
im dem
das
jeweils
eingestel-
Ite Entfernungssymbol
sichtbar
wird.
So
kann
man
auf die
Symbole
einstellen, ohne die
Kamera
absetzen
zu
mussen.
Frir
genaue
Einstellung
dienen die Meterffeet-
Skalen.
Achtung:
Der
Schdrfenring l?iBt
sich
Uber
den
Bereich der
Symbole
(bzw.l
Meter/
feet-Skalen
drehen, nicht
aber um
360'
www.orphancameras.com

Compose
the
picture
and
release the shutter
Hold
the camera firmly.
Look through the view-
finder
and
place
the subject
in the center
of
the
frame. Press
the shutter release
button
with
the
flat
part
of the
index finger, but
NOT
with
the
tip of this
f inger.
When
making
close-ups
(portrait
distance
symbol
or
1
meter, or closer),
frame the subject in the
area
enclosed by
3 small indices in
the
frame.
When
the
subject
is too
dim,
the
shutter
can not
be
released,
and a red warning
mark
comes
up
in the
viewfinder. lf
you
see this
signal,
simply
move the subject
to an area that
has
more light, or
perform
flash
photography.
f0
****
****'* **
* *
*
* ****
*
1O) Suchen
und Ausltisen
Man
hiilt
die Kamera
fest ans Auge, blickt durch
den
Sucher
und
wiihlt
den wirksamsten Bild-
ausschnitt
innerhalb
des Leuchtrahmens. Der
Ausl6ser wird
mit
dem
flach ausgestreckten
Zeigefinger
(nicht
mit der Fingerspitze)
weich
und ruhig
gedrr,ickt.
Werden
Nahaufnahmen
(Portrdtsymbol
oder
Einstellung auf
1
m oder kiirzer)
gemacht, gilt
der
Sucherausschnitt
innerhalb
der 3
kleinen
Marken
am Leuchtrahmen.
So
wird'die
bei
Nahaufnahmen
auftretende
Sucheroaiallaxe
kompensiert.
lst das
Licht fr,ir eine
gute
Aufnahme zu
dunkel,
so liiBt sich der Ausl6ser
nicht
drucken
und
eine rote Warnmarke erscheint im
Sucher, In
diesem Falle sollte
man sich nach
einer Moglich-
keit besserer Lichtverhiiltnisse umsehen
oder
zum Blitz
greifen.

11)
Rewind
the
film
When
a
roll of
film
is completely
exposed,
re.
wind the film.
DO
NOT attempt to
advance the
film. The
film is
completely
gxposed
when the
film counter
indicates
the number 36. 20 or L2
depending
upon
the length
of film
usel.
Press the
rewind
button
on the bottom of
the
camera
body.
Lift the
rewind
crank and tui-;i it
in the direction of
arrow. The
crank is
tight
while
the
film
is being rewound,
but when
the
end
of the film leaves
the take-up spool,
the
crank will
become loose.
Open the
fear
cover and
pull
out the film
rewind
knob. Then
remove
the film, keeping
it
away
from direct sunlight.
1) Riickspulen
des
Films
Je nach
der Lange des eingelegten Films rst der
Film voll
belichtet. wenn
das Ziihlwerk
36. 20
oder
12
anzeigt.
Der Film muB
nun in die
Patrone
zurrickgespult
werden,
bevor
die
Kamera
geoff-
net werden
darf.
I
Man
druckt den Rrickspul-Freilaufknopf
am
Boden
der
Kamera
Eanz
ein, klappt
die
Rijck-
spulkurbel
aus und
dreht
diese in Pfeilrichtung.
Das Ende der Rrickspulung
ist leicht daran zu
erkennen.
daB
sich
die
Kurbel wesentlich leichter
drehen 15Bt, wenn sich der Filmanfang vom
Kern der Aufwickelspule
geldst
hat.
Man offnet
nun
die
Kamerarr,ickwand. zieht die
Rr-ickspulkurbel bis
zum
Anschlag
heraus
und
entnimmt der Kamera die Filmpatrone.
Achtung: Filmwechsel sollte
nicht in
praller
Sonne, sondern zumindest
im Schat-
ten des eigenen Korpers
erfolgen!
www.orphancameras.com

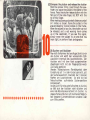
Flash
photography
(1)
The
use of
either flash bulbs or an electronic
flash
is recommended, if
red
warning signal ap-
pears
in the viewf inder.
We recommend
you
our
compact
style
Pen
Flash
CL which
accepts AG-l and
AG-l8
(for
color
photography).
IBlitz.Auf nahmen
(l)
In
Verbindung
mit
der
Trip
35
lassen sich sowohl
Kolbenblitze,
Blitzwi.irfel
und
Elektronenblitzge.
rate
verwenden. Blitzen ist immerdann angezeigt,
wenn im
Sucher
das rote Warnsignal
erscheint
und
sich der
Ausloser nicht
mehr
drilcken liiBt.
t2l
2.,
Set
thc camera to
manual
system by
turning the
F
stop
ring
(see
"1"
in
preceding
page}.
Set the
F number instructed on
your
flash bulb
package.
The shutter speed is automatically set at
1/40 sec.
Die Kamera wird auf
manuelle
Einstellung
um-
geschaltet,
indem man
den Blendenring von
"A"
wegstellt
und die notige Blende
wEihlt,
die
auf der
Blitzpackung
angegeben ist. Die VerschluBzeit
betragt dabei
automatisch immer ll$O't.

fr
(31
The Olvmpus Pen Flash
CL
can be connected
simply
by
slipping
its foot on to theaccessoryshoe
{incorporate
the cordless contact)
provided
on top
of the camera. To obtain
proper
lens opening,
which
is calculated by camera-to-subject distance,
please
refer to the exposure
chart
provided
on
the
rear
of
the flash unit"
Die Trip
35 hat einen
Sucherschuh
mit
eingebau-
tem Mittenkontakt. Blitzgerdte
mit
Mittenkontakt
-
z. B.
der Olympus Pen-Blitzer CL
-
brauchen
einfach nur in den Zubehorschuh
eingesteckt
zu
werden.
Zur Ermittlung
der richtigen
Blende hiilt
man
sich
an
die
angegebenen Leitzahlen,
die das
Produkt
aus
Entfernung
x Blende angeben. Viele
BlitzgerZite
haben
Belichtungstabellen auf dem
Geh Zi u se.
When using ordinary flash
gun
or electronic
f lash,
slip the foot of the
unit on to the accessory
shoe
and attach the flash connecting
plug
to the
syn-
chronizing socket
on the camera.
Bei Verwendung von Blitzger2iten
ohne
Mitten-
kontakt wird das
Verbindungskabel
dieser
GerZite
mit dem Kontaktnippel
an
der
Kamera
verbunden.
www.orphancameras.com

Main
features
Fifm
size:
?-4x36mm
Lens: D
Zuiko F2.8,
f
:4Omm
(4
elements
in 3
groups)
Shutter:
Programme
systent
Automatic 1/40
sec. or 1/200 sec.
Manual
1/40
sec. X syncro. contact
Self shutter release
button locking system
for
under
exoosure
Lensopening:
Automatic
Diaphragm
automatically
moves
from F2.B
to F22
Manual
For flasl.r
photography
from
F2.8
to
F22
Viewfinder:
Luminous
bright frame finder
(Magni-
fication
0.55)
with
parallax
correction
mark
and
zone focus
marks
Filnr
loading:
EL
(Easy
Loading) system
Film
winding: Thum
winding
at
camera
rear
Self-cocking to
prevent
double
ad-
vances
and double
exposures
Film counter: Exposed
counting, self-resettinC
type
Film
rewinding:
Crank
type with
rewinding
button
setting system
Focusing: Zone
focusing system
(4
position
setting)
with
distance scale in meter and foot
Exposure meter: Automatic exposure
adjustment
by built-in electric eye meter
Light measuring range EV 8.32-
EV
17.14
(ASA
100)
Film
speed setting: ASA
25-400
Filter
size; 43.5mm
(screw-in)
Rear
cover operationr Hinge type
Accessory
shoe: Cordless flash contact
Size &
weight:
116
(width)x70
(height)x57 (depth)
mm,
410
gr.
"
4)4
(width)x2%
lheieht)x2)tq ldeprhl
inch,
14%
oz,
Technische
Daten
und Ausstattungsmerk.
male:
Negativ-Format:
24x36 mm
auf KB-F|lm 135
Objektiv: D-Zuiko
l:2,8140
mm
(Vierlinser)
Verschlu0:
Programm-ZentralverschluB:
Automatic
mit
1/40.und
1/200,
manuell
mit 1/40.
X.Kontakt
Automatische
Auslosesperre
bei unzu
reichendem
Licht.
Bfendenbereich:
Automatic:
2,a-22
Manuell
ftir Blitz: 2,A-22
Sucher:
Leuchtrahmensucher
0.55x mit
Parallax-
kcrrektu
rma
rken u nd Zonen-Ei nstel
I ma rken
Filmeinlegen:
EL
(Easy
Loading)
System
Filmtransport: Durch
daumenbetatigtes
Reibriin.
del
an der RUckseite
der
Kamera,
Doppelbel.-sperre
Zihlwerk:
vorwdrtszdhlend, selbstruckstellend
Filmriickspulung:
mit
ausklappbarer Ruckspulkur.
oel
Scharfstellung:
mit
4 Ei.nstellzonen,
Markierung
in
m
und feet
Belichtungs-
vollautomatische
Programmsteue-
automatik:
rung im
Bereich
von
Lichtwert
8.3 bis
17.1 bei 21 DIN
Einsteuerunss-
bereidh:
Von
25-400
ASA=15
bis
27
DIN
Riickwand
befestigung:
a nsc ha rn iert
Zubehcirschuh: mit Mittenkontakt'fOr kabellose
BlitzgerEite
Ma0e:
116x57x70 mm
Gewicht:
4LO
e.
Printed
in
Japan
IEGOT35O05Z0.
10MG

www.orphancameras.com
-
 1
1
-
 2
2
-
 3
3
-
 4
4
-
 5
5
-
 6
6
-
 7
7
-
 8
8
-
 9
9
-
 10
10
-
 11
11
-
 12
12
-
 13
13


