
USER MANUALUSER MANUAL
GEBRAUCHSANWEISUNGGEBRAUCHSANWEISUNG
MODE D'EMPLOIMODE D'EMPLOI
ИНСТРУКЦИЯ ПО ОБСЛУЖИВАНИЮ И ЭКСПЛУАТАЦИИИНСТРУКЦИЯ ПО ОБСЛУЖИВАНИЮ И ЭКСПЛУАТАЦИИ
USER MANUAL
GEBRAUCHSANWEISUNG
MODE D'EMPLOI
ИНСТРУКЦИЯ ПО ОБСЛУЖИВАНИЮ И ЭКСПЛУАТАЦИИ
ENENEN
DEDEDE
FRFRFR
RURURU
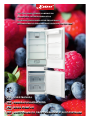
BUILT-IN FRIDGE FREEZER COMBINATIONBUILT-IN FRIDGE FREEZER COMBINATION
EINBAU-KÜHL-GEFRIER-KOMBINATIONEINBAU-KÜHL-GEFRIER-KOMBINATION
RÉFRIGÉRATEUR/CONGÉLATEUR ENCASTRABLERÉFRIGÉRATEUR/CONGÉLATEUR ENCASTRABLE
ВСТРАИВАЕМАЯ ХОЛОДИЛЬНО-МОРОЗИЛЬНАЯ КОМБИНАЦИЯВСТРАИВАЕМАЯ ХОЛОДИЛЬНО-МОРОЗИЛЬНАЯ КОМБИНАЦИЯ
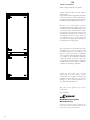
BUILT-IN FRIDGE FREEZER COMBINATION
EINBAU-KÜHL-GEFRIER-KOMBINATION
RÉFRIGÉRATEUR/CONGÉLATEUR ENCASTRABLE
ВСТРАИВАЕМАЯ ХОЛОДИЛЬНО-МОРОЗИЛЬНАЯ КОМБИНАЦИЯ

2
DEAR CUSTOMERS,
thank you for purchasing our product.
Berlin Germany
We inform you that our devices which are the
object of the present operating instructions are
assigned exclusively for domestic use.
We are convinced that you have made a
proper choice.
We wish you an effective use of our
refrigerator.
Our refrigerators correspond to the main
demands of the security, hygiene and
environment protection, according to the
directives of the EU which is confirmed
with certificates DIN ISO 9001, ISO 1400,
ac- cording to the standards established
within the frames of the EU, they also
correspond to the Gosstandart of Russia,
standards of the CIS, which is confirmed
with the corresponding certificates.
This product satisfies high quality demands
and corresponds to world comprehensive
standards; its modern appearance has been
developed by the best European designers.
We ask you to thoroughly read the
operating instructions before usage. The
consideration of recommendations protects
you from possible inconveniences which
can appear as a result of the wrong use of
the appliance and allows you to reduce the
consumption of electric energy. If the use
corresponds to the present operating
instructions, the refrigerator will bring you
a lot of pleasure for a long time.
Under the main idea of a constant
improvement of the quality of our
refrigerators the changes in design and
equipment which lead only to positive
changes of the technical qualities are
reserved by the manufacturer.
Yours faithfully
OLAN-Haushaltsgeräte
EN

3
RUFRDE
Dieses Produkt befriedigt hohe Qualitäts-
anforderungen und entspricht weltumfas-
senden Standards, sein modernes Aussehen
wurde von besten europäischen Designern
entwickelt.
LIEBE KUNDIN, LIEBER KUNDE,
wir danken Ihnen für den Erwerb unserer
Technik.
Wir sind überzeugt, dass Sie eine richtige
Wahl getroffen haben.
Wir bitten Sie, die Bedienungsanleitung vor
der Nutzung aufmerksam zu lesen. Die
Beachtung der Empfehlungen schützt Sie
von eventuellen Unannehmlichkeiten, die
als Folge einer falschen Nutzung des
Gerätes, auftreten können, und ermöglicht
Ihnen. den Verbrauch von Elektroenergie
zu reduzieren. Der Kühlschrank bereitet
Ihnen viel Vergnügen auf lange Zeit, wenn
der Gebrauch anhand der vorliegenden
Bedienungsanleitung erfolgt.
Unsere Kühlschrankes entsprechen den
Hauptforderungen der Sicherheit, der
Hygiene und des Umweltschutzes, laut den
Direktiven der EU, bestätigt durch die
Zertifikate DIN ISO 9001, ISO 1400,
entsprechend den im Rahmen der EU
geltenden Normen, und genauso auch den
Anforderungen von Gosstandart in
Russland und Standards anderer GUS
Länder, bestätigt durch die Iden-
tifikationszerti- fikate.
Unter dem Leitgedanken der ständigen
Verbesserung der Qualität unserer
Kühlschränke sind Änderungen bei Design
und Einrichtung, die nur zu positiven
Veränderungen der technischen Eigen-
schaften führen, vom Hersteller vorbehal-
ten.
Wir wünschen Ihnen eine effektive Nutzung
unseres Kühlschrankes.
Berlin Germany
Wir informieren Sie, dass unsere Geräte, die der
Gegenstand der vorliegenden Bedienungsanlei-
tung sind, ausschließlich für den häuslichen
Gebrauch bestimmt sind.
Hochachtungsvoll
OLAN-Haushaltsgeräte
OLAN-Haushaltsgeräte
Berlin Germany
Merci d'avoir acheté ce produit Kaiser.
Cordialement votre
Nous sommes convaincus que vous avez
fait le bon choix. Ce produit de haute
qualité, répondant aux normes internatio-
nales en vigueur, réalisera parfaitement
vos différentes cuissons, et son apparence
moderne conçu parles meilleurs designers
d'Europe, vous offrira une décoration de
cuisine magnifique.
Nous vous conseillons une lecture attentive
de ce manuel avant d'utiliser la table de
cuisson. La prise en compte des indications
vous protégera d'éventuels inconvénients
due à une mauvaise utilisation de l'appareil
et permet de réduire sa consommation de
gaz et d'énergie électrique. Si elle est
utilisée conformément à ce mode d'emploi,
la table de cuisson vous apportera
beaucoup de plaisir durant tout son cycle
de vie.
CHERS CLIENTS,
Nos réfrigérateurs répondent aux principa-
les exigences de sécurité, d'hygiène et de
protection de l'environnement, conformé-
ment aux directives de l'UE. Elles sont
toutes certifiées DIN ISO 9001 et ISO 1400,
dans le cadre de l'UE et elles répondent aux
Gosstandart de Russie, grâces à leurs
certifications aux standards de la CIS.
Nous vous informons que nos appareils faisant
l'objet du présent manuel d'utilisation sont
exclusivement destinés à l'usage domestique
Nous vous souhaitons une bonne utilisation
de nos fours.
Avec en pensée notre devoir d'amélioration
continue de la qualité de nos réfrigéra-
teurs, nous nous réservons le droit
d'apporter les modifications de conception
et de mode opératoire qui vous permettrons
de tirer le meilleur profit de votre équipe-
ment.
УВАЖАЕМЫЙ ПОКУПАТЕЛЬ,
благодарим Вас за приобретение нашей
техники.
Просим Вас внимательно прочитать
инструк ци ю по обс луж иванию и
эксплуатации до пуска устройства.
Соблюдение содержащихся в ней
рекомендаций защитит Вас от воз-
можных неприятностей при неправиль-
ной эксплуатации устройства, а
также позволит Вам уменьшить
расход электроэнергии. Если эксплуа-
тация холодильника будет соотве-
тствовать настоящей инструкции,
наше устройство будет радовать Вас
долгое время.
Желаем Вам эффективного пользования
холодильником нашей фирмы.
Данный продукт удовлетворяет самым
высоким требованиям и отвечает
мировым стандартам, его современный
облик разработан лучшими европейски-
ми дизайнерами.
Мы уверены, что Вы сделали правиль-
ный выбор.
Berlin Germany
Уважающий Вас
С мыслью о дальнейшем повышении
технических и эксплуатационных
характеристик наших холодильников
мы оставляем за собой право на
внесение изменений в дизайн и устро-
йство, влияющих только положительно
на п отреби тель ские качес тв а и
свойства продукта.
OLAN-Haushaltsgeräte
Наши холодильники полностью соотве-
тствуют основным требованиям
безопасности, гигиены и защиты
окружающей среды, согласно директи-
вам Европейского Союза, что подтвер-
ждено сертификатами DIN ISO 9001,
ISO 1400, в соответствии с настоящи-
ми нормами, действующими на терри-
тории Европейского сообщества, а
также полностью отвечают всем
требованиям Госстандарта России и
стандартов других стран СНГ, что
подтверждается сертификатами
соответствия.
Информируем, что наши приборы, являющи-
еся предметом настоящей Инструкции,
предназначены исключительно для домаш-
него пользования.

4
EN
CONTENTS
Transportation 34
WHAT TO DO IF? 38
Shelf life of frozen products 28
SERVICE AND MAINTENANCE 34
Switching on 22
Electrical connection 6
Electronic programmer
INSTALLATION INSTRUCTIONS 6
USE 22
Grounding 8
Installation 8
SAFETY PRECAUTIONS 16
Location drawing 20
INTELLIGENT SYSTEM 22
Defrosting frozen products 30
Switching off the refrigerator 26
BRIEF DESCRIPTION 20
Freezing fruit 30
Saving energy 32
PRACTICAL TIPS 26
Keeping products 26
Freezing products 28
Before calling the service centre 40
RESPECT FOR THE
ENVIRONMENT 46

5
RUFRDE
Gesamtansicht 21
INHALTSVERZEICHNIS
Einschalten 23
Energiespartipps 33
FÜR DEN INSTALLATEUR 7
Stromanschluss 7
Erdung 9
Installation 9
SICHERHEITSHINWEISE 15
KURZBESCHREIBUNG 21
GEBRAUCH 23
Elektronische zeitschaltuhr
INTELLIGENT SYSTEM 23
PRAKTISCHE TIPPS 27
Lebensmittel aufbewahren 27
Ausschalten des Kühlschranks 27
Einfrieren von Lebensmitteln 27
Lagerdauer des Gefriergutes 29
Einfrieren von Obst 29
Auftauen von Lebensmitteln 31
Transport 35
WARTUNG 35
WAS IST, WENN? 39
Bevor Sie sich an den Kundendienst
wenden 41
UMWELTVERTRÄGLICHKEIT 47
Décongélation des produits 31
QUE FAIRE SI? 39
Avant d'appeler le centre d’aide
technique 41
Conserver les produits 27
RESPECT
DE L'ENVIRONNEMENT 47
Congélation des fruits 31
Économiser de l'énergie 33
CONSEILS PRATIQUES 27
Congélation les aliments 29
ENTRETIEN ET MAINTENANCE 35
Durée de conservationdes produits
surgelés 31
Éteindre le réfrigérateur 27
Transport 35
Mise à la terre 9
SOMMAIRE
INSTRUCTIONS D'INSTALLATION 7
Connexion électrique 7
Installation 9
PRÉCAUTIONS DE SÉCURITÉ 17
DESCRIPTION SOMMAIRE 21
UTILISATION 23
Programmateur électronique
INTELLIGENT SYSTEM 23
Schémas des dispositifs 21
Mise en marche 23
Заземление 9
ИНСТРУКЦИЯ ПО МОНТАЖУ 7
Хранение продуктов 27
Размораживание продуктов 31
КРАТКОЕ ОПИСАНИЕ 21
Подключение к электросети 7
Замораживание фруктов 31
ИСПОЛЬЗОВАНИЕ 23
Продолжительность хранения
замороженных продуктов 31
ПРАКТИЧЕСКИЕ СОВЕТЫ 27
ОГЛАВЛЕНИЕ
УКАЗАНИЯ ПО ТЕХНИКЕ
БЕЗОПАСНОСТИ 17
Установка 9
Внешний вид 21
Включение 23
Электронное программирующее
устройство
INTELLIGENT SYSTEM 23
Отключение холодильника 27
Замораживание продуктов 29
Экономьте электроэнергию 33
ОБСЛУЖИВАНИЕ И УХОД 35
ОХРАНА ОКРУЖАЮЩЕЙ
СРЕДЫ 47
ЧТО ДЕЛАТЬ, ЕСЛИ? 39
Перед обращением в сервисный
центр 41
Транспортировка 35

6
EN
The mains supply has an efficient
ground connection complying with all
applicable laws and regulations.
The supply voltage corresponds to the
specifications on the data plate on the
front of the oven.
If the appliance is to be connected
directly to mains terminals, fit a switch
with minimum aperture of 3 mm
between the contacts. Make sure that
the switch is of sufficient capacity for
the power specified on the appliance's
data plate, and compliant with applica-
ble regulations. The switch must not
break the yellow-green earth wire. The
socket or switch must be easily reach-
able with the refrigerator fully installed.
ELECTRICAL CONNECTION
Correct grounding is a legal require-
ment. If the appliance is not pre-fitted
with a power cable and/or plug, use
only suitable cables and plugs capable
of handling the power specified on the
appliance's data plate and capable of
resisting heat. The power cable should
never reach a temperature of 50 °C at
any point along its length.
Before connecting the refrigerator to
the mains power supply, make sure
that:
IINSTALLATION
INSTRUCTIONS
Attention! Installation and electrical
connection must be executed by a
qualified expert only.
Attention! The manufacturer
declines all responsibility for
damage or injury if the above
instructions and normal safety
precautions are not respected.
!
!

7
RUFRDE
Vor der Durchführung des Stroman-
schlusses muss sichergestellt werden,
dass:
STROMANSCHLUSS
• das Stromnetz gemäß den gelten-
den Bestimmungen und Rechtsvor-
schriften geerdet ist.
• die Eigenschaften des Stromnetzes
mit den Werten auf dem angebrach-
ten Typenschild auf der hinteren Wand
des Kühlschranks übereinstimmen;
Wenn ein direkter Netzanschluss
gewünscht wird, muss ein allpoliger
Schalter mit Kontaktöffnung von min.
3mm vorgesehen werden und der
erlaubt das Gerät vom Netz zu trennen,
der den technischen Daten der gelten-
den Vorschriften entsprechen muss
(das gelb-grüne Erdungskabel darf
nicht vom genannten Schalter unter-
brochen werden). Der Stecker bzw. der
allpolige Schalter müssen bei installier-
tem Gerät problemlos zugänglich sein.
FÜR DEN INSTALLATEUR
Die Erdung ist eine notwendige
Voraussetzung der Nutzung des
Gerätes. Falls der Kühlschrank nicht
mit Kabel und/ oder Netzstecker
ausgestattet ist, muss geeignetes
Material verwendet werden, das der
auf dem Typenschild auf der hinteren
Wand des Gerätes angegebenen
Stromaufnahme und der Betriebstem-
peratur entspricht. Das Kabel darf an
keiner Stelle eine Temperatur von über
50 °C erreichen.
Avant de brancher le réfrigérateur au
secteur, s'assurer que:
• l'alimentation du secteur est équipée
d'une mise à la terre efficace
conforme à toutes les lois et régle-
mentations en vigueur.
Si l 'appareil doit être raccordé directe-
ment aux bornes du secteur, installer
un interrupteur avec une ouverture
minimale de 3 mm entre les contacts.
Assurez-vous que l'interrupteur a une
capacité suffisante pour la puissance
indiquée sur la plaque
INSTRUCTIONS
D'INSTALLATION
équipé d'un câble d'alimentation et / ou
• la tension d'alimentation correspond
aux spécifications figurant sur la
plaque signalétique à l'avant du four.
CONNEXION ÉLECTRIQUE
signalétique de l'appareil et qu'il est
conforme aux réglementations applica-
bles. Le commutateur ne doit pas briser
le fil de terre vert-jaune. La prise ou
l'interrupteur doit être facilement
accessible avec le four entièrement
installé.
Une mise à la terre correcte est une
exigence légale. Si l'appareil n'est pas
d'une fiche, utilisez uniquement des
câbles et des prises appropriés
capables de supporter la puissance
indiquée sur la plaque signalétique de
l'appareil et de résister à la chaleur. Le
câble d'alimentation ne doit jamais
atteindre une température de 50 ° C au-
dessus de la température ambiante en
tout point de sa longueur.
ИНСТРУКЦИЯ ПО МОНТАЖУ
ПОДКЛЮЧЕНИЕ К ЭЛЕКТРОСЕТИ
Перед подключением холодильника
к эл. сети, необходимо убедиться,
что:
• параметры сети соответствуют
данным в табличке на задней
стенке холодильника,
• электрическая сеть заземлена в
соответствии с действующими
предписаниями.
Заземление является необходимым
условием правильной эксплуатации.
Если холодильник не оборудована
кабелем и/или штекером, применяй-
те только материалы, соответствую-
щие данным, указанным в табличке
на задней стенке прибора, которые
могут функционировать в рабочем
режиме температур. Кабель ни в
коем случае не должен нагреваться
выше температуры более 50 °С.
В случае подсоединения непосре-
дственно к эл. сети, необходимо
использовать специальный автома-
тический выключатель с зазором
между контактами не менее 3 мм,
позволяющий отсоединять прибор
от сети, соответственно техническим
данным действующих предписаний
(желто-зеленый кабель заземления
не должен прерываться данным
выключателем). Штекер или автома-
тический выключатель на правильно
установленном приборе должен
быть всегда легко досягаем.
A c h t u n g ! M o n t a g e u n d
Stromnetzanschluss sollen nur von
d e r q u a l i fi z i e r t e n F a c h k r a f t
durchgeführt werden.
Attention! L'installation et la
connexion électrique ne doivent être
effectuées que par un technicien
qualifié.
Attention! Le fabricant décline toute
responsabilité pour les dommages
ou les blessures si les instructions ci-
dessus et les précautions normales
de sécurité ne sont pas respectées.
Внимание! Монтаж и подключе-
ние должны проводиться только
квалифицированным специалис-
том.
Внимание! Изготовитель не несет
никакой ответственности, если
при установке устройства не
соблюдаются все вышеприведен-
ные предписания.
! !
!
!
!
Achtung! Der Hersteller ist nicht
haftbar, wenn bei der Installation des
Gerätes alle oben angeführten
Anweisungen nicht befolgt werden.
!

8
EN
• Remove the package and self-
adhesive tape used to protect the
doors and accessories; use soap to
remove any glue residue;
GROUNDING
• Place the refrigerator in a dry
ventilated place protected from
direct sunlight and at a sufficient
distance from heat sources such as
a kitchen stove, radiator, etc. If this
condition cannot be met, use a
suitable insulating plate when
installing the refrigerator near heat
sources or provide the following
clearance from heat sources: from
the kitchen stove – 3 cm; from oil or
coal stoves – 30 cm;
• Keep expanded polystyrene packing
elements; these elements, foil and
self-adhesive tape will be used to
pack the refrigerator for protection
during transportation;
The power cord has a three-pronged
grounded plug for your personal safety.
It must be connected to a grounding
type wall receptacle, in accordance
with the legislation governing electric
installations in your country, as well as
any local regulations. Do not remove
the grounding prong, do not use a two
pronged adaptor, and never make a
connection to the schematic. Use the
cord supplied with the equipment (do
not exchange it). If the cord is
damaged, it must be immediately
replaced by specialized personnel.
INSTALLATION
• Wash the refrigerator's interior and
accessories with warm water and
dishwashing liquid and then wipe
dry;
• When installing the refrigerator next
to another refrigerator or a freezer,
ensure side clearance of at least 2
cm;
Attention! Grounding must be
provided for your safety. If there is no
grounding, contact a qualified
technician.
!

9
RUFRDE
• Beim Aufstellen neben einem
anderem Kühlgerät ist ein seitlicher
Mindestabstand von 2 cm erforder-
lich;
• Die Polsterteile der Verpackung aus
geschäumtem Polystyrol nicht
wegwerfen. Sollte erneuter Geräte-
transport nötig sein, so ist das Kühl-
und Gefriergerät mit Hilfe dieser
Polystyrolelemente und der Folie
einzupacken und mit einem Klebe-
band zusichern;
INSTALLATION
• Das Geräteinnere und die Ausstat-
tungselemente mit lauwarmem
Wasser unter Zusatz eines Geschirr-
spülmittels abwaschen und trocknen
lassen;
Das Netzkabel ist mit dem dreikontakt-
geerdeten Stecker für die Versorgung
Ihrer Sicherheit ausgestattet. Es muss
in die Steckdose des Erdungstyps
gesteckt werden, der den Normen
entspricht, die die Installation der
elektrischen Ausrüstung in Ihrem Land
regulieren sowie den jeweiligen lokalen
Normen. Nehmen Sie den Erdungs-
kontakt nicht heraus und verwenden
Sie den Zweikontaktadapter nicht.
Verwenden Sie das Kabel, das zusam-
men mit dem Kühlschrank geliefert wird
(tauschen Sie es nicht aus). Wenn das
Kabel beschädigt ist, muss es von der
qualifizierten Fachkraft sofort ersetzt
werden.
ERDUNG
• Das Gerät auspacken. das die Türen
und die Ausstattung schützende
Klebeband entfernen. Eventuell
verbliebene Kleberreste mit einem
milden Reinigungsmittel entfernen;
• Das Kühl- und Gefriergerät in einem
trockenen und belüftbaren Raum
aufstellen. Nicht direkter Sonnenbe-
strahlung aussetzen. Nicht in der
Nähe von Wärmequellen wie Herde,
Heizkörper, usw., aufstellen. Wenn
das Aufstellen neben einerWärme-
quelle unvermeidbar ist, verwenden
Sie eine geeignete Isolierplatte oder
halten Sie folgende Mindestabstän-
de ein: zu Elektro- oder Gasherden
u.ä. – ca. 3 cm, zu Öl- oder Kohlean-
stellherden – ca. 30 cm;
MISE À LA TERRE
Le cordon d'alimentation possède une
fiche a trois bouts incluant la mise à la
terre de sécurité. Il doit être connecté à
une prise murale conforme aux normes
régissant les installations électriques
dans votre pays, ainsi que toute
réglementation locale. Ne supprimez
pas le bout de mise à la terre prévu sur
la prise, n'utilisez pas'adaptateur a
deux bouts, et ne jamais effectuer un
raccordement électrique sur le disposi-
tif. Utilisez le cordon électrique fourni
avec l'équipement (ne le changer en
aucun cas). Si le cordon est endomma-
gé il doitêtre immédiatement remplacé
par un électricien spécialisé.
INSTALLATION
• Retirer l'emballage et la bande
autoadhésive utilisée pour protéger
les portes et les accessoires; Utiliser
du savon pour éliminer tout résidu de
colle sur les surface;
• Conserver l'emballage de couver-
ture en polystyrène; les éléments en
papier et les rubans autocollants
utilisé pour protéger le réfrigérateur
pendant sa transportation;
• Laver l'intérieur du réfrigérateur et
ses accessoires avec de l'eau
chaude et du liquide à vaisselle puis
essuyer sec;
• Placer le réfrigérateur dans un
endroit sec et bien ventilé à l'abri des
rayons directs du soleil et à une
distance suffisante des sources de
chaleur telles qu'une cuisinière, un
radiateur, etc. Si cette condition ne
peut être satisfaite, utilisez une
plaque isolante appropriée lors de
l'installation du réfrigérateur près
des sources de chaleur ou prévoir
une distance de sécurité par rapport
aux sources de chaleur: pour une
cuisinière – 3 cm; pour un cuiseur à
pétrole ou au charbon – 30 cm;
• Lors de l'installation du réfrigérateur
à proximité d'un autre réfrigérateur
ou d'un congélateur, prévoir une
distance de séparation latérale d'au
moins 2cm;
УСТАНОВКА
• Удалить упаковку изделия и
самоприклеивающееся ленты,
которыми предохранены двери и
оснастка; остатки клея удалить с
помощью моющих средств;
ЗАЗЕМЛЕНИЕ К ЭЛЕКТРОСЕТИ
Шнур питания оснащен трехконтак-
тной заземленной вилкой для
обеспечения Вашей безопасности.
Ее следует включать в розетку
заземляемого типа в соответствии с
нормами, регулирующими установку
электрооборудования в Вашей
стране, а также любыми местными
нормами. Не вынимайте заземляю-
щий контакт и не используйте
д ву х к о н та к т н ы й п е р ехо дн и к .
Используйте шнур, поставляемый
вместе с холодильником (не меняйте
его). Если шнур поврежден, он
должен быть немедленно заменен
квалифицированным специалистом.
• Сохранить упаковочные элемен-
ты из пенополистирола; в случае
не обход им ос т и т ра нс порта
холодильника они, фольга и
самоприклеивающаяся лента
будут пригодны для предохране-
ния и упаковки;
• Внутреннюю полость холодильни-
ка а также элементы оснастки
следует промыть тёплой водой
добавляя к ней жидкость для
мойки посуды а затем вытереть
досуха;
• Поместить холодильник в сухом,
проветриваемом помещении, на
место без доступа солнечных
лучей, с соблюдением соотве-
тственного расстояния от источни-
ков тепла таких, как: кухонная
плита, батареи центрального
отопления, и т.п. Если же послед-
нее условие является невыполни-
мым, тогда устанавливая холо-
дильник вблизи источников тепла
следует применить соответствен-
ную изоляционную пластину, либо
учесть следующие расстояние от
источников тепла: от кухонной
плиты – 3 см; от печей отопляемых
маслом либо углём –30 см;
• Помещая холодильник рядом с
другим либо рядом с морозилкой,
необходимо не менее 2 см между
их боковыми стенками;
Achtung! Im Interesse Ihrer
Sicherheit muss der Kühlschrank
unbedingt geerdet sein. Wenn keine
Erdung vorhanden ist, wenden Sie
sich an eine qualifizierte Fachkraft.
Attention! La mise à la terre doit
être prévue votre sécurité. Si votre
installation n'a pas de mise à la terre,
contacter un technicien qualifié
Внимание! В целях Вашей
безопасности необходимо зазем-
ление. Если заземление отсутству-
ет, следует обратиться к квалифи-
цированному специалисту.
!!!

10
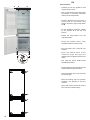
EN
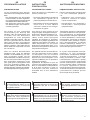
≥50 mm
≥550 mm
+10
560
0
+10
1776
0
2
≥200 cm
t
2
≥200 cm
t
Install the appliance only in a niche of
stable, fixed kitchen furniture, standing
on a horizontal and levelled surface. All
corners of the niche should be at 90°,
otherwise the door will not be exactly
adjacent to the furniture in the corners.
Ventilation
If the opening sizes are smaller, the
device will turn on more often and for a
longer time, which will lead to increased
power consumption and overheating of
the compressor. As a result, the
compressor may fail.
Observe the specified dimensions of
the ventilation openings to ensure the
normal functioning of the appliance.
The furniture for the installation should
be provided with unobstructed ventila-
tion.
For ventilation from the back of the
device, the distance to the wall must be
at least 40 mm.
Before installation make sure that the
furniture meets the specified dimen-
sions.
The air enters through the inlets in the
base of the kitchen furniture and exits
above in the back area of the niche. The
area of the air inlets in the basement, in
the furniture for installation and under
the ceiling should be at least 200 cm² to
remove heated air.
The vents should not be blocked. They
should be regularly cleaned of dust.

11
RUFRDE
Das Möbel für die Installation sollte mit
ungehinderter Belüftung versehen
werden.
Beachten Sie die angegebenen
Abmessungen der Lüftungsöffnungen,
um die normale Funktion des Geräts zu
gewährleisten.
Die Luft tritt durch die Öffnungen in der
Basis der Nische ein, tritt oben im
hinteren Bereich des Küchenmöbels
wieder heraus. Die Fläche der Lüf-
tungsöffnungen in der Basis, in den
Einbaumöbeln und unter der Decke
sollte mindestens 200 cm² betragen,
um die warme Luft abzuführen.
Für die Belüftung der Rückseite des
Geräts muss der Abstand zur Wand
mindestens 40 mm betragen.
Lüftungsöffnungen sollten nicht
blockiert oder vollgestellt werden. Sie
sollten regelmäßig von Staub gereinigt
werden.
Belüftung
Wenn die Lüftungsöffnungen kleiner
sind, schaltet sich das Gerät öfter und
länger ein, was zu einer erhöhten
Leistungsaufnahme und Überhitzung
des Kompressors führt. Infolgedessen
kann der Kompressor ausfallen.
Achten Sie vor der Installation darauf,
dass die Möbel den angegebenen
Größen entsprechen.
Installieren Sie das Gerät nur in einer
Nische von stabilen, festen Küchenmö-
beln, die auf einer horizontalen und
ebenen Fläche stehen. Alle Ecken der
Nische sollten 90° sein, sonst wird die
Tür in den Ecken nicht genau an die
Möbel angrenzen.
Installez l'appareil uniquement dans
une niche de meubles de cuisine
stables et fixes, posés sur une surface
horizontale et de niveau. Tous les coins
de la niche doivent être à 90°, sinon la
porte ne sera pas exactement adja-
cente au meuble dans les coins.
Avant de procéder à l'installation,
veillez à ce que les meubles correspon-
dent à les tailles spécifiées..
L'air entre par les bouches de la base
des meubles de la cuisine et sort par le
haut, à l'arrière de la niche. La surface
des bouches de ventilation dans le
sous-sol, dans les meubles pour
l'installation et sous le plafond doit être
d'au moins 200 cm² pour éliminer l'air
chaud.
Respectez les dimensions spécifiées
des bouches de ventilation pour
assurer le fonctionnement normal de
l'appareil.
Ventilation
Les bouches de ventilation ne doivent
pas être bloqués ou encombrés. Ils
doivent être régulièrement nettoyés de
la poussière.
Les meubles pour l'installation
devraient être pourvus d'une ventilation
non obstruée.
Si les bouches sont plus petits,
l'appareil s'allumera plus souvent et
plus longtemps, ce qui entraînera une
augmentation de la consommation
d'énergie et une surchauffe du
compresseur. En conséquence, le
compresseur peut échouer.
Pour la ventilation depuis l'arrière de
l'appareil, la distance au mur doit être
d'au moins 40 mm.
Перед установкой убедитесь, чтобы
мебель соответствовала заданным
размерам.
Встраивайте устройство только в
нишу устойчивой, зафиксированной
кухонной мебели, стоящей на
горизонтальной и ровной поверхнос-
ти. Все углы ниши должны состав-
лять 90°, иначе дверца не будет
ровно прилегать к мебели по углам.
Вентиляция
Соблюдайте указанные размеры
вентиляционных отверстий для
обеспечения нормального функцио-
нирования устройства.
Если размеры отверстий будут
меньше, устройство будет включать-
ся чаще и на более длительное
время, что приведёт к повышенному
потреблению электроэнергии и
перегреву компрессора. В результа-
те компрессор может выйти из строя.
Воздух поступает через отверстия в
основании кухонной мебели, выхо-
дит вверху, в задней области ниши.
Площадь вентиляционных отвер-
стий в основании, в мебели для
встройки и под потолком должна
составлять не менее 200 см² для
отвода нагретого воздуха.
Для вентиляции с задней стороны
устройства расстояние до стены
должно быть не менее 40 мм.
Мебель для встройки должна
обеспечивалась беспрепятственную
вентиляцию.
Вентиляционные отверстия не
должны быть закрыты или заграмож-
дены. Их следует регулярно очищать
от пыли.

12
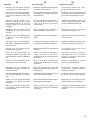
EN
180°
180°
5
3
1
4
7
7
8
9
5
9
10
11
10
1
2
6
4
2
• Fix the door with tapes in several
places which will allow a door
change without disassembly.
• Dismantle the upper hinge 1 and the
hole caps of the fridge door .2 3
• chamber , Remove the fridge door 3
lower 4 hinge (use an Allen wrench)
and hole cover .the 5
• Remove two fixing brackets of the 6
fridge door, rotate them by 180° and
install on the other side of the door.
• Replace positions of the lower hinge
4 and the upper hinge 1 and install
them, insert the top hole caps 2.
• Remove two fixing brackets of 11
the freezer door, rotate them by 180°
and install on the other side of the
door.
We recommend to have the door hinge
changed by our customer service.
Door right-left change
• oor Remove all food from the d
shelves.
• Before the change unplug the device
from main power or unplug the fuses.
• Dismantle the upper hinge 7 of the
freezer door .8
• chamber door Remove the freezer
8, bottom hinge 9 (use an Allen
wrench) and the bottom hole caps
10.
• Replace positions and install the
bottom hinge 9 and the upper hinge
7, fix the top hole cover 5 and the
insert bottom hole caps 10.

13
RUFRDE
• Das obere Scharnier 1 und die obere
Lochkappen 2 der Kühlraumtür 3
demontieren.
• Befestigen Sie die Tür zum Kühl-
schrank mit Klebeband an mehreren
Stellen, damit sie bei der Demontage
nicht herunterfällt.
• Ziehen Sie vor dem Wechsel den
Netzstecker.
• Nehmen Sie die Kühlraumtür 3 ab,
das untere Scharnier 4 (Schrauben
mit einem Sechskantschlüssel
lösen) und die Lochabdeckung 5.
• Die Gefrierfachtür 8, das untere
Scharnier 9 (Schrauben mit einem
Sechskantschlüssel lösen) und die
unteren Lochkappen 10 entfernen.
• Das obere Scharnier 7 der Gefrier-
fachtür 8 demontieren.
Wir empfehlen den Türanschlag durch
unseren Kundendienst wechseln zu
lassen.
• Entfernen Sie alle Lebensmittel aus
den Türregalen.
Wechsel des Türanschlages
• Das untere Scharnier 4 und das
obere Scharnier 1 austauschen und
montieren, stecken Sie die oberen
Lochkappen 2 ein.
• Nehmen Sie die beiden Befestigun-
gen 6 der Kühlraumtür ab, drehen
Sie sie um 180° und montieren Sie
sie auf der anderen Seite der Tür.
• Nehmen Sie die beiden Befestigun-
gen 11 der Gefrierfachtür ab,
drehen Sie sie um 180° und montie-
ren Sie sie auf der anderen Seite der
Tür.
• Das untere Scharnier 9 und das
obere Scharnier 7 austauschen und
montieren, die obere Lochabde-
ckung 5 befestigen und die unteren
Lochkappen 10 einstecken.
• Перед выполнением перенавеса
дверцы отключите электропита-
ние холодильника.
Смена положения дверей
Мы рекомендуем воспользоваться
услугами нашего сервисного центра
для смены положения дверцы.
• Удалите всю пищу с полок дверей.
• Прикрепите дверь к корпусу с
помощью скотча в нескольких
местах, чтобы она не падала при
разборке.
• Снимите дверь холодильной
камеры 3, нижнюю петлю 4
(шестигранным ключом открутите
её винты) и крышку отверстия 5.
• Поменяйте местами нижнюю
петлю 4 и верхнюю петлю 1 и
установите их, вставьте верхние
заглушки 2.
• Демонтируйте верхнюю петлю 1 и
заглушки 2 двери холодильной
камеры 3.
• Демонтируйте два крепежа 6 на
двери холодильной камеры,
разверните их на 180° и установите
на другую сторону двери.
• Демонтируйте верхнюю петлю 7
двери морозильной камеры 8.
• Снимите дверь морозильной
камеры 8, нижнюю петлю 9
(шестигранным ключом открутите
её винты) и нижние заглушки 10.
• Демонтируйте два крепежа 11 на
двери морозильной камеры,
разверните их на 180° и установите
на другую сторону двери.
• Поменяйте местами и установите
нижнюю петлю 9 и верхнюю петлю
7, закрепите крышку отверстия 5,
вставьте нижние заглушки 10.
• Démonter la fiche supérieure 1 et les
bouchons 2 de la porte de la
chambre frigorifique 3.
Inversion d'ouverture de porte
• Débranchez l'alimentation électrique
avant le changement de la porte.
• Enlevez tous les aliments des
tablettes.
Nous recommandons de remplacer la
charnière de la porte par notre service
clientèle.
• Fixez la porte avec des rubans
adhésifs sur plusieurs endroits pour
permettre le changement de porte
sans démontage.
• Démonter la porte de la chambre
frigorifique 3, la fiche bas 4 (utilisez
une clé Allen pour retirer la vis) et et
le couvercle du trou 5.
• Échanger les fiches bas 4 et
supérieure 1 et installer-les, insérer
les bouchons supérieurs 2.
• Retirer les deux fixations 6 de la
porte du réfrigérateur, virer de 180°
et installer-les de l'autre côté de la
porte.
• Démonter la porte du congélateur 8,
la fiche bas 9 (utilisez une clé Allen
pour retirer la vis) et les bouchons
10.
• Remplacer les positions et installer
la fiche bas 9 et la fiche supérieure 7,
fixer le couvercle du trou supérieur 5
et insérer les bouchons bas 10.
• Démonter les deux fixations 11 de la
porte du congélateur, virer de 180 °
et installer-les de l'autre côté de la
porte.
• Démonter la fiche supérieure 7 de la
porte du congélateur 8.

14
EN
1
1
5
5
5
5
1
33
3
42 4
3
Furniture Door
• Return the stop limiters 1 to the
original position.
• Pull outs the doors' sliders fixed
block 5 into position.
• Fix the appliance doors' sliders to the
cabinet doors using the screws.
• Open the cabinet doors to the
maximum angle and open the
appliance doors against the furniture
doors.
• Open and close the doors to check if
they can be moved smoothly.
• Check the cabinet doors. They
should be able to be fully closed.
• Pull out the bottom stop limiters 1 at
the bottom to maximum extension
and turn them downwards.
• Insert the plastic hole covers to hide
the screw caps.
• Carefully move the appliance and
insert it into the niche.
• Push the appliance into the niche. It
should rest on the bottom stop
limiters 1 and the upper stop limiter
bar 2.
• Fix the appliance inside the cabinet
by the screws 3 at the top and
bottom.
• Put the plastic hole covers 4 into
position.
• Stick the sealing strip into position
between the appliance and the
cabinet.

15
RUFRDE
Möbeltüre
• Bewegen Sie das Gerät vorsichtig
und setzen Sie es in die Nische ein.
• Befestigen Sie die Schieber der
Gerätetüren mit den Schrauben an
den Schranktüren.
• Ziehen Sie die Festblöcke 5 der
Schieber der Türen nach außen.
• Kleben Sie den Dichtungsstreifen
zwischen das Gerät und das
Gehäuse.
• Überprüfen Sie die Schranktüren.
Sie sollten vollständig geschlossen
werden können.
• Setzen Sie die Plastiklochdeckel ein,
um die Schraubkappen zu verber-
gen.
• Bringen Sie die Anschlagbegrenzer
1 wieder in die ursprüngliche
Position.
• Schieben Sie das Gerät in die
Nische. Es sollte auf den unteren
Anschlagbegrenzern 1 und der
oberen Be grenzung sleiste 2
aufliegen.
• Ziehen Sie die unteren Anschlagbe-
grenzer 1 für die maximale Entfer-
nung aus und drehen Sie sie nach
unten.
• Setzen Sie die Plastiklochab-
deckungen 4 in Position.
• Befestigen Sie das Gerät mit den
Schrauben 3 oben und unten im
Schrank.
• Öffnen Sie die Schranktüren im
maximalen Winkel und öffnen Sie
die Gerätetüren gegen die Möbeltü-
ren.
• Öffnen und schließen Sie die Türen,
um zu prüfen, ob sie sich reibungslos
bewegen lassen.
• Задвиньте устройство в нишу. Оно
должно упираться в нижние ограни-
чители 1 и верхнюю планку 2.
• Верните ограничители 1 в исход-
ное положение.
• Закрепите прибор в корпусе
шурупами 3 сверху и снизу.
• Проверьте мебельные двери. Они
должны закрываться полностью.
• Ус тан ови те пл ас тма сс овые
заглушки 4 на место.
Мебельные двери
• Вытяните нижние ограничители 1
в нижней части на максимальное
расстояние и поверните их вниз.
• Осторожно переместите устро-
йство и вставьте его в нишу.
• Откройте дверцы шкафа на
максимальный угол и откройте
дверцы а напротив устройств
мебельных дверец.
• Вытяните максимально науржу
блоки ползунков двери 5.
• Приклейте уплотнительную ленту
между ом и шкафом.устройств
• Откройте и закройте двери, чтобы
проверить, могут ли они двигаться
плавно.
• Прикрепите ползунки дверец
устройства к дверям шкафа с
помощью ов.шуруп
• пластмассовые заглуш-Вставьте
ки шуруп, чтобы скрыть шляпки ов.
Porte de meuble
• Fixez l'appareil dans l'armoire à
l'aide des vis 3 en haut et en bas.
• Remettez les limiteurs 1 à la position
initiale.
• Vérifiez les portes des armoires. Ils
peuvent être complètement fermés.
• Tirez les limiteurs inférieurs 1 du bas
à la distance maximale et tournez-
les vers le bas.
• Déplacez soigneusement l'appareil
et insérez-le dans la niche.
• Poussez l'appareil dans la niche. Il
doit reposer sur les limiteurs infé-
rieurs 1 et la barre de mesure
supérieure 2.
• Ouvrez les portes de l'armoire à
l'angle maximum et ouvrez les
portes de l'appareil contre les portes
du meuble.
• Ouvrez et fermez les portes pour
vérifier si elles peuvent se déplacer
en douceur.
• Mettez les bouchons en plastique 4
en place.
• Tirez le bloc 5 à l'extérieur des
curseurs des portes pour le mettre
en position.
• Fixez les glissières des portes de
l'appareil aux portes de l'armoire à
l'aide des vis.
• Coller la bande d'étanchéité en place
entre l'appareil et le boîtier.
• Insérez les caches en plastique pour
cacher les bouchons des vis.

16
EN
The manufacturer is not liable for any
damage resulting from failure to
observe the instructions provided in the
operating manual; take care to note all
the i nformat ion r elat ed to the
refrigerator's safe operation and
maintenance.
Please keep this operating manual for
reference and in order to present it to
the next owner of the refrigerator.
SAFETY PRECAUTIONS
After the refrigerator has been
installed, wait 2 hours before switching
it on, as a certain amount of tilting is
inevitable during transportation.
The refrigerator functions properly at
an ambient temperature of +16 °С to
+32 °С; do not place it in a basement,
porch or – in fall or winter – in unheated
country houses.
GENERAL INSTRUCTIONS TO BE
REVIEWED PRIOR TO SWITCHING
ON THE REFRIGERATOR
Take special care to make sure that
unattended children or disabled
persons do not use the device. Do not
allow children to sit on the elements
that slide out or to hang on the doors.
Prior to maintenance and arrangement
operations, pull the mains plug from the
socket by gripping the plug and not the
cable.
If the power cable is faulty, replace it
with a new one supplied by customer
service.
When installing, moving and lifting the
refrigerator, do not pull on the door
handles, touch the compressor's unit or
pull on the condenser located in the
recess in the rear panel.
Noise / cracking sounds are caused by
the expansion and shrinkage of the
d e v i c e ' s p a r t s a s a r e s u l t o f
temperature variations.

17
RUFRDE
Bewahren Sie diese Gebrauchsanwei-
sung auf, um sie in Zukunft auszunut-
zen oder den eventuellen Nachbesit-
zern übergeben zu können.
EMPFEHLUNGEN VOR DEM
EINSCHALTEN DES GERÄTES
Kinder nicht mit dem Gerät spielen
lassen. Auf keinen Fall sollten sich
Kinder z. B. auf Auszüge setzen oder
an die Tür hängen.
Im Falle einer beschädigten Anschluss-
leitung sollte diese nur vom techni-
schen Kundendienst ausgewechselt
werden.
SICHERHEITSHINWEISE
Das Kühl-und Gefriergerät funktioniert
in der Umgebungstemperatur von +10
°С bis +32 °С. Es ist weder im Keller,
noch im Hausflur oder in unbeheizten
Räumen im Herbst und Winter zu
betreiben.
Nach der Aufstellung des Gerätes darf
es erst nach 2 Stunden an das Netz
angeschlossen werden, weil während
des Transports eine Neigung des
Gerätes unvermeidlich ist.
Hörbare Geräusche, wie Knacken,
werden durch das Ausdehnen und
Schrumpfen der Bauelemente infolge
der Temperaturänderungen verur-
sacht.
Der Hersteller haftet nicht für die
Schäden, die Folge der Nichteinhal-
tung der in vorliegender Gebrauchsan-
weisung angeführten Prinzipien sind.
Darum sind die Informationen aufmerk-
sam zu lesen, die die Arbeitssicherheit,
Gebrauch und Wartung des Kühl- und
Gefriergerätes betreffen.
Vor Beginn von Wartungsarbeiten ist
der Netzstecker aus der Steckdose zu
ziehen (nicht am Anschlusskabel,
sondern am Netzstecker ziehen).
Zum Aufstellen, Verschieben, Aufhe-
ben sind nie die Türgriffe zu benutzen,
am Kondensator hinten zu ziehen und
der Kompressor zu berühren.
PRÉCAUTIONS DE SÉCURITÉ
Lorsque vous l'installez, le déplacez ou
le soulevez le réfrigérateur, assurez-
vous de ne pas tirer sur les manches de
portes, ne pas toucher le compresseur
ou tirer sur le condenseur situé dans la
cavité à l'arrière du réfrigérateur.
Veuillez conserver ce manuel pour
référence et le transmettre à son future
propriétaire.
Le réfrigérateur fonctionne correcte-
ment à un température ambiante
comprise entre +16 °C et +32 °С; Ne
pas l’installer dans un sous-sol, une
véranda – en automne ou en hiver –
dans les maisons de campagne non
chauffées.
Après l'installation du réfrigérateur,
attendez 2 heures avant de le mettre en
marche, puisque les secousses de
l’appareil son inévitable pendant son
transport.
Le fabricant décline toute responsabili-
té pour dommage résultant du nonres-
pect des instructions fournies dans ce
manuel d'utilisation; prenez soin de
prendre note de toutes les informations
relatives au fonctionnement sure du
Veillez particulièrement à ce que les
enfants sans surveillance ou les
personnes handicapés n'utilisent
l'appareil sans guidance. Ne pas
permettre aux enfants de s'asseoir sur
les accessoires accrochés aux portes
ou glissant du réfrigérateur.
réfrigérateur et de son entretien.
Des bruits / ou des sons de craquage
sont dus des fissuration causés les
dilatations des accessoires de
l'appareil en raison des variations de
leur température.
Avant toute maintenance ou opération
d'arrangement, débranchez le cordon
d'alimentation de la prise électrique, en
tirant par la tête de fiche et non le câble.
Si le câble d'alimentation est défec-
tueux, remplacez-le avec un neuf
recommandé par un technicien
qualifié.
INSTRUCTIONS GÉNÉRALES À LIRE
SOIGNEUSEMENT AVANT LA MISE
EN MARCHE DU RÉFRIGÉRATEUR
Холодильник работает надлежащим
образом в температуре окружающей
среды с +16 °С по +32 °С; не следует
помещать его в подвал, сени, а
осенью и зимой – в необогреваемых
дачных помещениях.
При установке, перемещении и
подьёме холодильника не следует
тянуть за рукоятки дверей, дотраги-
ваться к блоку компрессора, тянуть
за конденсатор находящийся в нише
задней стенки.
УКАЗАНИЯ ПО ТЕХНИКЕ
БЕЗОПАСНОСТИ
Изготовитель не несет ответствен-
ность за повреждения, возникшие в
результате несоблюдения указаний
приведенных в руководстве по
эксплуатации; поэтому следует
тщательно ознакомиться с информа-
цией по вопросу безопасности
работы, порядка использования и
ухода за холодильником.
ОБЩИЕ УКАЗАНИЯ, КОТОРЫЕ
СЛЕДУЕТ УЧЕСТЬ ДО
До начала операций связанных с
уходом за устройством, следует
вытянуть из розетки электросети
штепсельную вилку придерживая ее
руками и не выдергивая кабеля.
Обращаемся с просьбой сохранить
настоящее руководство по эксплуа-
тации, с целью использования его в
будущем, либо пере дачи очередно-
му владельцу холодильника.
ВКЛЮЧЕНИЯ ХОЛОДИЛЬНИКА
После установки холодильника на
предназначенное для него место,
рекомендуется включить его лишь
после истечения 2-х часов, так как во
время тр анспорта неизбеже н
некоторый наклон изделия.
В случае неисправности кабеля
питания его следует обменять
новым поставленным представите-
лем сервисного обслуживания.
Звуки/ трески вызваны расширением
и усадкой деталей устройства
вследствие изменений температу-
ры.
Особое внимание следует обратить
на то, чтобы устройством не пользо-
вались оставленные без присмотра
дети либо нетрудоспособные лица.
Запретите детям садиться на
выдвигаемые элементы и повисать
на дверях.

18
EN
Do not place bottled or canned
beverages – especially carbonated
beverages – in the refrigerator's freezer
compartment, as this can cause them
to shatter;
To avoid accidents, do not repair the
product yourself. Repairs conducted by
unqualified persons can pose a serious
risk to the user;
Do not refreeze partially thawed
products;
Frozen products (ice cream, ice cubes,
etc.) from the freezer compartment
should not be put directly into a
person's mouth, as the low temperature
can cause painful cold injuries (cold
burns);
To dispose of the device (to bring it to a
scrap yard), cut off and remove the
power cable and all the hazardous
elements, especially those dangerous
for children;
In case of damage to the cooling
device, ventilate the room where the
refrigerator was used for several
minutes (the volume of the room must
be at least 4 m³);
Children must not have access to
remaining packaging materials (bags,
pieces of expanded polystyrene, etc.)
as these materials can present a
potential source of danger;
Slopping refrigerant can get into eyes,
causing severe injury!
It is prohibited to transport the
refrigerator in the horizontal position or
allow it to deviate by more than 40° from
the vertical; this also holds when
moving or installing the refrigerator. If
this has occurred, the device may be
connected to the mains only after
waiting 2 hours following its installation.

19
RUFRDE
Das aus dem Gefrierraum herausge-
nommene Gefriergut (Eis, Eiswürfel
usw.) nicht direkt in den Mund stecken;
G e f r i e r t e m p e r a t u r e n k ö n n e n
empfindliche Verbrennungen verursa-
chen;
Die Lebensmittel, wenn auch nur
teilweise aufgetaut, dürfen nicht wieder
eingefroren werden;
Aus Sicherheitsgründen das Gerät
nicht selbst reparieren. Die Reparatu-
ren, die von Personen vorgenommen
werden, die keine erforderlichen
Qualifikationen haben, könnten für den
Benutzer des Gerätes eine ernste
Gefahr sein;
Getränke in Flaschen und Dosen,
insbesondere die kohlensäurehalti-
gen, dürfen nicht im Gefrierraum
aufbewahrt werden. Die Flaschen und
Dosen können platzen;
Sollte das ausgediente Gerät nicht
mehr benutzt werden, so muss es vor
dem Abtransport zur Entsorgung
vollständig abgesichertwerden, d.h. die
Anschlussleitung abgeschnitten und
alle gefährlichen Geräteelemente
entfernt werden;
Alle verwendeten Verpackungsmate-
rialien (Säcke, Polystyrolstücke usw.)
sollten nicht in die Reichweite von
Kindern geraten;
Das Kältemittel aus einem beschädig-
ten Kühlkreislauf herausspritzt, kann
es Augenverletzungen verursachen;
Ein beschädigtes Gerät sollte nicht in
Betrieb gesetzt werden; im Zweifelsfall
beim Hersteller nachfragen. Das
Kühlgerät möglichst immer senkrecht
transportieren. Bei einer Neigung von
mehr als 40° beim Transport, muss das
Gerät vor Gebrauch mindestens 2
Stunden ruhen und darf erst dann
eingeschaltet werden.
Falls das Kühlsystem beschädigt
worden ist, muss der Raum, in dem das
Gerät steht, während einiger Minuten
durchgelüftet werden (der Raum muss
mindestens 4 m³ groß sein);
Pour éviter les accidents, évitez de
réparer les appareils vous-même. Les
réparations effectuées par des
personnes non qualifiées constituent
un risque sérieux pour l'utilisateur;
Les enfants ne doivent pas être laissé
en contact avec les matériaux
d'emballage (sacs, couverture en
polystyrène, etc.) Car ces matériaux
constituent un danger potentiel;
Ne pas recongeler des produits
partiellement décongelés;
Pour se débarrasser de l'appareil (le
disposer à la ferraille), couper et retirer
le câble d'alimentation ainsi que tous
les éléments potentiellement dange-
reux, en particulier ceux comportant un
risque de blessure pour les enfants.
Ne placez pas de boissons en bouteille
ou en cannettes, surtout les boissons
gazeuses, dans le compartiment
congélateur du réfrigérateur, car cela
peut provoquer leur brisure;
Produits congelés (Les glaces, les
cubes de glace, etc.) du compartiment
congélateur ne devrait en aucun cas
être mis directement dans la bouche,
car les basses températures peuvent
causer un froid douloureux et des
blessures (brûlures par le froid);
En cas de dommages sur l'unité de
refroidissement et fuite du liquide
frigorifique, ventiler la pièce où le
réfrigérateur est utilisé pendant
plusieurs minutes (le volume de la
pièce doit être d'au moins 4 m³);
Le liquide frigorifique peut causer des
blessures graves s’il rentre en contact
avec les yeux.
Il est interdit de transporter le réfrigéra-
teur dans une position horizontale ou
inclinée à plus de 40° par rapport à la
verticale; Cela est valable également
lors sa transportation ou de son
installation. Si ces conditions ne sont
pas respectées, l'appareil peut être
connecté au réseau seulement après
avoir attendu pendant 2 heures après
son installation
В случае повреждения охлаждаю-
щего агрегата следует в течение
нескольких минут проветривать
помещение, в котором находится
холодильник (объём помещения – не
менее 4 м³);
В случае, если устройство предназ-
начено к ликвидации (вывозу на
свал ку мета лл ол о ма) к а бель
питания следует отрезать и удалить
из устройства все опасные элементы
угрожающие, прежде всего, детям;
Запрещается помещать в низкотем-
пературное отделение холодильни-
ка напитки в бутылках и банках –
особенно газированные двуокисью
углерода – так как существует
опасность растрескивания ёмкос-
тей;
Замороженные продукты (мороже-
ное, кубики льда, и т.п.) вынутые
непосредственно из низкотемпера-
турного отделения не следует
ложить в рот, т.к. их низкая темпера-
тура может вызвать болезненные
обморожения (ожоги);
Во избежание несчастных случаев
не следует проводить ремонт
устройства собственными силами.
Ремонты проводимые лицами без
соответственных квалификаций
могут представлять серьезную
опасность для потребителя холо-
дильника;
Остатки упаковочных материалов
(мешки, отрезки пенополистирола, и
т.п.) не должны попасть в руки детям,
т.к. являются потенциальным
источником опасности;
Выплескивающийся хладагент
попадая в глаза может привести к их
серьёзному заболеванию!
Запрещается повторное заморажи-
ван ие ч ас ти чно ра ста явш его
продукта;
Запрещается транспортировать
холодильник в горизонтальном
положении и отклонять больше, чем
на 40° от вертикали; указанное
относится также к его перемещению
и установке на предназначенное
место. Если же данная обстановка
возникла, тогда устройство можно
подключить к электросети лишь
только после истечения не менее 2-х
часов с момента его установки в
помещении.

20
EN
1
2
4
6
5
3
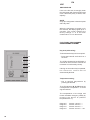
6. Freezer drawers
1. LED internal lighting
FREEZE BOX
3. Door trays
KAISER LOGIC SPACE
2. Storage shelves
KAISER SAFETY GLASS
FREEZE BOX
BRIEF DESCRIPTION
4. GARDEN BOX for fruits/
vegetables
It's recommended to seal up the food
before putting it into the refrigerator.
Fruit or vegetable compartment in
which the right moisture is maintained.
The insulated compartment with
ventilation and moisture control serves
to maintain the moisture and nutrients
in the food.
Arrangement of functional assemblies
is suitable for storage of a variety of
fruits, vegetables, beverages and other
food consumed in the short term.
As we are constantly working to im-
prove our products, your refrigerator
may differ slightly from this description;
however, the functions and mode of
operation remain the same.
NOTE
LOCATION DRAWING
5. Pizza drawer
Refrigerating chamber
GARDEN BOX
Cooked foods should not be placed in
the refrigerating chamber until cooled
down to room temperature.
Transparent plastic boxes made of
cold-resistant plastic. This highly-
effective special chamber has been
developed for best storage of meat,
fish, pizza. It allows keeping tastes and
nutritional properties three times longer
compared to traditional conditions of
products storage.
Seite wird geladen ...
Seite wird geladen ...
Seite wird geladen ...
Seite wird geladen ...
Seite wird geladen ...
Seite wird geladen ...
Seite wird geladen ...
Seite wird geladen ...
Seite wird geladen ...
Seite wird geladen ...
Seite wird geladen ...
Seite wird geladen ...
Seite wird geladen ...
Seite wird geladen ...
Seite wird geladen ...
Seite wird geladen ...
Seite wird geladen ...
Seite wird geladen ...
Seite wird geladen ...
Seite wird geladen ...
Seite wird geladen ...
Seite wird geladen ...
Seite wird geladen ...
Seite wird geladen ...
Seite wird geladen ...
Seite wird geladen ...
Seite wird geladen ...
Seite wird geladen ...
Seite wird geladen ...
Seite wird geladen ...
Seite wird geladen ...
Seite wird geladen ...
Seite wird geladen ...
Seite wird geladen ...
Seite wird geladen ...
Seite wird geladen ...
Seite wird geladen ...
Seite wird geladen ...
Seite wird geladen ...
Seite wird geladen ...
-
 1
1
-
 2
2
-
 3
3
-
 4
4
-
 5
5
-
 6
6
-
 7
7
-
 8
8
-
 9
9
-
 10
10
-
 11
11
-
 12
12
-
 13
13
-
 14
14
-
 15
15
-
 16
16
-
 17
17
-
 18
18
-
 19
19
-
 20
20
-
 21
21
-
 22
22
-
 23
23
-
 24
24
-
 25
25
-
 26
26
-
 27
27
-
 28
28
-
 29
29
-
 30
30
-
 31
31
-
 32
32
-
 33
33
-
 34
34
-
 35
35
-
 36
36
-
 37
37
-
 38
38
-
 39
39
-
 40
40
-
 41
41
-
 42
42
-
 43
43
-
 44
44
-
 45
45
-
 46
46
-
 47
47
-
 48
48
-
 49
49
-
 50
50
-
 51
51
-
 52
52
-
 53
53
-
 54
54
-
 55
55
-
 56
56
-
 57
57
-
 58
58
-
 59
59
-
 60
60


in anderen Sprachen
- English: Kaiser EKK 60174 User manual
- français: Kaiser EKK 60174 Manuel utilisateur
- русский: Kaiser EKK 60174 Руководство пользователя