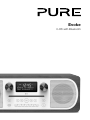
PURE EVOKE C-D6 WALNUT Bedienungsanleitung
- Kategorie
- Radios
- Typ
- Bedienungsanleitung

C-D6 with Bluetooth
Evoke


1
EN
NL
ES
IT
DA/NO
FR
ES
DE
Thank you for choosing Evoke C-D6 with Bluetooth. This
manual will get you up and running in no time and explains
how to make the most of Evoke’s great features. If you
need additional help with topics not covered in this manual,
please visit the Pure support pages at support.pure.com.
C-D6 with Bluetooth

2
Safety instructions
1. Read these instructions – All the safety and operating instructions should be read before this product is
used.
2. Keep these instructions – The safety and operating instructions should be retained for future reference.
3. Heed all warnings – All warnings on the appliance and in the operating instructions should be adhered to.
4. Follow all instructions – All operating and use instructions should be followed.
5. WARNING: Do not use the included power supply (with model number GPE036W-180200-Z) to power up
another apparatus as this may cause damage.
6. Use only power supplies listed in the user manual/user instructions (supplied by Pure with model
number GPE036W-180200-Z).
7. Fit the mains adapter to an easily accessible socket, located near the radio and ONLY use the mains
power adapter supplied.
8. WARNING: To reduce the risk of fire or electric shock, do not expose this apparatus to rain or moisture.
The apparatus shall not be exposed to dripping or splashing and objects filled with liquids, such as vases,
shall not be placed on apparatus.
9. CAUTION: Danger of explosion if the battery in the remote control is incorrectly replaced. Replace only
with the same or equivalent type.
10. WARNING: The battery (battery or batteries or battery pack) in the remote control shall not be exposed to
excessive heat such as sunshine, fire or similar.
11. Attention should be drawn to the environmental aspects of battery disposal.
12. WARNING: The direct plug-in adapter is used as a disconnect device, the disconnect device shall remain
readily operable and accessible.
13. Keep the radio away from heat sources such as radiators, heaters or other appliances that produce heat.
14. Do not expose the unit to direct sunlight.
15. Do not use the radio near water.
16. Avoid objects or liquids getting into the radio.
17. Do not remove screws from or open the radio casing.
18. Should not be immersed in water, used in shower or bathroom if plugged into the mains.
19. The mark label is on the exterior of the bottom of the apparatus.
20. The equipment’s ventilation should not be impeded by covering the ventilation openings with items such
as newspaper, tablecloths, curtains etc.
21. No naked flame sources, such as lighted candles, should be placed on the apparatus.
22. Only use the apparatus in places that have a moderate temperature.
23. The adapter plug is used as the disconnect device, the disconnect device shall remain readily operable.
WARNING
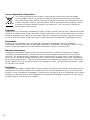
DO NOT INGEST BATTERY, CHEMICAL BURN HAZARD
The remote control supplied with this product contains a coin/button cell battery. If the coin/button cell
battery is swallowed, it can cause severe internal burns in just 2 hours and can lead to death.
Keep new and used batteries away from children. If the battery compartment does not close securely, stop
using the product and keep it away from children. If you think batteries may have been swallowed or placed
inside any part of the body, seek immediate medical attention.
Safety instructions
1. Read these instructions – All the safety and operating instructions should be read before this product is
used.
2. Keep these instructions – The safety and operating instructions should be retained for future reference.
3. Heed all warnings – All warnings on the appliance and in the operating instructions should be adhered to.
4. Follow all instructions – All operating and use instructions should be followed.
5. WARNING: Do not use the included power supply (with model number GPE036W-180200-Z) to power up
another apparatus as this may cause damage.
6. Use only power supplies listed in the user manual/user instructions (supplied by Pure with model
number GPE036W-180200-Z).
7. Fit the mains adapter to an easily accessible socket, located near the radio and ONLY use the mains
power adapter supplied.
8. WARNING: To reduce the risk of fire or electric shock, do not expose this apparatus to rain or moisture.
The apparatus shall not be exposed to dripping or splashing and objects filled with liquids, such as vases,
shall not be placed on apparatus.
9. CAUTION: Danger of explosion if the battery in the remote control is incorrectly replaced. Replace only
with the same or equivalent type.
10. WARNING: The battery (battery or batteries or battery pack) in the remote control shall not be exposed to
excessive heat such as sunshine, fire or similar.
11. Attention should be drawn to the environmental aspects of battery disposal.
12. WARNING: The direct plug-in adapter is used as a disconnect device, the disconnect device shall remain
readily operable and accessible.
13. Keep the radio away from heat sources such as radiators, heaters or other appliances that produce heat.
14. Do not expose the unit to direct sunlight.
15. Do not use the radio near water.
16. Avoid objects or liquids getting into the radio.
17. Do not remove screws from or open the radio casing.
18. Should not be immersed in water, used in shower or bathroom if plugged into the mains.
19. The mark label is on the exterior of the bottom of the apparatus.
20. The equipment’s ventilation should not be impeded by covering the ventilation openings with items such
as newspaper, tablecloths, curtains etc.
21. No naked flame sources, such as lighted candles, should be placed on the apparatus.
22. Only use the apparatus in places that have a moderate temperature.
23. The adapter plug is used as the disconnect device, the disconnect device shall remain readily operable.
WARNING
DO NOT INGEST BATTERY, CHEMICAL BURN HAZARD
The remote control supplied with this product contains a coin/button cell battery. If the coin/button cell
battery is swallowed, it can cause severe internal burns in just 2 hours and can lead to death.
Keep new and used batteries away from children. If the battery compartment does not close securely, stop
using the product and keep it away from children. If you think batteries may have been swallowed or placed
inside any part of the body, seek immediate medical attention.

3
EN
Contents
4 Introduction
4 Front panel
5 Rear connectors
5 Remote control
6 Display
7 Changing the information shown on screen
8 Getting started
8 Quick start
9 Changing digital radio stations
9 Changing FM radio stations
10 Storing and selecting presets
10 To quick-store a station to a preset button (1-3)
10 To store a station to the preset list (4-10)
10 To recall a preset when listening to digital radio or FM radio
11 Playing a CD
11 Inserting a CD
11 Playing a track
11 Shuffling tracks
11 Repeating tracks
11 Ejecting a CD
12 Streaming using Bluetooth
13 Using the auxiliary input
14 Alarms and timers
14 Setting an alarm
14 Cancelling a sounding alarm
15 Snoozing a sounding alarm
15 Setting the sleep timer
16 Options and settings
16 Digital radio settings
17 FM radio settings
18 System settings
21 Technical specifications

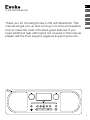
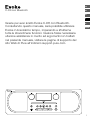
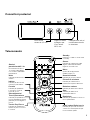
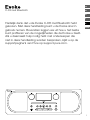
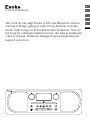
4
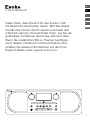
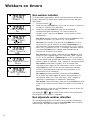
Remote
control
sensor
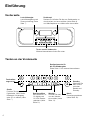
Front panel buttons
Source
Press to select
digital radio, FM radio,
Bluetooth, auxiliary input
or CD (see page 7).
Menu
Setup options
(see page 16).
Standby
Switch Evoke
between on
and standby.
Alarm
Press to set
the alarm (see
page 14).
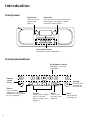
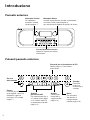
Introduction
Front panel buttons
See below for more information.
Front panel
Volume dial
Adjust and mute
volume (see
page 7).
Select dial
Turn and press to browse and select
radio stations (see page 9), select
and adjust menu options.
Presets
Store up to 10 digital
and 10 FM radio
preset stations (see
page 10).
CD playback controls
See page 11 for more
information.

5
EN
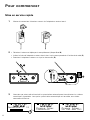
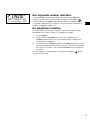
Rear connectors
Analogue stereo
input for iPod,
MP3 player, etc
3.5 mm stereo
headphone socket
Connect to supplied
mains adapter only
Remote control
Standby
Switch the radio between on
and standby.
Select buttons
Press to select and confirm
menu options
1 2
3 4
+
Presets 1-4+
Store up to 10 digital
and 10 FM radio
preset stations
Source
Press to select digital radio, FM
radio, Bluetooth, auxiliary input
or CD
Menu
Setup options (see page 16)
Back
Press to go back to
the previous screen.
Volume down
Press to reduce the volume.
Volume up
Press to increase the volume.
Mute
Press to mute volume.
Stop
Press to stop the CD.
Random
Press to shuffle the
tracks on a CD.
Repeat
Press to repeat the
current track or CD.
Rewind/Previous track
Press to play the
previous track. Press
and hold to rewind.
Fast forward/Skip track
Press to skip to the next
track. Press and hold to fast
forward.
Play/Pause track
Press to play or pause
the track that’s playing.

6
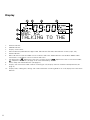
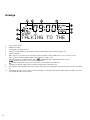
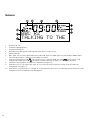
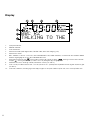
Display
DAB STATION DETA
DLS SCROLLING IN
BBC R2
TALKING TO THE
1. Volume indicator.
2. AM/PM indicator.
3. Displays current time.
4. Source indicator (DAB indicates digital radio, FM indicates FM radio, AUX indicates auxiliary input, CD).
5. Stereo indicator.
6. MP3 indicates that you’ve loaded a CD that contains MP3 files, WMA indicates that Windows Media Audio
information is available for a CD that contains MP3 files.
7. CD repeat icons (
DAB STATION DETA
DLS SCROLLING IN
: Repeat the track that’s currently playing,
DAB STATION DETA
DLS SCROLLING IN
: Repeat the tracks in the current folder,
DAB STATION DETA
DLS SCROLLING IN
: Repeat the whole CD (see page 11 for more information)).
8. Alarm, sleep and snooze indicators (see page 14).
9. Displays the name of the radio station or
if listening to a CD, displays the track number and elapsed time (see
page 11).
10.
Displays date, scrolling text, settings and station information. If listening to MP3s on a CD, displays the name of the
MP3 file.

7
EN
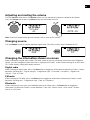
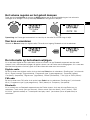
Adjusting and muting the volume
Turn the Volume dial or press the Volume buttons on the remote to increase or decrease the volume.
Press the Volume dial or press the Mute button on the remote to mute.
Note: Evoke will automatically go into standby if left in mute for 30 minutes.
Changing source
Use the Source button to choose between digital radio, FM radio, auxiliary input, Bluetooth or CD.
Volume
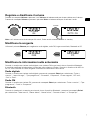
Changing the information shown on screen
When listening to a digital radio station, FM radio station or you are streaming a track from your Bluetooth
device, you can change the information that is displayed on Evoke’s screen. When listening to an MP3 on a
CD, Evoke displays information about the track.
Digital radio
When listening to digital radio, press the Select dial to toggle the information displayed on Evoke’s screen
between ‘Scrolling text’, ‘Signal strength’, ‘Programme type’, ‘Ensemble’, ‘Frequency’, ‘Signal error’,
‘Bitrate’, ‘Time’ or ‘Date’.
FM radio
When listening to FM radio, press the Select dial to toggle the information displayed on Evoke’s screen
between ‘Scrolling text’, ‘Programme type’, ‘Date’ or ‘Frequency’.
Bluetooth
When streaming a track from your Bluetooth device to Evoke, press the Select dial to toggle the
information displayed on Evoke’s screen between ‘Track title’, ‘Album name’, ‘Artist name’, ‘Stream
format’ or ‘Play time’.
Volume
Volume
Volume
04 MUTE ON
Volume
Volume
DAB FM

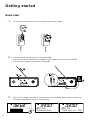
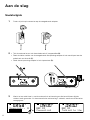
8
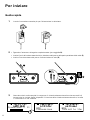
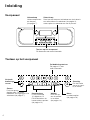
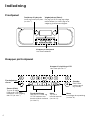
• Unclip the aerial and fully extend it (steps A and B).
• Insert the jack of the supplied mains adapter into the socket on the rear of the radio (C).
• Plug the mains adapter into the mains supply (D).
Wait for your radio to complete an Autotune and find all available digital stations. When the
Autotune is complete, a station will start playing.
Getting started
Quick start
2
3
B
A
C
D
Scanning... 11
BBC R2
Connecting
BBC R2
Talking to the
1
1
Fit the correct pin connector to the supplied mains power adapter.

9
EN
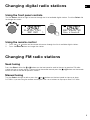
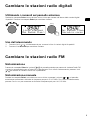
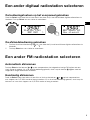
Using the front panel controls
Turn the Select dial left or right to browse through the list of available digital stations. Push the Select dial
to change the station.
Using the remote control
1. Press the
1 2
3 4
+
or
1 2
3 4
+
button on the remote to browse through the list of available digital stations.
2. Press the Select button to change the station.
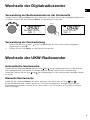
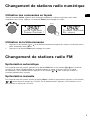
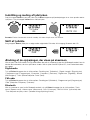
Changing digital radio stations
Seek tuning
Press the Select dial or the or buttons on the front panel to seek to the next or previous FM radio
station that has a strong signal. If you are using the remote control press the or buttons on the remote
control to seek to the next or previous station.
Manual tuning
Turn the Select dial right or left or press the or buttons on the front panel to step up or down
0.05 MHz. If you are using the remote control press the < or > buttons to step up or down 0.05 MHz.
Changing FM radio stations
Volume
Select
Volume
Volume
Volume
Select
Station List
< BBC R6M >
BBC Radio 6M
Now playing

10
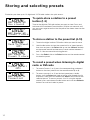
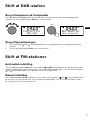
Storing and selecting presets
Evoke lets you store up to 10 digital and 10 FM radio stations for quick access.
To quick-store a station to a preset
button (1-3)
Tune to the digital or FM radio station you want to store. Press and
hold one of the numbered Preset buttons (1-3) for two seconds until
you see a message to confirm that the preset has been stored on the
bottom line.
To store a station to the preset list (4-10)
1. Tune to the digital radio or FM radio station you want to store.
2. Hold the 4+ button to view the numerical list of stored presets,
then turn and press the Select dial or use the <Select> buttons
on the remote control to choose any Preset number between 4
and 10. You can overwrite existing presets.
3. Press the Select dial or the Select button on the remote control
to store the preset.
To recall a preset when listening to digital
radio or FM radio
1. To tune to Presets 1 to 3, press the corresponding numbered
button on the front panel or on the remote control (1 to 3).
2. To access presets 4 to 10 on the front panel press the 4+
button, turn the Select dial right or left to scroll through the list
of presets, then push and release the Select dial to tune to the
selected preset. To access presets 4 to 10 using the remote
control, press and release the 4+ button and use the <Select>
buttons to scroll and select a preset.
BBC Radio 6M
Now playing
BBC Radio 6M
Preset 3 store
Save to Preset
(05)
BBC Radio 5L
Preset 5 store
Preset Recall
(05)
BBC Radio 5L
Connecting

11
EN
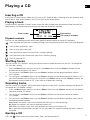
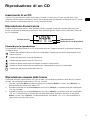
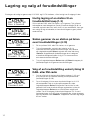
Playing a CD
Inserting a CD
Insert your CD label side up. When you first insert a CD, Evoke displays ‘Reading’ for a few seconds while
the CD loads. After a few seconds, your CD will start to play automatically.
Playing a track
During audio CD playback, Evoke’s display shows the track number and the amount of time the track has
been playing. The second line of the display will show the file name if available.
Playback controls
You can use the following controls on the front panel or remote control to control CD playback:
15 00:19
BEST OF 80s
Press to pause the track that is currently playing. If you have paused a track, press to resume playback.
Press to play the previous track.
Press to skip to the next track.
Press and hold to rewind the track that is currently playing.
Press and hold to fast forward the track that is currently playing.
Press to stop the CD.
Track number Elapsed time
File name (if available)
Shuffling tracks
You can use the ‘CD: Random’ setting on Evoke to listen to shuffle the tracks on your CD. To change the
‘CD: Random’ setting:
1. Press the Menu button and turn and press the Select dial or use the <Select> buttons on the
remote control to choose ‘CD Menu’.
2. Turn and press the Select dial or use the <Select> buttons on the remote control to choose
‘CD: Random’.
3. Turn and press the Select dial or use the <Select> buttons on the remote control to choose ‘On’ if
you want to enable track shuffling. Turn and press the Select dial tor use the <Select> buttons on
the remote control to choose ‘Off’ if you want to disable track shuffling.
Repeating tracks
You can use the ‘CD: Repeat’ setting on Evoke to repeat the track that is currently playing or the entire CD.
To change the ‘CD: Repeat’ setting:
1. Press the Menu button and turn and press Select dial or use the <Select> buttons on the remote
control to choose ‘CD Menu’.
2. Turn and press the Select dial or use the <Select> buttons on the remote control to choose
‘CD: Repeat’.
3. Turn and press the Select dial or use the <Select> buttons on the remote control to select one of
the following repeat options:
One: Select this option if you want to repeat the track that is currently playing.
All: Select this option if you want to repeat the entire CD.
Off: Select this option if you don’t want to repeat any tracks or the entire CD.
Dir: If you have multiple folders on your CD you can select this option to repeat the tracks stored in
the folder.
Ejecting a CD
Press the button. Wait until Evoke displays ‘Eject’ and remove the CD.

12
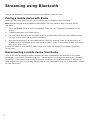
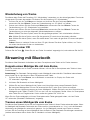
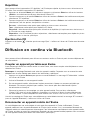
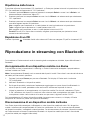
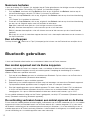
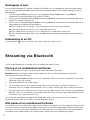
Streaming using Bluetooth
You can use Bluetooth to stream any audio from your phone or tablet to Evoke.
Pairing a mobile device with Evoke
Before you can stream audio to Evoke, you will need to pair your phone or tablet with Evoke.
Note: Bluetooth pairing varies on different mobile devices. See your phone or tablet manual for specific
information.
1. Press the Source button to switch to Bluetooth. Evoke will show ‘Bluetooth discoverable’ on the
display.
2. Enable Bluetooth on your mobile device.
3. On your mobile device, select the option to add a new Bluetooth device. On some mobile devices
you may need to select the search or scan option.
4. Start the pairing process on your mobile device. Do this by selecting ‘Evoke C-D6’ from the list of
available devices that appear on the your phone or tablet’s screen. If your phone or tablet asks you to
enter a key, enter ‘0000’.
If Evoke has paired to your phone or tablet successfully, Evoke will display ‘BT connected: (Bluetooth
device name)’.
Disconnecting a mobile device from Evoke
You can only have one phone or tablet connected to Evoke via Bluetooth at any one time.
If your mobile
device goes out of Evoke’s Bluetooth range (this is usually around 10m (30ft)) the mobile device’s Bluetooth
connection is disconnected automatically. To manually disconnect your mobile device from Evoke, you will
need to disconnect from the Bluetooth settings page on your mobile device (see your mobile device’s manual
for more information).

13
EN
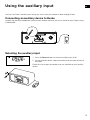
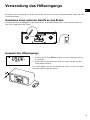
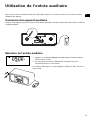
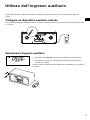
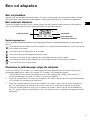
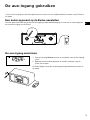
Using the auxiliary input
You can use Evoke’s auxiliary input to play any music from your phone or tablet through Evoke.
Connecting an auxiliary device to Evoke
Connect the line out or headphone socket of your auxiliary device to the Aux In socket on your Evoke using a
suitable cable.
Selecting the auxiliary input
1.
Press the Source button
to switch to auxiliary input (AUX).
2. On your auxiliary device, select the content that you want to listen to
on Evoke.
Evoke will start to play the content that you selected on your auxiliary
device.
AUX
Aux In

14
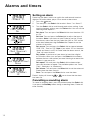
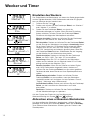
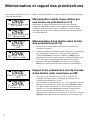
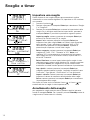
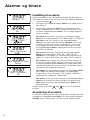
Setting an alarm
Evoke has two alarms which can switch the radio on and tune to a
digital or FM radio station, play a CD or sound an alarm tone.
1. Press the
1
button.
2. Turn and press the Select dial to select ‘Alarm 1’ or ‘Alarm 2’.
3. Turn the Select dial to scroll through each alarm setting. If you
want to change a setting, press the Select dial. You can set the
following alarm options:
Set alarm: Turn and press the Select dial to turn the alarm ‘On’
or ‘Off’.
Set time: Turn and press the Select dial to adjust the hour of
the alarm. Note: If you have set your Evoke to use the 12 hour
time format, make sure that you select the ‘AM’ or ‘PM’ version
of the hour before pressing the Select dial. Repeat to set the
minutes of the alarm.
Set source: Turn and press the Select dial to choose between
‘DAB’,‘FM’, ‘Tone’ or ‘CD’. Note: If you select ‘CD’ as the alarm
source and there is no CD in Evoke when the alarm sounds, the
‘Tone’ will sound instead.
Set station: If you have set your alarm to tune into a digital
or FM radio station, turn and press the Select dial to choose
between the last radio station you were listening to or one of the
stations in your preset list.
Set repeat: Turn and press the Select dial to choose when
you want the alarm to repeat. The available options are ‘Once’,
‘Daily’, ‘Weekdays’ or ‘Weekends’.
Set volume: Turn and press the Select dial to set the volume of
Evoke when the alarm sounds.
Save: Turn and press the Select dial to save the alarm.
Evoke’s display will show the
DAB STATION DETA
DLS SCROLLING IN
or
DAB STATION DETA
DLS SCROLLING IN
icon to show that the alarm
has been set.
Cancelling a sounding alarm
To cancel a sounding alarm, press any button except the Select dial.
If you press the Standby button during a sounding alarm, Evoke will
enter standby.
Alarms and timers
<Alarm 1>
<Set alarm>
On
<Set Source>
DAB
<Set Repetition>
Once
<Set volume>
12
<Set Time>
06:00

15
EN
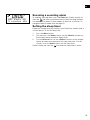
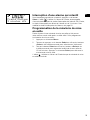
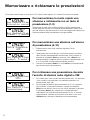
Snoozing a sounding alarm
To snooze a sounding alarm, press the Select dial. Evoke’s display will
show the
DAB STATION DETA
DLS SCROLLING IN
icon and a countdown timer to show how long the alarm
will snooze for. By default, Evoke snoozes an alarm for 10 minutes. To
change the default snooze time see page 20.
Setting the sleep timer
Evoke has a sleep timer that switches your Evoke into standby after a
set time period. To set the sleep timer:
1. Press the Menu button.
2. Turn and press the Select dial or use the <Select> buttons on
the remote control to choose ‘Sleep timer’.
3.
Turn the Select dial
or use the <Select> buttons on the remote
control
to increase the duration of the sleep timer from 15 to 60
minutes. Press the Select dial to start the sleep timer.
Evoke’s display will show the
DAB STATION DETA
DLS SCROLLING IN
icon when the sleep timer is active.
BBC Radio 6M
9 minutes zZz

16
Digital radio settings
Note: You can only see the digital radio settings when you have selected ‘DAB’ as the radio source.
Autotune
You can use the autotune function to automatically scan for new digital radio stations and remove inactive
ones.
To carry out an autotune:
1. Press the Menu button.
2. Turn and press the Select dial or use the <Select> buttons on the remote control to choose
‘DAB Menu’.
3. Turn and press the Select dial or use the <Select> buttons on the remote control to choose
‘Autotune’. The number of stations found will be displayed during the autotune.
When the autotune has finished, Evoke will tune to the last station that you were listening to. If the last station
you were listening to is no longer available, Evoke will tune into the first station in the alphabetical list.
Changing the digital radio station order
To change the order that Evoke displays digital radio stations in:
1. Press the Menu button.
2. Turn and press the Select dial or use the <Select> buttons on the remote control to choose
‘DAB Menu’.
3. Turn and press the Select dial or use the <Select> buttons on the remote control to choose
‘Station Order’.
4. Turn and press the Select dial or use the <Select> buttons on the remote control to choose
between one of the following options:
Alphanumeric: Choose this option to display digital radio stations in alphanumerical order.
Ensemble: Choose this option to list stations in groups according to their multiplex. Multiplexes or
ensembles are groups of stations owned and broadcast by a single operator.
Manual tuning
To manually tune Evoke to a digital radio station that broadcasts on DAB Band III.
1. Press the Menu button.
2. Turn and press the Select dial or use the <Select> buttons on the remote control to choose
‘DAB Menu’.
3. Turn and press the Select dial or use the <Select> buttons on the remote control to choose
‘Manual Tune’.
4. Turn and press the Select dial or use the <Select> buttons on the remote control to choose the
channel that the radio station is broadcasting on.
5. Press the Menu button to return to the main menu.
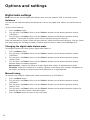
Options and settings

17
EN
Dynamic range control
Dynamic Range Control (DRC) is used to make quieter sounds in a digital radio broadcast easier to hear at
low volume or in a noisy environment. Check with the broadcasters to find out if they use DRC.
To change the DRC settings:
1. Press the Menu button.
2. Turn and press the Select dial or use the <Select> buttons on the remote control to choose
‘DAB Menu’.
3. Turn and press the Select dial or use the <Select> buttons on the remote control to
choose ‘DRC’.
4. Turn and press the Select dial or use the <Select> buttons on the remote control to choose
between one of the following options:
DRC High: Applies maximum compression to the DRC level.
DRC Low: Applies reduced compression to the DRC level.
DRC Off: Removes DRC compression.
Removing inactive digital radio stations from the station list
1. Press the Menu button.
2. Turn and press the Select dial or use the <Select> buttons on the remote control to choose
‘DAB Menu’.
3. Turn and press the Select dial or use the <Select> buttons on the remote control to choose ‘Trim’.
4. Turn and press the Select dial or use the <Select> buttons on the remote control to choose ‘Yes’.
Evoke will remove all inactive stations from the station list.
FM radio settings
Note: You can only see the FM radio settings when you have selected ‘FM’ as the radio source.
FM stereo option
You can choose between the ‘Stereo Allowed’ or ‘Forced Mono’ reception setting when listening to FM
radio. Mono may improve clarity where stereo signals are weak.
To change between Stereo or Mono reception:
1. Press the Menu button.
2. Turn and press the Select dial or use the <Select> buttons on the remote control to choose
‘FM Menu’.
3. Turn and press the Select dial or use the <Select> buttons on the remote control to choose
‘Audio Setting’.
4. Turn and press the Select dial or use the <Select> buttons on the remote control to choose
between ‘Stereo Allowed’ or ‘Forced Mono’ reception.

18
FM scanning mode
You can choose whether Evoke automatically stops at the next available FM station or the next available FM
station with a strong signal when scanning for an FM station. To change the FM scan setting:
1. Press the Menu button.
2. Turn and press the Select dial or use the <Select> buttons on the remote control to choose
‘FM Menu’.
3. Turn and press the Select dial or use the <Select> buttons on the remote control to choose ‘Scan
Setting’.
4. Turn and press the Select dial or use the <Select> buttons on the remote control to choose
between one of the following options:
All Stations: Choose this option to change the scan setting to automatically stop at the next available
FM station.
Strong Station: Choose this option to change the scan setting to automatically stop at the next
available FM station with a strong signal.
System settings
Carrying out a factory reset
Resetting your Evoke removes all presets, stored stations, alarms and resets all other options to default
settings.
1. Press the Menu button.
2. Turn and press the Select dial to choose ‘Settings’.
3. Turn and press the Select dial to choose ‘Factory reset’.
4. Turn and press the Select dial to select ‘Yes’ to reset Evoke to factory settings. Select ‘No’ if you do
not want to reset your Evoke to factory settings.
Displaying the firmware version
To display the firmware version:
1. Press the Menu button.
2. Turn and press the Select dial to choose ‘Settings’.
3. Turn and press the Select dial to choose ‘Firmware’.
4. Turn and press the Select dial to display the ‘DAB’ or ‘MCU’ firmware version.
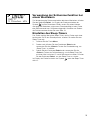
Changing your preferred language
You can select the language that your Evoke uses for menus and options.
1. Press the Menu button.
2. Turn and press the Select dial to choose ‘Settings’.
3. Turn and press the Select dial to choose ‘Language’.
4. Turn and press the Select dial to select a menu language from ‘English’, ‘Français’ (French),
‘Deutsch’ (German), ‘Italiano’ (Italian), or ‘Español’ (Spanish).
Seite wird geladen ...
Seite wird geladen ...
Seite wird geladen ...
Seite wird geladen ...
Seite wird geladen ...
Seite wird geladen ...
Seite wird geladen ...
Seite wird geladen ...
Seite wird geladen ...
Seite wird geladen ...
Seite wird geladen ...
Seite wird geladen ...
Seite wird geladen ...
Seite wird geladen ...
Seite wird geladen ...
Seite wird geladen ...
Seite wird geladen ...
Seite wird geladen ...
Seite wird geladen ...
Seite wird geladen ...
Seite wird geladen ...
Seite wird geladen ...
Seite wird geladen ...
Seite wird geladen ...
Seite wird geladen ...
Seite wird geladen ...
Seite wird geladen ...
Seite wird geladen ...
Seite wird geladen ...
Seite wird geladen ...
Seite wird geladen ...
Seite wird geladen ...
Seite wird geladen ...
Seite wird geladen ...
Seite wird geladen ...
Seite wird geladen ...
Seite wird geladen ...
Seite wird geladen ...
Seite wird geladen ...
Seite wird geladen ...
Seite wird geladen ...
Seite wird geladen ...
Seite wird geladen ...
Seite wird geladen ...
Seite wird geladen ...
Seite wird geladen ...
Seite wird geladen ...
Seite wird geladen ...
Seite wird geladen ...
Seite wird geladen ...
Seite wird geladen ...
Seite wird geladen ...
Seite wird geladen ...
Seite wird geladen ...
Seite wird geladen ...
Seite wird geladen ...
Seite wird geladen ...
Seite wird geladen ...
Seite wird geladen ...
Seite wird geladen ...
Seite wird geladen ...
Seite wird geladen ...
Seite wird geladen ...
Seite wird geladen ...
Seite wird geladen ...
Seite wird geladen ...
Seite wird geladen ...
Seite wird geladen ...
Seite wird geladen ...
Seite wird geladen ...
Seite wird geladen ...
Seite wird geladen ...
Seite wird geladen ...
Seite wird geladen ...
Seite wird geladen ...
Seite wird geladen ...
Seite wird geladen ...
Seite wird geladen ...
Seite wird geladen ...
Seite wird geladen ...
Seite wird geladen ...
Seite wird geladen ...
Seite wird geladen ...
Seite wird geladen ...
Seite wird geladen ...
Seite wird geladen ...
Seite wird geladen ...
Seite wird geladen ...
Seite wird geladen ...
Seite wird geladen ...
Seite wird geladen ...
Seite wird geladen ...
Seite wird geladen ...
Seite wird geladen ...
Seite wird geladen ...
Seite wird geladen ...
Seite wird geladen ...
Seite wird geladen ...
Seite wird geladen ...
Seite wird geladen ...
Seite wird geladen ...
Seite wird geladen ...
Seite wird geladen ...
Seite wird geladen ...
Seite wird geladen ...
Seite wird geladen ...
Seite wird geladen ...
Seite wird geladen ...
Seite wird geladen ...
Seite wird geladen ...
Seite wird geladen ...
Seite wird geladen ...
Seite wird geladen ...
Seite wird geladen ...
Seite wird geladen ...
Seite wird geladen ...
-
 1
1
-
 2
2
-
 3
3
-
 4
4
-
 5
5
-
 6
6
-
 7
7
-
 8
8
-
 9
9
-
 10
10
-
 11
11
-
 12
12
-
 13
13
-
 14
14
-
 15
15
-
 16
16
-
 17
17
-
 18
18
-
 19
19
-
 20
20
-
 21
21
-
 22
22
-
 23
23
-
 24
24
-
 25
25
-
 26
26
-
 27
27
-
 28
28
-
 29
29
-
 30
30
-
 31
31
-
 32
32
-
 33
33
-
 34
34
-
 35
35
-
 36
36
-
 37
37
-
 38
38
-
 39
39
-
 40
40
-
 41
41
-
 42
42
-
 43
43
-
 44
44
-
 45
45
-
 46
46
-
 47
47
-
 48
48
-
 49
49
-
 50
50
-
 51
51
-
 52
52
-
 53
53
-
 54
54
-
 55
55
-
 56
56
-
 57
57
-
 58
58
-
 59
59
-
 60
60
-
 61
61
-
 62
62
-
 63
63
-
 64
64
-
 65
65
-
 66
66
-
 67
67
-
 68
68
-
 69
69
-
 70
70
-
 71
71
-
 72
72
-
 73
73
-
 74
74
-
 75
75
-
 76
76
-
 77
77
-
 78
78
-
 79
79
-
 80
80
-
 81
81
-
 82
82
-
 83
83
-
 84
84
-
 85
85
-
 86
86
-
 87
87
-
 88
88
-
 89
89
-
 90
90
-
 91
91
-
 92
92
-
 93
93
-
 94
94
-
 95
95
-
 96
96
-
 97
97
-
 98
98
-
 99
99
-
 100
100
-
 101
101
-
 102
102
-
 103
103
-
 104
104
-
 105
105
-
 106
106
-
 107
107
-
 108
108
-
 109
109
-
 110
110
-
 111
111
-
 112
112
-
 113
113
-
 114
114
-
 115
115
-
 116
116
-
 117
117
-
 118
118
-
 119
119
-
 120
120
-
 121
121
-
 122
122
-
 123
123
-
 124
124
-
 125
125
-
 126
126
-
 127
127
-
 128
128
-
 129
129
-
 130
130
-
 131
131
-
 132
132
-
 133
133
-
 134
134
-
 135
135
-
 136
136


PURE EVOKE C-D6 WALNUT Bedienungsanleitung
- Kategorie
- Radios
- Typ
- Bedienungsanleitung
in anderen Sprachen
Verwandte Artikel
-
PURE Evoke C-D6 Walnut Stereo All-in-One Music System Benutzerhandbuch
-
PURE EVOKE C-D4 Bedienungsanleitung
-
PURE Evoke C-D6 Bedienungsanleitung
-
-
-
PURE Evoke D4 Benutzerhandbuch
-
-
PURE Evoke Home Benutzerhandbuch
-
-
Andere Dokumente
-
audizio Parma Portable DAB+ Radio Bedienungsanleitung
-
audizio Monza – Stereo DABDAB + BT FM 102.48, 102.420, 102.422 Benutzerhandbuch
-
-
-
-
-
-
-
Schwaiger 4004005030822 Operation And Safety Instructions
-
Tangent ALIO CD-DAB PLUS Benutzerhandbuch