
Interior Systems
Handbuch
manual
pureKNX - umfassendes
Softwarekompendium
pureKNX - comprehensive
software compendium
Version 1.1
Artikel-Nr./Part-No.: 15661

Ludwig-Rinn-Straße 10-14 • D- 35452 Heuchelheim/Gießen • Phone: +49 6 41-9 62 84-0 • Fax: +49 6 41-9 62 84-28 • www.tci.de Ludwig-Rinn-Straße 10-14 • D- 35452 Heuchelheim/Gießen • Phone: +49 6 41-9 62 84-0 • Fax: +49 6 41-9 62 84-28 • www.tci.de
Seite 2 von 36 Seite 3 von 36
Black vertical bars at the left margins indicates english text!
Inhaltsverzeichnis
1. HAFTUNG / COPYRIGHT .............................................4
2. DATENBANK ETS
2.1 ALLGEMEIN .....................................................6
2.2 GRUPPEN ANLEGEN ..............................................7
2.3 FUNKTIONEN EINER GRUPPE ZUWEISEN .............................8
2.4 APPLIKATIONSPROGRAMM LADEN.................................10
3. TAGS ............................................................11
4. FUNKTIONEN .....................................................13
5. BEDIENTKONZEPT EASY SMART HOME ...............................22
6. EINFÜHRUNGSVIDEO ..............................................30
7. SUPPORT ........................................................32
8. HERSTELLERGARANTIE.............................................34
Table of Content
1. LIABILITY / COPYRIGHT..............................................5
2. DATABASE ETS
2.1 COMMON .......................................................6
2.2 CREATING GROUPS ..............................................7
2.3 ALLOCATING FUNCTIONS TO A GROUP ..............................8
2.4 LOADING THE APPLICATION PROGRAM .............................10
3. TAGS ............................................................11
4. FUNCTIONS ......................................................13
5. OPERATING CONCEPT EASY SMART HOME .............................23
6. INTRODUCTION VIDEO .............................................31
7. SUPPORT ........................................................33
8. MANUFACTURER‘S GUARANTEE .....................................35

Ludwig-Rinn-Straße 10-14 • D- 35452 Heuchelheim/Gießen • Phone: +49 6 41-9 62 84-0 • Fax: +49 6 41-9 62 84-28 • www.tci.de Ludwig-Rinn-Straße 10-14 • D- 35452 Heuchelheim/Gießen • Phone: +49 6 41-9 62 84-0 • Fax: +49 6 41-9 62 84-28 • www.tci.de
Seite 4 von 36 Seite 5 von 36
1. Haftung / Copyright
Copyright tci GmbH, Ludwig-Rinn-Str. 10-14, 35452 Heuchelheim,
Deutschland
Dieses Handbuch, sowie die Hard- und Software, die es
beschreibt, ist urheberrechtlich geschützt und darf ohne
ausdrückliche schriftliche Genehmigung der tci GmbH in keiner
Weise vervielfältigt, übersetzt oder in eine andere Darstellungs-
form gebracht werden.
Warenzeichen Windows, Windows XP embedded, Windows 7 embedded und
Windows 10 IoT sind eingetragene Warenzeichen der Microsoft
Corp.
Diejenigen Bezeichnungen in dieser Publikation von Erzeugnissen
und Verfahren, die zugleich Warenzeichen sind, wurden nicht
besonders kenntlich gemacht. Solche Namen sind Warenzeichen
der jeweiligen Warenzeicheninhaber. Aus dem Fehlen der Markie-
rung ® kann nicht geschlossen werden, dass diese Bezeichnun-
gen freie Warennamen sind.
Hinweis Herausgeber, Übersetzer und Autoren dieser Publikation haben
mit größter Sorgfalt die Texte, Abbildungen und Programme
erarbeitet. Dennoch können Fehler nicht völlig ausgeschlossen
werden. Die tci GmbH übernimmt daher weder eine Garantie
noch eine juristische Verantwortung oder Haftung für Folgen, die
auf fehlerhafte Angaben zurückgehen. Mitteilungen über
eventuelle Fehler werden jederzeit gerne entgegengenommen.
Die Angaben in diesem Handbuch gelten nicht als Zusicherung
bestimmter Produkteigenschaften. Änderungen, die dem
technischen Fortschritt dienen, bleiben vorbehalten.
Haftung Die tci GmbH haftet nicht für unmittelbare Schäden, die im
Zusammenhang mit der Lieferung oder dem Gebrauch der
Dokumentation stehen. Wir haften zudem auch nicht für etwaige
Fehler in dieser Publikation. Wir verpflichten uns in keiner Weise,
die in dieser Dokumentation enthaltenen Informationen auf den
aktuellsten Stand zu bringen oder auf dem neuesten Stand zu
halten.
Alle Rechte vorbehalten • Printed in Germany
Gedruckt auf chlorfrei gebleichtem Papier.
1. Liability / Copyright
Copyright tci GmbH, Ludwig-Rinn-Str. 10-14, D-35452 Heuchelheim,
Germany
This manual, as well as the hard and software, which it describes
is protected by copyright and may not be duplicated, translated or
presented in any form without the written consent of tci GmbH.
Trademark Windows, Windows XP embedded, Windows 7 embedded and
Windows 10 IoT are registered trademarks of Microsoft Corp.
Those designation of products and procedures in this publication,
which are also trademarks, have not been expressly stated as
such. These names are trademarks of the respective trademark
owners. However, the absence of the ® symbol, implies in no way
that the designations are exempt from such rights.
Note Publisher, translators and authors of this publication have
carefully developed the texts, illustrations and programs.
However, errors can not be completely ruled out. tci GmbH, shall
neither warrant nor be held legally responsible for consequences
which occur due to incorrect data. Information concerning errors
are welcome at any time.
The information in this operating manual does not guarantee
definite product properties. Modifications concerning the support
of technical progress will be reserved.
Liability tci GmbH shall not be held liable for immediate damage occurring
in connection with the supply or utilization of the documents.
In addition, we shall not be held liable for any errors found in this
publication. We are not obliged in any way to update the
information contained in this document to latest standards.
All rights reserved • Printed in Germany
Printed on chlorine-free, bleached Paper.

Ludwig-Rinn-Straße 10-14 • D- 35452 Heuchelheim/Gießen • Phone: +49 6 41-9 62 84-0 • Fax: +49 6 41-9 62 84-28 • www.tci.de Ludwig-Rinn-Straße 10-14 • D- 35452 Heuchelheim/Gießen • Phone: +49 6 41-9 62 84-0 • Fax: +49 6 41-9 62 84-28 • www.tci.de
Seite 6 von 36 Seite 7 von 36
2. Datenbank ETS / Database ETS
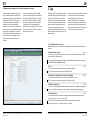
2.1 Allgemein / Common
Integrieren Sie die pureKNX Touchpanel-
Applikation in die ETS4-Software oder höher.
Die Datenbank ist auch im ETS Online Kata-
log zu finden. Fügen sie die Applikation in Ihr
bestehendes oder neu erstelltes Projekt ein.
Wählen sie den Punkt „Parameter“ und in dem
neu erscheinenden Auswahlmenü den Punkt
„Configuration“ und weiter „Common“. Hier
können Sie unter „Device-Name“ einen Namen
für das Gerät vergeben. Dieser Name dient nur
zur Übersicht im ETS Projekt bei mehreren
Geräten der gleichen Art.
Integrate the pureKNX touch panel application
into the ETS4 software or higher. You can find
the database in the ETS online catalog, too.
Add the application to your existing or new
project. Select the item „Parameter“,
„Configuration“ and then the item „Common“ in
the displayed selection menu.
You can now allocate a name for your device
with „Device Name“. This name is just for greater
clarity inside the ETS-project when using more
devices of the same kind.
Sie können die Produktdatenbank unter
www.pureKNX.de herunterladen.
To download the products database,
please visit www.pureKNX.de
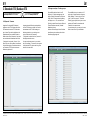
2.2 Gruppen anlegen / Creating groups
Der pureKNX erlaubt es Ihnen bis zu 25
Gruppen á 12 Objekte anzulegen zzgl. der
Gruppe „Building“. Wechseln Sie hierfür zum
Punkt „Main“. Es erscheint eine Aufzählung
der Gruppen von 1 – 25, sowie der Punkt
„Building“, welche Sie nun über den Reiter mit
„Enabled“ aktivieren oder mit „Disabled“
deaktivieren können.
Aktivieren Sie eine Gruppe können Sie dieser
einen Namen geben, welcher später in Ihrer
Visualisierung angezeigt wird.
The pureKNX allows you to create up to 25
groups with 12 objects each plus one group
called „Building“. To do this, go to the item
„Main“. A list of the groups 1 – 25 and the
“Building” group appears, which you can now
activate with “Enabled” or deactivate with
“Disabled” in the respective tab.
If you activate a group, you can give it a name,
which is then shown in your visualisation.

Ludwig-Rinn-Straße 10-14 • D- 35452 Heuchelheim/Gießen • Phone: +49 6 41-9 62 84-0 • Fax: +49 6 41-9 62 84-28 • www.tci.de Ludwig-Rinn-Straße 10-14 • D- 35452 Heuchelheim/Gießen • Phone: +49 6 41-9 62 84-0 • Fax: +49 6 41-9 62 84-28 • www.tci.de
Seite 8 von 36 Seite 9 von 36
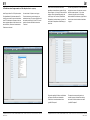
2.3 Funktionen einer Gruppe zuweisen / Allocating functions to a group
Jeder Gruppe können Sie 12 Objekte zuordnen.
Zum Auswählen der Funktionen wechseln Sie
in die Gruppe, welche Sie zuvor aktiviert haben.
In der ETS erscheinen die Gruppen mit den von
Ihnen vergebenen Namen. Ihnen stehen die, wie
unter dem Punkt „Funktionen“ beschriebenen
Funktionen zur Auswahl.
You can allocate 12 objects to each group.
To select the functions, select the group you
activated previously. The groups are shown with
the names specified by you in the ETS. You can
select the functions described in the section
“Functions“.
Diese können Sie einfach über den Reiter
auswählen und einen Namen vergeben. Mit der
Escape-Sequenz „\n“ können Sie eine neue Zeile
beginnen. Wie im nächsten Bild gezeigt, wird
in der Gruppe 1 die Funktion „Schalten ohne
Rückmeldung“ und dem Namen „Light wall“ in
zwei Spalten in der späteren Visualisierung zu
sehen sein.
You can simply select them on the respective tab
and give them a name. You can start a new line
with the escape sequence “\n”. As shown
in the next image, the function “Switching
without feedback“ and the name „Light wall“ are
shown in two columns in the later visualisation
in group 1.
Die jeweils zugehörige Funktion zum Verbinden
der Gruppen erscheint nach Auswahl der
Funktionen im linken Auswahlmenü unter
„pureKNX Touchpanel“.
The respective corresponding function to
connect the groups is shown after selecting
the function in the left selection menu under
“pureKNX Touchpanel”.

Ludwig-Rinn-Straße 10-14 • D- 35452 Heuchelheim/Gießen • Phone: +49 6 41-9 62 84-0 • Fax: +49 6 41-9 62 84-28 • www.tci.de Ludwig-Rinn-Straße 10-14 • D- 35452 Heuchelheim/Gießen • Phone: +49 6 41-9 62 84-0 • Fax: +49 6 41-9 62 84-28 • www.tci.de
Seite 10 von 36 Seite 11 von 36
2.4 Applikationsprogramm laden / Loading the application program
Zum überspielen des Applikationsprogramms
auf den pureKNX schließen Sie diesen an die
Spannungsversorgung, sowie an den KNX-Bus
an. Verbinden Sie den PC, auf dem sich die
ETS-Software befindet, mit dem KNX-Bus.
Wählen Sie unter dem Punkt Geräte den
„pureKNX Touchpanel“ mit einem Rechtsklick
aus. Unter dem nun erscheinenden Menü wählen
Sie den Punkt „Programmieren“. Im nächsten
Schritt wählen Sie „Applikationsprogramm“ aus,
um Ihr Programm auf den pureKNX zu laden.
Dieser Vorgang nimmt etwa eine Minute in
Anspruch.
To copy the application program to pureKNX,
connect it to the power supply and the KNX bus.
Select the PC with the ETS software to the KNX
bus. Select “pureKNX Touchpanel” with a right-
click under the item „Devices“. Select the item
“Programming” in the now displayed menu.
Select “Application Programme” in the next step
to load your program to pureKNX. This process
will take about one minute.
3. Tags
Durch Tags bietet TCI die Möglichkeit pureKNX-
spezifische Optionen bereits beim Programmie-
ren in der ETS zu aktivieren und zu variieren.
Dabei können Sie über die eckigen Klammern
[ ] einzelne Funktionen beeinflussen und über
das #-Symbol das Erscheinungsbild und die
Funktionen der Easy Smart Home Oberflä-
che anpassen. Nachstehend erhalten Sie eine
Übersicht welche Funktionen Sie mit einem Tag
editieren können.
Through tags TCI offers the possibility to activate
and vary pureKNX specific options already
during programming in the ETS. You can
influence individual functions via the square
brackets [ ] and adjust the appearance and the
functions of the Easy Smart Home interface via
the # symbol. Below you will find an overview of
which functions you can edit with a tag.
[ ] - Tags (Funktionen / Functions)
Ergänzen die Funktionen um die beschriebenen Eigenschaften /Add the described properties to the
functions
Temperature with setpoint (Page 16)
[T] – der interne Temperatursensor des Gerätes wird alle 15 sek. ausgelesen und über den BUS
gesendet. Bsp.: Außentemperatur[T]
[T] – the internal temperature sensor of the device is read out every 15 sec. and sent via
the BUS. Example: Außentemperatur[T]
Scene (Page 16)
[3] – dieser Tag würde die hinterlegte Szene 3 aufrufen. Bsp.: Relax[3]
[3] – this tag would call the stored scene 3. Example: Relax[3]
Scaling data control with state / Value based dimming (Page 19)
[D] – kann als „absolute Dimm Funktion“ verwendet werden. Bsp.: Licht[D]
[D] – can be used as „absolute dimming function“. Example: Licht[D]
2/4 byte float data state (Page 20)
[m/s] – kann als jegliche gewünschte Maßeinheit gesetzt werden. Bsp.: Windgeschwindigkeit[m/s]
[m/s] – can be set as any desired unit of measurement. Example: Windgeschwindigkeit[m/s]
Room Thermostat (Page 17)
Für diese Funktion können Grenzwerte für zulässige Min/Max Temperaturen definiert werden.
Bsp.: [10,50] für min = 10° und max = 50° Celsius.
For this function, limit values for permissible min/max temperatures can be defined.
Example: [10,50] for min = 10° Celsius and max = 50° Celsius.

Ludwig-Rinn-Straße 10-14 • D- 35452 Heuchelheim/Gießen • Phone: +49 6 41-9 62 84-0 • Fax: +49 6 41-9 62 84-28 • www.tci.de Ludwig-Rinn-Straße 10-14 • D- 35452 Heuchelheim/Gießen • Phone: +49 6 41-9 62 84-0 • Fax: +49 6 41-9 62 84-28 • www.tci.de
Seite 12 von 36 Seite 13 von 36
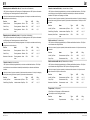
4. Funktionen / Functions
Beschreibung der Funktionsbausteine des pureKNX / Description of the function blocks of pureKNX
Disabled
Keine Funktion ausgewählt. / No function selected.
Switch actuator (dt. Schaltaktor)
Ohne Rückmeldung. 1 Bit Objekt zum Aussenden von Schalttelegrammen.
Without feedback. 1 bit object to send switching telegrammes.
Function Name Type DPT Flag
Schalter / Switch Switch actuator – On/Off 1 Bit 1.001 K, L, Ü
Switch actuator with state (dt. Schalt Aktor mit Status)
1 Bit Objekt zum Aussenden und Empfangen von Schalttelegrammen.
1 bit object to send switching telegrammes.
Function Name Type DPT Flag
Schalter / Switch Switch actuator – On/Off 1 Bit 1.001 K, L, Ü
Status / State Switch actuator – State 1 Bit 1.001 K, S
Dimming actuator (dt. Dimmeraktor)
1 Bit Objekt zum Aussenden von Schalttelegrammen. 4 Bit Objekt zum Aussenden und Empfangen
von Dimmtelegrammen zum relativen Dimmen. 8 Bit Objekt zum Aussenden und Empfangen von
Werttelegrammen.
1 bit object to send switching telegrammes. 4 bit object to send and receive dimming telegrammes
for relative dimming. 8 bit object to send value telegrammes.
Function Name Type DPT Flag
Schalter / Switch Dimming actuator – Switch 1 Bit 1.001 K, L, Ü
Schritt / Step Dimming actuator – Relative 4 Bit 3.007 K, L, Ü
Wert / Value Dimming actuator – Value 8 Bit 5.001 K, L, Ü
# - Tags (Easy Smart Home)
Easy function (Page 24)
# – die mit diesem Tag getagte Funktion erscheinen an den Seiten der Easy Smart Home
Oberfläche. Bsp.: Licht Wohnzimmer#E
# – the function tagged with this tag appear on the sides of the Easy Smart Home
interface. Example: Licht Wohnzimmer#E
Display function (Page 24)
#D – die mit diesem Tag getagte Funktion erscheint in der Mitte der Easy Smart Home Oberfläche.
Bsp.: Zeit#D
#D – the function tagged with this tag appears in the center of the Easy Smart Home interface.
Example: Zeit#D
Easy function „down“ (Page 24)
#ED – ermöglicht es Jalousien/Rollos gezielt nur nach unten fahren zu lassen.
Bsp.: Jalousie zentral#ED
#ED – enables the blinds/shutters to be moved downwards only.
Example: Jalousie zentral#ED
Easy function „up“ (Page 24)
#EU - ermöglicht es Jalousien/Rollos gezielt nur nach oben fahren zu lassen.
Bsp.: Jalousie runter#EU
#EU – enables the blinds/shutters to be moved upwards only.
Example: Jalousie runter#EU
Folgende Funktionen sind über das #-Tag im Easy Smart Home einsetzbar / (Page 22)
The following functions can be used in the Easy Smart Home via the # tag
• Switch actuator with state
• Dimming actuator with switch state
• Shutter actuator with state
• Jalousie actuator with state
• Binary data control with state
• Scene
• Temperature
• Temperature with setpoint
• Room thermostat – temperature
• Outdoor temperature
• Scaling data control with state
• 2 byte float data state
• 4 byte float data state
• Time
• Date
• Dimming actuator with switch state
• Dimming actuator with value state

Ludwig-Rinn-Straße 10-14 • D- 35452 Heuchelheim/Gießen • Phone: +49 6 41-9 62 84-0 • Fax: +49 6 41-9 62 84-28 • www.tci.de Ludwig-Rinn-Straße 10-14 • D- 35452 Heuchelheim/Gießen • Phone: +49 6 41-9 62 84-0 • Fax: +49 6 41-9 62 84-28 • www.tci.de
Seite 14 von 36 Seite 15 von 36
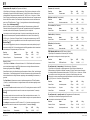
Dimming actuator with switch state (dt. Dimmer Aktor mit Schaltstatus)
1 Bit Objekt zum Aussenden und Empfangen von Schalttelegrammen. 4 Bit Objekt zum Aussenden
und Empfangen von Dimmtelegrammen zum relativen Dimmen.
1 bit object to send and receive switching telegrammes. 4 bit object to send and receive dimming
telegrammes for relative dimming.
Function Name Type DPT Flag
Schalter / Switch Dimming actuator – Switch 1 Bit 1.001 K, L, Ü
Schritt / Step Dimming actuator – Relative 4 Bit 3.007 K, L, Ü
Status / State Dimming actuator - Switch
state
1 Bit 1.001 K, S
Dimming actuator with value state (dt. Dimmer Aktor mit Wertstatus)
1 Bit Objekt zum Aussenden und Empfangen von Schalttelegrammen. 4 Bit Objekt zum Aussenden
und Empfangen von Dimmtelegrammen zum relativen Dimmen.
1 bit object to send and receive switching telegrammes. 4 bit object to send and receive dimming
telegrammes for relative dimming.
Function Name Type DPT Flag
Schalter / Switch Dimming actuator – Switch 1 Bit 1.001 K, L, Ü
Schritt / Step Dimming actuator – Relative 4 Bit 3.007 K, L, Ü
Wertstatus / Value state Dimming actuator – Value
state
8 Bit 5.001 K, S
Jalousie actuator (dt. Jalousie-Aktor)
1 Bit Objekt zum Verfahren (Langzeitbetrieb) von Jalousien und ähnlichen Antrieben. 1 Bit Objekt
zum Anhalten und zum schrittweisen Verstellen (Kurzzeitbetrieb) von Jalousien und ähnlichen
Antrieben.
1 bit object to move (long-term operation) of jalousies and other actuators. 1 bit object for stopping
and step-wise moving (short-term operation) of jalousies and other actuators.
Function Name Type DPT Flag
Auf/Ab | Up/Down Jalousie actuator - Up/Down 1 Bit 1.008 K, L, Ü
Schritt/Stopp | Step/Stop Jalousie actuator - Step/Stop 1 Bit 1.007 K, L, Ü
Jalousie actuator with state (dt. Jalousie-Aktor mit Status)
1 Bit Objekt zum Verfahren (Langzeitbetrieb) von Jalousien und ähnlichen Antrieben. 1 Bit Objekt
zum Anhalten und zum schrittweisen Verstellen (Kurzzeitbetrieb) von Jalousien und ähnlichen
Antrieben. 8 Bit Objekt zum Empfangen von Werten.
1 bit object to move (long-term operation) of jalousies and other actuators. 1 bit object for stopping
and step-wise moving (short-term operation) of jalousies and other actuators. 8 bit object to recei-
ve values.
Function Name Type DPT Flag
Auf/Ab | Up/Down Jalousie actuator - Up/Down 1 Bit 1.008 K, L, Ü
Schritt/Stopp | Step/Stop Jalousie actuator - Step/Stop 1 Bit 1.007 K, L, Ü
Wertstatus | Value State Jalousie actuator - Value
state
8 Bit 5.001 K, S
Shutter actuator (dt. Rollladen-Aktor)
1 Bit Objekt zum Verfahren (Langzeitbetrieb) von Rollläden und ähnlichen Antrieben. 1 Bit Objekt
zum Aussenden eines Stopp Befehles.
1 bit object to move (long-term operation) shutters and other actuators. 1 bit object to send a stop
command.
Function Name Type DPT Flag
Auf/Ab | Up/Down Shutter actuator - Up/Down 1 Bit 1.008 K, L, Ü
Stopp / Stop Shutter actuator - Stop 1 Bit 1.001 K, L, Ü
Shutter actuator with state (dt. Rollladen-Aktor mit Status)
1 Bit Objekt zum Verfahren (Langzeitbetrieb) von Rollläden und ähnlichen Antrieben. 1 Bit Objekt
zum Aussenden eines Stopp Befehles. 8 Bit Objekt zum Empfangen von Werten.
1 bit object to move (long-term operation) of shutters and other actuators. 1 bit object to send a
stop command. 8 bit object to receive values.
Function Name Type DPT Flag
Auf/Ab | Up/Down Shutter actuator - Up/Down 1 Bit 1.008 K, L, Ü
Stopp / Stop Shutter actuator - Stop 1 Bit 1.001 K, L, Ü
Wertstatus / Value State Shutter actuator - value
state
8 Bit 5.001 K, S
Temperature (dt. Temperatur)
2 Byte Objekt zum Empfangen von Gleitkommawerten.
2 byte object to receive floating point values.
Function Name Type DPT Flag
Status / State Temperature state 2 Byte 9.001 K, S

Ludwig-Rinn-Straße 10-14 • D- 35452 Heuchelheim/Gießen • Phone: +49 6 41-9 62 84-0 • Fax: +49 6 41-9 62 84-28 • www.tci.de Ludwig-Rinn-Straße 10-14 • D- 35452 Heuchelheim/Gießen • Phone: +49 6 41-9 62 84-0 • Fax: +49 6 41-9 62 84-28 • www.tci.de
Seite 16 von 36 Seite 17 von 36
Temperature with setpoint (dt. Temperatur mit Sollwert)
2 Byte Objekt zum Empfangen von Gleitkommawerten. 2 Byte Objekt zum Aussenden von Gleit-
kommawerten. Grenzwerte für Min/Max Temperatur: Für diese Funktion können Grenzwerte für
zulässige Min/Max Temperaturen definiert werden. Z.B. [10,50] für min = 10 und max = 50 Grad.
Diese Funktion kann außerdem dazu verwendet werden den Wert des internen Temperatursensors
über den KNX-Bus zu senden. Zum Einstellen des Temperatursensors muss bei der Namensver-
gabe in der ETS der Buchstabe „T“ (oder „t“) in eckigen Klammern hinter den Namen angefügt
werden. Bspw.: Außentemperatur[T]
Wird die Funktion so markiert, wird der gelesene Wert des Temperatursensors zyklisch alle 15
Sekunden über den Bus gesendet. Zum senden des Temperaturwerts wird die Gruppenadresse
verwendet, welche mit dem Datenpunkt „Temperature Set point“ verknüpft ist.
2 byte object to receive floating point values. 2 byte object to send floating point values. Limit
values for min/max temperature: permissible thresholdes for this function can be defined. E.g.
[10,50] for min = 10 and max = 50 degree Celsius. For setting the temperature sensor in the ETS
the letter “T” (or “t”) must be appended at the end of the name in square brackets. For example:
OutsideTemp[T]
If the function is tagged like this, the value of the temperature sensor sends periodically every 15
seconds via the KNX-Bus. For the sending operation the KNX groupaddress which is associated
with the datapoint “Temperature set point” will be used.
Function Name Type DPT Flag
Status / State Temperature state 2 Byte 9.001 K, S
Sollwert / Setpoint Temperature setpoint 2 Byte 9.001 K, L, S, Ü
Scene (dt. Szene)*
1 Byte Objekt zum Senden von Szenen mit Nummer 0 – 63. Zum Einstellen der Szenennummer
muss bei der Namensvergabe in der ETS die Szenennummer in eckigen Klammern hinter dem
Namen angefügt werden. Bspw.: Relax[3]
Dieses Beispiel würde in Ihrer Visualisierung den Szenenaufruf mit Namen „Relax“ und hinterlegter
Szenennummer „3“ bei Betätigung aufrufen. Wird keine Szenennummer oder eine Nummer außer-
halb des Wertebereichs in eckigen Klammern angehängt, wird standardmäßig Szenennummer „1“
gesendet.
Zum Speichern der Szenennummer muss bei der Namensvergabe in der ETS der Buchstabe
„S“ (oder „s“) und die Szenennummer in eckigen Klammern hinter dem Namen angefügt werden.
Bspw.: Relax[S3]
1 byte object to send scenes with numbers from 0 to 63. For setting the scene number in the ETS
the number must be appended at the end of the scene name in square brackets. For example:
Relax[3]
This example would fetch the scene with the name „Relax“ and deposited scene number „3“ in
the visualisation. If no scene number or a number outside the ranges is set in square brackets the
scene number „1“ is sent by default.
For saving the scene number in the ETS the letter “S” (or “s”) and the scene number must be
appended at the end of the scene name in square brackets. For example: Relax[S3]
Function Name Type DPT Flag
Schalter / Switch Scene switch 1 Byte 18.001 K, Ü
Presence (dt. Anwesenheit)
Function Name Type DPT Flag
Status / State Presence state 1 Bit 1.002 K, S
Window contact (dt. Fensterkontakt)
Function Name Type DPT Flag
Status / State Window contact state 1 Bit 1.001 K, S
Door contact (dt. Türkontakt)
Function Name Type DPT Flag
Status / State Door contact state 1 Bit 1.002 K, S
Smoke alert (dt. Rauchalarm)
Function Name Type DPT Flag
Status / State Smoke alert state 1 Bit 1.002 K, S
Water alert (dt. Wasseralarm)
Function Name Type DPT Flag
Status / State Water alert state 1 Bit 1.002 K, S
RGB dimming with state (dt. RGB Dimmer mit Status)
3 Byte Objekt zum Aussenden von Farbwerten (Rot, Grün, Blau).
3 byte object for sending color-values (red, green, blue).
Function Name Type DPT Flag
Schalter / Switch RGB Value-Switch 3 Byte 232.600 L, Ü
Room thermostat - temperature (dt. Raumthermostat - Temperatur)
2 Byte Objekt zum Empfangen von Gleitkommawerten. 2 Byte Objekt zum Aussenden von
Gleitkommawerten. Grenzwerte für Min/Max Temperatur: Für diese Funktion können Grenzwerte
für zulässige Min/Max Temperaturen definiert werden. Z.B. [10,50] für min = 10 und max = 50 Grad.
2 byte object to receive floating point values. 2 byte object to send floating point values.
Limit values for min/max temperature: permissible thresholdes for this function can be defined.
E.g. [10,50] for min = 10 and max = 50 degree Celsius.
Function Name Type DPT Flag
Status / State Actual temperature 2 Byte 9.001 K, S
Sollwert / Setpoint Set point 2 Byte 9.001 K, L, S, Ü
Status / State Actual set point 2 Byte 9.001 K, S
Room thermostat - operation mode (dt. Raumthermostat - Betriebsmodus)
1 Byte Objekt zum Senden und Empfangen des HAVC-mode.
1 byte object to send and receive HVAC mode.
Function Name Type DPT Flag
Schalter / Switch Operation mode 1 Byte 20.102 K, L, Ü
Status / State Actual operation mode 1 Byte 20.102 K, L, Ü

Ludwig-Rinn-Straße 10-14 • D- 35452 Heuchelheim/Gießen • Phone: +49 6 41-9 62 84-0 • Fax: +49 6 41-9 62 84-28 • www.tci.de Ludwig-Rinn-Straße 10-14 • D- 35452 Heuchelheim/Gießen • Phone: +49 6 41-9 62 84-0 • Fax: +49 6 41-9 62 84-28 • www.tci.de
Seite 18 von 36 Seite 19 von 36
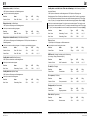
Binary data control (dt. Binär Steuern)
1 Bit Objekt zum Aussenden von Schalttelegrammen.
1 bit object to send switching telegrams.
Function Name Type DPT Flag
Schalter / Switch Data 1 Bit - Control 1 Bit 1.001 K, Ü
Binary data state (dt. Binär Status)
1 Bit Objekt zum Empfangen von Schalttelegrammen.
1 bit object to receive switching telegrams.
Function Name Type DPT Flag
Status / State Data 1 Bit - State 1 Bit 1.001 K, L, S
Binary data control with state (dt. Binär Steuern mit Status)
1 Bit Objekt zum Empfangen von Schalttelegrammen. 1 Bit Objekt zum Aussenden von
Schalttelegrammen.
1 bit object to receive switching telegrams. 1 bit object to send switching telegrams.
Function Name Type DPT Flag
Schalter / Switch Data 1 Bit - Control 1 Bit 1.001 K, Ü
Status / State Data 1 Bit - State 1 Bit 1.001 K, L, S
Scaling data control (dt. Wert Steuerung)
8 Bit Objekt zum Aussenden von Werttelegrammen.
8 bit object to send value telegrams.
Function Name Type DPT Flag
Wert / Value Data scaling - Control 8 Bit 5.001 K, L, Ü
Scaling data state (dt. Wert Status)
8 Bit Objekt zum Empfangen von Werttelegrammen.
8 bit object to receive value telegrams.
Function Name Type DPT Flag
Wert / Value Data scaling - State 8 Bit 5.001 K, S
Scaling data control with state / Value based dimming (dt. Wert Steuerung mit Status /
absolutes Dimmen)
8 Bit Objekt zum Aussenden von Werttelegrammen. 8 Bit Objekt zum Empfangen von
Werttelegrammen. Diese Funktion kann außerdem als „absolute Dimm Funktion“ verwendet wer-
den. Zum Einstellen des absoluten Dimmens muss bei der Namensvergabe in der ETS der Buch-
stabe „D“ (oder „d“) in eckigen Klammern hinter dem Namen eingefügt werden. Bspw.: Licht[D]
8 bit object to send value telegrams. 8 bit object to receive value telegrams. This function could
also be used as “value based dim function” For setting the absolute dimming in the ETS the letter
“D” (or “d”) must be appended at the end of the name in square brackets. For example: Light[D]
Function Name Type DPT Flag
Wert / Value Data scaling - Control 8 Bit 5.001 K, L, Ü
Wert / Value Data scaling - State 8 Bit 5.001 K, S
Date (dt. Datum)
2 Byte Objekt zum Empfangen von Gleitkommawerten.
2 byte object to receive floating point values.
Function Name Type DPT Flag
Status / State Date state 3 Byte 11.001 K, S
HVAC mode (= Heating, Ventilation and Air Conditioning
(dt. Heizung, Lüftung, Klimatechnik (HLK))
Function Name Type DPT Flag
Schalter / Switch HVAC mode switch 1 Byte 20.102 K, L, Ü
Doorbell (dt. Türklingel)
Function Name Type DPT Flag
Status / State Doorbell state 1 Bit 1.002 K, S
Door opener (dt. Türöffner)
Function Name Type DPT Flag
Schalter / Switch Door opener switch 1 Bit 1.002 K, L, Ü
Burglary alert (dt. Einbruchalarm)
Function Name Type DPT Flag
Status / State Burglary alert state 1 Bit 1.002 K, S
Rain alert (dt. Regenalarm)
Function Name Type DPT Flag
Status / State Rain alert state 1 Bit 1.002 K, S

Ludwig-Rinn-Straße 10-14 • D- 35452 Heuchelheim/Gießen • Phone: +49 6 41-9 62 84-0 • Fax: +49 6 41-9 62 84-28 • www.tci.de Ludwig-Rinn-Straße 10-14 • D- 35452 Heuchelheim/Gießen • Phone: +49 6 41-9 62 84-0 • Fax: +49 6 41-9 62 84-28 • www.tci.de
Seite 20 von 36 Seite 21 von 36
Wind alert (dt. Windalarm)
Function Name Type DPT Flag
Status / State Wind alert state 1 Bit 1.002 K, S
Outdoor temperature (dt. Außentemperatur)
Function Name Type DPT Flag
Status / State Outdoor temperature state 2 Byte 9.001 K, S
2 byte float data state (dt. 2 Byte Gleitkommazahl Status)*
2 Byte Objekt zum Empfangen von Gleitkommawerten.
2 byte object to receive floating point values.
Function Name Type DPT Flag
Status / State Data 2 byte float - State 2 Byte 9.001 K, S
4 byte float data state (dt. 4 Byte Gleitkommazahl Status)*
4 Byte Objekt zum Empfangen von Gleitkommawerten.
4 byte object to receive floating point values.
Function Name Type DPT Flag
Status / State Data 4 byte float - State 4 Byte 14.001 K, S
*Für 2 und 4 byte float data state / For 2 and 4 byte float data state:
Möchten Sie die Maßeinheit eines Wertes
angezeigt bekommen, müssen Sie diese in der
ETS hinter dem Namen der Funktion in eckigen
Klammern einfügen. Bsp.: Sonnenstunden[h]
oder Windgeschwindigkeit[m/s] oder [km/h].
If you want the measuring unit to appear after a
value, please enter the unit in square brackets in
the ETS behind the function name, e.g. hours of
sunshine[h] or wind speed[m/s] or [km/h].

Ludwig-Rinn-Straße 10-14 • D- 35452 Heuchelheim/Gießen • Phone: +49 6 41-9 62 84-0 • Fax: +49 6 41-9 62 84-28 • www.tci.de Ludwig-Rinn-Straße 10-14 • D- 35452 Heuchelheim/Gießen • Phone: +49 6 41-9 62 84-0 • Fax: +49 6 41-9 62 84-28 • www.tci.de
Seite 22 von 36 Seite 23 von 36
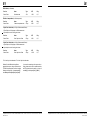
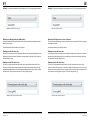
5. Bedienkonzept Easy Smart Home
Das neue Bedienkonzept ermöglicht die schnelle Verwendung von häufig benötigten Funktionen
direkt und bequem aus der neuen Oberfläche „Easy Smart Home“ heraus, ohne durch das Menü
navigieren zu müssen.
Bei pureKNX-Trend Systemen können bestimmte Funktionen mit einem zusätzlichen „Tag“(dt. Mar-
kierung) in der ETS versehen werden. Die neue Startseite wird danach automatisch generiert. Easy
Smart Home erlaubt die Verwendung von genau 1,2 oder 4 „Easy functions“ und einer „Display func-
tion“. Die Anordnung der „Easy functions“ erfolgt automatisch aufsteigend anhand der Reihenfolge
der „Tags“ in der ETS Parametrierung. Die „Display function“ befindet sich immer mittig.
Achtung:
Um die Easy Smart Home Oberfläche zu aktivieren/deaktivieren müssen in der ETS die „Tags“ gesetzt
oder entfernt, und das Gerät neu parametriert werden.
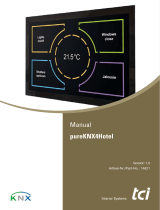
Abbildung: Easy Smart Home Oberfläche mit vier Easy und einer Display Funktion
Folgende Funktionen sind als „Easy function“ zulässig:
• Switch actuator with state
• Dimming actuator with switch state
• Shutter actuator with state
• Jalousie actuator with state
• Binary data control with state
• Scene
5. Operating concept easy smart home
The new operating concept enables the fast usage of functions frequently required directly and
comfortably from the new „Easy Smart Home“-surface, without having to navigate through the menu.
Certain functions of pureKNX-Trend systems can be additionally tagged in the ETS. Subsequently
the new homepage is automatically generated. Easy Smart Home allows the usage of exactly one,
two or four „Easy functions“ and of one „Display function“. The easy functions‘ positioning is
automatically done in an ascending order by means of the tag order in the ETS parameterization.
The „Display function“ is ositioned centrally always.
Attention:
To activate or deactivate the Easy Smart Home interface „Tags“ must be set or removed in the ETS
and the device has to be parameterized again.
Figure: Easy Smart Home interface with four „Easy functions“ and one „Display function“
The following functions can be used as „Easy function“:
• Switch actuator with state
• Dimming actuator with switch state
• Shutter actuator with state
• Jalousie actuator with state
• Binary data control with state
• Scene

Ludwig-Rinn-Straße 10-14 • D- 35452 Heuchelheim/Gießen • Phone: +49 6 41-9 62 84-0 • Fax: +49 6 41-9 62 84-28 • www.tci.de Ludwig-Rinn-Straße 10-14 • D- 35452 Heuchelheim/Gießen • Phone: +49 6 41-9 62 84-0 • Fax: +49 6 41-9 62 84-28 • www.tci.de
Seite 24 von 36 Seite 25 von 36
Folgende Funktionen sind als „Display function” zulässig:
• Temperature
• Temperature with setpoint
• Room thermostat – temperature
• Outdoor temperature
• Scaling data control with state
• 2 byte float data state
• 4 byte float data state
• Time
• Date
• Dimming actuator with switch state
• Dimming actuator with value state
Weitere Funktionen des pureKNX-Trend werden nicht unterstützt.
Konfiguration
Wenn Sie die der normalen Menüführung vorgeschaltete Easy Smart Home Oberfläche nutzen möch-
ten, müssen Sie mindestens eine „Easy function“ über das entsprechende „Tag“ in der ETS definieren
(1, 2 oder 4 möglich). Werden mehr als 4 „Easy functions“ angelegt, werden immer nur die ersten 4
verwendet, alle restlichen „Tags“ werden ignoriert.
Sobald mindestens eine „Easy function“ konfiguriert ist wird die Easy Smart Home Oberfläche
angezeigt.
Tags:
• Easy function: #E
• Display function: #D
• Easy function „down“: #ED (nur Jalousie w. state / Shutter w. state)
• Easy function „up“: #EU (nur Jalousie w. state / Shutter w. state)
Um eine Funktion als Easy oder Display „function“ zu konfigurieren geben Sie einfach das entspre-
chende „Tag“ in der ETS hinter dem Namen an. Großschreibung der „Tags“ ist zu beachten.
Beispiel:
„Light 1#E“ zum Markieren als „Easy function“, „Time#D“ zum Markieren als Display Funktion:
Abbildung: „Tag“ der „Easy Funktion“ in der ETS setzen
The following functions can be set as „Display function”:
• Temperature
• Temperature with setpoint
• Room thermostat – temperature
• Outdoor temperature
• Scaling data control with state
• 2 byte float data state
• 4 byte float data state
• Time
• Date
• Dimming actuator with switch state
• Dimming actuator with value state
Further functions of the pureKNX-Trend are not supported.
Configuration
If you want to use the Easy Smart Home interface that is upstream to the regular menu navigation,
you have to define at least one „Easy function“ via the respective „Tag“ in the ETS (1, 2 or 4 are
possible). Are more then four „Easy functions“ set up only the first four are used, all others are
ignored.
As soon as at least one „Easy function“ is configured the Easy Smart Home interface is displayed.
Tags:
• Easy function: #E
• Display function: #D
• Easy function „down“: #ED (only Jalousie w. state / Shutter w. state)
• Easy function „up“: #EU (only Jalousie w. state / Shutter w. state)
To configure an „Easy function“ or a „Display function“ just fill in the according tag in the ETS
dialogue behind the name. Please watch out for the capitalization of the tags.
Example:
„Light 1#E“ for setting as an „Easy function“, „Time#D“ for setting as a „Display function“:
Figure: „Tag“ of the „Easy function“ set in the ETS

Ludwig-Rinn-Straße 10-14 • D- 35452 Heuchelheim/Gießen • Phone: +49 6 41-9 62 84-0 • Fax: +49 6 41-9 62 84-28 • www.tci.de Ludwig-Rinn-Straße 10-14 • D- 35452 Heuchelheim/Gießen • Phone: +49 6 41-9 62 84-0 • Fax: +49 6 41-9 62 84-28 • www.tci.de
Seite 26 von 36 Seite 27 von 36
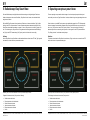
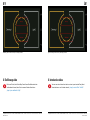
Bedienung der Easy Funktionen
Die neue Oberfläche „Easy Smart Home“ ist ab diesem Zeitpunkt ihre neue Startseite.
Um zur Gruppenansicht zu gelangen muss die Mitte des Displays, wie in Abb. 3 rot markiert zu
sehen, gedrückt werden. Um zurück zur Easy Smart Home Oberfläche zu gelangen muss das
Haus-symbol in der linken untern Ecke der Gruppenansicht betätigt werden. Sollte das
pureKNX-Trend 30 Sekunden lang nicht betätigen werden, erfolgt ein automatischer Rücksprung
zur Easy Smart Home Oberfläche.
Alle „Easy functions“ sind als 1-Tasten Bedingung konzipiert, im Folgenden eine Erklärung zum
Verhalten der einzelnen Funktionen.
Switch actuator with state / Dimming actuator with state / Binary Data Control with state
Einfache Schaltfunktion, drücken der Taste schaltet ein / aus.
Shutter / Jalousie
Erstes gedrückt halten der Taste fährt Jalousie / Shutter nach unten, loslassen der Taste stoppt das
Fahren und dreht die Fahrtrichtung für das nächste gedrückt halten um.
Shutter/Jalousie (up/down)
Bei der Verwendung der Tags #ED/#EU wird die 1-Tasten Bedienung durch „nur runter“ bzw.
„nur hoch“ ersetzt.
Szene
Sendet definierte Szenennummer.
Abbildung: Wechsel zur Gruppenansicht
The operation of the Easy functions
The new interface „Easy Smart Home“ is your new homepage from no on.
To get into the group view please touch the field in the center of the display (the mentioned area is
marked in red in the picture above). To get back to the Easy Smart Home interface please press the
house symbol in the lower left corner of the group view. The pureKNX-Trend automatically switch
back to the Easy Smart Home interface within 30 seconds if the system is unattended.
All „Easy functions“ are designed as one-key operation. Hereinafter the behaviour of the individual
functions are explained:
Switch actuator with state / Dimming actuator with state / Binary Data Control with state
Single switch function. Touching the button switches on and off.
Shutter / Jalousie
The first touch and hold lowers the Jalousie / Shutter. Relieasing the button stops the movement and
turns the direction for raising the Jalousie / Shutter for the next touching.
Shutter/Jalousie (up/down)
When using the tags #ED/#EU the one-key operation will be replaced by „only down“ or „only up“.
Scene
Sends defined scene number.
Figure: Switching to the group view

Ludwig-Rinn-Straße 10-14 • D- 35452 Heuchelheim/Gießen • Phone: +49 6 41-9 62 84-0 • Fax: +49 6 41-9 62 84-28 • www.tci.de Ludwig-Rinn-Straße 10-14 • D- 35452 Heuchelheim/Gießen • Phone: +49 6 41-9 62 84-0 • Fax: +49 6 41-9 62 84-28 • www.tci.de
Seite 28 von 36 Seite 29 von 36
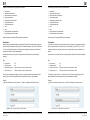
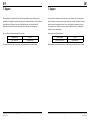
Achtung: Für richtige Funktionalität muss Szenennummer und „Tag“ wie folgt angegeben werden:
Abbildung: Szenen Nummer und „Tag“
Abbildung: Bsp. ETS Easy+Display function
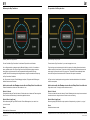
Bedienung der Display Funktionen im Menükreis
Die mit #D parametrierten Display Funktionen haben in der Regel keine Steuermöglichkeit sondern
dienen als reine Anzeige.
Eine Ausnahme bilden hier die beiden Dimm-Funktionen.
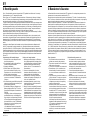
Dimming actuator with value state
Wird eine Dimm Funktion mit #D als Displayfunktion Markiert, kann die Helligkeit durch drücken des
Menükreis im oberen bzw. unteren Drittel erhöht / verringert werden. (siehe Abb. Dimm Funktion als
Easy und Display Funktion).
Dimming actuator with switch state
Die Funktion „Dimming actuator with switch state“ ist die einzige Funktion die sowohl als „Easy-“
wie auch als „Display- function“ markiert werden kann. Dieser Funktion können auch beide „Tags“
gleichzeitig zugewiesen werden. Das erlaubt das ein-/ausschalten über die „Easy function“ und das
dimmen über die „Display function“(siehe Abb.: ETS Easy+Display function).
Achtung: Für richtige Funktionalität muss Szenennummer und „Tag“ wie folgt angegeben werden:
Figure: Scene number and tag
Figure: ETS Easy+Display function e.g.
Operating the Display functions in the circle menu
The with #D parameterized display functions usually do not have a control feature. Their only purpose
is to display information.
An exception here are the two dimming functions.
Dimming actuator with value state
Is a dimming function set as a Display function (with #D), the brightness of the light can be increased
and reduced by pressing the upper third or lower third area in the center circle area. (see figure Dim-
ming function as Easy and Display function).
Dimming actuator with switch state
The function „Dimming actuator with switch state“ is the only function that can be set as „Easy
function“ as well as „Display function“. It is possible to assign both tags to that function at once. This
allows the user to switch the light on and off with the „Easy function“ and using the „Display function“
for the dimming of the light (please see figure: ETS Easy+Display function e.g.).

Ludwig-Rinn-Straße 10-14 • D- 35452 Heuchelheim/Gießen • Phone: +49 6 41-9 62 84-0 • Fax: +49 6 41-9 62 84-28 • www.tci.de Ludwig-Rinn-Straße 10-14 • D- 35452 Heuchelheim/Gießen • Phone: +49 6 41-9 62 84-0 • Fax: +49 6 41-9 62 84-28 • www.tci.de
Seite 30 von 36 Seite 31 von 36
Abbildung: Dimm Funktion als Easy und Display Funktion
6. Einführungsvideo
Ein kurzes Tutorial, wie Sie die Easy Smart Home Oberfläche einrichten
und bedienen können, finden Sie in unserem Youtube-Kanal unter:
„https://youtu.be/i6wfu3LQUy0“
Figure: Dimming function as Easy and Display function
6. Introduction video
You can see a short instruction video how to set up and use the Easy Smart
Home interface on our Youtube channel: „https://youtu.be/Y0aJ7JvkVAQ“

Ludwig-Rinn-Straße 10-14 • D- 35452 Heuchelheim/Gießen • Phone: +49 6 41-9 62 84-0 • Fax: +49 6 41-9 62 84-28 • www.tci.de Ludwig-Rinn-Straße 10-14 • D- 35452 Heuchelheim/Gießen • Phone: +49 6 41-9 62 84-0 • Fax: +49 6 41-9 62 84-28 • www.tci.de
Seite 32 von 36 Seite 33 von 36
5. Support
5.1 Support
Wir unternehmen im Vorfeld alles, um die Funktionsfähigkeit unserer Systeme zu ge-
währleisten. Sorgfältige Auswahl der Komponenten, aufwendige Tests und Prüfverfahren
stellen dies sicher. Dennoch kann es zu Ausfällen kommen. In einem solchen Fall
steht Ihnen unsere Hotline zur Verfügung. Wir helfen schnell und unkompliziert.
Rat und Hilfe bzw. Support erhalten Sie unter der
Telefonnummer E-Mail
0641-96284-55 [email protected]
Wir beantworten Ihre Fragen oder lösen Ihre Probleme so schnell wie möglich.
5.2 Rücksendung
Die richtige Verpackung ist der erste Schritt zur problemlosen Versendung eines Gerä-
tes. Verwenden Sie ausschließlich für Ihre Rücksendungen Original-Verpackungen von
tci, darin enthalten sind 2 Inletts und ein Umkarton. Sollten Sie keine Verpackung mehr
haben, wenden Sie sich bitte an unseren Support.
Unsachgemäß verpackte und dadurch beschädigte Geräte können von der Garantie
ausgeschlossen werden, wenn die Beschädigungen auf die unsachgemäße Verpackung
zurückzuführen ist. Wir empfehlen den Versand mit einer Spedition, da
erfahrungsgemäß hierbei weniger Schäden entstehen. Einen Verpackungshinweis und
einen Reparaturschein finden Sie unter www.tci.de/support.
5. Support
5.1 Support
It is our priority to guarantee the functionality of our systems. This is ensured by a
careful selection of components, extensive inspection and test procedure. However,
errors cannot be completely ruled out. If you should have any problems with your
unit, please do not hesitate to contact our hotline. We will assist you immediately
and without any complications.
You can reach our Support team at
Phone number E-Mail
+49-(0)641-96284-55 [email protected]
We will answer your questions or solve any problems you might have with your unit.
5.2 Dispatch
The right packaging is the first step for a trouble-free dispatch of a device. Please only use
the original tci protective packaging for your returns. Devices that get damaged due to
improper packaging can be excluded from guarantee.
We suggest to task a private forwarding agent with the shipment, because by our experi-
ence the devices get less damaged during the transport.
Further packaging information and a repair form you will find under www.tci.de/support.
7. Support 7. Support

Ludwig-Rinn-Straße 10-14 • D- 35452 Heuchelheim/Gießen • Phone: +49 6 41-9 62 84-0 • Fax: +49 6 41-9 62 84-28 • www.tci.de Ludwig-Rinn-Straße 10-14 • D- 35452 Heuchelheim/Gießen • Phone: +49 6 41-9 62 84-0 • Fax: +49 6 41-9 62 84-28 • www.tci.de
Seite 34 von 36 Seite 35 von 36
5.3 Herstellergarantie
Die tci - Gesellschaft für technische Informatik mbH (TCI) gewährt ihrem Käufer eine 12-monatige
Produktgarantie auf von TCI hergestellte Produkte.
Tritt bei einem von TCI hergestellten Produkt innerhalb von 12 Monaten nach Lieferung ein Mangel
auf, wird TCI diesen unter nachgenannten Voraussetzungen nach eigener Wahl entweder durch Liefe-
rung eines Neugerätes, Austausch von Teilen oder durch Reparatur beseitigen.
TCI trägt im Rahmen seiner Garantieleistungen während der Garantiezeit die mit dem Austausch oder
der Reparatur von Produkten oder Produktteilen verbundenen Kosten, soweit der Mangel im Rahmen
einer ordnungsgemäßen Nutzung der Produkte aufgetreten ist. Die Kosten zur Feststellung des Man-
gels beim Käufer sowie des Ein- oder Ausbaus sind vom Käufer zu tragen. Transport und Versand
von Produkten oder Produktteilen erfolgen auf Gefahr und Kosten des Käufers.
Garantiezeiten beginnen jeweils mit dem Tag, an dem die Lieferung des Produktes erfolgt. Die Erbrin-
gung von Garantieleistungen verlängern die Garantiezeiten nicht.
Die im oder zum Austausch gelieferten Produkte oder Produktteile sind neu oder neuwertig und in
einwandfreiem, funktionstüchtigem Zustand; ausgetauschte Produkte oder Produktteile werden mit
Absendung durch TCI oder Abholung der entsprechenden Austauschteile bei TCI deren Eigentum;
der Käufer garantiert, dass Rechte Dritter diesem Austausch und Eigentumsübergang nicht im Wege
stehen.
Ansprüche aus dieser Garantie sind innerhalb von einem Monat ab Kenntnis des Mangels schrift-
lich bei TCI anzumelden. Derzeitige Anschrift ist tci -Gesellschaft für technische Informatik mbH;
Ludwig-Rinn-Straße 10-14; 35452 Heuchelheim / Gießen. Weitergehende Ansprüche, insbesondere
Schadensersatzansprüche, sind von der Garantie nicht umfasst. Die gesetzliche Mängelhaftung bleibt
von der Garantie unberührt. Es gilt das Recht der Bundesrepublik Deutschland unter Ausschluss des
UN-Kaufrechts. Ist der Kunde Kaufmann, ist Gerichtsstand für Streitigkeiten aus dieser Garantie der
Sitz von TCI.
Voraussetzungen für Garantieleistungen:
1. Es handelt sich um einen Mangel, der nach
dem Kauf entstanden ist.
2. Das betreffende Produkt ist über die Serien-
nummer eindeutig identifizierbar.
3. Vorlage des Kaufbelegs.
4. Äußere Faktoren, wie z.B. Brand, Vanda-
lismus, nicht autorisierte Eingriffe, zu hohe
Temperaturen etc., oder normaler Verschleiß
sind als Ursache ausgeschlossen.
5. Das Produkt wurde nicht verändert, ausge-
nommen von autorisierten TCI-Mitarbeitern
/-Partnern.
6. Das Produkt wurde ausschließlich sachgemäß
entsprechend der Bedienung¬sanleitung und
Dokumentation angewendet.
7. Die Installation, Bedienung, Reparatur und
Wartung erfolgt gemäß den von TCI zur Ver-
fügung gestellten Vorgaben. Dies bedeutet im
Einzelnen:
a. Installation, Aufbau und Montage erfolgen
gemäß der Bedienungs- und Montageanlei-
tung und durch eine entsprechende Fachkraft.
b. Eine im Garantiefall notwendige
Reparatur
wird ausschließlich von einem TCI-Mitarbeiter/-
Partner oder mit von tci zur Verfügung gestell-
ten Ersatzteile durchgeführt.
c. Das betreffende Produkt wird ausschließ-
lich in Verbindung mit kompatiblen Produkten
angewendet.
Nicht von der Garantie umfasst:
1. Maßnahmen zur Beseitigung von Störungen,
die auf Bedienungsfehlern, sonstiger unsach-
gemäßer Behandlung, technischen Eingriffen
seitens des Käufers oder Dritter oder auf
äußeren, nicht von TCI zu vertretenden Ein-
flüssen beruhen.
2. Kosten von Austauschteilen, die einem
besonderen Verschleiß unterliegen, von Ver-
brauchsmaterial und von Datenträgern.
3. Instandsetzung von Zubehör, Änderungen,
Anbauten oder sonstigen Einrichtungen, die
nicht von tci geliefert wurden.
4. Instandsetzungsarbeiten, wenn die Umge-
bungs-bedingungen lt. der Dokumentation
nicht eingehalten wurden.
5. Mängel, die durch mangelhafte Systemausle-
gung, Systemkonfiguration und Montageart,
durch den Betrieb unter ungeeigneten Umge-
bungsbedingungen oder sonstigen ungeeig-
neten Betriebsmethoden, durch ungeeignete
Wartung oder ungeeig¬nete Tests oder durch
Einflüsse wie Verunreinigungen bedingt sind.
5.3 Manufacturer’s Guarantee
tci Gesellschaft für technische Informatik mbH (TCI) provides a 12-month product guarantee to the
purchaser, which covers products manufactured by TCI.
Should a defect be determined with a product manufactured by TCI within 12 months after delivery,
then TCI will remove this defect at their own option either by providing a new product, or by replacing
parts or by repairing the product subject to the conditions defined below.
Within the scope of the guarantee, TCI will bear all costs related to the replacement of parts or the
repair of products or product parts during the term of this guarantee, insofar as the defect has oc-
curred during proper use of the product. Any costs incurred for the determining of the defect as well
as costs of mounting and demounting at the customer’s premises are to be borne by the purchaser.
Delivery and dispatch of products or product parts will be effected at the purchaser’s risk and expen-
se. The term of guarantee shall begin from the date of delivery of the product. Any services provided
within the scope of the guarantee do not extend the term of guarantee.
All products or product parts delivered as or for a replacement are new or equivalent to new and in
perfect operative condition; replaced products or product parts will become property of TCI as soon
as they are sent off to or collected by TCI; the purchaser guarantees that there are not any legal im-
pediments to such transfer of product and ownership which might result from third-party rights.
Any claims under this guarantee are to be made to TCI in writing within one month after cognizance
of the defect. Current address: tci -Gesellschaft für technische Informatik mbH; Ludwig-Rinn-Strasse
10-14; 35452 Heuchelheim / Giessen Germany. Any further claims, claims for damages in particular,
are excluded from this guarantee. Statutory liability for defects remains unaffected of this guarantee.
The German law shall apply to all matters related to this guarantee. In case the purchaser is a mer-
chant, place of jurisdiction for any litigation resulting from this guarantee shall be the location of the
registered office of TCI.
Terms of guarantee:
1. Only defects that have occurred after the
purchase are covered by this guarantee.
2. The product in question must be clearly iden-
tifiable by its serial number.
3.
The voucher of the purchase has to be submitted.
4. External factors, e.g. fire, vandalism, unau-
thorized handling, excessive temperatures
etc., or normal wear are excluded from the
guarantee.
5. The product must not have been modified,
ex-
cept by authorized TCI employees or partners.
6. The product has been used exclusively in a
competent way according to the operating
manual and documentation.
7.
Installation, operation, repair, and maintenance
have been performed according to the instructions
and the operating documentation the purchaser
has obtained from TCI. This means in particular:
a. Installation, setup, and mounting have been
performed according to the installation and
operating instructions in the documentation
and by a competent professional.
b. Necessary repair work during the term of
guarantee has been performed exclusively by
a TCI employee or authorized partner or with
spare parts provided by TCI.
c. The product concerned has been used
exclusively in connection with compatible
products.
Excluded from this guarantee are:
1. All measures for the removal of defects that
have been caused by operating mistakes,
other incompetent handling, technical inter-
vention on the part of the purchaser or any
third party or any other external influence TCI
can not be held responsible for;
2. Costs of replacement parts subject to
extreme wear and of consumables and data
carriers;
3. Maintenance or repair of accessories, modi-
fied parts, added parts or any other part that
have not been delivered by TCI;
4. Repair work that has become necessary
because the limits of the environmental spe-
cifications in the documentation have been
exceeded;
5. Defects that have resulted from an inadequate
system layout, system configuration, and type
of mounting, or from operation under inappro-
priate environmental conditions or from other
inappropriate operating methods or from
incompetent maintenance or inappropriate
tests or from influences like contamination.
8. Herstellergarantie 8. Manufacturer‘s Guarantee

Ludwig-Rinn-Straße 10-14 • D-35452 Heuchelheim/Gießen
Tel.: +49 (0) 6 41- 9 62 84 -0 • Fax: +49 (0) 6 41- 9 62 84 -28
e-mail: [email protected] • www.ambiento.de
-
 1
1
-
 2
2
-
 3
3
-
 4
4
-
 5
5
-
 6
6
-
 7
7
-
 8
8
-
 9
9
-
 10
10
-
 11
11
-
 12
12
-
 13
13
-
 14
14
-
 15
15
-
 16
16
-
 17
17
-
 18
18
-
 19
19


in anderen Sprachen
- English: TCi pureKNX Owner's manual
Verwandte Artikel
-
 TCi IPC-DITX-EP Bedienungsanleitung
-
 TCi solo Bedienungsanleitung
-
 TCi pureKNX-Serie Bedienungsanleitung
-
 TCi E04A Bedienungsanleitung
-
 TCi IPC-TB-PREM Bedienungsanleitung
-
 TCi IPC-B Bedienungsanleitung
-
 TCi C-Series Bedienungsanleitung
-
 TCi G07T Bedienungsanleitung
-
 TCi amena7-XS Bedienungsanleitung
-
 TCi pureKNX4hotel Bedienungsanleitung


