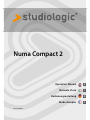
Studiologic Numa Compact 2 Bedienungsanleitung
- Typ
- Bedienungsanleitung

Manuale d‘uso
Operation Manual
Rev. 21-03-2018
D
F
I
E
Mode d’emploi
Bedienungsanleitung
Numa Compact 2

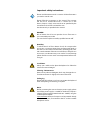
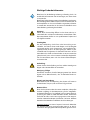
Important safety instructions
Please read the entire manual. It contains all the informations
you need to use this unit.
Please follow the instructions in the manual. The warranty
will be void if unauthorized work is carried out on the
Numa Compact 2. Only accessories that are specied by the
manufacturer should be used with this unit.
Use the unit only as specied in this manual.
DANGER!
Risk of electric shock. Do not open the chassis. There are no
user serviceable parts inside.
The unit should only be serviced by qualied service sta.
Humidity
To reduce the risk of re or electric shock, do not expose the
unit to rain or moisture. Never place containers with liquid on
the unit. Do not use the unit near water, swimming pool, bath-
tub or wet basement. If the unit is moved from a cold place to a
warm room, condensation may occur inside. To avoid damage
please allow the unit to reach room temperature before swit-
ching on.
Installation
Always use a stable rack to place the keyboard on. Please be
aware of its size and weight.
Cleaning / Maintenance
Never use any abrasive detergent, which may damage the sur-
face. We recommend a slightly moist micro-bre cloth.
Packaging
Please keep all packaging, and use it to protect the keyboard
when transporting or if servicing is required.
Mains
Before connecting the unit to the main power supply, please
check if the power supply is suitable for the Numa Compact 2
adapter. The unit can be powered with 100 – 240VAC, using the
included power adapter.
Important Note: the Numa Compact 2 can be powered directly
also by the USB port, if connected to the PC or other suitable
USB power sources.

Numa Compact 2 by Studiologic® 3
E
ENGLISH
Operation Manual
Numa Compact 2

Numa Compact 2 by Studiologic®
4
Index
Safety instructions
Yo u r n e w N um a C o m p ac t 2
Power - Inputs and connections
Panel - Display and navigation
Sound banks and sound section
Eects
Global edit
Program edit
Part edit
Product overview
Key features
Example of use
Operation diagram
Power connection
USB power
Expression / Universal pedals
Audio output
Headphones
Volume
USB
Sound / MIDI
Demo
SPLIT
Store - User programs
Sound mode
Sounds
FX1- FX2
FX Autoset
Strings Resonance (Damper model)
Transposer
Global tuner
Velocity curve
Fixed curve
Strings resonance (Damper eect)
Headphones (mode)
Pedal 2
FX Autoset
Factory reset
Firmware version and update
Programs send/receive
Program name
Split point
Mixer
Volume
Split assign
Transpose
Octave
Rev send
Pedal 1 - Pedal 2
Stick 1 - Stick 2
Aftertouch
2
6
6
7
7
10
10
10
10
11
11
11
12
13
13
13
14
15
16
17
17
18
18
18
18
18
18
19
19
20
20
21
22
22
22
23
23
24
24
24
24
24
25

Numa Compact 2 by Studiologic® 5
E
Index
MIDI (Zone edit)
Declarations
Appendix
26
26
26
27
27
27
27
27
27
28
29
118
119
120
120
Program Change
LSB - MSB
MIDI channel
Volume
Split assign
Transpose
Octave
Pedal 1 - Pedal 2
Stick 1 - Stick 2
Aftertouch
Sound map
MIDI Implementation chart
Specications
Dimensions

Numa Compact 2 by Studiologic®
6
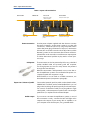
Your new Numa Compact 2
The Numa Compact 2 is an incredibly powerful musical instrument, packed in a stylish and slim
cabinet, based on a totally new technology and updated user interface. The keyboard includes an
Aftertouch control and together with the programmable Sticks, allows to have a total control of
the musical performance. The new sound engine is capable of 128 notes of max polyphony and
it includes two independent sections (Lower & Upper) with over 80 sounds, organized in 8 Sound
Banks, assignable to any portion of the keyboard, in Layer or Split mode. The 1GB (ash memory)
sounds are further enhanced by 2 eects post-processors (Fx1-Fx2) each one with a double inter-
nal architecture, for a total of 4 independent eects at once.
A controllable Strings Resonance and the Release-Staccato Samples make the main piano sounds
even more real, while a new Stereo Reverb post-processor further enhances the sound. Bass, Tre-
ble and Mastering controls allow to reach a studio quality, also noticeable thru the built in digital
amplier and elliptical back-reection speakers. The MIDI Module includes 2 independent MIDI
zones and all parameters can be programmed and stored.
Key features
88 notes light weighted keyboard
Aftertouch
Stick 1: Pitch Bend function on both axis
Stick 2: Sound Modulation and FX1/2 control (assignable or auto-selection)
Built in 2x10W amplifier + 2 elliptical back reflection speakers
128x64 graphic Oled display
Direct control User Interface
Lower-Upper-Zone A-Zone B
4 programmable sections (internal SOUNDS and MIDI) in any combination
1 GB of flash memory, 88 sounds organized in 8 Sound Banks
Concert Grand piano sounds with release-staccato samples and Strings Resonance
FX1-2 double effects processors - 4 programmable effects at once
Stereo Reverb with separate Lower/Upper controllable send level
Strings Resonance (Damper model) on acoustic Piano sounds (programmable)
Global-Program-Part EDIT
Bass, Treble, Mastering (3D+Compressor) post processing controls
MIDI module with 2 independent programmable Zones
Connections: Usb, MIDI In/Out, Audio L/R, Headphones, Ped1-Ped2
USB power
Product overview

Numa Compact 2 by Studiologic® 7
E
Your new Numa Compact 2
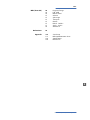
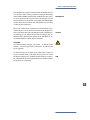
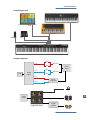
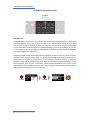
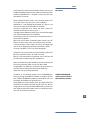
Example of use
PED2PED1
USB
MIDI OUT
MIDI IN
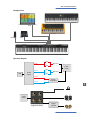
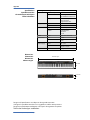
Operation diagram
1GB
Sound
engine
UPPER
Strings
resonance
FX1
FX2
Rev send
Stereo
reverb
LOWER
FX1
FX2
Rev send
UPPER
LOWER
Bass
Treble
Mastering
Volume
L
R
AUX out
L
R
BUILT-IN
SPEAKERS
Digital
amplier
AUDIO out
Stereo
reverb
Suggested setting

Numa Compact 2 by Studiologic®
8
Your new Numa Compact 2
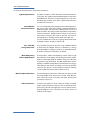
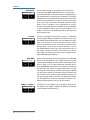
An overview of the functions of the Numa Compact 2:
The Numa Compact 2 oers the latest innovative technolo-
gy by Fatar: the sophisticated weighted keyboard TP9-Piano
with Aftertouch. The Numa Compact weighs just 7,1 kg and is
therefore very portable, yet it oers a great keyboard touch,
for which Fatar is famous.
You can immediately start playing the 88 selected high qua-
lity sounds, which have been carefully sampled. Experienced
keyboard players and musicians selected those sounds and
were involved in the design of the straightforward operation
of Numa Compact 2. Therefore Numa Compact 2 is your per-
fect partner on stage, in the studio or at home. 128 voices of
max polyphony is available to add depth and expression.
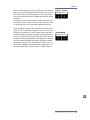
You can combine two sounds by assigning them to the Lower
and Upper sections in Split or Layer mode.
The 2 double FX processors allow to assign 2 dierent eects
to both Lower and Upper sections, in addition to a Strings
Resonance eect on all piano sounds and a Stereo Reverb, for
an endless variety of combinations of all kind.
A Volume, Bass, Treble and Mastering controls allow to get
the preferred sound setting and the internal monitor-ampli-
cation system with elliptical speakers allow you to play the
instrument using the internal 10+10W amplication system,
digitally controlled and equalized. For the best result a sugge-
sted setting is with all pots at halfway, to avoid any possible
distorsion and ensure a correct frequncy responce. Settings
can be modied according to the selected sound.
The master keyboard functions of the Numa Compact 2, with
2 programmable Zones, allow you to control other MIDI de-
vices, select the sounds and adjust the levels directly from
your Numa Compact 2.
As well as the stereo L/R audio output and built in ampli-
cation system, the Numa Compact 2 has an additional head-
phone plug, ideal for late-night jam sessions without distur-
bing the neighbours. This connection can also be used as an
auxiliary audio output.
Light weighted action
8 Sound Banks
88 Internal Sounds
FX1 - FX2- REV
Strings Resonance
Mixer & Mastering
Built-in Amplication
Master keyboard functions
Audio connections

Numa Compact 2 by Studiologic® 9
E
Your new Numa Compact 2
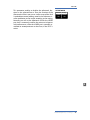
The integrated USB port allows your Numa Compact 2 to con-
nect to your computer and be powered directly, without the
need of the external adapter (included). You can use a USB
and MIDI out for MIDI data transmission. In addition, updates
of the rmware or the sound library are accessible via USB.
Please note that the internal amplication system is automa-
tically switched o when the instrument is powered by USB,
to avoid excessive power consumption or power drops.
Numa Compact 2
Power Adapter
CD Manual
Interactive Numa
USB <> Computer
Delivery includes

Numa Compact 2 by Studiologic®
10
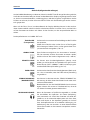
Power - Inputs and connections
Use the power adapter supplied with the device to connect
the Numa Compact 2 to the power socket (or use the USB
connection). Switch the unit on by using the power button
next to the power plug of the Numa Compact 2, set the main
Volume, Bass and Treble controls to the half position and the
Mastering control to zero-minimum (the function will be ex-
plained later on this manual) to avoid excessive output power
and allow the internal speakers to play with a correct dyna-
mic range.
The instrument can also be powered by USB, using a shielded
quality certied cable and providing that the computer
has enough power and not too many devices are powered
through the same USB port.
When the instrument is USB powered, in most cases the in-
ternal amplication system is disconnected if the power con-
sumption exceeds the computer‘s range.
PLEASE NOTE: in case of weak or unstable connection, use
the traditional power (see previous paragraph).
Connect the (optional) pedal or pedals to the related sockets,
labelled Ped1 and Ped2; at the socket labelled Ped 1 you can
plug in the Studiologic VP pedal, typically for volume-expres-
sion controls. To the Ped2 socket you can plug either a single
swicth pedal, a volume-expression pedal or the custom triple
pedal SLP3-D, as explained in the related chapter.
If you want to use external ampli cation systems, or record
the instruments sounds, connect the Left and Right audio
outputs to the inputs of your mixing desk or amplier, or to
your computer audio board inputs, using suitable cables.
Power connection
USB power
Expression / Universal pedals
Audio output
Power
12V - 2,5A
USB Port
MIDI I/O, rmware update,
power
Ped 1, Ped 2
Expression pedal,
Universal pedal
Audio L/R Out
2x 6,3mm mono jack
MIDI In-OutPower On/O
Headphones / Aux Out
1x 6,3mm stereo jack
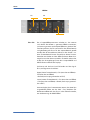
Power - Inputs and connections

Numa Compact 2 by Studiologic® 11
E
Power - Inputs and connections
The Headphones output can be used with an headphones set
or as an extra audio auxiliary output, according to the setting
of the related GLOBAL edit function (explained in this manu-
al). As an auxiliary audio out, you can use this plug to connect
the instrument to a subwoofer or an additional amplication
system, while the L/R outputs are still available for recording
or other audio connections.
When you use the Numa Compact 2 for the rst time, we re-
commend you to turn the Volume knob on the Output sec-
tion to not more than half way between 0 and Full. While you
are playing you can adjust the volume according to the se-
lected sounds. Adjusting the Volume knob will eect all au-
dio and headphone outputs at the same time.
CAUTION:
To prevent hearing damage, you should – as with all audio
devices – avoid using the Numa Compact 2 at high volume
for long periods.
For data transmission via USB, connect the Numa Compact 2
to your computer with a USB cable. The rst time you switch
the Numa Compact 2 on, it will be recognised by your compu-
ter automatically and the appropriate driver will be installed
by the OS (cross compliant).
Headphones
Volume
USB

Numa Compact 2 by Studiologic®
12
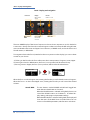
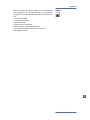
Panel - Display and navigation
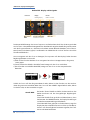
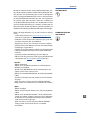
The main HOME display of the Numa Compact 2 is the one shown at power on and it’s divided in
3 main areas: the top area shows the current Program number and name, the left and right lower
areas are related to the Lower and Upper Sound sections, in SOUND mode, and to the Zone A and
Zone B sections, in MIDI Mode.
To navigate and move the focus (intended as the cursor position on the display) you can use three
controls at your choice:
a) Clicking on the Encoder: the focus will move to the 3 main positions: Programs, Lower, Upper.
b) Pressing the Sound or MIDI buttons, the focus (cursor position) will be moved on top.
c) Pressing Lower or Upper, the focus (cursor position) will be set to the related areas.
MIDI / Sound /
DEMO
Encoder
Rotation + click
Edit / Store
Lover - Upper
Parts/Zones
selection
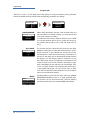
The two buttons marked SOUND and MIDI will toggle bet-
ween the two related views and controls.
When the SOUND button is selected and lighted, the user can
control the SOUND sections and selections, all related dis-
play, settings, edit pages and parameter settings.
When the MIDI button is selected and lighted, the display will
show the status of the MIDI Zones A and B and the user can
access to all available parameters, edit functions and values.
Sound / MIDI
Display
Monochrome
display
SPLIT / Mix
Panel - Display and navigation
P01-JAZZ DUET
Ac-Bass
V: 127
A0 - B3
Concert
V: 127
C4 - C8
UPPER
P01-JAZZ DUET
Ac-Bass
V: 127
A0 - B3
Concert
V: 127
C4 - C8
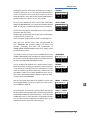
When the focus is on the Program area, rotating the Encoder you will select the various Programs.
When the focus is on the Lower/Upper areas, rotating the Encoder you will control the related
volumes.

Numa Compact 2 by Studiologic® 13
E
Panel - Display and navigation
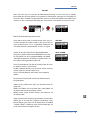
The SOUND button can also be pressed for a longer time, to
enable the eight DEMO songs (one for each sound BANK) to
start playing in sequence; clicking on a SOUND BANK you can
also select the related demo; at the end of it, the next demo
song will start for the other BANKS, in a continuous cycling
loop.
This button is a real time control of the SPLIT function, that is
edited and controlled in all details by the GLOBAL EDIT fun-
ction (Split Point) and PART EDIT function (Split Assign). This
is a fast way to immediately enable and disable the SPLIT and
play the UPPER and LOWER parts all over the keyboard, in layer
mode without split.
As explained in the EDIT sections, the SPLIT button can also
be used as a short cut to select the MIXER page, by keeping it
pressed for a few seconds.
The Numa Compact 2 has 99 user’s programmable memo-
ries called Programs, where you can store all SOUND, FX1/2
controls, amounts, functions, split points and all editable pa-
rameters also related to the MIDI ZONES, with a programma-
ble NAME for each Program. The only non-storable functions
are the VOLUME, BASS, TREBLE and MASTERING, since they are
pure real-time controls, not related to a particular Program.
All Programs can be sent and received via USB, as explained
in the related paragraph of this manual, in the GLOBAL EDIT
section.
Demo
SPLIT
STORE / User Programs

Numa Compact 2 by Studiologic®
14
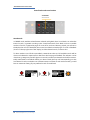
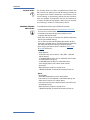
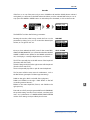
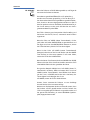
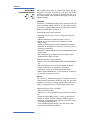
Sound banks and sound section
In SOUND mode, with the related button selected and lighted, the 8 Sound banks can select the
internal sounds, organized according to the Sound Bank names. Each Bank can have a variable
number of sounds, organized in pages of 4 sounds for each one. Selecting a Bank, you will see on
the display the sounds of that Bank, the current Sound Bank and total pages of sounds of the Bank
(shown on the top right area of the display) and the selected sound, in reverse color.
To select another sound of the current Bank, rotate the encoder and all available sounds will be
shown and selected in sequence, from the rst to the last page of the Bank. The selection can be
done during a temporary window (approx 5 seconds) and the last selected sound will be automa-
tically memorized for each Bank. When you select a Bank, the focus will automatically go to the
last selected Sound, to make the sound selection easier and faster. Thanks to this function, you will
have an automatic setting of your preferred sounds for each Bank.
SOUND BANKS
Sound selection
Sound banks and sound section
Sound mode
P01-JAZZ DUET
Ac-Bass
V: 127
A0 - B3
Concert
V: 127
C4 - C8
A-PIANO
A-PIANO [1/2]
Concert
Vintage
Stage
Studio
SOUND

Numa Compact 2 by Studiologic® 15
E
Sound bank and sound section
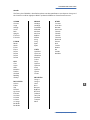
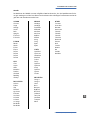
The factory list of SOUNDS is listed below; please note that specications are subject to change and
the Sound list could be slightly modied or updated in dierent or future rmware versions.
Sounds
A.PIANO
Concert
Stage
Vintage
Studio
Rock
Upright
E-Grand1
E-Grand2
E.PIANO
Rhodx
Wurlix
E-Pno1
E.Pno2
DxFm1
DxFm2
DxFm3
DxFm4
KEYS
Clavi
Harpsi
Vibes
Marimba
FunKlav
Cembalo
ReedOrg
GloKeys
BASS/GUITAR
Ac-Bass
El-Bass
Slap
Plucked
Ny-Guitar
El-Guitar
Ac-Guitar
Jz-Guitar
2 Guitars
12 Strings
BassRide1
BassRide2
ORGANS
JazzOrg1
JazzOrg2
DrawbVib
AllDrawb
888-Pure
888-Scan
MildSet
AllEven
V-Org
F-Org
Pipe1
Pipe2
SYNTH
SynthPad
SynHouse
SweetSaw
WowPad
Soloist
Funky
SynBass1
SynBass2
Jump
SynBrass
Square
Cluster
ORCHESTRA
Strings1
Strings2
Horns
Brass
Baroque
BigBand
BrassFall
SaxBand
TenorSax
JazzFlute
Trumpet
Oboe
OTHER
Cassotto
Accordion
Musette
Harmonica
ChoirAh
ChoirOh
ChoirUh
ChoirSint
Bouzouki
Kanoun
Oud
Cawala
Mizmar
Nai
StndKit
WorldKit

Numa Compact 2 by Studiologic®
16
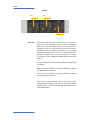
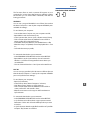
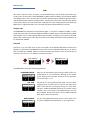
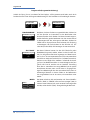
Eects
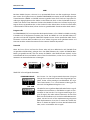
The 2 double eects processors allow to assign 2 separate ef-
fects to the Lower and Upper sections, for a total of 4 dierent
eects at once. As an example, the FX1 can be set to Drive for
the Upper section and, at the same time, to Chorus for the Lo-
wer section. Using the Upper/Lower button, you can toggle
between the related parts and show or select the eect for
that part. In addition, you will see or change the associated
FX using the 2 main LOWER and UPPER buttons below the
display.
You can visualize the Sound and FX structure and signal ow
as it follows:
Upper > FX1 (one of the four) > FX2 (one of the four) > Reverb
(programmable send in Edit)
Lower > FX1 (one of the four) > FX2 (one of the four) > Reverb
(programmable send in Edit)
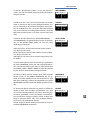
Amount: the 2 potentiometers control the Amount of the
selected eect, like the dry/wet ratio (for modulating eects
like the Chorus) or other parameters, like the distortion level
of the DRIVE eects.
FX1 - FX2
FX2
REVERB
FX1
Eects

Numa Compact 2 by Studiologic® 17
E
Eects
The FX Autoset function (a real-time function also explained
in the GLOBAL Edit section) automatically memorizes the last
selected FX 1-2 for each Sound, without the need of storing a
dedicated Program.
This real-time function will also control the association bet-
ween the Stick2 and the Sound or FX controls (modulation or
eect speed etc) in a logic and automatic way. When a par-
ticular FX is selected on a section, the Stick 2 will control a
particular parameter, like the Slow/Fast speed of the Rotary
or the Speed and Feedback of the Phaser.
The control will also be automatically set according to the
focus position: if you have a Lower part without FX and the
focus on Lower, the Stick 2 will control the Modulation; if the
focus is on Upper and you have an Organ sound with Rotary,
the Stick 2 will control the Rotary Slow/Fast speed.
If the FX Autoset function is set to o (see the GLOBAL Edit
section) the function of the Stick 2 will be under Part EDIT,
with not automatic assignments, and you can store all set-
tings in each Program.
With the FX Autoset o, the automatic association between
each sound and the last selected FX will be disabled and the
FX selection will be only manual or controlled by the FX set-
ting stored in each of the 99 Program.
In addition to the powerful FX1-2 double eect processors,
the Numa Compact 2 also has a built in STRINGS RESONANCE
post-processing eect, dedicated to the ACOUSTIC PIANOS
sound bank and controlled by the related parameter of the
GLOBAL EDIT. This eect, created using the experience of the
Numa STAGE and CONCERT renowned Studiologic instru-
ments, adds an even more realistic eect to the piano sounds,
reproducing the resonances of the real strings and sound
boards of the acoustic instrument.
FX Autoset
STRINGS RESONANCE
(Damper model)

Numa Compact 2 by Studiologic®
18
Global edit
To enable the GLOBAL edit, keep pressed the EDIT button for a few seconds; you will nd various
pages (shown on the top right area of the display) with functions that will aect the instrument,
regardless what Program is selected. To escape from the function, press again the EDIT button and
all settings will be memorized automatically.
When the focus (cursor) is on the top area of the display, rotating the encoder you can select the
various pages; clicking on the cursor, the focus will be moved on the parameter and rotating the
encoder you can change the related value.
The GLOBAL EDIT main functions are:
You can transpose the instrument to any other key; click on
the encoder to move the cursor on the value and rotate it to
input the desired transposition range.
This function allows to “tune” the instrument, in case you
have to play along with another instrument that is not tuned
to the standard (A=440 Hz).
You can select a dierent velocity curve, according to your ta-
ste and playing technique. There are 3 factory curves (SOFT/
NORMAL/HARD) and a programmable FIXED velocity setting,
with the related value.
You can set here the xed velocity value (from 1 to 127) when
the FIXED velocity is selected.
Here you can control the amount of the STRINGS RESONANCE
post-processing, that adds a more realistic eect to all acoustic
PIANO sounds. Please note that the CONCERT GRAND sound
also has a separate “release and resonance” built in natural ef-
fect, not controlled by this parameter.
When the parameter is set to AUTO ON, plugging the headpho-
nes will automatically switch o the internal amplication sy-
stem.
If the parameter is set to AUTO OFF, the internal amplication
system will be active also when a jack is inserted in the He-
adphones plug; this will allow to use the headphones out as an
extra auxiliary output, for recording or to connect it to an ac-
tive-amplied subwoofer, in addition to the internal speakers.
TRANSPOSER
GLOBAL TUNER
VELOCITY CURVE
FIXED CURVE
STRINGS RESONANCE
(DAMPER EFFECT)
HEADPHONES (MODE)
Global edit

Numa Compact 2 by Studiologic® 19
E
Global edit
PEDAL 2
FX AUTOSET
While the PED1 is always suitable for expression-volume pe-
dals, the PED2 can be programmed to connect almost all pos-
sible pedals, as it follows:
• SINGLE SWITCH normally open;
• SINGLE SWITCH normally closed;
• EXPRESSION (volume function, pedals with potentiometer
and stereo plug);
• SLP3-D – Triple pedal with Soft/Sostenuto/Sustain function
with half-damper control.
When the function is set to AUTO ON, the following automatic
functions are enabled:
The last selected eects (FX1-2) for each sound are memorized
by the instrument, allowing to select a sound and the related
preferred eect, with no need of storing the combination in a
Program. The FX Autoset not only will memorize and recall the
eects associated by the user for each sound, but also the va-
lue of the parameters controlled by the Stick 2 for each eect.
The STICK 2 control will be automatically assigned to a fun-
ction, according to the setting and the position of the FOCUS
/ cursor.
If the focus is on UPPER (as an example) and you have selected
an Organ sound with the ROTARY eect, the STICK2 will control
the Rotary SLOW/FAST speed.
If you move the focus on LOWER (by clicking on the encoder
or pressing the LOWER button) and you have another FX on
Lower, the STICK2 will control the LOWER eect.
If you don’t have any FX on a section (LOWER or UPPER) and
you move the focus on it, the STICK 2 will control the MODULA-
TION on the selected section.
As a typical example, imagine to have an ORGAN on UPPER
with Rotary and a BASS on LOWER with no eects: moving the
cursor on UPPER, the Stick 2 will control the Rotary Speed; mo-
ving the focus on LOWER; the STICK2 will control the Modula-
tion.
Note: this automatic function is an arbitrary selection done by
the instrument, based on a statistic playing situation; if you
want to control all parameters directly and manually, you can
set the function to OFF and select the function of the STICK 2
in the related PART EDIT; storing the desired setting in a PRO-
GRAM.

Numa Compact 2 by Studiologic®
20
Global edit
This function allows to make a complete Factory Reset, that
will cancel all user settings and reset all factory parameters to
the original status. Please note that this could make you lose
custom settings or programming and the function should be
done very carefully. To protect the user from unwanted reset,
a caution YES/NO message appears when trying to reset the
unit, allowing to conrm or not the factory restore.
To update the Firmware (upload) follow these steps:
- Download the rmware from www.studiologic-music.com
and save it in a known folder;
- Connect the instrument to the power and then to your
computer with the USB cable;
- Verify that is seen by your computer and selected as MIDI Out
device, in the related settings;
- Turn on the instrument while keeping pressed the A0 (rst
white key on the left) and D1 (fourth white key from the left);
the display will show the message “Firmware Upload”;
- Open any program able to “play” a midile (i.e. MIDI-Ox for
PC, QMidi for Mac etc);
MIDI-Ox:
- Open MIDI-Ox
- In the menu bar, choose Actions > Play MIDI... , MIDI Bar
will be opened;
- In the MIDI BAR windows, click on “Select MCI Port” button
and select Numa Compact 2;
- In MIDI BAR open the le you have downloaded;
- Press the play button and wait for the end of the
procedure;
- When the Numa Compact 2 display shows
“UPLOAD FINISHED”, restart the instrument (o and on).
QMidi:
- Open QMidi;
- Select the rmware le you have downloaded;
- In the menu bar choose QMidi > Audio/MIDI settings and
select Numa Compact 2 as output device;
- In the main window press the play button and wait for the
complete procedure;
- When the Numa Compact 2 display shows
“UPLOAD FINISHED”, restart the instrument (o and on).
FACTORY RESET
FIRMWARE VERSION
AND UPDATE
Seite wird geladen ...
Seite wird geladen ...
Seite wird geladen ...
Seite wird geladen ...
Seite wird geladen ...
Seite wird geladen ...
Seite wird geladen ...
Seite wird geladen ...
Seite wird geladen ...
Seite wird geladen ...
Seite wird geladen ...
Seite wird geladen ...
Seite wird geladen ...
Seite wird geladen ...
Seite wird geladen ...
Seite wird geladen ...
Seite wird geladen ...
Seite wird geladen ...
Seite wird geladen ...
Seite wird geladen ...
Seite wird geladen ...
Seite wird geladen ...
Seite wird geladen ...
Seite wird geladen ...
Seite wird geladen ...
Seite wird geladen ...
Seite wird geladen ...
Seite wird geladen ...
Seite wird geladen ...
Seite wird geladen ...
Seite wird geladen ...
Seite wird geladen ...
Seite wird geladen ...
Seite wird geladen ...
Seite wird geladen ...
Seite wird geladen ...
Seite wird geladen ...
Seite wird geladen ...
Seite wird geladen ...
Seite wird geladen ...
Seite wird geladen ...
Seite wird geladen ...
Seite wird geladen ...
Seite wird geladen ...
Seite wird geladen ...
-
 1
1
-
 2
2
-
 3
3
-
 4
4
-
 5
5
-
 6
6
-
 7
7
-
 8
8
-
 9
9
-
 10
10
-
 11
11
-
 12
12
-
 13
13
-
 14
14
-
 15
15
-
 16
16
-
 17
17
-
 18
18
-
 19
19
-
 20
20
-
 21
21
-
 22
22
-
 23
23
-
 24
24
-
 25
25
-
 26
26
-
 27
27
-
 28
28
-
 29
29
-
 30
30
-
 31
31
-
 32
32
-
 33
33
-
 34
34
-
 35
35
-
 36
36
-
 37
37
-
 38
38
-
 39
39
-
 40
40
-
 41
41
-
 42
42
-
 43
43
-
 44
44
-
 45
45
-
 46
46
-
 47
47
-
 48
48
-
 49
49
-
 50
50
-
 51
51
-
 52
52
-
 53
53
-
 54
54
-
 55
55
-
 56
56
-
 57
57
-
 58
58
-
 59
59
-
 60
60
-
 61
61
-
 62
62
-
 63
63
-
 64
64
-
 65
65