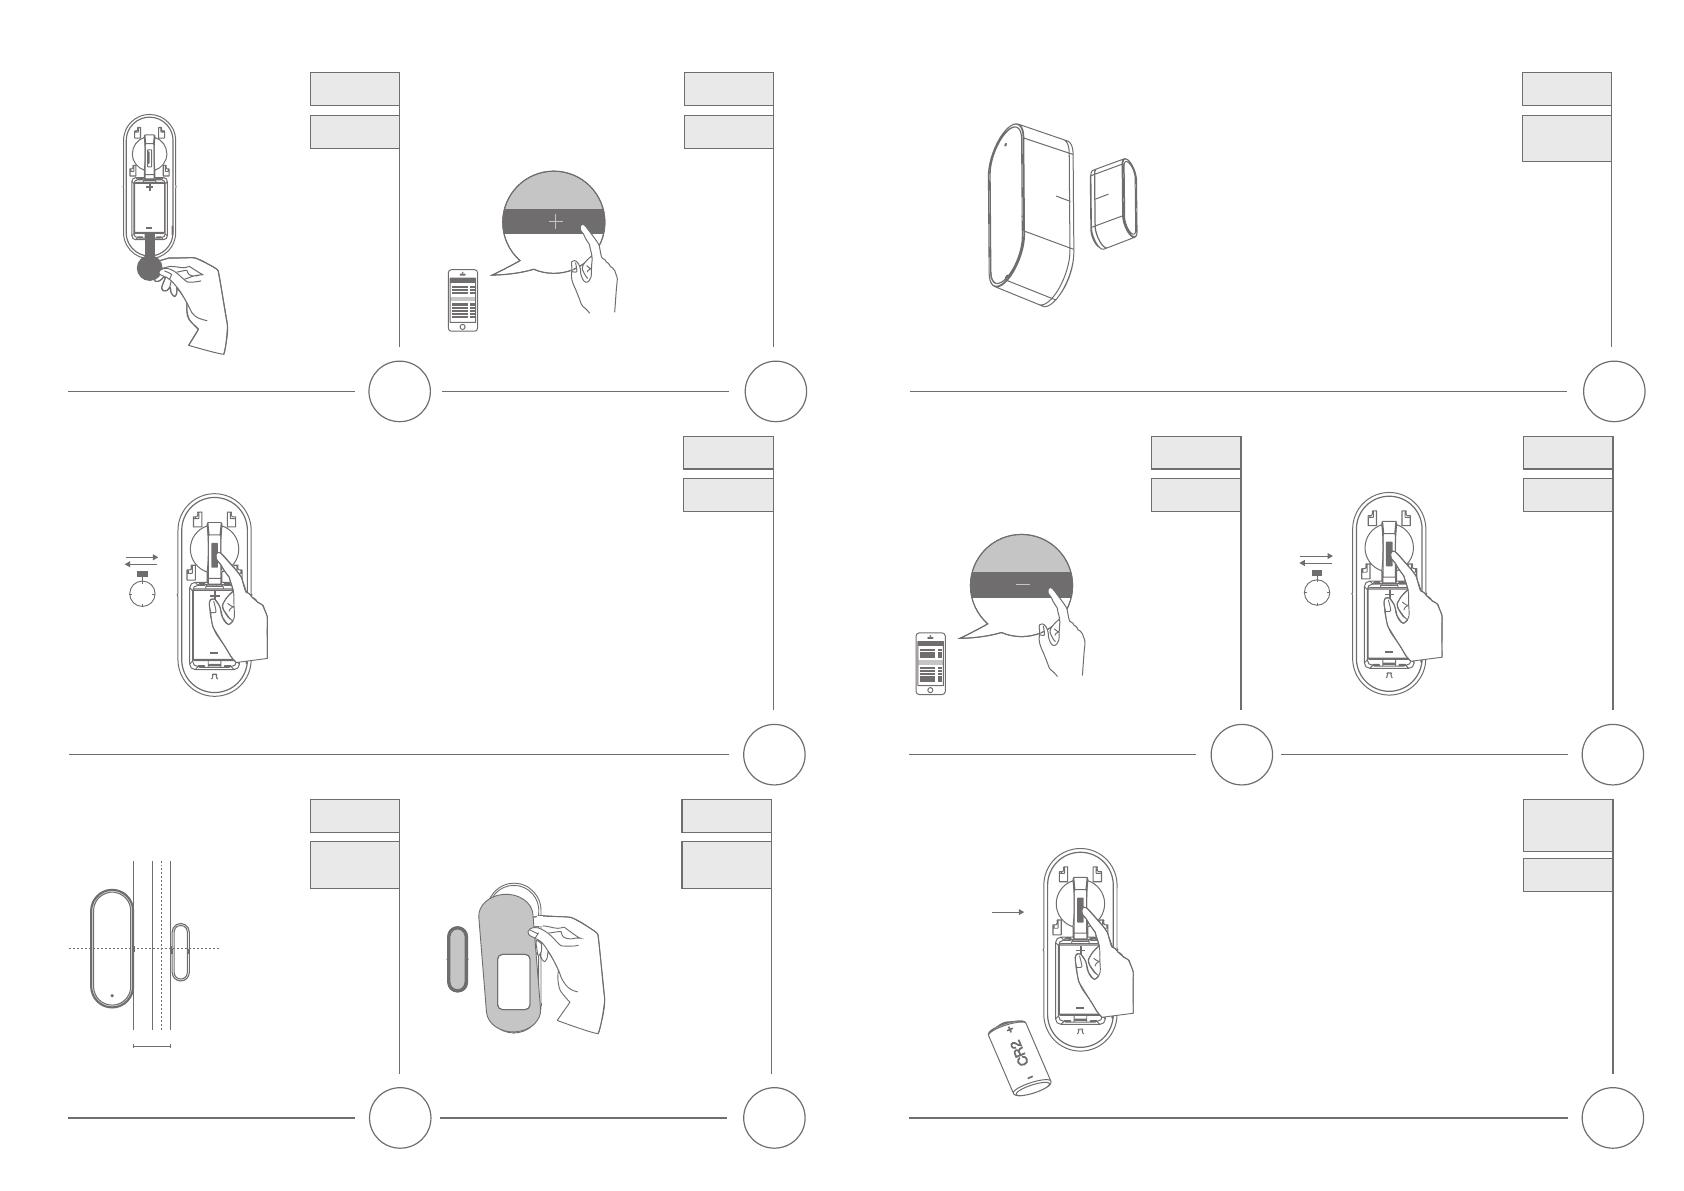
Add Device
Gerät einlernen
(Inclusion)
1.21.1
• Schieben Sie die
Montageplatte
vom Sensor und
entfernen den
Sicherungsstreifen
am Batteriefach.
• Slide the sensor
from the mounting
plate and remove
the safety strip
from the battery
compartment.
Add Device
Gerät einlernen
(Inclusion)
• Drücken Sie in
ihrer Z-Wave App
auf die + (Add)
Taste und folgen
den Anweisungen.
• Click the + (Add)
button in your
Z-Wave App and
follow the further
instructions.
1.3
Add Device
Gerät einlernen
(Inclusion)
• Drücken Sie innerhalb von 1.5 Sekunden 3mal
die Sabotage-Taste. Darauin leuchtet die
Status-LED auf der Sensorvorderseite 3mal auf.
• Der erfolgreiche Einlerne-Vorgang wird in der
App angezeigt und die die LED erlischt.
• Press the Tamper-button 3 times within
1.5 seconds and the Status-LED on the Sensor
front side will ash 3 times.
• The App will show if the Add device process was
successful and the Status-LED will turn o.
1.5
sec
3x
2.1
max. 15 mm
Installation &
Operating the
device
Montage &
Gerätebetrieb
• Testen Sie vorab das
Auslöseverhalten an
der gewünschten
Montageposition.
• Der Magnet sollte
maximal 15 mm vom
Sensor entfernt
montiert werden.
• Check the triggering
function prior to
installation at the
preferred mounting
position.
• Maximum distance
between Sensor and
magnet should
be 15 mm.
2.2
• Entfernen Sie
die Klebestreifen-
abdeckung vom
Sensor und Magneten
und befestigen diese
an der gewünschten
Position.
• Tear o the
double-side tape
and x the Sensor
and magnet at the
preferred position.
Installation &
Operating the
device
Montage &
Gerätebetrieb
2.3
• Richten Sie den Magneten mittig am Sensor
aus (siehe Markierungsstreifen).
• Beim Önen bzw. Schließen des Sensors
leuchtet die Status-LED 1x auf.
• Align the magnet centrally to the sensor.
(check the Alingment mark).
• The status-LED lights up one time when
the sensor is opened or closed.
Installation &
Operating the
device
Montage &
Gerätebetrieb
3.1
Remove Device
(Exclusion)
Gerät
auslernen
• Drücken Sie in ihrer
Z-Wave App auf
die - (Remove) Taste
und folgen den
Anweisungen.
• Click the – (Remove)
button in your Z-Wave
App and follow the
further instructions.
3.2
1.5
sec
3x
Remove Device
(Exclusion)
Gerät
auslernen
• Drücken Sie innerhalb
von 1.5 Sekunden 3mal
die Sabotage-Taste.
• Der erfolgreiche
Auslernprozess wird
in der App angezeigt
und die Status-LED
am Sensor leuchtet
6mal auf.
• Press the Tamper-button
3 times within 1.5
seconds.
• The App will show if the
Remove Device process
was successful and the
Status-LED on device
will ash 6 times.
4
• Halten Sie die Sabotagetaste gedrückt
während Sie die Batterie einsetzen.
• Das Gerät ist jetzt auf Werkseinstellungen
zurückgesetzt.
• Keep pressing the Tamper-Switch while
inserting the Battery.
• The device is now restored to factory settings.
Factory Reset
Werksein-
stellungen
zurücksetzen

