Canon Pixma TS300 series Bedienungsanleitung

Kategorie
Spielzeuge
Typ
Bedienungsanleitung
Aloitusopas
Lue Turvallisuus ja tärkeitä tietoja
(lisähuomautus) ensin.
Før du begynder
Læs Sikkerhedsoplysninger og vigtige
oplysninger (tillæg) først.
Komme i gang
Les Sikkerhetsinformasjon og viktig
informasjon (tillegg) først.
Uppstartsguide
Läs Information om säkerhet och annan viktig
information (bilaga) först.
Ξεκινώντας
Διαβάστε πρώτα τις Πληροφορίες για την ασφάλεια
και σημαντικές πληροφορίες (συμπλήρωμα).
Guía de inicio
Lea primero Información de seguridad e
información importante (apéndice).
Para Começar
Leia Informações Importantes e Sobre
Segurança (adendo) primeiro.
Guida Rapida
Leggere preventivamente le Informazioni
importanti e sulla sicurezza (appendice).
Aan de Slag-gids
Lees eerst Veiligheidsinformatie en belangrijke
informatie (addendum).
Inbetriebnahme
Lesen Sie Sicherheitsinformationen und
wichtige Hinweise (Anhang) zuerst.
Démarrage
Lire Sécurité et informations importantes
(addendum) en premier.
Getting Started
Read Safety and Important Information
(addendum) rst.
1
2
Tulostimen asennus ..................................................................................sivu 1
Yhdistäminen tietokoneeseen ja älypuhelimeen/tablet-tietokoneeseen .... sivu 4
Tulostimen pitäminen Havainnollistavat videot
Installation af printeren ..............................................................................side 1
Tilslutning med computer og smartphone/tablet ........................................side 4
Sådan holder du printeren Forklarende lm
Installere skriveren ....................................................................................side 1
Koble til datamaskin og smarttelefon/nettbrett ..........................................side 4
Hvordan holde skriveren Forklarende lmer
Installera skrivaren ....................................................................................sida 1
Ansluta med dator och smarttelefon/surfplatta ..........................................sida 4
Hur du håller skrivaren Förklarande lmer
Εγκατάσταση του εκτυπωτή ..................................................................σελίδα 1
Σύνδεση με υπολογιστή και Smartphone/Tablet ....................................σελίδα 4
Πώς να κρατάτε τον εκτυπωτή Επεξηγηματικές ταινίες
Instalación de la impresora................................................................... página 1
Conexión con el ordenador y con el teléfono inteligente o la tableta ... página 4
Cómo sujetar la impresora Películas explicativas
Instalando a impressora ....................................................................... página 1
Conectando a um computador e smartphone/tablet ............................ página 4
Como segurar a impressora Filmes explicativos
Installazione della stampante ............................................................... pagina 1
Connessione con computer e smartphone/tablet ................................. pagina 4
Come sospendere la stampante Filmati esplicativi
De printer installeren ............................................................................ pagina 1
Verbinden met een computer en smartphone/tablet............................. pagina 4
De printer vasthouden Films met uitleg
Installation des Druckers .........................................................................Seite 1
Herstellen einer Verbindung mit einem Computer und Smartphone/Tablet ......Seite 4
Halten des Druckers Anleitungsvideos
Installation de l'imprimante ...................................................................... page 1
Connexion avec un ordinateur et un smartphone ou une tablette ........... page 4
Manipulation de l'imprimante Vidéos explicatives
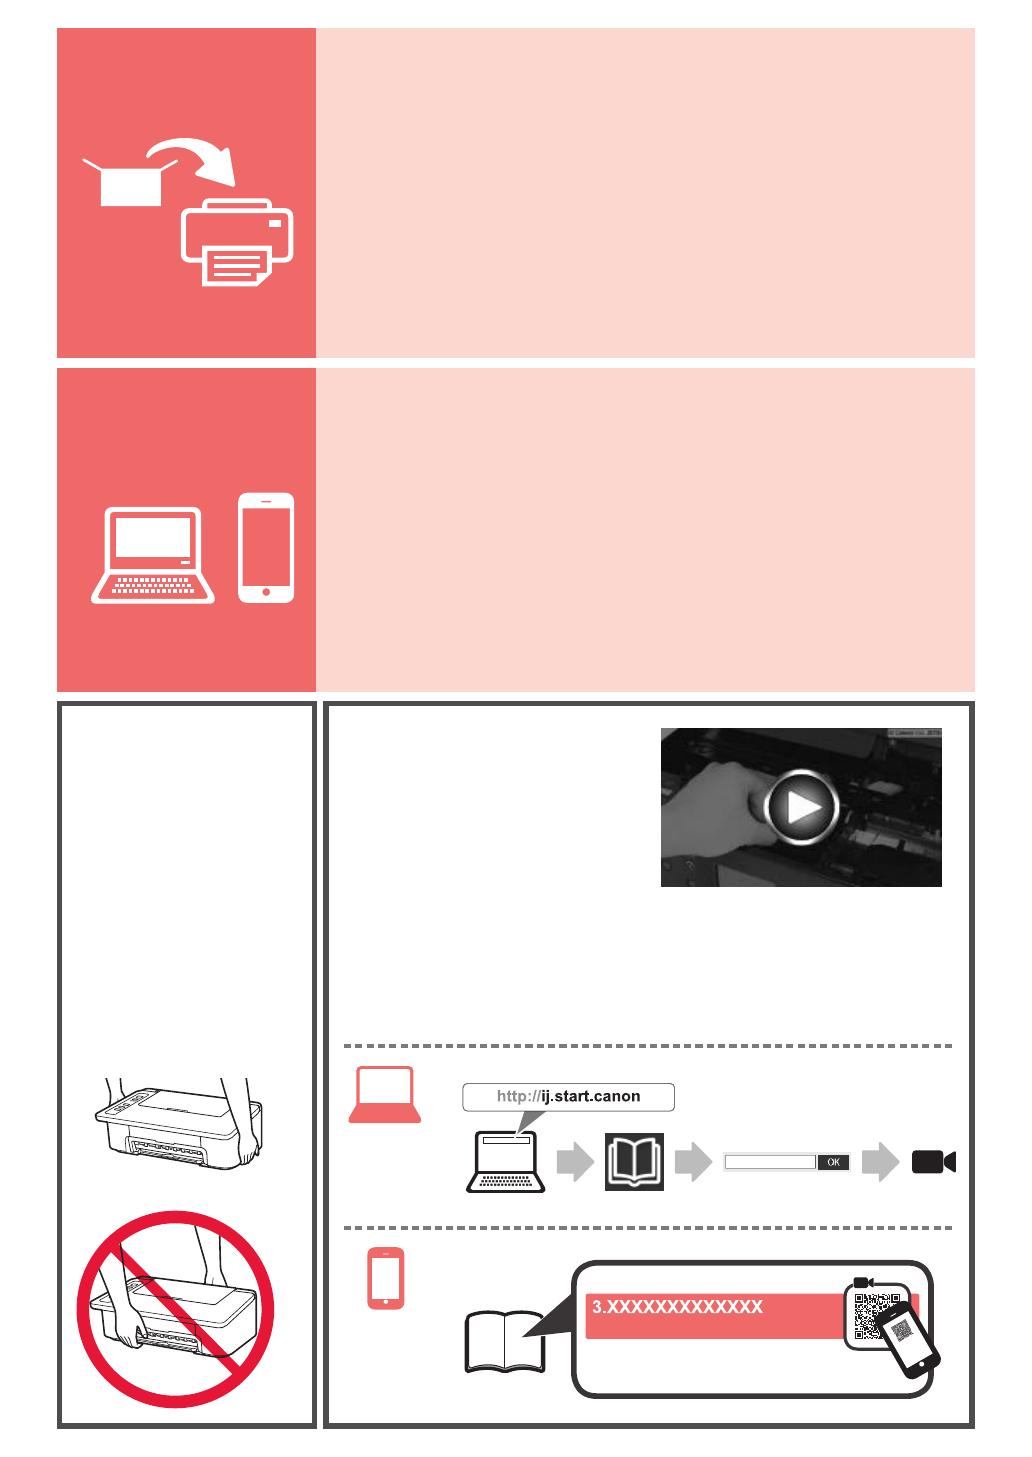
Installing the Printer ................................................................................. page 1
Connecting with Computer and Smartphone/Tablet ................................ page 4
How to Hold Printer Explanatory Movies
1
ENGLISH
1. Unpack Box
Power cord FINE cartridge
Safety and Important Information
Getting Started (this manual)Setup CD-ROM for
Windows PC
2. Remove Tape and Turn on
1
Stand the printer on its back and remove the
orange tape stuck to the bottom of it. Return the
printer to its original position.
a
b
c
2
Remove the packing materials (such as orange
tape) from outside the printer.
3
Open the cover.
4
Remove the orange tape and the protective
material and discard them both.
5
Close the cover.
6
Connect the power cord.
Do not connect any cables except the power cord yet.
7
Press the ON/Stop button.
The ON lamp lights.
Lit
If the Alarm lamp (A) ashes 9 times at a time,
press the ON/Stop button to turn off the power,
and then try again from step 3 of chapter 2
"Remove Tape and Turn on".
If the Alarm lamp (A) ashes 4 times at a time,
proceed to the next step as it is.
(A)
Flashing
2
3. Install Inks
1
Open the cover.
2
aTake out the Color FINE cartridge from the
package.
bRemove the protective tape.
a
Do not touch.
b
Be careful of ink on the protective tape.
3
aInsert the Color FINE cartridge into the FINE
cartridge holder on the left at a slight upward
angle.
bPush the FINE cartridge in and up rmly until it
snaps into place.
Make sure that the FINE cartridge is installed
horizontally.
Do not bump it against
the surrounding parts.
Click!
a
b
3
ENGLISH
4
Repeat steps 2 to 4 and install the Black FINE
cartridge as well, on the right.
5
Close the cover.
If the Alarm lamp ashes 4 times at a time, go
back to step 3 of chapter 3 "Install Inks" and check
whether the FINE cartridges for Color and Black are
installed correctly.
4. Load Paper
1
Open the paper support.
2
Slide the paper guide to the left.
3
Load plain LTR or A4 size paper against the right
edge with the print side facing up.
4
Slide the paper guide to align it with the side of the
paper stack.
5
Pull out the paper output tray and output tray
extension.
4
5. Preparing for Connection
From here on, the procedure differs depending on the device used to connect to the printer.
First, after checking that the Wireless lamp is ashing 2 times at a time, proceed to the following operations.
In the following description, smartphones and tablet devices are collectively described as smartphone.
When the Wireless lamp does not ash, try again
from chapter 2 "Remove Tape and Turn on".
Wireless
Flashing
To use the printer by connecting only to a computer or both to a computer and smartphone
"6-A. Connecting to Computer"
To use the printer by connecting only to a smartphone
"6-B. Connecting to Smartphone" on page 6
6-A. Connecting to Computer
macOS
Windows
You need a connection setup for each computer. Proceed with the setup from step 1 for each computer.
1
Start the setup le for either method or method .
aOpen a web browser ( etc.) on your computer.
bInput the following URL and access the Canon
website.
cSelect Set Up.
dInput the model name of your printer and click OK.
You can select a model name from the list.
eClick Setup.
The procedures for Windows and macOS are shown
below. If you are using a computer with an OS other
than Windows or macOS, such as a Chrome OS, do
the setup according to the on-screen instructions.
fClick Download and download the setup le.
gExecute the downloaded le.
Proceed to step on the next page to
continue.
Downloading from the Internet
5
ENGLISH
The connection with your computer is now complete. You can print from your
computer.
If the following screen appears, click Exit.
Follow the on-screen
instructions to proceed
with the setup.
Using Setup CD-ROM (Windows Only)
aLoad the Setup CD-ROM in your computer.
When using Windows 10 or Windows 8.1:
bWhen the following message appears on the right
side of your computer screen, click it.
cIf the following screen appears, click Run
Msetup4.exe.
dIf the User Account Control dialog box appears,
click Yes.
When This Message Does Not Appear (or Has
Disappeared)
1. Click File Explorer on the taskbar.
or
2. Click This PC on the left side of the opened window.
3. Double-click the
CD-ROM icon on the right side of
the window.
If the contents of the CD-ROM appear, double-click
Msetup4.exe.
4. Proceed to step d.
When using Windows 7:
b When the AutoPlay screen appears, click Run
Msetup4.exe.
c If the User Account Control dialog box appears,
click Continue.
When AutoPlay Screen Does Not Appear
1. Click Computer from the start menu.
2. Double-click the
CD-ROM icon on the right side of
the opened window.
If the contents of the CD-ROM appear, double-click
Msetup4.exe.
Proceed to step to continue.
2
Click Start Setup.
6
6-B. Connecting to Smartphone
Android
iOS
You need a connection setup for each smartphone. Proceed with the setup from step 1 for each smartphone.
Preparation
Turn on Wi-Fi on your smartphone.
If you have a wireless router, connect your smartphone to the wireless router you want to connect to the printer.
* For operations, refer to manuals of your smartphone and the wireless router or contact those manufacturers.
1
Install the application software Canon PRINT Inkjet/SELPHY in your smartphone.
: Search "Canon PRINT" in App Store.
: Search "Canon PRINT" in Google Play.
Or access the Canon website by scanning the QR code.
* You may not connect your smartphone to the Internet wirelessly during connecting the printer to the smartphone directly.
In that case, you may be charged depending on the contract with your service provider.
* Up to 5 devices can be connected to the printer via wireless LAN connection directly.
2
Check the Wireless lamp, and then proceed to or .
aTap the installed application software.
bFollow the on-screen instructions to register the
printer.
cMake sure that the following screen appears.
The connection with your smartphone is
now complete. You can print from your
smartphone.
To print photos, load photo paper. Proceed to "Loading
Photo Paper" on page 8.
If the Wireless lamp is not lit and the Network
lamp is lit, the printer cannot send transmissions
using a Wireless LAN connection. For details,
access "http://ij.start.canon" to see the
"Frequently Asked Questions".
Wireless
Network
Lit
Off or ashing (continue to )
Lit (continue to
)
Wireless
7
ENGLISH
Procedures below vary depending on iOS or Android. Select your operating system and proceed to its
procedure.
aTap Settings on your smartphone's home screen,
and tap Canon_ij_XXXX in the Wi-Fi settings.
If Canon_ij_XXXX does not appear on the list, see
"Troubleshooting" below to operate the printer, and
then repeat step a.
bTap the installed application software.
cFollow the on-screen instructions to register the
printer.
Follow the on-screen instructions to proceed
with the setup.
If you select Auto Select Conn. Method
(recommended) on the connection method
selecting screen, the appropriate connection
method is selected automatically depending on
your environment.
dMake sure that the following screen appears.
aTap the installed application software.
bFollow the on-screen instructions to register the
printer.
If a message saying "Printer is not registered.
Perform printer setup?" does not appear, see
"Troubleshooting" below to operate the printer, and
then wait for a while until the message appears.
Follow the on-screen instructions to proceed
with the setup.
The appropriate connection method is selected
depending on your environment.
cMake sure that the following screen appears.
The connection with your smartphone is now complete. You can print from your
smartphone.
To print photos, load photo paper. Proceed to "Loading Photo Paper" on page 8.
aPress and hold the Direct button on the printer for about 2 seconds until the Direct lamp starts to ash.
Flashing
bReturn to the operation of your smartphone.
Troubleshooting
Printer is not found from your smartphone.
8
1
Open the paper support.
2
Slide the paper guide to the left.
3
aLoad photo paper against the right edge with
the print side facing up.
bSlide the paper guide to align it with the side
of the paper stack.
a
b
4
Conrm that the Paper lamp that is lit matches
the paper size that is loaded.
LTR/
4"
×
6"/10
×
15cm
A4/Hagaki/L
If the Paper lamp that lights does not match the
paper size, press the Paper Select button.
5
Pull out the paper output tray and output tray
extension.
Loading Photo Paper
Smartphone Copy
You can copy documents by using the Canon PRINT Inkjet/SELPHY application software for
smartphones. To install the application, refer to step 1 on page 6. For the operation procedure, refer
to the Online Manual.
1
Load the document on the
printer.
2
Take a photo of the document
by using Canon PRINT Inkjet/
SELPHY.
3
Send the image data to the
printer and print it.
1
FRANÇAIS
1. Déballage
Cordon d'alimentation Cartouche FINE
Sécurité et informations importantes
Démarrage (ce manuel)CD-ROM d'installation
pour Windows PC
2. Retrait de la bande et mise
sous tension
1
Mettez l'imprimante en position verticale sur la
partie arrière et retirez la bande orange collée sur
le dessous. Remettez l'imprimante en place.
a
b
c
2
Retirez les matériaux d'emballage
(tels que la bande orange) de l'imprimante.
3
Ouvrez le capot.
4
Retirez la bande orange et le matériau protecteur
et jetez-les.
5
Refermez le capot.
6
Branchez le cordon d'alimentation.
Ne branchez aucun câble pour le moment,
à l'exception du cordon d'alimentation.
7
Appuyez sur le bouton MARCHE/Arrêt (ON/Stop).
Le voyant MARCHE (ON) s'allume.
Si le voyant Alarme (Alarm) (A) clignote 9 fois,
appuyez sur le bouton MARCHE/Arrêt (ON/Stop)
pour mettre l'imprimante hors tension et recommencez
la procédure à partir de l'étape 3 du chapitre 2
« Retrait de la bande et mise sous tension ».
Si le voyant Alarme (Alarm) (A) clignote 4 fois,
passez à l'étape suivante.
(A)
Clignotant
Allumé
2
3. Installation de l'encre
1
Ouvrez le capot.
2
aSortez la cartouche FINE couleur de la boîte.
bRetirez le ruban protecteur.
a
Ne pas toucher.
b
Faites attention à l'encre se trouvant sur le ruban protecteur.
3
aInsérez la cartouche FINE couleur dans
le porte-cartouche FINE sur la gauche
en l'inclinant légèrement vers le haut.
bPoussez fermement la cartouche FINE
vers le bas puis vers le haut jusqu'à entendre
un déclic.
Assurez-vous que la cartouche FINE est installée
horizontalement.
Ne cognez pas la
cartouche contre les bords.
Clic !
a
b
3
FRANÇAIS
4
Répétez les étapes 2 à 4 et installez la cartouche
FINE noire également, sur la droite.
5
Refermez le capot.
Si le voyant Alarme (Alarm) clignote 4 fois,
revenez à l'étape 3 de la section 3 « Installation de
l'encre » et vériez si les cartouches FINE couleur
et noir sont installées correctement.
4. Chargement du papier
1
Ouvrez le support papier.
2
Faites glisser le guide papier vers la gauche.
3
Chargez du papier ordinaire au format LTR ou A4
le long du bord droit face à imprimer vers le haut.
4
Faites glisser le guide papier de manière à l'aligner
avec le côté de la pile de papier.
5
Retirez le bac de sortie papier et l'extension du
bac de sortie papier.
4
5. Préparation de la connexion
À partir de ce point, la procédure diffère selon le périphérique utilisé pour se connecter à l'imprimante.
Tout d'abord, après avoir vérié que le voyant Sans l (Wireless) clignote 2 fois, procédez aux opérations suivantes.
Dans la description suivante, les smartphones et les tablettes sont regroupés sous le terme smartphone.
Lorsque le voyant Sans l (Wireless) ne clignote
pas, faites une nouvelle tentative à partir du chapitre 2
« Retrait de la bande et mise sous tension ».
Wireless
Clignotant
Pour utiliser l'imprimante en la connectant uniquement à un ordinateur, ou à la fois à un ordinateur et à un smartphone
« 6-A. Connexion à un ordinateur »
Pour utiliser l'imprimante en la connectant uniquement à un smartphone
« 6-B. Connexion à un smartphone », à la page 6
6-A. Connexion à un ordinateur
macOS
Windows
Vous devez congurer une connexion pour chaque ordinateur. Effectuez la conguration à partir de l'étape 1 pour chaque ordinateur.
1
Démarrez le chier de conguration pour la méthode ou la méthode .
aOuvrez un navigateur Web ( etc.) sur votre ordinateur.
bEntrez l'URL suivante et accédez au site Web Canon.
cSélectionnez Conguration.
dEntrez le nom de modèle de votre imprimante et
cliquez sur OK.
Vous pouvez sélectionner un nom de modèle à partir de la liste.
eCliquez sur Conguration.
Les procédures pour Windows et macOS sont
présentées ci-dessous. Si vous utilisez un ordinateur
équipé d'un système d'exploitation autre que
Windows ou macOS, Chrome OS, par exemple,
procédez à la conguration en fonction des
instructions qui s'afchent à l'écran.
fCliquez sur Télécharger et téléchargez le chier de
conguration.
gExécutez le chier téléchargé.
Poursuivez avec l'étape à la page
suivante pour continuer.
Téléchargement depuis Internet
5
FRANÇAIS
Utilisation du CD-ROM d'installation (Windows uniquement)
aChargez le CD-ROM d'installation dans votre ordinateur.
Si vous utilisez Windows 10 ou Windows 8.1 :
bLorsque le message suivant apparaît sur la droite
de l'écran de l'ordinateur, cliquez dessus.
cSi l'écran suivant s'afche, cliquez sur
Exécuter Msetup4.exe.
dSi la boîte de dialogue Contrôle de compte
d'utilisateur apparaît, cliquez sur Oui.
Lorsque ce message n'apparaît pas (ou n'est plus afché)
1. Cliquez sur Explorateur de chiers dans la barre
des tâches.
ou
2.
Cliquez sur Ce PC dans la partie gauche de la fenêtre ouverte.
3. Double-cliquez sur l'icône CD-ROM dans la partie
droite de la fenêtre.
Si le contenu du CD-ROM s'afche, double-cliquez
sur Msetup4.exe.
4. Passez à l'étape d.
Si vous utilisez Windows 7 :
b Lorsque l'écran Lecture automatique apparaît,
cliquez sur Exécuter Msetup4.exe.
c Si la boîte de dialogue Contrôle de compte
d'utilisateur apparaît, cliquez sur Continuer.
Lorsque l'écran Lecture automatique ne s'afche pas
1. Cliquez sur Ordinateur à partir du menu Démarrer.
2. Double-cliquez sur
l'icône CD-ROM dans la partie
droite de la fenêtre ouverte.
Si le contenu du CD-ROM s'afche, double-cliquez
sur Msetup4.exe.
Poursuivez avec l'étape pour continuer.
Suivez les instructions
à l'écran pour poursuivre
la conguration.
Si l'écran suivant s'afche, cliquez sur Quitter.
La connexion avec votre ordinateur est terminée. Vous pouvez imprimer à partir
de votre ordinateur.
2
Cliquez sur Commencer la conguration.
6
6-B. Connexion à un smartphone
Android
iOS
Vous devez congurer une connexion pour chaque smartphone. Effectuez la conguration à partir de l'étape 1 pour
chaque smartphone.
Préparation
Activez Wi-Fi sur votre smartphone.
Si vous avez un routeur sans l, connectez votre smartphone au routeur sans l que vous voulez connecter à l'imprimante.
* Pour le fonctionnement, reportez-vous aux manuels de votre smartphone et du routeur sans l ou prenez contact avec les
fabricants.
1
Installez le logiciel d'application Canon PRINT Inkjet/SELPHY sur votre smartphone.
: Recherchez « Canon PRINT » dans App Store.
: Recherchez « Canon PRINT » dans Google Play.
Vous pouvez également accéder au site Web Canon en numérisant le code QR.
* Il se peut que vous ne parveniez pas à connecter votre smartphone via une connexion sans l à Internet lorsque
l'imprimante est connectée directement au smartphone. Dans ce cas, vous risquez de devoir payer des frais en fonction
du contrat avec votre fournisseur de services.
* Jusqu'à 5 périphériques peuvent être connectés directement à l'imprimante via une connexion réseau sans l.
2
Vériez le voyant Sans l (Wireless), puis passez à l'étape ou .
aTouchez le logiciel d'application installé.
bSuivez les instructions à l'écran pour enregistrer
l'imprimante.
cAssurez-vous que l'écran suivant s'afche.
La connexion avec votre smartphone
est terminée. Vous pouvez imprimer
à partir de votre smartphone.
Pour imprimer des photos, chargez du papier photo. Passez
à la section « Chargement de papier photo », à la page 8.
Si le voyant Sans l (Wireless) n'est pas allumé
et que le voyant Réseau (Network) est allumé,
l'imprimante ne peut pas transmettre de données
via une connexion réseau local sans l. Pour plus
de détails, accédez à « http://ij.start.canon » pour
consulter la section « Foire aux questions ».
Wireless
Network
Allumé
Éteint ou clignotant (passez à l'étape )
Allumé (passez
à l'étape
)
Wireless
7
FRANÇAIS
Les procédures ci-dessous varient selon que vous utilisez iOS ou Android. Sélectionnez votre système
d'exploitation et effectuez la procédure s'y rapportant.
aTouchez Réglages sur l'écran d'accueil du
smartphone, puis touchez Canon_ij_XXXX dans
les réglages Wi-Fi.
Si Canon_ij_XXXX n'apparaît pas dans la liste,
reportez-vous à la section « Dépannage » ci-
dessous pour faire fonctionner l'imprimante, puis
répétez l'étape a.
bTouchez le logiciel d'application installé.
cSuivez les instructions à l'écran pour enregistrer l'imprimante.
Suivez les instructions à l'écran pour
poursuivre la conguration.
Si vous sélectionnez Méthode sél. auto conn.
(recommandé) dans l'écran de sélection de la
méthode de connexion, la méthode de connexion
appropriée est sélectionnée automatiquement selon
votre environnement.
dAssurez-vous que l'écran suivant s'afche.
aTouchez le logiciel d'application installé.
bSuivez les instructions à l'écran pour enregistrer
l'imprimante.
Si le message « L'imprimante n'est pas
enregistrée. Congurer l'imprimante ? »
ne s'afche pas, reportez-vous à la section
« Dépannage » ci-dessous pour faire fonctionner
l'imprimante et attendez que le message s'afche.
Suivez les instructions à l'écran pour
poursuivre la conguration.
La méthode de connexion appropriée est
sélectionnée selon votre environnement.
cAssurez-vous que l'écran suivant s'afche.
La connexion avec votre smartphone est terminée. Vous pouvez imprimer à partir
de votre smartphone.
Pour imprimer des photos, chargez du papier photo. Passez à la section « Chargement de papier photo », à la page 8.
aAppuyez sur le bouton Direct de l'imprimante et maintenez-le enfoncé pendant environ 2 secondes, jusqu'à
ce que le voyant Direct commence à clignoter.
Clignotant
bRevenez au fonctionnement de votre smartphone.
Dépannage
L'imprimante est introuvable à partir de votre smartphone.
8
1
Ouvrez le support papier.
2
Faites glisser le guide papier vers la gauche.
3
aChargez du papier photo le long du bord
droit face à imprimer vers le haut.
bFaites glisser le guide papier de manière
à l'aligner avec le côté de la pile de papier.
a
b
4
Conrmez que le voyant Papier (Paper)
allumé correspond au format du papier chargé.
LTR/
4"
×
6"/10
×
15cm
A4/Hagaki/L
Si le voyant Papier (Paper) qui s'allume ne
correspond pas au format du papier, appuyez sur
le bouton Sélectionner le papier (Paper Select).
5
Retirez le bac de sortie papier et l'extension
du bac de sortie papier.
Chargement de papier photo
Copie smartphone
Vous pouvez copier des documents par l'intermédiaire du logiciel d'application Canon PRINT Inkjet/
SELPHY pour smartphones. Pour installer l'application, reportez-vous à l'étape 1, à la page 6.
Pour la procédure de fonctionnement, reportez-vous au Manuel en ligne.
1
Chargez le document
sur l'imprimante.
2
Prenez une photo du
document avec Canon PRINT
Inkjet/SELPHY.
3
Envoyez les données
de l'image à l'imprimante
et imprimez-les.
1
DEUTSCH
1. Box auspacken
Netzkabel FINE-Patrone
Sicherheitsinformationen
und wichtige Hinweise
Inbetriebnahme (dieses Handbuch)Installations-CD-ROM
für Windows-PCs
2. Klebeband entfernen und
einschalten
1
Stellen Sie den Drucker auf die Rückseite und
entfernen Sie das orangefarbene Klebeband
am Boden des Druckers. Bringen Sie den Drucker
wieder in die ursprüngliche Position.
a
b
c
2
Entfernen Sie das Verpackungsmaterial (z. B.
orangefarbenes Klebeband) außen am Drucker.
3
Öffnen Sie die Abdeckung.
4
Entfernen Sie das orangefarbene Klebeband
und das Schutzmaterial und entsorgen Sie beides.
5
Schließen Sie die Abdeckung.
6
Schließen Sie das Netzkabel an.
Schließen Sie außer dem Netzkabel noch keine Kabel an.
7
Drücken Sie die Taste EIN/Stopp (ON/Stop).
Die EIN (ON)-Anzeige leuchtet.
Wenn die Alarm-Anzeige (A) 9-mal hintereinander
aufblinkt, drücken Sie die EIN/Stopp (ON/Stop)-
Taste, um den Drucker auszuschalten, und
wiederholen Sie den Vorgang ab Schritt 3 des
Kapitels 2 "Klebeband entfernen und einschalten".
Wenn die Alarm-Anzeige (A) 4-mal blinkt, fahren Sie
mit dem nächsten Schritt fort.
(A)
Blinken
Leuchten
2
3. Tinten installieren
1
Öffnen Sie die Abdeckung.
2
aNehmen Sie die farbige FINE-Patrone aus der
Verpackung.
bEntfernen Sie das Schutzband.
a
Nicht berühren.
b
Achten Sie auf Tintenspuren auf dem Schutzband.
3
aSetzen Sie die FINE-Farbpatrone mit einem
leichten Aufwärtswinkel in die FINE-Patronen-
Halterung auf der linken Seite ein.
bDrücken Sie die FINE-Patrone hinein und fest
nach oben, bis sie hörbar einrastet.
Stellen Sie sicher, dass die FINE-Patrone horizontal
eingesetzt ist.
Stoßen Sie mit der
Patrone nicht gegen
die umgebenden Teile.
Klicken Sie!
a
b
  • Page 1 1
  • Page 2 2
  • Page 3 3
  • Page 4 4
  • Page 5 5
  • Page 6 6
  • Page 7 7
  • Page 8 8
  • Page 9 9
  • Page 10 10
  • Page 11 11
  • Page 12 12
  • Page 13 13
  • Page 14 14
  • Page 15 15
  • Page 16 16
  • Page 17 17
  • Page 18 18
  • Page 19 19
  • Page 20 20
  • Page 21 21
  • Page 22 22
  • Page 23 23
  • Page 24 24
  • Page 25 25
  • Page 26 26
  • Page 27 27
  • Page 28 28
  • Page 29 29
  • Page 30 30
  • Page 31 31
  • Page 32 32
  • Page 33 33
  • Page 34 34
  • Page 35 35
  • Page 36 36
  • Page 37 37
  • Page 38 38
  • Page 39 39
  • Page 40 40
  • Page 41 41
  • Page 42 42
  • Page 43 43
  • Page 44 44
  • Page 45 45
  • Page 46 46
  • Page 47 47
  • Page 48 48
  • Page 49 49
  • Page 50 50
  • Page 51 51
  • Page 52 52
  • Page 53 53
  • Page 54 54
  • Page 55 55
  • Page 56 56
  • Page 57 57
  • Page 58 58
  • Page 59 59
  • Page 60 60
  • Page 61 61
  • Page 62 62
  • Page 63 63
  • Page 64 64
  • Page 65 65
  • Page 66 66
  • Page 67 67
  • Page 68 68
  • Page 69 69
  • Page 70 70
  • Page 71 71
  • Page 72 72
  • Page 73 73
  • Page 74 74
  • Page 75 75
  • Page 76 76
  • Page 77 77
  • Page 78 78
  • Page 79 79
  • Page 80 80
  • Page 81 81
  • Page 82 82
  • Page 83 83
  • Page 84 84
  • Page 85 85
  • Page 86 86
  • Page 87 87
  • Page 88 88
  • Page 89 89
  • Page 90 90
  • Page 91 91
  • Page 92 92
  • Page 93 93
  • Page 94 94
  • Page 95 95
  • Page 96 96
  • Page 97 97
  • Page 98 98
  • Page 99 99
  • Page 100 100

Canon Pixma TS300 series Bedienungsanleitung

Kategorie
Spielzeuge
Typ
Bedienungsanleitung