
LED-UNTERBAULEUCHTE MIT FARBTONWAHL
/ LED UNDER-
CABINET LIGHT WITH ADJUSTABLE LIGHT COLOUR /
RÉGLETTE SOUS MEUBLE LED À BLANC VARIABLE
LED-UNTERBAULEUCHTE MIT
FARBTONWAHL
Montage-, Bedienungs- und Sicherheitshinweise
LED UNDER-CABINET LIGHT WITH
ADJUSTABLE LIGHT COLOUR
Installation, operating and safety information
RÉGLETTE SOUS MEUBLE LED À
BLANC VARIABLE
Manuel de montage, d‘utilisation et consignes de sécurité
LED-ONDERBOUWLAMP MET
KLEURENKEUZE
Montage-, bedienings- en veiligheidsinstructies
IAN 366591_2101
LED SVÍTIDLO S NASTAVITELNÝMI
BAREVNÝMI ODSTÍNY
Pokyny k montáži, obsluze a bezpečnostní pokyny
LAMPA LED DO ZABUDOWY Z
MOŻLIWOŚCIĄ WYBORU KOLORU
Wskazówki dotyczące montażu, obsługi i bezpieczeństwa
LED-UNDERB YGNINGSLAMPE
M/JUSTERBAR FARVENUANCE
Montage-, betjenings- og sikkerhedshenvisninger
SVIETIDLO POD SKRINKU S FAREBNÝM LED
Návod na montáž, obsluhu a bezpečnostné pokyny
REGLETA LED BAJO MUEBLE
CON TONOS DE LUZ
Instrucciones de montaje, uso y seguridad

DE / AT / CH Montage-, Bedienungs- und Sicherheitshinweise Seite 5
GB / IE Installation, operating and safety information Page 13
FR / BE Manuel de montage, d‘utilisation et consignes de sécurité Page 21
NL / BE Montage-, bedienings- en veiligheidsinstructies Pagina 29
PL Wskazówki dotyczące montażu, obsługi i bezpieczeństwa Strona 37
CZ Pokyny k montáži, obsluze a bezpečnostní pokyny Strana 45
SK Návod na montáž, obsluhu a bezpečnostné pokyny pokyny Strana 53
ES Instrucciones de montaje, uso y seguridad Página 61
DK Montage-, betjenings- og sikkerhedshenvisninger Side 69
Klappen Sie vor dem Lesen die Seite mit den Abbildungen aus und machen Sie sich anschließend mit allen
Funktionen des Gerätes vertraut.
Before reading, unfold the page containing the illustrations and familiarise yourself with all functions of the
device.
Avant de lire le mode d‘emploi, ouvrez la page contenant les illustrations et familiarisez-vous ensuite avec
toutes les fonctions de l‘appareil.
Vouw vóór het lezen de pagina met de afbeeldingen open en maak u vertrouwd met alle functies van het
apparaat.
Przed przeczytaniem proszę rozłożyć stronę z ilustracjami, a następnie proszę zapoznać się z wszystkimi
funkcjami urządzenia.
Před čtením si otevřete stranu s obrázky a potom se seznamte se všemi funkcemi přístroje.
Pred čítaním si odklopte stranu s obrázkami a potom sa oboznámte so všetkými funkciami prístroja.
Antes de empezar a leer abra la página que contiene las imágenes y, en seguida, familiarícese con todas
las funciones del dispositivo.
Før du læser, vend siden med billeder frem og bliv bekendt med alle apparatets funktioner.

B
3 mm
A
D
C14156804L / 14156806L
13
5
1011
9
8
47
12
1
2
3
4
3
5
5
6
14
2
14156804L / 14156806L
14156804L / 14156806L


5 DE/AT/CH
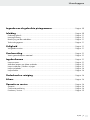
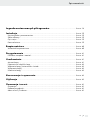
Inhaltsverzeichnis
Legende der verwendeten Piktogramme ........................................................... Seite 6
Einleitung ......................................................................................................................................... Seite 7
Bestimmungsgemäße Verwendung ....................................................................................................Seite 7
Lieferumfang ........................................................................................................................................ Seite 7
Teilebeschreibung ...............................................................................................................................Seite 7
Technische Daten ................................................................................................................................Seite 7
Sicherheit ......................................................................................................................................... Seite 8
Sicherheitshinweise .............................................................................................................................Seite 8
Vorbereitung ................................................................................................................................Seite 9
Benötigtes Werkzeug und Material ...................................................................................................Seite 9
Inbetriebnahme ......................................................................................................................... Seite 9
Leuchte montieren ...............................................................................................................................Seite 9
Mehrere Leuchten miteinander verbinden ......................................................................................... Seite 9
Leuchte einschalten / Lichtfarbe wechseln .........................................................................................Seite 10
Leuchte ausschalten ............................................................................................................................Seite 10
Leuchte ausrichten ............................................................................................................................... Seite 10
Wartung und Reinigung .....................................................................................................Seite 10
Entsorgung .....................................................................................................................................Seite 10
Garantie und Service ............................................................................................................Seite 11
Garantie ..............................................................................................................................................Seite 11
Konformitätserklärung .........................................................................................................................Seite 11
Hersteller / Service ..............................................................................................................................Seite 11
V2.0

6 DE/AT/CH
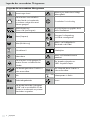
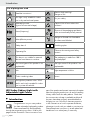
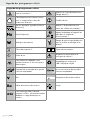
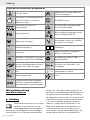
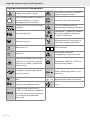
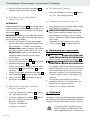
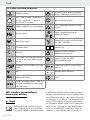
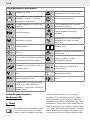
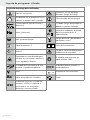
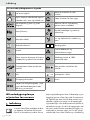
Legende der verwendeten Piktogramme
Anweisungen lesen! Warnung vor elektrischem Schlag!
Lebensgefahr!
Diese Leuchte ist ausschließlich
für den Betrieb im Innenbereich,
in trockenen und geschlossenen
Räumen geeignet.
So verhalten Sie sich richtig
Wechselspannung
(Strom- und Spannungsart)
Vorsicht! Verbrennungsgefahr durch
heiße Oberflächen!
Hertz (Frequenz)
b
a
Entsorgen Sie Verpackung
und Gerät umweltgerecht!
Watt (Wirkleistung) Lebens- und Unfallgefahr für
Kleinkinder und Kinder!
Schutzklasse II ON OFF Schaltzyklen
Lebensdauer Warn- und Sicherheitshinweise
beachten!
Diese Leuchte ist nicht geeignet für
externe Dimmer und elektronische
Schalter.
Die Verpackung besteht aus
100 % recyceltem Papier.
LED
230V
Das Betriebsgerät dieses Produkts ist
nicht austauschbar. LED LED Die Lichtquelle dieses Produkts ist
nicht austauschbar.
Volt Lichttemperatur in Kelvin
Ra Farbwiedergabeindex Lumen
IP20
Die Leuchte besitzt den Schutzgrad
„IP20“ und ist ausschließlich für den
Einsatz im Innenbereich von privaten
Haushalten vorgesehen.
Legende der verwendeten Piktogramme Einleitung

7 DE/AT/CH
LED-Unterbauleuchte mit
Farbtonwahl
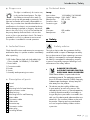
Einleitung
Wir beglückwünschen Sie zum Kauf Ihres
neuen Gerätes. Sie haben sich damit für
ein hochwertiges Produkt entschieden.
Bitte lesen Sie diese Bedienungsanleitung vollständig
und sorgfältig durch. Klappen Sie die Seite mit den
Abbildungen aus. Diese Anleitung gehört zu diesem
Produkt und enthält wichtige Hinweise zur Inbetrieb-
nahme und Handhabung. Beachten Sie immer alle
Sicherheitshinweise. Prüfen Sie vor der Inbetrieb-
nahme, ob die korrekte Spannung vorhanden ist und
ob alle Teile richtig montiert sind. Sollten Sie Fragen
haben oder unsicher in Bezug auf die Handhabung
des Gerätes sein, setzen Sie sich bitte mit Ihrem
Händler oder der Servicestelle in Verbindung. Be-
wahren Sie diese Anleitung bitte sorgfältig auf und
geben Sie sie ggf. an Dritte weiter.
Bestimmungsgemäße
Verwendung
Diese Leuchte ist ausschließlich für den
Betrieb im Innenbereich, in trockenen
und geschlossenen Räumen geeignet.
Wegen der Schalterbedienung sollte die Leuchte im
Handbereich angebracht werden. Die Leuchte kann
auf allen normal entflammbaren Oberflächen befestigt
werden. Eine andere Verwendung als zuvor be-
schrieben oder eine Veränderung des Gerätes ist
nicht zulässig und führt zur Beschädigung. Darüber
hinaus können weitere lebensgefährliche Gefahren
und Verletzungen sowie technische Fehlfunktionen
(z. B. Kurzschluss, Brand, elektrischer Schlag) die
Folge sein. Dieses Gerät ist nur für den Einsatz in
privaten Haushalten vorgesehen.
Dieses Produkt ist vorgesehen für den normalen Betrieb.
Lieferumfang
Kontrollieren Sie unmittelbar nach dem Auspacken
immer den Lieferumfang auf Vollständigkeit sowie
den einwandfreien Zustand des Gerätes.
1 LED-Unterbauleuchte mit Farbtonwahl,
Modell 14156804L / 14156806L
1 Netzkabel
1 Verbindungskabel
2 Dübel
2 Schrauben
1 Montage- und Bedienungsanleitung
Teilebeschreibung
1 Dübel
2 Schraube
3 Montageloch zur Unterbaubefestigung
4 Leuchtensteckdose
5 Leuchtengehäuse
6 Montageloch zur Wandbefestigung
7 Netzkabel
8 Verbindungskabel
9 Schiebeschalter
10 Schutzkappe
11 Verbindungssteckdose
12 Netzstecker
13 Schwenkbarer Reflektor
Technische Daten
Leuchte:
Artikel-Nummer: 14156804L / 14156806L
Betriebsspannung: 230‒240 V~, 50 Hz
Nennleistung: LED, 6,5 W
Schutzklasse: II /
Schutzart: IP20
LED:
Leuchtmittel: LED-Modul
Nennleistung: 6 W
Legende der verwendeten Piktogramme Einleitung

8 DE/AT/CH
Sicherheit
Sicherheitshinweise
Bei Schäden, die durch Nichtbeachtung dieser
Bedienungsanleitung verursacht werden, erlischt
der Garantieanspruch! Für Folgeschäden wird
keine Haftung übernommen!
Bei Sach- oder Personenschäden, die durch un-
sachgemäße Handhabung oder Nichtbeachtung
der Sicherheitshinweise verursacht werden, wird
keine Haftung übernommen!
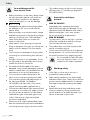
LEBENS- UND UNFALL-
GEFAHR FÜR KLEINKINDER
UND KINDER!
Lassen Sie Kinder niemals unbeaufsichtigt mit
dem Verpackungsmaterial. Es besteht Erstickungs-
gefahr durch Verpackungsmaterial. Kinder un-
terschätzen häufig die Gefahren. Halten Sie
Kinder stets vom Produkt fern.
Dieses Gerät kann von Kindern ab 8 Jahren
und darüber, sowie von Personen mit verringer-
ten physischen, sensorischen oder mentalen
Fähigkeiten oder Mangel an Erfahrung und
Wissen benutzt werden, wenn sie beaufsichtigt
oder bezüglich des sicheren Gebrauchs des
Gerätes unterwiesen wurden und die daraus
resultierenden Gefahren verstehen. Kinder dür-
fen nicht mit dem Gerät spielen. Reinigung und
Benutzerwartung dürfen nicht von Kindern ohne
Beaufsichtigung durchgeführt werden.
Vermeiden Sie Lebensgefahr
durch elektrischen Schlag
Überprüfen Sie vor jedem Netzanschluss die
Leuchte, das Netzkabel sowie ggf. das Verbin-
dungskabel auf etwaige Beschädigungen.
Benutzen Sie Ihre Leuchte niemals, wenn Sie
irgendwelche Beschädigungen feststellen.
Beschädigte Netzkabel und Verbindungskabel
bedeuten Lebensgefahr durch elektrischen Schlag.
Vergewissern Sie sich vor der Montage, dass
die vorhandene Netzspannung mit der benötigten
Betriebsspannung der Leuchte übereinstimmt
(siehe „Technische Daten“).
Vermeiden Sie unbedingt die Berührung der
Leuchte mit Wasser oder anderen Flüssigkeiten.
Öffnen Sie niemals eines der elektrischen Be-
triebsmittel (z. B. Schalter, Fassung o. Ä.) oder
stecken irgendwelche Gegenstände in dieselben.
Derartige Eingriffe bedeuten Lebensgefahr
durch elektrischen Schlag.
Fassen Sie nur den isolierten Bereich des Netz-
steckers beim Anschluss oder Trennen vom
Netzstrom an!
Die Lichtquelle dieser Leuchte ist nicht ersetzbar;
wenn die Lichtquelle das Ende ihrer Lebens-
dauer erreicht hat, ist die gesamte Leuchte zu
ersetzen.
Wenn die äußere flexible Leitung dieser Leuchte
beschädigt ist, darf sie nur durch eine spezielle
Leitung oder durch eine Leitung ersetzt werden,
die ausschließlich über den Hersteller oder
seinen Servicevertreter erhältlich ist.
Schließen Sie die Unterbauleuchte nur mit dem
Original-Netzkabel an den Netzstrom an.
Verbinden Sie nur original Unterbauleuchten des
gleichen Typs (14156804L / 14156806L).
Schließen Sie miteinander verbundene Unter-
bauleuchten nur an eine Steckdose an. Achten
Sie darauf, dass Sie nur maximal 10 Unterbau-
leuchten des gleichen Typs über eine Steckdose
zusammenschalten. Andernfalls kann es zu Über-
lastungen der Anschlüsse und Kabel kommen.
Achten Sie darauf, dass erst alle Unterbau-
leuchten mittels Verbindungskabel verbunden
sein müssen, bevor Sie den Netzstecker in die
Steckdose stecken.
Dieses Produkt enthält eine Lichtquelle der
Energieeffizienzklasse “E“ (entsprechend der
Verordnung (EU) 2019/2015).
Vermeiden Sie Brand- und
Verletzungsgefahr
VERLETZUNGSGEFAHR!
Überprüfen Sie unmittelbar nach dem Auspacken
jede Leuchte und jedes Lampenglas auf Beschä-
digungen. Betreiben Sie die Leuchte nicht mit
defekter Lichtquelle und / oder defektem
Sicherheit Sicherheit / Vorbereitung / Inbetriebnahme

9 DE/AT/CH
Lampenglas. Setzen Sie sich in diesem Fall für Er-
satz mit der Servicestelle in Verbindung.
VERBRENNUNGSGEFAHR!
Stellen Sie sicher, dass die Leuchte ausgeschaltet
und abgekühlt ist, bevor Sie diese berühren, um
Verbrennungen zu vermeiden. Leuchtmittel
entwickeln eine starke Hitze.
Dieser Artikel enthält keine Teile, die vom Ver-
braucher gewartet werden können.
Bei Betrieb nicht aus kurzem Abstand in die
LED schauen. Die LED nicht mit einem optischen
Instrument (z. B. Lupe) betrachten.
Verwenden Sie diese Leuchte nicht für
Dimmer und elektronische Schalter.
Sie ist dafür nicht geeignet.
So verhalten Sie sich richtig
Montieren Sie die Leuchte so, dass sie vor
Feuchtigkeit und Verschmutzung geschützt ist.
Bereiten Sie die Montage sorgfältig vor und
nehmen Sie sich ausreichend Zeit. Legen Sie
alle Einzelteile und zusätzlich benötigtes Werk-
zeug oder Material vorher übersichtlich und
griffbereit zurecht.
Seien Sie stets aufmerksam! Achten Sie immer
darauf was Sie tun und gehen Sie stets mit Ver-
nunft vor. Montieren Sie die Leuchte in keinem
Fall, wenn Sie unkonzentriert sind oder sich
unwohl fühlen.
Vorbereitung
Benötigtes Werkzeug
und Material
Die genannten Werkzeuge und Materialien sind
nicht im Lieferumfang enthalten. Es handelt sich hierbei
um unverbindliche Angaben und Werte zur Orien-
tierung. Die Beschaffenheit des Materials richtet
sich nach den individuellen Gegebenheiten vor Ort.
- Bleistift / Markierwerkzeug
- Schraubendreher
- Bohrmaschine
- Bohrer (Ø 6 mm)
- Wasserwaage
- Maßband
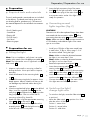
Inbetriebnahme
Leuchte montieren
Hinweis: Vergewissern Sie sich vor der Montage,
dass eine Steckdose in der Nähe ist, die mit dem
mitgelieferten Netzkabel 7 erreichbar ist.
Hinweis: Die Leuchte ist über den Schiebeschalter
9 in 3 Lichtstufen einstellbar.
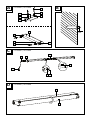
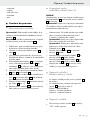
1. Vermessen Sie die Wand bzw. Montagefläche
für die Bohrungen. Verwenden Sie zur genauen
Ausrichtung eine Wasserwaage.
2. Markieren Sie den Abstand der Montagelöcher
3 oder 6.
3. Bohren Sie nun die Befestigungslöcher
(ø ca. 6 mm, Tiefe ca. 40 mm). Stellen Sie
sicher, dass Sie keine Zuleitung beschädigen.
4. Führen Sie die beigefügten Dübel 1 in die
Bohrlöcher ein. Drehen Sie die beigefügten
Schrauben 2 in die Dübel 1 ein und lassen
diese ca. 3 mm von der Wand bzw. Montage-
fläche abstehen (Abb. A und B).
5.
Befestigen Sie die Leuchte mit den entsprechenden
Montagelöchern 3 oder 6 an den Schrauben
2.
6. Wenn Sie die Leuchte über den Montagelöchern
3 befestigt haben, müssen Sie zusätzlich das
Leuchtengehäuse 5 bis zum Anschlag nach
links schieben.
7. Stecken Sie den Anschluss des Netzkabels 7
in die Leuchtensteckdose 4 (Abb. C).
8. Stecken Sie den Netzstecker 12 in die Steck-
dose. Ihre Leuchte ist nun betriebsbereit.
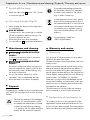
Mehrere Leuchten miteinander
verbinden (Abb. C)
VORSICHT!
Achten Sie darauf, dass erst alle Unterbauleuchten
mittels Verbindungskabel 8 verbunden sein müssen,
bevor Sie den Netzstecker 12 in die Steckdose
stecken.
Sicherheit Sicherheit / Vorbereitung / Inbetriebnahme

10 DE/AT/CH
Entsorgung / Garantie und Service
Hinweis: Achten Sie darauf, dass Sie nur maximal
10 Unterbauleuchten des gleichen Typs über eine
Steckdose zusammenschalten.
Montieren Sie bis zu 10 Leuchten des gleichen
Typs nebeneinander. Befolgen Sie dazu die
Arbeitsschritte 1.–5. des Kapitels „Leuchte
montieren“.
Hinweis: Achten Sie darauf, dass der Abstand
zwischen den Leuchten nicht größer als 15 cm ist.
Hinweis: Achten Sie darauf, dass der Abstand
zwischen den Leuchten nicht kleiner als 10 cm ist.
Entfernen Sie die Schutzkappe 10 .
Stecken Sie das Verbindungskabel 8 in die
Verbindungssteckdose 11 der Leuchte.
Stecken Sie den zweiten Anschluss des Verbin-
dungskabels 8 in die Leuchtensteckdose 4
der anderen Leuchte.
Stecken Sie den Anschluss des Netzkabels 7
in die Leuchtensteckdose 4 der äußeren,
linken Leuchte.
Stecken Sie den Netzstecker 12 in die Steck-
dose. Ihre Leuchten sind nun betriebsbereit.
Leuchte einschalten /
Lichtfarbe wechseln
Schieben Sie den Schiebeschalter 9 auf
Position I, um die Leuchte einzuschalten.
Schieben Sie den Schiebeschalter 9 auf die
Positionen II oder III, um die Lichtfarbe einzu-
stellen:
Position I - warmweiß
Position II - neutralweiß
Position III - kaltweiß
Leuchte ausschalten
Schieben Sie den Schiebeschalter 9 auf die
Posion „OFF“, um die Leuchte auszuschalten.
Leuchte ausrichten (Abb. D)
Verändern Sie die Ausrichtung der Leuchte nur,
wenn die Leuchte ausgeschaltet ist.
VERBRENNUNGSGEFAHR!
Stellen Sie sicher, dass die Leuchte ausgeschal-
tet und abgekühlt ist, bevor Sie diese berühren,
um Verbrennungen zu vermeiden. Leuchtmittel
entwickeln eine starke Hitze.
Lassen Sie die Leuchte vollständig abkühlen.
Schwenken Sie den Reflektor 13 in die ge-
wünschte Richtung.
Wartung und Reinigung
STROMSCHLAGGEFAHR!
Ziehen Sie den Netzstecker 12 aus der Steck-
dose.
STROMSCHLAGGEFAHR!
Aus Gründen der elektrischen Sicherheit darf
die Leuchte niemals mit Wasser oder anderen
Flüssigkeiten gereinigt oder gar in Wasser
getaucht werden. Verwenden Sie zur Reinigung
nur ein trockenes, fusselfreies Tuch.
Benutzen Sie keine Lösungsmittel, Benzin o. Ä.
Die Leuchte würde hierbei Schaden nehmen.
Lassen Sie die Leuchte vollständig abkühlen.
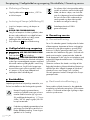
Entsorgung
Die Verpackung besteht aus umweltfreundlichen
Materialien, die Sie über die örtlichen Recyclingstellen
entsorgen können.
b
a
Beachten Sie die Kennzeichnung der
Verpackungsmaterialien bei der Abfall-
trennung, diese sind gekennzeichnet mit
Abkürzungen (a) und Nummern (b) mit
folgender Bedeutung: 1–7: Kunststoffe /
20–22: Papier und Pappe / 80–98:
Verbundstoffe.
Das Produkt und die Verpackungsmateri-
alien sind recycelbar, entsorgen Sie
diese getrennt für eine bessere Abfallbe-
handlung. Das Triman-Logo gilt nur für
Frankreich.
Inbetriebnahme / Wartung und Reinigung / Entsorgung

11 DE/AT/CH
Entsorgung / Garantie und Service
Werfen Sie Ihr Produkt, wenn es ausge-
dient hat, im Interesse des Umweltschut-
zes nicht in den Hausmüll, sondern
führen Sie es einer fachgerechten Entsor-
gung zu. Über Sammelstellen und deren
Öffnungszeiten können Sie sich bei Ihrer
zuständigen Verwaltung informieren.
Die Verpackung besteht aus 100 %
recyceltem Papier.
Garantie und Service
Garantie
Sie erhalten zum Zeitpunkt des Kaufs auf dieses Gerät
36 Monate Garantie. Das Gerät wurde sorgfältig
produziert und einer genauen Qualitätskontrolle
unterzogen. Innerhalb der Garantiezeit beheben wir
kostenlos alle Material- oder Herstellerfehler. Sollten
sich dennoch während der Garantiezeit Mängel
herausstellen, senden Sie das Gerät bitte an die
aufgeführte Service-Adresse unter Angabe folgender
Modell-Nummer: 14156804L / 14156806L.
Von der Garantie ausgeschlossen sind Schäden
durch nicht sachgemäße Handhabung, Nichtbe-
achtung der Bedienungsanleitung oder Eingriff durch
nicht autorisierte Personen sowie Verschleißteile (wie
z. B. Leuchtmittel). Durch die Garantieleistung wird
die Garantiezeit weder verlängert noch erneuert.
Konformitätserklärung
Dieses Produkt erfüllt die Anforderungen der
geltenden europäischen und nationalen Richtlinien.
Die Konformität wurde nachgewiesen. Entsprechende
Erklärungen und Unterlagen sind beim Hersteller
hinterlegt.
Hersteller / Service
Briloner Leuchten GmbH & Co. KG
Im Kissen 2,
59929 Brilon
DEUTSCHLAND
Tel.: +49 29 61 / 97 12–800
Fax: +49 29 61 / 97 12–199
E-Mail: [email protected]
www.briloner.com
Kostenlose Servicenummer:
Tel.: 00800 / 27456637
IAN 366591_2101
Bitte halten Sie für alle Anfragen den Kassenbon
und die Artikelnummer (z. B. IAN 123456_7890)
als Nachweis für den Kauf bereit.
Inbetriebnahme / Wartung und Reinigung / Entsorgung

12 12
Table of contents

13 GB/IE
List of pictograms used ........................................................................................................ Page 14
Introduction ................................................................................................................................... Page 14
Proper use ............................................................................................................................................Page 15
Included items .....................................................................................................................................Page 15
Description of parts ............................................................................................................................. Page 15
Technical data ..................................................................................................................................... Page 15
Safety .................................................................................................................................................Page 15
Safety advice .......................................................................................................................................Page 15
Preparation ...................................................................................................................................Page 17
Required tools and materials ..............................................................................................................Page 17
Preparations for use .............................................................................................................. Page 17
Fitting the light .....................................................................................................................................Page 17
Connecting several lights together .....................................................................................................Page 17
Switch on the light / change light color .............................................................................................Page 17
Switch off the lamp .............................................................................................................................Page 18
Directing the light ................................................................................................................................Page 18
Maintenance and cleaning ............................................................................................... Page 18
Disposal ............................................................................................................................................Page 18
Warranty and service ...........................................................................................................Page 18
Warranty .............................................................................................................................................Page 18
Declaration of Conformity ..................................................................................................................Page 18
Manufacturer / Service .......................................................................................................................Page 19
Table of contents

14 GB/IE
List of pictograms used
Read the instructions! Electric shock warning!
Danger to life!
This light is only suitable for indoor
use in dry and enclosed spaces. For your safety
Alternating current
(type of current and voltage) Caution! Risk of burns due to hot
surfaces!
Hertz (frequency)
b
a
Dispose of the packaging and device
in an environmentally-friendly manner!
Watt (effective power) Danger to life and risk of accidents
for infants and children!
Safety class II ON OFF Switching cycles
Operating life Observe the warnings and safety
notices!
This lamp is not suitable for external
dimmers and electronic switches.
The packaging is made from 100 %
recycled paper.
LED
230V
The control gear of this product is not
replaceable. LED LED The light source of this product is not
replaceable.
Volt Light temperature in Kelvin
Ra Colour rendering index Lumen
IP20 The light has protection class “IP20“
and is exclusively intended for indoor
use in private households.
LED Under-Cabinet Light with
Adjustable Light Colour
Q Introduction
Congratulations on your new product.
You have selected a high quality product.
Please read carefully and completely
through these operating instructions. Fold out the
page with the illustrations. These instructions form
part of the product and contain important information
about bringing the product into use and its handling.
Always observe all the safety advice. Check that
the correct mains voltage is available and that all
the parts have been properly assembled before
bringing into use. Should you have any questions
or be uncertain as to how to operate the device,
please get in touch with your dealer or service point.
Please keep these instructions in a safe place and
hand them on to a third party if necessary.
Introduction Introduction / Safety

15 GB/IE
Introduction
Proper use
This light is suitable only for interior use,
in dry and enclosed spaces. The light
should be positioned within reach so
that the switch can be operated conveniently. The
light can be fitted to all normally inflammable sur-
faces. Any use other than that described above or
modification to the lamp is not permitted and may
lead to damage to people or property. Moreover,
there is the risk of injury or loss of life and that the
lamp may develop technical faults such as short
circuit or fire or give an electric shock. This lamp is
intended for use only in a domestic environment.
This product is intended for normal operation.
Included items
Check that all the items and accessories are present
and that the lamp is in perfect condition immediately
after unpacking.
1 LED Under-Cabinet Light with Adjustable Light
Colour, Model 14156804L / 14156806L
1 Power cable
1 Connection cable
2 Dowels
2 Screws
1 Assembly and operating instructions
Description of parts
1 Dowel
2 Screw
3 Mounting hole for base fastening
4 Light connector socket
5 Lamp housing
6 Mounting hole for wall fastening
7 Mains cable
8 Connection cable
9 Slide switch
10 Protective cap
11 Connection socket
12 Mains plug
13 Swiveling reflector
Technical data
Lamp:
Item number: 14156804L / 14156806L
Operating voltage: 230‒240 V~ 50 Hz
Rated power: LED, 6.5 W
Protection class: II /
Protection type: IP20
LED:
Illuminant: LED module
Rated power: 6 W
Q Safety
Safety advice
The right to claim under the guarantee shall be
rendered invalid in respect of damage caused by
the non-observance of these operating instructions.
No liability is accepted for consequent damage.
No liability is accepted for damage to property
or persons caused by improper handling or non-
observance of the safety advice.
DANGER TO LIFE AND
ACCIDENT HAZARD FOR TOD-
DLERS AND SMALL CHILDREN!
Never leave children unsupervised with the
packaging material. The packaging material
poses a suffocation hazard. Children frequently
underestimate the dangers. Always keep chil-
dren away from the product.
This device may be used by children age
8 years and up, as well as by persons with
reduced physical, sensory or mental capacities,
or lacking experience and/or knowledge, so
long as they are supervised or instructed in the
safe use of the device and understand the asso-
ciated risks. Do not allow children to play with
the product. Cleaning and user maintenance
must not be performed by children without
supervision.
Introduction / Safety

16 GB/IE
To avoid danger to life
from electric shock
Before connecting it to the mains, always check
the light, the power cable as well as the con-
necting cable if need be for any damage.
Never use the light if you see any damage.
Damaged power cables and connecting cables
are a danger to life as you could suffer an
electric shock.
Before assembly, ensure that the mains voltage
available corresponds to the operating voltage
necessary of the light (see “Technical data“).
Never let the lamp come into contact with
water or other liquids.
Never open or insert anything into electrical
fittings or equipment. Doing this sort of thing can
lead to a serious danger to life from electric
shock.
Touch only the insulated part of the plug when
connecting to or disconnecting from the mains
supply.
The light's illuminant is not replaceable. The en-
tire light needs to be replaced if the illuminant
reaches the end of its service life.
If the external flexible cable of this lamp is
damaged, it may only be replaced by a special
cable or a cable that is only available from the
manufacturer or his service representative.
Only connect the under-cabinet light to the
mains current using the original power cable.
Only connect original under-cabinet lights of
the same type (Model 14156804L /
14156806L) with each other. Only use the
original connecting cable supplied to do so.
Connect the under-cabinet lights that are linked
up together to one socket only. Make sure that
you only connect a maximum of 10 linked-up
under-cabinet lights of the same type to one
socket. Otherwise this might overload the
connections and cables.
Please ensure all under-cupboard lamps have
been connected with the connection lead before
connecting the mains plug to the mains socket.
This product contains a light source of energy
efficiency class “E“ (according to Regulation
(EU) 2019/2015).
Prevent fire and injury
hazards
RISK OF INJURY!
Immediately after unpacking check each
light and the lamp glass for damage. Do not
operate the lamp with defective bulbs and/or
defective lamp glass. In this case, contact
the service centre for a replacement.
RISK OF BURNS!
To prevent burns, be sure the light is switched
off and has cooled down before touching it.
The illuminants become very hot.
This product does not contain any parts that
can be serviced by the user.
Do not look into the LED from a close distance
during operation. Do not look at the LED with
an optical instrument (e.g. magnifying glass).
Do not operate this light with a dim-
mer or an electronic switch. It is not
suitable for this mode of operation.
Working safely
Fit the light in such a way to ensure it is
protected from damp and dirt.
Make careful preparations for the assembly
and take sufficient time. Clearly lay out all com-
ponents and any additional tools or materials
that might be required so that they are readily
to hand.
Remain alert at all times and always watch
what you are doing. Always proceed with
caution and do not assemble the lamp if you
cannot concentrate or feel unwell.
Safety Preparation / Preparations for use

17 GB/IE
Safety
Q Preparation
Q Required tools and materials
The tools and materials mentioned are not included
in the delivery. The details and values given are
non-binding and for guidance only. The nature of
the material depends on the individual circumstances
on site.
- Pencil / Marking tool
- Screwdriver
- Electric drill
- Drill (Ø 6 mm)
- Spirit level
- Measuring tape
Q Preparations for use
Q Fitting the light
Note: Prior to installation, verify there is a socket
nearby within reach of the included power cable 7.
Note: The light can be set to 3 light levels using a
slide switch 9.
1. Measure up the wall or mounting surface for
drilling the holes. Use a spirit level to improve
accuracy.
2. Mark the distance for the mounting holes 3
or 6.
3. Now drill the mounting holes (ø approx. 6 mm,
depth approx. 40 mm). Make sure that you do
not damage any electrical cables during this
operation.
4. Insert the supplied wall plugs 1 into the drilled
holes. Insert the supplied screws 2 into the
wall plugs 1 and tighten them, stopping when
they project about 3 mm out of the wall or
mounting surface (Fig. A and B).
5. Attach the light using the appropriate mounting
holes 3 or 6 to the screws 2.
6. When you have attached the light above the
assembly holes 3, slide the light housing 5
to the left until it clicks into place.
7. Insert the light connector plug of the mains
lead 7 into the light connector socket 4.
8. Insert the mains plug of the mains lead 12 into
a convenient mains socket. Your light is now
ready for operation.
Q
Connecting several
lights together (Fig. C)
CAUTION!
Please ensure all under-cupboard lamps have been
connected with the connection cable 8 before
connecting the mains plug 12 to the mains socket.
Note: Make sure that you only connect a maximum
of 10 linked-up under-cabinet lights of the same
type to one socket.
Install up to 10 lights of the same model next
to each other. To do so, follow steps 1–5 of
the section called “Fitting the light”.
Note: Make sure that the distance between
the lights is not more than 15 cm.
Note: Make sure that the distance between
the lights is not less than 10 cm.
Remove the protective head guard 10.
Insert the connecting cable 8 into the con-
necting socket 11 of the light.
Insert the second connection of the connecting
cable 8 into the socket 4 of the other light.
Insert the connection of the power cable 7
into the socket 4 of the outer, left-hand light.
Connect the mains plug 12 to the mains socket.
Your lights are now ready for operation.
Switch on the light /
change light color
To switch on the light, move the slide switch 9
to position I.
Move the slide switch 9 to position II or III to
alter the colour of the light:
Position I - warm white
Position II - neutral white
Position III - cold white
Preparation / Preparations for use

18 GB/IE
Warranty and service
Q Switch off the lamp
Move the slide switch 9 to the “OFF“ position
to switch the light off.
Q Directing the light (Fig. D)
Never change the direction of the light while
it is switched on.
RISK OF BURNS!
To prevent burns, be sure the light is switched
off and cooled down before touching it. The
illuminants become very hot.
Allow the light to cool down completely.
Turn the reflector 13 into the desired direction.
Q Maintenance and cleaning
DANGER OF ELECTRIC
SHOCK!
To do this pull the mains plug on the mains
lead 12 out of the socket.
DANGER OF ELECTRIC
SHOCK!
For reasons of electrical safety, the light must
never be cleaned with water or other fluids or
be immersed in water. When cleaning, only
use a dry, lint-free cloth.
Do not use solvents, benzene or similar
substances. They could damage the light.
Allow the lamp to cool down completely.
Q Disposal
The packaging is made entirely of recyclable mate-
rials, which you may dispose of at local recycling
facilities.
b
a
Observe the marking of the packaging
materials for waste separation, which
are marked with abbreviations (a) and
numbers (b) with following meaning:
1–7: plastics / 20–22: paper and fibre-
board / 80–98: composite materials.
The product and packaging materials
are recyclable, dispose of it separately
for better waste treatment. The Triman
logo is valid in France only.
To help protect the environment, please
dispose of the product properly when it
has reached the end of its useful life and
not in the household waste. Information
on collection points and their opening
hours can be obtained from your local
authority.
The packaging is made from
100 % recycled paper.
Warranty and service
Warranty
You receive a 36 month warranty on this product,
valid from the date of purchase.
The device has been carefully produced under strict
quality control.
Within the warranty period we shall rectify without
charge all material and manufacturing defects. In
the event of a defect arising during the warranty
period, please send the device to the listed Service
Centre address, making reference to the following
model number: 14156804L / 14156806L.
Wear parts (such as bulbs) and damage caused
by improper handling, non-observance of the oper-
ating instructions or unauthorised interference are
excluded from the warranty.
The performance of services under the warranty
does not extend or renew the warranty period.
Q Declaration of Conformity
This product conforms to the requirements of the
applicable European and national directives. Con-
formity has been demonstrated. The relevant decla-
rations and documents are held by the manufacturer.
Preparations for use / Maintenance and cleaning / Disposal / Warranty and service

19 GB/IE
Warranty and service
Q Manufacturer / Service
Briloner Leuchten GmbH & Co. KG
Im Kissen 2 · 59929 Brilon · GERMANY
Tel.: +49 29 61 / 97 12–800
Fax: +49 29 61 / 97 12–199
E-Mail: [email protected]
www.briloner.com
Free service number:
Tel.: 00800 / 27456637
IAN 366591_2101
When inquiring about your product, please have
your receipt and product number (e.g. IAN
123456_7890) ready as your proof of purchase.
Preparations for use / Maintenance and cleaning / Disposal / Warranty and service

20
Table des matières
Seite laden ...
Seite laden ...
Seite laden ...
Seite laden ...
Seite laden ...
Seite laden ...
Seite laden ...
Seite laden ...
Seite laden ...
Seite laden ...
Seite laden ...
Seite laden ...
Seite laden ...
Seite laden ...
Seite laden ...
Seite laden ...
Seite laden ...
Seite laden ...
Seite laden ...
Seite laden ...
Seite laden ...
Seite laden ...
Seite laden ...
Seite laden ...
Seite laden ...
Seite laden ...
Seite laden ...
Seite laden ...
Seite laden ...
Seite laden ...
Seite laden ...
Seite laden ...
Seite laden ...
Seite laden ...
Seite laden ...
Seite laden ...
Seite laden ...
Seite laden ...
Seite laden ...
Seite laden ...
Seite laden ...
Seite laden ...
Seite laden ...
Seite laden ...
Seite laden ...
Seite laden ...
Seite laden ...
Seite laden ...
Seite laden ...
Seite laden ...
Seite laden ...
Seite laden ...
Seite laden ...
Seite laden ...
Seite laden ...
Seite laden ...
-
 1
1
-
 2
2
-
 3
3
-
 4
4
-
 5
5
-
 6
6
-
 7
7
-
 8
8
-
 9
9
-
 10
10
-
 11
11
-
 12
12
-
 13
13
-
 14
14
-
 15
15
-
 16
16
-
 17
17
-
 18
18
-
 19
19
-
 20
20
-
 21
21
-
 22
22
-
 23
23
-
 24
24
-
 25
25
-
 26
26
-
 27
27
-
 28
28
-
 29
29
-
 30
30
-
 31
31
-
 32
32
-
 33
33
-
 34
34
-
 35
35
-
 36
36
-
 37
37
-
 38
38
-
 39
39
-
 40
40
-
 41
41
-
 42
42
-
 43
43
-
 44
44
-
 45
45
-
 46
46
-
 47
47
-
 48
48
-
 49
49
-
 50
50
-
 51
51
-
 52
52
-
 53
53
-
 54
54
-
 55
55
-
 56
56
-
 57
57
-
 58
58
-
 59
59
-
 60
60
-
 61
61
-
 62
62
-
 63
63
-
 64
64
-
 65
65
-
 66
66
-
 67
67
-
 68
68
-
 69
69
-
 70
70
-
 71
71
-
 72
72
-
 73
73
-
 74
74
-
 75
75
-
 76
76


in anderen Sprachen
- français: LIVARNO 366591 Le manuel du propriétaire
- español: LIVARNO 366591 El manual del propietario
- Nederlands: LIVARNO 366591 de handleiding
- slovenčina: LIVARNO 366591 Návod na obsluhu
- dansk: LIVARNO 366591 Brugervejledning
- polski: LIVARNO 366591 Instrukcja obsługi
Verwandte Papiere
-
LIVARNO 305839 Bedienungsanleitung
-
-
-
-
-
-
-
-
-