
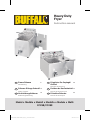
Model • Modèle • Modell • Modello • Modelo • Malli:
FC258/FC259
Heavy Duty
Fryer
Instruction manual
NL Zware Friteuse
Handleiding
8IT Friggitrice Per Impieghi
Gravosi
Manuale di istruzioni
26
FR Friteuse À Usage Intensif
Mode d'emploi
14 ES Freidora de Uso Industrial
Manual de instrucciones
32
DE Hochleistungsfritteuse
bedienungsanleitung
20 PT Fritadeira Robusta
Manual de instruções
44

2
UK
Safety Tips
• Position on a flat, stable surface.
• A service agent/qualified technician should carry out
installation and any repairs if required. Do not remove any
components on this product.
• Consult Local and National Standards to comply with the
following:
- Health and Safety at Work Legislation
- BS EN Codes of Practice
- Fire Precautions
- IEE Wiring Regulations
- Building Regulations
• ALWAYS ensure oil levels are within the ‘MIN’ and ‘MAX’
levels. Failure to do so could result in fire.
• ALWAYS use a suitable cooking oil.
• ALWAYS remove excess moisture/water from food before
frying to avoid excess foaming and spitting of the oil.
• Change oil regularly. The flashpoint of oil (the point at which it
ignites) gradually reduces the more it is used.
• DO NOT cover the oil pan when frying.
• DO NOT immerse the appliance in water.
• Some surfaces become hot during operation - take care when
using the appliance.
• Always switch off and disconnect the power supply to the
appliance when not in use.
• Not suitable for outdoor use.
• This appliance must only be used in accordance with these
instructions and by persons competent to do so.
• Keep all packaging away from children. Dispose of the
packaging in accordance to the regulations of local authorities.

3
UK
• If the power cord is damaged, it must be replaced by an
BUFFALO agent or a recommended qualified technician in
order to avoid a hazard.
• This appliance is not intended for use by persons (including
children) with reduced physical, sensory or mental capabilities,
or lack of experience or knowledge, unless they have been
given supervision or instruction concerning the use of the
appliance by a person responsible for their safety.
• Children should be supervised to ensure that they do not play
with the appliance.
• Buffalo recommends that this appliance should be periodically
tested (at least annually) by a Competent Person. Testing
should include, but not be limited to: Visual Inspection,
Polarity Test, Earth Continuity, Insulation Continuity and
Functional Testing.
• DO NOT use jet/pressure washers to clean the appliance.
• Ensure oil levels are maintained above the minimum level.
Failing to do so may result in element failure.
Introduction
Please take a few moments to carefully read through this manual. Correct maintenance and operation of
this machine will provide the best possible performance from your BUFFALO product.
These appliances are intended to be used for commercial applications, for example in kitchens of
restaurants, canteens, hospitals and in commercial enterprises such as bakeries, butcheries, etc., but not
for continuous mass production of food.
Buffalo will not accept liability for product failures in the event that:
• The instructions in this manual have not been followed correctly.
• Unqualified or unauthorized personnel have adjusted the Fryer.
• Non-original spare parts are used.
• The Fryer has not been handled and cleaned correctly.
• The Fryer has been used for a purpose for which it was not intended.

4
UK
Pack Contents
The following is included:
• BUFFALO fryer
• Basket (FC375/FC377 x 2)
• Element guard (FC375/FC377 x 2)
• Lid (FC375/FC377 x 2)
• Instruction manual
BUFFALO prides itself on quality and service, ensuring that at the time of packaging the contents are
supplied fully functional and free of damage.
Should you find any damage as a result of transit, please contact your BUFFALO dealer immediately.
Installation
• Remove the Fryer from the packaging, ensuring that all protective packaging, plastic and residues are
thoroughly cleaned from its surfaces.
• Place the Fryer on a firm level surface (Or Fryer stand if purchased).
• Before installing and operating the Fryer, it is the user’s responsibility to ensure that all Health &
Safety regulations concerning safe positioning, spacing, ventilation, electrical installation, and fire risk,
are complied with.
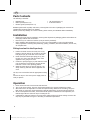
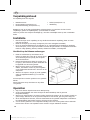
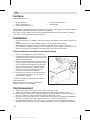
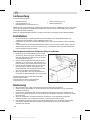
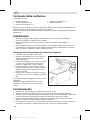
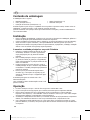
Fitting head unit to the Fryer body
1. Position the head unit onto the body of the fryer,
locating it into the hole (A) at the side of the main
body by the pin (B) on the side of the head unit.
2. Rotate the head unit and put spring pin (C) into
the hole (D) ,then it can hold the position if the
appliance is not going to be used.
3. Continue to push spring pin (C) and rotate the head
unit, the element is lowered into the pan and the
head unit is close to the operating position.
4. When the spring pin is put into the hole (E), the
safety switch (F) will work and the appliance will
work.
The fryer can now be filled with the appropriate cooking
oil.
Connect the Fryer to the correct power supply and it is
ready to operate.
Operation
1. Please ensure Oil level is between Min and Max lines.
2. Turn on the power switch. Then turn the thermostat dial to the required temperature setting.
3. Allow time for the oil temperature to reach the required setting. While the oil is heating, the green
light will be on. When the oil has reached the required temperature, the green light will switch off.
4. As the oil temperature fluctuates, the thermostat will operate to maintain the set temperature, the
indicator light will be lit when the Fryer is heating the oil.
5. A temperature setting of between 170°C and 180°C will be sufficient for most cooking. However this
may vary for particular food types or according to individual requirements.

5
UK
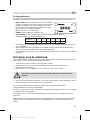
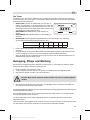
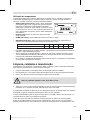
Using the timer
The digital timer with audible alarm can be set from 1 second to 15 minutes. The timer provides an
audible alarm only; after the set time expires unit will continue to operate at set temperature.
• START/STOP: Press START/STOP to start timer, press again
to stop. The timer will provide an audible alarm after the
set time. The alarm will beep 10 times and the display will
continue to flash until timer is reset (press the START/STOP
button).
• UP: Press UP to add extra time.
• DOWN: Press DOWN to reduce time.
• PROGRAM: There are a total of 6 programmable timer settings. The default factory program settings
are given below.
Program 1 2 3 4 5 6
Factory preset time 00:30 01:00 01:30 02:00 02:30 03:00
• To change the length of a program select the program you want to change by scrolling using the
PROGRAM button.
• Adjust the program time by using the UP and DOWN buttons. Press START/STOP to commence the
count-down. The new program time will be automatically stored.
• If the unit is left without power for more than 24hrs the timer settings will revert to the factory
defaults.
Cleaning, Care & Maintenance
The Fryer should be cleaned after each day’s operation; however it may require cleaning more often,
depending on the volume of frying carried out.
1. Switch off the power and disconnect from the power supply by removing the plug from the socket.
2. The Fryer must be left until the oil has cooled to room temperature before cleaning.
3. Empty oil by opening the drain tap at the front of the unit.
Note: If the oil is to be reused, it should be filtered.
4. Once the oil has been emptied from the fryer, the head unit can be tilted back enabling the pan to be
cleaned using warm soapy water.
Warm soapy water is recommended for cleaning. Cleaning agents after prolonged use can cause damage
to stainless steel.
The main body can also be cleaned with warm soapy water. Remove the head unit and element before
cleaning takes place.
The head unit cannot be immersed in water, but can be wiped down with a damp cloth.
After cleaning as above, please use a dry cloth to clean the appliance to ensure there is no water on the
heating element and in the water oil pan.

6
UK
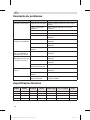
Troubleshooting
Fault Probable Cause Solution
Appliance not
working The unit is not switched on Check the unit is plugged in correctly and
switched on
Plug and lead are damaged Call BUFFALO agent or qualified Technician
Fuse in the plug has blown Replace the plug fuse
Power supply Check power supply
Internal wiring fault Call BUFFALO agent or qualified technician
Appliance does
not reach set
temperature
Faulty thermostat Call BUFFALO agent or qualified technician
Faulty element Call BUFFALO agent or qualified technician
Build-up of fat on the element Clean the appliance
Appliance heats up
but indicator light
does not come on
Indicator light has expired Call BUFFALO agent or qualified technician
Power indicator
light comes on but
appliance does not
heat up
Faulty element Call BUFFALO agent or qualified technician
Faulty thermostat Call BUFFALO agent or qualified technician
Thermostat set incorrectly Check thermostat
Appliance slow to
heat up Faulty element Call BUFFALO agent or qualified technician
Build-up of fat on the element Clean the appliance
No power Thermal cut-out activated Press re-set switch on rear of unit
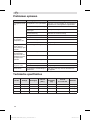
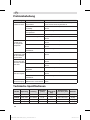
Technical Specifications
Model Voltage Power Capacity
(litres) Max batch
load (kg) Dimensions
H x W x D mm Weight
FC374 230V, 50Hz 2900W 8L 1 450 x 280 x 510 11.1kg
FC375 230V, 50Hz 2 x 2900W 2 x 8L 2 x 1 450 x 560 x 510 19.6kg
FC376 230V, 50Hz 6000W 8L 1 450 x 280 x 510 12.2kg
FC377 230V, 50Hz 2 x 6000W 2 x 8L 2 x 1 450 x 560 x 510 22.3kg

7
UK
Electrical Wiring - FC374/FC375
This appliance is supplied with a 3 pin BS1363 plug and lead.
The plug is to be connected to a suitable mains socket.
This appliance is wired as follows:
• Live wire (coloured brown) to terminal marked L
• Neutral wire (coloured blue) to terminal marked N
• Earth wire (coloured green/yellow) to terminal marked E
This appliance must be earthed.
If in doubt consult a qualified electrician.
Electrical isolation points must be kept clear of any obstructions. In the event of any emergency
disconnection being required they must be readily accessible.
Electrical Wiring - FC376/FC377
FC376 and FC377 are supplied unplugged and require hardwiring to a suitable electrical power supply
capable of supporting 6KW at 230V/50hz.
This appliance is wired as follows:
• Live wire (coloured brown) to terminal marked L
• Neutral wire (coloured blue) to terminal marked N
• Earth wire (coloured green/yellow) to terminal marked E
This appliance must be earthed.
If in doubt consult a qualified electrician.
Electrical isolation points must be kept clear of any obstructions. In the event of any emergency
disconnection being required they must be readily accessible.
Connection to a suitable power supply should only be carried out by a qualified and
competent electrical engineer.
Compliance
The WEEE logo on this product or its documentation indicates that the product must
not be disposed of as household waste. To help prevent possible harm to human
health and/or the environment, the product must be disposed of in an approved and
environmentally safe recycling process. For further information on how to dispose of
this product correctly, contact the product supplier, or the local authority responsible for
waste disposal in your area.
BUFFALO parts have undergone strict product testing in order to comply with regulatory
standards and specifications set by international, independent, and federal authorities.
BUFFALO products have been approved to carry the following symbol:
All rights reserved. No part of these instructions may be produced or transmitted in any form or by any means, electronic,
mechanical, photocopying, recording or otherwise, without the prior written permission of BUFFALO.
Every effort is made to ensure all details are correct at the time of going to press, however, BUFFALO reserve the right to
change specifications without notice.

8
NL
Veiligheidstips
• Plaatsen op een vlakke en stabiele ondergrond.
• De installatie en eventuele reparaties dienen door een
gekwalificeerde onderhoudsmonteur/vakman uitgevoerd te worden.
Verwijder geen componenten of servicepanelen van dit product.
• Raadpleeg en volg de plaatselijke en nationale regelgeving op
m.b.t. tot het volgende:
- Wetgeving inzake gezondheid en veiligheid op het werk
- Werkregels
- Brandpreventie
- IEE-bedradingsvoorschriften
- Bouwvoorschriften
• ALTIJD controleren of het olieniveau tussen ‘MIN’ en ‘MAX’
staat. Anders kan er brand ontstaan.
• ALTIJD geschikte kookolie gebruiken.
• Bij het frituren ALTIJD overtollig vocht/water van het voedsel
halen om schuimvorming en het spetteren van olie te voorkomen.
• Vervang regelmatig de olie. Het valmpunt van olie (het punt
waarop olie vlamvat) wordt bij het hergebruik van de olie
steeds lager.
• Oliepan tijdens het frituren NIET afbedekken.
• Dit apparaat NIET in water dompelen.
• Bepaalde oppervlakken worden tijdens gebruik heet - let
hierop wanneer u het apparaat gebruikt.
• Schakel het apparaat altijd uit en haal de steker uit het
stopcontact wanneer u het apparaat niet gebruikt.
• Niet geschikt voor gebruik buitenshuis.
• Dit apparaat mag uitsluitend in overeenstemming met deze
instructies en door competente personen worden gebruikt.
• Laat verpakkingsmateriaal niet binnen handbereik van kinderen.
Verpakkingsmateriaal in overeenstemming met de regelgeving
van de plaatselijke overheden als afval laten verwerken
.

9
NL
• Indien de stroomkabel beschadigd raakt, dient men deze
door een Buffalo-monteur of aanbevolen vakman te laten
vervangen om gevaarlijke situaties te voorkomen.
• Dit apparaat is niet bedoeld voor gebruik door personen met
lichamelijke, zintuiglijke of mentale beperkingen (inclusief
kinderen) of door personen met gebrek aan ervaring of kennis,
tenzij zij hierin worden begeleid of zijn opgeleid in het gebruik
van het apparaat door een persoon, die verantwoordelijk is
voor hun veiligheid.
• Men dient er toezicht op te houden dat kinderen niet met het
apparaat spelen.
• Buffalo beveelt aan dat dit apparaat periodiek (minstens
jaarlijks) door een bevoegde persoon wordt getest. Tests moeten
omvatten, maar zijn niet beperkt tot: visuele inspectie, polariteit,
aardings continuïteit, isolatie continuïteit en functionele test
.
• Dit product NIET reinigen met spuit-/drukreinigers.
• Zorg ervoor dat het peil van alle olie boven het minimum
wordt gehouden. Als het vereiste peil niet wordt gehandhaafd
kan dit leiden tot een defect element.
Inleiding
Neem de tijd om deze handleiding aandachtig door te lezen. Correct gebruik en onderhoud van deze
machine waarborgt de beste prestatie van uw Buffalo product.
Deze toestellen zijn bedoeld voor commerciële toepassingen, bijvoorbeeld in de keukens van restaurants,
kantines, ziekenhuizen en zaken zoals bakkerijen, slagerijen, enz., maar niet voor de massaproductie van
voedingsmiddelen.
Buffalo stelt zich niet aansprakelijk voor defecten van het product in het geval dat:
• De instructies in deze handleiding niet goed zijn opgevolgd.
• De frituurpan door onbevoegd of ondeskundig personeel is aangepast.
• Geen authentieke reserveonderdelen worden gebruikt.
• De frituurpan niet op de juiste manier is gehanteerd en schoongemaakt.
• De frituurpan is gebruikt voor een doel waarvoor het niet geschikt is.

10
NL
Verpakkingsinhoud
De verpakking bevat het volgende:
• BUFFALO Friteuse
• Friteusemandje (FC375/FC377 x 2)
• Elementbescherming (FC375/FC377 x 2)
• Deksel (FC375/FC377 x 2)
• Handleiding
BUFFALO is trots op de haar productkwaliteit en dienstverlening en controleert de inhoud van de
verpakkingen, tijdens de verpakkingsfase, op functionaliteit en schade.
Mocht uw product door transport beschadigd zijn, neem dan onmiddellijk contact op met uw BUFFALO-
dealer.
Installatie
• Haal de frituurpan uit de verpakking en zorg dat alle beschermende verpakking, plastic en resten
goed zijn verwijderd.
• Plaats de frituurpan op een stevige ondergrond (of de extra verkrijgbare standaard).
• Het is de verantwoordelijkheid van de gebruiker om er, voorafgaand aan de installatie en bediening
van de frituurpan, voor te zorgen dat voldaan wordt aan alle gezondheids- en veiligheidsvoorschriften
inzake de veilige plaatsing, afstand, ventilatie, elektrische installatie, en brandgevaar.
Hoofdunit op de friteuse aanbrengen
1. Plaats de hoofdeenheid op het lichaam van de
friteuse en plaats deze in het gat (A) aan de zijkant
van de behuizing door de pen (B) aan de zijkant
van de hoofdeenheid.
2. Draai de hoofdeenheid en plaats de veerpen (C) in
het gat (D), dan kan deze de positie vasthouden als
het apparaat niet zal worden gebruikt.
3. Blijf de veerpen duwen en de hoofdeenheid
draaien, het element wordt in de pan neergelaten
en de hoofdeenheid bevindt zich in de buurt van de
werkpositie.
4. Wanneer de veerpen in het gat (E) wordt geplaatst,
werkt de veiligheidsschakelaar (F) en werkt het
apparaat.
De frituurpan kan nu worden gevuld met een geschikte
bakolie.
Sluit de frituurpan aan op het lichtnet en hij is klaar
voor gebruik.
Operation
1. Zorg ervoor dat het oliepeil tussen Min en Max lijnen ligt.
2. Zet de stroomschakelaar aan. Draai vervolgens de thermostaatknop naar de gewenste
temperatuurinstelling.
3. Wacht tot de olietemperatuur de vereiste instelling heeft bereikt. Wanneer de olie opwarmt, brandt het
groene lampje. Wanneer de olie de gewenste temperatuur heeft bereikt, gaat het groene lampje uit.
4. Als de olietemperatuur fluctueert, werkt de thermostaat om de ingestelde temperatuur te handhaven.
Het indicatielampje gaat branden wanneer de friteuse de olie opwarmt.
5. Voor de meeste gerechten is een temperatuurinstelling tussen 170 en 180 graden Celsius voldoende.
Dit kan echter variëren voor bepaalde soorten voedsel of volgens individuele vereisten.

11
NL
De timer gebruiken
De digitale timer met alarmtoon kan worden ingesteld tussen 1 seconde en 15 minuten. De alarmtoon klinkt
pas nadat de ingestelde tijd is verstreken maar de frituurpan blijft op de ingestelde temperatuur werken.
• START/STOP: Druk op START/STOP om de timer sta starten,
en druk er nogmaals op om hem te stoppen. Na de ingestelde
tijd klinkt de alarmtoon van de timer. De alarmtoon gaat 10
keer af en het scherm blijft knipperen totdat de timer wordt
uitgeschakeld (met de START/STOP-knop).
• UP: Druk op UP voor een langere tijd.
• DOWN: Druk op DOWN voor een kortere tijd.
• PROGRAMMA: er zijn in totaal 6 programmeerbare instellingen van de timer. De
standaardinstellingen bij levering staan hieronder.
Proramma 1 2 3 4 5 6
Standaard tijd 00:30 01:00 01:30 02:00 02:30 03:00
• Om de lengte van een programma te wijzigen, selecteert u het betreffende programma met de knop
voor PROGRAMMA.
• Stel de gewenste tijd in met de knoppen UP en DOWN. Druk op START/STOP om de timer aan te
zetten. De nieuwe programmatijd wordt automatisch opgeslagen.
• Als de frituurpan meer dan 24 uur geen stroom ontvangt, gaat de timer weer terug naar de standaard
instellingen.
Reiniging, zorg & onderhoud
De frituurpan moet aan het eind van elke dag worden schoongemaakt, maar het kan nodig zijn om hem
vaker schoon te maken, afhankelijk van de mate van gebruik.
1. Zet de stroom uit door de stekker uit het stopcontact te halen.
2. Voordat de frituurpan kan worden schoongemaakt, moet worden gewacht tot de olie op
kamertemperatuur is gekomen.
3. Haal de olie er uit door de aftapper aan de voorkant van de pan open te zetten.
Opmerking: als de olie opnieuw moet worden gebruikt, moet deze worden
gefilterd.
4. Als de olie uit de frituurpan is verwijderd, kan de regeling naar achteren worden gekanteld en kan de
pan van binnen met een warm sopje worden schoongemaakt.
Voor het schoonmaken wordt een warm sopje aanbevolen. Na langdurig gebruik kunnen
reinigingsmiddelen het roestvrij staal beschadigen.
Ook de pan zelf kan met een warm sopje worden schoongemaakt. Verwijder het element met de regeling
voordat hij worden schoongemaakt.
De regeling kan niet in water worden ondergedompeld maar kan wel met een vochtige doek worden
afgenomen.
Nadat hij volgens de bovenstaande instructies is schoongemaakt, moet hij met een droge doek worden
afgenomen om ervoor te zorgen dat er geen water achterblijft op het verwarmingselement en in de
oliepan.

12
NL
Problemen oplossen
Probleem Mogelijke oorzaak Handeling
Het apparaat werkt
niet Het apparaat is niet ingeschakeld Controleer of de stroomkabel van het apparaat is
aangesloten en of het apparaat is ingeschakeld.
Stekker en kabel zijn beschadigd Laat een Buffalo-monteur of een vakman komen
De zekering in de stekker is
gesprongen Vervang de zekering in de stekker
Stroomvoorziening Controleer de stroomvoorziening
Storing interne bedrading Laat een Buffalo-monteur of een vakman komen
Het apparaat bereikt
de ingestelde
temperatuur niet
Defecte thermostaat Laat een Buffalo-monteur of een vakman komen
Defect verwarmingselement Laat een Buffalo-monteur of een vakman komen
Opbouw van vet op het element Reinig het apparaat
Het apparaat wordt
warm maar het
indicatielampje gaat
niet aan
Indicatorlampje vervangen Laat een Buffalo-monteur of een vakman komen
Het lampje van de
stroomindicator
gaat aan maar het
apparaat wordt niet
op temperatuur
gebracht
Defect verwarmingselement Laat een Buffalo-monteur of een vakman komen
Defecte thermostaat Laat een Buffalo-monteur of een vakman komen
Thermostaat verkeerd ingesteld Controleer de thermostaat
Apparaat wordt heel
langzaam warm Kookoppervlak is niet schoon Laat een Buffalo-monteur of een vakman komen
Opbouw van vet op het element Reinig het apparaat
Geen stroom De thermische uitschakelknop is
geactiveerd Druk op de reset-knop aan de achterkant van
het apparaat
Technische specificaties
Model Voltage Vermogen Inhoud
(liter)
Max. enkele
belasting
(kg)
Inhoud
h x b x d mm Gewicht
FC374 230V, 50Hz 2900W 8L 1 450 x 280 x 510 11,1kg
FC375 230V, 50Hz 2 x 2900W 2 x 8L 2 x 1 450 x 560 x 510 19,6kg
FC376 230V, 50Hz 6000W 8L 1 450 x 280 x 510 12,2kg
FC377 230V, 50Hz 2 x 6000W 2 x 8L 2 x 1 450 x 560 x 510 22,3kg

13
NL
Elektrische bedrading - FC374/FC375
Men dient de stekker op een geschikt stopcontact aan te sluiten.
De bedrading van dit apparaat is als volgt:
• Stroomkabel (bruin) naar de aansluitklem gemarkeerd met L
• Neutraalkabel (blauw) naar de aansluitklem gemarkeerd met N
• Aardekabel (groen/geel) naar de aansluitklem gemarkeerd met E
Dit apparaat moet worden geaard.
Raadpleeg bij twijfel een vakkundige elektricien.
De elektrische isolatiepunten mogen niet worden geblokkeerd. In geval van een nooduitschakeling
moeten de isolatiepunten direct toegankelijk zijn.
Elektrische bedrading - FC376/FC377
FC376 en FC377 worden zonder stekker geleverd en moeten permanent op een geschikte voeding van
6kW en 230V/50Hz worden aangesloten.
De bedrading van dit apparaat is als volgt:
• Stroomkabel (bruin) naar de aansluitklem gemarkeerd met L
• Neutraalkabel (blauw) naar de aansluitklem gemarkeerd met N
• Aardekabel (groen/geel) naar de aansluitklem gemarkeerd met E
Dit apparaat moet worden geaard.
Raadpleeg bij twijfel een vakkundige elektricien.
De elektrische isolatiepunten mogen niet worden geblokkeerd. In geval van een nooduitschakeling
moeten de isolatiepunten direct toegankelijk zijn.
De aansluiting op een geschikte stroomvoorziening mag uitsluitend worden uitgevoerd door
een bevoegd en deskundig elektricien.
Productconformiteit
Het WEEE-logo op dit product of bijbehorende documentatie geeft aan dat het product
niet onder huisvuil valt en ook niet als zodanig mag worden verwerkt. Ter preventie van
mogelijke gevaren voor de gezondheid van personen en/of voor het milieu, dient men
dit product in overeenstemming met het voorgeschreven en milieuveilige recyclingproces
als afval te verwerken. Neem contact op met uw productleverancier of uw plaatselijke
afvalverwerkingsbedrijf voor meer informatie over de juiste verwerking van dit product.
De onderdelen van BUFFALO-producten hebben strenge producttesten ondergaan om te
voldoen aan wettelijke regels en specificaties die door internationale, onafhankelijke en
landelijke overheden worden voorgeschreven.
BUFFALO-producten zijn goedgekeurd en voorzien van het volgende symbool:
Alle rechten voorbehouden. Het is verboden om deze handleiding, hetzij volledig of gedeeltelijk, elektronisch of mechanisch
te reproduceren, kopiëren, op opslagmedia op te slaan of op enigerlei wijze over te dragen, zonder voorafgaande
goedkeuring van BUFFALO.
Wij hebben er alles aan gedaan om er zeker van te zijn dat op publicatiedatum van de handleiding alle details correct zijn.
BUFFALO behoudt zich echter het recht voor om specificaties zonder aankondiging te wijzigen.

14
FR
Conseils de sécurité
• Placez l’appareil sur une surface plane, stable.
• L’installation et les éventuelles réparations doivent être
confiées à un dépanneur / technicien qualifié. Ne retirez aucun
composant ou cache de ce produit.
• Consultez les normes locales et nationales pour vous
conformer aux :
- lois sur l’hygiène et la sécurité au travail ;
- codes de bonnes pratiques BS EN ;
- précautions contre le risque d’incendie ;
- réglementations sur les branchements électriques IEE ;
- règlements sur la construction.
• Vous devez TOUJOURS vérifier que le niveau d’huile est entre
les repères MIN et MAX. Un niveau d’huile inapproprié peut
poser des risques d’incendie.
• Choisissez TOUJOURS une huile de cuisson adaptée.
• Éliminez TOUJOURS l’excédent d’humidité ou d’eau sur les
aliments avant de les frire pour éviter les éclaboussures d’huile
et la formation de mousse.
• Changez régulièrement l’huile. Plus une huile est utilisée, plus
son point d’inflammation baisse progressivement (le point
d’inflammation est température à laquelle elle prend feu).
• Ne couvrez jamais la friteuse pendant la cuisson.
• NE PAS immerger l’appareil.
• Certaines surfaces chauffent en service - prenez les
précautions qui s’imposent.
• Veillez à toujours éteindre l’appareil et à le débrancher de la
prise d’alimentation secteur hors service.
• Cet appareil est réservé exclusivement à une utilisation à l’intérieur.
• L’utilisation de cet appareil est exclusivement réservée aux
personnes formées en la matière et doit se conformer à ces
instructions.
• Gardez les emballages hors de portée des enfants.
Débarrassez-vous des emballages conformément aux
règlements des autorités locales.

15
FR
• Un cordon d’alimentation endommagé doit être remplacé par
un agent Buffalo ou un technicien qualifié recommandé, pour
éviter tout danger.
• Cet appareil n’a pas été conçu pour être utilisé par des
personnes (enfants inclus) à capacités physiques, sensorielles
ou mentales réduites ou ne disposant pas d’une expérience ou
de connaissances suffisantes, à moins que lesdites personnes
n’aient été formées ou instruites quant à son utilisation, par
une personne responsable de leur sécurité.
• Les enfants doivent être surveillés afin de s’assurer qu’ils ne
jouent pas avec l’appareil.
• Buffalo recommande de faire tester régulièrement cet appareil
(une fois par an au minimum) par une personne compétente.
Le test devrait inclure, entre autres : inspection visuelle, test de
polarité, la continuité de masse (équipement de classe I), test
d’isolation et test de fonctionnement.
• NE PAS nettoyer cet appareil avec un nettoyeur à jet / à
pression.
• Veiller à maintenir le niveau de l’huile au-dessus du seuil
minimum indiqué, au risque d’entraîner une défaillance des
éléments de chauffe.
Introduction
Nous vous invitons à consacrer quelques instants à la lecture attentive de ce manuel. L’entretien et
l’utilisation appropriés de cet appareil vous permettront de tirer le meilleur de votre produit Buffalo.
Ces appareils sont conçus pour être utilisés dans un environnement commercial, dans les cuisines de
restaurants, les cantines, les hôpitaux, les boulangeries, les boucheries, etc., mais ne sont pas conçus
pour la production alimentaire en masse.
Buffalo décline toute responsabilité en cas de défaillance du produit lorsque :
• Les instructions de ce manuel n’ont pas été suivies correctement,
• Du personnel non qualifié ou non autorisé a réglé la friteuse,
• Des pièces détachées non authentiques ont été utilisées,
• La friteuse n’a pas été manipulée, ni nettoyée correctement,
• La friteuse a été utilisée à des fins pour lesquelles elle n’est pas conçue.

16
FR
Contenu
Eléments fournis de série :
• Friteuse BUFFALO
• Panier (FC375/FC377 x 2)
• Protection (FC375/FC377 x 2)
• Couvercle (FC375/FC377 x 2)
• Mode d’emploi
Buffalo attache une grande importance à la qualité et au service et veille à fournir des produits en parfait
état opérationnel, parfaitement intacts au moment de l’emballage.
Nous vous prions de contacter votre revendeur Buffalo immédiatement si vous constatez un dommage
quelconque survenu pendant le transport du produit.
Installation
• Retirer la friteuse de son emballage. Veiller à bien éliminer tout plastique de protection et résidu de la
surface.
• Poser la friteuse sur une surface solide de niveau (ou sur le support, le cas échéant).
• Avant d’installer et d’utiliser la friteuse, il incombe à l’utilisateur de se conformer à toutes les
réglementations en matière de santé et de sécurité relatives au positionnement en toute sécurité, aux
distances de sécurité, à la ventilation, à l’installation électrique et au risque d’incendie.
Unité principale à raccorder au corps de la friteuse
1. Placez l’unité principale sur le corps de la friteuse
en faisant correspondre l’orifice (A) situé sur le côté
corps principal avec la broche (B) située sur la paroi
latérale de l’unité principale.
2. Faites pivoter l’unité principale et insérez la broche à
ressort (C) dans l’orifice (D) pour que l’unité puisse
rester en position quand l’appareil n’est pas utilisé.
3. Maintenez la broche à ressort enfoncée et faites
pivoter l’unité principale pour abaisser l’élément
dans le bac et pour que l’unité principale soit
presque en position de fonctionnement.
4. Quand la broche à ressort est insérée dans l’orifice
(E), l’interrupteur de sécurité (F) est actionné et
l’appareil peut fonctionner.
La friteuse peut alors être remplie avec de l’huile de
cuisson appropriée.
Brancher la friteuse à une source d’alimentation
adéquate et elle est prête à l’emploi.
Fonctionnement
1. Vérifiez que le niveau d’huile soit bien situé entre les traits Min. et Max.
2. Appuyez sur l’interrupteur marche/arrêt puis réglez le thermostat à la température voulue.
3. Laissez chauffer l’huile jusqu’à la température paramétrée. Quand l’huile est en train de chauffer, le
témoin vert s’allume. Il s’éteint quand l’huile atteint la température voulue.
4. Étant donné que la température fluctue, le thermostat se déclenchera pour maintenir la température
paramétrée. Le témoin vert s’allume quand la friteuse est en train de chauffer l’huile.
5. Une température paramétrée entre 170 et 180 °C est suffisante pour cuire la plupart des aliments.
Elle peut toutefois varier pour des types d’aliments particuliers ou selon les préférences personnelles.

17
FR
Utilisation de la minuterie
La minuterie numérique avec alarme sonore peut être réglée sur une période allant de 1 s à 15 min. La
minuterie émet uniquement un signal sonore. Une fois la durée programmée expirée, l’appareil continue
de fonctionner à la température sélectionnée.
• START/STOP : Appuyer sur START/STOP pour démarrer
la minuterie et appuyer à nouveau sur ce bouton pour
l’arrêter. La minuterie émet un signal sonore une fois la
durée programmée expirée. L’alarme retentit 10 fois et
l’écran continue de clignoter jusqu’à ce que la minuterie soit
réinitialisée (appuyer sur START/STOP).
• UP : Appuyer sur UP pour prolonger la durée.
• DOWN : Appuyer sur DOWN pour réduire la durée.
• PROGRAM : Il existe 6 programmes de minuterie. Les programmes par défaut d’usine sont indiqués
ci-dessous.
Proramme 1 2 3 4 5 6
Durée prédéfinie 00:30 01:00 01:30 02:00 02:30 03:00
• Pour modifier la longueur d’un programme, sélectionner le programme à modifier en les faisant
dérouler à l’aide du bouton PROGRAM
• Régler la durée du programme avec les boutons UP et DOWN. Appuyer sur START/STOP pour
commencer le décompte. La nouvelle durée du programme sera automatiquement enregistrée.
• Si l’appareil n’est pas alimenté en courant pendant plus de 24 h, les valeurs par défaut d’usine des
programmes de la minuterie seront rétablies.
Nettoyage, entretien et maintenance
La friteuse doit être nettoyée chaque jour après utilisation. Elle pourra cependant nécessiter un nettoyage
plus fréquent en fonction du volume de friture réalisé.
1. Débrancher la prise de la prise secteur afin de couper l’alimentation.
2. Laisser l’huile de la friteuse refroidir à la température ambiante avant de procéder au nettoyage de
l’appareil.
3. Vider l’huile en ouvrant le robinet de vidange situé sur le devant de la friteuse.
Remarque : filtrer l’huile si elle doit être réutilisée.
4. Une fois l’huile vidée, le boîtier de commande peut être incliné vers l’arrière pour nettoyer la cuve à
l’eau chaude savonneuse.
Il est recommandé de le nettoyer à l’eau chaude savonneuse. Une utilisation prolongée d’agents de
nettoyage peut endommager l’inox.
La friteuse peut également être nettoyée à l’eau chaude savonneuse. Retirer le boîtier de commande et
l’élément de chauffe avant de procéder au nettoyage.
Ne pas immerger le boîtier de commande dans l’eau, mais le nettoyer avec un chiffon humide.
Une fois le nettoyage terminé, essuyer l’appareil avec un chiffon sec pour s’assurer qu’il ne reste aucune
trace d’eau sur l’élément de chauffe et dans la cuve à huile.

18
FR
Dépannage
Dysfonctionnement Cause probable Intervention
L’appareil ne fonctionne
pas L'appareil n'est pas allumé Vérifier que l'appareil est bien branché et allumé
La prise et le cordon sont
endommagés Appeler un agent POLAR ou un technicien qualifié
Alimentation Vérifier l'alimentation
Problème de branchement
interne Appeler un agent Buffalo ou un technicien qualifié
L’appareil n’atteint
pas la température
souhaitée
Thermostat défectueux Appeler un agent POLAR ou un technicien qualifié
Élément défectueux Appeler un agent POLAR ou un technicien qualifié
Accumulation de matière
grasse sur l’élément chauffant Nettoyez la friteuse
L’appareil chauffe, mais
le témoin ne s’allume
pas
Ampoule grillée Appeler un agent POLAR ou un technicien qualifié
Le témoin s’allume,
mais l’appareil ne
chauffe pas
Thermostat défectueux Appeler un agent POLAR ou un technicien qualifié
Élément défectueux Appeler un agent POLAR ou un technicien qualifié
Thermostat mal réglé Vérifier le thermostat
L’appareil chauffe
lentement Élément défectueux Appeler un agent POLAR ou un technicien qualifié
Accumulation de matière
grasse sur l’élément chauffant Nettoyez la friteuse
Aucune alimentation Le rupteur thermique a été
déclenché Appuyer sur le commutateur Réinitialiser à
l’arrière de l’unité
Spécifications techniques
Modèle Tension Puissance Capacité
(litres)
Charge max.
par cuisson
(kg)
Dimensions
h x l x p mm Poids
FC374 230V, 50Hz 2900W 8L 1 450 x 280 x 510 11,1kg
FC375 230V, 50Hz 2 x 2900W 2 x 8L 2 x 1 450 x 560 x 510 19,6kg
FC376 230V, 50Hz 6000W 8L 1 450 x 280 x 510 12,2kg
FC377 230V, 50Hz 2 x 6000W 2 x 8L 2 x 1 450 x 560 x 510 22,3kg

19
FR
Raccordement électrique - FC374/FC375
La prise doit être branchée dans une prise secteur appropriée.
Le branchement des fils de cet appareil correspond au schéma suivant :
• Fil conducteur (brun) à la borne marquée L
• Fil neutre (bleu) à la borne marquée N
• Fil de terre (vert / jaune) à la borne marquée E
Cet appareil doit être mis à la terre.
En cas de doute, consultez un électricien qualifié.
Les points d’isolation électrique doivent être libres de toute obstruction. En cas de débranchement requis
en urgence, ils doivent être facilement accessibles.
Raccordement électrique - FC376/FC377
Les modèles FC376 et FC377 sont fournis sans prise et doivent être raccordés de manière fixe à une
source d’alimentation appropriée capable de prendre en charge une puissance de 6KW à 230V/50 Hz.
Le branchement des fils de cet appareil correspond au schéma suivant :
• Fil conducteur (brun) à la borne marquée L
• Fil neutre (bleu) à la borne marquée N
• Fil de terre (vert / jaune) à la borne marquée E
Cet appareil doit être mis à la terre.
En cas de doute, consultez un électricien qualifié.
Les points d’isolation électrique doivent être libres de toute obstruction. En cas de débranchement requis
en urgence, ils doivent être facilement accessibles.
Le raccordement à une source d’alimentation appropriée doit uniquement être réalisé par un
électricien qualifié et compétent.
Conformité
Le logo WEEE qui figure sur ce produit ou sa documentation indique qu’il ne doit pas
être mis au rebut avec les ordures ménagères. Pour éviter qu’il ne présente un risque
pour la santé humaine et / ou écologique, confiez la mise au rebut de ce produit à un
site de recyclage agréé respectueux de l’environnement. Pour de plus amples détails sur
la mise au rebut appropriée de ce produit, contactez le fournisseur du produit ou l’autorité
responsable de l’enlèvement des ordures dans votre région.
Les pièces BUFFALO ont été soumises à des tests rigoureux pour pouvoir être déclarées
conformes aux normes et spécifications réglementaires définies par les autorités
internationales, indépendantes et fédérales.
Les produits BUFFALO ont été déclarés aptes à porter le symbole suivant :
Tous droits réservés. La production ou transmission, partielles ou intégrales, sous quelque forme que ce soit ou par n’importe
quel moyen, tant électronique que mécanique, sous forme de photocopie, d’enregistrement ou autre de ce mode d’emploi
sont interdites sans l’autorisation préalablement accordée par BUFFALO.
Nous nous efforçons, par tous les moyens dont nous disposons, de faire en sorte que les détails contenus dans le présent
mode d’emploi soient corrects en date d’impression. Toutefois, BUFFALO se réserve le droit de changer les spécifications de
ses produits sans préavis.

20
DE
Sicherheitshinweise
• Auf eine flache, stabile Oberfläche stellen.
• Alle erforderlichen Montage- und Reparaturarbeiten sollten
von Wartungspersonal oder einem qualifizierten Techniker
durchgeführt werden. Keine Bauteile oder Bedienflächen von
diesem Produkt entfernen.
• Für folgende Normen und Vorschriften sind die lokalen und
nationalen Normen heranzuziehen:
- Arbeitsschutzvorschriften
- BS EN Verhaltenspraktiken
- Brandschutzvorschriften
- IEE-Anschlussvorschriften
- Bauvorschriften
• IMMER darauf achten, dass das Öl zwischen den Markierungen
„MIN“ und „MAX“ steht. Bei Nichtbeachtung ist ein Brand nicht
auszuschließen.
• IMMER ein geeignetes Speiseöl verwenden.
• Vor dem Frittieren IMMER überschüssige Feuchtigkeit/Wasser
von den Speisen entfernen, um übermäßige Schaumbildung
und Fettspritzer zu vermeiden.
• Das Fett regelmäßig wechseln. Der Flammpunkt von Öl und
Fett (die Temperatur, bei dem sich Öl entzündet) sinkt mit
zunehmendem Gebrauch allmählich.
• Das Fettbecken während des Gebrauchs NICHT zudecken.
• Gerät NICHT in Wasser eintauchen.
• Einige Flächen werden während des Betriebs heiß - Vorsicht
beim Gebrauch des Geräts.
• Nach dem Gebrauch das Gerät stets ausschalten und den
Netzstecker ziehen.
• Nicht zum Gebrauch im Freien geeignet.
• Dieses Gerät darf nur in Übereinstimmung mit diesen Anweisungen
und von dafür zuständigen Personen benutzt werden.
• Verpackungsmaterial außerhalb der Reichweite von Kindern
aufbewahren und gemäß den lokalen Vorschriften entsorgen.
Seite wird geladen ...
Seite wird geladen ...
Seite wird geladen ...
Seite wird geladen ...
Seite wird geladen ...
Seite wird geladen ...
Seite wird geladen ...
Seite wird geladen ...
Seite wird geladen ...
Seite wird geladen ...
Seite wird geladen ...
Seite wird geladen ...
Seite wird geladen ...
Seite wird geladen ...
Seite wird geladen ...
Seite wird geladen ...
Seite wird geladen ...
Seite wird geladen ...
Seite wird geladen ...
Seite wird geladen ...
Seite wird geladen ...
Seite wird geladen ...
Seite wird geladen ...
Seite wird geladen ...
Seite wird geladen ...
Seite wird geladen ...
Seite wird geladen ...
Seite wird geladen ...
-
 1
1
-
 2
2
-
 3
3
-
 4
4
-
 5
5
-
 6
6
-
 7
7
-
 8
8
-
 9
9
-
 10
10
-
 11
11
-
 12
12
-
 13
13
-
 14
14
-
 15
15
-
 16
16
-
 17
17
-
 18
18
-
 19
19
-
 20
20
-
 21
21
-
 22
22
-
 23
23
-
 24
24
-
 25
25
-
 26
26
-
 27
27
-
 28
28
-
 29
29
-
 30
30
-
 31
31
-
 32
32
-
 33
33
-
 34
34
-
 35
35
-
 36
36
-
 37
37
-
 38
38
-
 39
39
-
 40
40
-
 41
41
-
 42
42
-
 43
43
-
 44
44
-
 45
45
-
 46
46
-
 47
47
-
 48
48


Buffalo FC375 Bedienungsanleitung
- Typ
- Bedienungsanleitung
in anderen Sprachen
- français: Buffalo FC375 Le manuel du propriétaire
- español: Buffalo FC375 El manual del propietario
- italiano: Buffalo FC375 Manuale del proprietario
- Nederlands: Buffalo FC375 de handleiding
- português: Buffalo FC375 Manual do proprietário
Verwandte Artikel
-
Buffalo FC258 Bedienungsanleitung
-
Buffalo FC256 Bedienungsanleitung
-
-
Buffalo CP793 Benutzerhandbuch
-
Buffalo GH127 Bedienungsanleitung
-
-
-
Buffalo HE154 Benutzerhandbuch
-
Buffalo CE208 Benutzerhandbuch
-