Ingo Maurer Schlitz Up LED Bedienungsanleitung
- Typ
- Bedienungsanleitung

Schlitz Up LED Instructions
Schlitz Up Instructions

32
Schlitz Up
Design: Ingo Maurer 2002
Deutsch Seite 4
English Page 7
Français Page 10
Italiano Pagina 13
Zeichnungen Seite 16
Drawings Page 16
Dessins Page 16
Disegni Pagina 16
Montageanleitung
Bitte vor der Montage aufmerksam lesen und auf-
bewahren!
Instructions for assembly
Please read these instructions carefully before going
any further, and keep them in a safe place for future
reference!
Instructions de montage
À lire attentivement avant le montage et à conserver!
Istruzioni di montaggio
Prima del montaggio, leggere attentamente le
istruzioni e conservarle!

54
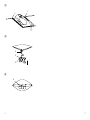
Anschließen der Leuchte
Wichtig: Achten Sie darauf, dass die Sicherung des Decken-
auslasses abgeschaltet ist.
Ziehen Sie das Zuleitungskabel des Deckenauslasses nach
unten heraus und isolieren Sie die Adern ca. 5 mm ab.
Schließen Sie Phase, Null-Leiter und Erdung zugentlastet
im Lüsterklemmengehäuse (2) des Anschlusskabels an und
schließen Sie das Gehäuse. ②
Schieben Sie das Zuleitungskabel, das Lüsterklemmengehäuse
und das Anschlusskabel komplett durch die obere Öffnung
der Leuchte in die abgehängte Decke.
Stecken Sie den Fassungsträger (3) unten durch den Schlitz
und xieren Sie ihn in der Öffnung der Abdeckung, indem Sie
die Knöpfe (4) der Druckverschlüsse in die Haltebuchsen (5)
eindrücken. ③
Einsetzen der Leuchtmittel
Drücken Sie das Leuchtmittel bei gleichzeitiger leichter
Drehung nach rechts in die Bajonettlöcher der Fassung.
Achten Sie auf korrekten Sitz des Leuchtmittels, bevor Sie
die Sicherung wieder einschalten.
Wechsel der Leuchtmittel
Achtung: Schalten Sie die Sicherung aus und lassen Sie die
Lampe vollständig abkühlen.
Das alte Leuchtmittel lässt sich durch leichtes Eindrücken
und anschließende Linksdrehung (gegen den Uhrzeigersinn)
aus der Bajonettfassung lösen. Setzen Sie das neue Leucht-
mittel ein wie unter Einsetzen des Leuchtmittels beschrieben.
Achten Sie auf korrekten Sitz des Leuchtmittels, bevor Sie
die Sicherung wieder einschalten.
Deutsch
Montage und Elektroanschluss sind von einer Elektrofachkraft
auszuführen. Wir empfehlen, die Montage mit zwei Personen
durchzuführen.
Achtung: Schalten Sie vor der Montage die Sicherung aus.
Einbau der Leuchte
Achtung: Achten Sie auf den Verlauf der Elektroleitungen,
damit auf keinen Fall ein Kabel angebohrt wird.
Wichtig: Die Leuchte darf nicht mit Dämmmaterial oder
ähnlichen Werkstoffen abgedeckt werden! Der Mindestab-
stand zu normal entammbaren Flächen in der abgehängten
Decke beträgt 5 cm. Eine ausreichende Hinterlüftung der
Leuchte in der abgehängten Decke muss gewährleistet sein.
Einbautiefe: mindestens 15 cm.
Montagevorbereitung:
Sie benötigen an der Montagestelle eine vorbereitete
Netzleitung in ausreichender Länge. Wählen Sie den
Ausschnitt in der abgehängten Decke so knapp wie möglich:
Die lichte Weite des Ausschnittes beträgt 880 mm x 410 mm.
Montage:
Schieben Sie die Leuchte von unten durch den Ausschnitt,
richten Sie sie exakt aus und verschrauben Sie die Auage-
ächen (1) fest mit der Decke. Überdecken Sie den Über-
gang zwischen Decke und Leuchte mit einem Textilband und
verspachteln Sie die Fläche.
Die eingebaute Leuchte muss abschließend zusammen mit
der Decke überstrichen werden.
Achtung: Achten Sie darauf, dass nur die Aussenseite der
Leuchte gestrichen wird. Vermeiden Sie Farbauftrag auf der
Innenseite. ①
Deutsch

76
The lamp assembly and all electrical work must be carried
out by a qualied electrician.We recommend that a second
person be present to assist with the assembly.
Caution: Switch off or remove the fuse for the mains
supply before beginning the assembly.
Lamp xture
Caution: Please take care to ascertain the exact position of
the mains cable, so as to avoid drilling into it.
Important: The lamp must not be covered with insulating
or other materials. Allow clearance of at least 5 cm from
ammable surfaces in the ceiling cavity. It is also essential to
ensure sufcient air circulation in the ceiling behind the lamp.
Minimum installation depth: 15 cm.
Preparations for assembly:
At the installation site a prepared mains cable of sufcient
length is required. The aperture in the ceiling should be
as small as possible. The inside dimensions of the slit are
880 mm x 410 mm.
Assembly:
Push the lamp up through the aperture in the ceiling, position
it symmetrically and screw the edges rmly onto the ceiling.
Cover the gap between the ceiling and the edges of the
lamp with patching tape and apply a coat of ller before
painting the lamp surface and the ceiling.
Caution: Ensure that the paint is applied only to the exterior
surface of the slit; do not paint inside the opening. ①
English
Technische Daten
Wichtig: Diese Leuchte ist geeignet für LED-Leuchtmittel
der Energieklasse A++- A.
Die Leuchte ist NICHT geeignet für Halogen-Leuchtmittel!
100-240V~, 50/60Hz.,
3x Fassung GU10, MR16 LED max.10W
Mindestabstand zu angestrahltenen Flächen: 1,0 m
Die Leuchte darf nicht mit Dämmmaterial oder
ähnlichen Werkstoffen abgedeckt werden!
Achtung: Mindestabstand zu normal entammbaren
Flächen in der abgehängten Decke: 5 cm
Eventuell notwendige Reparaturen dürfen nur von einer
Elektrofachkraft durchgeführt werden. Die äußere Leitung
darf bei Beschädigung nur von der Ingo Maurer GmbH
ausgetauscht werden.
Bei Schäden, die durch Nichtbeachten dieser Bedienungs-
anleitung, unsachgemäßer Inbetriebnahme und/oder bau-
licher Veränderung z.B. durch Fremdbauteile, Handhabung
oder Fremdeingriff verursacht werden, erlischt der
Garantieanspruch.
Deutsch

98
Technical specication
Important: This lamp is suitable for use with LED light
bulbs of the energy classes A++- A.
The lamp is NOT suitable for halogen bulbs!
100-240V~, 50/60Hz.,
3x Socket GU10, MR16 LED max.10W
Minimum distance from combustible surfaces:
100 cm
The lamp must not be covered with insulating or
other materials.
Caution: Ensure clearance of least 5 cm from ammable
surfaces in the ceiling cavity.
Any repairs that may become necessary must be carried out
by a professional electrician. In the event of damage to the
power cord, replacements may only be tted by Ingo Maurer
GmbH.
In case of damage caused by disregarding these operating
instructions, improper commissioning and/or construction
change, e.g. due to foreign components, handling
or external interference, the warranty claim is void.
English
English
Connecting the lamp
Caution: Make sure the fuse for the mains supply is
switched off.
Pull the end of the mains cable down through the ceiling
aperture and strip about 5 mm from the ends of the three
wires. Connect the phase, neutral and earth wires to the
contacts in the terminal (2) on the connection cable, ensu-
ring that the wires are strain-relieved, and close the terminal
box. ②
Push the assembly with the terminal through the top of the
slit into the ceiling cavity.
Push the socket holder (3) through the slit and secure it
with the stud fasteners (4) on the retaining xture (5). ③
Inserting the bulbs
Insert the bulbs in the sockets, applying gentle pressure with
a clockwise twist until the bayonet tting locks into position.
Make sure that the bulbs are securely in position before
reactivating the fuse for the mains supply.
Changing the bulb
Caution: Remove or switch off the fuse for the mains
supply and allow the lamp to cool down completely.
To remove the spent bulb, apply gentle downward pressure
with an anticlockwise twist to release the bayonet tting.
Insert the replacement as described in Inserting the bulbs
above. Make sure that the bulbs are securely in position
before reactivating the fuse for the mains supply.

1110
Français
Connexion de la lampe
Important: Vérier si le fusible de la sortie au plafond est
déconnecté.
Tirer le câble de la conduite électrique de plafond vers le
bas et dénuder les extrémités des ls d’environ 5 mm.
Connecter phase, phase nulle et la phase-terre, déchargée
de traction, au câble de la lampe dans le boîtier de con-
nexion (2) et fermer le boîtier.
Faire passer complètement la conduite électrique, le boîtier
de connexion et le câble de la lampe par l’ouverture supéri-
eure de la lampe sur le faux-plafond. ②
Faire passer le support de douilles (3) par le dessous au
travers de la fenteet le xer dans l‘ouverture de la coque en
enfonçant les boutons (4) de fermeture dans les douilles de
fermeture (5). ③
Insertion des ampoules LED
Insérer les ampoules LED dans les douilles à baïonnette en
tournant en même temps légèrement vers la droite.
Vérier qu‘elles soient bien positionnées avant de reconnec-
ter le fusible.
Remplacement des ampoules LED
Attention: déconnecter le fusible et laisser refroidir la
lampe complètement.
L’ampoule à changer doit être enlevée de la douille à
baïonnette par une légère pression puis une rotation vers la
gauche. Insérer la nouvelle ampoule comme décrit au point
«Insertion de l’ampoule».
Assurer un bon positionnement de l‘ampoule avant tourner
le fusible à nouveau.
Le montage et le branchement électrique sont à effectuer
par un électricien. Nous recommandons d’effectuer le
montage à deux personnes.
Attention: déconnecter le fusible avant le montage.
Encastrement de la lampe
Attention: il est indispensable de respecter le positionne-
ment des conduites électriques an d‘éviter de percer un
câble électrique.
Important: En aucun cas couvrir la lampe avec du matériel
isolant ou des matières similaires. La distance minimale aux
surfaces enammables au faux-plafond s’élève à 5 cm. Il faut
assurer une aération sufsante de la lampe au faux-plafond.
Profondeur de montage: minimum 15 cm.
Préparation au montage:
Sur le lieu d‘installation, vous devez disposer d‘un câble
secteur préparé d‘une longueur sufsante.
Choisir une découpe du faux-plafond la plus
précise possible: la dimension intérieure de la découpe
se monte à 880 mm x 410 mm.
Montage:
Faire passer la lampe au travers de la découpe par le des-
sous. La positionner exactement et visser les surfaces
d‘appui (1) au plafond. Recouvrir le passage du plafond à
la lampe par un ruban textile (2) et mastiquer la surface.
La lampe encastrée doit être peinte ultérieurement avec le
plafond. ①
Attention: Faire attention de peindre uniquement la surface
extérieure de la lampe. Eviter de peindre la surface intérieure.
Français

1312
Italiano
Il montaggio e il collegamento alla rete devono essere
eseguiti da un elettricista. Raccomandiamo che il montaggio
venga effettuato da due persone.
Attenzione: Prima del montaggio staccare la corrente.
Incasso della lampada
Attenzione: Fare attenzione al percorso delle linee di
alimentazione per evitare di danneggiare un cavo durante
l’installazione.
Importante: La lampada non deve essere coperta da ma-
teriali isolanti o simili! Distanza minima da superci normal-
mente inammabili nel controsoftto 5 cm. Una sufciente
aerazione della lampada all’interno del controsoftto deve
essere garantita. Profondità minima di incasso 15 cm.
Preparazione del montaggio:
Sul luogo di installazione è necessario un cavo di rete
preparato di lunghezza sufciente. Tagliare un‘apertura nel
controsoftto la più precisa e minima pos-sibile: le dimensio-
ni interne dell‘apertura devono essere
880 mm x 410 mm.
Montaggio:
Inserire la lampada dal basso nell‘apertura, posizionarla con
esattezza e avvitare le superci d‘appoggio (1) saldamente
al controsoftto. Ricoprire la sporgenza tra controsoftto
e lampada con una garza e stuccarla.
Dipingere successivamente la lampada unitamente al softto.
①
Attenzione: Fare attenzione a dipingere soltanto la super-
cie esterna della lampada. Evitare di verniciare la supercie
interna.
Données techniques
Important: Ce luminaire est compatible avec des ampoules
LED des classes énergétiques A++- A.
La lampe ne convient pas pour les ampoules halogènes!
100-240V~, 50/60Hz,
3x douille de lampe GU10, MR16 LED max.10W
Distance minimale aux surfaces inammables: 1,0 m
Le luminaire ne doit pas être recouverte
d‘isolation ou de matériaux similaires!
Attention: Distance minimale aux surfaces au faux-plafond
s’élève à 5 cm.
Des réparations éventuellement nécessaires ne doivent être
effectuées que par un spécialiste. En cas d’endommagement,
le câble électrique externe ne doit être échangé que par la
société Ingo Maurer GmbH.
En cas de dommages causés par le non-respect de ce mode
d‘emploi, une mise en service incorrecte et/ou une modi-
cation de la construction, par exemple en raison de compo-
sants étrangers, de manipulations ou d‘interférences externes,
le droit à la garantie est annulé.
Français

1514
Italiano
Dati tecnici
Attenzione: Questa lampada è compatibile con lampadine
LED di classi energetiche A++- A.
La lampada NON è compatibile con lampadine alogene!
100-240V~, 50/60Hz,
3x zoccolo lampada GU10, MR16 LED max.10W
Distanza minima dalle superci illuminate: 1,0 m
La lampada non deve essere coperta da materiale
isolante o simili!
Attenzione: Distanza minima da superci normalmente
inammabili all‘interno del controsoftto: 5 cm.
Eventuali riparazioni possono essere effettuate esclusivamente
da un elettricista. Il cavo esterno – se danneggiato – può
essere sostituito soltanto dalla Ingo Maurer GmbH.
In caso di danni causati dall‘inosservanza delle presenti
istruzioni d‘uso, da una messa in servizio e/o da una modi-
ca costruttiva non corretta, ad es. a causa di componenti
estranei, manipolazione o interferenze esterne, il diritto alla
garanzia decade.
Italiano
Collegamento elettrico
Attenzione: Assicurarsi che la corrente dell’uscita di cor-
rente al softto sia staccata.
Estrarre verso il basso il cavo di alimentazione e spelare le
estremità per ca. 5 mm. Collegare fase, neutro e terra com-
pleta di antistrappo alla morsettiera (2) del cavo di collega-
mento e chiudere la scatola. ②
Spingere il cavo di alimentazione, la scatoletta con morsettiera
e il relativo cavo completo nella controsofttatura, attraverso
la fessura rettangolare della lampada.
Inserire il portalampade (3), da sotto, attraverso il taglio
e ssarlo nella fessura rettangolare usando i due pulsanti
laterali (4) che si bloccano a spinta nelle loro sedi a boc-
cola (5). ③
Inserimento della lampadina
Inserire la lampadina nei fori a baionetta del portalampada
spingendo e girando leggermente in senso orario. Fare atten-
zione che la lampadina sia correttamente inserita prima di
riattaccare la corrente.
Sostituzione della lampadina
Attenzione: Staccare la corrente e attendere che la lampa-
da sia completamente fredda.
Rimuovere la vecchia lampadina dal portalampada a baionetta
premendola leggermente e in seguito girandola verso sinistra
(in senso antiorario). Inserire la nuova lampadina come
descritto al paragrafo „Inserimento della lampadina“. Fare
attenzione che la lampadina sia correttamente inserita prima
di riattaccare la corrente.

1716
1
1
2
4
3
5
①
②
③

1918

Ingo Maurer GmbH
Kaiserstrasse 47
D-80801 München
Tel. +49. 89. 381 606-0
Fax +49. 89. 381 606 20
info@ingo-maurer.com
www.ingo-maurer.com
April 2020 Made in Germany
-
 1
1
-
 2
2
-
 3
3
-
 4
4
-
 5
5
-
 6
6
-
 7
7
-
 8
8
-
 9
9
-
 10
10
-
 11
11


Ingo Maurer Schlitz Up LED Bedienungsanleitung
- Typ
- Bedienungsanleitung
in anderen Sprachen
Verwandte Artikel
-
Ingo Maurer Light Cone S Bedienungsanleitung
-
-
-
-
-
-
-
-
-

