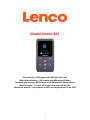
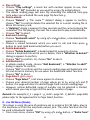
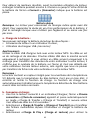
Lenco Xemio-861BU Bedienungsanleitung
- Kategorie
- MP3 / MP4-Player
- Typ
- Bedienungsanleitung
Dieses Handbuch eignet sich auch für

1
Model Xemio-861
User manual – MP3 player with 8GB micro SD card
Gebruikshandleiding – MP3-speler met 8GB microSD-kaart
Bedienungsanleitung – MP3-Player mit 8 GB microSD-Speicherkarte
Mode d’emploi – Lecteur MP3 avec carte micro SD de 8 Go
Manual de usuario – reproductor de MP3 con tarjeta micro SD de 8 GB

2
Index
English ...................................................................................................... 3
Nederlands ............................................................................................. 28
Deutsch .................................................................................................. 57
Français .................................................................................................. 87
Español ................................................................................................ 116

3
English
Xemio-861
CAUTION:
Usage of controls or adjustments or performance of procedures other than
those specified herein may result in hazardous radiation exposure.
PRECAUTIONS BEFORE USE
KEEP THESE INSTRUCTIONS IN MIND:
1. Do not cover or block any ventilation openings. When placing the device
on a shelf, leave 5 cm (2”) free space around the whole device.
2. Install in accordance with the supplied user manual.
3. Keep the device away from heat sources such as radiators, heaters,
stoves, candles and other heat-generating products or naked flame. The
apparatus can only be used in moderate climates. Extremely cold or
warm environments should be avoided. Working temperature between
0° and 35° C.
4. Avoid using the device near strong magnetic fields.
5. Electrostatic discharge can disturb normal usage of this device. If so,
simply reset and restart the device following the instruction manual.
During file transmission, please handle with care and operate in a
static-free environment.
6. Warning! Never insert an object into the product through the vents or
openings. High voltage flows through the product and inserting an object
can cause electric shock and/or short circuit internal parts. For the same
reason, do not spill water or liquid on the product.
7. Do not use in wet or moist areas such as bathrooms, steamy kitchens or
near swimming pools.
8. The apparatus shall not be exposed to dripping or splashing and make
sure that no objects filled with liquids, such as vases, are placed on or
near the apparatus.
9. Do not use this device when condensation may occur. When the unit is
used in a warm wet room with damp, water droplets or condensation
may occur inside the unit and the unit could maybe not work properly;
let the unit stand in power OFF for 1 or 2 hours before turning on the
power: the unit should be dry before getting any power.
10. Although this device is manufactured with the utmost care and checked
several times before leaving the factory, it is still possible that problems
may occur, as with all electrical appliances. If you notice smoke, an
excessive build-up of heat or any other unexpected phenomena, you
should disconnect the plug from the main power socket immediately.
11. This device must operate on a power source as specified on the
specification label. If you are not sure of the type of power supply used in
your home, consult your dealer or local power company.
12. Keep away from rodents. Rodents enjoy biting on power cords.
13. To clean the device, use a soft dry cloth. Do not use solvents or petrol
based fluids. To remove severe stains, you may use a damp cloth with
dilute detergent.

4
14. The supplier is not responsible for damage or lost data caused by
malfunction, misuse, modification of the device or battery replacement.
15. Do not interrupt the connection when the device is formatting or
transferring files. Otherwise, data may be corrupted or lost.
16. If the unit has USB playback function, the usb memory stick should be
plugged into the unit directly. Don’t use an usb extension cable because it
can cause interference resulting in failing of data.
17. The rating label has been marked on the bottom or back panel of the
apparatus.
18. This device is not intended for use by people (including children) with
physical, sensory or mental disabilities, or a lack of experience and
knowledge, unless they’re under supervision or have received
instructions about the correct use of the device by the person who is
responsible for their safety.
19. This product is intended for non professional use only and not for
commercial or industrial use.
20. Make sure the unit is adjusted to a stable position. Damage caused by
using this product in an unstable position vibrations or shocks or by
failure to follow any other warning or precaution contained within this
user manual will not be covered by warranty.
21. Never remove the casing of this apparatus.
22. Never place this apparatus on other electrical equipment.
23. Do not allow children access to plastic bags.
24. Only use attachments/accessories specified by the manufacturer.
25. Refer all servicing to qualified service personnel. Servicing is required
when the apparatus has been damaged in any way, such as the power
supply cord or the plug, when liquid has been spilled or objects have
fallen into the apparatus, when the apparatus has been exposed to rain
or moisture, does not operate normally, or has been dropped.
26. Prolonged exposure to loud sounds from personal music players may lead
to temporary or permanent hearing loss.
27. If the product is delivered with power cable or AC power adaptor :
⚫ If any trouble occur, disconnect the AC power card and refer servicing
to qualified personnel.
⚫ To completely disconnect the power input, the mains plug of the
apparatus shall be disconnected from the mains, as the disconnect
device is the mains plug of apparatus.
⚫ Don’t step on or pinch the power adaptor. Be very careful,
particularly near the plugs and the cable’s exit point. Do not place
heavy items on the power adaptor, which may damage it. Keep the
entire device out of children’s reach! When playing with the power
cable, they can seriously injure themselves.
⚫ Unplug this device during lightning storms or when unused for a long
period.
⚫ The socket outlet must be installed near the equipment and must be
easily accessible.

5
⚫ Do not overload ac outlets or extension cords. Overloading can cause
fire or electric shock.
⚫ Devices with class 1 construction should be connected to a main
socket outlet with a protective earthed connection.
⚫ Devices with class 2 construction do not require a earthed
connection.
⚫ Always hold the plug when pulling it out of the main supply socket. Do
not pull the power cord. This can cause a short circuit.
⚫ Do not use a damaged power cord or plug or a loose outlet. Doing so
may result in fire or electric shock.
28. If the product contains or is delivered with a remote control containing
coin / cell batteries:
Warning:
⚫ “Do not ingest battery, Chemical Burn Hazard” or equivalent working.
⚫ [The remote control supplied with] This product contains a coin /
button cell battery is swallowed, it can cause severe internal burns in
just 2 hours and can lead to death.
⚫ Keep new and used batteries away from children.
⚫ If the battery compartment does not close securely, stop using the
product and keep it away from children.
⚫ If you think batteries might have been swallowed or placed inside any
part of the body, seek immediate medical attention.
29. Caution about the use of Batteries:
⚫ Danger of explosion if battery is incorrectly replaced. Replace only
with the same or equivalent type.
⚫ Battery cannot be subjected to high or low extreme temperatures,
low air pressure at high altitude during use, storage or transportation.
⚫ Replacement of a battery with an incorrect type that can result in an
explosion or the leakage of flammable liquid or gas.
⚫ Disposal of a battery into fire or a hot oven, or mechanically crushing
or cutting of a battery, that can result in an explosion.
⚫ Leaving a battery in an extremely high temperature surrounding
environment that can result in an explosion or that leakage of
flammable liquid or gas.
⚫ A battery subjected to extremely low air pressure that may result in
an explosion or the leakage of flammable liquid or gas.
⚫ Attention should be drawn to the environmental aspects of battery
disposal.
INSTALLATION
• Unpack all parts and remove protective material.
• Do not connect the unit to the mains before checking the mains voltage
and before all other connections have been made.

6
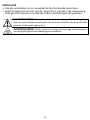
WARNING: When participating in the traffic listening to a personal music
player can make the listener less aware of potential dangers such as
approaching cars.
WARNING: To prevent possible hearing damage, do not listen at high
volume levels for long periods.

7
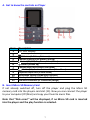
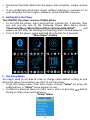
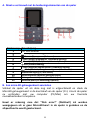
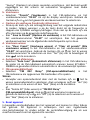
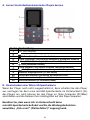
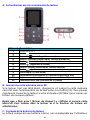
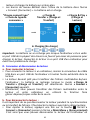
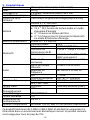
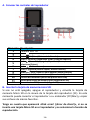
A. Get to know the controls on Player
Item
Description
1
TFT LCD Display
2
Button (Volume Down)
3
M Button (Call Menu/Submenu)
4
< Button (Previous/Fast-Rewind, Item up)
5
Button (ON/OFF, Play/Pause, Select/Enter)
6
Button (Volume Up)
7
> Button (Next/Fast-Forward, item down)
8
Button (Exit; Back to Previous Menu/Main Menu)
9
Earphone Output Jack (3.5mm Stereo)
10
Microphone Position (inside Micro USB port)
11
Memory Card Slot (for Micro SD Card)
12
USB Micro Connector (PC Connection/Charge)
B. Insert Micro SD Memory Card
If not already switched off, turn off the player and plug the Micro SD
memory card into the players card slot (11). Now you can connect the player
to your computer (PC/Mac) and copy your favorite music files.
Note that “Disk error!” will be displayed, if no Micro SD card is inserted
into the player and the play function is selected.

8
C. About Player Battery
Player has an internal, non–user-replaceable battery. For best results, the
first time you use player, let it charge for about 3 ~ 4 hours or until the
battery status icon in the “Connect” screen shows that the battery is in full.
Battery is full
Note: Player may continue use battery power after it’s been turned off. For
maintain the battery life and performance, if unit isn’t used for a while, the
battery need to be recharged, recharging the battery at least once per
month.
a. Charging the Battery:
You can charge the player battery in two ways:
▪ Connect player to your computer. Or,
▪ Use the USB power charger. (not included)
Warning:
Better use the original USB cable delivered with your MP3 player. This cable
is a data and charging cable. Some other USB cables in the market are
charging only cables. If you use a charging only cable to transfer data from
your computer to your player, it will only show the battery symbol on the
screen and will not be detected by your computer as an external drive; this
means that you can not transfer any files from your computer to your MP3
player.
Note :
The player contains a built-in temperature monitor sensor. If it senses that
the battery pack temperature is not in good condition it will control and stop
the charging function. The charging function will be automatically restored
when the detected battery pack temperature returns to within normal
limits.
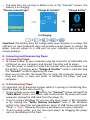
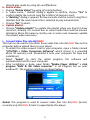
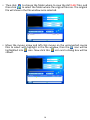
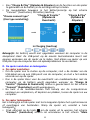
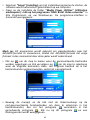
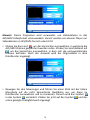
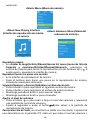
b. Connection and Charging:
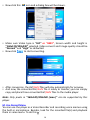
▪ Once you have connected player with computer/power charger, then you
will see the “Choose connection” screen appear to choose and it will
switch to Charge & Transfer” mode automatically if no action in 4 ~ 5
seconds.
▪ Choose “Charge & Transfer” to upload or download the media files with
your computer and charging the Player’s battery.
▪ Choose “Charge & Play” to operates the Player’s function and the battery
charging in background.

9
▪ The level bars are running in battery icon at the “Connect” screen. The
battery is in charging.
“Choose connect type”
“Charge & Transfer”
“Charge & Play”
or
In Charging
Important: The battery does not charge when your computer is in sleep. The
USB port on most keyboards does not provide enough power to charge the
player. Connect player to a USB port on your computer only to prevent
charge problem.
D. Connecting and Disconnecting Player
a. To Connecting Player:
▪ To connect player to your computer, plug the connector of USB Cable into
a USB port on your computer, and connect the other end to player.
▪ Then the player is ready for media files transfer with your computer and
the battery is charging when “Charge & Transfer” mode is selected. And
the “Connect” screen is appearing for view.
▪ Now you can transfer the media files by using the computer mouse use
drag and place, or copy and paste, in between the player and your
computer.
b. To Disconnecting Player:
It’s important not to disconnect player while it’s syncing or transferring files.
Eject the player before disconnect it.
▪ To eject player, press once button, the “Connect” screen will switch to
“Main Menu” screen. And now is safe to disconnect the player with your
computer. Unplug the USB cable from the player. Or,
▪ If you’re using a Windows PC, you can also eject player in My Computer
or by clicking the “Safely Remove Hardware” icon in the Windows
system tray, select the correspondence name of USB Device and choose
“Stop” or “Eject” follow by the pop-up windows you’re your computer.
▪ If you’re using a Mac, you can also eject player by dragging the player
icon on the desktop to the Trash.

10
▪ Disconnect the USB cable from the player and computer, simply remove
it.
▪ If you accidentally disconnect player without ejecting it, reconnect it to
your computer and sync again. However, some media file may loss.
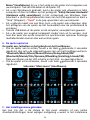
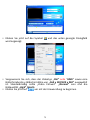
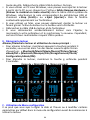
E. Getting Start the Player
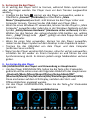
Turn ON/OFF the player and use of Main Menu:
▪ To turn ON the player, press and hold the button for 3 seconds, then
you will see any one of the following shown Main Menu screen,
“Bluetooth/Music/Movie/Record/Picture/Setup/eBook/FM”, will
appear on LCD after the Loading and Opening screen have displayed.
▪ To turn OFF the player, press and hold the button for 3 seconds.
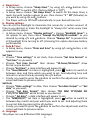
“Main Menu” screens
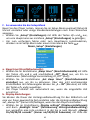
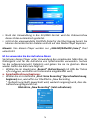
F. Use Setup Menu
You might need to set date & time or change some default setting as you
desired in setup menu before you start to use the player.
▪ To go into setup menu, from main menu, choose “Setup” by using </>
and buttons, a “Setup” menu appears to use;
▪ For back to previous menu or main menu, press or pressing button
during in setup menu and submenu.
“Setup” Menu

11
a. Sleep timer:
▪ In Setup menu, choose “Sleep timer”, by using </> and buttons then
choose “Off” to switch off it. (factory default is “Off”)
▪ In Setup menu, choose “Set sleep timer” to switch On the sleep timer, a
levels bar with number appear to use, then choose “1 ~ 99” (Minutes) as
you want by using </> and buttons.
▪ The Player will turn off itself automatically as your desired time set.
b. Display settings:
You can set the backlight to illuminate the screen for a certain amount of
time as you desired, or make the backlight to “always On” when every time
you turn ON the player.
▪ In Setup menu, choose “Display settings” > choose “Backlight timer”, a
list appear to use, then chose “Always On/10/20/30 seconds” as you
desired by using </> and buttons. Choose “Always On” to prevent the
LCD backlight from turning to off. (choosing this option decrease battery
performance)
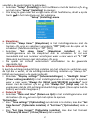
c. Date & Time:
▪ In Setup menu, choose “Date and time” by using </> and button, a list
appears to use.
Set Time
▪ Choose “Time settings” to set clock, then choose “Set time format” or
“Set time” as you want;
▪ Choose “Set time format” then choose “12-hours/24-hours” show
format as you desired.
▪ Choose “Set time”, a clock interface will appear to set;
▪ The “Hour/Minute” set item is highlighted, press button to switch in
between Hour and Time which you want to set. And adjusting hour and
minute to current time by pressing the </> button.
▪ Finally, you need to press the button to confirm the adjustment and the
screen will back to previous menu.
Set Date
▪ Choose “Date settings” to date, then choose “Set date format” or “Set
date” as you want;
▪ Choose “Set date format” then choose “DD MM YYYY/MM DD
YYYY/YYYY MM DD” which format as you desired.
▪ Choose “ Set date”, a date interface will appear to set;
▪ The “MM/DD/YY” set item is highlighted, press button to switch in
between day, month and year which you want to set. And adjusting them
to current date by pressing the </> button.
▪ Finally, you need to press the button to confirm the adjustment and the
screen will back to previous menu.
d. Language:
This player can use difference OSD languages.

12
▪ To set the language, choose “Language”, and then choose which
language as you desired by using </> and button.
e. Information:
You can view about the player information and Micro SD memory card status,
such as firmware version, remaining memory space available and the
number of support media files available in player.
▪ In Setup menu, choose “Information” by using </> and button, a list
appears to use.
▪ Choose “Player information” or “Disk space” which you want to view.
f. Factory Settings:
▪ In Setup menu, choose “Factory settings”, a dialog “Restore factory
settings?” will pop up to confirm;
▪ Choose “Yes” to confirm. Or, “No” to abort.
▪ Press button to exit Setup menu.
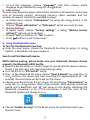
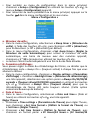
G. Using the Bluetooth menu
To Turn On the Bluetooth Function:
● From the main menu, choose the Bluetooth function by using </> and
buttons, a Bluetooth sub menu appears.
Search and Pair Bluetooth device.
NOTE: Before pairing, please make sure your Bluetooth Receiver Device
supports the Bluetooth A2DP profile.
● Keep the device within a 1 meter range of your Bluetooth receiver device.
Power it On and set it into searching/pairing mode;
● Turn the BT On in “BT Control” menu.
● Then, in the Bluetooth list menu choose “Search Device” by using the </>
and buttons, the device will start searching for approximately 10 ~ 20
seconds. Devices found will be listed on the screen.
● Choose your device from the on screen list and choose “Pair/connect” by
using the </> and button. Wait a few seconds. Both devices should be
paired and a Bluetooth icon “ ” will show on the display indicating the
Bluetooth connection is ok. If the connection is lost the color of the
Bluetooth symbol will change to grey.
● Choose “Folders & songs” in the Music menu list to directly select your
favorite music.

13
● “The player will switch to the “Now Playing” screen.
You now can select Previous/Next/Play/Pause and adjust Volume by using
the </>, and / buttons.
● To exit the Bluetooth Transmission function, press the button until
you see the main menu icons. Select the Bluetooth menu. Select
‘BTcontrol’ from the list and select ‘Turn BT off’.
Bluetooth Function notes:
1. When using the Bluetooth audio transmitting mode, the players earphone
output will be turned off automatically;
2. There is no fast-forward/backward function in Bluetooth mode.
H. Use Music Menu
You can use this music player to playback with almost full format of music
file of audio coding. To open the music player in Main Menu:
▪ From main menu, choose “Music” by using </> and button, a list menu
appears to use;
▪ Choose “Folders & songs/Artists/Albums/Genres/playlist/Update
Playlist” as you desired;
▪ Choose “Folders & songs”, you will see all supported song files will list
out in playlist when item selected > choose a song file in list where start
the play.
▪ Choose “Artists” to enter folder (s) list menu grouping by Artist name,
then choose who name of Artist folder > choose a song file in list where
start the play.
▪ Choose “Albums” to enter folder (s) list menu grouping by Album name,
then choose who name of Album folder > choose a song file in list where
start the play.
▪ Choose “Genres” to enter folder (s) list menu grouping by Genres name,
then choose who name of Genres folder > choose a song file in list where
start the play.
▪ Choose “Playlists” > choose “Playlist on the go [1]/Playlist on the go
[2]/Playlist on the go [3]” > Select the song which you want to start with.
(you have to add songs to the selected playlist before you can use it. read
the “add to playlist” section of the “Music submenu” part, on page 15,
for more information.
▪ Choose “Update playlist” to update the playlist when you found it show
incorrect; actually, it is normal due to some media files could be manual
deleted in Micro SD memory card by user in some case. However, update
the playlist when necessary.

14
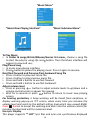
“Music Menu”
“Music Now Playing Interface”
“Music Submenu Menu”
To Play Music
▪ In Folder & songs/Artists/Albums/Genres list menu, choose a song file
to start the play by using </> and button. Then the Music interface will
appear to view and use;
Play/Pause Song
▪ In music now playing interface;
▪ Press button to pause the playing music. Press it again to resume.
Next/Fast-forward and Previous/Fast-backward Song file
▪ Press > button to play next music file.
▪ Press < button to play previous music file.
▪ Press and hold > button to use fast-forward
▪ Press and hold < button to use fast-backward.
Adjust volume level
▪ Press or pressing / button to adjust volume levels to up/down and a
volume control screen is appear for viewing.
▪ Wait for 6 seconds or press button to return to music now playing
screen.
For hearing protection; a beep warning will be heard from earphone, or
display warning pop-up on TFT screen, when every time you increase the
volume level and reach to the default setting level which may exceed 85dB.
Press button to accept the warning and enter into the volume control for
increase the level and until to maximum level.
Use Lyric Display
This player supports “*.LRC” lyric files and lyrics can synchronous displayed

15
while playing music if you music has lyric included.
▪ When the playing music included with lyrics file, then the lyrics display
mode will switched on automatically and the lyrics will display at the
music now playing interface.
I. Music Submenu
In music now playing interface, press button to enter to music submenu,
a music submenu “Play mode/Equalizer/Add to Playlist/Remove from
Playlist/Delete” is appear to choose;
a. Play Mode:
▪ In Music submenu, choose “Play mode”, a list menu “Repeat/Shuffle”
appears to choose;
▪ Choose “Repeat” > choose “choose “Repeat off/Repeat 1/Repeat
all/Repeat folder” as you desired play mode by using </> and buttons.
▪ Choose “Shuffle” > choose “Off/On” as you desired.
b. Equalizer
▪ In Music submenu, choose “Equalizer”, then choose
“Normal/Rock/Funk/Hip hop/Jazz/Classical/Techno” as you desired
sound effect by using </> and buttons.
Note : The equalizer function don’t work when using a Bluetooth
earphone/headphone. The equalizer function will only work when a cabled
earphone/headphone is used.
c. Add to playlist
▪ When playing a song you would like to add to a playlist, press the “ ”
button and use the </> keys to go to the “add to playlist” option and
select with Then you can select the playlist you want to add this song
to;
▪ Repeat the above steps to add more songs to your playlist (s)
▪ To use the playlist you made. Select “playlist” on the main menu and
then select your favorite playlist
NOTE: It is possible to manually create a playlist for use with your mp3 player.
You can use MediaMonkey for Windows computer. This is a freeware mp3
manager/player in which you can create your own playlists. The Xemio-861
is compatible with. M3u playlist files. Instructions on how to create playlists
can be found on the website from MediaMonkey. You can find the
information and download MediaMonkey from www.mediamonkey.com
d. Remove from playlist
▪ When you are playing music from the playlist and want to remove the
current song from the list the you press the “M” button.
▪ Select “Remove from playlist” and select the playlist you’re currently
using.
▪ A dialog screen will appear
▪ Choose “Yes” to confirm or choose “No” to abort.
▪ Repeat the above steps if you want to remove more music files from the

16
playlist.
e. Delete:
▪ In Music submenu, choose “Delete file” by using </> and buttons;
▪ A “song name…” delete? dialog is appear to confirm, choose “Yes” to
confirm delete the current song file in Micro SD memory card;
▪ A “deleting” dialog is appears for few seconds and the current song file is
deleted. And the next song’s file is selected to play automatically.
▪ Choose “No” to abort.
J. Movie Menu
To Play Movie
▪ From Main Menu, choose “Movie” by using </> and buttons, a files list
appears to choose;
▪ Choose the desired movie file to start the play and the screen switch to
movie now playing screen. The movie is playing automatically.
Play /Pause Movie
▪ In movie now playing screen, press button to pause the playing.
▪ Press it again to continue the play.
▪ Press button to go back files list screen for choose another movie file
to play if you want it.
Play Previous or Next Movie file
▪ Press > button to play next movie file.
▪ Press < button to play previous movie file.
Fast-Forward or Fast-Backward
▪ Press and hold > button to play fast-forward.
▪ Press and hold < button to play fast-backward.
Adjust Volume Level
▪ In movie now playing screen,
▪ Press or pressing button to increase the volume level.
▪ Press or pressing button to decrease the volume level.
For hearing protection; a beep warning will be heard from earphone, or
display warning pop-up on TFT screen, when every time you increase the
volume level and reach to the default setting level which may exceed 85dB.
Press button to accept the warning and enter into the volume control for
increase the level and until to maximum level.
K. Use Movie Submenu
You might need to change the play mode or delete some unwanted movie
files. To do this:
▪ In movie now playing screen, press button, a movie submenu
“Repeat/Delete video/Update Playlist” is appear to choose;
a. Repeat:
▪ Choose “Repeat” > choose “Repeat off/Repeat 1/Repeat all” as you

17
desired play mode by using </> and buttons.
b. Delete Video:
▪ Choose “Delete Video” by using </> and buttons;
▪ A “video name…” delete? dialog is appear to confirm, choose “Yes” to
confirm delete the current song file in Micro SD memory card;
▪ A “deleting” dialog is appears for few seconds and the current song file is
deleted. And the next movie’s file is selected to play automatically.
▪ Choose “No” to abort.
c. Update playlist:
▪ Choose “Update playlist” to update the playlist when you found it show
incorrect; actually, it is normal due to some media files could be manual
deleted in Micro SD memory card by user in some case. However, update
the playlist when necessary.
L. Convert Video files into AVI/AMV
This tool can be used to transform those video files into AVI/AMV files on the
computer before upload them to your player.
▪ To install this video convert tool to your computer, open a folder named
“UTILITIES > Video Conversion Software” which stored in a provided
Micro SD memory card. (Download it onto your computer for copy and
installation)
▪ Select “Setup” to start the install program, the software will
automatically install to your computer.
▪ After installation is done, open folder “Media Player Utilities” > click
program “AMV & AVI Video converter” in All Program bar on your
window PC. The program interface as shown below:
Noted: This program is used to convert video files into AVI/AMV format,
currently only AVI/AMV format is supported by this player.

18
▪ Then click to choose the folder where to save the AVI/AMV files, and
then click to select the folder where the original files are. The original
file will show in the file window once selected.
▪ Move the mouse arrow and left click mouse on the unconverted source
files to select with highlight in the file window, then the icon will be
highlighted into icon. Now click this icon and a dialog box will be
shown.

19
▪ Now click this icon and a dialog box will be shown.
▪ Make sure Video type is “AVI” or “AMV”, Screen width and height is
“160x120/320x240” selected. Video convert and Image quality should be
“Normal” and “High” as defaulted.
▪ Now click to start converting.
▪ After conversion, the AVI/AMV files will play automatically for preview.
▪ And now, the converted AVI/AMV file is ready to transfer, you can simply
copy and place those converted AVI/AMV files to the media player.
Note: Only pixels in “160x120/320x240 (max.)” can be supported by this
player.
M. Use Record Menu
You can use the player as a Voice Recorder and recording voice memos using
the built-in microphone. Besides, look for the recorded file(s) and playback
them in same menu. To do this:

20
▪ From main menu, choose “Record” by using </> and buttons, a list
menu appear to choose;
a. Start Voice Recording:
▪ From list menu, choose “Start Voice Recording”, a “Now Recording”
screen appear to view and it is in recording;
“Now Recording” Screen
To Start/Pause Recording
▪ In recording mode, press button to pause the recording.
▪ Press button again to start the recording again.
To Save and Stop Recording File
▪ Press button, a “save recording?” dialog pop up to confirm;
▪ Choose “Yes” to confirm, the recorded file will save into Micro SD
memory card and back to the list menu for next action.
▪ Choose “No” to abort.
b. Recordings Library: (Playback Recorded file)
▪ From list menu, choose “Recordings Library”, a list menu appear to
choose;
For delete all recorded files from Player’s
▪ Choose “Delete All” to remove all the recorded files from the Micro SD
memory card if you wish. Once choose it, a dialog pop to confirm.
▪ Choose “Yes” to delete all files. Or, choose “No” to abort.
For playback recorded file(s)
▪ From list menu, choose a desired recorded file (RECxxx.*) to start the
play by using </> and buttons;
▪ The screen will switch to “Library Now Playing” and the selected file will
start to play.
Play/Pause file
▪ In library now playing interface;
▪ Press button to pause the playing file. Press it again to resume.
Next/Fast-forward and Previous/Fast-backward Song file
▪ Press > button to play next file.
▪ Press < button to play previous file.
▪ Press and hold > button to use fast-forward
▪ Press and hold < button to use fast-backward.
▪
Seite wird geladen ...
Seite wird geladen ...
Seite wird geladen ...
Seite wird geladen ...
Seite wird geladen ...
Seite wird geladen ...
Seite wird geladen ...
Seite wird geladen ...
Seite wird geladen ...
Seite wird geladen ...
Seite wird geladen ...
Seite wird geladen ...
Seite wird geladen ...
Seite wird geladen ...
Seite wird geladen ...
Seite wird geladen ...
Seite wird geladen ...
Seite wird geladen ...
Seite wird geladen ...
Seite wird geladen ...
Seite wird geladen ...
Seite wird geladen ...
Seite wird geladen ...
Seite wird geladen ...
Seite wird geladen ...
Seite wird geladen ...
Seite wird geladen ...
Seite wird geladen ...
Seite wird geladen ...
Seite wird geladen ...
Seite wird geladen ...
Seite wird geladen ...
Seite wird geladen ...
Seite wird geladen ...
Seite wird geladen ...
Seite wird geladen ...
Seite wird geladen ...
Seite wird geladen ...
Seite wird geladen ...
Seite wird geladen ...
Seite wird geladen ...
Seite wird geladen ...
Seite wird geladen ...
Seite wird geladen ...
Seite wird geladen ...
Seite wird geladen ...
Seite wird geladen ...
Seite wird geladen ...
Seite wird geladen ...
Seite wird geladen ...
Seite wird geladen ...
Seite wird geladen ...
Seite wird geladen ...
Seite wird geladen ...
Seite wird geladen ...
Seite wird geladen ...
Seite wird geladen ...
Seite wird geladen ...
Seite wird geladen ...
Seite wird geladen ...
Seite wird geladen ...
Seite wird geladen ...
Seite wird geladen ...
Seite wird geladen ...
Seite wird geladen ...
Seite wird geladen ...
Seite wird geladen ...
Seite wird geladen ...
Seite wird geladen ...
Seite wird geladen ...
Seite wird geladen ...
Seite wird geladen ...
Seite wird geladen ...
Seite wird geladen ...
Seite wird geladen ...
Seite wird geladen ...
Seite wird geladen ...
Seite wird geladen ...
Seite wird geladen ...
Seite wird geladen ...
Seite wird geladen ...
Seite wird geladen ...
Seite wird geladen ...
Seite wird geladen ...
Seite wird geladen ...
Seite wird geladen ...
Seite wird geladen ...
Seite wird geladen ...
Seite wird geladen ...
Seite wird geladen ...
Seite wird geladen ...
Seite wird geladen ...
Seite wird geladen ...
Seite wird geladen ...
Seite wird geladen ...
Seite wird geladen ...
Seite wird geladen ...
Seite wird geladen ...
Seite wird geladen ...
Seite wird geladen ...
Seite wird geladen ...
Seite wird geladen ...
Seite wird geladen ...
Seite wird geladen ...
Seite wird geladen ...
Seite wird geladen ...
Seite wird geladen ...
Seite wird geladen ...
Seite wird geladen ...
Seite wird geladen ...
Seite wird geladen ...
Seite wird geladen ...
Seite wird geladen ...
Seite wird geladen ...
Seite wird geladen ...
Seite wird geladen ...
Seite wird geladen ...
Seite wird geladen ...
Seite wird geladen ...
Seite wird geladen ...
Seite wird geladen ...
Seite wird geladen ...
Seite wird geladen ...
Seite wird geladen ...
-
 1
1
-
 2
2
-
 3
3
-
 4
4
-
 5
5
-
 6
6
-
 7
7
-
 8
8
-
 9
9
-
 10
10
-
 11
11
-
 12
12
-
 13
13
-
 14
14
-
 15
15
-
 16
16
-
 17
17
-
 18
18
-
 19
19
-
 20
20
-
 21
21
-
 22
22
-
 23
23
-
 24
24
-
 25
25
-
 26
26
-
 27
27
-
 28
28
-
 29
29
-
 30
30
-
 31
31
-
 32
32
-
 33
33
-
 34
34
-
 35
35
-
 36
36
-
 37
37
-
 38
38
-
 39
39
-
 40
40
-
 41
41
-
 42
42
-
 43
43
-
 44
44
-
 45
45
-
 46
46
-
 47
47
-
 48
48
-
 49
49
-
 50
50
-
 51
51
-
 52
52
-
 53
53
-
 54
54
-
 55
55
-
 56
56
-
 57
57
-
 58
58
-
 59
59
-
 60
60
-
 61
61
-
 62
62
-
 63
63
-
 64
64
-
 65
65
-
 66
66
-
 67
67
-
 68
68
-
 69
69
-
 70
70
-
 71
71
-
 72
72
-
 73
73
-
 74
74
-
 75
75
-
 76
76
-
 77
77
-
 78
78
-
 79
79
-
 80
80
-
 81
81
-
 82
82
-
 83
83
-
 84
84
-
 85
85
-
 86
86
-
 87
87
-
 88
88
-
 89
89
-
 90
90
-
 91
91
-
 92
92
-
 93
93
-
 94
94
-
 95
95
-
 96
96
-
 97
97
-
 98
98
-
 99
99
-
 100
100
-
 101
101
-
 102
102
-
 103
103
-
 104
104
-
 105
105
-
 106
106
-
 107
107
-
 108
108
-
 109
109
-
 110
110
-
 111
111
-
 112
112
-
 113
113
-
 114
114
-
 115
115
-
 116
116
-
 117
117
-
 118
118
-
 119
119
-
 120
120
-
 121
121
-
 122
122
-
 123
123
-
 124
124
-
 125
125
-
 126
126
-
 127
127
-
 128
128
-
 129
129
-
 130
130
-
 131
131
-
 132
132
-
 133
133
-
 134
134
-
 135
135
-
 136
136
-
 137
137
-
 138
138
-
 139
139
-
 140
140
-
 141
141
-
 142
142
-
 143
143
-
 144
144


Lenco Xemio-861BU Bedienungsanleitung
- Kategorie
- MP3 / MP4-Player
- Typ
- Bedienungsanleitung
- Dieses Handbuch eignet sich auch für
in anderen Sprachen
- English: Lenco Xemio-861BU Owner's manual
- français: Lenco Xemio-861BU Le manuel du propriétaire
- español: Lenco Xemio-861BU El manual del propietario
- Nederlands: Lenco Xemio-861BU de handleiding
Verwandte Artikel
-
Lenco XEMIO-861 Benutzerhandbuch
-
Lenco XEMIO-768 Grey Bedienungsanleitung
-
-
-
-
-
-
-
Lenco Xemio-560 Benutzerhandbuch
-
Andere Dokumente
-
AGPtek A58 Bedienungsanleitung
-
AGPtek M30 Benutzerhandbuch
-
Polaroid SL4TF24PR001/SEC Benutzerhandbuch
-
Ingo PMP 10 Bedienungsanleitung
-
-
Sony NWZ-B133 Bedienungsanleitung
-
 LUXYA MP403 Dark silver Bedienungsanleitung
-
Lexibook DMP103BB Benutzerhandbuch
-
-
 ZICPLAY VIZIO Bedienungsanleitung

