VICTRIX Pro BFG Benutzerhandbuch

Typ
Benutzerhandbuch
This product is manufactured and imported by Victrix.
Ce produit est fabriqué et importé par Victrix.
555 South 65th Avenue, Suite 200, Phoenix, AZ 85043
Phone: 800 331 3844 (US and Canada only)
Herikerbergweg 88, 1101 CM Amsterdam, Netherlands
GPO Box 457 Brisbane, QLD 4001, Australia
Tower 42, 25 Old Broad Street, London, EC2N 1HQ
Made in China.
Designed in San Diego, CA USA by Victrix.
For PS5
consoles &
PS4
consoles
For Windows 10/11*
*PC compatibility not tested nor endorsed
by Sony Interactive Entertainment.
QUICK START GUIDE
USING THE PRO BFG IN WIRELESS MODE TOURNAMENT LOCK MODE
The Pro BFG has a Tournament Lock Mode to prevent accidental presses of
system buttons that can disqualify you during tournaments. When Tournament
Lock Mode is enabled, the PS, CREATE, OPTIONS, and Touchpad Button inputs will
all be disabled.
1. To enable Tournament Lock Mode, simultaneously press and quickly release the
"Function" Button (on the front of the controller) and the "Profile" Button (on the
back of the controller). The Function LED and Profile LED will illuminate dimly in
Red and blink every few seconds to indicate it is in Tournament Lock Mode.
2. To leave Tournament Lock Mode, simultaneously press and quickly release the
"Function" Button and the "Profile" Button again to resume normal mode.
TRIGGER STOPS
The Pro BFG Controller features our patented Clutch Trigger mechanism with 5
trigger stop settings.
• To adjust the trigger stop, press and hold the Clutch Sliders on the back of the
controller, then depress the trigger to the desired stopping position. Release the
Clutch Slider to set the trigger stop to your selected position.
• To set the triggers to Hair Trigger mode for fastest response and minimal travel
distance, press and release the Clutch Sliders without touching the triggers. The
triggers will now operate as a digital button.
• The Function LED will illuminate Yellow when the left clutch trigger is being
adjusted, Turquoise for the right clutch trigger, and Green if both left and right are
being adjusted simultaneously.
REMOVING / SWAPPING MODULES
The Left module can be rotated 180º to choose between the standard analog stick
layout of PlayStation® wireless controllers, or an offset sticks layout. The Right
module can be removed and replaced with the 6-button Fightpad module for
fighting games.
1. To remove the module, locate the included purple Module Swap Tool in the carrying
case and unscrew the 2 hex-screws on the module. The screws will be retained in
the module and will not remove entirely or fall out from the module plate.
2. Swap in the module of your
choosing and screw in the 2
hex-screws to lock the module
in place.
NOTE: It is recommended to
recalibrate your Pro BFG after
swapping the Left Module layout.
Follow the steps in the
Recalibration section.
RECALIBRATING CONTROLLER
It is recommended to recalibrate your controller after swapping the Left
Module layout, or if you are experiencing issues with the Analog Sticks
or Triggers.
1. To recalibrate your controller, Power Off your controller by holding the
PS Button for 5 seconds until the X-Logo LED turns off.
2. Toggle the purple Mode Switch on the back of the controller to WIRED MODE.
3. Hold the D-PAD DOWN button while simultaneously plugging in the USB-C
Cable to the controller.. You should see the X-Logo LED and white Function
LED blinking rapidly.
4. Press the “X” (Cross) action button. The LEDs will now blink slowly.
5. Rotate both Left and Right Analog Sticks in full 360º circular motions 3 times.
6. Set both Triggers to full travel mode using the Clutch Buttons, then fully press
and release both triggers 3 times.
7. Press D-PAD DOWN to exit recalibration mode and confirm new calibration.
BATTERY CHARGING
The Pro BFG includes a Rechargeable Lithium Ion Battery.
To recharge your controller, connect the included USB-C Cable to the USB-C
port on the controller, and the other end into the USB port of your PS5
console, PS4™ console, or PC.
The X-Logo on the Touchpad will light up and begin fading in and out to
indicate it is charging.
Once fully charged, the X-Logo will remain solid on to indicate the
battery is full.
USING THE PRO BFG™ IN WIRED MODE
1. To use the Pro BFG in Wired Mode, toggle the purple switch on the back of the
controller to the position with the Cable icon ( ).
2. Plug the included USB-C cable into the USB-C port on the top of the controller,
and the other end into your PS5™ console, PS4™ console, or PC.
3. Press the PS Button on the front of the controller to power on and connect to
the console.
NOTE: If the switch on the back of the controller is set to the Cable icon (Wired
Mode) but no USB Cable is connected when the PS Button is pressed, the
Function LED will illuminate Red for 1 second before turning off. Make sure the
cable is securely connected to the controller and the console.
AUDIO SETTINGS
• To adjust the game volume, hold down
the “Function” button and press
Up/Down on the D-pad.
• Cycle through different audio mode
profiles by holding down the
“Function” button and pressing L1/R1.
The LED on the “Function” button will
cycle between Purple (Pure Audio),
Blue (Bass Boost), or Green (Treble
Boost) to indicate the profile.
• To mute your microphone, press the
“Function” button twice; the LED will
illuminate Amber.
PROGRAMMABLE BACK
BUTTONS
1. To program the back buttons, hold the
“Profile” button on the back of the
controller and press the desired back
button you would like to map an input
to. Once the Profile LED is flashing,
press any button on the controller to
map that button’s function to the
selected back button. The Proflie LED
will blink quickly 3 times indicating
successful programming.
2. To clear or disable a back button, hold
the “Profile” button and double press
the back button you wish to disable.
The Profile LED will blink quickly 3
times indicating successful clearing.
CREATING CUSTOM
PROFILES
Three custom profiles of back
button mappings can be stored on
the controller.
1. Press and release the “Profile”
button on the back of the controller
to toggle between the 3 profiles.
The “Profile” LED will illuminate in
Purple, Blue, or Green to indicate
which Profile is active.
2. When mapping inputs to the back
buttons, the “Profile” LED will
blink in the color of the currently
active Profile.
CHANGING ANALOG
STICK CAPS
The Pro BFG includes 4 analog stick
caps (2 standard concave, 1 short
convex, 1 tall Sniper Stick).
1. To remove the analog stick cap,
firmly pull up on the analog stick to
remove it from the controller.
2. To install the analog stick cap, align
the mounting neck and press down
until it clicks securely into place.
CHANGING THE D-PAD
1. To remove a D-pad, hold between
two fingers and gently pull the
Module out.
2. To add a D-pad, line it up with the
controller and gently push down
until you hear a click.
CHANGING THE GATES
1. Remove the Module you wish to
change the analog stick gate on
(follow directions for Removing /
Swapping Modules).
2. To remove a gate, flip the module
plate over (so the back is facing you)
and press firmly on the back side of
the gate with your thumb. The gate
should pop out.
3. When adding a gate, first make sure
the front of the module plate is facing
you. Then, line up the small alignment
dot on the gate to the alignment dot
on the module plate (octagonal gate
only), and press down firmly until it
clicks in around the whole gate.
Coverage and Term • Victrix warrants that this product will
be free from manufacturing defects for two years from the
original date of purchase. Manufacturing defects are those
defects in materials and/or workmanship, subject to final
determination by Victrix’s customer service department.
This warranty applies only to original purchasers with a valid
proof of purchase from an authorized Victrix retailer that
clearly shows the date of purchase.
Exclusive Remedy and Exclusions • The exclusive remedy
for valid claims will be the repair, replacement or refund of
the product. This warranty does not cover defects caused by
accidents, improper or abusive use of the product,
unauthorized or improper modifications, repairs or handling.
How to Get Service • Purchasers with product issues should
not return the product to the store, but instead contact
Victrix’s customer service department first. You can contact
Victrix customer service by phone at 1-800-331-3844 (US
and Canada only), Monday to Friday from 8 AM to 6 PM PST.
International customers can contact us by phone at
+442036957905. You can always reach us, 24/7, by visiting
victrixpro.com/support-victrix. Inquiries are typically
answered within 24 business hours.
Your Rights Under Applicable Law • This warranty does
not affect the legal rights of customers under applicable
state, provincial, or national laws governing the sale of
consumer goods.
Additional Information for Australian Consumers:
Victrix products come with guarantees that cannot be
excluded under the Australian Consumer Law. You are
entitled to a replacement or refund for a major failure and
compensation for any other reasonably foreseeable loss or
damage. You are also entitled to have the goods repaired or
replaced if the goods fail to be of acceptable quality and the
failure does not amount to a major failure. The benefits given
to you under our express warranty are in addition to other
rights and remedies you have under the Australian
Consumer Law and other laws.
WARRANTY INFORMATION
©2023 Victrix. Victrix, Pro BFG, and its respective logos
are trademarks and/or registered trademarks of Victrix.
“ ”, “PS5” and “PS4” are registered trademarks or
trademarks of Sony Interactive Entertainment Inc. All other
trademarks are the property of their respective owners.
Manufactured and distributed under license from Sony
Interactive Entertainment.
This product is manufactured and imported by Victrix.
This device complies with Part 15 of the FCC Rules.
Operation is subject to the following two conditions: (1) this
device may not cause harmful interference, and (2) this
device must accept any interference received, including
interference that may cause undesired operation.
WIRELESS CONTROLLER
PRO BFG
1. To use the Pro BFG™ in Wireless Mode, toggle the purple switch on the back of the
controller to the position with the Wireless icon ( ).
2. Plug the included Wireless USB Dongle into your PS5™ console, PS4™ console, or
PC. The LED on the dongle will begin flashing purple.
3. Press and release the PS Button on the front of the Pro BFG Controller.
4. Once connected, the X-Logo on the controller and the LED on the dongle will be
illuminated solid purple.
5. To turn off the controller, press and hold the PS Button for 5 seconds until the
X-Logo LED turns off.
• This controller uses 2.4GHz radio
frequency range. When the PS5
console or other products use the same
radio frequency range, it may give
negative influence mutually.
PDP validated operability between
PS5™ consoles (CFI-1000 series) and
this controller.
• It is recommended to insert the USB
Dongle into the front USB port of PS5
consoles (CFI-1000 series).
PLATFORM SELECTION
SWITCH
The Pro BFG can be used on PS5
consoles, PS4™ consoles, and PC
(Xinput).
1. Use the 3-position purple slide switch
on top of the controller (next to the
USB-C port) to select between "PS5",
"PS4", and "PC" modes to match the
platform you are currently using.
NOTE: When using PC (Xinput) Mode,
the Pro BFG does not support audio
through the headset jack and does not
support the touchpad feature.
When your controller
reaches a low battery
level, the X-Logo will begin
flashing quickly to warn
you of the low battery.
When the battery level is
critically low and will die
any minute, an audible
warning tone will play
every minute through a
connected headset.
052-002
This product is manufactured and imported by Victrix.
Ce produit est fabriqué et importé par Victrix.
555 South 65th Avenue, Suite 200, Phoenix, AZ 85043
Phone: 800 331 3844 (US and Canada only)
Herikerbergweg 88, 1101 CM Amsterdam, Netherlands
GPO Box 457 Brisbane, QLD 4001, Australia
Tower 42, 25 Old Broad Street, London, EC2N 1HQ
Made in China.
Designed in San Diego, CA USA by Victrix.
For PS5
consoles &
PS4
consoles
For Windows 10/11*
*PC compatibility not tested nor endorsed
by Sony Interactive Entertainment.
GUIDE DE DÉMARRAGE RAPIDE
UTILISER LA MANETTE PRO BFG™ EN MODE SANS FIL MODE VERROUILLAGE TOURNOI
1. La manette Pro BFG dispose d'un mode verrouillage pour empêcher d'appuyer
accidentellement sur les touches système, ce qui peut disqualifier le joueur lors
d'un tournoi. Quand le mode verrouillage tournoi est activé, les touches PS,
CRÉER, OPTIONS et le pavé tactile seront désactivés.
2. Pour activer le mode verrouillage tournoi, appuyez rapidement sur la touche «
Fonction» (à l'avant de la manette) et la touche «Profil» (à l'arrre de la
manette) simultanément. Les DEL Fonction et Profil s'allument faiblement en
rouge et clignotent régulièrement pour indiquer que la manette est en mode
verrouillage tournoi.
3. Pour quitter le mode verouillage tournoi, appuyez à nouveau rapidement sur la
touche «Fonction» (à l'avant de la manette) et la touche «Profil» (à l'arrière de la
manette) pour revenir en mode normal.
Arrêts des gâchettes
1. La manette Pro BFG est équipée de notre mécanisme breveté Clutch Trigger, avec 5
points d'arrêt pour les gâchettes.
2. Pour régler le point d'arrêt, maintenez les Clutch Sliders à l'arrre de la manette
enfons, puis appuyez sur la gâchette jusqu'à la position d'arrêt que vous
souhaitez. Relâchez les Clutch Sliders pour fixer le point d'art à l'endroit choisi.
3. Pour régler les gâchettes sur le mode Hair Trigger, qui offre la vitesse de réponse la
plus rapide et la distance d'appui la plus courte, appuyez sur les Clutch Sliders et
relâchez-les sans toucher aux gâchettes. Les gâchettes fonctionneront alors comme
des boutons numériques.
4. La DEL «Fonction» s'allume en jaune lorsque vous réglez la gâchette gauche, en
turquoise lorsque vous réglez la gâchette droite et en vert lorsque vous réglez les
deux simultanément.
REMPLACER LES MODULES
1. Le module gauche peut être pivoté à 180 degs pour passer de la disposition
standard PlayStation® à la disposition en manches décalés. Le module droit peut
être remplacé par un module Pad de combat à 6 boutons pour les jeux de combat.
2. Pour retirer le module, utilisez l'outil de remplacement de module qui se trouve
dans l'étui pour dévissez les deux vis. Les vis restent attaces au module et ne
peuvent pas tomber ni être totalement retirées.
3. Placez le module de votre choix
dans l'emplacement et serrez les
deux vis pour le fixer.
Attention: Il est conseillé de
recalibrer votre manette Pro BFG
aps avoir changé la disposition du
module gauche. Suivez les étapes
de la section Recalibrage.
RECALIBRER LA MANETTE
1. Il est conseillé de recalibrer votre manette Pro BFG après avoir changé la
disposition du module gauche ou si vous rencontrez des problèmes avec le
manche analogique ou les gâchettes.
2. Pour recalibrer la manette, éteignez-la en maintenant la touche PS enfoncée
pendant 5 secondes jusqu'à ce que la lumière du logo s'éteigne.
3. Placez l'interrupteur violet à l'arrière de la manette sur MODE FILAIRE.
4. Maintenez la touche BAS de la croix directionnelle enfoncée tout en branchant le
ble USB-C. Le logo et la DEL blanche de la touche «Fonction» devraient se
mettre à clignoter rapidement.
5. Appuyez sur le bouton d'action «X» (Croix). Les DEL clignotent alors lentement.
6. Faites tourner les manches analogiques gauche et droit en faisant 3
cercles complets.
7. Reglez les deux gâchettes sur leur distance d'appui maximale à l'aide des boutons
Clutch, puis appuyez et relâchez les deux gâchettes comptement 3 fois.
8. Appuyez sur le touche BAS de la croix directionnelle pour quitter le mode
calibrage et confirmer.
RECHARGER LA BATTERIE
1. La manette Pro BFG comprend une batterie au lithium-ion rechargeable.
2. Pour recharger votre manette, branchez le câble USB-C inclus dans le port
USB-C de la manette, et branchez l'autre extremité dans le port USB de
votre PS5™ ou PS4™, ou de votre PC.
3. Le logo sur le pavé tactile s'allume et s'éteint lentement pour indiquer que
la manette est en charge.
4. Lorsque le logo reste allumé, la manette est complètement chargée.
UTILISER LA MANETTE PRO BFG™ EN MODE FILAIRE
1. Pour utiliser la manette Pro BFG™ en mode filaire, faites glisser l'interupteur
violet à l'arrre de la manette vers l'icône «Filaire».
2. Branchez le câble USB-C inclus dans le port USB-C en haut de la manette, puis
branchez l'autre extrémité du câble à votre console PS5™ ou PS4™, ou à votre PC.
3. Appuyez sur la touche PS à l'avant de la manette pour l'allumer et la connecter à
la console.
Attention: Si l'interrupteur à l'arrre est reglé en mode filaire mais qu'aucun
ble USB n'est branché lorsque vous appuyez sur la touche PS, la DEL «Fonction
» s'allumera en rouge pendant 1 seconde. Assurez-vous que le câble est bien
branché à la manette et à la console ou basculez en mode sans fil pour utiliser la
manette sans le câble.
PARAMÈTRES AUDIO
1. Pour ajuster le volume du jeu,
maintenez la touche «Fonction»
enfone et utilisez les touches
Haut/Bas de la croix directionnelle.
2. Basculez entre difrents profils
audio en maintenant la touche «
Fonction» enfone et en utilisant
L1/R1. La DEL de la touche «Fonction
» passe du violet (Pure Audio), au bleu
(Bass Boost) et au vert (Treble Boost)
pour indiquer le profil actuel.
3. Pour mettre votre microphone en
sourdine, appuyez deux fois sur la
touche «Fonction». La DEL s'allume
alors en orange.
BOUTONS ARRIÈRE
PROGRAMMABLES
1. Pour programmer les boutons
arrière, maintenez la touche «Profil»
à l'arrière de la manette enfoncée,
puis appuyez sur le bouton auquel
vous souhaitez attribuer une entrée.
Une fois que la DEL réagit, appuyez
sur n'importe quelle touche de la
manette pour assigner sa fonction au
bouton arrière sélectionné. La DEL
clignote rapidement 3 fois pour
indiquer que la programmation du
bouton est réussie.
2. Pour réinitialiser ou désactiver un
des boutons arrière, maintenez la
touche «Profil» enfone et appuyez
deux fois sur le bouton que vous
souhaitez désactiver. La DEL clignote
rapidement 3 fois pour indiquer que la
réinitialisation du bouton est réussie.
CRÉER DES PROFILS
PERSONNALISÉS
1. Trois profils personnalisés de
programmation des boutons
arrière peuvent être enregistrés
dans la manette.
2. Appuyez sur la touche «Profil» à
l'arrière de la manette et
rechez-la pour basculer entre
les 3 profils. La DEL «Profil»
s'allume en violet, en bleu ou en
vert pour indiquer le profil actif.
3. Lorsque vous paratrez les
boutons arrières, la DEL «Profil»
clignote dans la couleur du
profil actif.
CHANGER LES TÊTES DES
MANCHES ANALOGIQUES
1. La manette Pro BFG comprend 4
têtes de manches analogiques (2
manches concaves standard, 1
manche court convexe et 1 grand
manche sniper).
2. Pour retirer la tête du manche,
tirez fermement sur le manche
pour le détacher de la manette.
3. Pour installer une autre tête,
alignez le manche sur l'emplace-
ment et appuyez vers le bas
jusqu'à ce qu'un clic se fasse
entendre, indiquant qu'il est
bien fixé.
CHANGER LA CROIX
DIRECTIONNELLE
1. Pour retirer la croix directionnelle,
tenez-la de chaque côté et tirez
doucement sur le module.
2. Pour placer une autre croix
directionnelle, alignez-la avec
l'emplacement et appuyez
doucement vers le bas jusqu'à ce
qu'un clic se fasse entendre.
CHANGER LES BAGUES
DE RETENUE
1. Retirez le module sur lequel vous
souhaitez remplacer la bague de retenue
du manche analogique (suivez les
instructions de la section «Remplacer
les modules»).
2. Pour retirer une bague de retenue,
retournez le module (de façon à ce que
l'arrière soit orienté vers vous) et
appuyez fermement sur l'arrière de la
bague avec les pouces, elle devrait se
détacher.
3. Pour placer une autre bague de retenue,
assurez-vous d'abord que l'avant du
module est devant vous. Puis, alignez les
points de repère sur la bague de retenue
avec ceux du module (pour la bague
octogonale uniquement) et appuyez
fermement pour fixer les bords.
Couverture et conditions • Victrix garantit ce produit pour
tout défaut de fabrication pendant 2 ans suivant la date
d'achat. Les défauts de fabrication concernent tous les
fauts de matériaux ou de confection du produit, et sont
termis à la discrétion du Service client de Victrix. Cette
garantie est valable uniquement pour l'acheteur original du
produit avec une preuve d'achat valide aups de revendeurs
agés avec une date d'achat clairement visible.
Modalités et exclusions de garantie • Les demandes valides
seront traitées exclusivement par une réparation, un
remplacement ou un remboursement du produit. Cette
garantie ne couvre par les dégats caus par des accidents,
un usage inadapté ou abusif du produit, ou des modifications,
réparations ou manipulations non autorisées.
Comment faire votre réclamation Les clients doivent
s'adresser en premier lieu au Service client Victrix sans
ramener le produit en magasin. Vous pouvez communiquer
avec le service client Victrix au 1800331-3844 (États-Unis et
Canada uniquement), du lundi au vendredi de 8h à 18h
(heure du Pacifique). Pour les autres pays, composez le +44
203695-7905. Vous pouvez également communiquer avec
nous à tout moment au victrixpro.com/support-victrix. Les
demandes sont généralement traies dans un délai de 24
heures ouvrables.
Vos droits en vertu de la loi applicable • Cette garantie
n'affecte pas les droits des clients en vertu des lois
étatiques, provinciales ou nationales applicables régissant
la vente de biens de consommation.
RENSEIGNEMENTS SUR
LA GARANTIE
©2023 Victrix. Victrix, Pro BFG et leurs logos respectifs sont
des marques de commerce et des marques dépoes de
Victrix. « », «PS5», «PS4» et «PlayStation Shapes Logo
» sont des marques de Sony Interactive Entertainment inc.
Toutes les autres marques sont la propriété de leurs
tenteurs respectifs. Fabriqué et distribué sous licence de
Sony Interactive Entertainment.
Ce produit est fabriqué et importé par Victrix.
Cet appareil est en aquation avec la section 15 du
glement de la FCC. Le fonctionnement est soumis aux
deux conditions suivantes: (1) l'appareil ne doit pas causer
d'interrences nuisibles; (2) l'appareil doit accepter toutes
les interférences rue, y compris celles qui pourraient
causer un fonctionnement non voulu.
MANETTE SANS FIL
PRO BFG
1. Pour utiliser la manette Pro BFG™ en mode sans fil, faites glisser l'interupteur
violet à l'arrre de la manette vers l'icône «Sans fil».
2. Branchez l'adaptateur USB inclus à votre console PS5™ ou PS4™, ou à votre PC.
La DEL sur l'adaptateur se met à clignoter en violet.
3. Pressez puis relâchez la touche PS à l'avant de la manette Pro BFG.
4. Une fois la connection établie, le logo en forme de X sur la manette et la DEL de
l'adaptateur restent tous les deux allus en violet.
5. Pour éteindre la manette, maintenez la touche PS enfoncée pendant 5 secondes,
jusqu'à ce que le logo s'éteigne.
Cette manette utilise la fréquence 2,4
GHz pour la connectivité sans fil. Si
votre console PS5™ ou un autre
appareil utilise la même fquence, cela
peut cer des interférences.
PDP™ a confirmé la compatibilité entre
la PlayStation®5 (rie CFI-1000) et
cette manette.
Il est recommandé de brancher
l'adaptateur USB dans l'un des ports
USB à l'avant de la PlayStation®5 (rie
CFI-1000).
INTERRUPTEUR DE
SELECTION DE PLATEFORME
1. La manette Pro BFG peut être utilisé
avec les consoles PS5™ et PS4™, et
sur PC (Xinput).
2. Glissez l'interrupteur en haut de la
manette (à côté du port USB-C) sur
l'une des 3 positions pour basculer
entre PS5™, PS4™ et PC selon la
plateforme sur laquelle vous jouez.
Attention: En mode PC (Xinput), la
manette Pro BFG ne prend pas en
charge la sortie casque audio ou les
commandes au pavé tactile
PlayStation™.
5. Le logo commence à
clignoter rapidement
lorsque le niveau de
batterie est faible.
6. Si le niveau de batterie est
très faible et qu'un casque
y est connecté, vous
entendrez un son dans le
casque pour vous alerter
régulièrement.
052-002
This product is manufactured and imported by Victrix.
Ce produit est fabriqué et importé par Victrix.
555 South 65th Avenue, Suite 200, Phoenix, AZ 85043
Phone: 800 331 3844 (US and Canada only)
Herikerbergweg 88, 1101 CM Amsterdam, Netherlands
GPO Box 457 Brisbane, QLD 4001, Australia
Tower 42, 25 Old Broad Street, London, EC2N 1HQ
Made in China.
Designed in San Diego, CA USA by Victrix.
For PS5
consoles &
PS4
consoles
For Windows 10/11*
*PC compatibility not tested nor endorsed
by Sony Interactive Entertainment.
GUIDA RAPIDA
UTILIZZO DEL PRO BFG™ IN MODALITÀ WIRELESS MODALITÀ DI BLOCCO DA TORNEO
1. Pro BFG è dotato di una modalità di blocco da torneo per prevenire la pressione
involontaria dei pulsanti di sistema che porterebbero a una squalifica dai tornei.
Quando la modalità di blocco da torneo è abilitata, vengono disabilitati i comandi
PS, CREA, OPZIONI e del pulsante Touchpad.
2. Per abilitare la modalità di blocco da torneo, premere e lasciare rapidamente il
pulsante “Funzione” (sul lato anteriore del controller) e il pulsante “Profilo” (sul
lato posteriore del controller) contemporaneamente. Il LED di Funzione e il LED di
Profilo si accenderanno debolmente di colore rosso e lampeggeranno ogni alcuni
secondi per indicare la modalità di blocco da torneo.
3. Per uscire dalla modalità di blocco da torneo e tornare alla modalità normale,
premere e lasciare rapidamente il pulsante “Funzione” (sul lato anteriore del
controller) e il pulsante “Profilo” (sul lato posteriore del controller).
ARRESTI DEI GRILLETTI
1. Il controller Pro BFG è dotato del meccanismo brevettato dei grilletti del cambio
con 5 impostazioni di arresto.
2. Per regolare l'arresto dei grilletti, tenere premuto il dispositivo di scorrimento del
cambio sul lato posteriore del controller e poi rilasciare il grilletto fino alla
posizione di arresto desiderata. Lasciare il dispositivo di scorrimento del cambio
per impostare l’arresto del grilletto nella posizione selezionata.
3. Per impostare i grilletti nella modalità “Hair Trigger” per una risposta più rapida e
una distanza di spostamento minima, premere e lasciare il dispositivo di
scorrimento del cambio senza toccare i grilletti. I grilletti vengono impostati per
funzionare come un pulsante digitale.
4. Il LED di funzione si accende di colore giallo se viene regolato il grilletto del
cambio sinistro, di colore turchese per il grilletto del cambio destro e di colore
verde se vengono regolati entrambi contemporaneamente.
RIMOZIONE E CAMBIO DEI MODULI
1. Il modulo sinistro può essere ruotato di 180º per funzionare come levetta analogica
PlayStation® standard o come offset. Il modulo destro può essere rimosso e
sostituito dal un modulo Fightpad a 6 pulsanti per i giochi di combattimento.
2. Per rimuovere il modulo, individuare lo strumento di cambio del modulo viola
incluso nella custodia da trasporto e svitare le 2 viti esagonali del modulo. Le viti
devono rimanere agganciate al modulo, senza essere rimosse, per evitare di cadere
dalla piastra del modulo.
3. Inserire il modulo desiderato e
avvitare le 2 viti esagonali per
fissare il modulo.
NOTA: Si consiglia di ricalibrare il
Pro BFG dopo aver cambiato il
modulo sinistro. Seguire la
procedura della sezione relativa
alla ricalibrazione.
RICALIBRAZIONE DEL CONTROLLER
1. Si consiglia di ricalibrare il controller dopo aver cambiato il modulo sinistro
o in caso di problemi con le levette analogiche o i grilletti.
2. Per ricalibrare il controller, spegnere il controller tenendo premuto il
pulsante PS per 5 secondi finché il LED X-Logo non si spegne.
3. Posizionare linterruttore di modalità viola sul lato posteriore del controller
nella modalità con cavo.
4. Tenendo premuto il pulsante Giù della croce direzionale, inserire il cavo
USB-C. Il LED X-Logo e il LED funzione bianco lampeggiano rapidamente.
5. Premere il pulsante azione “X” (croce). I LED lampeggiano lentamente.
6. Ruotare le levette sinistra e destra 3 volte di 360º con movimenti circolari.
7. Impostare entrambi i grilletti in modalità di viaggio utilizzando i pulsanti del
cambio e poi premere completamente e lasciare entrambi i grilletti 3 volte.
8. Premere il pulsante Giù della croce direzionale per uscire dalla modalità di
ricalibrazione e confermare la nuova calibrazione.
CARICA DELLA BATTERIA
1. Pro BFG è dotato di una batteria ricaricabile a ioni di litio.
2. Per ricaricare il controller, collegare il cavo USB-C incluso alla porta
USB-C del controller e alla porta della PS5™/PS4™/PC.
3. X-Logo sul Touchpad si accende e lampeggia lentamente per indicare che
è in fase di carica.
4. Una volta completata la carica, X-Logo rimane acceso fisso per indicare
che la batteria è carica.
UTILIZZO DEL PRO BFG™ IN MODALITÀ CON CAVO
1. Per utilizzare Pro BFG in modalità con cavo, mettere linterruttore viola sul
retro del controller nella posizione con l’icona del cavo.
2. Collegare con il cavo USB-C incluso la porta USB-C nella parte superiore del
controller e la console PS5, console PS4™ o PC.
3. Premere il pulsante PS sul lato anteriore del controller per accendere e
collegare la console.
NOTA: Se l’interruttore sul lato posteriore del controller è impostato sulla
modalità con cavo ma non è collegato nessun cavo USB quando il pulsante PS
viene premuto, il LED della funzione si accende di colore rosso per 1 secondo e
poi si spegne. Verificare che il cavo sia collegato correttamente al controller e
alla console oppure posizionare linterruttore in modalità wireless per
utilizzare il controller senza bisogno di cavi.
IMPOSTAZIONI AUDIO
1. Per regolare il volume di gioco,
tenere premuto il pulsante
“Funzione” e premere Alto/Basso
nella croce direzionale.
2. Scorrere i diversi profili audio tenendo
premuto il pulsante “Funzione” e
premendo L1/R1. Il LED del pulsante
“Funzione” cambierà da viola (Pure
Audio), blu (Bass Boost) o verde
(Treble Boost) per indicare il profilo.
3. Per silenziare il microfono, premere
due volte il pulsante “Funzione”; il LED
si accende di colore ambra.
PULSANTI POSTERIORI
PROGRAMMABILI
1. Per programmare i pulsanti inferiori,
tenere premuto il pulsante “Profilo”
sulla parte posteriore del controller e
premere il pulsante di cui vuoi
effettuare la mappatura. Quando il
LED lampeggia, premere un pulsante
del controller per mapparlo con il
pulsante posteriore selezionato. Il
LED lampeggerà rapidamente 3 volte
per segnalare che la programmazi-
one è avvenuta correttamente.
2. Per cancellare la mappatura o
disabilitare un pulsante posteriore,
tenere premuto il pulsante “Profilo” e
premere due volte il pulsante
posteriore che vuoi disabilitare. Il
LED lampeggerà rapidamente 3 volte
per segnalare che la cancellazione
della mappatura è avvenuta
correttamente.
CREAZIONE DI PROFILI
PERSONALIZZATI
1. Nel controller possono essere
memorizzati tre profili
personalizzati di mappatura
dei pulsanti posteriori.
2. Premere e lasciare il pulsante
“Profilo” sul lato posteriore del
controller per passare da uno
all'altro dei 3 profili. Il LED “Profilo”
si accende di colore viola, blu o
verde per indicare il profilo attivo.
3. Quando si effettua la mappatura
dei pulsanti posteriori, il LED
“Profilo” lampeggia del colore del
profilo attivo.
CAMBIO DELLE COPERTURE
DELLE LEVETTE ANALOGICHE
1. Pro BFG include 4 coperture delle
levette analogiche (2 standard
concave, 1 corta convessa, 1 lunga
da cecchino).
2. Per rimuovere la copertura della
levetta analogica, tirare verso l'alto
la levetta per rimuoverla dal
controller.
3. Per installare la copertura della
levetta analogica, allineare il collo
di montaggio e premere verso il
basso per bloccarla in posizione.
CAMBIO DELLA
CROCE DIREZIONALE
1. Per rimuovere una croce
direzionale, tenerla con due dita e
sollevare con delicatezza il modulo.
2. Per aggiungere una croce
direzionale, allinearla al controller
e premere con delicatezza fino a
sentire uno scatto.
CAMBIO DELLE BASI
1. Rimuovere il modulo di cui si vuole
cambiare la base della levetta (seguire
le indicazioni per la rimozione e cambio
dei moduli).
2. Per rimuovere le basi, ribaltare il
modulo (in modo da avere la parte
posteriore in alto) e premere in modo
deciso sulla parte posteriore della base
con i pollici; la base dovrebbe staccarsi
facilmente.
3. Quando si aggiunge una base, verificare
di avere davanti la parte anteriore del
modulo. Poi allineare i puntini di
allineamento della base a quelli del
modulo (solo per le basi ottagonali) e
premere verso il basso finché non si
blocca in posizione in modo completo.
Copertura e termini • Victrix garantisce che questo prodotto
è privo di difetti di fabbricazione per due anni dalla data di
acquisto originale. I difetti di fabbricazione sono i difetti dei
materiali e/o della lavorazione e sono soggetti ad
accertamento definitivo da parte del dipartimento di
assistenza clienti Victrix. Questa garanzia si applica solo agli
acquirenti originali con una valida prova di acquisto presso
un rivenditore autorizzato Victrix che indichi in modo chiaro
la data dell’acquisto.
Rimedio esclusivo ed esclusioni I rimedi esclusivi per le
richieste valide sono la riparazione, la sostituzione o il
rimborso del prodotto. Questa garanzia non copre difetti
causati da incidenti, utilizzo inappropriato o abusivo del
prodotto, modifiche non autorizzate o inappropriate,
riparazioni o manipolazione.
Come ottenere assistenza • Gli acquirenti con problemi
relativi al prodotto non devono restituire il prodotto al
negozio; devono invece contattare il dipartimento di
assistenza clienti Victrix. Puoi contattare l'assistenza clienti
Victrix telefonicamente al numero 1-800-331-3844 (solo per
USA e Canada), dal lunedì al vener, dalle 8:00 alle 18:00
PST. I clienti internazionali possono contattarci al numero
+442036957905. Puoi metterti in contatto con noi 24 ore al
giorno tramite il sito victrixpro.com/support-victrix. La
risposta alle richieste viene di solito inviata entro 24 ore
lavorative.
I tuoi diritti in base alle leggi applicabili • Questa garanzia
non influenza i diritti legali dei clienti in base alle leggi
statali, provinciali o nazionali applicabili relative alla vendita
dei beni di consumo.
INFORMAZIONI SULLA
GARANZIA
©2023 Victrix. Victrix, Pro BFG e i rispettivi loghi sono
marchi e/o marchi registrati di Victrix. “ ”, “PS5”, “PS4” e
“PlayStation Shapes Logo” sono marchi registrati o marchi
commerciali di Sony Interactive Entertainment Inc. Gli altri
marchi sono di proprietà dei rispettivi detentori. Prodotto e
distribuito con licenza Sony Interactive Entertainment.
Questo prodotto è realizzato e importato da Victrix.
Questo dispositivo è conforme alla parte 15 delle norme
FCC. Lutilizzo è soggetto alle seguenti due condizioni:
(1) questo dispositivo non deve causare interferenze dannose
e (2) questo dispositivo deve accettare qualsiasi interferenza
ricevuta, comprese le interferenze che possono causare un
funzionamento indesiderato.
WIRELESS CONTROLLER
PRO BFG
1. Per utilizzare Pro BFG™ in modalità wireless, posizionare l’interruttore viola sul
retro del controller nella posizione con l’icona Wireless.
2. Collegare l'adattatore USB wireless incluso con la console PS5™, console PS4™ o
PC. Il LED sulladattatore inizia a lampeggiare di colore viola.
3. Premere e lasciare il pulsante PS sul lato anteriore del controller Pro BFG.
4. Una volta collegato, l’X-Logo del controller e il LED dell’adattatore sono accesi fissi
di colore viola.
5. Per spegnere il controller, tenere premuto il pulsante PS per 5 secondi finché il LED
X-Logo non si spegne.
* Questo controller utilizza l’intervallo
di frequenze radio a 2,4 GHz; quando la
console PS5™ e altri prodotti utilizzano
lo stesso intervallo di frequenze, le
trasmissioni potrebbero disturbarsi
a vicenda.
* PDP™ ha convalidato l’operabilità tra
PlayStation®5 (serie CFI-1000) e
questo controller.
* Consigliamo di inserire l'adattatore
USB nella porta USB del lato anteriore
della PlayStation®5 (serie CFI-1000).
INTERRUTTORE DI SELEZIONE
DELLA PIATTAFORMA
1. Pro BFG può essere utilizzato sulle
console PS5™, sulle console PS4™ e
su PC (Xinput).
2. Usare linterruttore viola a 3 posizioni
sul lato superiore del controller (vicino
alla porta USB-C) per selezionare PS5
™, PS4™ o PC in base alla piattaforma
utilizzata.
NOTA: Quando si usa la modalità PC
(Xinput), Pro BFG non supporta l’audio
mediante lo spinotto delle cuffie e non
supporta il funzionamento Touchpad di
PlayStation™.
5. Quando il controller
scende a un livello di
carica basso, X-Logo
inizia a lampeggiare
rapidamente per
avvisare che la batteria
è quasi scarica.
6. Quando il livello della
batteria è molto basso e il
tempo di utilizzo è di pochi
minuti, ogni minuto viene
emesso un avviso sonoro
alle cuffie collegate.
052-002
This product is manufactured and imported by Victrix.
Ce produit est fabriqué et importé par Victrix.
555 South 65th Avenue, Suite 200, Phoenix, AZ 85043
Phone: 800 331 3844 (US and Canada only)
Herikerbergweg 88, 1101 CM Amsterdam, Netherlands
GPO Box 457 Brisbane, QLD 4001, Australia
Tower 42, 25 Old Broad Street, London, EC2N 1HQ
Made in China.
Designed in San Diego, CA USA by Victrix.
For PS5
consoles &
PS4
consoles
For Windows 10/11*
*PC compatibility not tested nor endorsed
by Sony Interactive Entertainment.
SCHNELLSTARTANLEITUNG
NUTZUNG DES PROBFG™ IM WIRELESS-MODUS: TURNIER-SPERRMODUS
1. Der ProBFG hat einen Turnier-Sperrmodus, um das unbeabsichtigte Betätigen von
Systemtasten zu verhindern, das dich bei Turnieren disqualifizieren kann. Wenn der
Turnier-Sperrmodus aktiviert ist, wird die Eingabe über die PS-, CREATE-,
OPTIONS- und Touchpad-Taste deaktiviert.
2. Um den Turnier-Sperrmodus zu aktivieren, drücken Sie schnell die
FUNCTION-Taste (an der Vorderseite des Controllers) und die PROFILE-Taste (an
der Rückseite des Controllers) gleichzeitig. Die Function-LED und die Profile-LED
leuchten rot und blinken alle paar Sekunden, um anzuzeigen, dass sich der
Controller im Turnier-Sperrmodus befindet.
3. Um den Turnier-Sperrmodus zu beenden, drücken Sie erneut schnell die
FUNCTION-Taste (an der Vorderseite des Controllers) und die PROFILE-Taste (an
der Rückseite des Controllers), um in den normalen Modus zu wechseln.
TRIGGER-STOPS
1. Der ProBFG-Controller hat unseren patentierten ClutchTrigger-Mechanismus mit
5Trigger-Stop-Einstellungen.
2. Um den Trigger-Stop anzupassen, halten Sie die ClutchSlider an der Rückseite des
Controllers gedckt und lassen Sie den Trigger dann auf der gewünschten
Stopp-Position los. Lassen Sie den ClutchSlider los, um den Trigger-Stop auf die
gewünschte Position einzustellen.
3. Um die Trigger in den Hair-Trigger-Modus zu stellen, um eine schnelle Reaktion und
minimale Bewegungsdistanzen zu ermöglichen, drücken Sie die ClutchSlider, ohne
die Trigger zu behren. Die Trigger funktionieren nun als digitale Taste.
4. Die Function-LED leuchtet gelb, wenn der linke Clutch-Trigger angepasst wird;
rkis beim rechten Clutch-Trigger; und grün, wenn sowohl der linke als auch der
rechte Trigger gleichzeitig angepasst werden.
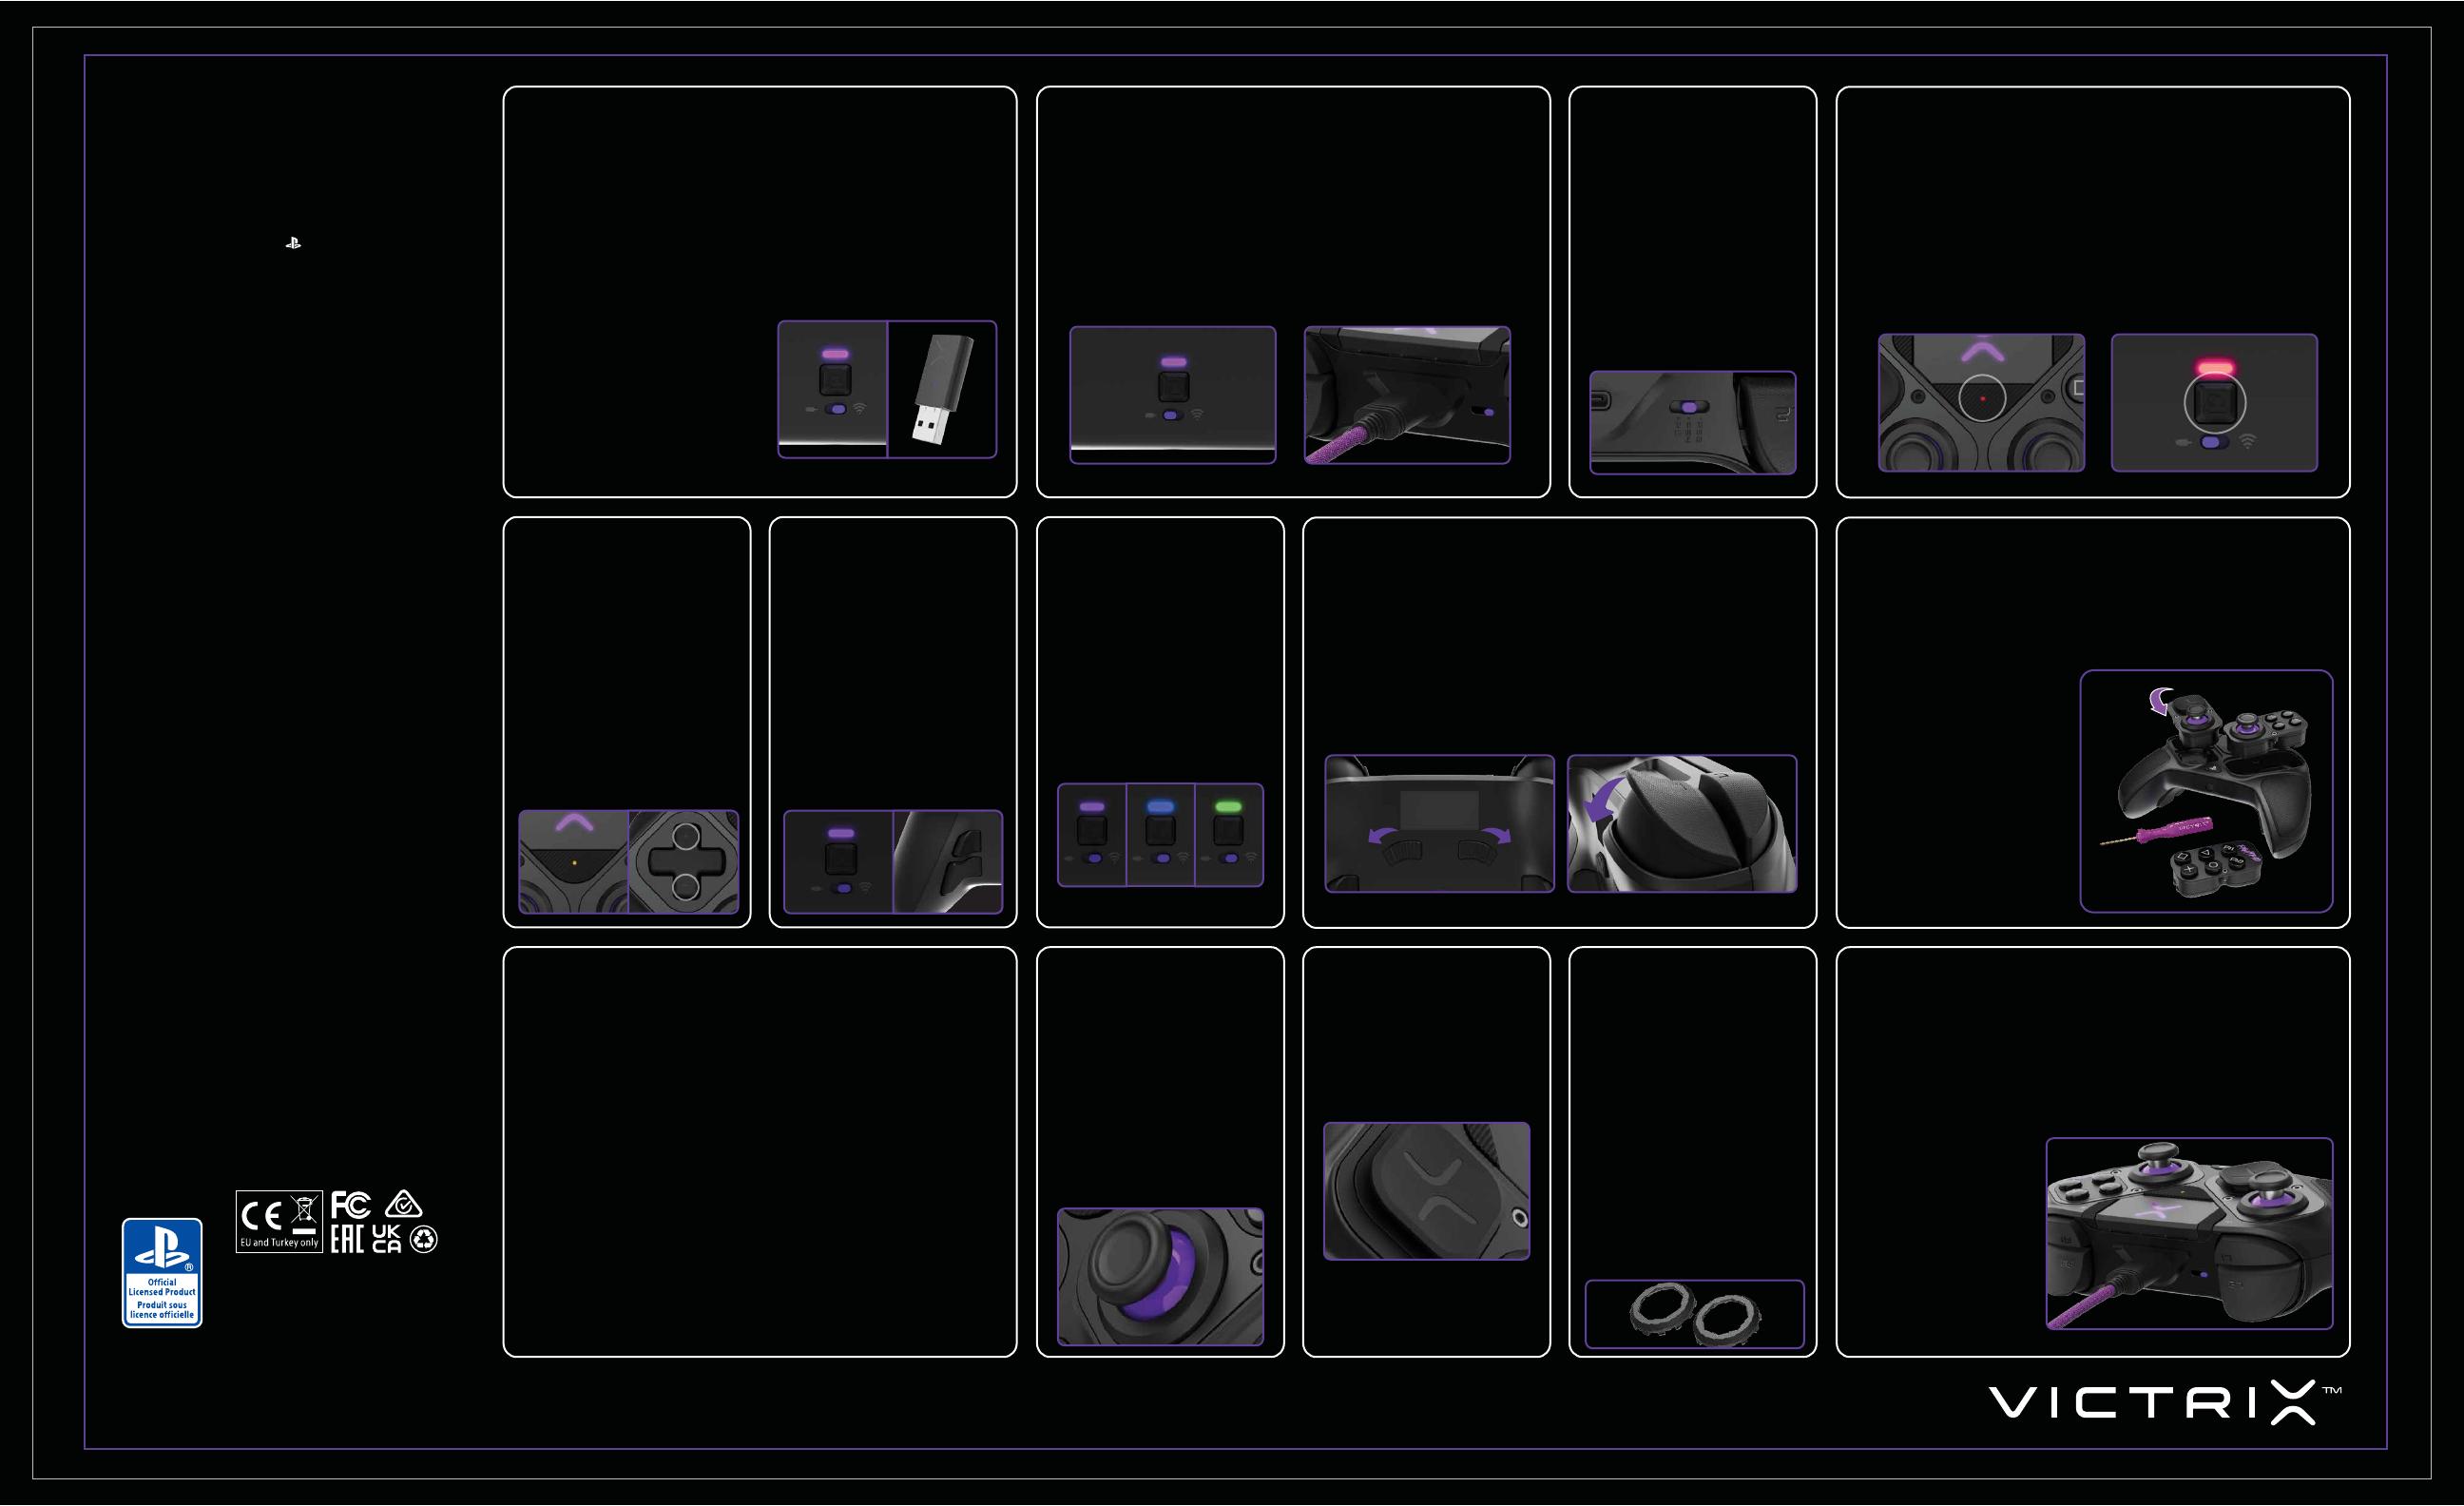
MODULE ENTFERNEN/WECHSELN
1. Das linke Modul kann um 180° gedreht werden, um zwischen dem normalen
PlayStation® Analog-Stick-Layout oder einem Offset-Stick-Layout zu wählen. Das
rechte Modul kann entfernt und für Kampfspiele durch ein Sechs-Tasten-Fight-
pad-Modul ersetzt werden.
2. Um das Modul zu entfernen, suchen Sie das mitgelieferte lilafarbene Modul-Wech-
sel-Tool im TravelCase und lösen Sie die beiden Sechskantschrauben am Modul.
Die Schrauben halten das Modul und werden nicht vollständig entfernt oder aus der
Modulplatte fallen.
3. Tauschen Sie das Modul Ihrer Wahl
aus und schrauben Sie die beiden
Sechskantschrauben wieder fest,
um das Modul zu fixieren.
HINWEIS: Es wird empfohlen, Ihren
ProBFG neu zu kalibrieren,
nachdem das linke Modul-Layout
gewechselt wurde. Befolgen Sie die
Schritte im Abschnitt
„Neukalibrierung“.
NEUKALIBRIERUNG DES CONTROLLERS
1. Es wird empfohlen, Ihren Controller neu zu kalibrieren, nachdem das linke
Modul-Layout gewechselt wurde oder wenn sie Probleme mit den
Analog-Sticks oder den Triggers haben.
2. Um den Controller neu zu kalibrieren, schalten Sie Ihren Controller aus,
indem Sie die PS-Taste 5Sekunden lang gedrückt halten, bis die
X-Logo-LED erlischt.
3. Stellen Sie den lilafarbenen Modus-Schalter an der Rückseite des
Controllers in den WIRED-Modus.
4. Halten Sie die AB-Taste auf dem Steuerkreuz gedrückt, während Sie
gleichzeitig das USB-C-Kabel einstecken. Die X-Logo-LED und die weiße
Function-LED sollten schnell blinken.
5. Drücken Sie denX“-Knopf (Kreuz). Die LEDs blinken jetzt langsam.
6. Drehen Sie sowohl den linken als auch den rechten Analog-Stick dreimal in
vollständigen 360°-Bewegungen.
7. Stellen Sie beide Trigger über die Clutch-Tasten in den vollständigen
Reise-Modus und drücken Sie dann beide Trigger dreimal vollständig durch.
8. Drücken Sie die AB-Taste auf dem Steuerkreuz, um den Neukalibrierungs-
modus zu beenden und die neue Kalibrierung zu bestätigen.
AKKU LADEN
1. Der ProBFG ist mit einer wiederaufladbaren Lithium-Ionen-Batterie
versehen.
2. Um Ihren Controller aufzuladen, Stecken Sie das mitgelieferte USB-C-Ka-
bel in den USB-C-Port am Controller und das andere Ende in den USB-Port
Ihrer PS5™/PS4™/ Ihres PC.
3. Das X-Logo auf dem Touchpad pulsiert langsam, um den Ladevorgang
anzuzeigen.
4. Sobald der Akku vollständig geladen ist, leuchtet das X-Logo durchgehend.
NUTZUNG DES PROBFG™ IM WIRED-MODUS
1. Um den ProBFG™ im Wired-Modus zu nutzen, stellen Sie den lilafarbenen Schalter
an der Rückseite des Controllers auf die Position mit dem Kabelsymbol.
2. Stecken Sie das mitgelieferte USB-C-Kabel in den USB-C-Port an der Oberseite des
Controllers und das andere Ende in Ihre PS5™- oder PS4™-Konsole oder Ihren PC.
3. Drücken Sie die PS-Taste an der Vorderseite des Controllers, um ihn einzuschalten
und mit der Konsole zu verbinden.
HINWEIS: Falls der Schalter an der Rückseite des Controllers auf den Wired-Modus
gestellt ist, jedoch kein USB-Kabel angeschlossen ist, wenn die PS-Taste gedrückt
wird, leuchtet die Funktion-LED 1Sekunde lang rot, bevor sie erlischt. Achten Sie
darauf, dass das Kabel richtig mit dem Controller und der Konsole verbunden ist
oder schieben Sie den Schalter auf den Wireless-Modus, um den Controller
kabellos zu nutzen.
AUDIO-EINSTELLUNGEN
1. Um die Spiellautstärke anzupas-
sen, halten Sie die FUNCTION-Taste
gedrückt und drücken Sie Auf/Ab
auf dem Steuerkreuz.
2. Wechseln Sie durch die verschie-
denen Audio-Modi, indem Sie die
FUNCTION-Taste gedrückt halten
und L1/R1 drücken. Die LED der
FUNCTION-Taste wechselt
zwischen Lila (reines Audio), Blau
(BassBoost) und Grün (Treble
Boost), um das Profil anzuzeigen.
3. Um Ihr Mikrofon stummzuschalten,
drücken Sie die FUNCTION-Taste
zweimal. Die LED leuchtet
daraufhin gelb.
PROGRAMMIERBARE
RÜCKTASTEN
1. Um die Rücktasten zu programmieren,
halten Sie die PROFILE-Taste an der
Rückseite des Controllers gedrückt und
drücken Sie die Taste, die Sie für eine
Eingabe kongurieren möchten. Sobald
die LED blinkt, drücken Sie eine beliebige
Taste auf dem Controller, um die Funktion
dieser Taste der ausgewählten hinteren
Taste zuzuweisen. Die LED blinkt dreimal
schnell, um die erfolgreiche Program-
mierung anzuzeigen.
2. Um eine Rücktaste zu löschen oder zu
deaktivieren, halten Sie die PROFILE-Taste
gedrückt und drücken Sie zweimal auf die
hintere Taste, die Sie deaktivieren
chten. Die LED blinkt dreimal schnell,
um die erfolgreiche Löschung anzuzeigen.
BENUTZERDEFINIERTE
PROFILE ERSTELLEN
1. Es können drei benutzerdefinierte
Profile von Rücktasten auf dem
Controller gespeichert werden.
2. Drücken Sie die PROFILE-Taste an
der Rückseite des Controllers, um
zwischen den drei Profilen zu
wechseln. Die Profile-LED leuchtet
lila, blau oder grün, um anzuzeigen,
welches Profil aktiv ist.
3. Bei der Konfiguration der
Rücktasten blinkt die Profile-LED
in der Farbe des derzeit
aktiven Profils.
ANALOG-STICK-CAPS
AUSTAUSCHEN
1. Der ProBFG umfasst 4
Analog-Stick-Caps (2standard
konkav, 1kurz konvex, 1 hoch
Sniper-Stick).
2. Um den Analog-Stick-Cap zu
entfernen, ziehen Sie fest am
Analog-Stick, um ihn aus dem
Controller zu entfernen.
3. Um den Analog-Stick-Cap
aufzusetzen, richtigen Sie den
Montagehals aus und drücken Sie ihn
nach unten, bis er hörbar einrastet.
STEUERKREUZ AUSTAUSCHEN
1. Um das Steuerkreuz zu entneh-
men, halten Sie es mit zwei Fingern
und ziehen Sie das Modul vorsichtig
heraus.
2. Um ein Steuerkreuz zu installieren,
richten Sie es auf den Controller
aus und drücken Sie es vorsichtig
nach unten, bis es hörbar einrastet.
GATES AUSTAUSCHEN
1. Entfernen Sie das Modul, auf dem Sie das
Analog-Stick-Gate wechseln möchten
(befolgen Sie die Anweisungen im
Abschnitt „Module entfernen/wechseln“).
2. Um ein Gate zu entfernen, drehen Sie die
Modulplatte um (damit Sie auf die
ckseite schauen) und drücken Sie mit
dem Daumen fest gegen die Rückseite
des Gates. Dieses sollte dabei
herausfallen.
3. Wenn Sie ein Gate installieren, achten Sie
darauf, dass Sie auf die Vorderseite der
Modulplatte drücken. Richten Sie
anschließend den kleinen Ausrichtung-
spunkt auf dem Gate auf den Ausrich-
tungspunkt auf der Modulplatte (nur
achteckiges Gate) aus und drücken Sie es
fest nach unten, bis es hörbar um das
gesamte Gate einrastet.
Abdeckung und Laufzeit • Victrix garantiert zwei Jahre ab
dem urspnglichen Kaufdatum, dass dieses Produkt frei von
Herstellungsmängel sein wird. Herstellungsmängel sind
Mängel an Material und/oder Verarbeitung, die endgültig
durch den Kundenservice von Victrix festgestellt wird. Diese
Garantie gilt nur für Originalkäufer mit einem gültigen
Kaufnachweis von einem zugelassenen Victrix-Einzelhändler,
auf dem das Kaufdatum deutlich zu sehen ist.
Ausschließliches Rechtsmittel und Ausnahmen • Die
ausschließlichen Rechtsmittel für zulässige Forderungen
sind die Reparatur, der Ersatz oder die Erstattung des
Produkts. Diese Garantie deckt keine Mängel durch Unlle,
unsachgemäße oder missbräuchliche Nutzung des Produkts,
unbefugte oder unangemessene Modifikationen, Reparaturen
oder Handhabung.
So funktioniert der Service • Käufer mit Produktproblemen
rfen das Produkt nicht zum Laden zurückbringen, sondern
müssen stattdessen zuerst den Victrix Kundenservice
kontaktieren. Sie erreichen den Victrix Kundenservice
montags bis freitags von 8Uhr bis 18Uhr PST telefonisch
über 1-800-331-3844 (nur USA und Kanada). Internationale
Kunden kontaktieren uns telefonisch über +442036957905.
Sie erreichen uns rund um die Uhr über
victrixpro.com/support-victrix. Anfragen werden in der Regel
innerhalb von 24Geschäftsstunden beantworten.
Ihre Rechte nach geltendem Recht • Diese Garantie wirkt
sich nicht auf die gesetzlichen Rechte von Verbrauchern nach
geltendem staatlichem, regionalem oder nationalem Recht
aus, welche den Verkauf von Verbrauchsgütern regeln.
INFORMATIONEN ZUR GARANTIE
©2023 Victrix. Victrix, Pro BFG und die entsprechenden
Logos sind Markenzeichen und/oder eingetragene
Markenzeichen von Victrix. „ “, „PS5“, „PS4“ und das
„PlayStation Shapes Logo“ sind eingetragene
Markenzeichen oder Markenzeichen von Sony Interactive
Entertainment Inc. Alle anderen Markenzeichen sind
Eigentum der jeweiligen Eigentümer. Hergestellt und
vertrieben unter Lizenz von Sony Interactive Entertainment.
Dieses Produkt wird von Victrix hergestellt und importiert.
Dieses Gerät entspricht Part15 der FCCRules. Der Betrieb
unterliegt den beiden folgenden Bedingungen: (1) Dieses
Gerät darf keine schädlichen Interferenzen verursachen und
(2) dieses Gerät muss alle empfangenen Interferenzen
aufnehmen, einschließlich Interferenzen, die zu einer
unerwünschten Funktionsweise führen.
WIRELESS CONTROLLER
PRO BFG
1. Um den ProBFG™ im Wireless-Modus zu nutzen, stellen Sie den lilafarbenen
Schalter an der Rückseite des Controllers auf die Position mit dem Wireless-Sym-
bol.
2. Stecken Sie den mitgelieferten Wireless USB-Dongle in Ihre PS5- oder PS4
-Konsole oder Ihren PC. Die LED auf dem Dongle blinkt dann lilafarben.
3. Drücken Sie die PS-Taste an der Vorderseite des ProBFG-Controllers.
4. Sobald die Verbindung hergestellt wurde, leuchten das X-Logo auf dem Controller
und die LED auf dem Dongle durchgehend lilafarben.
5. Um den Controller abzuschalten, halten Sie die PS-Taste 5Sekunden lang gedrückt,
bis die X-Logo-LED erlischt.
* Dieser Controller nutzt eine Funkbandb-
reite von 2,4GHz. Falls die PS5-Konsole
oder andere Produkte die gleiche
Funkfrequenz-Bandbreite nutzen, können
sie sich gegenseitig beeinträchtigen.
* Durch PDP™ validierte Funktions-
fähigkeit zwischen PlayStation®5
(CFI-1000-Serie) und diesem Controller.
* Es wird empfohlen, den USB-Dongle
in den vorderen USB-Port der
PlayStation®5 (CFI-1000-Serie) zu stecken.
PLATTFORMAUSWAHL
-SCHALTE
1. Der ProBFG kann auf PS5-,
PS4™-Konsolen und PC (Xinput)
genutzt werden.
2. Verwenden Sie den lilafarbenen
Drei-Wege-Schieberegler an der
Oberseite des Controllers (neben dem
USB-C-Port), um zwischen PS5™, PS4
™ und PC zu wechseln und die derzeit
genutzte Plattform auszuwählen.
HINWEIS: Wenn Sie den PC
(Xinput)-Modus nutzen, unterstützt
der ProBFG weder Audio über die
Headset-Buchse noch das
PlayStation™Touchpad.
5. Bei niedrigem Batterie-
stand Ihres Controllers
blinkt das X-Logo schnell,
um Sie davor zu warnen.
6. Wenn der Batteriestand
kritisch niedrig ist und der
Controller jeden Augen-
blick versagen könnte, wird
jede Minute ein
akustisches Warnsignal
über ein angeschlossenes
Headset ausgegeben.
052-002
This product is manufactured and imported by Victrix.
Ce produit est fabriqué et importé par Victrix.
555 South 65th Avenue, Suite 200, Phoenix, AZ 85043
Phone: 800 331 3844 (US and Canada only)
Herikerbergweg 88, 1101 CM Amsterdam, Netherlands
GPO Box 457 Brisbane, QLD 4001, Australia
Tower 42, 25 Old Broad Street, London, EC2N 1HQ
Made in China.
Designed in San Diego, CA USA by Victrix.
For PS5
consoles &
PS4
consoles
For Windows 10/11*
*PC compatibility not tested nor endorsed
by Sony Interactive Entertainment.
GUÍA DE INICIO RÁPIDO
USAR EL PRO BFG™ EN MODO INALÁMBRICO MODO DE BLOQUEO PARA TORNEOS
1. El Pro BFG tiene un modo de bloqueo para torneos que evita que se presionen
accidentalmente los botones del sistema y te descalifiquen por ello. Cuando se
activa el modo de bloqueo para torneos, los botones de OPCIONES, CREAR, PS y el
panel táctil estarán desactivados.
2. Para activar el modo de bloqueo para torneos, pulsa y suelta rápida y simultánea-
mente el botón de «funcn» (en la parte delantera del mando) y el botón de «perfi
(en la parte posterior del mando). Los LED de función y perfil se iluminarán
tenuemente en rojo y parpadean cada pocos segundos para indicar que está en
modo de bloqueo para torneos.
3. Para salir del modo de bloqueo para torneos, pulsa y suelta rápidamente otra vez
el botón de «función» (en la parte delantera del mando) y el de «perfil» (en la parte
posterior del mando), con lo que volves al modo normal.
TOPES DE GATILLOS
1. El mando Pro BFG incluye nuestro mecanismo patentado de gatillo de embrague
(Clutch Trigger) con cinco topes de gatillos.
2. Para ajustar el tope del gatillo, mantén pulsados los controles deslizantes del
embrague de la parte posterior del mando y, luego, presiona el gatillo hasta la
posición donde deseas establecer el tope. Suelta el control deslizante del
embrague para ajustar el tope del gatillo en la posición seleccionada.
3. Para configurar los gatillos en el modo de gatillo sensible y así obtener una
respuesta más rápida y una distancia de recorrido mínima, pulsa y suelta los
controles deslizantes del embrague sin tocar los gatillos. Los gatillos funcionarán
ahora como un botón digital.
4. El LED de función se iluminará en amarillo cuando se ajuste el gatillo de embrague
izquierdo, en turquesa para el gatillo de embrague derecho y en verde si se ajustan
simultáneamente el izquierdo y el derecho.
QUITAR O CAMBIAR MÓDULOS
1. El módulo izquierdo se puede girar 180grados para optar entre una disposición de
sticks analógicos esndar de PlayStation® o una de sticks desplazados. El módulo
derecho se puede quitar y reemplazar con el módulo de mando para juegos de
lucha de seis botones.
2. Para retirar el módulo, busca la herramienta violeta de cambio de módulo incluida
en el estuche de transporte y afloja los dos tornillos hexagonales del módulo. Los
tornillos quedarán retenidos en el módulo y no se quitan por completo ni se
caerán de la placa.
3. Cambia el módulo por el que
prefieras y atornilla de nuevo los
dos tornillos hexagonales para
bloquear el módulo en su lugar.
NOTA: Se recomienda volver a
calibrar el Pro BFG después de
cambiar la disposición del módulo
izquierdo. Sigue los pasos de la
sección de recalibración.
RECALIBRAR EL MANDO
1. Se recomienda volver a calibrar el mando después de cambiar la disposición
del módulo izquierdo, o si ess teniendo problemas con los sticks analógicos
o los gatillos.
2. Para recalibrar tu mando, apágalo manteniendo pulsado el botón PS durante
cinco segundos hasta que se apague el LED con el logotipo en forma de X.
3. Cambia el conmutador de modo violeta de la parte posterior del mando al
MODO DE CABLE.
4. Mantén pulsado el botón ABAJO de la CRUCETA mientras conectas el cable
USB-C. Deberías ver que tanto el LED con el logotipo en forma de X como el
LED de función blanco parpadean rápidamente.
5. Pulsa el botón de acción «X» (Cruz). Ahora los LED parpadearán lentamente.
6. Gira tres veces 360grados ambos sticks analógicos.
7. Ajusta ambos gatillos al modo de recorrido completo usando los botones de
embrague y, desps, pulsa y suelta ambos gatillos tres veces.
8. Pulsa el botón ABAJO de la CRUCETA para salir del modo de recalibración y
confirmar los cambios.
CARGAR LA BATEA
1. El Pro BFG incluye una batea recargable de ion de litio.
2. Para recargar tu mando, conecta el cable USB-C incluido tanto al puerto
USB-C del mando como al de tu PS5™, PS4™ o PC.
3. El logotipo con forma de X del panel táctil se iluminará y comenzará a
parpadear atenuándose gradualmente para indicar que se está cargando.
4. Una vez que esté completamente cargada, el logotipo con forma de X se
mantendrá encendido para indicar que la batería está llena.
USAR EL PRO BFG™ CON CABLE
1. Para usar el Pro BFG con cable, coloca el conmutador violeta de la parte
posterior del mando en la posición del icono de un cable.
2. Conecta, en el puerto de la parte superior del mando, el cable USB-C que se
incluye, y su otro extremo en la consola PS5™, consola PS4™ o PC.
3. Pulsa el botón PS de la parte delantera del mando para encenderlo y
conectarlo a la consola.
NOTA: Si el conmutador de la parte posterior del mando está en la posición de
conexn por cable pero no hay ningún cable USB conectado cuando se pulsa
el botón PS, el LED de funcn se iluminará en rojo durante un segundo antes
de apagarse. Asegúrate de que el cable esté bien conectado al mando y a la
consola, o coloca el conmutador en modo inambrico para usar el mando de
ese otro modo.
AJUSTES DE AUDIO
1. Para ajustar el volumen del juego,
mantén pulsado el botón de «función»
y pulsa arriba/abajo en la cruceta.
2. Recorre tus perfiles de modo de
audio manteniendo pulsado el botón
de «función» y pulsando L1/R1. El
LED del botón de «función» cambiará
entre violeta (sonido puro), azul
(graves potenciados) o verde (agudos
potenciados) para indicar el perfil
seleccionado.
3. Para silenciar tu micrófono, pulsa
dos veces el botón de «función»; el
LED se iluminará en ámbar.
BOTONES TRASEROS
PROGRAMABLES
1. Para programar los botones traseros,
mantén pulsado el botón de «perfil» de la
parte posterior del mando y pulsa el
botón que quieras asignar. Una vez que el
LED esté parpadeando, pulsa cualquier
botón del mando para asignar la función
de ese botón al de la parte posterior. El
LED parpadeará rápidamente tres veces
para indicar que la programación se ha
realizado correctamente.
2. Para borrar o desactivar un botón de la
parte trasera, mantén pulsado el botón
de «perfil» y presiona dos veces el botón
que deseas desactivar. El LED
parpadeará rápidamente tres veces para
indicar que la programación se ha
borrado correctamente.
CREAR PERFILES
PERSONALIZADOS
1. Se pueden almacenar en el mando
tres perfiles de asignación
personalizada de botones traseros.
2. Pulsa y suelta el botón de «perfi
de la parte posterior del mando
para alternar entre los tres
perfiles. El LED de «perfil» se
iluminará en violeta, azul o verde
para indicar qué perfil está activo.
3. Cuando asignes los botones
traseros, el LED de «perfil»
parpadeará en el color del perfil
activo en ese momento.
CAMBIAR LAS TAPAS DE
LOS STICKS ANALÓGICOS
1. El Pro BFG incluye cuatro tapas
de sticks analógicos (dos cóncavas
estándar, una convexa corta y una
Sniper Stick alta).
2. Para quitar la tapa del stick
analógico, tira con firmeza de él
para quitarlo del mando.
3. Para colocar la tapa del stick
analógico, alinea el cuello de
montaje y presiona hacia abajo
hasta que encaje en su lugar con
un clic.
CAMBIAR LA CRUCETA
1. Para quitar la cruceta, sostenla
con dos dedos y tira suavemente
para sacar el módulo.
2. Para colocar una cruceta,
alinéala con el mando y presiona
suavemente hacia abajo hasta
escuchar un clic.
CAMBIAR LOS LIMITADORES
1. Retira el módulo del que quieras cambiar
el limitador del stick analógico (sigue las
instrucciones para quitar o cambiar
módulos).
2. Para quitar un limitador, da la vuelta a la
placa del módulo (de modo que la parte
posterior quede hacia ti) y presiona
firmemente con el pulgar en la parte
posterior del limitador; este debería salir.
3. Para poner un limitador, asegúrate
primero de que el frontal de la placa del
dulo quede mirando hacia ti. Lo
siguiente será alinear el pequeño punto
de alineación del limitador con el de la
placa del módulo (solo con el limitador
octogonal) y presionar firmemente hasta
que encaje alrededor de todo el limitador.
Cobertura y plazo • Victrix garantiza que este producto
estará libre de defectos de fabricación durante dos años a
partir de la fecha original de compra. Se consideran
defectos de fabricación los defectos de materiales o de
mano de obra, sujetos a la determinación final por parte del
servicio al cliente de Victrix. Esta garantía se aplica solo a
los compradores originales con un comprobante de compra
válido de un minorista autorizado de Victrix que muestre
claramente la fecha de adquisición.
Única solución y exclusiones • la única solución ante
reclamaciones válidas será la reparación, sustitución o
reembolso del producto. Esta garantía no cubre los defectos
causados por accidentes, uso inadecuado o abusivo del
producto, modificación, reparación o manipulación no
autorizada o inapropiada.
Cómo obtener asistencia • si el comprador tiene algún
problema con el producto, antes de devolverlo a la tienda
debe ponerse en contacto con el servicio al cliente de
Victrix. Puede hacerlo por teléfono, llamando al
1-800-331-3844 (solo para Estados Unidos y Canadá), de
lunes a viernes de 08:00 H a 18:00 H de la zona horaria PST.
Los clientes internacionales pueden ponerse en contacto en
el tefono +442036957905. Siempre es posible
comunicarse con nosotros en cualquier momento visitando
victrixpro.com/support-victrix. Normalmente, se responde
a las consultas en un plazo de 24 horas laborables.
Tus derechos según la legislación vigente • esta garantía
no afecta a los derechos legales de los clientes según las
leyes nacionales, autonómicas o locales aplicables que rijan
la venta de bienes de consumo.
INFORMACIÓN DE GARANTÍA
©2023 Victrix. Victrix, Pro BFG y sus respectivos logotipos
son marcas comerciales y/o marcas registradas de Victrix.
« », «PS5», «PS4» y «las formas del logo de PlayStatio
son marcas registradas o marcas comerciales de Sony
Interactive Entertainment Inc. Todas las des marcas
comerciales son propiedad de sus respectivos propietarios.
Fabricado y distribuido bajo licencia de Sony Interactive
Entertainment.
Este producto lo ha fabricado e importado Victrix.
Este dispositivo cumple con el apartado 15 de las normas de
la FCC. Su funcionamiento está sujeto a las dos condiciones
siguientes: (1) este dispositivo no puede causar
interferencias perjudiciales y (2) este dispositivo debe
aceptar cualquier interferencia recibida, incluidas las que
puedan causar un funcionamiento no deseado.
MANDO INALÁMBRICO
PRO BFG
1. Para usar el Pro BFG™ en modo inalámbrico, coloca el conmutador violeta de la
parte posterior del mando en la posición del icono de transmisión inambrica.
2. Conecta en tu consola PS5™, consola PS4™ o PC el adaptador USB inambrico que
se incluye. El LED del adaptador comenzará a parpadear en color violeta.
3. Pulsa y suelta el botón PS de la parte delantera del mando Pro BFG.
4. Una vez conectado, el logotipo con forma de X del mando y el LED del adaptador
permanecerán iluminados en color violeta.
5. Para apagar el mando, mantén pulsado el botón PS durante cinco segundos hasta
que se apague el LED del logotipo con forma de X.
* Este mando utiliza un rango de
radiofrecuencia de 2,4GHz. Si la
consola PS5™ u otros productos usan
el mismo rango de radiofrecuencia,
podrían interferirse mutuamente.
* Funcionamiento del mando acreditado
por PDP™ con PlayStatio5 (CFI-1000
series).
* Recomendamos insertar el adaptador
USB en el puerto delantero de la
PlayStation®5 (CFI-1000 series).
CONMUTADOR DE SELECCIÓN
DE PLATAFORMA
1. El Pro BFG se puede usar en consolas
PS5, consolas PS4™ o PC (XInput).
2. Utiliza el conmutador deslizante
violeta de tres posiciones de la parte
superior del mando (al lado del puerto
USB-C) para seleccionar PS5™, PS4™
o PC, sen la plataforma que estés
usando actualmente.
NOTA: En modo PC (XInput), el Pro
BFG no es compatible con el audio a
través del conector para auriculares
ni con el funcionamiento del panel
ctil de PlayStation™.
5. Cuando tu mando tenga
poca batería, el logotipo
con forma de X
parpadeará rápidamente
para avisarte.
6. Cuando el nivel de la
batería sea muy bajo y
pueda apagarse en
cualquier momento,
emitirá un tono de
advertencia cada minuto a
través del auricular que
tengas conectado.
052-002
This product is manufactured and imported by Victrix.
Ce produit est fabriqué et importé par Victrix.
555 South 65th Avenue, Suite 200, Phoenix, AZ 85043
Phone: 800 331 3844 (US and Canada only)
Herikerbergweg 88, 1101 CM Amsterdam, Netherlands
GPO Box 457 Brisbane, QLD 4001, Australia
Tower 42, 25 Old Broad Street, London, EC2N 1HQ
Made in China.
Designed in San Diego, CA USA by Victrix.
For PS5
consoles &
PS4
consoles
For Windows 10/11*
*PC compatibility not tested nor endorsed
by Sony Interactive Entertainment.
PRZEWODNIK „SZYBKI START”
KORZYSTANIE Z KONTROLERA PRO BFG™
W TRYBIE BEZPRZEWODOWYM
TRYB BLOKADY TURNIEJOWEJ
1. Kontroler Pro BFG jest wyposażony w Tryb blokady turniejowej zapobiegający
przypadkowemu naciśnięciu przycisków systemowych, które mogą
zdyskwalifikować użytkownika podczas turniew. Po włączeniu Trybu blokady
turniejowej wączone zostaną wszystkie dane wejściowe elementów PS,
UTRZ, OPCJE i panelu dotykowego.
2. Aby włączyć Tryb blokady turniejowej, jednocześnie szybko naciśnij i zwolnij
przyciski „Funkcyjny” (z przodu kontrolera) oraz przycisk „Profil (z tyłu
kontrolera). Diody LED funkcyjna i profilowa zapalą się blado na czerwono i bę
mrugy co kilka sekund, wskazuc, że urządzenie znajduje się w Trybie blokady
turniejowej.
3. Aby wyć z Trybu blokady turniejowej, ponownie szybko nacnij i zwolnij przyciski
„Funkcyjny” (z przodu kontrolera) oraz „Profil” (z tyłu kontrolera), aby powcić do
trybu normalnego.
PUNKTY BLOKADY SPUSTU
1. Kontroler Pro BFG jest wyposażony w nasz opatentowany mechanizm spra
spustu z 5 punktami jego blokady.
2. Aby ustawić blokadę spustu, nacnij i przytrzymaj suwaki spra z tyłu
kontrolera, a następnie wciśnij spust do poziomu żądanej pozycji blokady. Zwolnij
suwak spra, aby ustawić blokadę spustu w żądanej pozycji.
3. Aby ustawić spusty w trybie bardzo miękkiego spustu w celu zapewnienia szybkiej
reakcji po minimalnym przycnięciu, naciśnij i zwolnij suwaki spra bez
dotykania spustów. Spusty będą wtedy dziać jak przycisk cyfrowy.
4. Funkcyjna dioda LED będzie paliła się na żółto podczas regulacji lewego sprgła
spustu, na turkusowo w przypadku prawego sprzęgła spustu oraz na zielono w
przypadku jednoczesnego ustawiania lewego i prawego sprzęgła.
WYJMOWANIE/WYMIANA MODUŁÓW
1. Lewy moduł można obrócić o 180º, aby wybrać standardowy układ drążka
analogowego PlayStation® lub uad przesuntych drążków. Prawy moduł
można wyć i zastąpić 6-przyciskowym modułem pada bitewnego na potrzeby
gier bitewnych.
2. Aby wyć moduł, włóż fioletowe narzędzie wymiany modułów w etui oraz odkręć 2
śruby sześciokątne na module. Śruby pozostaną w module oraz nie wysuną s
całkowicie ani nie wypadną z płytki modułu.
3. Zamień na wybrany moduł i wkręć
2 śrubki sześciotne, aby
zabezpieczyć moduł w
odpowiednim miejscu.
UWAGA: po zmianie uadu lewego
modułu zaleca się przekalibrować
kontroler Pro BFG. Wykonaj
czynności opisane w części
Rekalibracja.
REKALIBRACJA KONTROLERA
1. Kontroler zaleca się zrekalibrować po zmianie układu lewego modułu lub w
przypadku problemów z drążkami analogowymi bądź spustami.
2. Aby zrekalibrować kontroler, wyłącz kontroler, przytrzymując przycisk PS
przez 5 sekund, aż do wyłączenia się diody LED logo-X.
3. Przełącz fioletowy przełącznik trybu z tyłu kontrolera do pozycji TRYB
PRZEWODOWY.
4. Przytrzymaj przycisk W DÓŁ na padzie kierunkowym D-PAD, wadając
jednocześnie przed USB-C. Szybko zaczną migać diody LED logo-X oraz
bia funkcyjna dioda LED.
5. Nacnij przycisk akcji „X” (Krzyżyk). Diody LED będą teraz migały wolno.
6. 3 razy obróć prawy i lewy dżek analogowy o pne 360º.
7. Oba spusty ustaw w trybie pełnego przesunięcia za pomocą przycisków
spra, a naspnie 3 razy naciśnij do oporu i zwolnij oba wyzwalacze.
8. Nacnij strzkę W DÓŁ na padzie kierunkowym D-PAD, aby wyć z trybu
rekalibracji i zatwierdzić nową kalibrację.
ŁADOWANIE AKUMULATORA
1. Kontroler Pro BFG jest wyposażony w akumulator litowo-jonowy.
2. Aby naładować kontroler, poącz przed USB-C z zestawu do gniazda
USB-C w kontrolerze, a drugi koniec do gniazda USB w konsoli PS5™/PS4™/
komputerze.
3. Logo-X na panelu dotykowym rozbłyśnie oraz zacznie jnieć i gasnąć w
sposób sygnalizujący ładowanie.
4. Po pełnym naładowaniu logo-X będzie się paliło światłem stałym,
wskazując pełne naładowanie akumulatora.
OBUGA KONTROLERA PRO BFG™ W TRYBIE PRZEWODOWYM
1. Aby używać kontrolera Pro BFG w trybie przewodowym, przesuń fioletowy
przełącznik z tyłu kontrolera do pozycji z ikoną przewodu.
2. Dołączony przed USB-C wepnij do gniazda USB-C na górnej części kontrolera,
a jego drugi koniec poącz do konsoli PS5™, konsoli PS4™ lub komputera.
3. Nacnij przycisk PS z przodu kontrolera, aby włączyć zasilanie oraz połączyć
urządzenie z konsolą.
UWAGA: jeżeli przełącznik z tyłu kontrolera jest ustawiony na tryb przewodowy,
ale w momencie nacnięcia przycisku PS przewód USB nie jest poączony,
funkcyjna dioda LED rozbłyśnie czerwono na 1 sekun, a potem zgnie.
Należy sprawdzić, czy przewód jest dobrze podłączony do kontrolera oraz
konsoli, albo przesunąć przełącznik do trybu bezprzewodowego, aby korzystać
z kontrolera bezprzewodowo.
USTAWIENIA AUDIO
1. Aby dostosować głośnć w grze,
przytrzymaj przycisk „Funkcyjny”
oraz naciśnij strzałki „w górę/ w dół”
na padzie kierunkowym D-Pad.
2. Przechodź pomdzy różnymi
profilami trybu audio, przytrzymując
przycisk „Funkcyjny” i naciskając
przyciski L1/R1. Dioda LED przycisku
„Funkcyjnego”dzie zmieniała kolor
pomiędzy fioletowym (czyste audio),
niebieskim (podbicie tow niskich) i
zielonym (podbicie tonów wysokich),
wskazując odpowiedni profil.
3. Aby wyciszyć mikrofon, dwukrotnie
naciśnij przycisk „Funkcyjny”; dioda
LED rozbłnie bursztynowo.
PROGRAMOWALNE
PRZYCISKI TYLNE
1. Aby zaprogramować przyciski tylne,
przytrzymaj przycisk „Profil”
znajdujący się z tyłu kontrolera oraz
naciśnij przycisk, do którego chcesz
przypisać funkc. Gdy dioda LED
miga, naciśnij dowolny przycisk na
kontrolerze, aby zamapować funkcję
przycisku do wybranego przycisku
tylnego. Dioda LED zamiga 3 razy,
wskazując udane zaprogramowanie.
2. Aby wyczyścić lub dezaktywow
przycisk tylny, przytrzymaj przycisk
„Profil i dwukrotnie naciśnij przycisk
tylny, kry chcesz wyłączyć. Dioda
LED zamiga szybko 3 razy, wskazuc
skuteczne wyczyszczenie.
TWORZENIE PROFILI
NIESTANDARDOWYCH
1. W kontrolerze można zapisać trzy
niestandardowe profile mapowania
przycisków tylnych.
2. Nacnij i zwolnij przycisk „Profil
znajdujący się z tyłu kontrolera, aby
przełączać pomdzy 3 profilami.
Dioda LED przycisku „Profil” będzie
mia kolor fioletowy, niebieski lub
zielony w zalności od tego, który
profil jest aktywny.
3. Podczas mapowania funkcji do
przycisków tylnych dioda LED
przycisku „Profil” będzie migała w
kolorze aktualnie aktywnego profilu.
WYMIANA NASADEK
DRĄŻKA ANALOGOWEGO
1. Kontroler Pro BFG zawiera 4
nasadki na drążek analogowy (2
standardowe wke, 1 krót
wypuą, 1 wysoką typu „drążek
snajpera”).
2. Aby zdjąć nasadkę drążka
analogowego, mocno pociągnij
drążek analogowy i wyjmij z
kontrolera.
3. Aby założyć nasadkę drążka
analogowego, wyrównaj kołnierz
montażowy i docnij, aż bezpiecznie
kliknie we właściwym miejscu.
WYMIANA PADA
KIERUNKOWEGO D-PAD
WYMIANA BRAMEK
1. Wyjmij mod, w którym chcesz
wymienić bramkę drążka analogowego
(przestrzegaj wskazówek dotyczących
Wyjmowania/Wymiany Modułów).
2. Aby wyć bramkę, odwróć płyt
modułu (aby jego tył był skierowany do
Ciebie) i mocno naciśnij kciukiem tylną
cść bramki; bramka powinna
wyskoczyć.
3. Podczas wkładania bramki najpierw
pamiętaj, aby przednią część płytki
modułu trzymać skierowaną do siebie.
Następnie ustaw mą kropkę
wywnania na bramce na równi z kropką
wywnania na płytce modułu (tylko
bramka ośmiotna), i mocno nacnij, aż
bramka kliknie na cym obwodzie.
Okres obowiązywania i warunki Victrix gwarantuje, że
produkt pozostanie wolny od wad produkcyjnych przez dwa
lata, licc od pierwotnej daty zakupu. Wady produkcyjne
obejmują defekty materiałowe i/lub wykonawcze, które
ostatecznie potwierdza dział obsługi klienta firmy Victrix. Ta
gwarancja ma zastosowanie tylko do faktycznych nabyww
posiadacych ważny dowód zakupu wydany przez właściwego
dostawcę Victrix i oznaczony wyrną datą nabycia.
Jedyne środki naprawcze i wączenia • jedynym środkiem
naprawczym w przypadku wnych roszczeń są naprawa,
wymiana lub zwrot kosztów zakupu produktu. Ta gwarancja
nie obejmuje usterek spowodowanych przez wypadki,
nieodpowiednie lub nadmiernie intensywne używanie
produktu, nieautoryzowane czy niewłciwe modyfikacje,
naprawy bądź metody obsługi.
Jak uzyskać serwis • osoby, które kupy produkt z wadami,
nie powinny zwracać go do sklepu, lecz w pierwszej kolejnci
skontaktować się z dziem obsługi klienta Victrix. Z działem
obugi klienta firmy Victrix mna się skontaktować
telefonicznie pod numerem telefonu 1-800-331-3844 (dotyczy
tylko USA i Kanady), od poniedziku do piątku w godzinach od
8:00 do 18:00 czasu PST. Klienci z innych kraw mogą
zadzwonić pod numer +442036957905. Można się też z nami
skontaktować przez całą dobę i siedem dni w tygodniu,
odwiedzając witrynę victrixpro.com/support-victrix. Na
zapytania odpowiadamy zazwyczaj w ciągu 24 godzin
roboczych.
Prawa przyugujące użytkownikowi z mocy obowzujących
przepisów niniejsza gwarancja nie wpływa na prawa
klientów przysługujące im na podstawie przepiw lokalnych,
regionalnych i krajowych regulujących kwestię sprzedaży
towarów konsumenckich.
INFORMACJE GWARANCYJNE
©2023 Victrix. Victrix, Pro BFG oraz powzane loga są
znakami towarowymi i/lub zarejestrowanymi znakami
towarowymi spółki Victrix. „ ”, „PS5”, „PS4” oraz „kształty
logo PlayStation” są znakami towarowymi lub zarejestrow-
anymi znakami towarowymi słki Sony Interactive
Entertainment Inc. Wszystkie inne znaki towarowe są
asnością ich poszczególnych właścicieli. Produkcja i
dystrybucja przebiegają na podstawie licencji uzyskanej
od słki Sony Interactive Entertainment.
Ten produkt jest wytwarzany i importowany przez
spół Victrix.
To urdzenie spełnia wymogi cści 15 wytycznych FCC.
ytkowanie jest dopuszczalnepod dwomawarunkami: (1)
urządzenie nie może powodować szkodliwych zaóceń oraz
(2) urządzenie musi odbierać wszelkie przychodzące
zakłócenia, w tym zakłócenia mogące powodować
niepożądane działanie.
KONTROLER BEZPRZEWODOWY
PRO BFG
1. Aby kontrolera Pro BFG™ używać w trybie bezprzewodowym, fioletowy przełącznik
z tyłu kontrolera przesuń do pozycji oznaczonej ikoną połączenia bezprzewodowego.
2. Dołączony adapter bezprzewodowy USB wepnij do konsoli PS5, konsoli PS4™ lub
komputera PC. Dioda LED na adapterze zacznie migać w kolorze fioletowym.
3. Nacnij i zwolnij przycisk PS znajducy się z przodu kontrolera Pro BFG.
4. Po podłączeniu logo-X na kontrolerze i dioda LED na adapterze zaczną świec
stałym fioletowym światłem.
5. Aby wyłączyć kontroler, nacnij przycisk PS i przytrzymaj go przez 5 sekund, aż
wyłączy się dioda LED logo-X.
* Ten kontroler pracuje w zakresie
cstotliwci radiowej 2,4GHz, a kiedy
konsola PS5™ lub inne produkty
ywają tej samej cstotliwości
radiowej, urządzenia mogą na siebie
wzajemnie negatywnie oddziaływać.
* PDP potwierdza kompatybilność
operacyjną konsoli PlayStation®5 (seria
CFI-1000) z tym kontrolerem.
* Zaleca się wsuć adapter USB do
przedniego gniazda USB w konsoli
PlayStation®5 (seria CFI-1000).
PRZEŁĄCZNIK WYBORU
PLATFORMY
1. Kontrolera Pro BFG można używać w
połączeniu z konsolami PS5™, PS4™
oraz komputerem (Xinput).
2. Za pomocą fioletowego przełącznika
przesuwnego na górnej części
kontrolera (obok gniazda USB-C)
wybierz jedną z trzech pozycji: PS5™,
PS4™ lub PC, aby ustawić aktualnie
ywaną platformę.
UWAGA: w trybie komputera PC
(Xinput) kontroler Pro BFG nie
obsługuje strumienia audio przez
ącze zestawu słuchawkowego ani
panelu dotykowego PlayStation™.
5. Gdy poziom nadowania
kontrolera osiągnie niski
poziom, logo-X zacznie
szybko mig, ostrzegac o
niskim stanie akumulatora.
6. Kiedy poziom naładowania
akumulatora jest krytycznie
niski i grozi bliskim
roadowaniem, co minu
w poączonym zestawie
uchawkowym będzie
rozbrzmiewał dźwk
ostrzegawczy.
1. Aby wyć D-Pada, przytrzymaj go
pomiędzy dwoma palcami i
delikatnie wysuń mod.
2. Aby dodać D-Pada, wywnaj go
względem kontrolera i delikatnie
dociśnij, aż usłyszysz kliknięcie.
052-002
  • Page 1 1
  • Page 2 2
  • Page 3 3
  • Page 4 4
  • Page 5 5
  • Page 6 6

VICTRIX Pro BFG Benutzerhandbuch

Typ
Benutzerhandbuch