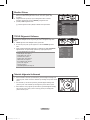
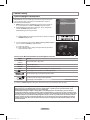
Samsung PS50A750 Benutzerhandbuch
- Kategorie
- LCD-Fernseher
- Typ
- Benutzerhandbuch

imagine the possibilities
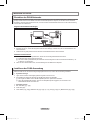
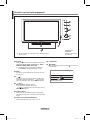
Thank you for purchasing this Samsung product.
To receive more complete service, please register
your product at
www.samsung.com/global/register
Model Serial No.
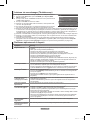
Contact SAMSUNG WORLD-WIDE
If you have any questions or comments relating to Samsung products, please contact the SAMSUNG customer care centre.
Plasma TV
user manual
Country
Customer Care Centre
Web Site
AUSTRIA 0810 - SAMSUNG(7267864, € 0.07/min) www.samsung.com/at
BELGIUM 02 201 2418 www.samsung.com/be
CZECH REPUBLIC
800 - SAMSUNG (800-726786) www.samsung.com/cz
Samsung Zrt., česká organizační složka, Oasis Florenc, Sokolovská394/17, 180 00, Praha 8
DENMARK 8 - SAMSUNG(7267864) www.samsung.com/dk
EIRE 0818 717 100 www.samsung.com/ie
ESTONIA 800-7267 www.samsung.ee
FINLAND
30 - 6227 515
www.samsung.com/fi
FRANCE
3260 SAMSUNG(7267864, € 0,15/Min)
0825 08 65 65 (€ 0.15/Min)
www.samsung.com/fr
GERMANY 01805 - SAMSUNG(7267864, € 0.14/Min) www.samsung.de
HUNGARY 06 - 80 - SAMSUNG(7267864) www.samsung.com/hu
ITALIA 800 - SAMSUNG(7267864) www.samsung.com/it
KAZAKHSTAN 8-10-800-500-55-500 www.samsung.com/kz_ru
KYRGYZSTAN 00-800-500-55-500
LATVIA 8000-7267 www.samsung.com/lv
LITHUANIA 8-800-77777 www.samsung.lt
LUXEMBURG 02 261 03 710 www.samsung.com/lu
NETHERLANDS 0900 - SAMSUNG(7267864, € 0.10/Min) www.samsung.com/nl
NORWAY 3 - SAMSUNG(7267864) www.samsung.com/no
POLAND
0 - 801 - 1SAMSUNG(172678)
022 - 607 - 93 - 33
www.samsung.com/pl
PORTUGAL 808 20 - SAMSUNG(7267864) www.samsung.com/pt
RUSSIA 8-800-555-55-55 www.samsung.ru
SLOVAKIA 0800 - SAMSUNG(7267864) www.samsung.com/sk
SPAIN 902 - 1 - SAMSUNG (902 172 678) www.samsung.com/es
SWEDEN 075 - SAMSUNG(726 78 64) www.samsung.com/se
Switzerland 0848 - SAMSUNG(7267864, CHF 0.08/min) www.samsung.com/ch
TADJIKISTAN 8-10-800-500-55-500
Turkey 444 77 11 www.samsung.com/tr
U.K 0845 SAMSUNG(7267864) www.samsung.com/uk
UKRAINE 8-800-502-0000 www.samsung.ua
UZBEKISTAN 8-10-800-500-55-500 www.samsung.com/kz_ru
BN68-01757J-Eng_.indb 1 2008-08-28 오후 5:59:02
BN68-01757J-01
Seite wird geladen ...
Seite wird geladen ...
Seite wird geladen ...
Seite wird geladen ...
Seite wird geladen ...
Seite wird geladen ...
Seite wird geladen ...
Seite wird geladen ...

English - 10
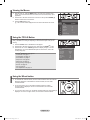
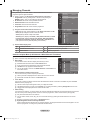
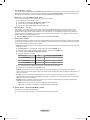
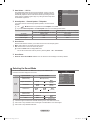
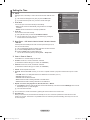
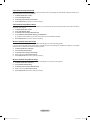
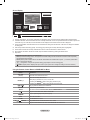
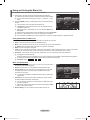
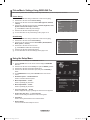
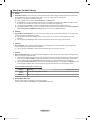
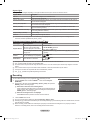
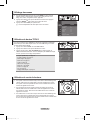
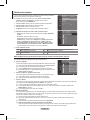
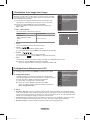
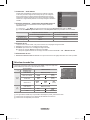
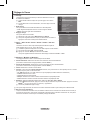
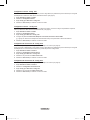
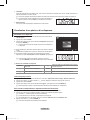
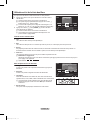
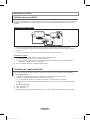
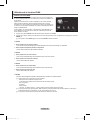
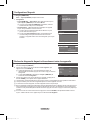
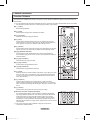
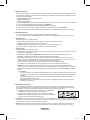
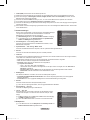
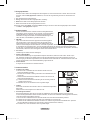
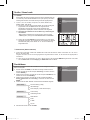
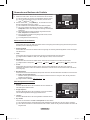
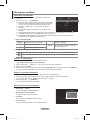
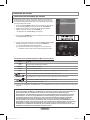
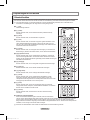
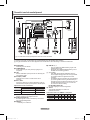
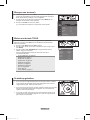
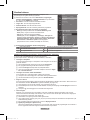
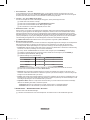
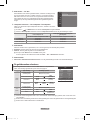
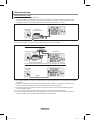
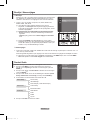
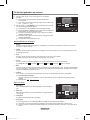
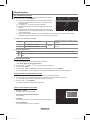
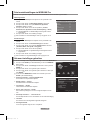
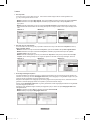
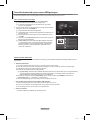
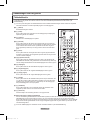
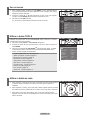
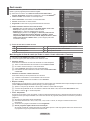
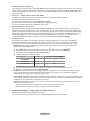
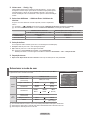
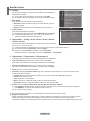
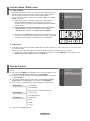
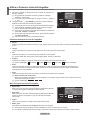
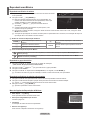
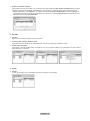
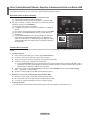
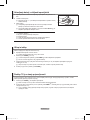
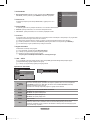
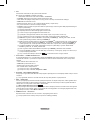
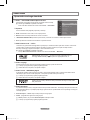
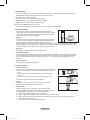
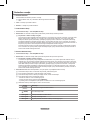
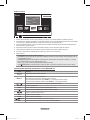
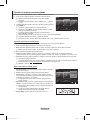
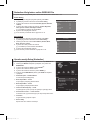
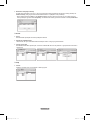
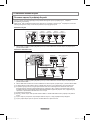
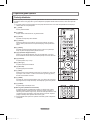
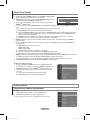
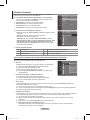
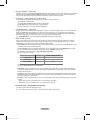
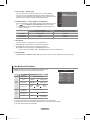
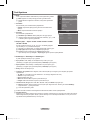
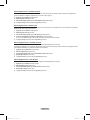
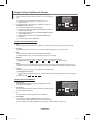
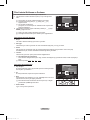
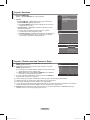
Viewing the Menus
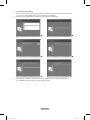
1. With the power on, press the MENU button. The main menu appears on the
screen. The menu’s left side has icons: Picture, Sound, Channel, Setup, Input,
Application.
2. Press the ▲ or ▼ button to select one of the icons. Then press the ENTER
E
button to access the icon’s sub-menu.
3. Press the EXIT button to exit.
The on-screen menus disappear from the screen after about one minute.
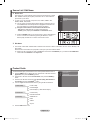
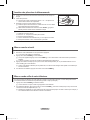
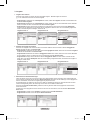
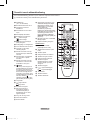
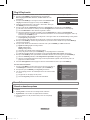
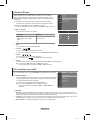
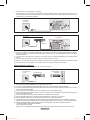
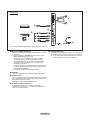
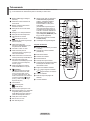
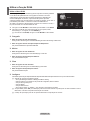
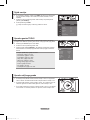
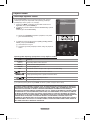
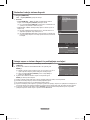
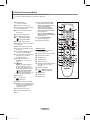
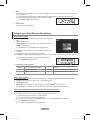
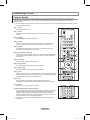
Using the TOOLS Button
You can use the TOOLS button to select your frequently used functions quickly and
easily. The Tools menu changes depending on which external input mode you are
viewing.
1.
Press the TOOLS button. The Tools menu will appear.
2
. Press the ▲ or ▼ button to select a menu, then press the ENTER
E
button.
3. Press the ▲ / ▼ / ◄ / ► / ENTER
E
buttons to display, change, or use the
selected items. For a more detailed description of each function, refer to the
corresponding page.
Anynet
+
(HDMI-CEC): see page 53
Picture Size: see page 17
Picture Mode: see page 15
Sound Mode: see page 21
Sleep Timer: see page 26
SRS TS XT: see page 21
Energy Saving: see page 25
Dual l ll: see page 22
PIP: see page 19
Auto Adjustment: see page 19
•
•
•
•
•
•
•
•
•
•
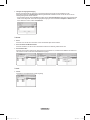
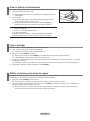
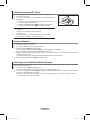
Using the Wheel button
To increase the channel number, turn the wheel clockwise when the Channel
Display is displayed. To decrease the channel number, turn the wheel
counterclockwise.
To turn the volume up, turn the wheel clockwise when the Volume
Control window is displayed. To turn the volume down, turn the wheel
counterclockwise.
To move to a lower menu, turn the wheel clockwise when the menu Display is
displayed. To move to a higher menu, turn the wheel counterclockwise.
N
Mode
:
Standard
Cell Light : 7
Contrast : 95
Brightness : 45
Sharpness : 50
Colour : 50
Tint (G / R) : G50 / R50
Detailed Settings
Picture
Tools
Anynet+ (HDMI-CEC)
Picture Size : Auto Wide
Picture Mode : Standard
Sound Mode : Custom
Sleep Timer : Off
SRS TS XT : Off
Energy Saving : Off
Dual l ll : Mono
U
Move
E
Enter
e
Exit
BN68-01757J-Eng_.indb 10 2008-08-28 오후 5:59:16
Seite wird geladen ...
Seite wird geladen ...
Seite wird geladen ...
Seite wird geladen ...
Seite wird geladen ...
Seite wird geladen ...
Seite wird geladen ...
Seite wird geladen ...
Seite wird geladen ...

English - 20
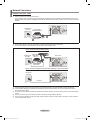
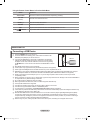
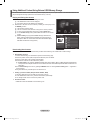
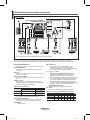
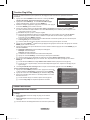
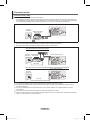
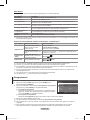
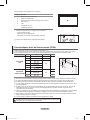
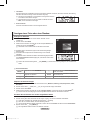
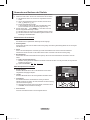
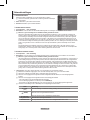
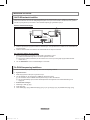
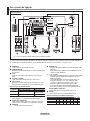
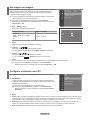
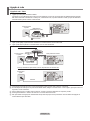
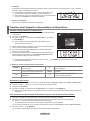
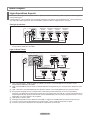
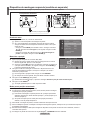
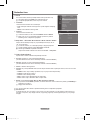
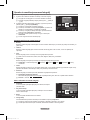
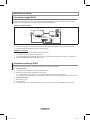
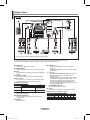
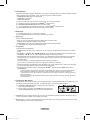
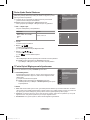
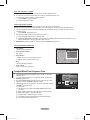
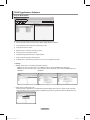
PC Display
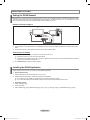
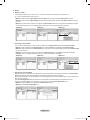
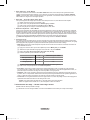
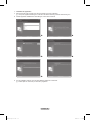
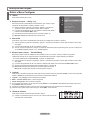
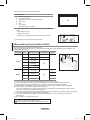
Setting Up Your PC Software (Based on Windows XP)
The Windows display-settings for a typical computer are shown below. The actual
screens on your PC will probably be different, depending upon your particular
version of Windows and your particular video card. However, even if your actual
screens look different, the same basic set-up information will apply in almost all
cases. (If not, contact your computer manufacturer or Samsung Dealer.)
1. First, click on ‘Control Panel’ on the Windows start menu.
2
. When the control panel window appears, click on ‘Appearance and Themes’
and a display dialog-box will appear.
3. When the control panel window appears, click on ‘Display’ and a display dialog-
box will appear.
4.
Navigate to the ‘Settings’ tab on the display dialog-box.
The correct size setting (resolution)
Optimum: 1920 X 1080 pixels
If a vertical-frequency option exists on your display settings dialog box, the
correct value is ‘60’ or ‘60 Hz’. Otherwise, just click ‘OK’ and exit the dialog box.
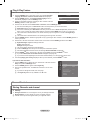
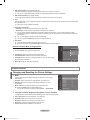
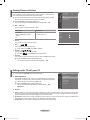
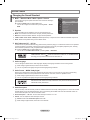
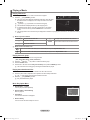
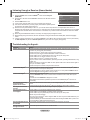
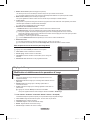
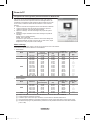
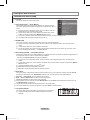
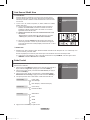
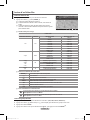
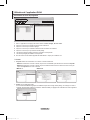
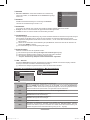
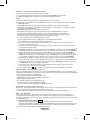
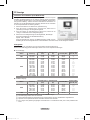
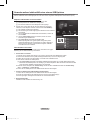
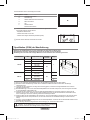
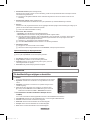
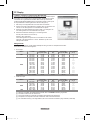
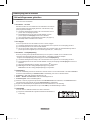
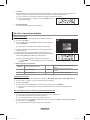
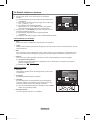
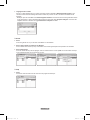
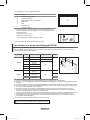
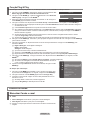
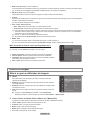
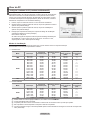
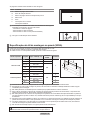
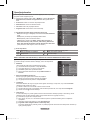
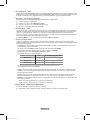
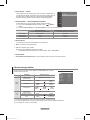
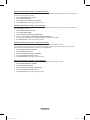
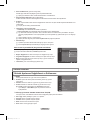
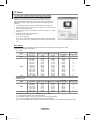
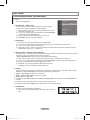
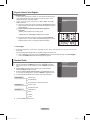
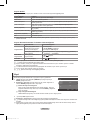
Display Modes
Both screen position and size will vary depending on the type of PC monitor and its resolution.
The resolutions in the table are recommended.
D-Sub Input
Mode Resolution
Horizontal
Frequency (kHz)
Vertical Frequency
(Hz)
Pixel Clock
Frequency (MHz)
Sync Polarity
(H / V)
IBM
640 x 350
720 x 400
31.469
31.469
70.086
70.087
25.175
28.322
+ / -
- / +
VESA
640 x 480
640 x 480
640 x 480
800 x 600
800 x 600
800 x 600
1024 x 768
1024 x 768
1024 x 768
1280 x 1024
1280 x 1024
1360 x 768
1600 x 1200
31.469
37.861
37.500
37.879
48.077
46.875
48.363
56.476
60.023
63.981
79.976
47.712
75.000
59.940
72.809
75.000
60.317
72.188
75.000
60.004
70.069
75.029
60.020
75.025
60.015
60.000
25.175
31.500
31.500
40.000
50.000
49.500
65.000
75.000
78.750
108.000
135.000
85.500
162.000
- / -
- / -
- / -
+ / +
+ / +
+ / +
- / -
- / -
+ / +
+ / +
+ / +
+ / +
+ / +
CVT 1920 x 1080RB 66.587 59.934 138.500 + / -
HDMI / DVI Input
Mode Resolution
Horizontal
Frequency (kHz)
Vertical Frequency
(Hz)
Pixel Clock
Frequency (MHz)
Sync Polarity
(H / V)
VESA
640 x 480
800 x 600
1024 x 768
1280 x 1024
1360 x 768
1600 x 1200
31.469
37.879
48.363
63.981
47.712
75.000
59.940
60.317
60.004
60.020
60.015
60.000
25.175
40.000
65.000
108.000
85.500
162.000
- / -
+ / +
- / -
+ / +
+ / +
+ / +
CEA 1920 x 1080p 67.500 60.000 148.500 + / +
When using an HDMI / DVI cable connection, you must use the HDMI IN
2 jack.
The interlace mode is not supported.
The set might operate abnormally if a non-standard video format is selected.
Separate and Composite modes are supported. SOG is not supported.
Too long or low quality VGA cable can cause picture noise at high resolution modes (1920x1080).
N
N
N
N
N
BN68-01757J-Eng_.indb 20 2008-08-28 오후 5:59:20
Seite wird geladen ...

English - 22
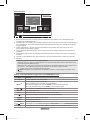
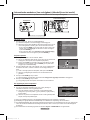
Auto Volume→Off/On
Each broadcasting station has its own signal conditions, and so it is not easy
to adjust the volume every time the channel is changed. This feature lets you
automatically adjust the volume of the desired channel by lowering the sound
output when the modulation signal is high or by raising the sound output when
the modulation signal is low.
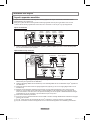
SelectSpeaker→ExternalSpeaker/TVSpeaker
If you want to hear the sound through separate speakers, cancel the internal
amplier.
The –
+, MUTE buttons do not operate when the TV Speaker is set to Off.
If you select External Speaker in the Select Speaker menu, the sound settings will be limited.
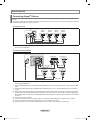
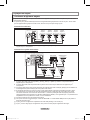
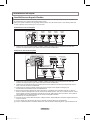
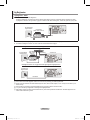
TV's Internal Speakers Audio Out (Optical, L / R Out) to Sound System
TV / Ext. / AV / S-Video / Component / PC / HDMI TV / Ext. / AV / S-Video / Component / PC / HDMI
TV Speaker Speaker Output Sound Output
External Speaker Mute Sound Output
Video No Signal Mute Mute
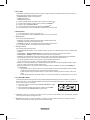
Sound Select
When the PIP feature is activated, you can listen to the sound of the sub (PIP) picture.
Main: Used to listen to the sound of the main picture.
Sub: Used to listen to the sound of the sub picture.
Press the TOOLS button to display Tools menu.
You can also set the sound of the sub picture by selecting Tools→PIP→SoundSelect.
Sound Reset
Reset All / Reset Sound Mode / Cancel:
You can restore the Sound settings to the factory defaults.
❑
❑
N
N
❑
T
❑
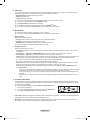
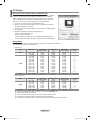
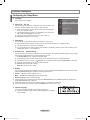
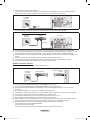
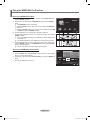
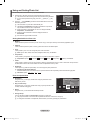
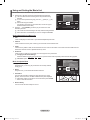
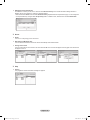
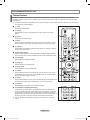
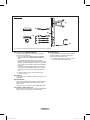
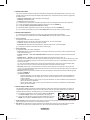
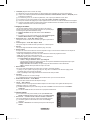
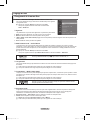
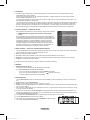
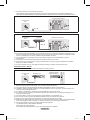
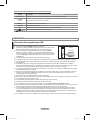
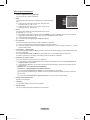
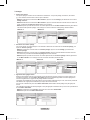
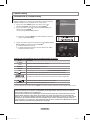
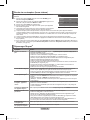
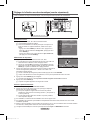
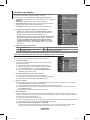
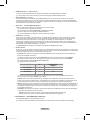
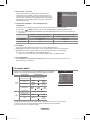
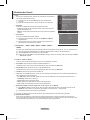
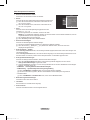
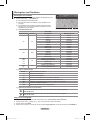
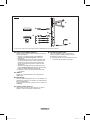
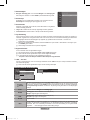
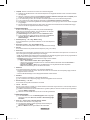
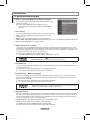
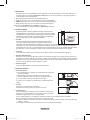
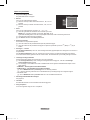
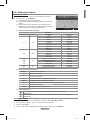
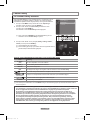
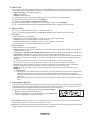
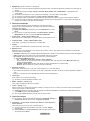
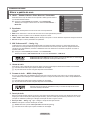
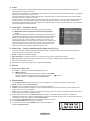
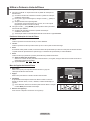
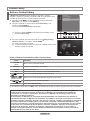
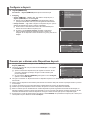
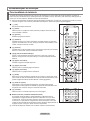
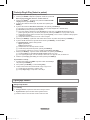
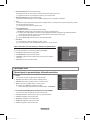
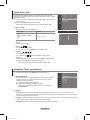
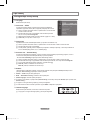
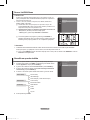
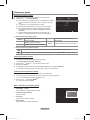
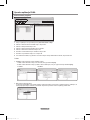
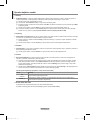
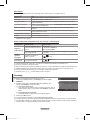
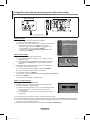
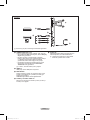
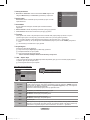
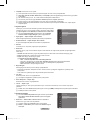
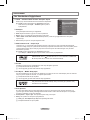
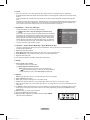
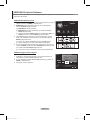
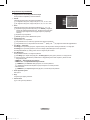
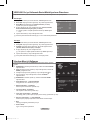
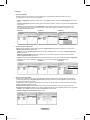
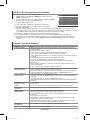
Selecting the Sound Mode
You can set the sound mode in the Tools menu. When you set to Dual l ll, the
current sound mode is displayed on the screen.
Type of broadcast
On-screen indication
NICAM
Stereo
Regular broadcast
(Standard audio)
Mono (Normal use)
Regular + NICAM Mono
NICAM
Mono
(Normal)
NICAM-Stereo
NICAM
Stereo
Mono
(Normal)
NICAM Dual-I/II
NICAM
Dual-1
NICAM
Dual-2
Mono
(Normal)
A2
Stereo
Regular broadcast
(Standard audio)
Mono (Normal use)
Bilingual or DUAL-I/II
Dual I Dual II
Stereo Stereo
Mono
(Forced mono)
If the stereo signal is weak and an automatic switching occurs, then switch to the mono.
This function is only activated in stereo sound signal. It is deactivated in mono sound signal.
This function is only available in TV mode.
N
N
N
Tools
Anynet+ (HDMI-CEC)
Picture Size : Auto Wide
Picture Mode : Standard
Sound Mode : Custom
Sleep Timer : Off
SRS TS XT : Off
Energy Saving : Off
Dual l ll ◄ Mono ►
U
Move
L
Adjust
e
Exit
Select Speaker : TV Speaker
Sound Select : Main
SoundReset ►
Sound
BN68-01757J-Eng_.indb 22 2008-08-28 오후 5:59:21
Seite wird geladen ...
Seite wird geladen ...
Seite wird geladen ...
Seite wird geladen ...
Seite wird geladen ...
Seite wird geladen ...
Seite wird geladen ...
Seite wird geladen ...
Seite wird geladen ...
Seite wird geladen ...
Seite wird geladen ...
Seite wird geladen ...
Seite wird geladen ...
Seite wird geladen ...
Seite wird geladen ...
Seite wird geladen ...
Seite wird geladen ...

English - 40
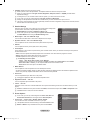
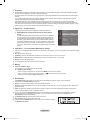
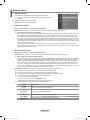
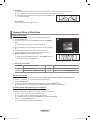
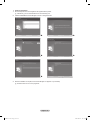
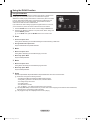
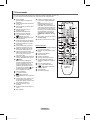
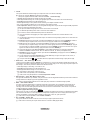
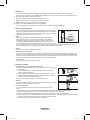
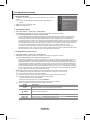
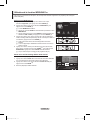
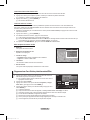
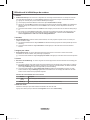
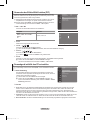
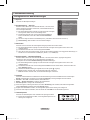
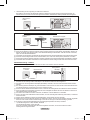
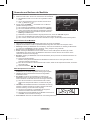
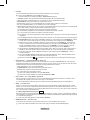
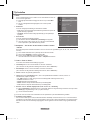
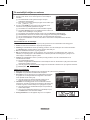
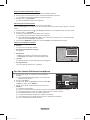
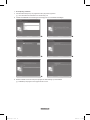
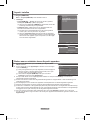
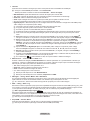
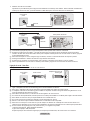
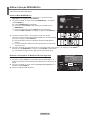
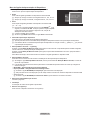
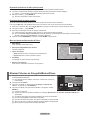
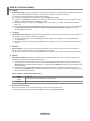
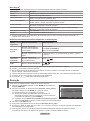
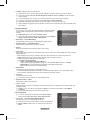
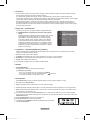
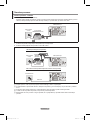
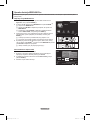
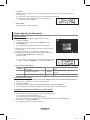
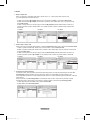
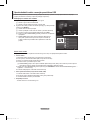
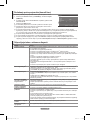
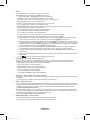
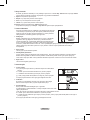
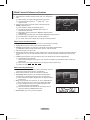
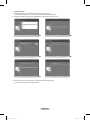
Using and Sorting the Movie List
You can sort movies in the Movie List by a particular standard.
1.
Press the ▲ or ▼ button to select a sorting standard in the Movie list.
The movie les are sorted according to the newly selected sorting
standard.
To move to the previous/next group, press the
π
(REW) or
µ
(FF)
button.
Movie doesn't support subtitles.
(for example, not support smi, srt and sub les, etc and not support
subtitles included in movie les)
2
. Press the
∂
(Play)/ENTER
E
button to play the movie in the order
selected by the user.
The movies are sorted according to the newly selected sorting standard.
Movie information is automatically set. You can change the Favorites.
Sorting Standard for the Movie List
Title
It sorts and displays the Movie titles in symbol/Number/alphabet/special order.
Timeline
It sorts and shows movies by date. It sorts by year and month from the earliest movie.
Folder
If there are many folders in USB, the movies les are shown in order in each folder. The movie le in the Root folder is shown
rst and the others are shown in alphabetical order by name.
Preference
It sorts movies by preference. (Favourites) You can change the movie preferences.
Changing the Favourites Settings
Select the desired movie le in the movie list, then press the Green button repeatedly until the desired setting appears.
Favourites options:
★ ★ ★
,
★ ★ ★
,
★ ★ ★
,
★ ★ ★
Movie List Option Menu
Play Current Group
Using this menu, you can only play movie les in the currently selected
sorting group.
Delete
Using this menu, you can delete the selected movie les.
Information
The movie le information including the order of the le in the current
directory, the name, the size, the date modied and the path is displayed.
Alternatively, select a movie le from the movie list and press the INFO
button to view the information.
Remove Safely
You can remove the device safely from the TV.
N
N
N
N
N
N
N
O
Movie
SUM
Device
Favourites Settings
Select
Jump
Option
movie_1.jpg
Date : Jan.01.2008
Folder : movie-folder
Favourites :
★ ★ ★
Preference
Title
Timeline
A M
SYMBOL
▲
□
ENG
Movie
SUM
Device
Favourites Settings
Select
Jump
Option
movie_1.jpg
Date : Jan.01.2008
Folder : movie-folder
Favourites :
★ ★ ★
Preference
Title
Timeline
A M
SYMBOL
▲
□
ENG
Play Current Group
Delete
Information
Remove Safely
BN68-01757J-Eng_.indb 40 2008-08-28 오후 5:59:45

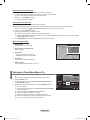
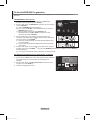
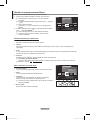
English - 41
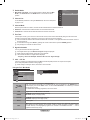
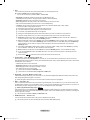
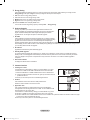
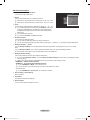
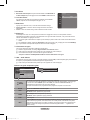
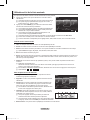
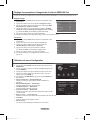
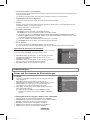
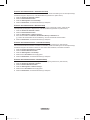
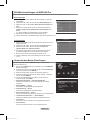
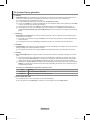
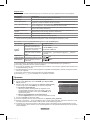
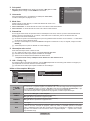
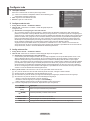
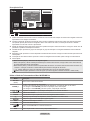
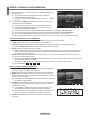
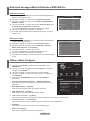
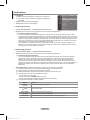
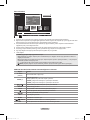
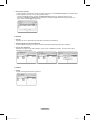
Playing a Movie File
Playingamoviele
1. Pressing the ◄ or ► button to select a movie to be played.
2. Press the
∂
(Play)/ENTER
E
button.
The selected le is played.
The selected le is displayed at the top with its playing time.
The playing duration of a movie le may be displayed as ‘00:00:00’ if its
playing time information is not found at the start of the le.
Supported Video Formats
Video Codec
File Extention Container Video Decoder Max Resolution Sti
*.avi AVI
XviD 720x576
MPEG1 720x576
MPEG2 720x576
H.264 BP 1920x1088
H.264 BP 1920x1088
H.264 HP 1920x1088
MPEG-4 SP 720x576
MPEG-4 ASP 720x576
*.mp4 MP4
H.264 BP 1920x1088
H.264 MP 1920x1088
H.264 HP 1920x1088
MPEG-4 SP 720x576
MPEG-4 ASP 720x576
*.mpg
PS
MPEG1 (Program Stream) 1920x1088
*.mpeg MPEG2 (Program Stream) 1920x1088
*.vro MPEG2 VOB 1920x1088
*.vob MPEG2 VRO 1920x1088
others
(ts)
TS
MPEG2 (Transport Stream) 1920x1088
H.264 (Transport Stream) 1920x1088
Video Play Control Buttons
ENTER
E
Play/Pauses the movie le
∂
Play the movie le
∑
Pause the movie le
∫
Exit play mode and return to the movie list.
TOOLS
Run various functions from the movie menus.
◄/► Skip forwards or backwards through the movie le in 20 second intervals.
▲/▼ Play the next le or the previous le.
Movie function information icon
When all movie les in the folder (or the selected le) are repeated.
Repeat Mode is On.
When all movie les in the folder (or the selected le) are played once.
Repeat Mode is Off.
Playing the movie group
1. Press the ▲ or ▼ button to select a sorting standard. (Title, Timeline, Folder, Preference)
2. Press the π (REW) or µ (FF) button to select the desired group.
3. Press the TOOLS button.
4. Press the ▲ or ▼ button to select Play Current Group, then press the ENTER
E
button.
N
N
N
N
N
N
SUM
E
Pause
-20sec
+20sec
Option
Return
1/5 00:00:48 00:23:05
ABC.avi
BN68-01757J-Eng_.indb 41 2008-08-28 오후 5:59:46
Seite wird geladen ...

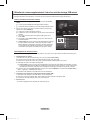
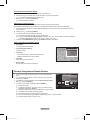
English - 43
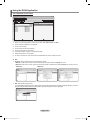
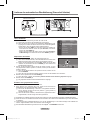
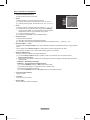
Picture/Music Settings Using WISELINK Pro
When watching a Slide Show or listening to music using WISELINK Pro, you can set the picture and sound.
Picture Setting
1. Press the TOOLS button during a Slide Show or while music is playing.
2. Press the ▲ or ▼ button to select Picture Setting.
3.
Press the ◄ or ► button to select the Picture Mode (Dynamic, Standard,
or Movie).
4.
Press the ▲ or ▼ button to move to an item. (Contrast, Brightness, Color,
Dynamic Contrast, Black Adjust, or Reset)
Select Reset to initialize the picture settings.
5.
Press the ◄ or ► button to adjust the settings.
For more information on the picture settings, refer to pages 15~18.
Sound Setting
1. Press the TOOLS button during a Slide Show or while music is playing.
2. Press the ▲ or ▼ button to select Sound Setting.
3.
Press the ◄ o r ► button to select the Sound Mode. (Standard, Music,
Movie, Speech, or Custom)
4.
Press the ▲ or ▼ button to move to an item.
Select Reset to initialize the sound settings.
5.
Press the ◄ or ► button to adjust the settings.
For more information on the sound settings, refer to page 21~22.
Using the Setup Menu
Setup displays the user settings of the WISELINK Pro menu.
1. Press the W.LINK button on the remote control to display the WISELINK
Pro menu.
2
. Press the ◄ or ► button to select Setup, then press the ENTER
E
button.
3. Press the ▲ or ▼ button to select the desired option.
4 .
Press the ◄ or ► button to select the option, then press the ENTER
E
button.
To exit WISELINK Pro mode, press the W.LINK button on the remote
control.
SlideShowSpeed→Fast/Slow/Normal
Select to control the slide show speed.
MusicRepeatMode→On/Off
Select to repeatedly play music les.
MovieRepeatMode→On/Off
Select to repeatedly play movie les.
Cont. movie play help
→On/Off
Select to display the help pop-up message for continuous movie playback.
ScreenSaverRunTime→1min/3min/5min
Select to set the waiting time before the screen saver appears.
Information
Select to viewing the information of the connected device.
Remove Safely
You can remove the device safely from the TV.
N
N
N
N
N
Setup
SUM
Device
Move Adjust
Return
Slide Show Speed ◄ Normal ►
Music Repeat Mode : On
Movie Repeat Mode : On
Cont. movie play help : On
Screen Saver Run Time : 3 min
Information
Remove Safely
WISELINK Pro
Photo
SUM
Device
e
Exit
Music Setup
SETUP
SUM
851.98MB/995.00MB Free
Movie
Picture Setting
Picture Mode ◄ Standard ►
Contrast : 90
Brightness : 45
Color : 50
Dynamic Contrast : Off
Black Adjust : Off
Reset
U
Move
L
Adjust
E
Enter
R
Return
Sound Setting
Sound Mode ◄ Custom ►
Balance : L50 R50
100Hz : 0
300Hz : 0
1KHz : 0
3KHz : 0
10KHz : 0
Reset
U
Move
L
Adjust
E
Enter
R
Return
BN68-01757J-Eng_.indb 43 2008-08-28 오후 5:59:48
Seite wird geladen ...

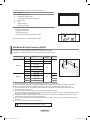
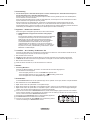
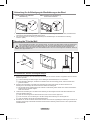
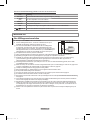
English - 45
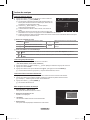
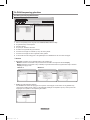
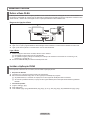
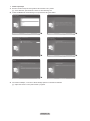
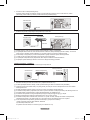
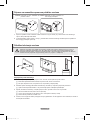
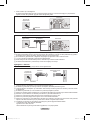
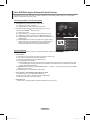
Install the application
1. Run the Setup.exe le on the Programme CD supplied with the product.
Alternatively, you can download the le from www.samsung.com.
2
. Install the SAMSUNG PC Share Manager as shown in the gures below.
► ►
► ►
►
3. When the installation is complete, the PC Share Manager icon appears on your Desktop.
Double-click the icon to run the programme.
N
N
BN68-01757J-Eng_.indb 45 2008-08-28 오후 5:59:51
Seite wird geladen ...
Seite wird geladen ...
Seite wird geladen ...
Seite wird geladen ...
Seite wird geladen ...
Seite wird geladen ...
Seite wird geladen ...
Seite wird geladen ...
Seite wird geladen ...
Seite wird geladen ...
Seite wird geladen ...
Seite wird geladen ...

English - 58
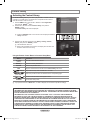
The teletext pages are organized according to six categories:
Part Contents
A Selected page number.
B Broadcasting channel identity.
C Current page number or search indications.
D Date and time.
E Text.
F Status information.
FASTEXT information.
Teletext information is often divided between several pages displayed in sequence,
which can be accessed by:
Entering the page number
Selecting a title in a list
Selecting a coloured heading (FASTEXT system)
Press the TV button to exit from the teletext display.
N
-
-
-
O
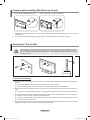
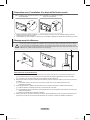
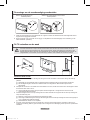
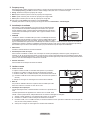
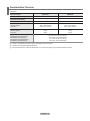
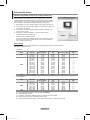
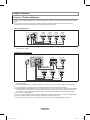
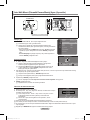
WallMountKitSpecications(VESA)
Install your wall mount on a solid wall perpendicular to the oor.
When attaching to other building materials, please contact your nearest dealer.
If installed on a ceiling or slanted wall, it may fall and result in severe personal injury.
Product Family inch VESA Spec. (A * B)
Standard
Screw
Quantity
LCD-TV
23 ~ 26 200
*
100 M4
4
32 ~ 40 200
*
200 M6
46 ~ 52
400 * 400
600 * 400
M8
57
700 * 400
(No VESA)
57 ~ 70 800 * 400
80 ~ 1400 * 800
PDP-TV
42 ~ 58
400 * 400
600 * 400
M8
4
63
676 * 407
(No VESA)
6
63 ~ 70 800 * 400 4
80 ~ 1400 * 800 4
We provided the standard dimensions for wall mount kits as shown in the table above.
When purchasing our wall mount kit, a detailed installation manual and all parts necessary for assembly are provided.
Do not use screws longer than the standard dimension, as they may cause damage to the inside of the TV set.
For wall mounts that do not comply with the VESA standard screw specifications, the length of the screws may differ
depending on their specifications.
Do not use screws that do not comply with the VESA standard screw specifications.
Do not use fasten the screws too strongly, this may damage the product or cause the product to fall, leading to personal injury.
Samsung is not liable for these kinds of accidents.
Samsung is not liable for product damage or personal injury when a non-VESA or non-specified wall mount is used or the
consumer fails to follow the product installation instructions.
Our 57” and 63” models do not comply with VESA Specifications. Therefore, you should use our dedicated wall mount kit for
this model.
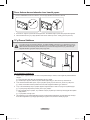
Do not exceed 15 degrees tilt when mounting this TV.
Do not install your Wall Mount Kit while your TV is turned on.
It may result in personal injury due to electric shock.
N
N
N
N
N
N
N
N
BN68-01757J-Eng_.indb 58 2008-08-28 오후 6:00:00
Seite wird geladen ...
Seite wird geladen ...
Seite wird geladen ...

English - 62
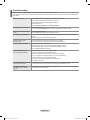
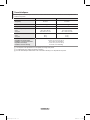
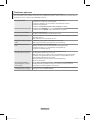
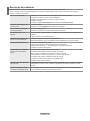
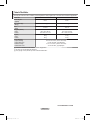
Specications
The descriptions and characteristics in this booklet are given for information purposes only and are subject to modification without
notice.
Model Name PS50A756 PS63A756
Screen Size (Diagonal)
50 inch 63 inch
PC Resolution (Optimum)
1920 x 1080 @ 60 Hz 1920 x 1080 @ 60 Hz
Sound (Output) 10 W x 2 15 W x 2
Dimension (WxHxD)
Body
With stand
1240 x 766 x 96 mm
1240 x 830 x 315 mm
1531 x 932 x 99 mm
1531 x 1005 x 418 mm
Weight
Body
With stand
39 kg
44 kg
67 kg
84 kg
Environmental Considerations
Operating Temperature
Operating Humidity
Storage Temperature
Storage Humidity
50 °F to 104 °F (10 °C to 40 °C)
10% to 80%, non-condensing
-4 °F to 113 °F (-20 °C to 45 °C)
5% to 95%, non-condensing
This device is a Class B digital apparatus.
Design and specications are subject to change without prior notice.
For the power supply and Power Consumption, refer to the label attached to the product.
N
N
N
BN68-01757J-Eng_.indb 62 2008-08-28 오후 6:00:03

This page is intentionally
left blank.
BN68-01757J-Eng_.indb 63 2008-08-28 오후 6:00:03

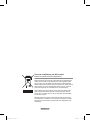
Correct Disposal of This Product
(Waste Electrical & Electronic Equipment)
(Applicable in the European Union and other European countries with
separate collection systems)
This marking shown on the product or its literature, indicates that it
should not be disposed with other household wastes at the end of its
working life.
To prevent possible harm to the environment or human health from
uncontrolled waste disposal, please separate this from other types of
wastes and recycle it responsibly to promote the sustainable reuse of
material resources.
Household users should contact either the retailer where they
purchased this product, or their local government office, for details
of where and how they can take this item for environmentally safe
recycling.
Business users should contact their supplier and check the terms and
conditions of the purchase contract. This product should not be mixed
with other commercial wastes for disposal.
BN68-01757J-Eng_.indb 64 2008-08-28 오후 6:00:03
Seite wird geladen ...
Seite wird geladen ...
Seite wird geladen ...
Seite wird geladen ...
Seite wird geladen ...
Seite wird geladen ...
Seite wird geladen ...
Seite wird geladen ...
Seite wird geladen ...
Seite wird geladen ...
Seite wird geladen ...
Seite wird geladen ...
Seite wird geladen ...
Seite wird geladen ...
Seite wird geladen ...
Seite wird geladen ...
Seite wird geladen ...
Seite wird geladen ...
Seite wird geladen ...
Seite wird geladen ...

Français - 22
Sélection du mode Son
Vous pouvez congurer le mode sonore dans le menu Outils. Lorsque vous réglez cette
option sur Dual l ll, le mode sonore actuel est afché à l’écran.
Type de programme
Indication à l'écran
Indication à l’écran
NICAM
stéréo
Programme normal
(Audio standard)
Mono (Usage normal)
Normal + Mono NICAM NICAM
Mono
(Normal)
NICAM Stéréo
NICAM
stéréo
Mono
(Normal)
NICAM DUAL-I/II
NICAM
dual 1
NICAM
dual
2
Mono
(Normal)
A2
stéréo
Programme normal
(Audio standard)
Mono (Usage normal)
Bilingue ou DUAL-I/II Dual I
Dual II
Stéréo Stéréo
Mono
(Mono forcé)
Si le signal stéréo est faible et qu’une permutation automatique se produit, passez alors en Mono.
Cette fonction n’est activée qu’en son stéréo. Elle est désactivée en mode mono.
Cette fonction n’est disponible qu’en mode TV.
N
N
N
Volume auto → Arrêt / Marche
Chaque station de télédiffusion possède ses propres conditions de signal et
il n’est donc pas facile de régler le volume chaque fois que vous changez de
chaîne. Cette fonction vous permet de régler automatiquement le volume du
canal désiré en réduisant la puissance sonore lorsque le signal de modulation
est élevé ou en augmentant la puissance sonore lorsque le signal de modulation
est faible.
Sélection Haut-parleur → Haut-parleur externe/Haut-parleur TV
Pour entendre le son par l’intermédiaire d’enceintes séparées, désactivez l’
amplicateur interne.
Les boutons –
+, MUTE ne fonctionnent pas lorsque la fonction Haut-parleur TV est réglée sur Arrêt.
Si vous sélectionnez Haut-parleur externe dans le menu Haut-parleur externe, les paramètres de son sont limités.
Haut-parleurs internes du téléviseur Sortie audio (Optique, Sortie G/D) vers système audio
TV / Ext. / AV / S-Video / Component / PC / HDMI TV / Ext. / AV / S-Video / Component / PC / HDMI
Haut-parleur TV Sortie enceinte Sortie son
Haut-parleur externe Silence Sortie son
Absence de signal vidéo Silence Silence
Sélection du son
Lorsque la fonction PIP est activée, vous pouvez écouter le son accompagnant l’image secondaire.
Principal
: pour écouter le son accompagnant l’image principale.
Secondaire: pour écouter le son accompagnant l’image secondaire.
Appuyez sur le bouton TOOLS pour afcher le menu Outils.
Vous pouvez également dénir le son de l’image secondaire en sélectionnant Outils → PIP →
Sélection du son.
Réinitialisation du son
Réinitial. tout / Réinitial. mode son / Annuler: Vous pouvez ramener tous les réglages mémorisés à leur valeur par défaut.
❑
❑
N
N
❑
T
❑
Sélection Haut-parleur : Haut-parleur TV
Sélection du son : Principal
Réinitialisation du son
►
Son
Outils
Anynet+ (HDMI-CEC)
Format de l'image : Larg. auto
Image Mode : Standard
Son Mode : Personnel
Veille : Arrêt
SRS TS XT : Arrêt
Mode éco. : Arrêt
Dual l ll ◄ Mono ►
U
Déplacer
L
Régler
e
Quitter
BN68-01757J-Fre.indb 22 2008-9-23 13:22:34
Seite wird geladen ...
Seite wird geladen ...
Seite wird geladen ...
Seite wird geladen ...
Seite wird geladen ...
Seite wird geladen ...
Seite wird geladen ...
Seite wird geladen ...
Seite wird geladen ...
Seite wird geladen ...

Français - 33
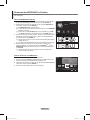
Utilisation de la fonction WISELINK Pro
Cette fonction vous permet de lire des photos, de la musique et/ou des lms enregistrés sur un périphérique de stockage de
masse USB (MSC).
Accès au menu WISELINK Pro
1. Appuyez sur le bouton MENU. Appuyez sur le bouton ▲ ou ▼ pour
sélectionner Application, puis appuyez sur le bouton ENTER
E
.
2. Appuyez sur le bouton ▲ ou ▼ pour sélectionner WISELINK Pro, puis
appuyez sur le bouton ENTER
E
.
Le menu WISELINK Pro s’afche.
Appuyez sur le bouton W.LINK de la télécommande pour afcher le menu
WISELINK Pro.
Appuyez plusieurs fois sur le bouton SOURCE de la télécommande pour
sélectionner USB ou DLNA, puis appuyez sur le bouton ENTER
E
.
3. Appuyez sur le bouton rouge, puis sur le bouton ▲ ou ▼ pour sélectionner
l’unité de stockage USB correspondante (si elle est connectée par le biais d’un
concentrateur). Appuyez sur le bouton ENTER
E
.
Cette fonction diffère selon l’unité de stockage USB connectée au
téléviseur.
Le nom du périphérique USB sélectionné s’afche dans le coin inférieur
gauche de l’écran.
4.
Appuyez sur le bouton ◄ ou ► pour sélectionner une icône (Photo, Music,
Movie, Setup), puis appuyez sur le bouton ENTER
E
. Pour quitter le mode
WISELINK Pro, appuyez sur le bouton W.LINK de la télécommande.
Les jeux vidéo sont pris en charge (pas de programmes de jeu).
Retrait d’une unité de stockage USB en toute sécurité
Vous pouvez retirer le périphérique du téléviseur en toute sécurité.
1. Appuyez sur le bouton TOOLS dans l'écran de la liste des chiers WISELINK
Pro ou pendant la lecture d'un chier musical ou d'un diaporama.
2
. Appuyez sur le bouton ▲ ou ▼ pour sélectionner Retrait sécurisé, puis
appuyez sur le bouton ENTER
E
.
3. Retirez le périphérique USB du téléviseur.
N
O
O
N
N
N
WISELINK Pro
Photo
SUM
Périph.
Retour
Music Setup
PHOTO
SUM
851.98MB/995.00MB Free
Movie
Photo
SUM
Périph.l
Favoris
Sélection
Passer
Option
image_1.jpg
Mois Jan
Date :
Jan.01.2008
Couleur : Gris
Compo. :
Dossier : P-other
Favori :
★ ★ ★
Préférence
Mois
Date
Jan Nov
▲
▲
Lire gp act.
Supprimer
Information
Retrait sécurisé
BN68-01757J-Fre.indb 33 2008-9-23 13:22:48
Seite wird geladen ...
Seite wird geladen ...
Seite wird geladen ...
Seite wird geladen ...
Seite wird geladen ...
Seite wird geladen ...
Seite wird geladen ...

Français - 41
Lecture d’un fichier film
Lecture d’un chier lm
1. Appuyez sur le bouton ◄ ou ► pour sélectionner un lm à lire.
2. Appuyez sur le bouton
∂
(Lecture)/ENTER
E
.
La lecture du chier sélectionné commence.
Le chier sélectionné s’af che en haut de l’écran, avec la durée de
lecture.
La durée de lecture d’un chier lm peut s’af cher sous la forme
“00:00:00” si les informations relatives au temps de lecture ne
gurent
pas au début du chier.
Formats vidéo pris en charge
Codec vidéo
L’extension du chier
Conteneur Décodeur vidéo Résolution max. Sti
*.avi AVI
XviD 720x576
MPEG1 720x576
MPEG2 720x576
H.264 BP 1920x1088
H.264 BP 1920x1088
H.264 HP 1920x1088
MPEG-4 SP 720x576
MPEG-4 ASP 720x576
*.mp4 MP4
H.264 BP 1920x1088
H.264 MP 1920x1088
H.264 HP 1920x1088
MPEG-4 SP 720x576
MPEG-4 ASP 720x576
*.mpg
PS
MPEG1 (Program Stream) 1920x1088
*.mpeg MPEG2 (Program Stream) 1920x1088
*.vro MPEG2 VOB 1920x1088
*.vob MPEG2 VRO 1920x1088
autres
(ts)
TS
MPEG2 (Transport Stream) 1920x1088
H.264 (Transport Stream) 1920x1088
Boutons de commande de lecture vidéo
ENTER
E
Lance/Interrompt la lecture du diaporama.
∂
Lit le chier lm.
∑
Interrompt la lecture du chier lm.
∫
Quitte le mode de lecture et revient à la Liste des lms.
TOOLS Exécute diverses fonctions dans les menus Film.
◄/► Avance ou recule de 20 secondes dans le lm en cours de lecture.
µ
Modi e la vitesse de lecture.
▲/▼ Lance la lecture du chier suivant ou précédent.
Icône d’informations sur la fonction Film
Tous les chiers lm du dossier (ou le chier sélectionné) sont répétés.
Mode Répétition est dé ni sur Marche.
Tous les chiers lm du dossier (ou le chier sélectionné) sont lus une seule fois.
Mode Répétition est dé ni sur Arrêt.
Lecture du groupe de lms
1. Appuyez sur le bouton ▲ ou ▼ pour sélectionner un ordre de tri. (Titre, Date, Dossier, Préférence)
2. Appuyez sur le bouton π (Retour arrière) ou µ (Avance rapide) pour sélectionner le groupe de votre choix.
3. Appuyez sur le bouton TOOLS.
4. Appuyez sur le bouton ▲ ou ▼ pour sélectionner Lire gp act., puis appuyez sur le bouton ENTER
E
.
N
N
N
N
N
N
SUM
E
Pause
-20sec
+20sec
Option
Retour
1/5 00:00:48 00:23:05
ABC.avi
BN68-01757J-Fre.indb 41 2008-9-23 13:22:56
Seite wird geladen ...
Seite wird geladen ...
Seite wird geladen ...
Seite wird geladen ...

Français - 46
Utilisation de l’application DLNA
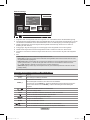
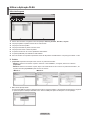
Présentation de l’écran du programme
1. Menus : l’application s’accompagne des menus suivants : Fichier, Partager, Serveur et Aide.
2. Cliquez sur ce bouton pour partager le dossier serveur sélectionné.
3.
Cliquez sur ce bouton pour annuler le partage.
4.
Cliquez sur ce bouton pour actualiser la liste des chiers et dossiers de l’ordinateur
.
5. Cliquez sur ce bouton pour synchroniser l’état de partage.
6
. Les dossiers et chiers à partager stockés sur l’ordinateur sont répertoriés.
7
. Les dossiers partagés par l’utilisateur sont répertoriés.
8
. Nom du serveur PC dans la liste d'appareils de WISELINK Pro : Cliquez pour modier le nom.
Fichier
Propriété: affiche des informations sur le fichier ou dossier sélectionné.
Méthode 1: sélectionnez un chier ou dossier, cliquez sur le menu Fichier, puis sélectionnez le sous-menu Propriété.
Méthode 2: sélectionnez un chier ou dossier, cliquez sur l’élément sélectionné avec le bouton droit de la souris, puis
cliquez sur Propriété dans le menu contextuel.
<Méthode
1> <Méthode 2>
Name Modied
Name
Name
Name
Yes No
Name Modied
Name
Name
Name
Yes No
Name Modied
Name
Name
Name
Yes No
Quitter: ferme l’application DLNA.
Si vous sélectionnez Exit sans appliquer les modications après avoir changé l’état de partage, un message vous invite à
enregistrer les paramètres modiés sur l’ordinateur. Sélectionnez Oui pour appliquer les modications et fermer l’application.
❑
-
-
Name Modied
Name
Name
Name
Yes No
1
2 3 4 5
6 7
8
BN68-01757J-Fre.indb 46 2008-9-23 13:23:02
Seite wird geladen ...
Seite wird geladen ...
Seite wird geladen ...
Seite wird geladen ...
Seite wird geladen ...
Seite wird geladen ...
Seite wird geladen ...
Seite wird geladen ...
Seite wird geladen ...
Seite wird geladen ...
Seite wird geladen ...

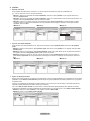
Français - 58
Les pages télétexte sont organisées en six catégories :
Catégorie Sommaire
A Numéro de la page sélectionnée
B Identité du canal émetteur
C Numéro de la page actuelle ou indications de recherche
D Date et heure
E Texte
F Informations sur l’état
Informations FASTEXT
Les informations du télétexte sont souvent réparties sur plusieurs pages qui
s’afchent l’une après l’autre. Ces pages sont accessibles en
:
entrant le numéro de page ;
sélectionnant un titre dans une liste ;
sélectionnant un en-tête de couleur (système FASTEXT).
Appuyez sur le bouton TV pour quitter l’afchage télétexte.
N
-
-
-
O
Caractéristiques du kit de fixation murale (VESA)
Installez votre fixation murale sur un mur solide perpendiculaire au sol.
Si vous souhaitez la fixer sur d’autres matériaux de construction, veuillez prendre contact avec votre revendeur le plus proche.
Si vous l’installez au plafond ou sur un mur non droit, elle peut tomber et provoquer des blessures corporelles graves.
Famille de produit pouce Caract. VESA (A * B) Vis standard Quantité
TELEVISEUR
LCD
23 ~ 26 200
*
100 M4
4
32 ~ 40 200
*
200 M6
46 ~ 52
400 * 400
600 * 400
M8
57
700 * 400
(Pas VESA)
57 ~ 70 800 * 400
80 ~ 1400 * 800
TELEVISEUR
ECRAN A PLASMA
42 ~ 58
400 * 400
600 * 400
M8
4
63
676 * 407
(Pas VESA)
6
63 ~ 70 800 * 400 4
80 ~ 1400 * 800 4
Nous avons fourni les dimensions standard pour tous les kits de xation murale, comme indiqué dans le tableau ci-dessus.
Un manuel d’installation détaillé et toutes les pièces nécessaires au montage sont fournis avec le kit de xation mural.
N’utilisez pas de vis plus longues que la dimension standard car elles pourraient endommager l’intérieur du téléviseur.
Pour les xations murales non conformes aux caractéristiques des vis VESA standard, la longueur des vis peut varier
, selon
leurs caractéristiques.
N’utilisez pas de vis non conformes aux caractéristiques des vis VESA standard. Ne serrez pas trop les vis : cela pourrait
endommager le produit ou provoquer sa chute, entraînant des blessures corporelles. Samsung ne peut être tenue
responsable de ce type d’accident.
Samsung ne peut être tenue responsable de tout dommage au produit ou toute blessure corporelle dans le cas de l’utilisation
d’une xation murale non-VESA ou non spécié, ni si l’utilisateur ne suit pas les instructions d’installation du produit.
Nos modèles 57” et 63” ne sont pas conformes aux caractéristiques VESA. Vous devez par conséquent utiliser notre kit de
xation mural approprié pour ce modèle.
Lors du montage, l’inclinaison du téléviseur ne doit pas dépasser 15 degrés.
N
N
N
N
N
N
N
N
N’installez pas votre kit de montage mural lorsque votre téléviseur est en fonctionnement.
Une blessure par choc électrique pourrait en résulter.
BN68-01757J-Fre.indb 58 2008-9-23 13:23:09
Seite wird geladen ...
Seite wird geladen ...
Seite wird geladen ...

Français - 62
Caractéristiques
Les descriptions et caractéristiques fournies dans ce manuel sont données à titre indicatif seulement et sont susceptibles d'être
modifiées sans préavis.
Nom du modèle PS50A756 PS63A756
Taille de l’écran
(diagonale)
50 inches 63 inches
Résolution PC 1920 x 1080 @ 60 Hz 1920 x 1080 @ 60 Hz
Son (Sortie) 10 W x 2 15 W x 2
Dimensions (WxHxD)
Corps
Avec pied
1240 x 766 x 96 mm
1240 x 830 x 315 mm
1531 x 932 x 99 mm
1531 x 1005 x 418 mm
Poids
Corps
Avec pied
39 kg
44 kg
67 kg
84 kg
Considérations environnementales
Température de fonctionnement
Humidité au cours du fonctionnement
Température de stockage
Humidité sur le lieu de stockage
50 °F to 104 °F (10 °C to 40 °C)
10% to 80%, non-condensing
-4 °F to 113 °F (-20 °C to 45 °C)
5% to 95%, non-condensing
La conception et les spécications sont susceptibles de changer sans préavis.
Ce périphérique est un appareil numérique de classe
B.
Pour les caractéristiques d’alimentation et de consommation électrique, voir l’étiquette xée au produit.
N
N
N
BN68-01757J-Fre.indb 62 2008-9-23 13:23:12
Seite wird geladen ...

© 2008 Samsung Electronics Co., Ltd. All rights reserved.
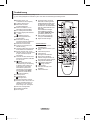
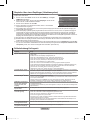
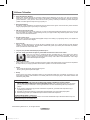
Benutzerhinweise
Einbrennen von Standbildern
Zeigen Sie Standbilder (z. B. bei einem Videospiel oder bei Anschluss eines PC an diesen Plasmamonitor) niemals länger als 2
Stunden auf dem Plasmabildschirm an, da das Bild auf diese Weise einbrennen kann. Das Einbrennen von Standbildern wird auch als „
Bildkonservierung“ bezeichnet. Sie können das Einbrennen vermeiden, indem Sie die Helligkeit und den Kontrast des Monitors beim
Anzeigen von Standbildern verringern.
Höhe
Um normalen Betrieb zu gewährleisten, muss der Plasmabildschirm in einer Höhe unter 2000 m aufgestellt werden. Der Betrieb des
Monitors wird möglicherweise gestört, wenn er in mehr als 2000 m Höhe betrieben wird. Sie dürfen den Plasmabildschirm deshalb nicht in
einer Höhe von über 2000 m aufstellen und betreiben.
Wärmeentwicklung auf der Oberseite des Plasmabildschirms
Die Oberseite des Produkts kann nach längerem Betrieb warm werden, da die Wärme aus dem Monitor über die Entlüftungsöffnung im
oberen Teil des Geräts abgeführt wird. Dies ist normal und weist nicht auf einen Defekt oder eine Fehlfunktion des Geräts hin. Allerdings
sollten Kinder von dem oberen Teil des Geräts ferngehalten werden.
Das Gerät verursacht ein „knackendes“ Geräusch.
Ein „knackendes“ Geräusch entsteht, wenn das Gerätematerial sich aufgrund einer Änderung der Umgebung, wie z. B.
Temperaturschwankungen oder Änderung der Luftfeuchtigkeit, zusammenzieht oder ausdehnt. Das ist normal und stellt keinen Defekt des
Geräts dar.
Pixelfehler
Der Plasmabildschirm besitzt eine Bildfläche mit 1.230.000 (bei SD-Auflösung) bis 3.150.000 (bei HD-Auflösung) Pixeln, für dessen
Herstellung hoch entwickelte Technologie eingesetzt wird. Allerdings können ein paar zu helle oder zu dunkle Pixel auf der Bildfläche zu
sehen sein. Diese Pixelfehler haben keinen Einfluss auf die Geräteleistung.
Vermeiden Sie den Betrieb des Plasmabildschirms bei Temperaturen unter 5°C.
Ein Standbild, dass zu lange angezeigt wird, kann zu einer bleibenden Beschädigung des Plasmabildschirms führen
Der Betrieb des Plasmafernsehers im Format 4:3 über einen längeren Zeitraum kann links, rechts und in der Mitte
des Monitors Spuren der Bildränder hinterlassen, die durch die unterschiedliche Lichtemission auf dem Bildschirm
verursacht werden. Das Wiedergeben einer DVD oder der Betrieb einer Spielkonsole kann auf dem Bildschirm zu
ähnlichen Ef
fekten führen. Schäden, die durch die o. g. Effekte verursacht wurden, unterliegen nicht der Garantie.
Nachbilder auf dem Monitor
Das Anzeigen von Standbildern von Videospielen und PC-Anwendungen über einen bestimmten Zeitraum kann zu partiellen Nachbildern
führen. Um diesen Effekt zu verhindern, verringern Sie Helligkeit und Kontrast, wenn Sie Standbilder anzeigen möchten.
Garantie
– Durch diese Garantie nicht abgedeckt sind Schäden, die durch Einbrennen von Bildern entstehen.
– Das Einbrennen von Bildern wird von der Garantie nicht abgedeckt.
Installieren
Wenden Sie sich an den autorisierten Kundendienst, wenn das Gerät an einem Ort mit hoher Konzentration an Staubpartikeln,
außergewöhnlich hoher oder geringer Raumtemperatur, extrem hoher Luftfeuchtigkeit, in unmittelbarer Nähe zu chemischen Lösungsmitteln
oder für den Dauerbetrieb, z.B. auf Bahn- oder Flughäfen, aufgestellt werden soll. Eine nicht fachgerechte Aufstellung kann zu schweren
Schäden am Gerät führen.
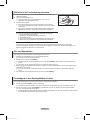
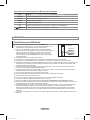
Deutsch - 2
Hinweis zu Digitalfernsehgeräten (DVB-T)
1. FUNKTIONEN FÜR DIGITALFERNSEHEN (DVB) SIND NUR IN LÄNDERN UND REGIONEN VERFÜGBAR, IN
DENEN DIGITALE DVB-T-SIGNALE (MPEG2 UND MPEG4 AVC) TERRESTRISCH GESENDET WERDEN. DVB-T
ist der Standard des Europäischen Konsortiums für terrestrisches Digitalfernsehen. Fragen Sie Ihren örtlichen Händler,
wenn Sie Informationen über die Verfügbarkeit von DVB-T in Ihrer Gegend benötigen.
2. Zwar hält dieses Fernsehgerät die Vorgaben der DVB-T-Spezikation [August 2008] ein, aber es kann nicht garantiert
werden, dass die Kompatibilität mit zukünftigen digitalen terrestrischen DVB-T-Signalen gewahrt bleibt.
3.
Manche Funktionen des Digitalfernsehens stehen möglicherweise nicht zur Verfügung oder arbeiten in bestimmten
Ländern und Regionen möglicherweise nicht korrekt.
4.
Für weitere Informationen setzen Sie sich bitte mit dem SAMSUNG-Kundendienstzentrum in Verbindung.
Kontakt zu Samsung
Falls Sie Fragen oder Anregungen zu Samsung-Produkten haben, wenden Sie sich bitte an den Samsung-Kundendienst. (Weitere
Informationen auf der Rückseite)
BN68-01757J-Ger.indb 2 2008/08/28 10:24:13

Deutsch
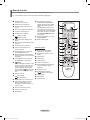
N O T
Symbol Drücken Hinweis Zielwahltaste TOOL-Taste
Deutsch - 3
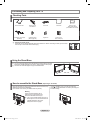
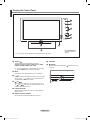
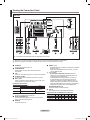
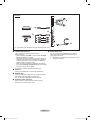
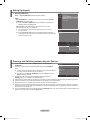
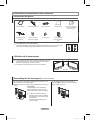
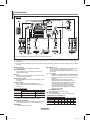
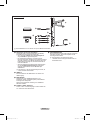
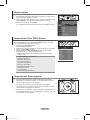
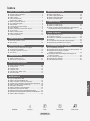
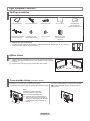
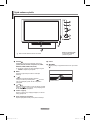
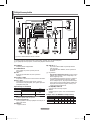
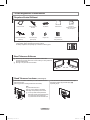
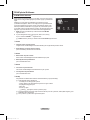
Anschließen und Vorbereiten des Fernsehgeräts
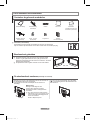
Lieferumfang .......................................................................4
Verwenden des Standfußes ................................................4
Montieren des Standfußes (modellabhängig) .....................4
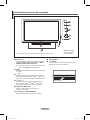
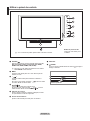
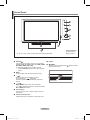
Bedienfeld ...........................................................................5
Anschlussfeld ......................................................................6
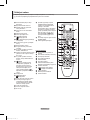
Fernbedienung ....................................................................8
Batterien in die Fernbedienung einsetzen ...........................9
Ein- und Ausschalten ...........................................................9
Fernsehgerät in den Standby-Modus schalten ....................9
Menüs anzeigen ................................................................10
Verwenden der Taste TOOLS ............................................10
Verwenden des Steuerungsrads .......................................10
Plug & Play-Funktion .........................................................11
Kanalsteuerung
Speichern von Kanälen und Kanal ...................................11
Verwalten von Kanälen ......................................................14
Bildeinstellungen
Ändern und Zurücksetzen der Bildeinstellungen ...............15
Verwenden der Bild-in-Bild-Funktion (PIP) ........................19
Fernsehgerät mithilfe des PCs einstellen ..........................19
PC-Anzeige .......................................................................20
Toneinstellungen
Tonstandard wählen ..........................................................21
Tonmodus wählen .............................................................22
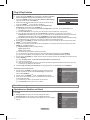
Funktionsbeschreibung
Kongurieren der Menüeinstellungen ................................23
Einstellen der Uhrzeit ........................................................26
Netzwerkverbindung ..........................................................27
Netzwerk einrichten ...........................................................29
Quellen / Name bearb. ......................................................31
Gerätehandbuch ................................................................31
WISELINK Pro
Anschließen eines USB-Geräts .........................................32
Verwenden der WISELINK Pro-Funktion ..........................33
Verwenden und Sortieren der Fotoliste .............................35
Anzeigen eines Fotos oder einer Diashow ........................36
Verwenden und Sortieren der Musikliste ...........................38
Wiedergeben von Musik ....................................................39
Verwenden und Sortieren der Filmliste .............................40
Wiedergeben von Filmdateien ...........................................41
Löschen von Foto-/Musik-/Filmdateien .............................42
Bild-/Musikeinstellungen mit WISELINK Pro .....................43
Verwenden des Menüs Einstellungen ...............................43
■
■
■
■
■
■
■
■
■
■
■
■
■
■
■
■
■
■
■
■
■
■
■
■
■
■
■
■
■
■
■
■
■
■
■
■
■
■
WISELINK Pro-DLNA
Einrichten des DLNA-Netzwerks .......................................44
Installieren der DLNA-Anwendung ....................................44
Verwenden der DLNA-Anwendung ...................................46
Verwenden der DLNA-Funktion .........................................49
Bibliothek der Inhalte
Aktivieren der Bibliothek der Inhalte ..................................50
Verwenden der Bibliothek der Inhalte ................................51
Verwenden weiterer Inhalte mithilfe eines externen
USB-Speichers ..................................................................52
Informationen zu Anynet+
Anschließen von Anynet+-Geräten....................................53
Einrichten von Anynet+......................................................54
Suchen von Anynet+-Geräten und Umschalten
zwischen diesen Geräten ..................................................54
Aufnahme ..........................................................................55
Abspielen über einen Receiver (Heimkinosystem) ............56
Fehlerbehebung für Anynet+ ............................................56
Empfehlungen für den Betrieb
Videotextfunktion ...............................................................57
Spezikation (VESA) der Wandhalterung ..........................58
Justieren der automatischen Wandhalterung
(Gesondert lieferbar) ........................................................69
Vorbereitung für die Befestigung der
Wandhalterung an der Wand .............................................60
Securing the TV to the Wall ...............................................60
Fehlerbehebung ................................................................61
Technische Daten ..............................................................62
■
■
■
■
■
■
■
■
■
■
■
■
■
■
■
■
■
■
■
■
Inhalt
BN68-01757J-Ger.indb 1 2008/08/28 10:24:13
Seite wird geladen ...
Seite wird geladen ...
Seite wird geladen ...
Seite wird geladen ...
Seite wird geladen ...
Seite wird geladen ...
Seite wird geladen ...
Seite wird geladen ...
Seite wird geladen ...
Seite wird geladen ...
Seite wird geladen ...
Seite wird geladen ...
Seite wird geladen ...
Seite wird geladen ...
Seite wird geladen ...
Seite wird geladen ...
Seite wird geladen ...
Seite wird geladen ...
Seite wird geladen ...
Seite wird geladen ...
Seite wird geladen ...
Seite wird geladen ...
Seite wird geladen ...
Seite wird geladen ...
Seite wird geladen ...
Seite wird geladen ...
Seite wird geladen ...
Seite wird geladen ...
Seite wird geladen ...
Seite wird geladen ...
Seite wird geladen ...
Seite wird geladen ...
Seite wird geladen ...
Seite wird geladen ...
Seite wird geladen ...
Seite wird geladen ...
Seite wird geladen ...
Seite wird geladen ...
Seite wird geladen ...
Seite wird geladen ...
Seite wird geladen ...
Seite wird geladen ...
Seite wird geladen ...
Seite wird geladen ...
Seite wird geladen ...
Seite wird geladen ...
Seite wird geladen ...
Seite wird geladen ...
Seite wird geladen ...
Seite wird geladen ...
Seite wird geladen ...
Seite wird geladen ...
Seite wird geladen ...
Seite wird geladen ...
Seite wird geladen ...
Seite wird geladen ...
Seite wird geladen ...
Seite wird geladen ...
Seite wird geladen ...
Seite wird geladen ...
Seite wird geladen ...
Seite wird geladen ...
Seite wird geladen ...
Seite wird geladen ...
Seite wird geladen ...
Seite wird geladen ...
Seite wird geladen ...
Seite wird geladen ...
Seite wird geladen ...
Seite wird geladen ...
Seite wird geladen ...
Seite wird geladen ...
Seite wird geladen ...
Seite wird geladen ...
Seite wird geladen ...
Seite wird geladen ...
Seite wird geladen ...
Seite wird geladen ...
Seite wird geladen ...
Seite wird geladen ...
Seite wird geladen ...
Seite wird geladen ...
Seite wird geladen ...
Seite wird geladen ...
Seite wird geladen ...
Seite wird geladen ...
Seite wird geladen ...
Seite wird geladen ...
Seite wird geladen ...
Seite wird geladen ...
Seite wird geladen ...
Seite wird geladen ...
Seite wird geladen ...
Seite wird geladen ...
Seite wird geladen ...
Seite wird geladen ...
Seite wird geladen ...
Seite wird geladen ...
Seite wird geladen ...
Seite wird geladen ...
Seite wird geladen ...
Seite wird geladen ...
Seite wird geladen ...
Seite wird geladen ...
Seite wird geladen ...
Seite wird geladen ...
Seite wird geladen ...
Seite wird geladen ...
Seite wird geladen ...
Seite wird geladen ...
Seite wird geladen ...
Seite wird geladen ...
Seite wird geladen ...
Seite wird geladen ...
Seite wird geladen ...
Seite wird geladen ...
Seite wird geladen ...
Seite wird geladen ...
Seite wird geladen ...
Seite wird geladen ...
Seite wird geladen ...
Seite wird geladen ...
Seite wird geladen ...
Seite wird geladen ...
Seite wird geladen ...
Seite wird geladen ...
Seite wird geladen ...
Seite wird geladen ...
Seite wird geladen ...
Seite wird geladen ...
Seite wird geladen ...
Seite wird geladen ...
Seite wird geladen ...
Seite wird geladen ...
Seite wird geladen ...
Seite wird geladen ...
Seite wird geladen ...
Seite wird geladen ...
Seite wird geladen ...
Seite wird geladen ...
Seite wird geladen ...
Seite wird geladen ...
Seite wird geladen ...
Seite wird geladen ...
Seite wird geladen ...
Seite wird geladen ...
Seite wird geladen ...
Seite wird geladen ...
Seite wird geladen ...
Seite wird geladen ...
Seite wird geladen ...
Seite wird geladen ...
Seite wird geladen ...
Seite wird geladen ...
Seite wird geladen ...
Seite wird geladen ...
Seite wird geladen ...
Seite wird geladen ...
Seite wird geladen ...
Seite wird geladen ...
Seite wird geladen ...
Seite wird geladen ...
Seite wird geladen ...
Seite wird geladen ...
Seite wird geladen ...
Seite wird geladen ...
Seite wird geladen ...
Seite wird geladen ...
Seite wird geladen ...
Seite wird geladen ...
Seite wird geladen ...
Seite wird geladen ...
Seite wird geladen ...
Seite wird geladen ...
Seite wird geladen ...
Seite wird geladen ...
Seite wird geladen ...
Seite wird geladen ...
Seite wird geladen ...
Seite wird geladen ...
Seite wird geladen ...
Seite wird geladen ...
Seite wird geladen ...
Seite wird geladen ...
Seite wird geladen ...
Seite wird geladen ...
Seite wird geladen ...
Seite wird geladen ...
Seite wird geladen ...
Seite wird geladen ...
Seite wird geladen ...
Seite wird geladen ...
Seite wird geladen ...
Seite wird geladen ...
Seite wird geladen ...
Seite wird geladen ...
Seite wird geladen ...
Seite wird geladen ...
Seite wird geladen ...
Seite wird geladen ...
Seite wird geladen ...
Seite wird geladen ...
Seite wird geladen ...
Seite wird geladen ...
Seite wird geladen ...
Seite wird geladen ...
Seite wird geladen ...
Seite wird geladen ...
Seite wird geladen ...
Seite wird geladen ...
Seite wird geladen ...
Seite wird geladen ...
Seite wird geladen ...
Seite wird geladen ...
Seite wird geladen ...
Seite wird geladen ...
Seite wird geladen ...
Seite wird geladen ...
Seite wird geladen ...
Seite wird geladen ...
Seite wird geladen ...
Seite wird geladen ...
Seite wird geladen ...
Seite wird geladen ...
Seite wird geladen ...
Seite wird geladen ...
Seite wird geladen ...
Seite wird geladen ...
Seite wird geladen ...
Seite wird geladen ...
Seite wird geladen ...
Seite wird geladen ...
Seite wird geladen ...
Seite wird geladen ...
Seite wird geladen ...
Seite wird geladen ...
Seite wird geladen ...
Seite wird geladen ...
Seite wird geladen ...
Seite wird geladen ...
Seite wird geladen ...
Seite wird geladen ...
Seite wird geladen ...
Seite wird geladen ...
Seite wird geladen ...
Seite wird geladen ...
Seite wird geladen ...
Seite wird geladen ...
Seite wird geladen ...
Seite wird geladen ...
Seite wird geladen ...
Seite wird geladen ...
Seite wird geladen ...
Seite wird geladen ...
Seite wird geladen ...
Seite wird geladen ...
Seite wird geladen ...
Seite wird geladen ...
Seite wird geladen ...
Seite wird geladen ...
Seite wird geladen ...
Seite wird geladen ...
Seite wird geladen ...
Seite wird geladen ...
Seite wird geladen ...
Seite wird geladen ...
Seite wird geladen ...
Seite wird geladen ...
Seite wird geladen ...
Seite wird geladen ...
Seite wird geladen ...
Seite wird geladen ...
Seite wird geladen ...
Seite wird geladen ...
Seite wird geladen ...
Seite wird geladen ...
Seite wird geladen ...
Seite wird geladen ...
Seite wird geladen ...
Seite wird geladen ...
Seite wird geladen ...
Seite wird geladen ...
Seite wird geladen ...
Seite wird geladen ...
Seite wird geladen ...
Seite wird geladen ...
Seite wird geladen ...
Seite wird geladen ...
Seite wird geladen ...
Seite wird geladen ...
Seite wird geladen ...
Seite wird geladen ...
Seite wird geladen ...
Seite wird geladen ...
Seite wird geladen ...
Seite wird geladen ...
Seite wird geladen ...
Seite wird geladen ...
Seite wird geladen ...
Seite wird geladen ...
Seite wird geladen ...
Seite wird geladen ...
Seite wird geladen ...
Seite wird geladen ...
Seite wird geladen ...
Seite wird geladen ...
Seite wird geladen ...
Seite wird geladen ...
-
 1
1
-
 2
2
-
 3
3
-
 4
4
-
 5
5
-
 6
6
-
 7
7
-
 8
8
-
 9
9
-
 10
10
-
 11
11
-
 12
12
-
 13
13
-
 14
14
-
 15
15
-
 16
16
-
 17
17
-
 18
18
-
 19
19
-
 20
20
-
 21
21
-
 22
22
-
 23
23
-
 24
24
-
 25
25
-
 26
26
-
 27
27
-
 28
28
-
 29
29
-
 30
30
-
 31
31
-
 32
32
-
 33
33
-
 34
34
-
 35
35
-
 36
36
-
 37
37
-
 38
38
-
 39
39
-
 40
40
-
 41
41
-
 42
42
-
 43
43
-
 44
44
-
 45
45
-
 46
46
-
 47
47
-
 48
48
-
 49
49
-
 50
50
-
 51
51
-
 52
52
-
 53
53
-
 54
54
-
 55
55
-
 56
56
-
 57
57
-
 58
58
-
 59
59
-
 60
60
-
 61
61
-
 62
62
-
 63
63
-
 64
64
-
 65
65
-
 66
66
-
 67
67
-
 68
68
-
 69
69
-
 70
70
-
 71
71
-
 72
72
-
 73
73
-
 74
74
-
 75
75
-
 76
76
-
 77
77
-
 78
78
-
 79
79
-
 80
80
-
 81
81
-
 82
82
-
 83
83
-
 84
84
-
 85
85
-
 86
86
-
 87
87
-
 88
88
-
 89
89
-
 90
90
-
 91
91
-
 92
92
-
 93
93
-
 94
94
-
 95
95
-
 96
96
-
 97
97
-
 98
98
-
 99
99
-
 100
100
-
 101
101
-
 102
102
-
 103
103
-
 104
104
-
 105
105
-
 106
106
-
 107
107
-
 108
108
-
 109
109
-
 110
110
-
 111
111
-
 112
112
-
 113
113
-
 114
114
-
 115
115
-
 116
116
-
 117
117
-
 118
118
-
 119
119
-
 120
120
-
 121
121
-
 122
122
-
 123
123
-
 124
124
-
 125
125
-
 126
126
-
 127
127
-
 128
128
-
 129
129
-
 130
130
-
 131
131
-
 132
132
-
 133
133
-
 134
134
-
 135
135
-
 136
136
-
 137
137
-
 138
138
-
 139
139
-
 140
140
-
 141
141
-
 142
142
-
 143
143
-
 144
144
-
 145
145
-
 146
146
-
 147
147
-
 148
148
-
 149
149
-
 150
150
-
 151
151
-
 152
152
-
 153
153
-
 154
154
-
 155
155
-
 156
156
-
 157
157
-
 158
158
-
 159
159
-
 160
160
-
 161
161
-
 162
162
-
 163
163
-
 164
164
-
 165
165
-
 166
166
-
 167
167
-
 168
168
-
 169
169
-
 170
170
-
 171
171
-
 172
172
-
 173
173
-
 174
174
-
 175
175
-
 176
176
-
 177
177
-
 178
178
-
 179
179
-
 180
180
-
 181
181
-
 182
182
-
 183
183
-
 184
184
-
 185
185
-
 186
186
-
 187
187
-
 188
188
-
 189
189
-
 190
190
-
 191
191
-
 192
192
-
 193
193
-
 194
194
-
 195
195
-
 196
196
-
 197
197
-
 198
198
-
 199
199
-
 200
200
-
 201
201
-
 202
202
-
 203
203
-
 204
204
-
 205
205
-
 206
206
-
 207
207
-
 208
208
-
 209
209
-
 210
210
-
 211
211
-
 212
212
-
 213
213
-
 214
214
-
 215
215
-
 216
216
-
 217
217
-
 218
218
-
 219
219
-
 220
220
-
 221
221
-
 222
222
-
 223
223
-
 224
224
-
 225
225
-
 226
226
-
 227
227
-
 228
228
-
 229
229
-
 230
230
-
 231
231
-
 232
232
-
 233
233
-
 234
234
-
 235
235
-
 236
236
-
 237
237
-
 238
238
-
 239
239
-
 240
240
-
 241
241
-
 242
242
-
 243
243
-
 244
244
-
 245
245
-
 246
246
-
 247
247
-
 248
248
-
 249
249
-
 250
250
-
 251
251
-
 252
252
-
 253
253
-
 254
254
-
 255
255
-
 256
256
-
 257
257
-
 258
258
-
 259
259
-
 260
260
-
 261
261
-
 262
262
-
 263
263
-
 264
264
-
 265
265
-
 266
266
-
 267
267
-
 268
268
-
 269
269
-
 270
270
-
 271
271
-
 272
272
-
 273
273
-
 274
274
-
 275
275
-
 276
276
-
 277
277
-
 278
278
-
 279
279
-
 280
280
-
 281
281
-
 282
282
-
 283
283
-
 284
284
-
 285
285
-
 286
286
-
 287
287
-
 288
288
-
 289
289
-
 290
290
-
 291
291
-
 292
292
-
 293
293
-
 294
294
-
 295
295
-
 296
296
-
 297
297
-
 298
298
-
 299
299
-
 300
300
-
 301
301
-
 302
302
-
 303
303
-
 304
304
-
 305
305
-
 306
306
-
 307
307
-
 308
308
-
 309
309
-
 310
310
-
 311
311
-
 312
312
-
 313
313
-
 314
314
-
 315
315
-
 316
316
-
 317
317
-
 318
318
-
 319
319
-
 320
320
-
 321
321
-
 322
322
-
 323
323
-
 324
324
-
 325
325
-
 326
326
-
 327
327
-
 328
328
-
 329
329
-
 330
330
-
 331
331
-
 332
332
-
 333
333
-
 334
334
-
 335
335
-
 336
336
-
 337
337
-
 338
338
-
 339
339
-
 340
340
-
 341
341
-
 342
342
-
 343
343
-
 344
344
-
 345
345
-
 346
346
-
 347
347
-
 348
348
-
 349
349
-
 350
350
-
 351
351
-
 352
352
-
 353
353
-
 354
354
-
 355
355
-
 356
356
-
 357
357
-
 358
358
-
 359
359
-
 360
360
-
 361
361
-
 362
362
-
 363
363
-
 364
364
-
 365
365
-
 366
366
-
 367
367
-
 368
368
-
 369
369
-
 370
370
-
 371
371
-
 372
372
-
 373
373
-
 374
374
-
 375
375
-
 376
376
-
 377
377
-
 378
378
-
 379
379
-
 380
380
-
 381
381
-
 382
382
-
 383
383
-
 384
384
-
 385
385
-
 386
386
-
 387
387
-
 388
388
-
 389
389
-
 390
390
-
 391
391
-
 392
392
-
 393
393
-
 394
394
-
 395
395
-
 396
396
-
 397
397
-
 398
398
-
 399
399
-
 400
400
-
 401
401
-
 402
402
-
 403
403
-
 404
404
-
 405
405
-
 406
406
-
 407
407
-
 408
408
-
 409
409
-
 410
410
-
 411
411
-
 412
412
-
 413
413
-
 414
414
-
 415
415
-
 416
416
-
 417
417
-
 418
418
-
 419
419
-
 420
420
-
 421
421
-
 422
422
-
 423
423
-
 424
424
-
 425
425
-
 426
426
-
 427
427
-
 428
428
-
 429
429
-
 430
430
-
 431
431
-
 432
432
-
 433
433
-
 434
434
-
 435
435
-
 436
436


Samsung PS50A750 Benutzerhandbuch
- Kategorie
- LCD-Fernseher
- Typ
- Benutzerhandbuch
in anderen Sprachen
- English: Samsung PS50A750 User manual
- français: Samsung PS50A750 Manuel utilisateur
- Nederlands: Samsung PS50A750 Handleiding
- português: Samsung PS50A750 Manual do usuário
Verwandte Artikel
-
Samsung PS50A656 Benutzerhandbuch
-
-
Samsung LE32A769 Benutzerhandbuch
-
-
Samsung PS50B451B2W Benutzerhandbuch
-
-
Samsung PS51D490 Bedienungsanleitung
-
-
Samsung PS64D8090FS Schnellstartanleitung
-
