
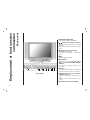
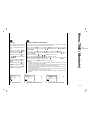
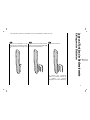
JV-DTV23 / JV-DTV27 / JV-DTV30
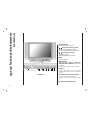
Please read this manual carefully before operating your set. Retain it
for future reference.
See the label attached on the back cover and quote this information to
your dealer when you require service.
JV -DTV23/27 /30V10M10/EN/FR/ GE/IT/SP 0511200 5

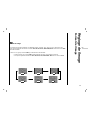
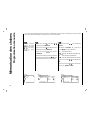
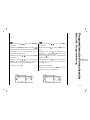
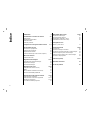
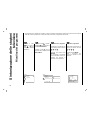
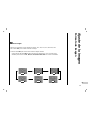
Installation 3
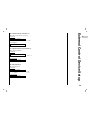
Remote control handset 4-5
Controls 4
Battery installation 5
Controls of
Front panel 6
Connections of
Back panel 7
Connection to
External equipment 8-11
Basic operation
On and Off 12
Programme selection 12
Volume adjustment 12
On screen language selection (option) 12
On screen menus
Menu selection 13
Picture adjustment 14-15
PSM (Picture Status Memory) 14
Manual Picture Control 14
Picture Format 15
Sound adjustment 16-18
SSM (Sound Status Memory) 16
Balance 17
AVL (Auto Volume Leveler) 17
Stereo/Dual/NICAM reception 18
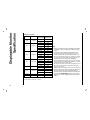
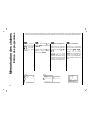
Setting up TV stations 19-24
Auto programme tuning 19
Manual programme tuning 20-21
Programme edit 22-23
Calling the programme table 24
Time Menu / Other functions 25-26
Clock 25
On/Off Time 25
Auto sleep / Sleep timer 26
CSM (Colour Status Memory) 26
Connection of PC
PC Setup 27
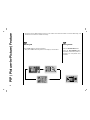
PIP (Picture-In-Picture) Feature 28-29
Watching PIP 28
Moving the PIP 28
Swapping the PIP 29
Selecting a Input Signal Source for the PIP 29
Programme selection for sub picture 29
Programme scan 29
Teletext (option) 30-31
External Control Device Setup 32-39
Displayable Monitor Specification 40
Troubleshooting
Check list 43
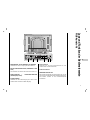
Contents
2

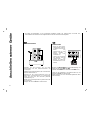
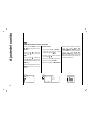
Power
This set operates on an AC mains supply, the voltage is as
indicated on the label on the back cover. Never apply DC
power to the set. In the event of thunderstorms or power-
cuts, please pull out the aerial and mains plugs.
Warning
To prevent fire or shock hazard, do not expose the set to
rain or moisture. Do not rub or strike the Active Matrix LCD
with anything hard as this may scratch, mar, or damage the
Active Matrix LCD permanently.
Service
Never remove the back cover of the set as this can expose
you to very high voltage and other hazards. If the set does
not operate properly, unplug it and call your dealer.
Aerial
Connect the aerial cable to the socket marked +75 Ω on
the back cover. For the best reception an outdoor aerial
should be used.
Location
Position your set so that no bright light or sunlight falls
directly onto the screen. Care should be taken not to
expose the set to any unnecessary vibration, moisture,
dust or heat. Also ensure that the set is placed in a posi-
tion to allow a free flow of air. Do not cover the ventilation
openings on the back cover.
Cleaning
Unplug the set before cleaning the face of the LCD Screen.
Dust the set by wiping the screen and the cabinet with a
soft, clean cloth. If the screen requires additional cleaning,
use a clean, damp cloth. Do not use liquid cleaners or
aerosol cleaners.
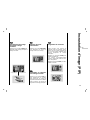
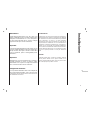
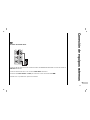
Installation
3
EN

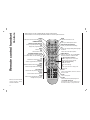
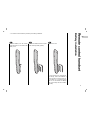
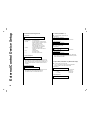
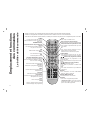
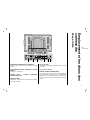
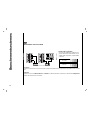
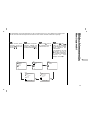
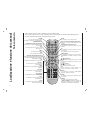
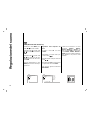
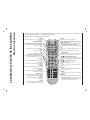
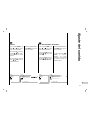
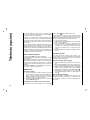
- All the functions can be controlled with the remote control handset.
- Some functions can also be adjusted with the buttons on the front panel of the set.
POWER
switches the set on from standby or off to
standby.
NUMBER BUTTONS
PSM (Picture Status Memory)
recalls your preferred picture setting.
LIST
displays the programme table.
MENU
selects a menu.
EXIT
exits from each mode.
TELETEXT BUTTONS (option)
These buttons are used for teletext.
For further details, see the ‘Teletext’ sec-
tion.
PIP
Switches the sub picture on or off.
PIP PR +/-
Selects a program for the sub picture.
SWAP
Alternates between main and sub picture.
PIP INPUT
Selects the input mode for the sub pic-
ture.
PIP POSITION
relocates the sub picture in clockwise
direction.
STILL
freezes motion of the sub picture.
SCAN
switches on the programme scan mode
through 4/12 sub pictures.
MUTE
switches the sound on or off.
ARC
select your desired picture format.
SSM (Sound Status Memory)
recalls your preferred sound setting.
I/II
selects the language during dual language
broadcast.
selects the sound output (option).
INPUT SELECT
Select TV, AV1, AV2, SAV, COMPONENT,
RGB-DTV, RGB-PC, RGB-DVI mode.
DD
/
EE
(Programme Up/Down)
selects a programme or a menu item.
switches the set on from standby.
FF / GG (Volume Up/Down)
adjusts the volume.
adjusts menu settings.
OK
accepts your selection or displays the
current mode.
PC/DVI
selects COMPONENT, RGB-DTV, RGB-PC,
RGB-DVI mode.
SLEEP
sets the sleep timer.
Q.VIEW
returns to the previously viewed programme.
- COLOURED BUTTONS
These buttons are used for teletext (only
TELETEXT models) or programme edit.
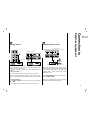
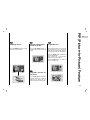
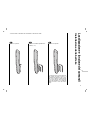
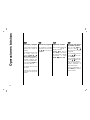
Remote control handset
Controls
Before you use the remote
control handset, please
install the batteries.
4
i
?
REVEAL
MIX
INDEX
TIME
PIP PR+ PIP PR- SWAP
PIP INPUT
PIP
PIP POSITION
STILL
SCAN
UPDATE
MODE
SIZE
HOLD
MENU
INPUT SELECT
SLEEP
VOL
VOL
PR
OK
1
3
4 6
7 9
2
5
8
0
I / II
ARC
LIST
EXIT
PR
TEXT
PC/DVI
Q.VIEW
X
M
PSM
POWER
SSM

EN
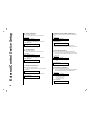
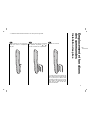
- Your remote control handset is powered by two AAA type batteries.
To insert batteries, turn the remote
control handset over and remove the
battery cover.
Remote control handset
Battery installation
5
1
1
Put the two batteries into the compart-
ment observing battery polarity.
2
2
Replace the cover.
To avoid damage from possible bat-
tery leakage, remove the batteries if
you do not plan to use the remote con-
trol handset for an extended period
time. Do not use batteries of differing
age or type. Always discard of batter-
ies safely.
3
3

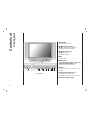
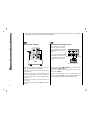
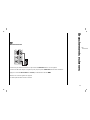
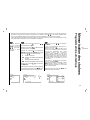
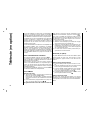
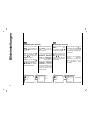
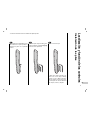
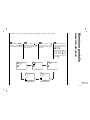
1. MAIN POWER
switches the set on or off.
2.
DD
/
EE
(Programme Up/Down)
selects a programme or a menu item.
switches the set on from standby.
3.
FF / GG (Volume Down/Up)
adjusts the volume.
adjusts menu settings.
4. MENU
selects a menu.
5. INPUT SELECT
selects
TV, AV1, AV2, S-Video, Component,
RGB-DTV, RGB-PC, RGB-DVI mode.
switches the set on from standby.
6. POWER (I /
rr )
switches the set on from standby or off to
standby.
7. POWER/STANDBY INDICATOR (rr)
illuminates red in standby mode.
illuminates green when the set is switched on.
8. REMOTE CONTROL SENSOR
(Front panel)
Controls of
Front panel
6
1
4 5 6 7 82 3

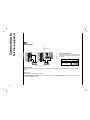
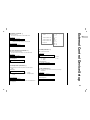
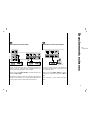
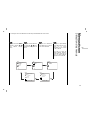
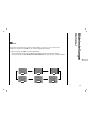
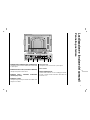
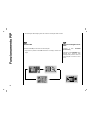
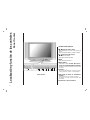
1. RGB INPUT / AUDIO INPUT / DVI INPUT SOCKETS
Connect the set output socket of the PERSONAL COM-
PUTER to this socket.
2. RS-232C INPUT(CONTROL/SERVICE) PORT
Connect to the RS-232C port on a PC.
3. AUDIO INPUT / COMPONENT INPUT (480i/480p/720p/
1080i) SOCKETS
4. S-VIDEO INPUT
connect video out from an S-VIDEO VCR to the S-
VIDEO input.
EURO SCART SOCKET
connect the euro scart socket of the VCR to these sock-
ets.
5. AERIAL SOCKET
6. POWER CORD SOCKET
This set operates on an AC power. The voltage is indi-
cated on the Specifications page. Never attempt to oper-
ate the set on DC power.
Connections of
Back panel
7
EN
RGB INPUTRGB INPUT
AUDIO INP UTAUDIO INP UT
DVI INPUTDVI INPUT
RS-232C I NPUTRS-232C I NPUT
(CONTROL/ SER(CONTRO L/SERV ICE)VICE )
S-VIDEOS-VIDEO
AAV1V1
AAV2V2
AUD IO INP UTAUD IO INP UT
AUD IOAUDIO
RR TT
COM PONENT COM PONENT INPUT INP UT
(480 i/480p /720p /1080i )(480 i/480p /720p /1080i )
YY PP
bb
PP
rr
AN TAN T. I N. IN
AC INPUTAC INPUT
1 2 3 4 5 6

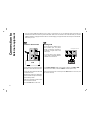
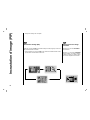
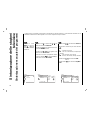
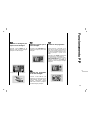
- You can connect additional equipment, such as VCRs, camcorders etc. to your set. However please check with your
manufacturers instruction books for specific information. Make sure all connections are made with both your set and
additional appliance unplugged from the mains to avoid damaging your equipment. Here shown may be somewhat dif-
ferent from your set.
Connect the RF out socket of the VCR to
the aerial socket on the back of the set.
Connect the aerial cable to the RF aerial
in socket of the VCR.
Store the VCR channel on a desired pro-
gramme number using the ‘Manual pro-
gramme tuning’ section.
Select the programme number where
the VCR channel is stored.
Press the PLAY button on the VCR.
Connect to Aerial socket
- If you connect an S-VIDEO VCR to
the S-VIDEO input, the picture
quality is improved; compared to
connecting a regular VCR to the
Video input.
- To avoid picture noise (interfer-
ence), leave an adequate distance
between the VCR and set.
Use the INPUT SELECT button on the remote control to select
AV1 or AV2.
(If connected to S-VIDEO, select the S-Video external input source.)
Insert a video tape into the VCR and press the PLAY button on the VCR. (See
VCR owner’s manual)
Watching VCR
Connection to
External equipment
8
S-VIDEOS-VIDEO
AAV2V2
ANTANT. IN. IN
AC INPUTAC INPUT
VCR
S-VIDE O
OUT
IN
(R) AU DIO (L) VIDEO
S-VIDEOS-VIDEO
AAV1V1
AAV2V2
ANTANT. IN. IN
AC INPUTAC INPUT
1
1
2
2
< Back panel of the set >
< Back panel of VCR >

EN
Connection to
External equipment
9
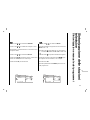
- After subscribing for a local cable TV station and installing a con-
verter you can watch cable TV.
- For further information of cable TV, contact the local cable TV
station.
In using connection 1
Select programme number in programme switch of cable box.
Match the set programme with selected programme of cable box.
Select your desired programme with the remote control for cable
box.
In using connection 2
Use the INPUT SELECT button on the remote control and select
AV1 or AV2.
Tune to cable service provided channels using the cable box.
Cable
TV
(R) AUDIO (L) VIDEO
VCR
RF
DVI INPUTDVI INPUT
RS-232C INPUTRS-232C INPUT
(CONTROL/SER(CONTROL/SERVICE)VICE)
S-VIDEOS-VIDEO
AAV1V1
AAV2V2
AUDIO INPUTAUDIO INPUT
AUDIOAUDIO
RR TT
CO MPONEN T COMPONEN T INPU T IN PUT
(48 0i/480 p/720p/10 80i)(48 0i/480 p/720p/10 80i)
YY PP
bb
PP
rr
ANTAN T. I N. IN
AC INPUTAC INPUT
S-VIDEOS-VIDEO
AAV1V1
AAV2V2
ANTAN T. I N. IN
AC INPUTAC INPUT
Cable
TV
(R) AUDIO (L) VIDEO
VCR
RF
Watching Cable TV
3
3
When connecting the set to an external source,
match the colours of AUDIO/VIDEO input jacks on
the set with the output jacks on the audio/video
equipment: Video = yellow, Audio (Left) = white,
Audio (Right) = red.
Use the INPUT SELECT button on the remote con-
trol to select
AV1 or AV2.
Operate the corresponding external equipment.
See external equipment operating guide.
R L
AUDIO VIDEO
S-VIDEOS-VIDEO
AAV1V1
AAV2V2
ANTANT. IN. IN
AC INPUTAC INPUT
Watching external AV source
4
4
For cable TV
< Cable Box >
< Back panel of the set >
< Back panel of the set >
Camcorder
Video game set
< Back panel of the external
equipment >
2
1

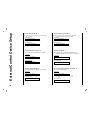
• Component Input ports
You can get better picture quality if you con-
nect DVD player with component input ports
as below.
Connection to
External equipment
10
How to connect
Connect DVD video inputs to Y, PB, PR of COMPONENT (DVD INPUT) and audio inputs to Audio sockets of AUDIO
INPUT.
How to use
Turn on the DVD player, and insert a DVD.
Use INPUT SELECT or PC/DVI button on the remote control to select
Component. Refer to the DVD player's man-
ual for operating instructions.
Watching DVD
O INPUT
DVI INPUT
RS-232C INPUT
(CONTROL/SERVICE)
S-VIDEO
AV1
AV2
AUDIO INPUT
AUDIO
R T
COMPONENT INPUT
(480i/480p/720p/1080i)
Y P
b
P
r
ANT. IN
AC INPUT
PUT
RS-232C INPUT
(CONTROL/SERVICE)
AV1
AV2
AUDIO INPUT
AUDIO
R T
COMPONENT INPUT
(480i/480p/720p/1080i)
Y P
b
P
r
B
R
(R) AUDIO (L)
PUT
RS-232C INPUT
(CONTROL/SERVICE)
AV1
AV2
AUDIO INPUT
AUDIO
R T
COMPONENT INPUT
(480i/480p/720p/1080i)
Y P
b
P
r
(R) AUDIO (L)
S-VIDEO
5
5
< Back panel of the set >
< Back panel of a DVD player >
or
Component ports of the
set
Y PB
PR
Video output ports
of DVD player
Y
Y
Y
Y
Pb
B-Y
Cb
P
B
Pr
R-Y
Cr
P
R

EN
Connection to
External equipment
11
Connect the signal cable from the monitor output socket of the PERSONAL COMPUTER to the RGB INPUT socket of
the set.
Connect the audio cable from the PC to the AUDIO INPUT sockets of the set.
Press the INPUT SELECT or PC/DVI button to select
RGB.
Switch on the PC, and the PC screen appears on the set.
The set can be operated as the PC monitor.
Connecting PC
RGB INPUTRGB INPUT
AUDIO INPUTAUDIO INPUT
AUDIO INPUTAUDIO INPUT
AUDIOAUDIO
RR TT
6
6

Press the FF / GG button to
adjust the volume.
If you want to switch the
sound off, press the MUTE
button.
You can cancel it by press-
ing the MUTE,
FF / GG, SSM
or I/II button.
You can select a programme
number with the
DD
/
EE
or
NUMBER buttons.
Press the main power but-
ton to switch the set on.
If the set is in standby mode,
press the POWER,
DD
/
EE
,
INPUT SELECT, PC/DVI or
NUMBER buttons on the
remote control handset to
switch it on fully.
Press the POWER button
on the remote control hand-
set.
The set reverts to standby
mode.
Press the main power but-
ton again to switch the set
off.
Basic operation
12
1
1
On and Off
2
2
Programme selection
3
3
Volume adjustment
Press the MENU button and
then use
DD
/
EE
button to
select the SPECIAL menu.
Press the
GG button and then
use
DD
/
EE
button to select
Language.
Press the
GG button and then
use
DD
/
EE
button to select
your desired language.
All the on screen displays
will appear in the selected
language.
Repeatedly press the MENU
button to return to normal TV
viewing.
4
4
On screen language
selection (option)

EN
- The dialogue between you and your set takes place on screen with an operator menu. The buttons required for the
operating steps are also displayed.
Press the MENU button
and then use
DD
/
EE
button
to display each menu.
On screen menus
Menu selection
13
1
1
Press the GG button and
then use
DD
/
EE
button to
select a menu item.
2
2
Press the GG button to dis-
play the sub menu or the
pull-down menu.
3
3
Change the setting of an
item in the sub or pull-
down menu with
FF / GG or
DD
/
EE
.
You can move to the high-
er level menu with
FF button
and to move to the lower
level menu press the
GG
button.
4
4
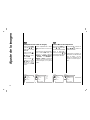
PICTURE
()OO}{OOOKOOMENU
PSM
Contrast
Brightness
Colour
Sharpness
SOUND
()OO}{OOOKOOMENU
SSM
Balance
AVL
STATION
()OO}{OOOKOOMENU
Auto
Manual
Edit
TIME
()OO}{OOOKOOMENU
Clock
Off Time
On Time
Auto Sleep
SPECIAL
()OO}{OOOKOOMENU
Language
CSM
PC Control
WXGA
Set ID

Picture adjustment
14
Press the MENU
button and then use
DD
/
EE
button to
select the PICTURE
menu.
Press the GG button
and then use
DD
/
EE
button to select
PSM.
Press the
GG button
and then use
DD
/
EE
button to select a
picture setting on
the PSM pull-down
menu.
1
1
Repeatedly press the MENU but-
ton to return to normal TV viewing.
You can also recall a desired pic-
ture (
Dynamic, Standard, Mild
or User) with PSM button on the
remote control. The picture
Dynamic, Standard and Mild
are programmed for good picture
reproduction at the factory and
cannot be changed.
PSM (Picture Status Memory)
2
2
Manual Picture Control
PICTURE
()OO}{OOOKOOMENU
PSM
Contrast
Brightness
Colour
Sharpness
PICTURE
()OO}{OOOKOOMENU
PSM
Contrast
Brightness
Colour
Sharpness
PICTURE
()OO}{OOOKOOMENU
Dynamic
Standard
Mild
User
PSM
Contrast
Brightness
Colour
Sharpness
PICTURE
()OO}{OOOKOOMENU
100
PSM
Contrast
Brightness
Colour
Sharpness
Press the MENU
button and then use
DD
/
EE
button to
select the PICTURE
menu.
Press the GG button
and then use
DD
/
EE
button to select the
desired picture option.
Press the GG button and then use
FF / GG button to make appropriate
adjustments.
You can adjust picture contrast,
brightness, colour, sharpness and
tint (NTSC input only) to the levels
you prefer.

Picture adjustment
Picture Format
15
EN
You can watch TV in various picture formats; 16:9, 14:9, 4:3, Zoom, Panorama, Auto.
Repeatedly press the ARC button to select your desired picture format.
1. Press the ARC button to select a desired picture format.
• Each press of ARC button changes the screen display as shown below.
• You can also select
16:9, 14:9, 4:3, Zoom, Panorama, Auto in the SCREEN menu.
3
3
Picture format
16 : 9
Auto
14 : 9
4 : 3
Panorama
Zoom

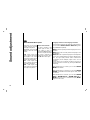
Sound adjustment
16
SOUND
()OO}{OOOKOOMENU
SSM
Balance
AVL
SOUND
()OO}{OOOKOOMENU
Flat
Speech
Movie
Music
User
Press the MENU button and then
use
DD
/
EE
button to select the
SOUND menu.
Press the GG button and then use
DD
/
EE
button to select SSM.
Press the
GG button and then use
DD
/
EE
button to select a sound setting on
the
SSM pull-down menu.
Repeatedly press the MENU but-
ton to return to normal TV view-
ing.
1
1
Sound Frequency Adjustment
a. Press the GG button in User.
b. Select a sound band by pressing the
FF / GG button.
c. Make appropriate sound level with
the
DD / EE button.
d. Press the OK button to store it for the
sound
User.
The display Stored will appear.
You can also recall a desired sound
(
Flat, Speech, Movie, Music or
User) with SSM button on the remote
control. The sound
Flat, Speech,
Movie and Music are programmed for
good sound reproduction at the factory
and cannot be changed.
SSM (Sound Status Memory)
SSM
Balance
AVL
()OO}{OOOKOOMENU
0.1 0.5 1.0 5.0 10kHz

Sound adjustment
17
EN
Press the MENU button
and then use
DD
/
EE
button
to select the SOUND
menu.
Press the
GG button and
then use
DD
/
EE
button to
select
AVL.
Press the GG button and
then use
DD
/
EE
button to
select
On or Off.
3
3
Repeatedly press the
MENU button to return to
normal TV viewing.
This feature maintains an
equal volume level; even if
you change channels.
AVL (Auto Volume Leveler)
SOUND
()OO}{OOOKOOMENU
SSM
Balance
AVL
Press the MENU button and
then use
DD
/
EE
button to
select the SOUND menu.
Press the
GG button and then
use
DD
/
EE
button to select the
desired sound item.
Press the GG button and then
use
FF / GG button to make
appropriate adjustments.
2
2
Repeatedly press the
MENU button to return to
normal TV viewing.
Balance
SOUND
()OO}{OOOKOOMENU
0SSM
Balance
AVL
SOUND
()OO}{OOOKOOMENU
SSM
Balance
AVL
SOUND
()OO}{OOOKOOMENU
Off
On
SSM
Balance
AVL

Sound adjustment
18
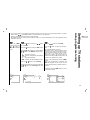
Language selection for dual language broadcast
If a programme received in two languages (dual language),
you can switch to
DUAL I, DUAL II or DUAL I+II by press-
ing the I/II button repeatedly.
DUAL I sends the primary broadcast language to the loud-
speakers.
DUAL II sends the secondary broadcast language to the
loudspeakers.
DUAL I+II sends a separate language to each loudspeaker.
If your set is equipped with the receiver for NICAM recep-
tion, the high quality NICAM (Near Instantaneous
Companding Audio Multiplex) digital sound can be
received.
Sound output can be selected according to the type of
received broadcast as follows by pressing the I/II button
repeatedly.
When NICAM mono is received, you can select
NICAM
MONO
or FM MONO.
When NICAM stereo is received, you can select NICAM
STEREO
or FM MONO. If the stereo signal is weak, switch
to FM mono.
When NICAM dual is received, you can select
NICAM
DUAL I
, NICAM DUAL II or NICAM DUAL I+II or
MONO. When FM mono is selected the display MONO
appears on the screen.
Mono sound selection
In stereo reception if the
stereo signal is weak, you
can switch to mono by
pressing the I/II button twice.
In mono reception the depth
of sound is improved. To
switch back to stereo, press
the I/II button twice again.
In AV mode, you can select
output sound for the left
and right loudspeakers.
Repeatedly press the I/II
button to select the sound
output.
L+R :Audio signal from
audio L input is sent to left
loud-speaker and audio
signal from audio R input is
sent to right loudspeaker.
L+L : Audio signal from
audio L input is sent to left
and right loudspeakers.
R+R : Audio signal from
audio R input is sent to left
and right loud-speakers.
4
4
Stereo/Dual/NICAM reception

STATION
Setting up TV stations
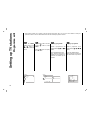
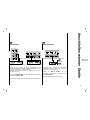
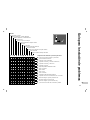
Auto programme tuning
19
EN
- Up to 100 TV stations can be stored by programme numbers (0 to 99). Once you have preset the stations, you will be
able to use the
DD
/
EE
or NUMBER buttons to scan the stations you programmed.
Stations can be tuned using automatic or manual modes.
- All stations that can be received are stored by this method. It is recommended that you use auto programme during
installation of this set.
Press the MENU
button and then use
DD
/
EE
button to
select the STATION
menu.
1
1
Press the GG button and then use
DD
/
EE
button
to select
Auto.
Press the GG button to display the Auto menu.
Press the GG button. Select a TV system with the
FF / GG button on the System pull-down menu;
L : SECAM L/L’ (France)
BG : PAL B/G, SECAM B/G (Europe/East
Europe)
I : PAL I/II (U.K./Ireland)
DK : PAL D/K, SECAM D/K (East Europe)
Press the
DD
/
EE
button to select Storage.
Select the beginning programme number with
the
FF / GG button on the Storage pull-down
menu.
2
2
Press the
DD
/
EE
button to select Start.
Press the GG button to begin auto program-
ming.
All receivable stations are stored.
The station name is stored for stations which
broadcast VPS (Video Programme Service),
PDC (Programme Delivery Control) or TELE-
TEXT data. If no station name can be
assigned to a station, the channel number is
assigned and stored as C (V/UHF 01-69) or S
(Cable 01-47), followed by a number.
To stop auto programming, press the MENU
button.
When auto programming is completed, the
edit menu appears on the screen. See the
‘Programme edit’section to edit the stored pro-
gramme.
Repeatedly press the MENU button to return
to normal TV viewing.
3
3
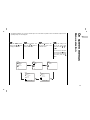
STATION
()OO}{OOOKOOMENU
Auto
Manual
Edit
STATION
STOP : MENU
()OO}{OOOKOOMENU
Auto
Manual
Edit
System
FF
DK
GG
Storage From 7
Start
GGGGGG
Auto
Manual
Edit
System
FF
DK
GG
Storage From 7
Start
GGGGGG
7 14%

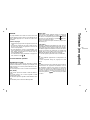
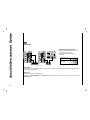
Setting up TV stations
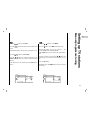
Manual programme tuning
20
- Manual programme lets you manually tune and arrange the stations in whatever order you desire. Also you can assign
a station name with five characters to each programme number.
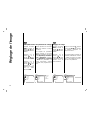
Press the MENU
button and then use
DD
/
EE
button to
select the STATION
menu.
Press the GG button and then use
DD
/
EE
button
to select
Manual.
Press the GG button to display the Manual
menu.
Press the
DD
/
EE
button to select Storage.
Press the
FF / GG button to select the pro-
gramme number.
1
1
2
2
Press the
DD
/
EE
button to select System.
Select a TV system with the FF / GG button on the
System pull-down menu;
L : SECAM L/L’ (France)
BG : PAL B/G, SECAM B/G (Europe/East
Europe)
I : PAL I/II (U.K./Ireland)
DK : PAL D/K, SECAM D/K (East Europe)
Press the
DD
/
EE
button to select Channel.
Press the
FF / GG button to select V/UHF or
Cable on the Channel pull-down menu.
3
3
STATION
()OO}{OOOKOOMENU
Auto
Manual
Edit
STATION
()OO}{OOOKOOMENU
Auto
Manual
Edit
Storage 4
System
FF
DK
GG
Channel V/UHF 33
Fine
GGGGGG
Search
GGGGGG
Name C 33
STATION
()OO}{OOOKOOMENU
Auto
Manual
Edit
Storage 4
System
FF
DK
GG
Channel V/UHF 33
Fine
GGGGGG
Search
GGGGGG
Name C 33
Seite wird geladen ...
Seite wird geladen ...
Seite wird geladen ...
Seite wird geladen ...
Seite wird geladen ...
Seite wird geladen ...
Seite wird geladen ...
Seite wird geladen ...
Seite wird geladen ...
Seite wird geladen ...
Seite wird geladen ...
Seite wird geladen ...
Seite wird geladen ...
Seite wird geladen ...
Seite wird geladen ...
Seite wird geladen ...
Seite wird geladen ...
Seite wird geladen ...
Seite wird geladen ...
Seite wird geladen ...
Seite wird geladen ...
Seite wird geladen ...
Seite wird geladen ...
Seite wird geladen ...
Seite wird geladen ...
Seite wird geladen ...
Seite wird geladen ...
Seite wird geladen ...
Seite wird geladen ...
Seite wird geladen ...
Seite wird geladen ...
Seite wird geladen ...
Seite wird geladen ...
Seite wird geladen ...
Seite wird geladen ...
Seite wird geladen ...
Seite wird geladen ...
Seite wird geladen ...
Seite wird geladen ...
Seite wird geladen ...
Seite wird geladen ...
Seite wird geladen ...
Seite wird geladen ...
Seite wird geladen ...
Seite wird geladen ...
Seite wird geladen ...
Seite wird geladen ...
Seite wird geladen ...
Seite wird geladen ...
Seite wird geladen ...
Seite wird geladen ...
Seite wird geladen ...
Seite wird geladen ...
Seite wird geladen ...
Seite wird geladen ...
Seite wird geladen ...
Seite wird geladen ...
Seite wird geladen ...
Seite wird geladen ...
Seite wird geladen ...
Seite wird geladen ...
Seite wird geladen ...
Seite wird geladen ...
Seite wird geladen ...
Seite wird geladen ...
Seite wird geladen ...
Seite wird geladen ...
Seite wird geladen ...
Seite wird geladen ...
Seite wird geladen ...
Seite wird geladen ...
Seite wird geladen ...
Seite wird geladen ...
Seite wird geladen ...
Seite wird geladen ...
Seite wird geladen ...
Seite wird geladen ...
Seite wird geladen ...
Seite wird geladen ...
Seite wird geladen ...
Seite wird geladen ...
Seite wird geladen ...
Seite wird geladen ...
Seite wird geladen ...
Seite wird geladen ...
Seite wird geladen ...
Seite wird geladen ...
Seite wird geladen ...
Seite wird geladen ...
Seite wird geladen ...
Seite wird geladen ...
Seite wird geladen ...
Seite wird geladen ...
Seite wird geladen ...
Seite wird geladen ...
Seite wird geladen ...
Seite wird geladen ...
Seite wird geladen ...
Seite wird geladen ...
Seite wird geladen ...
Seite wird geladen ...
Seite wird geladen ...
Seite wird geladen ...
Seite wird geladen ...
Seite wird geladen ...
Seite wird geladen ...
Seite wird geladen ...
Seite wird geladen ...
Seite wird geladen ...
Seite wird geladen ...
Seite wird geladen ...
Seite wird geladen ...
Seite wird geladen ...
Seite wird geladen ...
Seite wird geladen ...
Seite wird geladen ...
Seite wird geladen ...
Seite wird geladen ...
Seite wird geladen ...
Seite wird geladen ...
Seite wird geladen ...
Seite wird geladen ...
Seite wird geladen ...
Seite wird geladen ...
Seite wird geladen ...
Seite wird geladen ...
Seite wird geladen ...
Seite wird geladen ...
Seite wird geladen ...
Seite wird geladen ...
Seite wird geladen ...
Seite wird geladen ...
Seite wird geladen ...
Seite wird geladen ...
Seite wird geladen ...
Seite wird geladen ...
Seite wird geladen ...
Seite wird geladen ...
Seite wird geladen ...
Seite wird geladen ...
Seite wird geladen ...
Seite wird geladen ...
Seite wird geladen ...
Seite wird geladen ...
Seite wird geladen ...
Seite wird geladen ...
Seite wird geladen ...
Seite wird geladen ...
Seite wird geladen ...
Seite wird geladen ...
Seite wird geladen ...
Seite wird geladen ...
Seite wird geladen ...
Seite wird geladen ...
Seite wird geladen ...
Seite wird geladen ...
Seite wird geladen ...
Seite wird geladen ...
Seite wird geladen ...
Seite wird geladen ...
Seite wird geladen ...
Seite wird geladen ...
Seite wird geladen ...
Seite wird geladen ...
Seite wird geladen ...
Seite wird geladen ...
Seite wird geladen ...
Seite wird geladen ...
-
 1
1
-
 2
2
-
 3
3
-
 4
4
-
 5
5
-
 6
6
-
 7
7
-
 8
8
-
 9
9
-
 10
10
-
 11
11
-
 12
12
-
 13
13
-
 14
14
-
 15
15
-
 16
16
-
 17
17
-
 18
18
-
 19
19
-
 20
20
-
 21
21
-
 22
22
-
 23
23
-
 24
24
-
 25
25
-
 26
26
-
 27
27
-
 28
28
-
 29
29
-
 30
30
-
 31
31
-
 32
32
-
 33
33
-
 34
34
-
 35
35
-
 36
36
-
 37
37
-
 38
38
-
 39
39
-
 40
40
-
 41
41
-
 42
42
-
 43
43
-
 44
44
-
 45
45
-
 46
46
-
 47
47
-
 48
48
-
 49
49
-
 50
50
-
 51
51
-
 52
52
-
 53
53
-
 54
54
-
 55
55
-
 56
56
-
 57
57
-
 58
58
-
 59
59
-
 60
60
-
 61
61
-
 62
62
-
 63
63
-
 64
64
-
 65
65
-
 66
66
-
 67
67
-
 68
68
-
 69
69
-
 70
70
-
 71
71
-
 72
72
-
 73
73
-
 74
74
-
 75
75
-
 76
76
-
 77
77
-
 78
78
-
 79
79
-
 80
80
-
 81
81
-
 82
82
-
 83
83
-
 84
84
-
 85
85
-
 86
86
-
 87
87
-
 88
88
-
 89
89
-
 90
90
-
 91
91
-
 92
92
-
 93
93
-
 94
94
-
 95
95
-
 96
96
-
 97
97
-
 98
98
-
 99
99
-
 100
100
-
 101
101
-
 102
102
-
 103
103
-
 104
104
-
 105
105
-
 106
106
-
 107
107
-
 108
108
-
 109
109
-
 110
110
-
 111
111
-
 112
112
-
 113
113
-
 114
114
-
 115
115
-
 116
116
-
 117
117
-
 118
118
-
 119
119
-
 120
120
-
 121
121
-
 122
122
-
 123
123
-
 124
124
-
 125
125
-
 126
126
-
 127
127
-
 128
128
-
 129
129
-
 130
130
-
 131
131
-
 132
132
-
 133
133
-
 134
134
-
 135
135
-
 136
136
-
 137
137
-
 138
138
-
 139
139
-
 140
140
-
 141
141
-
 142
142
-
 143
143
-
 144
144
-
 145
145
-
 146
146
-
 147
147
-
 148
148
-
 149
149
-
 150
150
-
 151
151
-
 152
152
-
 153
153
-
 154
154
-
 155
155
-
 156
156
-
 157
157
-
 158
158
-
 159
159
-
 160
160
-
 161
161
-
 162
162
-
 163
163
-
 164
164
-
 165
165
-
 166
166
-
 167
167
-
 168
168
-
 169
169
-
 170
170
-
 171
171
-
 172
172
-
 173
173
-
 174
174
-
 175
175
-
 176
176
-
 177
177
-
 178
178
-
 179
179
-
 180
180
-
 181
181
-
 182
182
-
 183
183
-
 184
184
-
 185
185
-
 186
186
-
 187
187
-
 188
188


jWIN JV-DTV30 Bedienungsanleitung
- Kategorie
- Plasmafernseher
- Typ
- Bedienungsanleitung
in anderen Sprachen
- English: jWIN JV-DTV30 Owner's manual
- français: jWIN JV-DTV30 Le manuel du propriétaire
- español: jWIN JV-DTV30 El manual del propietario
- italiano: jWIN JV-DTV30 Manuale del proprietario
Andere Dokumente
-
Rolsen RL-15 X11 Benutzerhandbuch
-
LG L172WT Benutzerhandbuch
-
Packard Bell DIGITAL TV 170 / 230 / 300 SW Benutzerhandbuch
-
LG 26LX2R Benutzerhandbuch
-
LG 32LB1R Benutzerhandbuch
-
LG 42LB1R Benutzerhandbuch
-
LG 37LC2R Benutzerhandbuch
-
LG 20LS1R Benutzerhandbuch
-
Hyundai HLT-1711 Bedienungsanleitung
-
Philips SBCRP420 Benutzerhandbuch