Perfectpro UBOX 400R Bedienungsanleitung
- Kategorie
- Radios
- Typ
- Bedienungsanleitung

GB
NL
D
F
UBOX 400R
Operating instruction
Gebruiksaanwijzing
Bedienungsanleitung
Mode d’emploi
GB
NL
D
F
3A81b86L00000
Perfectpro B.V.
Everdenberg 9A
Oosterhout
The Netherlands

1
The Bluetooth® word mark and logos are registered trademarks owned by Bluetooth SIG, Inc. and any use of such
marks by Perfectpro B.V. is under license.
WARNING!
WARRANTY BECOMES VOID ONCE THE DEVICE CABINET HAS BEEN OPENED OR ANY MODIFICATIONS OR
ALTERATIONS TO THE ORIGINAL DEVICE HAVE BEEN MADE.
NEVER OPEN THE DEVICE CASING. THE MANUFACTURER WILL NOT ACCEPT ANY LIABILITY FOR DAMAGE
RESULTING FROM IMPROPER HANDLING. THE TYPE PLATE IS LOCATED ON THE BACK OF THE DEVICE.

2
GB
Important Safety Instructions
1. Read these instructions.
2. Keep these instructions.
3. Heed all warnings.
4. Follow all instructions.
5. Do not use this apparatus near water.
6. Clean only with dry cloth.
7. Do not block any ventilation openings. Install in
accordance with the instructions.
8. Do not install near any heat sources such as
radiators, heat registers, stoves or other apparatus
(including ampliers) that produce heat.
9. Protect the power cord from being walked on or
pinched particularly at plug, convenience receptacles,
and the point where they exit from the apparatus.
10. Only use attachments/accessories specified by the
manufacturer.
11. Use only with the cart, stand, tripod, bracket, or
table specied by the manufacturer, or sold with the
apparatus. When a cart is used, use caution when
moving the cart/apparatus combination to avoid injury
from tip-over.
12. Unplug this apparatus during lightning storms or when
unused for long periods of time.
13. Refer all servicing to qualified service personnel.
Servicing is required when the apparatus has been
damaged in any way, such as power supply cord or
plug is damaged, liquid has been spilled or objects
have fallen into the apparatus, the apparatus has
been exposed to rain or moisture, does not operate
normally, or has been dropped.
14. To reduce the risk of fire or electric shock, do not
expose this appliance to Rain or Moisture. For
outdoors use, to avoid electric shock, only use
batteries power during a raining day or the weather
is wet. This apparatus is provided with protection
against splashing water and dust ingress (IP64).
15. The Shock Hazard Marking and Associated Graphical
Symbol is provided on the back of unit.
16. Apparatus shall not be exposed to dripping or
splashing and no objects filled with liquids, shall be
placed on the apparatus.
17. The power plug should be close to the radio, and
easy to be approached that during the emergency, to
disconnect the power from the radio, just unplug the
power plug from the AC power slot.
18. Notice: The changes or modications not expressly
approved by the party responsible for compliance
could void the user’s authority to operate the
equipment.
19. Where the MAINS plug or an appliance coupler is
used as the disconnect device, the disconnect device
shall remain readily operable.
20. A warning that batteries (battery pack or batteries
installed) shall not be exposed to excessive heat such
as sunshine, re or the like.
21. To prevent possible hearing damage, do not
listen at high volume levels for long periods.

3
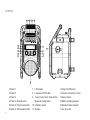
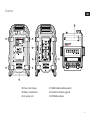
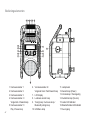
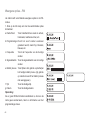
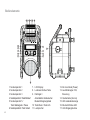
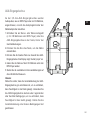
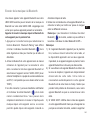
Controls
12345 6
11
13
14
15
16
12
9
8
7
10
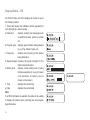
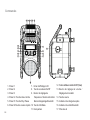
12.Power On/Off button
13.Volume control/Tone control
14.Source button
15.Battery charging indicator
16.Bluetooth status indicator
17.Aux In socket
17
1.Preset 1
2.Preset 2
3.Preset 3
4.Preset 4 / Rewind button
5.Preset 5 / Play/ Pause button
6.Preset 6 / Fast-forward button
7. LCD display
8. Loudness On/Off button
9. Tuning control knob / Seek button /
Bluetooth pairing button
10. Info/Menu button
11. Speaker

4
GB
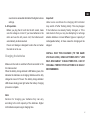
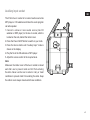
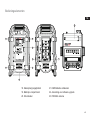
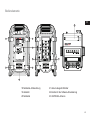
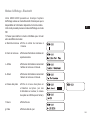
Controls
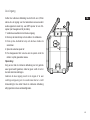
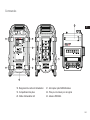
18.Power cord storage
19.Battery compartment
20.AC power cord
20
21
19
1818
18 18
22
23
21.NiMH/Alkaline batteries switch
22.Socket for software upgrade
23.FM/DAB+ antenna

5
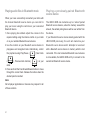
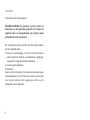
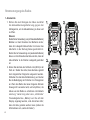
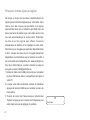
Powering the radio
1. Battery operation
1.
2.
Installing the batteries, rst turn battery cover xture
anti-clockwise to loosen and open the battery cover.
Note:
Before you insert the batteries, if you use non-
rechargeable batteries, make sure the NiMH/
Alkaline switch which located inside the battery
compartment is switched to Alkaline position. If you
use rechargeable batteries, make sure to switch
NiMH/Alkaline switch to NiMH position.
Insert 6 x AA size (UM-3) battery into the compartment.
Ensure the batteries are inserted in accordance with
the diagram shown. Close the battery cover and
fasten the xture by turning clockwise. If the radio is
not to be used for any extended period of time, it is
recommended that the batteries are removed from
the radio. Reduced power, distortion and a stuttering
sound or “Battery Low” showing on the display
are all signs that the batteries need replacing or
recharging. (see below information on “charging the
batteries”).
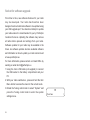
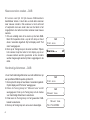
When playing on (rechargeable) batteries the output
power is less compared to the output power when
playing on AC mains power. Because of this the

6
GB
2. AC operation
Charging the batteries
Make sure the radio is switched off and connected to the
AC mains socket.
When the battery charge indicator LED ashes green, this
indicates the batteries are charging. Batteries will be fully
charged in around 5-7 hours. The battery charge indicator
LED shows steady green light when the battery charging
process is complete.
Note:
Duration for charging your batteries fully can vary
according to the mAh capacity of the batteries. Higher
mAh batteries require longer charging time.
Important:
Under some conditions the charging LED indicator
may switch off after flashing briefly. This may happen
if the batteries are already freshly charged, or if the
radio detects that you may be attempting to recharge
alkaline batteries or mixed different types or capacity of
rechargeable battery. In these cases the charging will be
stopped.
INSTALL ONLY PRE-CHARGED (TO THE SAME
VOLTAGE LEVEL) NIMH BATTERIES WITH “LOW
SELF-DISCHARGE” CHARACTERISTICS. USE OF
ORIGINAL PERFECTPRO BATTERIES IS HIGHLY
RECOMMENDED.
sound can be somewhat distorted at the highest volume
settings.
Before you plug the AC cord into the AC socket, make
sure the voltage is correct. If you have batteries in the
radio and use the AC power cord, the batteries will
automatically be disconnected.
Power cord storage is designed to store the cord when
the radio is not in use.

7
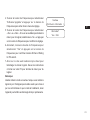
IMPORTANT INFORMATION ON CHARGING
AND USING RECHARGEABLE BATTERIES
1. Recharge the batteries in any case at least every 2
months.
2. Make sure the Battery Select switch next the battery
compartment is set to the “CHARGE NiMH ON”
position.
3. Put the batteries in the compartment whilst paying
attention to the correct polarity of the batteries (+ and -).
4. First use: Charge new batteries in one continuous,
uninterrupted, charge until they are full. This first
charge may take longer than normal. For longer battery
life it is advised to always recharge in one continuous,
uninterrupted charge until batteries are full and to not
recharge again whilst the batteries are still full.
5. New batteries will only reach their full capacity after
some time of use (several charge – discharge cycles).
6. Leave the complete group of batteries in place inside
the radio and do not use these batteries or a few of
them for other purposes. This will result in a mix of (fully)
charged and (partly) empty batteries. This can seriously
damage the batteries and radio when recharged.
7. It is advised to only charge batteries at room
temperatures between 5 degrees C – 35 degrees C. In
lower or higher temperatures full charge cannot be
achieved.
8. Depending on the capacity of the batteries, charging
from “empty” to “full” can take several hours, even up
to 7 hours or more.
9. Do not charge batteries when the radio is hot or
exposed to heat or heat sources.
10. It is advised to clean the metal contacts of the
batteries and of the charger inside the radio e.g. with
a contact-spray from time to time.
11. Do not use a mix of old and new rechargeable
batteries.
12. Do not use a mix of rechargeable and non-
rechargeable batteries.
13. Do not use a mix of full and empty rechargeable
batteries.
14. Do not use batteries that have a different mAh
capacity.
15. Do not use damaged, deformed or leaking batteries.
16. Battery level indication is an approximate indication
only and can vary with battery type used.
17. Batteries can become hot during charging.

8
GB
18. In cold conditions the capacity of batteries will
be much lower than when used at normal room
temperature.
19. Batteries (even when supplied with the radio), as
being consumables, do not fall under the warranty
conditions of the radio.
20. It is advised to use Perfectpro rechargeable batteries
as the radio and its charger were developed for use
with these batteries.
21. Batteries should not be disposed of by incineration
and with household waste.
22. Disposable batteries should be taken to a suitable
recycling center if possible.

9
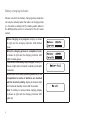
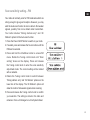
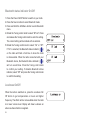
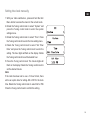
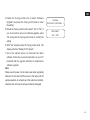
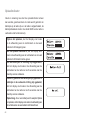
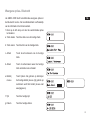
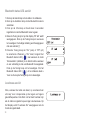
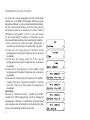
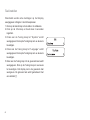
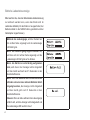
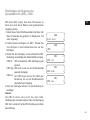
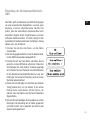
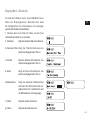
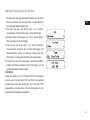
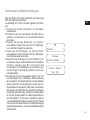
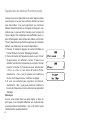
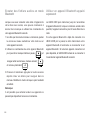
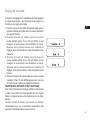
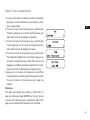
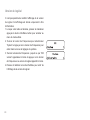
Battery charging indicator
Please note that the battery charging status detection
can only be activated when the radio is in charging mode
(i.e. the radio is switched off, the battery switch slides to
the NiHM position and it is connected to the AC mains
socket).
When charging is in progress, display is shown
at right and the charging indicator LED flashes
green.
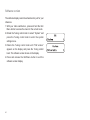
When the charging process is completed, display
is shown at right and the charging indicator LED
lights in steady green.
If batteries are already fully charged, display is
shown at right and it will switch to standby mode after
5 seconds.
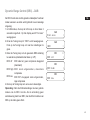
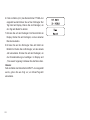
When there is no battery/missing batteries in the
compartment or some of batteries are inserted
with the incorrect polarity, display is shown at right
and it will enter standby screen after 5 seconds.
Note: If a battery is removed while charging, display
is shown at right and the charging indicator LED
lights red.

10
GB
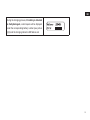
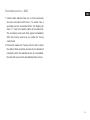
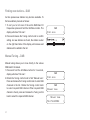
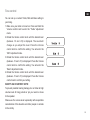
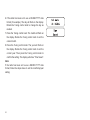
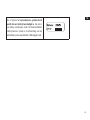
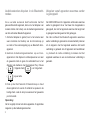
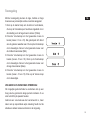
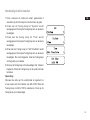
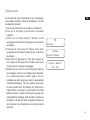
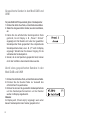
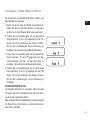
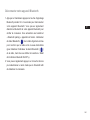
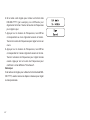
During the charging process, if a battery is detected
as faulty/damaged, a solid square will be displayed
under the corresponding battery number (see picture
right) and the charging indicator LED ashes red.

11
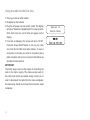
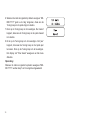
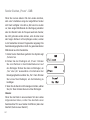
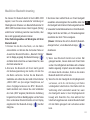
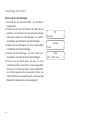
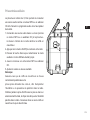
Using the radio for the rst time
1. Place your radio on a at surface.
2. Straighten up the antenna.
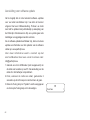
3. Plug the AC power cord into an AC socket. The display
will show “Welcome to Digital Radio” for a few seconds.
After short time, the current time will appear on the
display.
4. If no time is displayed, the screen will show “00:00”.
Press the Power On/Off button to turn on your radio
and it will find a DAB clock radio stations. It may be
necessary to relocate your radio to a position giving
better reception and carry out a scan to nd stations as
described in later sections.
IMPORTANT:
The mains plug is used as the means of connecting the
radio to the mains supply. The mains socket used for
the radio must remain accessible during normal use. In
order to disconnect the radio from the mains completely,
the mains plug should be removed from the mains outlet
completely.
Welcome to
Digital Radio

12
GB
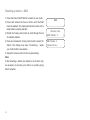
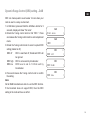
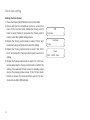
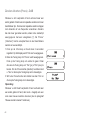
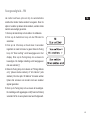
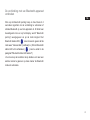
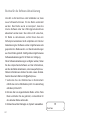
Operating your radio – DAB
1. Straighten the antenna properly which is for both DAB
and FM reception. Press the Power On/Off button to
switch on your radio.
2. Press the Source button to select DAB band.
3. If this is the rst time the radio is used, a quick scan of
Band III DAB channels will be carried out. If the radio
has been used before, the last used station will be
selected.
4. During Autotune, as new stations are detected, the
station counter on the right hand side of the display
will increase and stations will be added to the list.
The display shows a bar graph indicating progress of
autotune.
5. When the Autotune is completed, the first station (in
numeric-alpha order 0…9…A…Z) will be selected.
6. If the station list is still empty after the Autotune, your
radio will display “No DAB Station”.
7. If no signals are found, it may be necessary to relocate
your radio to a position giving better reception.
Note:
That radio station name and frequency displays shown in
this user guide may differ from those that you see on your
radio. Broadcasters may change radio station names that
are transmitted, and the frequencies used for DAB and
FM radio stations may not be the same in all parts of the
country.

13
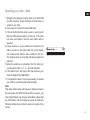
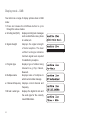
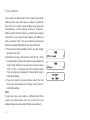
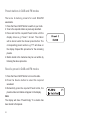
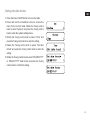
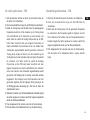
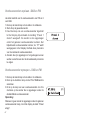
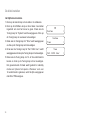
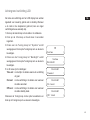
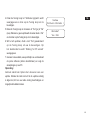
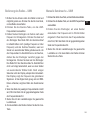
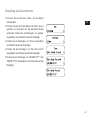
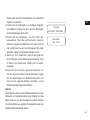
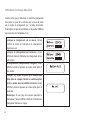
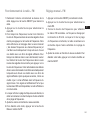
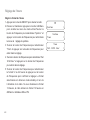
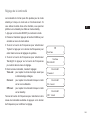
Selecting a station – DAB
1. Press the Power On/Off button to switch on your radio.
2. Press and release the Source button until the DAB
mode is selected. The display will show the name of the
radio station currently selected.
3. Rotate the Tuning control knob to scroll through the list
of available stations.
4. Press and release the Tuning control knob to select the
station. The display may show “Connecting…” while
your radio nds the new station.
5. Adjust the Volume control to the required setting.
Note:
If after selecting a station, the station is not found it may
be necessary to relocate your radio to a position giving
better reception.
DAB
Station list
<BBC Radio 2 >
BBC Radio 2
Connecting...

14
GB
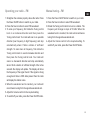
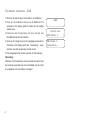
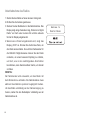
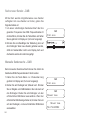
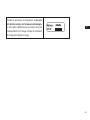
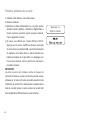
Secondary service – DAB
1. Certain radio stations have one or more secondary
services associated with them. If a station has a
secondary service associated with it, the display will
show “>>” next to the station name on the station list.
The secondary service will then appear immediately
after the primary service as you rotate the Tuning
control knob.
2. Press and release the Tuning control knob to select
the station. Most secondary services do not broadcast
continually and if the selected service is not available,
the radio will re-tune to the associated primary service.

15
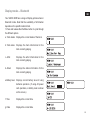
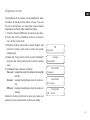
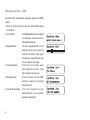
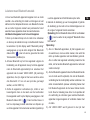
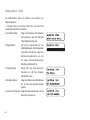
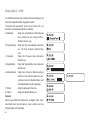
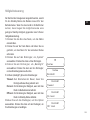
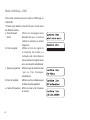
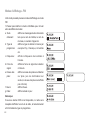
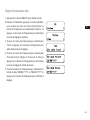
Display mode – DAB
Your radio has a range of display options when in DAB
mode:
1. Press and release the Info/Menu button to cycle
through the various modes.
displays scrolling text messages
such as artist/track name, phone
in number, etc.
displays the signal strength
of radio reception. The clear
unfilled rectangle indicates
minimum signal level required
for satisfactory reception.
displays type of station being
listened to e.g. Pop, Classic,
News etc.
displays name of multiplex to
which current station belongs.
displays current channel and
frequency.
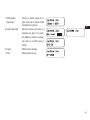
displays the digital bit rate and
the audio type for the currently
tuned DAB station.
a. Scrolling text (DLS)
b. Signal strength
c. Program type
d. Multiplex name
e. Channel & frequency
f. Bit rate / audio type

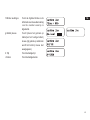
16
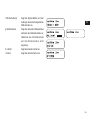
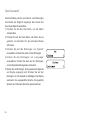
GB
displays current battery level
of using batteries operation. (If
using AC power cord operation,
no battery level is shown on the
screen.)
displays the current time.
displays the current date.
g. Battery level
h. Time
i. Date

17
DAB
<Full scan >
DAB
<Full scan >
DAB
<Manual tune >
<5A 174.928MHz >
Manual tune
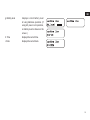
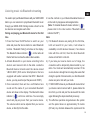
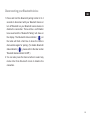
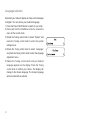
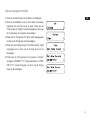
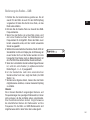
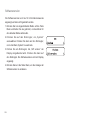
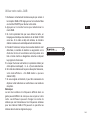
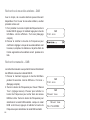
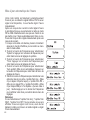
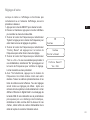
Finding new stations – DAB
As time passes new stations may become available. To
nd new stations proceed as follows:
1. To carry out a full scan of the entire DAB Band III
frequencies press and hold the Info/Menu button. The
display will show “Full scan”.
2. Press and release the Tuning control knob to conrm
setting. As new stations are found, the station counter
on the right hand side of the display will increase and
stations will be added to the list.
Manual Tuning – DAB
Manual tuning allows you to tune directly to the various
DAB band III channels.
1. Press and hold the Info/Menu button for 2 seconds,
display will show “Full scan”.
2. Rotate the Tuning control knob to find “Manual tune”.
Press and release the Tuning control knob to enter DAB
channels in the list. Rotate the Tuning control knob
to select required DAB channel. When required DAB
channel is found, press and release the Tuning control
knob to select the required DAB channel.

18
GB
DAB
<Full scan >
DAB
<DRC >
DRC *
<DRC off >
DRC
<DRC high >
DRC
<DRC low >
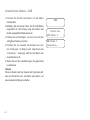
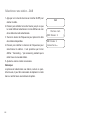
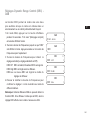
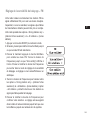
Dynamic Range Control (DRC) setting – DAB
DRC can make quieter sound easier to hear when your
radio is used in a noisy environment.
1. In DAB band, press and hold the Info/Menu button for 2
seconds, display will show “Full scan”.
2. Rotate the Tuning control knob to find “DRC ”. Press
and release the Tuning control knob to enter adjustment
mode.
3. Rotate the Tuning control knob to select required DRC
setting (default is off).
4. Press and release the Tuning control knob to conrm
the setting.
Note:
Not all DAB broadcasts are able to use the DRC function.
If the broadcast does not support DRC, then the DRC
setting in the radio will have no effect.
DRC off
DRC high
DRC low
DRC is switched off, Broadcast DRC will
be ignored.
DRC is set as sent by broadcaster.
DRC level is set to 1/2 that sent by
broadcaster.

19
Prune stations
If you move to a different part of the country, some of the
stations which were listed may no longer be available.
Also from time to time, some DAB services may stop
broadcasting, or may change location or frequency.
Stations which cannot be found, or which have not been
received for a very long time are shown in the station list
with a question mark. The prune stations function will
delete the marked DAB stations from your station list.
1. Press and hold the Info/Menu button and the display
will show “Full scan”.
2. Rotate the Tuning control knob to find “Prune”. Press
and release the Tuning control knob to enter adjustment
mode. Then rotate the Tuning control knob to select
“Yes” or “No”. To activate the Prune function select
“Yes”, and press and release the Tuning control knob to
conrm the setting.
3. If you do not wish to prune stations, select “No” and
then press and release the Tuning control knob to
conrm the setting.
Note:
If you have moved your radio to a different part of the
country you should also carry out a search for new
stations (please see the section 'Finding new stations').
Seite wird geladen ...
Seite wird geladen ...
Seite wird geladen ...
Seite wird geladen ...
Seite wird geladen ...
Seite wird geladen ...
Seite wird geladen ...
Seite wird geladen ...
Seite wird geladen ...
Seite wird geladen ...
Seite wird geladen ...
Seite wird geladen ...
Seite wird geladen ...
Seite wird geladen ...
Seite wird geladen ...
Seite wird geladen ...
Seite wird geladen ...
Seite wird geladen ...
Seite wird geladen ...
Seite wird geladen ...
Seite wird geladen ...
Seite wird geladen ...
Seite wird geladen ...
Seite wird geladen ...
Seite wird geladen ...
Seite wird geladen ...
Seite wird geladen ...
Seite wird geladen ...
Seite wird geladen ...
Seite wird geladen ...
Seite wird geladen ...
Seite wird geladen ...
Seite wird geladen ...
Seite wird geladen ...
Seite wird geladen ...
Seite wird geladen ...
Seite wird geladen ...
Seite wird geladen ...
Seite wird geladen ...
Seite wird geladen ...
Seite wird geladen ...
Seite wird geladen ...
Seite wird geladen ...
Seite wird geladen ...
Seite wird geladen ...
Seite wird geladen ...
Seite wird geladen ...
Seite wird geladen ...
Seite wird geladen ...
Seite wird geladen ...
Seite wird geladen ...
Seite wird geladen ...
Seite wird geladen ...
Seite wird geladen ...
Seite wird geladen ...
Seite wird geladen ...
Seite wird geladen ...
Seite wird geladen ...
Seite wird geladen ...
Seite wird geladen ...
Seite wird geladen ...
Seite wird geladen ...
Seite wird geladen ...
Seite wird geladen ...
Seite wird geladen ...
Seite wird geladen ...
Seite wird geladen ...
Seite wird geladen ...
Seite wird geladen ...
Seite wird geladen ...
Seite wird geladen ...
Seite wird geladen ...
Seite wird geladen ...
Seite wird geladen ...
Seite wird geladen ...
Seite wird geladen ...
Seite wird geladen ...
Seite wird geladen ...
Seite wird geladen ...
Seite wird geladen ...
Seite wird geladen ...
Seite wird geladen ...
Seite wird geladen ...
Seite wird geladen ...
Seite wird geladen ...
Seite wird geladen ...
Seite wird geladen ...
Seite wird geladen ...
Seite wird geladen ...
Seite wird geladen ...
Seite wird geladen ...
Seite wird geladen ...
Seite wird geladen ...
Seite wird geladen ...
Seite wird geladen ...
Seite wird geladen ...
Seite wird geladen ...
Seite wird geladen ...
Seite wird geladen ...
Seite wird geladen ...
Seite wird geladen ...
Seite wird geladen ...
Seite wird geladen ...
Seite wird geladen ...
Seite wird geladen ...
Seite wird geladen ...
Seite wird geladen ...
Seite wird geladen ...
Seite wird geladen ...
Seite wird geladen ...
Seite wird geladen ...
Seite wird geladen ...
Seite wird geladen ...
Seite wird geladen ...
Seite wird geladen ...
Seite wird geladen ...
Seite wird geladen ...
Seite wird geladen ...
Seite wird geladen ...
Seite wird geladen ...
Seite wird geladen ...
Seite wird geladen ...
Seite wird geladen ...
Seite wird geladen ...
Seite wird geladen ...
Seite wird geladen ...
Seite wird geladen ...
Seite wird geladen ...
Seite wird geladen ...
Seite wird geladen ...
Seite wird geladen ...
Seite wird geladen ...
Seite wird geladen ...
Seite wird geladen ...
Seite wird geladen ...
Seite wird geladen ...
Seite wird geladen ...
Seite wird geladen ...
Seite wird geladen ...
Seite wird geladen ...
Seite wird geladen ...
Seite wird geladen ...
Seite wird geladen ...
Seite wird geladen ...
Seite wird geladen ...
Seite wird geladen ...
Seite wird geladen ...
Seite wird geladen ...
Seite wird geladen ...
Seite wird geladen ...
Seite wird geladen ...
Seite wird geladen ...
Seite wird geladen ...
Seite wird geladen ...
Seite wird geladen ...
Seite wird geladen ...
Seite wird geladen ...
-
 1
1
-
 2
2
-
 3
3
-
 4
4
-
 5
5
-
 6
6
-
 7
7
-
 8
8
-
 9
9
-
 10
10
-
 11
11
-
 12
12
-
 13
13
-
 14
14
-
 15
15
-
 16
16
-
 17
17
-
 18
18
-
 19
19
-
 20
20
-
 21
21
-
 22
22
-
 23
23
-
 24
24
-
 25
25
-
 26
26
-
 27
27
-
 28
28
-
 29
29
-
 30
30
-
 31
31
-
 32
32
-
 33
33
-
 34
34
-
 35
35
-
 36
36
-
 37
37
-
 38
38
-
 39
39
-
 40
40
-
 41
41
-
 42
42
-
 43
43
-
 44
44
-
 45
45
-
 46
46
-
 47
47
-
 48
48
-
 49
49
-
 50
50
-
 51
51
-
 52
52
-
 53
53
-
 54
54
-
 55
55
-
 56
56
-
 57
57
-
 58
58
-
 59
59
-
 60
60
-
 61
61
-
 62
62
-
 63
63
-
 64
64
-
 65
65
-
 66
66
-
 67
67
-
 68
68
-
 69
69
-
 70
70
-
 71
71
-
 72
72
-
 73
73
-
 74
74
-
 75
75
-
 76
76
-
 77
77
-
 78
78
-
 79
79
-
 80
80
-
 81
81
-
 82
82
-
 83
83
-
 84
84
-
 85
85
-
 86
86
-
 87
87
-
 88
88
-
 89
89
-
 90
90
-
 91
91
-
 92
92
-
 93
93
-
 94
94
-
 95
95
-
 96
96
-
 97
97
-
 98
98
-
 99
99
-
 100
100
-
 101
101
-
 102
102
-
 103
103
-
 104
104
-
 105
105
-
 106
106
-
 107
107
-
 108
108
-
 109
109
-
 110
110
-
 111
111
-
 112
112
-
 113
113
-
 114
114
-
 115
115
-
 116
116
-
 117
117
-
 118
118
-
 119
119
-
 120
120
-
 121
121
-
 122
122
-
 123
123
-
 124
124
-
 125
125
-
 126
126
-
 127
127
-
 128
128
-
 129
129
-
 130
130
-
 131
131
-
 132
132
-
 133
133
-
 134
134
-
 135
135
-
 136
136
-
 137
137
-
 138
138
-
 139
139
-
 140
140
-
 141
141
-
 142
142
-
 143
143
-
 144
144
-
 145
145
-
 146
146
-
 147
147
-
 148
148
-
 149
149
-
 150
150
-
 151
151
-
 152
152
-
 153
153
-
 154
154
-
 155
155
-
 156
156
-
 157
157
-
 158
158
-
 159
159
-
 160
160
-
 161
161
-
 162
162
-
 163
163
-
 164
164
-
 165
165
-
 166
166
-
 167
167
-
 168
168
-
 169
169
-
 170
170
-
 171
171
-
 172
172
-
 173
173
-
 174
174
-
 175
175
-
 176
176
-
 177
177


Perfectpro UBOX 400R Bedienungsanleitung
- Kategorie
- Radios
- Typ
- Bedienungsanleitung
in anderen Sprachen
- English: Perfectpro UBOX 400R Owner's manual
- français: Perfectpro UBOX 400R Le manuel du propriétaire
- Nederlands: Perfectpro UBOX 400R de handleiding
Verwandte Artikel
-
Perfectpro WORKTUBE Bedienungsanleitung
-
Perfectpro TEAMBOX Bedienungsanleitung
-
-
Perfectpro Rockpro Bedienungsanleitung
-
-
-
-
Perfectpro AB1 Getting Started
Andere Dokumente
-
 Power Dynamics PDC40 Bedienungsanleitung
-
Makita DMR115 Benutzerhandbuch
-
Sangean DCR-200 Bedienungsanleitung
-
Albrecht DR 855 Digitalradio, DAB+/UKW Bedienungsanleitung
-
TEAC R-5DAB Bedienungsanleitung
-
TEAC CR-H258i Bedienungsanleitung
-
Makita DMR104 Benutzerhandbuch
-
Makita MR006G Benutzerhandbuch
-
-
Sangean MMR-99DAB Benutzerhandbuch
