
38032
H0 Ländliche Feuerwache inkl. Hausbeleuchtungs-
Startset, Funktionsbausatz
H0 Rural fire station incl. house illumination starter set, functional kit
H0 rurale caserne incl. début maison d'éclairage fixé, kit fonctionnel
SzT
Stand 04/sw
87843
06/2020
Mounting instruction
Montageanleitung
1
Bitte halten Sie beim Zusammenbau
unbedingt die Reihenfolge der Bauab-
schnitte ein!
Vorsicht
Verletzungsgefahr!
Aufgrund der detaillierten Abbildung des
Originals bzw. der vorgesehenen
Verwendung kann das Produkt Spitzen,
Kanten und abbruchgefährdete Teile
aufweisen. Für die Montage sind
Werkzeuge nötig.
Stromschlaggefahr!
Die Anschlussdrähte niemals in eine
Steckdose einführen! Verwendetes
Versorgungsgerät (Transformator,
Netzteil) regelmäßig auf Schäden
überprüfen. Bei Schäden am
Versorgungsgerät dieses keinesfalls
benutzen!
Sicherheitshinweise
Als Klebstoff verwenden Sie bitte
ausschließlich den kibri Plastikkleber
flüssig (Art.-Nr. 39995/39996).
1. Wichtige Hinweise
Andere Klebstoffe können zu Verfor-
mungen der Kunststoffteile führen.
Montage des Bausatzes
Dieser Bausatz wurde sorgfältig geprüft
und verpackt. Sollte es trotzdem einmal
vorkommen, dass ein Teil fehlt, fordern
Sie dieses bitte per E-Mail oder per Post
bei uns an. Bitte nennen Sie uns die
Bezeichnung und Artikel-Nummer des
Bausatzes sowie Spritzling- und Teile-Nr.
Diese Angaben finden Sie in der Bau-
anleitung. Sie erhalten dann umgehend
von uns Ersatz.
Da Spritzlinge für mehrere Artikel
verwendet werden, kann es sein, dass
bei diesem Bausatz einige Teile übrig
bleiben.
Die beim jeweiligen Montageschritt
benötigten Teile trennen Sie bitte mit
einem Seitenschneider bzw. Modellbau-
messer vorsichtig vom Spritzbaum ab
und entgraten die Ränder.
Safety information
Electrical hazard!
Due to the detailed reproduction of the
original and the intended use, this
product can have peaks, edges and
breakable parts. For installation tools are
required.
Caution:
Take care for the right phase of construc-
tion by mounting. Due to production
some parts could be remaining.
Risk of injury!
Part the pieces from the injection molded
by using a cutter. Take care not to injure
yourself.
Use only kibri item-No. 39995/39996
plastic glue.
Other adhesives may deform the plastic
parts.
The contents of the kit have been
checked and thus should correspond
with contents as listed in the part list.
Nevertheless in case that a part is
missing or it is faulty send a written order
show ing item-No., part-No. and
injection-molded number.
Never put the connecting wires into a
power socket! Regularly examine the
transformer for damage. In case of any
damage, do not use the transformer!
1. Important information
Lors de l’assemblage des kits respectez
sc rupu leus emen t les stade s de
construction décrits sur la notice de
montage.
Les pieces destinées au montage sont
détachées de leur support a l’aide d’une
pince ou d’un cutter. Un petit coup de
lime éliminera les bavures résiduelles.
1. Remarques importantes
A coller uniquement avec la colle kibri
art.-no. 39995/39996.
D’autre types de colles pouvant
détériorer, voire déformer les pieces
utilisées. Il est normal d’avoir certaines
pieces en trop, car certaines grappes de
pieces sont utilisées aussi dans d’autres
kits kibri.
Ce kit a fait l’objet d’un contrôle minu-
tieux avant sa commercialisation.
Toutefois, si l’une ou l’autre piece serait
manquante ou présenterait un défaut de
fabrication vous pourrez demander un
remplacement de celle-ci en nous
communicant la référence du kit, le
numéro de la grappe et celui de la ou
des piece(s) incriminées (voir votre
notice).
Afin d’éviter des erreurs de transmission,
nous acceptons uniquement les
demandes de pieces d’échange
adressées par courrier classique.
DE EN
FR
DE
EN
3. Einbau der Hausinnenbeleuchtung ...............................2
5. Anschluss der Hausinnenbeleuchtung ............................3
2. Inhalt ......................................................2
1. Wichtige Hinweise ............................................1
4. Montage ...................................................2
6. Beleuchtungs-Tipp ............................................5
4. Mounting....................................................2
6. Illumination-tip................................................5
1. Important information ..........................................1
2. Contents....................................................2
3. ...............................2
Mounting of the house illumination
5. Connection of house illumination .................................3
FR
2. Contenu ....................................................2
6. Tuyau d'éclairage .............................................5
3. Montage de d’éclairage de la maison..............................2
4. Montage....................................................2
1. Informations importantes .......................................1
5. Connexion des lumieres de la maison.............................3
5. Beleuchtungs-Tipp ..................................................5
4. Montage .........................................................3
2. Inhalt ............................................................2
3. Einbau und Anschluss der Hausinnenbeleuchtung..........................2
1. Wichtige Hinweise ..................................................1
1. Important information ................................................1
3. Mounting and connection of the house illumination . . . . . . . . . . . . . . . . . . . . . . . . . 2
4. Mounting .........................................................3
2. Contents ..........................................................2
5. Illumination-tip ......................................................5
1. Wichtige Hinweise
Verletzungsgefahr!
Sicherheitshinweise
Vorsicht
Aufgrund der detaillierten Abbildung des Originals bzw. der
vorgesehenen Verwendung kann das Produkt Spitzen, Kanten
und abbruchgefährdete Teile aufweisen. Für die Montage sind
Werkzeuge nötig.
Bitte halten Sie beim Zusammenbau unbedingt die Reihen-
folge der Bauabschnitte ein!
Stromschlaggefahr!
Die Anschlussdrähte niemals in eine Steckdose einführen!
Verwendetes Versorgungsgerät (Transformator, Netzteil)
regelmäßig auf Schäden überprüfen. Bei Schäden am
Versorgungsgerät dieses keinesfalls benutzen!
Da Spritzlinge für mehrere Artikel verwendet werden, kann es
sein, dass bei diesem Bausatz einige Teile übrig bleiben.
Montage des Bausatzes
Dieser Bausatz wurde sorgfältig geprüft und verpackt. Sollte es
trotzdem einmal vorkommen, dass ein Teil fehlt, fordern Sie
dieses bitte per E-Mail oder per Post bei uns an. Bitte nennen
Sie uns die Bezeichnung und Artikel-Nummer des Bausatzes
sowie Spritzling- und Teile-Nr. Diese Angaben finden Sie in der
Montageanleitung. Sie erhalten dann umgehend von uns
Ersatz.
Die beim jeweiligen Montageschritt benötigten Teile trennen
Sie bitte mit einem Seitenschneider bzw. Modellbaumesser
vorsichtig vom Spritzbaum ab und entgraten die Ränder.
Passenden Kleber für die Bausätze finden Sie im kibri
Sortiment.
DE
Please observe the correct sequence when assembling the
parts to sub-assemblies and to the completed product!
Safety information
1. Important information
Never put the connecting wires into a power socket!
Regularly examine the transformer for damage. In case of
any damage, do not use the transformer!
Carefully separate the parts required for the respective
assembly phase with a side cutter or a sharp utility knife from
the injection-moulded sprue and deflash the edges.
The contents of this kit have been carefully checked against
the parts list. However, should a part be missing please
contact us by e-mail or by sending a letter. Please state the
precise product description and the item-No. as well as the
No. of the sprue and the specific part that is missing. You will
find all necessary information in this manual. We will
promptly supply the missing parts.
Caution:
Electrical hazard!
Due to the finely detailed reproduction of the original and the
intended use, this product may have sharp points or edges
as well as parts that may easily break off. Some tools are
required for assembly.
You will find suitable glue for the kits in the kibri product
range.
Risk of injury!
Assembly
Since some sprues are used for several different products it
is quite possibly that some parts may not be needed for this
particular product.
EN
Ausdrucken – ausschneiden – aufkleben – fertig!
Hochauflösende Druckvorlagen für Beschriftungen und
Beschilderungen finden Sie auf unserer Homepage
www.kibri.de im Download Center. Die Dekobögen lassen
sich auf einem handelsüblichen Farbdrucker ausdrucken.
Für den jeweiligen Druckertyp (Tintenstrahl oder Laser)
geeignetes Papier bzw. Folie gibt es im Schreibwaren-
fachhandel. Ideal sind selbstklebende, glatte Papiere oder
Folien mit geringer Materialstärke.
The high-resolution master copy for all kind of signs in your
kibri kit are available as download for free. Deco sheets can be
printed by using a standard colour printer. Suitable paper or foil
for the respective printers are offered by specialized trade.
Best way is to use self-adhesive smooth papers or foil with low
material thickness.
Print – cut – stick – ready!
DE EN
dekoboegen.kibri.de
Kataloge von Viessmann und kibri/Vollmer können auch bequem über das Internet
angefordert werden. Folgen Sie dazu einfach diesem Link bzw. scannen Sie den
QR-Code.
Catalogues by Viessmann and kibri/Vollmer can be ordered alternatively via internet.
Please follow the link or use QR-code.
katalogversand.kibri.de
Made in Europe
Entsorgen Sie dieses Produkt nicht über den (unsortierten) Hausmüll, sondern führen Sie
es der Wiederverwertung zu.
Do not dispose this product through (unsorted) general trash, but supply it to the recycling.
Schwierigkeitsgrad
der Bausätze:
Level of difficulty:
Einsteiger
Learners
Fortgeschrittene
Profis
Professionals
Advanced learners
Die aktuelle Version der Anleitung finden Sie auf der kibri-Homepage unter der Artikelnummer.
You will find the latest version of the manual on the kibri website using the item-No
Änderungen vorbehalten. Keine Haftung für Druckfehler und Irrtümer.
Subject to change without prior notice. No liability for mistakes and printing errors.
Viessmann Modelltechnik GmbH
Bahnhofstraße 2a
D - 35116 Hatzfeld-Reddighausen
www.viessmann-modell.de

- Haftetikett:
- diese Anleitung
C195 1 C342 1 C363 1 C388 1 C417 1 C436 2
C438 1 C347 2 C368 1 C393 1 C420 2 M83 2
C442 4 C350 1 C371 1 C398 1 C424 1
C336 2 C358 1 C380 2 C406 1 C433 1
C198 1 C345 1 C366 1 C392 1 C410 1 M81 1
C411 2
C190 4 C337 1 C359 12 C383 1 C412 2 C429 1
C194 2 C341 1 C387 1 C416 1 C440 2
C197 1 C344 1 C365 1 C391 1 C409 1
C444 2 C352 1 C372 2 C400 1 C426 2
C331 1 C354 1 C374 1 C402 1 C428 1
C443 2 C351 1 C399 1 C425 1
C193 4 C340 1 C362 2 C386 1 C415 1 C439 2
C332 1 C355 1 C375 1 C403 1 C429 3
C356 3 C404 1 C430 1
C335 2 C357 1 C379 2 C405 1 C432 2
C381 1 C407 1 C434 1
C382 2 C408 3 C435 1
C199 1 C346 1 C367 1 C418 1 C419 2 M82 1
C191 2 C338 1 C360 2 C384 1 C413 1 C432 1
C440 2 C369 1 C396 1 C422 1
C441 2 C349 1 C370 1 C397 2 C423 1
C192 4 C339 1 C361 2 C385 1 C414 2 C438 1
C196 1 C343 1 C364 1 C389 4 C408 1 C437 1
C439 2 C348 1 C395 3 C421 1 M84 1
C353 1 C373 1 C401 1 C427 3
C409 2
C410 3
Après déballage veuillez contrôler si le
contenu est complet :
- this manual
- Sticker: - Autocollant :
- ce mode d'emploi
2
87843/38032
X936 1 X951 1
X942 1 X957 1
X950 1
X937 4 X952 1
X940 1 X955 2
X939 4
X953 2
X938 1 X954 2
X941 1 X956 2
X958 4
X930 1 X943 2 A670 10 1
X931 4 X944 2
X932 4 X945 2 A671 12 1
X946 2
X934 2 X948 8
X933 1 X947 2
X935 1 X949 4
- 87829Wasserablöslisches Papier
- 1 Schraube M4x10
- 24 Ballastgewichte
- 1 Mutter M4
- diese Anleitung
- 2 m Faden
- 1 nut M4
- this manual
- wet slide image 87829
- 1 screw M4x10
- 2 m string
- 24 counterweight
- 2 m chaîne
- écrou M4
- ce mode d'emploi
- décalcomanies 87829
- 1 vis M4x10
- 24 contre poids
- 12 Lichtboxen, 4 verschiedene Größen
- 1 LED weiß
- H582, 88103 Dekopapier
- Schwarzes Papier
- Anleitung
-
12 lightboxes – 4 different sizes
- 1 white LED
- H582, 88103 deco paper
- Black paper
- Manual
- 12 visionneuses - 4 tailles différentes
- 1 LED blanche
- H582, 88103 papier déco
- papier noir
- mode d'emploi
Teile-Nr. Stück Teile-Nr. Stück
- Anleitung
- H38 Dekopapier
- manual
- H38 Deco paper - H38 papier déco
- mode d'emploi
FEUERWACHE
FEUERWACHE
FEUERWACHE
FEUERWACHE
Feuerwehrausfahrt
freihalten
Feuerwehrausfahrt
freihalten
85131 H582
- schwarzes Papier
- Dekopapier 88103
- Haftetikett
- Anleitung
- black paper
- Sticker
- deco paper 88103
- manual
- papier noir
- Autocollant
- papier déco 88103
- mode d'emploi
Kontrollieren Sie nach dem Auspacken den Lieferumfang
auf Vollständigkeit:
Check the contents of the package for completeness after
unpacking:
2. Inhalt 2. Contents
Spr.-Nr. Teile-Nr. Stück
3. Einbau und Anschluss der Hausinnenbeleuchtung
Mounting and connection of the house illumination
6007, weiß Art. 6008, warmweiß Art. 6006, die Platinen mit
je zwei LEDs in gelb Art. 6018, weiß Art. 6017 und warm-
weiß Art. 6021, die LEDs mit Anschlusskabel in gelb Art.
6047, weiß Art. 6048 und warmweiß Art. 6046 oder die LED
mit TV-Simulation Art. 5079. Die Lichtboxen werden von
innen hinter die Fenster geklebt und geben dem Raum Tiefe.
Auf diese Weise wird das Durchleuchten der Wände
verhindert. Auch für TT und N Gebäude geeignet.
TIPP: Das Viessmann Powermodul Art. 5205 sorgt für
flackerfreies Licht beim Betrieb mit Wechselstrom und
erzeugt nahezu doppelte Helligkeit.
Maße der Lichtboxen: L 17 x B 18 x H 26 mm, L 17 x B 16 x
H 21 mm, L 17 x B 12 x H 19 mm, L 17 x B 14 x H 23 mm.
Viessmann-Sortiment die Platinen mit einer LED in gelb Art.
Eigenschaften
Die Lichtboxen zur indirekten Fensterbeleuchtung ermög -
lichen eine völlig neuartige Einzelbeleuchtung von Räumen.
Zur Beleuchtung der Lichtboxen empfehlen wir aus dem
Description
The light boxes provide completely new clear lighting of each
single room. For lighting we recommend our boards from the
Viessmann-assortment with an LED in yellow item 6007, white
item 6008, warm-white item 6006, boards with two LEDs in
yellow item 6018, white item 6017 and warm-white item 6021,
LEDs with connection cable in yellow item 6047, white item
6048 and warm-white item 6046 or the LED with TV simulation
item 5079. Lightboxes should be fixed inside the house behind
the windows. Light shining through is prevented. Also suitable
for TT and N buildings.
Dimensions of the light boxes: L 17 x W 18 x H 26 mm,
Hint: The Viessmann power module item 5205 offers flicker-
free lighting by using AC power and generates nearly double
brightness.
L 17 x W 16 x H 21 mm, L 17 x W 12 x H 19 mm, L17 x W 14 x
H 23 mm.
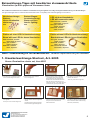
Gardinenmotiv kleben
Curtain glueing
2345
Einklipsen
Clip into place
Anschließen
Connecting
Einkleben
Glueing
Fertig
Ready
z. B. / e. g. 5200
1
Betriebsspannung: 10 – 16 V AC ~
13 – 24 V Digitalsignal
Ausschließlich nach VDE/EN-gefertigte Modellbahntransfor-
(Mit und ohne Viessmann Powermodul Art. 5215/5205)
14 – 24 V DC =
Alle Anschluss- und Montagearbeiten nur bei abgeschalteter
Betriebsspannung durchführen!
matoren (z. B. Viessmann Art. 5200) verwenden!
Stromquellen unbedingt so absichern, dass es bei einem
Kurzschluss nicht zum Kabelbrand kommen kann.
Achtung:
Widerstand und Diode an den Enden der Anschlussdrähte
sind für die Funktion erforderlich. Keinesfalls entfernen!
Widerstand nicht mit Isolationsmaterial umhüllen, da sonst
keine ausreichende Kühlung möglich ist!
Caution:
Make sure that the power supply is switched off when you
mount the device and connect the wires!
Resistor and diode at the cables are needed for proper
function of the lamp. Never cut them off! Never cover resistor
or diode with insulation material, because they have to be
cooled by surrounding air!
13 – 24 V Digital signal
(e. g. Viessmann item 5200) for the power supply!
The power sources must be protected to prevent the risk of
burning wires.
(with and without Viessmann power module 5215/5205)
Power supply: 10 – 16 V AC ~
14 – 24 V DC =
Only use VDE/EN tested special model train transformer
gelb
yellow
gelb / yellow
gelb / yellow
braun / brown
braun
brown
braun
brown
Viessmann
Abb. 1
Fig. 1
Tipp:
Viessmann Art. 5205
Verhindert Flackern bei Wechselstrom.
Annähernd doppelte Helligkeit gegen-
über reinem Wechselstrombetrieb.
Verteilerleiste mit Powermodul
Tip:
Viessmann item 5205
Power module with distribution strip
Avoids flickering with AC power supply.
Nearly double brightness of the lamps.
6046, 6047 oder / or 6048
z. B. / e. g. 5205
z. B. / e. g. 5200
Schließen Sie die LED an den Lichtausgang eines Modell-
Gleichspannung: Verbinden Sie die Diode (braunes Kabel)
mit dem Plus-Pol des Netzteils, den Widerstand mit dem
Minus-Pol.
bahntransformators (z. B. Viessmann Art. 5200) an.
Wechselspannung: Bei Betrieb mit Wechselspannung kann
es zu leichtem Flackern kommen. Daher empfehlen wir den
Betrieb mit der Verteilerleiste mit Powermodul von
Viessmann, Art. 5205 (Abb. 1).
Die oben auf dem Modul gut zugängliche Steck-Verteiler-
leiste ermöglicht den bequemen lötfreien Anschluss von 12
Stromverbrauchern durch einfaches Einstecken ihrer Wider-
stände und Dioden in die Buchsen der Leiste.
Stecken Sie das Anschlusskabel mit der Diode in eine An-
schlussbuchse der braunen Anschlussleiste, das Anschluss-
kabel mit Widerstand in eine Anschlussbuchse der gelben
Anschlussleiste auf dem Powermodul.
transformer (e. g. Viessmann item 5200).
DC voltage: Connect the diode (brown cable) with the plus
pole of the transformer, the resistor with the minus pole.
Connect the LED to the light output of a model train
AC voltage: While operation with AC voltage it may flicker
slightly.
Therefore, we recommend to use the Viessmann power
module with distribution strip item 5205 (fig. 1).
Plug the connection cable with the diode into an output socket
of the brown connection rail, the connection cable with the
resistor into an output socket of the yellow connection rail on
top of the power module.
The distribution strip on the top allows a comfortable connec-
tion of 12 loads without soldering, just by plugging the leads of
resistors and diodes into the sockets of the distribution strip.

X 942
12
10
2x
X 943
X 931
X 931
X 931
X 931
X 932
X 932
X 932
X 932
X 935
X 940
X 952
X 941
X 930
2x X 939
2x X 939
2x X 937
2x
X 937
2x
X 958
2x
X 958
X 934
X 957
X 936
X 938
X 933
X 934
4x
X 948
4x
X 948
2x
X 955
2x
X 956
2x
X 954
2x
X 953 3
87843/38032
4. Montage
Mounting Einbau der Hausinnenbeleuchtung
Mounting of the house illumination
Tipp:
Viessmann
Powermodul 5215:
Verhindert Flackern
bei Wechselstrom.
Annähernd doppelte
Helligkeit gegenüber
reinem Wechsel-
strombetrieb.
Tip:
Viessmann
Power module 5215:
Avoids flickering with
AC power supply.
Approx. double
brightness of the
lamps.
FEUERWACHE
FEUERWACHE
FEUERWACHE
FEUERWACHE
Feuerwehrausfahrt
freihalten
Feuerwehrausfahrt
freihalten
85131 H582
2x
2x
Betriebsspannung: 10 – 16 V AC ~
Achtung:
14 – 24 V DC =
Au sschließ lich n ach VD E/EN-
gefertigte Modellbahntransfor-
matoren (z. B. Viessmann Art. 5200)
verwenden! Strom-quellen unbedingt
so absichern, dass es bei einem
Kurzschluss nicht zum Kabel-
brand kommen kann.
Widerstand und Diode an den Enden
der Anschlussdrähte sind für die
Funktion erforderlich. Keinesfalls
entfernen! Widerstand nicht mit
Isolationsmaterial umhüllen, da sonst
keine ausreichende Kühlung möglich
ist!
Beleuchtung
13 – 24 V Digitalsignal
4. Anschluss der
(Mit und ohne Viessmann
Powermodul Art.-Nr. 5215)
Alle Anschluss- und Montagearbeiten
nur bei abgeschalteter Betriebs-
spannung durchführen!
Caution:
4. tingConnection of ligh
14 – 24 V DC =
Only use VDE/EN tested special
model train transformers (e.g.
Viessmann item-No. 5200) for the
power supply! The power sources
must be protected to prevent the risk
of burning wires.
13 – 24 V Digital signal
Resistor and diode at the cables are
needed for proper function of the
lamp. Never cut them off! Never cover
resistor or diode with insulation
material, because they have to be
cooled by surrounding air!
Power supply: 10 – 16 V AC ~ (with
and without Viessmann power
module 5215)
Make sure that the power supply is
switched off when you mount the
device and connect the wires!
Nicht kleben
Do not glue
Tipp:
Verwenden Sie das beiliegende schwarze Papier zum Abdunkeln des Modells von innen.
Tip:
Use the enclosed black paper to shade the model from inside.

4
87843/38032
2. Montage
2. Mounting
2. Montage
X 946
X 944
X 944
2x
X 949
2x
X 949
X 945
X 947
X 951
X 945
X 947
X 950
X 946

Beleuchtungs-Tipps mit bewährten Viessmann Artikeln
6006 warmweiß, 10 Stück
warm-white, 10 pieces
6007 gelb, 10 Stück
yellow, 10 pieces
6008 weiß, 10 Stück
white, 10 pieces
Platine mit einer LED für Hausbeleuchtung:
Die Lichtboxen/Lichtschienen zur indirekten Fensterbeleuchtung ermöglichen eine völlig neuartige Einzelbeleuchtung von Räumen/Etagen.
6005
Board with one LED for house illumination:
6017 gelb, 10 Stück
yellow, 10 pieces
6018 weiß, 10 Stück
white, 10 pieces
6021 warmweiß, 10 Stück
warm-white, 10 pieces
Board two for h :with LEDs ouse illumination
Illumination tip with approved Viessmann items
The light boxes/light rails for indirect window illumination allow a completely new individual lighting of rooms/floors.
6046 warmweiß, 10 Stück
warm-white, 10 pieces
6047 gelb, 10 Stück
yellow, 10 pieces
6048 weiß, 10 Stück
white, 10 pieces
LED mit Anschlusskabeln:
LED with connection cable:
Hausbeleuchtungs-
Startset:
House illumination
starter set:
6045
Startset Etagen-
innenbeleuchtung:
Starter set floor
interior lighting:
Platine mit zwei LEDs für Hausbeleuchtung:
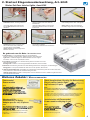
1. Schneiden Sie ein Gardinenmotiv aus. 2. Kleben Sie es auf die Lichtbox. 3. Zeichnen Sie auf einem mindestens
1 mm dicken Karton die Innenmaße
des Fensters auf und schneiden den
Grundriss mit einem Bastelmesser aus.
4. Das Gleiche geschieht mit dem Außen-
rahmen der Lichtbox.
5. Dieses Teil wird nun auf das Gardinen-
motiv geklebt. 6. Auf die mit Scheiben versehenen Fenster
können nun die Lichtboxen aufgeklebt
werden.
7. In diesem Beispiel zeigen wir Ihnen ein
Fenster mit und das andere ohne Laibung.
8. Dieses Bild zeigt die bessere Wirkung des
mit Laibung versehenen Fensters (links).
Mehr Tiefenwirkung für die Modellfenster / Fantastic depth effect for your windows
Cut out curtain background motive. Fix on the light box.
Draw the internal measurements on a
cardboard minimum 1 mm depth required.
Cut the window ground plot with cutter.
Same way outer frame of light box.
Fix the part on the curtain background.
Glue the light boxes onto the windows
which are now equipped with glasses.
Here you see a window with and
without embrasure.
Picture shows the better method using
embrasure (left window).
House illumination starter set, item 6005
5
1. Hausbeleuchtungs-Startset, Art. 6005
Viessmann Modelltechnik GmbH
Bahnhofstraße 2a
D - 35116 Hatzfeld-Reddighausen
www.viessmann-modell.de

1. Hintergrundmotiv ausschneiden und in die
Lichtschiene kleben. Richtung beachten!
2. Trennwände einkleben zur Lichtabschottung
zwischen Fenstern und Türen sowie als
Endabschluss.
3. Füllstücke zur Abdeckung zwischen den
LEDs beliebig kürzbar bzw. verlängerbar.
4. Die Füllstücke und die LED mit Kunst-
stofffassung werden punktgenau über
den Fenstern und Türen positioniert.
5. Dann wird die Lichtschiene hinter der
Fensterreihe angeklebt.
6. Ein schönes Ergebnis mit viel Tiefenwirkung.
Cut out the background motive and fix
into the light rail. Please take care for
direction!
Glue the dividing walls to cover the light
between windows and doors as well as
for final end.
Filling parts to cover space between
the LEDs, length can be cut accordingly.
The filling pieces and the LED
plastic version are fixed exactly above
windows and doors.
Glue the light rail behind the window line.
Nice result with depth effect.
Starter Set floor interior lights, item 6045
Es geht auch um die Ecke / Around the corner
1. Lichtschienen in 4 verschiedenen Höhen für unterschiedliche
Fenster-/Türhöhen und Spurgrößen. Beliebig kürzbar, mit Einkerbungen.
Light rails in 4 different heights for different window and door heights
and scales. Can be cut as required,with notches. 1
2. Trennwände verschiebbar, zur Lichtabschottung zwischen Fenstern und Türen
sowie als Endabschluss.
Dividing walls movable to cover the light between the windows, doors and finish.
2
3
3. Füllstücke zur Abdeckung zwischen den LEDs beliebig kürzbar bzw. verlängerbar, mit Einkerbungen.
Filling parts to cover space between the LEDs to be cut as required, with notches.
4. LED mit Kunststofffassung verschiebbar zur punktgenauen Positionierung über den Fenstern und Türen.
Auch passend für Lichtboxen der Hausbeleuchtung Art. 6005.
LED with plastic frame movable to exact position over the windows and doors. Suitable for light boxes from
house illumination item 6005.
4
5215
Powermodul
Power module
Weiteres Zubehör / More accessories
6049
Steck-Verteilerleiste 12-polig, für Beleuchtung
Plug-in rail for interior light-
ing on board, 12-pole
Die geniale und praktische 12-polige Verteilerleiste verbindet bis
zu 12 Stromverbraucher. Ohne Stecker, ohne Schraubklemmen
und ohne Löten.
The brilliant and useful 12-pole plug-in rail for interior lighting on board
connects up to 12 power consumers - simply by jacks for plugging in
the resistors. No extra plug, screw terminals or soldering required.
5205
Verteilerleiste mit Powermodul
Power module with plug-in rail
Only one item combines a
power module and plug-in rail.
6044
Adapterstift für
Verteilerleiste, 25 Stück
Adapter pen for rail, 25 pieces
To equip thin wires and litz wires to make them
pluggable, e. g. in connection with item 6049
or item 5205.
6
2. Startset Etageninnenbeleuchtung, Art. 6045
-
 1
1
-
 2
2
-
 3
3
-
 4
4
-
 5
5
-
 6
6


in anderen Sprachen
- English: Kibri 38032 Owner's manual
Verwandte Artikel
-
Kibri 39496 Bedienungsanleitung
-
-
-
-
-
-
-
-
-
Andere Dokumente
-
Vollmer 45154 Bedienungsanleitung
-
-
-
-
Viessmann 6016 Bedienungsanleitung
-
-
Viessmann 6094 Bedienungsanleitung
-
-
-