
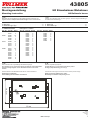
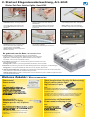
H0 Eisenbahner-Wohnhaus
25254 1 60245 2
25255 1 60246 2
25256 1 60247 2
25257 1 60248 2
25258 2 60249 8
25262 2
25265 8
25062 4 60235 2 60256 2
25067 25060 16 60233 2 60254 1
60232 2 60253 2
25065 2 60236 4 60257 2
25070 4 60239 2
60242 2
25266 25251 46 60243 2
25082 25080 2 60250 60230 2 60259 60251 2
25079 25069 16 60238 2
25074 2 60241 2
60237 4 60258 2
25253 2 60244 2
25073 4 60240 2
25081 2 60231 2 60252 2
25061 4 60234 2 60255 2
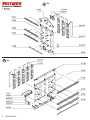
Spr.-Nr. Teile-Nr. Stück Spr.-Nr. Teile-Nr. Stück Spr.-Nr. Teile-Nr. Stück
Spr.-Nr. Teile-Nr. Stück Spr.-Nr. Teile-Nr. Stück
Dekopapier: 139993
139992
06/2022
SzT
Stand 04/sw
43805
1
H0 Railman’s house
1. Inhalt ..........................1
2. Montage.........................2
4. Anschluss der Beleuchtung . . . . . . . . . . 0
3. Einbau der Beleuchtung . . . . . . . . . . . . 0
5. Beleuchtung-Tipp
4. Connection of house interior lights. . . . . 0
5. Illumination-tip
2. Mounting ........................2
3. . . . . 0
Mounting of the house illumination
1. Contents .......................1
3. Montage de l'éclairage de la maison . . . 0
2. Montage .........................2
5. D’éclairage-tip
1. Contenu ........................1
4. Connexion les lumieres de la maison . . 0
Wir verwenden den recyclefähigen Kunststoff Polystyrol.We use recyclable polystyrene.
1. Inhalt/Contents
DE
DE
EN
EN
1. Inhalt . . . . . . . . . . . . . . . . . . . . . . . . . . . . . . . . . . . . . . . . . 1
3. Beleuchtungs-Tipp ...............................5
2. Montage . . . . . . . . . . . . . . . . . . . . . . . . . . . . . . . . . . . . . . 22. Mounting . . . . . . . . . . . . . . . . . . . . . . . . . . . . . . . . . . . . . . 2
3. Illumination-tip . . . . . . . . . . . . . . . . . . . . . . . . . . . . . . . . . . 5
1. Contents . . . . . . . . . . . . . . . . . . . . . . . . . . . . . . . . . . . . . . 1
Bitte legen Sie die Einzelteile nach Buchstabengruppen zusammen und
beginnen Sie dann mit dem Zusammenbau.
entsprechend der Zeichnungen
Arrange the individual parts by letter groups, and then begin assembling in
accordance with the drawings.
Made in Europe
Montageanleitung
Mounting instruction
Congratulations on your purchase of this Vollmer product.
Our high quality kits will bring you much joy.
Wir gratulieren Ihnen zum Erwerb dieses hochwertigen Vollmer-Bausatzes.
Die hohe Passgenauigkeit unserer Bausätze wird Ihnen viel Freude
bereiten.
Änderungen vorbehalten.
Keine Haftung für Druckfehler und Irrtümer.
Diverse Kleber für die Bausätze finden Sie im Vollmer Sortiment.
Subject to change without prior notice.
No liability for mistakes and printing errors.
You will find various glues for the kits in the Vollmer product range.
10,5 cm
16 cm

Von vorne e inkleben!
Fensteraufsätze
Bitte zuerst
2 139992/43805
A
B
2x
2x
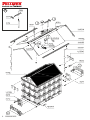
2. Montage
Mounting

139992/43805 3
D
C
E
2x 2x
Tipp:
Möchten Sie das Modell von innen beleuchten,
verwenden Sie bitte die Viessmann Art. 6832
Hausbeleuchtungssockel mit Glühlampe E5,5, klar.
Möchten Sie die Fenster einzeln und individuell
beleuchten, so empfehlen wir das Hausbeleuchtungs-
Startset Art. 6005 von Viessmann.
Siehe Produkthinweis auf der letzten Seite.
Tip:
To illuminate the model from inside, please use
Viessmann item 6832 House illumination socket with
bulb E5,5, clear. For detailed illumination of each
window and room, please use Viessmann item 6005
House illumination starter set.
See product information on the last page.

Von vorne e inkleben!
Fensteraufsätze
Bitte zuerst
4 139992/43805
2. Montage
2. Mounting
2. Montage
F
2x

Beleuchtungs-Tipps mit bewährten Viessmann Artikeln
6006 warmweiß, 10 Stück
warm-white, 10 pieces
6007 gelb, 10 Stück
yellow, 10 pieces
6008 weiß, 10 Stück
white, 10 pieces
Platine mit einer LED für Hausbeleuchtung:
Die Lichtboxen/Lichtschienen zur indirekten Fensterbeleuchtung ermöglichen eine völlig neuartige Einzelbeleuchtung von Räumen/Etagen.
6005
Board with one LED for house illumination:
6017 gelb, 10 Stück
yellow, 10 pieces
6018 weiß, 10 Stück
white, 10 pieces
6021 warmweiß, 10 Stück
warm-white, 10 pieces
Board two for h :with LEDs ouse illumination
Illumination tip with approved Viessmann items
The light boxes/light rails for indirect window illumination allow a completely new individual lighting of rooms/floors.
6046 warmweiß, 10 Stück
warm-white, 10 pieces
6047 gelb, 10 Stück
yellow, 10 pieces
6048 weiß, 10 Stück
white, 10 pieces
LED mit Anschlusskabeln:
LED with connection cable:
Hausbeleuchtungs-
Startset:
House illumination
starter set:
6045
Startset Etagen-
innenbeleuchtung:
Starter set floor
interior lighting:
Platine mit zwei LEDs für Hausbeleuchtung:
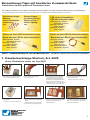
1. Schneiden Sie ein Gardinenmotiv aus. 2. Kleben Sie es auf die Lichtbox. 3. Zeichnen Sie auf einem mindestens
1 mm dicken Karton die Innenmaße
des Fensters auf und schneiden den
Grundriss mit einem Bastelmesser aus.
4. Das Gleiche geschieht mit dem Außen-
rahmen der Lichtbox.
5. Dieses Teil wird nun auf das Gardinen-
motiv geklebt. 6. Auf die mit Scheiben versehenen Fenster
können nun die Lichtboxen aufgeklebt
werden.
7. In diesem Beispiel zeigen wir Ihnen ein
Fenster mit und das andere ohne Laibung.
8. Dieses Bild zeigt die bessere Wirkung des
mit Laibung versehenen Fensters (links).
Mehr Tiefenwirkung für die Modellfenster / Fantastic depth effect for your windows
Cut out curtain background motive. Fix on the light box.
Draw the internal measurements on a
cardboard minimum 1 mm depth required.
Cut the window ground plot with cutter.
Same way outer frame of light box.
Fix the part on the curtain background.
Glue the light boxes onto the windows
which are now equipped with glasses.
Here you see a window with and
without embrasure.
Picture shows the better method using
embrasure (left window).
House illumination starter set, item 6005
5
1. Hausbeleuchtungs-Startset, Art. 6005
Viessmann Modelltechnik GmbH
Bahnhofstraße 2a
D - 35116 Hatzfeld-Reddighausen
www.viessmann-modell.de

1. Hintergrundmotiv ausschneiden und in die
Lichtschiene kleben. Richtung beachten!
2. Trennwände einkleben zur Lichtabschottung
zwischen Fenstern und Türen sowie als
Endabschluss.
3. Füllstücke zur Abdeckung zwischen den
LEDs beliebig kürzbar bzw. verlängerbar.
4. Die Füllstücke und die LED mit Kunst-
stofffassung werden punktgenau über
den Fenstern und Türen positioniert.
5. Dann wird die Lichtschiene hinter der
Fensterreihe angeklebt.
6. Ein schönes Ergebnis mit viel Tiefenwirkung.
Cut out the background motive and fix
into the light rail. Please take care for
direction!
Glue the dividing walls to cover the light
between windows and doors as well as
for final end.
Filling parts to cover space between
the LEDs, length can be cut accordingly.
The filling pieces and the LED
plastic version are fixed exactly above
windows and doors.
Glue the light rail behind the window line.
Nice result with depth effect.
Starter Set floor interior lights, item 6045
Es geht auch um die Ecke / Around the corner
1. Lichtschienen in 4 verschiedenen Höhen für unterschiedliche
Fenster-/Türhöhen und Spurgrößen. Beliebig kürzbar, mit Einkerbungen.
Light rails in 4 different heights for different window and door heights
and scales. Can be cut as required,with notches. 1
2. Trennwände verschiebbar, zur Lichtabschottung zwischen Fenstern und Türen
sowie als Endabschluss.
Dividing walls movable to cover the light between the windows, doors and finish.
2
3
3. Füllstücke zur Abdeckung zwischen den LEDs beliebig kürzbar bzw. verlängerbar, mit Einkerbungen.
Filling parts to cover space between the LEDs to be cut as required, with notches.
4. LED mit Kunststofffassung verschiebbar zur punktgenauen Positionierung über den Fenstern und Türen.
Auch passend für Lichtboxen der Hausbeleuchtung Art. 6005.
LED with plastic frame movable to exact position over the windows and doors. Suitable for light boxes from
house illumination item 6005.
4
5215
Powermodul
Power module
Weiteres Zubehör / More accessories
6049
Steck-Verteilerleiste 12-polig, für Beleuchtung
Plug-in rail for interior light-
ing on board, 12-pole
Die geniale und praktische 12-polige Verteilerleiste verbindet bis
zu 12 Stromverbraucher. Ohne Stecker, ohne Schraubklemmen
und ohne Löten.
The brilliant and useful 12-pole plug-in rail for interior lighting on board
connects up to 12 power consumers - simply by jacks for plugging in
the resistors. No extra plug, screw terminals or soldering required.
5205
Verteilerleiste mit Powermodul
Power module with plug-in rail
Only one item combines a
power module and plug-in rail.
6044
Adapterstift für
Verteilerleiste, 25 Stück
Adapter pen for rail, 25 pieces
To equip thin wires and litz wires to make them
pluggable, e. g. in connection with item 6049
or item 5205.
6
2. Startset Etageninnenbeleuchtung, Art. 6045
-
 1
1
-
 2
2
-
 3
3
-
 4
4
-
 5
5
-
 6
6


in anderen Sprachen
- English: Vollmer 43805 Owner's manual
Verwandte Artikel
-
Vollmer 43807 Bedienungsanleitung
-
-
-
-
-
-
-
-
-
Andere Dokumente
-
Kibri 39408 Bedienungsanleitung
-
-
-
-
-
-
-
-
-