
Firefighting Thermal Camera
HIKMICRO FT Series
Quick Start Guide
Contact Us

Firefighting Thermal Camera FT Series Quick Start Guide
English
3
Wärmebildkamera zur Brandbekämpfung FT-Serie – Kurzanleitung
Deutsch
6
Guide de démarrage rapide de la caméra thermique anti-incendie de la série FT
Français
10
Guía de inicio rápido de la cámara térmica contra incendios serie FT
Español
14
Guia de início rápido da Câmara térmica de combate a incêndios Série FT
Português
18
Guida introduttiva alla Termocamera antincendio Serie FT
Italiano
22
Stručná příručka k hasičské termokameře řady FT
Čeština
26
Stručná úvodná príručka k hasičskej termografickej kamere radu FT
Slovenčina
29
Skrócony podręcznik użytkownika pożarniczej kamery termowizyjnej z serii FT
Polski
33
Tűzvédelmi hőkamera FT-sorozat Gyors üzembe helyezési útmutató
Magyar
37
Ghid de inițiere rapidă pentru camerele termice de prevenire a incendiilor din
seria FT
Română
41
Snelstartgids voor Thermische camera voor brandbestrijding FT-serie
Nederlands
44
FT-serien af termiske kameraer til brandbekæ mpelse - Hurtig startvejledning
Dansk
48
Hurtigveiledning for termisk brannkamera i FT-serien
Norsk
52
FT-sarjan palontorjuntalämpökameran pikaopas
Suomi
55
Brandbekämpningsvärmekamera FT-serien Snabbstartguide
Svenska
59
Краткое руководство по началу работы с противопожарной
тепловизионной камерой серии FT
Русский
62
Yangınla Mücadele için Termal Kamera FT Serisi Hızlı Başlangıç Kılavuzu
Türkçe
67
消防用サーマルカメラFTシリーズクイックスタートガイド
日本語
70
소방용 열화상 카메라 FT 시리즈 빠른 시작 가이드
한국어
74
消防熱像儀 FT 系列快速入門指南
繁體中文
78

1
A
1
2
3
6
8
10
11
7
9
4
5
12
13
14
15

2
B
C

3
English
1. Brief Description
The firefighting thermal camera is a rugged, compact,
high-quality thermal imaging camera designed for
inspectors to observe in total darkness and smoke, helping
to save lives, protect property and keep inspectors safe.
Various image modes can satisfy most scenarios.
You can view live view, and capture snapshots via
HIKMICRO Viewer on your phone. You can also analyze
pictures offline, generate and share a report via the app.
Scan the QR codes on the cover to download the app.
You can download HIKMICRO Analyzer
(https://www.hikmicrotech.com/en/industrial-
products/hikmicro-analyzer-software.html) to analyze
pictures offline professionally, and generate a custom
format report on your PC.
HIKMICRO Viewer Android
HIKMICRO Viewer iOS
2. Appearance (Page 1 – A)
The appearances of different models may vary. Please
take the actual product for reference.
2.1 Component & Interface
No.
Component
Function
1
Screen
Show the live view interface.
2
Buttons
For operating the device.
3
Lanyard
Mounting
Points
Mount the lanyard for easy
carrying.
4
Interface Cover
Protect interfaces. The
interface cover is protected
by a rubber cover on top.
5
Ring-Pull Handle
for Interface
Rotate to lock and unlock the
interface cover.
6
Charging
Indicator
Solid Red: Charging
normally.
Solid Green: Fully charged.
Flashing Red and Green:
Charging exception.
7
USB Type-C
Interface
Charge the device or export
files with USB type-A to type-
C cable.
8
SIM Card Slot
Reserved.
9
Neck Strap
Mounting
Points
Mount the neck strap.
10
Battery
Supply power to the device.
11
Ring-Pull Handle
for Battery
Rotate to lock and unlock the
battery.
12
Thermal Lens
View the thermal image.
No.
Component
Function
13
Charging
Contacts
Reserved.
14
Tripod Mount
Mount the tripod.
15
Trigger
Live View:
Pull the trigger to capture
snapshots.
Menu Mode:
Pull the trigger to browse
options from bottom to top.
2.2 Buttons
Button
Description
Function
Power
Button
Hold to power on/off the
device.
Menu Mode:
Press to exit the menu or
return to the previous menu.
Mode
Button
Live View:
Press to switch among image
modes.
Menu Mode:
Press to browse options from
top to bottom.
Zoom-in
Button
Live View:
Press to switch zoom-in levels.
Menu Mode:
Press to add value when
setting parameters or turn
on/off functions.
Note: Press and at the same time to enter
the menu.
3. Attach Neck Strap and Lardyards (Page 2)
Attach the neck strap and retractable lanyard for easy
carrying, and to prevent accidental falls.
3.1 Neck Strap (Page 2 – B)
3.2 Lanyards (Page 2 – C)
Note: ①Lanyard; ②Retractable Lanyard.
4. Charge Device
Please charge the device when the battery is low. For the
first charge, turn on the device and charge it for 3 hours
until it is fully charged. The device clock may roll back to
the default time, if the device is not fully charged.
Note:
The built-in cell battery that powers the real time clock
(RTC) of the device may drain during longtime
transportation or storage. If the rechargeable battery is
removed from device for a long time, it is
recommended to recharge the RTC battery for 10 hours
to ensure the wellfunctioning of the device clock.
To fully charge the RTC battery, the following
requirements should be met:

4
a) The rechargeable lithium battery should be
installed on the device.
b) The device should keep working for more than 8
hours before shutting down.
4.1 Charge Device via Type-C Interface
Steps
1. Fold up the rubber cover.
2. Grip the ring-pull handle for interface and rotate it to
unlock, and pull out the interface cover.
3. Plug in the USB type-A to type-C cable, and charge the
device.
4. Put the interface cover in place, and grip the ring-pull
handle for interface and rotate it to lock the interface
cover.
5. Put back rubber cover on top.
4.2 Charge Device via Charging Base
Steps:
1. Remove the battery from the device.
1) Grip the ring-pull handle for battery, and rotate it
by 90° to unlock the battery.
2) Pull out the battery from the battery compartment.
2. Connect the charging base to power supply using the
supplied charging base power adapter.
3. Insert the battery into the charging base. You can see
the charging status via the indicators.
Charging
Indicators for
Batteries
Charging Base
Indicator
Note:
The input voltage of the charging base should meet the
limited energy circuit (12 VDC, 2 A).
Charging indicators for batteries statuses are as follows:
①Solid Red: Charging normally; ②Solid Green: Fully
charged; ③ OFF: Charging exception.
Charging base indicator statuses are as follows: ①Solid
Red: Functioning properly; ②OFF: Not functioning.
4. When the battery is fully charged, draw the battery
from the charging base.
5. Align the ribbed piece on battery with the notch of the
device, and push the battery into the battery
compartment until it is in the locked position.
Ribbed Piece
6. Grip the ring-pull handle, and rotate it to lock the
battery.
User Manual
Legal Information
© 2023 Hangzhou Microimage Software Co., Ltd. All rights
reserved.
About this Manual
The Manual includes instructions for using and managing
the Product. Pictures, charts, images and all other
information hereinafter are for description and explanation
only. The information contained in the Manual is subject to
change, without notice, due to firmware updates or other
reasons. Please find the latest version of this Manual at the
HIKMICRO website (www.hikmicrotech.com).
Please use this Manual with the guidance and assistance of
professionals trained in supporting the Product.
Trademarks
and other HIKMICRO’s trademarks and logos
are the properties of HIKMICRO in various jurisdictions.
Other trademarks and logos mentioned are the properties
of their respective owners.
Disclaimer
TO THE MAXIMUM EXTENT PERMITTED BY APPLICABLE
LAW, THIS MANUAL AND THE PRODUCT DESCRIBED, WITH
ITS HARDWARE, SOFTWARE AND FIRMWARE, ARE
PROVIDED “AS IS” AND “WITH ALL FAULTS AND ERRORS”.
HIKMICRO MAKES NO WARRANTIES, EXPRESS OR IMPLIED,
INCLUDING WITHOUT LIMITATION, MERCHANTABILITY,
SATISFACTORY QUALITY, OR FITNESS FOR A PARTICULAR
PURPOSE. THE USE OF THE PRODUCT BY YOU IS AT YOUR
OWN RISK. IN NO EVENT WILL HIKMICRO BE LIABLE TO YOU
FOR ANY SPECIAL, CONSEQUENTIAL, INCIDENTAL, OR
INDIRECT DAMAGES, INCLUDING, AMONG OTHERS,
DAMAGES FOR LOSS OF BUSINESS PROFITS, BUSINESS
INTERRUPTION, OR LOSS OF DATA, CORRUPTION OF
SYSTEMS, OR LOSS OF DOCUMENTATION, WHETHER BASED
ON BREACH OF CONTRACT, TORT (INCLUDING
NEGLIGENCE), PRODUCT LIABILITY, OR OTHERWISE, IN
CONNECTION WITH THE USE OF THE PRODUCT, EVEN IF
HIKMICRO HAS BEEN ADVISED OF THE POSSIBILITY OF SUCH
DAMAGES OR LOSS.
YOU ACKNOWLEDGE THAT THE NATURE OF THE INTERNET
PROVIDES FOR INHERENT SECURITY RISKS, AND HIKMICRO
SHALL NOT TAKE ANY RESPONSIBILITIES FOR ABNORMAL
OPERATION, PRIVACY LEAKAGE OR OTHER DAMAGES
RESULTING FROM CYBER-ATTACK, HACKER ATTACK, VIRUS
INFECTION, OR OTHER INTERNET SECURITY RISKS;
HOWEVER, HIKMICRO WILL PROVIDE TIMELY TECHNICAL
SUPPORT IF REQUIRED.
YOU AGREE TO USE THIS PRODUCT IN COMPLIANCE WITH
ALL APPLICABLE LAWS, AND YOU ARE SOLELY RESPONSIBLE

5
FOR ENSURING THAT YOUR USE CONFORMS TO THE
APPLICABLE LAW. ESPECIALLY, YOU ARE RESPONSIBLE, FOR
USING THIS PRODUCT IN A MANNER THAT DOES NOT
INFRINGE ON THE RIGHTS OF THIRD PARTIES, INCLUDING
WITHOUT LIMITATION, RIGHTS OF PUBLICITY,
INTELLECTUAL PROPERTY RIGHTS, OR DATA PROTECTION
AND OTHER PRIVACY RIGHTS. YOU SHALL NOT USE THIS
PRODUCT FOR ANY PROHIBITED END-USES, INCLUDING THE
DEVELOPMENT OR PRODUCTION OF WEAPONS OF MASS
DESTRUCTION, THE DEVELOPMENT OR PRODUCTION OF
CHEMICAL OR BIOLOGICAL WEAPONS, ANY ACTIVITIES IN
THE CONTEXT RELATED TO ANY NUCLEAR EXPLOSIVE OR
UNSAFE NUCLEAR FUEL-CYCLE, OR IN SUPPORT OF HUMAN
RIGHTS ABUSES.
IN THE EVENT OF ANY CONFLICTS BETWEEN THIS MANUAL
AND THE APPLICABLE LAW, THE LATTER PREVAILS.
Regulatory Information
These clauses apply only to the products bearing the
corresponding mark or information.
EU/UK Compliance Statement
This product and - if applicable - the supplied
accessories too are marked with "CE" and
comply therefore with the applicable harmonized
European standards listed under the Directive
2014/30/EU (EMCD), Directive 2014/35/EU (LVD),
Directive 2011/65/EU (RoHS), Directive 2014/53/EU.
This product and - if applicable - the supplied
accessories too are marked with "UKCA" and
comply therefore with the following
directives: Radio Equipment Regulations
2017, Electromagnetic Compatibility Regulations 2016,
Electrical Equipment (Safety) Regulations 2016, the
Restriction of the Use of Certain Hazardous Substances
in Electrical and Electronic Equipment Regulations 2012.
Frequency Bands and Power (for CE/UKCA)
The frequency bands and transmitting power (radiated
and/or conducted) nominal limits applicable to the
following radio equipment are as follows:
Wi-Fi 2.4 GHz (2.4 GHz to 2.4835 GHz): 20 dBm
Bluetooth 2.4 GHz (2.4 GHz to 2.4835 GHz): 20 dBm
For the device without a supplied power adapter, use
the power adapter provided by a qualified
manufacturer. Refer to the product specification for
detailed power requirements.
For the device without a supplied battery, use the
battery provided by a qualified manufacturer. Refer to
the product specification for detailed battery
requirements.
Warning: This is a class A product. In a domestic
environment this product may cause radio interference
in which case the user may be required to take
adequate measures.
Directive 2012/19/EU (WEEE Directive):
Products marked with this symbol cannot be
disposed of as unsorted municipal waste in the
European Union. For proper recycling, return
this product to your local supplier upon the purchase of
equivalent new equipment, or dispose of it at
designated collection points. For more information see:
www.recyclethis.info.
According to the Waste Electrical and Electronic
Equipment Regulations 2013: Products marked with this
symbol cannot be disposed of as unsorted municipal
waste in the United Kingdom. For proper recycling, return
this product to your local supplier upon the purchase of
equivalent new equipment, or dispose of it at designated
collection points. For more information see:
www.recyclethis.info.
Directive 2006/66/EC and its amendment
2013/56/EU (Battery Directive): This product
contains a battery that cannot be disposed of
as unsorted municipal waste in the European Union. See
the product documentation for specific battery
information. The battery is marked with this symbol,
which may include lettering to indicate cadmium (Cd),
lead (Pb), or mercury (Hg). For proper recycling, return
the battery to your supplier or to a designated
collection point. For more information see:
www.recyclethis.info.
According to the Batteries and Accumulators (Placing on
the Market) Regulations 2008 and the Waste Batteries
and Accumulators Regulations 2009: This product
contains a battery that cannot be disposed of as unsorted
municipal waste in the United Kingdom. See the product
documentation for specific battery information. The
battery is marked with this symbol, which may include
lettering to indicate cadmium (Cd), lead (Pb), or mercury
(Hg). For proper recycling, return the battery to your
supplier or to a designated collection point. For more
information see: www.recyclethis.info.
Safety Instruction
Please read all the safety information carefully before
using.
These instructions are intended to ensure that user can
use the product correctly to avoid danger or property loss.
Laws and Regulations
● Use of the product must be in strict compliance with
the local electrical safety regulations.
Transportation
● Keep the device in original or similar packaging while
transporting it.
● Keep all wrappers after unpacking them for future use.
In case of any failure occurred, you need to return the
device to the factory with the original wrapper.
Transportation without the original wrapper may result
in damage on the device and the company shall not
take any responsibilities.
● Do not drop the product or subject it to physical shock.
Keep the device away from magnetic interference.
Power Supply
● The input voltage should meet the limited energy
circuit (5 VDC, 2 A) according to the IEC61010-1
standard. Please refer to technical specifications for
detailed information.
● Make sure the plug is properly connected to the power
socket.
● DO NOT connect multiple devices to one power
adapter, to avoid over-heating or fire hazards caused by
overload.
● For the device without a supplied power adapter, use
the power adapter provided by a qualified
manufacturer. Refer to the product specification for
detailed power requirements.
Battery
● Improper use or replacement of the battery may result
in explosion hazard. Replace with the same or
equivalent type only. The battery type is HM-AHB02-
3754. Dispose of used batteries in conformance with
the instructions provided by the battery manufacturer.

6
● Do not charge other battery types with the supplied
charger. Confirm there is no flammable material within
2 m of the charger during charging.
● For long-term storage of the battery, make sure it is
fully charged every half year to ensure the battery
quality. Otherwise, damage may occur.
● DO NOT place the battery near heating or fire source.
Avoid direct sunlight.
● DO NOT swallow the battery to avoid chemical burns.
● DO NOT place the battery in the reach of children.
● CAUTION: Risk of explosion if the battery is replaced by
an incorrect type.
● Do not dispose of the battery into fire or a hot oven, or
mechanically crush or cut the battery, which may result
in an explosion.
● Do not subject the battery to extremely low air
pressure, which may result in an explosion or the
leakage of flammable liquid or gas.
● When the device is powered off and the RTC battery is
full, the time settings can be kept for 90 days.
● In the first use, power on the device and charge the RTC
battery with the lithium battery for more than 10
hours.
● The battery voltage is 3.7 V, and the battery capacity is
5400 mAh.
Maintenance
● If the product does not work properly, please contact
your dealer or the nearest service center. We shall not
assume any responsibility for problems caused by
unauthorized repair or maintenance.
● Wipe the device gently with a clean cloth and a small
quantity of ethanol, if necessary.
● If the device is used in a manner not specified by the
manufacturer, the protection provided by the device
may be impaired.
● Please notice that the current limit of USB 3.0
PowerShare port may vary with the PC brand, which is
likely to result in incompatibility issue. Therefore, it’s
advised to use regular USB 3.0 or USB 2.0 port if the
USB device fails to be recognized by PC via USB 3.0
PowerShare port.
● Your camera will periodically perform a self-calibration
to optimize image quality and measurement accuracy.
In this process the image will pause briefly and you will
hear a “click” as a shutter moves in front of the
detector. The self-calibration will be more frequent
during the startup or in very cold or hot environments.
This is a normal part of operation to ensure optimum
performance for your camera.
Using Environment
● DO NOT expose the device to extremely hot, cold,
dusty, corrosive, saline-alkali, or damp environments.
Make sure the running environment meets the
requirement of the device. The operating temperature
shall be -20 °C to 60 °C (-4 °F to 140 °F), and the
operating humidity shall be less than 95%.
● Place the device in a dry and well-ventilated
environment.
● DO NOT expose the device to high electromagnetic
radiation or dusty environments.
● DO NOT aim the lens at the sun or any other bright
light.
● When any laser equipment is in use, make sure that the
device lens is not exposed to the laser beam, or it may
burn out.
● The device is suitable for indoor conditions.
● The pollution degree is 2.
● The protection level is IP67.
Calibration Service
● We recommend you send the device back for
calibration once a year, and please contact the local
dealer for the information on maintenance points. For
more detailed calibration services, please visit
https://www.hikmicrotech.com/en/support/calibration
-service.html.
Technical Support
● https://www.hikmicrotech.com/en/contact-us.html will
help you as a HIKMICRO customer to get the most out
of your HIKMICRO products. The portal gives you access
to our support team, software and documentation,
service contacts, etc.
Emergency
● If smoke, odor, or noise arises from the device,
immediately turn off the power, unplug the power
cable, and contact the service center.
Manufacture Address
Room 313, Unit B, Building 2, 399 Danfeng Road, Xixing
Subdistrict, Binjiang District, Hangzhou, Zhejiang 310052,
China
Hangzhou Microimage Software Co., Ltd.
COMPLIANCE NOTICE: The thermal series products might
be subject to export controls in various countries or
regions, including without limitation, the United States,
European Union, United Kingdom and/or other member
countries of the Wassenaar Arrangement. Please consult
your professional legal or compliance expert or local
government authorities for any necessary export license
requirements if you intend to transfer, export, re-export
the thermal series products between different countries.
Deutsch
1. Kurze Beschreibung
Die Wärmebildkamera zur Brandbekämpfung ist eine
robuste, kompakte, hochwertige Wärmebildkamera, die
für Inspekteure entwickelt wurde, um bei völliger
Dunkelheit und Rauch zu beobachten und so dazu
beizutragen, Leben zu retten, Eigentum zu schützen und
die Sicherheit der Inspekteure zu gewährleisten.
Verschiedene Bildmodi können die meisten Szenarien
abdecken.
Sie können auf Ihrem Telefon über HIKMICRO Viewer die
Live-Ansicht anzeigen und Fotos aufnehmen. Sie können
Bilder offline analysieren und einen Bericht über die App
generieren und teilen. Scannen Sie die QR-Codes auf der
Abdeckung, um die App herunterzuladen.
Sie können den HIKMICRO Analyzer
(https://www.hikmicrotech.com/de/industrial-
products/hikmicro-analyzer-software.html)
herunterladen, um Bilder professionell offline zu
analysieren und auf Ihrem PC einen Bericht in einem
individuellen Format zu erstellen.
HIKMICRO Viewer für
Android
HIKMICRO Viewer für iOS

7
2. Erscheinungsbild (Seite 1 – A)
Das Erscheinungsbild kann je nach Modell variieren. Bitte
nehmen Sie das tatsächliche Produkt als Referenz.
2.1 Komponenten und Anschlüsse
Nr.
Komponente
Funktion
1
Bildschirm
Zeigt die Live-Ansicht an.
2
Schaltflächen
Zum Bedienen des
Geräts.
3
Befestigungspunkte
für Halsband
Befestigen Sie das
Halsband, um das
Tragen zu erleichtern.
4
Anschlussabdeckung
Schützt die Anschlüsse.
Die Anschlussabdeckung
ist durch eine
Gummiabdeckung
geschützt.
5
Ringzuggriff für
Anschluss
Drehen, um die
Anschlussabdeckung zu
ver- und entriegeln.
6
Ladeanzeige
Durchgehend rot:
Wird normal
aufgeladen.
Leuchtet Grün:
Vollständig
aufgeladen.
Blinkt rot und grün:
Ausnahme beim
Aufladen.
7
USB-Typ-C-
Schnittstelle
Das Gerät wird über ein
Typ-A-auf-Typ-C-USB-
Kabel aufgeladen, über
das auch Dateien
exportiert werden
können.
8
SIM-Kartensteckplatz
Reserviert.
9
Befestigungspunkte
für Nackenriemen
Befestigt den
Nackenriemen.
10
Akku
Versorgt das Gerät mit
Strom.
11
Ringzuggriff für Akku
Drehen, um den Akku zu
ver- und entriegeln.
12
Wärmebildobjektiv
Wärmebild anzeigen.
13
Ladekontakte
Reserviert.
14
Befestigung für ein
Stativ
Befestigung für ein
Stativ.
15
Auslöser
Live-Ansicht:
Drücken Sie den
Auslöser, um Fotos
aufzunehmen.
Menümodus:
Drücken Sie den
Auslöser, um die
Optionen von unten
nach oben zu
durchsuchen.
2.2 Tasten
Taste
Beschreibung
Funktion
Ein/Aus-Taste
Zum Ein- und Ausschalten
des Geräts gedrückt
halten.
Menümodus:
Drücken, um das Menü zu
verlassen oder zum
vorherigen Menü
zurückzukehren.
Modustaste
Live-Ansicht:
Drücken, um zwischen den
Bildmodi zu wechseln.
Menümodus:
Drücken, um die Optionen
von oben nach unten zu
durchsuchen.
Taste zum
Vergrößern
Live-Ansicht:
Drücken, um zwischen den
Vergrößerungsstufen zu
wechseln.
Menümodus:
Drücken, um beim
Einstellen der Parameter
einen Wert hinzufügen
oder um Funktionen
ein-/auszuschalten.
Hinweis: Drücken Sie und gleichzeitig, um
das Menü zu öffnen.
3. Nackenriemen und Halsbänder
befestigen (Seite 2)
Befestigen Sie den Nackenriemen und das einziehbare
Halsband, um das Tragen zu erleichtern und ein
versehentliches Herunterfallen zu vermeiden.
3.1 Nackenriemen (Seite 2 – B)
3.2 Halsbänder (Seite 2 – C)
Hinweis: ①Halsband; ②Einziehbares Halsband.
4. Gerät laden
Laden Sie das Gerät auf, wenn der Akkustand gering ist.
Schalten Sie bei erstmaliger Aufladung das Gerät ein und
laden Sie es 3 Stunden lang auf, bis es vollständig
aufgeladen ist. Die Geräteuhr könnte auf die Standardzeit
zurückgesetzt werden, falls das Gerät nicht vollständig
geladen wird.
Hinweis:
Die eingebaute Batterie, die die Echtzeituhr (RTC) des
Geräts mit Strom versorgt, kann sich entladen, wenn
das Gerät über längere Zeit nicht verwendet wird.
Wenn der Akku für längere Zeit aus dem Gerät entfernt
wird, wird empfohlen, den RTC-Akku 10 Stunden lang
aufzuladen, um die einwandfreie Funktion der
Geräteuhr zu gewährleisten.
Um die RTC-Batterie vollständig aufzuladen, müssen die
folgenden Voraussetzun gen erfüllt sein:
a) Der Lithium-Akku muss sich im Gerät befinden.
b) Das Gerät muss mindestens 8 Stunden
eingeschaltet sein.

8
4.1 Gerät über die Typ-C-Schnittstelle aufladen
Schritte
1. Schieben Sie die Gummiabdeckung nach oben.
2. Greifen Sie den Ringzuggriff für den Anschluss, drehen
Sie ihn, um ihn zu entriegeln, und ziehen Sie die
Anschlussabdeckung heraus.
3. Schließen Sie den USB Typ-A zu Typ-C Kabel an und
laden Sie das Gerät.
4. Bringen Sie die Anschlussabdeckung an, greifen Sie
den Ringzuggriff für den Anschluss und drehen Sie ihn,
um die Anschlussabdeckung zu verriegeln.
5. Ziehen Sie die Gummiabdeckung wieder darüber.
4.2 Gerät über Ladestation laden
Schritte:
1. Entnehmen Sie den Akku aus dem Gerät.
1) Greifen Sie den Ringzuggriff für den Akku und
drehen Sie ihn um 90°, um den Akku zu entriegeln.
2) Entnehmen Sie den Akku aus dem Akkufach.
2. Schließen Sie die Ladestation mit dem mitgelieferten
Netzteil an das Stromnetz an.
3. Setzen Sie den Akku in die Ladestation ein. Sie können
den Ladestatus über die Anzeigen ablesen.
Ladeanzeigen
für Akkus
Anzeige der
Ladestation
Hinweis:
Die Eingangsspannung der Ladestation muss einer
Schaltung für begrenzte Leistungsaufnahme (12 V DC,
2 A) entsprechen.
Dies sind die Ladestatusanzeigen für die Akkus:
①Leuchtet dauerhaft rot: Wird normal aufgeladen;
②Leuchtet dauerhaft grün: Vollständig geladen; ③
OFF (AUS): Ausnahme beim Aufladen.
Dies sind die Ladestatusanzeigen für die Ladestation:
①Leuchtet dauerhaft rot: Funktioniert
ordnungsgemäß; ②AUS (OFF): Funktioniert nicht.
4. Wenn der Akku vollständig geladen ist, nehmen Sie
den Akku aus der Ladestation.
5. Richten Sie die Führung des Akkus mit dem Gerät aus
und führen Sie den Akku in das Akkufach ein, bis er
einrastet.
Führung
6. Greifen Sie den Ringzuggriff und drehen Sie ihn, um
den Akku zu verriegeln.
Benutzerhandbuch
Rechtliche Informationen
Haftungsausschluss
DIESE BEDIENUNGSANLEITUNG UND DAS BESCHRIEBENE
PRODUKT MIT SEINER HARDWARE, SOFTWARE UND
FIRMWARE WERDEN, SOWEIT GESETZLICH ZULÄSSIG, IN
DER „VORLIEGENDEN FORM“ UND MIT „ALLEN FEHLERN
UND IRRTÜMERN“ BEREITGESTELLT. HIKMICRO GIBT
KEINE GARANTIEN, WEDER AUSDRÜCKLICH NOCH
STILLSCHWEIGEND, EINSCHLIEßLICH, ABER OHNE DARAUF
BESCHRÄNKT ZU SEIN, MARKTGÄNGIGKEIT,
ZUFRIEDENSTELLENDE QUALITÄT ODER EIGNUNG FÜR
EINEN BESTIMMTEN ZWECK. DIE NUTZUNG DES
PRODUKTS DURCH SIE ERFOLGT AUF IHRE EIGENE
GEFAHR. IN KEINEM FALL IST HIKMICRO IHNEN
GEGENÜBER HAFTBAR FÜR BESONDERE, ZUFÄLLIGE,
DIREKTE ODER INDIREKTE SCHÄDEN, EINSCHLIEßLICH,
ABER OHNE DARAUF BESCHRÄNKT ZU SEIN, VERLUST VON
GESCHÄFTSGEWINNEN, GESCHÄFTSUNTERBRECHUNG,
DATENVERLUST, SYSTEMBESCHÄDIGUNG, VERLUST VON
DOKUMENTATIONEN, SEI ES AUFGRUND VON
VERTRAGSBRUCH, UNERLAUBTER HANDLUNG
(EINSCHLIEßLICH FAHRLÄSSIGKEIT), PRODUKTHAFTUNG
ODER ANDERWEITIG, IN VERBINDUNG MIT DER
VERWENDUNG DIESES PRODUKTS, SELBST WENN
HIKMICRO ÜBER DIE MÖGLICHKEIT DERARTIGER SCHÄDEN
ODER VERLUSTE INFORMIERT WAR.
SIE ERKENNEN AN, DASS DIE NATUR DES INTERNETS
DAMIT VERBUNDENE SICHERHEITSRISIKEN BEINHALTET.
HIKMICRO ÜBERNIMMT KEINE VERANTWORTUNG FÜR
ANORMALEN BETRIEB, DATENVERLUST ODER ANDERE
SCHÄDEN, DIE SICH AUS CYBERANGRIFFEN,
HACKERANGRIFFEN, VIRUSINFEKTION ODER ANDEREN
SICHERHEITSRISIKEN IM INTERNET ERGEBEN. HIKMICRO
WIRD JEDOCH BEI BEDARF ZEITNAH TECHNISCHEN
SUPPORT LEISTEN.
SIE STIMMEN ZU, DIESES PRODUKT IN
ÜBEREINSTIMMUNG MIT ALLEN GELTENDEN GESETZEN ZU
VERWENDEN, UND SIE SIND ALLEIN DAFÜR
VERANTWORTLICH, DASS IHRE VERWENDUNG GEGEN
KEINE GELTENDEN GESETZE VERSTÖßT. INSBESONDERE
SIND SIE DAFÜR VERANTWORTLICH, DIESES PRODUKT SO
ZU VERWENDEN, DASS DIE RECHTE DRITTER NICHT
VERLETZT WERDEN, EINSCHLIESSLICH, ABER NICHT
BESCHRÄNKT AUF VERÖFFENTLICHUNGSRECHTE, DIE
RECHTE AN GEISTIGEM EIGENTUM ODER DEN
DATENSCHUTZ UND ANDERE PERSÖNLICHKEITSRECHTE.
SIE DÜRFEN DIESES PRODUKT NICHT FÜR VERBOTENE
ENDANWENDUNGEN VERWENDEN, EINSCHLIESSLICH DER

9
ENTWICKLUNG ODER HERSTELLUNG VON
MASSENVERNICHTUNGSWAFFEN, DER ENTWICKLUNG
ODER HERSTELLUNG CHEMISCHER ODER BIOLOGISCHER
WAFFEN, JEGLICHER AKTIVITÄTEN IM ZUSAMMENHANG
MIT EINEM NUKLEAREN SPRENGKÖRPER ODER
UNSICHEREN NUKLEAREN BRENNSTOFFKREISLAUF BZW.
ZUR UNTERSTÜTZUNG VON
MENSCHENRECHTSVERLETZUNGEN.
IM FALL VON WIDERSPRÜCHEN ZWISCHEN DIESER
BEDIENUNGSANLEITUNG UND GELTENDEM RECHT IST
LETZTERES MASSGEBLICH.
Behördliche Informationen
Diese Bestimmungen gelten nur für Produkte, die das
entsprechende Zeichen oder die entsprechenden
Informationen tragen.
EU/UK-Konformitätserklärung
Dieses Produkt und – gegebenenfalls – das
mitgelieferte Zubehör tragen das „CE“-
Kennzeichen und entsprechen daher den geltenden
harmonisierten europäischen Normen, die in der
Richtlinie 2014/30/EU (EMV), der Richtlinie 2014/35/EU
(NSR), der Richtlinie 2011/65/EU (RoHS) und der
Richtlinie 2014/53/EU (RED) aufgeführt sind.
Frequenzbänder und Leistung (für CE)
Dies sind die für das folgende Funkgerät geltenden
Frequenzbänder und die nominalen Grenzwerte für die
Sendeleistung (gestrahlt und/oder leitungsgeführt):
WLAN 2,4 GHz (2,4 Ghz bis 2,4835 GHz) 20 dBm
Bluetooth 2,4 GHz (2,4 bis 2,4835 GHz) 20 dBm
Verwenden Sie bei einem Gerät ohne mitgeliefertes
Netzteil nur ein Netzteil von einem zugelassenen
Hersteller. Detaillierte Angaben zum Strombedarf finden
Sie in der Produktspezifikation.
Verwenden Sie bei einem Gerät ohne mitgelieferte
Batterien nur Batterien/Akkus von einem zugelassen
Hersteller. Detaillierte Angaben zu den Batterie-/Akku-
Anforderungen finden Sie in der Produktspezifikation.
Warnung: Dies ist ein Produkt der Klasse A. In einer
Wohnumgebung kann dieses Produkt Funkstörungen
verursachen, die möglicherweise vom Benutzer durch
geeignete Maßnahmen zu beseitigen sind.
Richtlinie 2012/19/EU (WEEE-Richtlinie):
Produkte, die mit diesem Symbol
gekennzeichnet sind, dürfen innerhalb der
Europäischen Union nicht mit dem Hausmüll
entsorgt werden. Für korrektes Recycling geben Sie
dieses Produkt an Ihren örtlichen Fachhändler zurück
oder entsorgen Sie es an einer der Sammelstellen.
Weitere Informationen finden Sie unter:
www.recyclethis.info.
Richtlinie 2006/66/EC und ihre Änderung
2013/56/EU (Akkurichtlinie): Dieses Produkt
enthält einen Akku, der innerhalb der
Europäischen Union nicht mit dem Hausmüll entsorgt
werden darf. Siehe Produktdokumentation für
spezifische Hinweise zu Akkus oder Batterien. Der Akku
ist mit diesem Symbol gekennzeichnet, das zusätzlich
die Buchstaben Cd für Cadmium, Pb für Blei oder Hg für
Quecksilber enthalten kann. Für korrektes Recycling
geben Sie die Akkus/Batterien an Ihren örtlichen
Fachhändler zurück oder entsorgen Sie sie an einer der
Sammelstellen. Weitere Informationen finden Sie unter:
www.recyclethis.info.
Sicherheitshinweis
Bitte lesen Sie alle Sicherheitshinweise sorgfältig durch,
bevor Sie das Gerät in Betrieb nehmen.
Diese Anleitungen sollen gewährleisten, dass Sie das
Produkt korrekt verwenden, um Gefahren oder
Sachschäden zu vermeiden.
Gesetze und Vorschriften
● Die Verwendung des Produkts muss in strikter
Übereinstimmung mit den örtlichen Vorschriften zur
elektrischen Sicherheit erfolgen.
Transportwesen
● Bewahren Sie das Gerät beim Transport in der
ursprünglichen oder einer vergleichbaren Verpackung
auf.
● Bewahren Sie das gesamte Verpackungsmaterial nach
dem Auspacken für zukünftigen Gebrauch auf. Im Falle
eines Fehlers müssen Sie das Gerät in der
Originalverpackung an das Werk zurücksenden. Beim
Transport ohne Originalverpackung kann das Gerät
beschädigt werden und wir übernehmen keine
Verantwortung.
● Lassen Sie das Produkt nicht fallen und vermeiden Sie
heftige Stöße. Halten Sie das Gerät von magnetischen
Störungen fern.
Spannungsversorgung
● Die Eingangsspannung muss einer Schaltung für
begrenzte Leistungsaufnahme (5 V DC, 2 A) gemäß der
Norm IEC61010-1 entsprechen. Siehe technische Daten
für detaillierte Informationen.
● Stellen Sie sicher, dass der Stecker richtig in der
Steckdose steckt.
● Verbinden Sie NICHT mehrere Geräte mit einem
Netzteil, da es andernfalls durch Überlastung zu einer
Überhitzung oder einem Brand kommen kann.
● Verwenden Sie bei einem Gerät ohne mitgeliefertes
Netzteil nur ein Netzteil von einem zugelassenen
Hersteller. Detaillierte Angaben zum Strombedarf
finden Sie in der Produktspezifikation.
Akku
● Wenn der Akku unsachgemäß verwendet oder
ausgetauscht wird, besteht möglicherweise
Explosionsgefahr. Tauschen Sie stets gegen den
gleichen oder äquivalenten Typ aus. Der Akkutyp ist
HM-AHB02-3754. Entsorgen Sie verbrauchte Akkus
entsprechend den Anweisungen des Akkuherstellers.
● Laden Sie keine anderen Akkutypen mit dem
mitgelieferten Ladegerät auf. Stellen Sie sicher, dass
sich während des Ladevorgangs im Umkreis von 2 m um
das Ladegerät kein brennbares Material befindet.
● Achten Sie bei langfristiger Lagerung des Akkus darauf,
dass er alle sechs Monate vollständig geladen wird, um
seine Lebensdauer zu gewährleisten. Anderenfalls kann
es zu Schäden kommen.
● Lagern Sie den Akku NICHT in unmittelbarer Nähe einer
Wärme- oder Feuerquelle. Keinem direkten Sonnenlicht
aussetzen.
● Den Akku NICHT verschlucken, es besteht
Verätzungsgefahr.
● Bewahren Sie den Akku NICHT in der Reichweite von
Kindern auf.
● ACHTUNG: Bei Austausch der Batterie durch einen
falschen Typ besteht Explosionsgefahr.

10
● Batterien nicht durch Verbrennen, in einem heißen
Ofen oder Zerkleinern oder Zerschneiden entsorgen.
Das kann zu einer Explosion führen.
● Setzen Sie Batterien keinem extrem niedrigen Luftdruck
aus. Das kann zu einer Explosion oder zum Auslaufen
von entflammbarer Flüssigkeit oder Gas führen.
● Wenn das Gerät ausgeschaltet und der RTC-Akku
vollständig geladen ist, können die Zeiteinstellungen 90
Tage lang gespeichert werden.
● Schalten Sie bei der ersten Verwendung das Gerät ein
und laden Sie den RTC-Akku und den Lithium-Akku
mindestens 10 Stunden lang auf.
● Der Akku hat eine Spannung von 3,7 V und eine
Kapazität von 5400 mAh.
Wartung
● Falls das Produkt nicht einwandfrei funktionieren sollte,
wenden Sie sich an Ihren Händler oder den
nächstgelegenen Kundendienst. Wir übernehmen keine
Haftung für Probleme, die durch nicht Reparatur- oder
Instandhaltungsarbeiten von nicht autorisierten Dritten
verursacht werden.
● Wischen Sie das Gerät bei Bedarf sanft mit einem
sauberen Tuch und einer geringen Menge Ethanol ab.
● Wenn das Gerät nicht bestimmungsgemäß gebraucht
wird, kann der durch das Gerät bereitgestellte Schutz
beeinträchtigt werden.
● Beachten Sie bitte, dass die Stromgrenze des USB 3.0
PowerShare-Anschlusses je nach PC-Marke variieren
kann. Dies kann Kompatibilitätsprobleme verursachen.
Verwenden Sie daher einen normalen USB 3.0- oder
USB 2.0-Anschluss, wenn der PC das USB-Gerät über
den USB 3.0 PowerShare-Anschluss nicht erkennt.
● Ihre Kamera führt in regelmäßigen Abständen eine
Selbstkalibrierung durch, um Bildqualität und
Messgenauigkeit zu optimieren. Bei diesem Vorgang
wird stoppt das Bild kurz und Sie hören einen
„Klickton“, wenn sich ein Verschluss vor dem Detektor
bewegt. Die Selbstkalibrierung erfolgt häufiger
während des Einschaltens bzw. in sehr kalten oder
heißen Umgebungen. Dies ist ein normaler Vorgang,
um die optimale Leistung Ihrer Kamera zu erzielen.
Einsatzumgebung
● Setzen Sie das Gerät NICHT extrem heißen, kalten,
staubigen, korrosiven, salzhaltigen, alkalischen oder
feuchten Umgebungen aus. Achten Sie darauf, dass die
Betriebsumgebung den Anforderungen des Geräts
entspricht. Die Betriebstemperatur des Geräts beträgt -
20 °C bis +60 °C und die Betriebsluftfeuchtigkeit darf
höchstens 95 % betragen.
● Stellen Sie das Gerät an einem kühlen und gut
belüfteten Ort auf.
● Setzen Sie das Gerät KEINER hohen
elektromagnetischen Strahlung oder staubigen
Umgebungen aus.
● Richten Sie das Objektiv NICHT auf die Sonne oder eine
andere helle Lichtquelle.
● Achten Sie bei Verwendung eines Lasergeräts darauf,
dass das Objektiv des Geräts nicht dem Laserstrahl
ausgesetzt wird. Andernfalls könnte es durchbrennen.
● Das Gerät ist zur Verwendung in Innenräumen
bestimmt.
● Der Verschmutzungsgrad beträgt 2.
● Die Schutzklasse ist IP67.
Kalibrierungsdienst
● Wir empfehlen Ihnen, das Gerät einmal im Jahr zur
Kalibrierung einzusenden. Wenden Sie sich bitte an
Ihren Händler vor Ort, um Informationen zu den
Wartungspunkten zu erhalten. Weitere Informationen
über Kalibrierungsdienste finden Sie unter
https://www.hikmicrotech.com/en/support/calibration
-service.html.
Technischer Support
● https://www.hikmicrotech.com/en/contact-us.html
hilft Ihnen als HIKMICRO-Kunde, Ihre HIKMICRO-
Produkte optimal zu nutzen. Über dieses Portal haben
Sie Zugang zu unserem Support-Team, zu Software und
Dokumentation, zu Servicekontakten usw.
Notruf
● Sollten sich Rauch, Gerüche oder Geräusche in dem
Gerät entwickeln, so schalten Sie es unverzüglich aus
und ziehen Sie den Netzstecker. Wenden Sie sich dann
an den Kundendienst.
Anschrift des Herstellers
Raum 313, Einheit B, Gebäude 2, 399 Danfeng-Straße,
Gemarkung Xixing, Stadtbezirk Binjiang, Hangzhou,
Zhejiang 310052, China
Hangzhou Microimage Software Co., Ltd.
RECHTLICHER HINWEIS: Die Produkte der
Wärmebildkamera-Serie unterliegen unter Umständen in
verschiedenen Ländern oder Regionen Exportkontrollen,
wie zum Beispiel in den Vereinigten Staaten, der
Europäischen Union, dem Vereinigten Königreich und/oder
anderen Mitgliedsländern des Wassenaar-Abkommens.
Bitte informieren Sie sich bei Ihrem Rechtsexperten oder
bei den örtlichen Behörden über die erforderlichen
Exportlizenzen, wenn Sie beabsichtigen, die Produkte der
Wärmebildkamera-Serie in verschiedene Länder zu
transferieren, zu exportieren oder zu reexportieren.
Français
1. Brève description
La caméra thermique anti-incendie est une caméra
thermique robuste, compacte et de haute qualité, conçue
pour permettre aux inspecteurs de voir dans l'obscurité
totale et dans la fumée, ce qui contribue à sauver des vies,
à protéger les biens et à assurer la sécurité des inspecteurs.
Différents modes d'image permettent de faire face à la
plupart des scénarios.
Vous pouvez afficher la vue en direct et prendre des
instantanés à l'aide de HIKMICRO Viewer sur votre
téléphone. Il est également possible d’analyser les images
hors ligne, de générer et de partager un rapport à l’aide de
l’application. Scannez les codes QR sur la couverture pour
télécharger l’application.
Vous pouvez télécharger HIKMICRO
Analyzer(https://www.hikmicrotech.com/en/industrial-
products/hikmicro-analyzer-software.html) pour analyser
de manière professionnelle des images hors ligne et générer
un rapport sous le format personnalisé sur votre ordinateur.
HIKMICRO Viewer pour
Android
HIKMICRO Viewer pour iOS

11
2. Apparence (page 1 – A)
Les apparences peuvent varier en fonction des différents
modèles. Veuillez vous référer au produit réel.
2.1 Composant et interface
N°
Composant
Fonction
1
Écran
Affiche l’interface de la vue
en temps réel.
2
Touches
Pour le fonctionnement de
l'appareil.
3
Points de
montage du
cordon
Montez le cordon pour un
transport facile.
4
Cache de
l’interface
Protégez les interfaces. Le
cache de l'interface est
protégé par un couvercle en
plastique au dessus.
5
Poignée à
anneau pour
l'interface
Tournez pour verrouiller et
déverrouiller le cache de
l'interface.
6
Indicateur de
chargement
Rouge fixe : chargement
normal.
Vert fixe : chargement
complet.
Vert et rouge clignotants :
Anomalie de charge.
7
Interface USB
de type C
Rechargez l’appareil ou
exportez des fichiers à l’aide
d’un câble USB type A à
type C.
8
Logement de
carte SIM
Réservé.
9
Points de
montage de la
bride de cou
Montez la bride de cou.
10
Batterie
Alimentez l'appareil.
11
Poignée à
anneau pour la
batterie
Tournez pour verrouiller et
déverrouiller la batterie.
12
Objectif
thermique
Observer l’image thermique.
13
Contacts de
charge
Réservé.
14
Fixation pour
trépied
Permet de monter un
trépied.
15
Gâchette
Vue en direct:
Appuyez sur la gâchette pour
prendre des instantanés.
Dans le menu Mode :
Appuyez sur la gâchette pour
parcourir les options de bas
en haut.
2.2 Boutons
Touche
Description
Fonction
Bouton
d’alimentation
Maintenir enfoncée pour
allumer/éteindre l’appareil.
Dans le menu Mode :
Appuyez pour quitter le
menu ou revenir au menu
précédent.
Bouton de
mode
Vue en direct:
Appuyez pour changer de
mode d'image.
Dans le menu Mode :
Appuyez pour parcourir les
options de haut en bas.
Bouton de
zoom avant
Vue en direct:
Appuyez pour changer de
niveaux de zoom en avant.
Dans le menu Mode :
Appuyez pour ajouter de la
valeur lors du réglage des
paramètres ou pour
activer/désactiver des
fonctions.
Remarque : Appuyez sur et sur simultanément
pour accéder au menu.
3. Fixez la bride de cou et les cordons
(page 2)
Fixez la bride de cou et le cordon rétractable pour faciliter
le transport et éviter les chutes accidentelles.
3.1 Bride de cou (Page 2 – B)
3.2 Cordons (Page 2 – C)
Remarque : ①Cordon ; ②Cordon rétractable.
4. Chargement de l’appareil
Veuillez charger l’appareil lorsque la batterie est faible.
Lors de la première charge, allumez l'appareil et chargez-le
pendant 3 heures jusqu'à ce qu'il fasse le plein de batterie.
L’horloge de l’appareil peut revenir à l’heure par défaut si
l’appareil n’est pas complètement chargé.
Remarque :
La batterie intégrée qui alimente l’horloge en temps
réel (RTC) de l’appareil peut se décharger en cas de
transport ou de stockage de longue durée. Si la batterie
rechargeable est retirée de l'appareil pendant une
longue période, il est recommandé de recharger la
batterie RTC pendant 10 heures pour garantir le bon
fonctionnement de l'horloge de l'appareil.
Pour charger complètement la batterie RTC, les
conditions suivantes doivent être remplies :
a) Les batterie rechargeables au lithium doivent être
installées dans l'appareil.
b) L’appareil doit pouvoir fonctionner pendant plus
de 8 heures avant de s’éteindre.
4.1 Chargement de l'appareil par le port de type C
Procédure
1. Repliez le couvercle en plastique.
2. Saisissez la poignée à anneau de l'interface et tournez-
la pour la déverrouiller, puis retirez le couvercle de
l'interface.

12
3. Connectez le câble USB-A vers USB-C et rechargez
l’appareil.
4. Mettez le couvercle de l'interface en place, et saisissez
le poignée annulaire de l'interface et tournez-le pour
verrouiller le couvercle de l'interface.
5. Remettez le couvercle en plastique au dessus.
4.2 Chargement de l'appareil via une station de
recharge
Procédure :
1. Retirez la pile de l'appareil.
1) Saisissez le poignée annulaire de la pile et tournez-
le de 90 ° pour déverrouiller la batterie.
2) Retirez la batterie du compartiment de batterie.
2. Connectez la station de recharge à l'alimentation
électrique à l'aide de l'adaptateur électrique de la
station de recharge fournie.
3. Insérez la batterie dans la station de recharge. Vous
pouvez voir l'état de charge grâce aux voyants.
Voyants de
charge pour
les batteries
Voyant de la
station de charge
Remarque :
La tension d'entrée de la station de recharge doit être
conforme au circuit d'énergie limité (12 VDC, 2 A).
Les indicateurs de charge de l'état de la batterie sont :
①Rouge fixe : Charge normale; ②Vert fixe : Charge
complète ; ③ DÉSACTIVÉE : Anomalie de charge.
Les états des indicateurs de la station de recharge sont :
①Rouge fixe : Fonctionnement normal ; ②DÉSACTIVÉ :
Ne fonctionne pas.
4. Lorsque la batterie est complètement chargée,
retirez-la de la station de recharge.
5. Alignez la partie striée de la batterie sur l'encoche de
l'appareil et poussez la batterie dans son
compartiment jusqu'à ce qu'elle soit en position
verrouillée.
Partie nervurée
6. Saisissez le poignée à anneau et tournez-le pour
verrouiller la batterie.
Manuel d’utilisation
Informations légales
Clause d’exclusion de responsabilité
DANS LES LIMITES AUTORISÉES PAR LA LOI EN VIGUEUR,
LE PRÉSENT MANUEL ET LE PRODUIT DÉCRIT, AINSI QUE
SON MATÉRIEL, SES LOGICIELS ET SES MICROLOGICIELS,
SONT FOURNIS « EN L’ÉTAT » ET « AVEC CES FAIBLESSES
ET ERREURS ». HIKMICRO NE FAIT AUCUNE GARANTIE,
EXPLICITE OU IMPLICITE, Y COMPRIS, MAIS SANS S’Y
LIMITER, DE QUALITÉ MARCHANDE, DE QUALITÉ
SATISFAISANTE, OU D’ADÉQUATION À UN USAGE
PARTICULIER. VOUS UTILISEZ LE PRODUIT À VOS PROPRES
RISQUES. EN AUCUN CAS, HIKMICRO NE SERA TENU
RESPONSABLE DE TOUT DOMMAGE SPÉCIAL,
CONSÉCUTIF, ACCESSOIRE OU INDIRECT, Y COMPRIS,
ENTRE AUTRES, LES DOMMAGES RELATIFS À LA PERTE DE
PROFITS D’ENTREPRISE, À L’INTERRUPTION D’ACTIVITÉS
COMMERCIALES, OU LA PERTE DES DONNÉES, LA
CORRUPTION DES SYSTÈMES, OU LA PERTE DES
DOCUMENTS, S’ILS SONT BASÉS SUR UNE VIOLATION DE
CONTRAT, UNE FAUTE (Y COMPRIS LA NÉGLIGENCE), LA
RESPONSABILITÉ EN MATIÈRE DE PRODUITS, OU AUTRE,
EN RAPPORT AVEC L’UTILISATION DU PRODUIT, MÊME SI
HIKMICRO A ÉTÉ INFORMÉ DE LA POSSIBILITÉ D’UN TEL
DOMMAGE OU D’UNE TELLE PERTE.
VOUS RECONNAISSEZ QUE LA NATURE D’INTERNET EST
SOURCE DE RISQUES DE SÉCURITÉ INHÉRENTS, ET
HIKMICRO SE DÉGAGE DE TOUTE RESPONSABILITÉ EN CAS
DE FONCTIONNEMENT ANORMAL, DIVULGATION
D’INFORMATIONS CONFIDENTIELLES OU AUTRES
DOMMAGES DÉCOULANT D’UNE CYBERATTAQUE, D’UN
PIRATAGE INFORMATIQUE, D’UNE INFECTION PAR DES
VIRUS, OU AUTRES RISQUES DE SÉCURITÉ LIÉS À
INTERNET ; TOUTEFOIS, HIKMICRO FOURNIRA UNE
ASSISTANCE TECHNIQUE DANS LES DÉLAIS SI NÉCESSAIRE.
VOUS ACCEPTEZ D’UTILISER CE PRODUIT
CONFORMÉMENT À L’ENSEMBLE DES LOIS EN VIGUEUR. IL
EST DE VOTRE RESPONSABILITÉ EXCLUSIVE DE VEILLER À
CE QUE VOTRE UTILISATION SOIT CONFORME À LA LOI
APPLICABLE. IL VOUS APPARTIENT SURTOUT D’UTILISER CE
PRODUIT D’UNE MANIÈRE QUI NE PORTE PAS ATTEINTE
AUX DROITS DE TIERS, Y COMPRIS, MAIS SANS S’Y
LIMITER, LES DROITS DE PUBLICITÉ, LES DROITS DE
PROPRIÉTÉ INTELLECTUELLE, OU LA PROTECTION DES
DONNÉES ET D’AUTRES DROITS À LA VIE PRIVÉE. VOUS NE
DEVEZ PAS UTILISER CE PRODUIT POUR TOUTE
UTILISATION FINALE INTERDITE, NOTAMMENT LA MISE AU
POINT OU LA PRODUCTION D’ARMES DE DESTRUCTION
MASSIVE, LA MISE AU POINT OU LA FABRICATION
D’ARMES CHIMIQUES OU BIOLOGIQUES, LES ACTIVITÉS
DANS LE CONTEXTE LIÉ AUX EXPLOSIFS NUCLÉAIRES OU
AU CYCLE DU COMBUSTIBLE NUCLÉAIRE DANGEREUX, OU
SOUTENANT LES VIOLATIONS DES DROITS DE L’HOMME.
EN CAS DE CONFLIT ENTRE CE MANUEL ET LES LOIS EN
VIGUEUR, CES DERNIÈRES PRÉVALENT.
Réglementation

13
Ces clauses ne s’appliquent qu’aux produits portant la
marque ou l’information correspondante.
Déclaration de conformité UE/RU
Ce produit et, le cas échéant, les accessoires
qui l’accompagnent, sont estampillés « CE » et
sont donc conformes aux normes européennes
harmonisées en vigueur répertoriées sous la
Directive 2014/30/UE (EMCD), la Directive 2014/35/UE
(LVD), la Directive 2011/65/UE (RoHS) et la
Directive 2014/53/UE.
Bandes de fréquence et puissance (pour la CE)
Les bandes de fréquence et les limites nominales de la
puissance de transmission (rayonnée et/ou conduite)
applicables aux équipements radio suivants sont les
suivantes :
Wi-Fi 2,4 GHz (2,4 GHz à 2,4835 GHz) : 20 dBm
Bluetooth 2,4 GHz (2,4 GHz à 2,4835 Ghz) : 20 dBm
Pour les appareils sans adaptateur d’alimentation offert,
utilisez l’adaptateur d’alimentation fourni par un
fabricant qualifié. Reportez-vous aux spécifications du
produit pour les dispositions nécessaires et détaillées en
matière d’alimentation.
Pour les appareils sans batterie offerte, utilisez la
batterie fournie par un fabricant qualifié. Reportez-vous
aux spécifications du produit pour les détails concernant
la pile.
Avertissement : Il s’agit d’un produit de classe A. Dans
un environnement domestique, ce produit peut
provoquer des interférences radio, auquel cas
l’utilisateur peut être amené à prendre des mesures
adéquates.
Directive 2012/19/UE (directive DEEE) : dans
l’Union européenne, les produits portant ce
pictogramme ne doivent pas être déposés dans
une décharge municipale où le tri des déchets
n’est pas pratiqué. Pour un recyclage adéquat, remettez
ce produit à votre revendeur lors de l’achat d’un nouvel
équipement équivalent, ou déposez-le dans un lieu de
collecte prévu à cet effet. Pour de plus amples
informations, visitez le site Web : www.recyclethis.info.
Directive 2006/66/CE et son
amendement 2013/56/UE (directive sur les
batteries) : ce produit renferme une pile qui ne
doit pas être déposée dans une décharge municipale où
le tri des déchets n’est pas pratiqué, dans l’Union
européenne. Pour plus de précisions sur la pile,
reportez-vous à sa documentation. La pile porte le
pictogramme ci-contre, qui peut inclure la mention Cd
(cadmium), Pb (plomb) ou Hg (mercure). Pour la
recycler correctement, renvoyez-la à votre revendeur
ou déposez-la dans un point de collecte prévu à cet
effet. Pour de plus amples informations, visitez le site
Web : www.recyclethis.info.
Consignes de sécurité
Veuillez lire soigneusement toutes les consignes de
sécurité avant d’utiliser l’appareil.
L’objectif de ces instructions est de garantir que
l’utilisateur soit en mesure d’utiliser correctement le
produit sans danger ou dommage aux biens.
Lois et réglementations
● L’appareil doit être strictement utilisé conformément à
la réglementation locale en matière de sécurité
électrique.
Transport
● Gardez l’appareil dans son emballage d’origine ou dans
un emballage similaire lors de son transport.
● Veuillez conserver l’emballage de l’appareil pour toute
utilisation ultérieure. En cas de panne, vous devrez
renvoyer l’appareil à l’usine dans son emballage
d’origine. Le transport de l’appareil sans son emballage
d’origine peut l’endommager, et l’entreprise se dégage
de toute responsabilité dans ce cas.
● Ne pas faire tomber le produit ou le soumettre à un
choc physique. Éloigner l’appareil d’interférences
magnétiques.
Alimentation électrique
● La tension d’entrée doit être conforme à celle d’un
circuit à énergie limitée (5 V CC, 2 A) selon la
norme CEI 61010-1. Veuillez vous référer aux
caractéristiques techniques pour des informations
détaillées.
● Vérifiez que la prise est correctement branchée à la
prise électrique.
● Pour éviter tout risque de surchauffe ou d’incendie dû à
une surcharge, ne reliez PAS plusieurs appareils à un
seul adaptateur d’alimentation.
● Pour les appareils sans adaptateur d’alimentation
offert, utilisez l’adaptateur d’alimentation fourni par un
fabricant qualifié. Reportez-vous aux spécifications du
produit pour les dispositions nécessaires et détaillées
en matière d’alimentation.
Batterie
● Une utilisation ou un remplacement inapprorié de la
pile/des batteries peut entraîner un risque d’explosion.
Remplacez-les uniquement par une pile/des batteries
identiques ou de type équivalent. Le type de batterie
est HM-AHB02-3 754. Éliminez les piles/batteries usées
conformément aux instructions fournies par leur
fabricant.
● Ne chargez pas d’autres types de batteries avec le
chargeur fourni. Pendant la recharge des batteries,
vérifiez qu’il n’y a aucun matériau inflammable à moins
de 2 m du chargeur.
● En cas de stockage à long terme de la pile, assurez-vous
qu’elle est complètement chargée tous les six mois afin
d’en conserver la qualité. Dans le cas contraire, elle
pourrait se détériorer.
● NE placez PAS la pile à proximité d’une source de
chaleur ou de feu. Ne l’exposez pas à la lumière directe
du soleil.
● N’avalez PAS la pile pour éviter les risques de brûlures
chimiques.
● NE laissez PAS la batterie à portée des enfants.
● ATTENTION : Il y a un risque d’explosion lorsque la
batterie est remplacée par une batterie de type
incorrect.
● Ne jetez pas une pile au feu ou dans un four chaud, ni
ne broyez mécaniquement ou découpez une pile, car
cela pourrait engendrer une explosion.

14
● N’exposez pas une pile à des pressions atmosphériques
extrêmement basses, car vous encourez un risque
d’explosion ou une fuite de liquide ou de gaz
inflammable.
● Lorsque l'appareil est éteint et que la batterie RTC est
complètement chargée, les réglages de l'heure peuvent
être conservés pendant 90 jours.
● À la première utilisation, allumez l’appareil et chargez la
batterie RTC au lithium pendant plus de 10 heures.
● La tension de la batterie est de 3,7 V et sa capacité est
de 5 400 mAh.
Maintenance
● Si le produit ne fonctionne pas correctement, contactez
votre revendeur ou le centre de service le plus proche.
Nous n’assumerons aucune responsabilité concernant
les problèmes causés par une réparation ou une
opération de maintenance non autorisée.
● Essuyez délicatement l’appareil à l’aide d’un chiffon
propre imbibé d’une petite quantité d’éthanol, si
nécessaire.
● Si l’appareil n’est pas utilisé conformément aux
indications du fabricant, le dispositif de protection
fourni par l’appareil peut être compromis.
● Sachez que la limite actuelle du port USB 3.0
PowerShare peut varier selon la marque de
l’ordinateur. C’est pourquoi un problème
d’incompatibilité peut survenir. Par conséquent, il est
conseillé d’utiliser un port USB 3.0 ou USB 2.0 standard
si le périphérique USB n’est pas reconnu par le PC via le
port USB 3.0 PowerShare.
● Votre caméra effectue automatiquement et
régulièrement un étalonnage pour optimiser la qualité
des images et la précision des mesures. Pendant cette
opération, l’image s’interrompt brièvement et vous
entendez un déclic lorsque l’obturateur s’ouvre devant
le détecteur. L’étalonnage automatique est plus
fréquent au démarrage ou dans des environnements
très froid ou chaud. Ce comportement est normal et
permet de garantir des performances optimales de
votre caméra.
Environnement d’exploitation
● N’exposez PAS l’appareil à des environnements
extrêmement chauds, froids, poussiéreux, corrosifs,
salins-alcalins ou humides. Assurez-vous que
l’environnement d’exploitation répond aux exigences
de l’appareil. La température de fonctionnement doit
être comprise entre -20 °C et 60 °C (-4 °F à 140 °F) et
l'humidité de fonctionnement doit être inférieure à
95 %.
● Placez l’appareil dans un endroit sec et bien aéré.
● N’exposez PAS l’appareil à de puissants rayonnements
électromagnétiques ou à des environnements
poussiéreux.
● N’orientez PAS l’objectif vers le soleil ou toute autre
source de lumière vive.
● Pendant l’utilisation de tout équipement générant un
laser, veillez à ce que l’objectif de l’appareil ne soit pas
exposé au faisceau laser, car il pourrait brûler.
● L’appareil est destiné à un usage en intérieur.
● Le degré de pollution est de 2.
● Le niveau de protection est de IP67.
Services d’étalonnage
● Nous vous recommandons de renvoyer l’appareil pour
étalonnage une fois par an. Veuillez également contacter
le revendeur local pour obtenir des informations sur
les points d’entretien. Pour des services d’étalonnage
plus détaillés, veuillez visiter le site Internet
https://www.hikmicrotech.com/en/support/calibration
-service.html.
Assistance technique
● Le portail https://www.hikmicrotech.com/en/contact-
us.html vous aidera en tant que client HIKMICRO à tirer
le meilleur de vos produits HIKMICRO. Depuis le portail,
accédez à notre équipe d’assistance, à des logiciels et
de la documentation, à des contacts en rapport avec le
support, etc.
Urgence
● Si de la fumée, des odeurs ou du bruit s’échappent de
l’appareil, mettez immédiatement l’appareil hors
tension et débranchez le câble d’alimentation, puis
contactez un centre de réparation.
Adresse de fabrication
Logement 313, Unité B, Bâtiment 2, 399 Danfeng Road,
Sous-district de Xixing, District de Binjiang, Hangzhou,
Zhejiang 310052, Chine
Hangzhou Microimage Software Co., Ltd.
AVIS DE CONFORMITÉ : il est possible que les produits de
la série thermique soient soumis à des contrôles
d’exportation dans divers pays ou diverses régions, ce qui
inclut, sans s’y limiter, les États-Unis, l’Union européenne,
le Royaume-Uni ou d’autres pays membres de
l’Arrangement de Wassenaar. Veuillez consulter votre
expert professionnel en questions juridiques ou en
conformité ou les autorités de votre gouvernement local
pour toute exigence de permis d’exportation si vous
prévoyez de transférer, d’exporter ou de réexporter des
produits de la série thermique entre différents pays.
Español
1. Descripción breve
La cámara térmica contra incendios es una cámara de
imágenes resistente, compacta y de alta calidad, diseñada
para que los inspectores puedan ver en total oscuridad y
cuando hay humo, para ayudar a salvar vidas, proteger la
propiedad y mantenerse seguros. Hay diferentes modos
de imagen para adaptarse a la mayoría de las situaciones.
Puede ver en directo y capturar instantáneas a través de
HIKMICRO Viewer en su teléfono. También puede analizar
imágenes sin conexión, generar y compartir informes a
través de la aplicación. Escanee los códigos QR de la
portada para descargar la aplicación.
Puede descargar HIKMICRO Analyzer
(https://www.hikmicrotech.com/en/industrial-
products/hikmicro-analyzer-software.html) para analizar
las imágenes profesionalmente con el dispositivo
desconectado y generar un informe con formato
personalizado en su ordenador.
HIKMICRO Viewer Android
HIKMICRO Viewer iOS
2. Apariencia (Página 1 – A)
El aspecto puede variar con los diferentes modelos.
Seleccione el tipo del producto real como referencia.

15
2.1 Componente e interfaz
Núm.
Componente
Función
1
Pantalla
Muestra la interfaz de
visualización en directo.
2
Botones
Para hacer funcionar el
dispositivo.
3
Punto de
montaje del
cordón de
seguridad
Monte el cordón de
seguridad para facilitar su
transporte.
4
Tapa de
conexiones
Proteja las interfaces. La tapa
de conexiones está protegida
por una tapa de goma en la
parte superior.
5
Mango de
anilla para la
interfaz
Gírelo para bloquear y
desbloquear la cubierta de la
interfaz.
6
Indicador de
carga
Rojo fijo: Carga normal.
Verde fijo: carga completa.
Rojo y verde intermitente:
Excepción de carga.
7
Interfaz USB
tipo C
Utilice el cable USB de tipo A
a tipo C para cargar el
dispositivo o exportar
archivos.
8
Ranura de la
tarjeta SIM
Reservados.
9
Puntos de
montaje de la
correa de
cuello
Coloque la correa de cuello.
10
Batería
Suministre energía al
dispositivo.
11
Mango de
anilla para la
batería
Gírelo para bloquear y
desbloquear la batería
12
Lente térmica
Ver la imagen térmica.
13
Contactos de
carga
Reservados.
14
Soporte para
trípode
Coloque el trípode.
15
Activador
Vista en directo:
Presione el gatillo para
capturar instantáneas.
Modo menú:
Apriete el gatillo para
navegar por las opciones de
abajo a arriba.
2.2 Botones
Botón
Descripción
Función
Botón de
encendido
Manténgalo pulsado para
encender o apagar el
dispositivo.
Modo menú:
Pulse para salir del menú o
volver al menú anterior.
Botón de
modo
Vista en directo:
Púlselo para alternar entre los
modos de imagen.
Modo menú:
Púlselo para navegar por las
opciones de arriba a abajo.
Botón de
ampliación
Vista en directo:
Púlselo para cambiar los
niveles de zoom.
Modo menú:
Púlselo para añadir valor al
ajustar parámetros o activar y
desactivar funciones.
Nota: Pulse y al mismo tiempo para entrar
en el menú.
3. Coloque la correa de cuello y los
cordones de seguridad (página 2)
Coloque la correa de cuello y el cordón retráctil para
facilitar su transporte y evitar caídas accidentales.
3.1 Correa de cuello (página 2 - B)
3.2 Cordones de seguridad (página 2 - C)
Nota: ①Cordón de seguridad; ②Cordón retráctil.
4. Cargar el dispositivo
Cargue el dispositivo cuando la batería esté baja. Para la
primera carga, encienda el dispositivo y cárguelo durante
3 horas hasta que esté completamente cargado. El reloj
del dispositivo podría recuperar la hora predeterminada
de fábrica si el dispositivo no se carga completamente.
Nota:
La batería integrada que alimenta el reloj en tiempo
real (RTC) del dispositivo se puede agotar en periodos
largos de almacenamiento o transporte. Si se retira la
batería recargable del dispositivo durante mucho
tiempo, se recomienda recargar la batería RTC durante
10 horas para garantizar el buen funcionamiento del
reloj del dispositivo.
Para cargar completamente la batería del reloj en
tiempo real, se debe cumplir con los siguientes
requisitos:
a) La batería de litio recargable se debe instalar en el
dispositivo.
b) El dispositivo debería seguir funcionando durante
más de 8 horas antes de apagarse.
4.1 Cargar el dispositivo con la interfaz Tipo-C
Pasos
1. Doble hacia arriba la tapa de goma.
2. Agarre el mango de anilla de la interfaz y gírelo para
desbloquearlo, y extraiga la tapa de conexiones.

16
3. Conecte el cable USB de tipo A a tipo C y cargue el
dispositivo.
4. Coloque la tapa de conexiones correctamente y agarre
el mango de anilla de la interfaz, y gírelo para
bloquear la tapa de conexiones.
5. Vuelva a colocar la tapa de goma en la parte superior.
4.2 Carga del dispositivo con la base de carga
Pasos:
1. Retire la batería del dispositivo.
1) Agarre el mango de anilla de la batería y gírelo 90°
para desbloquearla.
2) Extraiga la batería del compartimento de batería.
2. Conecte la base de carga a la red eléctrica con el
adaptador de corriente que se suministra con la base
de carga.
3. Inserte la batería en la base de carga. Puede ver el
estado de carga mediante los indicadores.
Indicadores
de carga de
las baterías
Indicador de la
base de carga
Nota:
La tensión de entrada de la base de carga debe cumplir
el circuito de energía limitada (12 V CC, 2 A).
Los indicadores de carga de los estados de las baterías
son los siguientes: ①Rojo fijo: Carga normal; ②Verde
fijo: Totalmente cargado; ③ Apagado: Excepción de
carga.
Los indicadores de carga de los estados de la base son
los siguientes: ①Rojo fijo: Funcionamiento correcto;
②Apagado: No está funcionando.
4. Cuando la batería esté completamente cargada,
retírela de la base de carga.
5. Alinee la pieza estriada de la batería con la muesca del
dispositivo e introduzca la batería en el
compartimento hasta que quede en posición de
bloqueo.
Pieza acanalada
6. Agarre el mango de anilla y gírelo para bloquear la
batería.
Manual de usuario
Información legal
Descargo de responsabilidad
EN LA MEDIDA MÁXIMA PERMITIDA POR LAS LEYES
APLICABLES, ESTE MANUAL Y EL PRODUCTO DESCRITO —
INCLUIDOS SU HARDWARE, SOFTWARE Y FIRMWARE— SE
SUMINISTRAN «TAL CUAL» Y «CON TODOS SU FALLOS Y
ERRORES». HIKMICRO NO OFRECE GARANTÍAS, EXPLÍCITAS
O IMPLÍCITAS, INCLUIDAS, A MODO MERAMENTE
ENUNCIATIVO MAS NO LIMITATIVO, AQUELLAS DE
COMERCIABILIDAD, CALIDAD SATISFACTORIA O
IDONEIDAD PARA UN PROPÓSITO EN PARTICULAR. EL USO
QUE HAGA DEL PRODUCTO CORRE BAJO SU ÚNICO
RIESGO. EN NINGÚN CASO, HIKMICRO PODRÁ
CONSIDERARSE RESPONSABLE ANTE USTED DE NINGÚN
DAÑO ESPECIAL, CONSECUENTE, INCIDENTAL O
INDIRECTO, INCLUYENDO, ENTRE OTROS, DAÑOS POR
PÉRDIDAS DE BENEFICIOS COMERCIALES, INTERRUPCIÓN
DE LA ACTIVIDAD COMERCIAL, PÉRDIDA DE DATOS,
CORRUPCIÓN DE LOS SISTEMAS O PÉRDIDA DE
DOCUMENTACIÓN, YA SEA POR INCUMPLIMIENTO DEL
CONTRATO, AGRAVIO (INCLUYENDO NEGLIGENCIA),
RESPONSABILIDAD DEL PRODUCTO O EN RELACIÓN CON
EL USO DEL PRODUCTO, INCLUSO CUANDO HIKMICRO
HAYA RECIBIDO UNA NOTIFICACIÓN DE LA POSIBILIDAD
DE DICHOS DAÑOS O PÉRDIDAS.
USTED RECONOCE QUE LA NATURALEZA DE INTERNET
IMPLICA RIESGOS DE SEGURIDAD INHERENTES Y QUE
HIKMICRO NO TENDRÁ NINGUNA RESPONSABILIDAD POR
NINGÚN FUNCIONAMIENTO ANORMAL, FILTRACIONES DE
PRIVACIDAD U OTROS DAÑOS RESULTANTES DE ATAQUES
CIBERNÉTICOS, ATAQUES DE PIRATAS INFORMÁTICOS,
INFECCIONES DE VIRUS U OTROS RIESGOS DE SEGURIDAD
PROPIOS DE INTERNET; NO OBSTANTE, HIKMICRO
PROPORCIONARÁ EL APOYO TÉCNICO OPORTUNO DE SER
NECESARIO.
USTED ACEPTA USAR ESTE PRODUCTO DE CONFORMIDAD
CON TODAS LAS LEYES APLICABLES Y SOLO USTED ES EL
ÚNICO RESPONSABLE DE ASEGURAR QUE EL USO CUMPLA
CON DICHAS LEYES. EN ESPECIAL, USTED ES RESPONSABLE
DE USAR ESTE PRODUCTO DE FORMA QUE NO INFRINJA
LOS DERECHOS DE TERCEROS, INCLUYENDO, A MODO
ENUNCIATIVO, DERECHOS DE PUBLICIDAD, DERECHOS DE
PROPIEDAD INTELECTUAL, DERECHOS RELATIVOS A LA
PROTECCIÓN DE DATOS Y OTROS DERECHOS RELATIVOS A
LA PRIVACIDAD. NO UTILIZARÁ ESTE PRODUCTO PARA
NINGÚN USO FINAL PROHIBIDO, INCLUYENDO EL
DESARROLLO O LA PRODUCCIÓN DE ARMAS DE
DESTRUCCIÓN MASIVA, EL DESARROLLO O PRODUCCIÓN
DE ARMAS QUÍMICAS O BIOLÓGICAS, NINGUNA
ACTIVIDAD EN EL CONTEXTO RELACIONADO CON ALGÚN
EXPLOSIVO NUCLEAR O EL CICLO DE COMBUSTIBLE
NUCLEAR INSEGURO O EN APOYO DE ABUSOS DE LOS
DERECHOS HUMANOS.
EN CASO DE HABER CONFLICTO ENTRE ESTE MANUAL Y LA
LEGISLACIÓN VIGENTE, ESTA ÚLTIMA PREVALECERÁ.

17
Información normativa
Estas cláusulas solo se aplican a los productos que
lleven la marca o la información correspondiente.
Declaración de cumplimiento normativo de la UE/RU
Este producto, así como los accesorios
suministrados (si procede), llevan la marca
«CE» y, por lo tanto, cumplen con las normativas
europeas armonizadas aplicables que se enumeran en la
Directiva 2014/30/UE (CEM), la Directiva 2014/35/UE
(baja tensión), la Directiva 2011/65/UE (RoHS) y la
Directiva 2014/53/UE.
Bandas de frecuencia y potencia (para la CE)
Las bandas de frecuencia y los límites nominales de
potencia de transmisión (radiada o conducida)
aplicables a los siguientes equipos de radio son:
Wi-Fi a 2,4 GHz (2,4 GHz - 2,4835 GHz): 20 dBm
Bluetooth 2,4 GHz (2,4 GHz a 2,4835 GHz): 20 dBm
En el caso de los dispositivos suministrados sin
adaptador de corriente, utilice un adaptador de
corriente de un fabricante cualificado. Consulte las
especificaciones técnicas del producto para conocer los
requisitos eléctricos detallados.
En el caso de los dispositivos suministrados sin batería,
utilice una batería de un fabricante cualificado. Consulte
las especificaciones técnicas del producto para conocer
los requisitos detallados de la batería.
Advertencia: Este es un producto de clase A. En un
entorno doméstico este producto puede ocasionar
interferencias radio, en cuyo caso es posible que sea el
usuario el responsable de adoptar las medidas
adecuadas.
Directiva 2012/19/UE (directiva RAEE): En la
Unión Europea, los productos marcados con
este símbolo no pueden ser desechados en el
sistema de basura municipal sin recogida
selectiva. Para un reciclaje adecuado, entregue este
producto en el lugar de compra del equipo nuevo
equivalente o deshágase de él en el punto de recogida
designado a tal efecto. Para más información visite:
www.recyclethis.info.
Directiva 2006/66/CE y su enmienda
2013/56/UE (directiva sobre baterías): Este
producto lleva una batería que no puede ser
desechada en el sistema municipal de basuras sin
recogida selectiva dentro de la Unión Europea. Consulte
la documentación del producto para ver la información
específica de la batería. La batería lleva marcado este
símbolo, que incluye unas letras indicando si contiene
cadmio (Cd), plomo (Pb), o mercurio (Hg). Para un
reciclaje adecuado, entregue la batería a su vendedor o
llévela al punto de recogida de basuras designado a tal
efecto. Para más información visite:
www.recyclethis.info.
Instrucciones de seguridad
Lea detenidamente toda la información de seguridad
antes de usar el dispositivo.
Estas instrucciones están destinadas a garantizar que el
usuario pueda utilizar el producto correctamente para
evitar peligros o pérdidas materiales.
Leyes y normativas
● El uso del producto ha de cumplir estrictamente con las
normas de seguridad eléctrica locales.
Transporte
● Guarde el dispositivo en su paquete original o en uno
similar cuando lo transporte.
● Guarde el embalaje para uso futuro. En el caso de que
ocurra algún fallo, deberá devolver el dispositivo a la
fábrica con el envoltorio original. En caso de transporte
sin el envoltorio original podría resultar en daños en el
dispositivo y la empresa no se hará responsable.
● No deje caer el producto ni lo someta a impactos
físicos. Mantenga el dispositivo alejado de
interferencias magnéticas.
Fuente de alimentación
● La tensión de entrada debe cumplir con el límite del
circuito de alimentación (5 Vcc, 2 A) según el estándar
IEC61010-1. Consulte las especificaciones técnicas para
obtener información detallada.
● Asegúrese de que el enchufe esté correctamente
conectado a la toma de corriente.
● NO conecte múltiples dispositivos a un mismo
adaptador de corriente, para evitar el
sobrecalentamiento y los riesgos de incendio por
sobrecarga.
● En el caso de los dispositivos suministrados sin
adaptador de corriente, utilice un adaptador de
corriente de un fabricante cualificado. Consulte las
especificaciones técnicas del producto para conocer los
requisitos eléctricos detallados.
Batería
● El uso o sustitución inadecuados de la batería pueden
ser un riesgo de explosión. Cámbiela únicamente por
otra del mismo tipo o equivalente. El tipo de batería es
HM-AHB02-3754. Deshágase de las baterías usadas
conforme a las instrucciones proporcionadas por el
fabricante de la batería.
● No cargue otros tipos de baterías con el cargador
suministrado. Confirme que no haya material inflamable
a menos de 2 m del cargador durante la carga.
● Para almacenar la batería durante un periodo
prolongado, compruebe que esté completamente
cargada cada medio año para garantizar la calidad de la
misma. De lo contrario, podrían ocurrir daños.
● NO coloque la batería cerca de fuentes de calor o de
fuego. Evite la luz directa del sol.
● NO se trague la batería para evitar quemaduras
químicas.
● NO deje la batería al alcance de los niños.
● PRECAUCIÓN: Riesgo de explosión si se reemplaza la
batería por otra de tipo incorrecto.
● No arroje la batería al fuego ni la meta en un horno
caliente, ni intente aplastar o cortar mecánicamente la
batería, ya que podría explotar.
● No permita que la batería quede expuesta a una
presión de aire extremadamente baja, ya que podría
explotar o tener fugas de líquido electrolítico o gas
inflamable.
● Cuando el dispositivo esté apagado y la batería RTC
esté llena, los ajustes de tiempo se podrán guardar
durante 90 días.
● En el primer uso, encienda el dispositivo y cargue la
batería RTC con la batería de litio durante más de
10 horas.
● La tensión de la batería es de 3,7 V y la capacidad de la
batería es de 5400 mAh.

18
Mantenimiento
● Si el producto no funciona correctamente, por favor,
póngase en contacto con su distribuidor o con el centro
de servicio técnico más próximo. No nos haremos
responsables de los problemas derivados de una
reparación o mantenimiento no autorizados.
● Limpie suavemente el dispositivo con una gamuza
limpia con una pequeña cantidad de etanol, si fuese
necesario.
● Si el dispositivo no se utiliza de la forma especificada
por el fabricante, la protección que este ofrece podría
verse mermada.
● Tenga en cuenta que el límite real del puerto USB 3.0
PowerShare puede variar según la marca del
ordenador, lo que podría causar problemas de
incompatibilidad. Por ello, se aconseja utilizar un
puerto USB 3.0 o USB 2.0 común si el ordenador no
reconoce el dispositivo USB a través del puerto USB 3.0
PowerShare.
● La cámara realizará periódicamente una autocalibración
para optimizar la calidad de la imagen y la precisión de
las mediciones. Durante este proceso, la imagen se
detendrá brevemente y se oirá un «clic» cuando el
obturador se mueva delante del detector. La
autocalibración será más frecuente durante el arranque
o en ambientes muy fríos o calientes. Se trata de un
proceso normal para garantizar un rendimiento óptimo
de la cámara.
Entorno de uso
● NO exponga el dispositivo a entornos excesivamente
cálidos, fríos, con polvo, corrosivos, salinos-alcalinos o
húmedos. Compruebe que el entorno de uso se adapte
a los requisitos del dispositivo. La temperatura de
funcionamiento estará entre -20 °C y 60 °C (-4 °F y
140 °F), y la humedad relativa será inferior al 95 %.
● Coloque el dispositivo en un entorno seco y con buena
ventilación.
● NO exponga el dispositivo a radiaciones
electromagnéticas o entornos polvorientos.
● NO oriente la lente hacia el sol ni a otras luces
brillantes.
● Cuando utilice equipos láser, asegúrese de que el
objetivo del dispositivo no quede expuesto al rayo láser
ya que podría quemarse.
● El dispositivo es apto para uso en interiores
únicamente.
● El grado de contaminación es 2.
● El nivel de protección es IP67.
Servicio de calibración
● Le recomendamos llevar el dispositivo para su
calibración una vez al año. Póngase en contacto con su
distribuidor local para obtener información sobre el
mantenimiento. Para obtener más información sobre
los servicios de calibración, consulte
https://www.hikmicrotech.com/en/support/calibration
-service.html.
Soporte técnico
● https://www.hikmicrotech.com/en/contact-us.html le
ayudará como cliente de HIKMICRO a sacar el máximo
partido de sus productos HIKMICRO. El sitio le ofrece
acceso a nuestro equipo de soporte, software y
documentación, contactos de servicio, etc.
Emergencia
● Si hay presencia de humo, olores o ruidos procedentes
del dispositivo, apague la alimentación
inmediatamente, desenchufe el cable de alimentación y
contacte con el servicio técnico.
Dirección de fabricación
Habitación 313, Unidad B, Edificio 2, Carretera de Danfeng
399, Subdistrito de Xixing, Distrito de Binjiang, Hangzhou,
Zhejiang 310052, China
Hangzhou Microimage Software Co., Ltd.
AVISO DE CONFORMIDAD: Los productos de las series
térmicas podrían estar sujetos a controles de exportación
en algunos países o regiones; entre ellos, por ejemplo, los
Estados Unidos, la Unión Europea, el Reino Unido y/o otros
países miembros del Arreglo de Wassenaar. Consulte con
algún experto en cumplimiento normativo y legal o con las
autoridades gubernamentales locales para cumplir con los
requisitos de licencia de exportación necesarios si desea
transferir, exportar o reexportar los productos de las series
térmicas entre distintos países.
Português
1. Breve descrição
A câmara térmica de combate a incêndios é uma câmara
termográfica resistente, compacta e de alta qualidade
concebida para os inspetores conseguirem ver na
escuridão total e no meio de fumo, ajudando a salvar
vidas, a proteger propriedades e a manter a segurança dos
inspetores. Vários modos de imagem consoante a maior
parte dos cenários.
Pode ver a visualização em direto e capturar instantâneos
através do HIKMICRO Viewer no seu telemóvel. Também
pode analisar imagens offline, gerar e partilhar um
relatório através da aplicação. Leia os códigos QR na
tampa para transferir a aplicação.
Pode transferir o HIKMICRO Analyzer
(https://www.hikmicrotech.com/en/industrial-
products/hikmicro-analyzer-software.html) para analisar
profissionalmente imagens offline e gerar um relatório
com um formato personalizado no seu PC.
HIKMICRO Viewer Android
HIKMICRO Viewer iOS
2. Aspeto (Página 1 – A)
As características podem variar consoante os diferentes
modelos. Tenha o produto real como referência.
2.1 Componentes e interface
N.º
Componente
Função
1
Ecrã
Apresentar a interface de
visualização em direto.
2
Botões
Para utilizar o dispositivo.
3
Pontos de
montagem do
cordão
Montar o cordão para
facilitar o transporte.
4
Tampa da
interface
Para proteger as interfaces. A
tampa da interface é
protegida através de uma
tampa de borracha por cima.
Seite wird geladen ...
Seite wird geladen ...
Seite wird geladen ...
Seite wird geladen ...
Seite wird geladen ...
Seite wird geladen ...
Seite wird geladen ...
Seite wird geladen ...
Seite wird geladen ...
Seite wird geladen ...
Seite wird geladen ...
Seite wird geladen ...
Seite wird geladen ...
Seite wird geladen ...
Seite wird geladen ...
Seite wird geladen ...
Seite wird geladen ...
Seite wird geladen ...
Seite wird geladen ...
Seite wird geladen ...
Seite wird geladen ...
Seite wird geladen ...
Seite wird geladen ...
Seite wird geladen ...
Seite wird geladen ...
Seite wird geladen ...
Seite wird geladen ...
Seite wird geladen ...
Seite wird geladen ...
Seite wird geladen ...
Seite wird geladen ...
Seite wird geladen ...
Seite wird geladen ...
Seite wird geladen ...
Seite wird geladen ...
Seite wird geladen ...
Seite wird geladen ...
Seite wird geladen ...
Seite wird geladen ...
Seite wird geladen ...
Seite wird geladen ...
Seite wird geladen ...
Seite wird geladen ...
Seite wird geladen ...
Seite wird geladen ...
Seite wird geladen ...
Seite wird geladen ...
Seite wird geladen ...
Seite wird geladen ...
Seite wird geladen ...
Seite wird geladen ...
Seite wird geladen ...
Seite wird geladen ...
Seite wird geladen ...
Seite wird geladen ...
Seite wird geladen ...
Seite wird geladen ...
Seite wird geladen ...
Seite wird geladen ...
Seite wird geladen ...
Seite wird geladen ...
Seite wird geladen ...
Seite wird geladen ...
Seite wird geladen ...
-
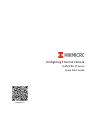 1
1
-
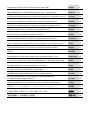 2
2
-
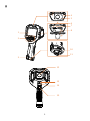 3
3
-
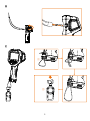 4
4
-
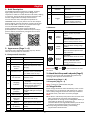 5
5
-
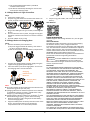 6
6
-
 7
7
-
 8
8
-
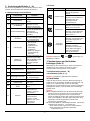 9
9
-
 10
10
-
 11
11
-
 12
12
-
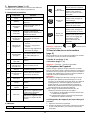 13
13
-
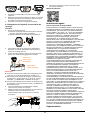 14
14
-
 15
15
-
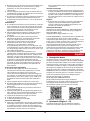 16
16
-
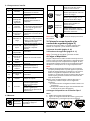 17
17
-
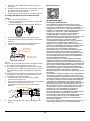 18
18
-
 19
19
-
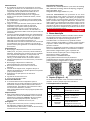 20
20
-
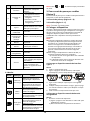 21
21
-
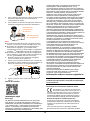 22
22
-
 23
23
-
 24
24
-
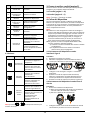 25
25
-
 26
26
-
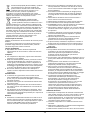 27
27
-
 28
28
-
 29
29
-
 30
30
-
 31
31
-
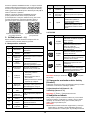 32
32
-
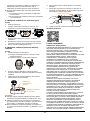 33
33
-
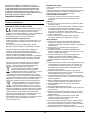 34
34
-
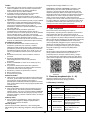 35
35
-
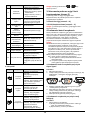 36
36
-
 37
37
-
 38
38
-
 39
39
-
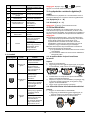 40
40
-
 41
41
-
 42
42
-
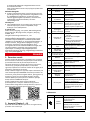 43
43
-
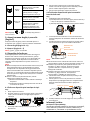 44
44
-
 45
45
-
 46
46
-
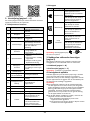 47
47
-
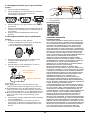 48
48
-
 49
49
-
 50
50
-
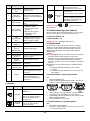 51
51
-
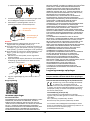 52
52
-
 53
53
-
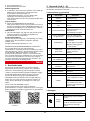 54
54
-
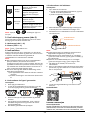 55
55
-
 56
56
-
 57
57
-
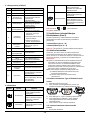 58
58
-
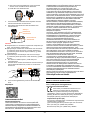 59
59
-
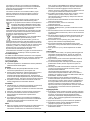 60
60
-
 61
61
-
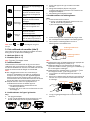 62
62
-
 63
63
-
 64
64
-
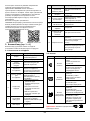 65
65
-
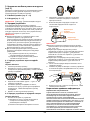 66
66
-
 67
67
-
 68
68
-
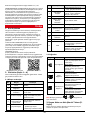 69
69
-
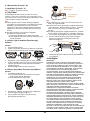 70
70
-
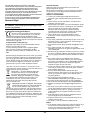 71
71
-
 72
72
-
 73
73
-
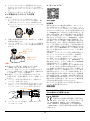 74
74
-
 75
75
-
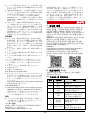 76
76
-
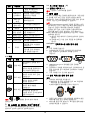 77
77
-
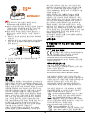 78
78
-
 79
79
-
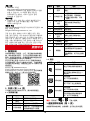 80
80
-
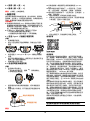 81
81
-
 82
82
-
 83
83
-
 84
84


in anderen Sprachen
Verwandte Artikel
-
HIKMICRO E Series HM-TP30-1AQF-Eco-V Handheld Thermal Camera Benutzerhandbuch
-
 HIKMICRO E1L Benutzerhandbuch
-
HIKMICRO B Series Schnellstartanleitung
-
 HIKMICRO FB series Benutzerhandbuch
-
 HIKMICRO E Series Benutzerhandbuch
-
 HIKMICRO CHEETAH Clip-On Benutzerhandbuch
-
 HIKMICRO CHEETAH Clip-On Benutzerhandbuch
-
 HIKMICRO HEIMDAL Schnellstartanleitung
-
 HIKMICRO Raptor Schnellstartanleitung
-
 HIKMICRO Viewer User Manua


