LIVARNO 112105 Bedienungsanleitung
- Kategorie
- Baby Nachtlichter
- Typ
- Bedienungsanleitung

IAN 112105
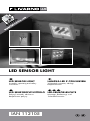
LED SENSOR LIGHT
LED SENSOR LIGHT
Assembly, operating and safety
instructions
LAMPKA LED Z CZUJNIKIEM
Wskazówki montażu, obsługi i
bezpieczeństwa
LED SENZOROVÉ SVÍTIDLO
Pokyny k montáži, obsluze a
bezpečnostní pokyny
LED-SENSORLEUCHTE
Montage-, Bedienungs- und
Sicherheitshinweise

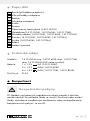
Before reading, unfold both pages containing illustrations and familiarise yourself
with all functions of the device.
Przed przeczytaniem proszę rozłożyć obie strony z ilustracjami, a następnie proszę
zapoznać się z wszystkimi funkcjami urządzenia.
Před čtením si odklopte obě dvě strany s obrázky a potom se seznamte se všemi
funkcemi přístroje.
Klappen Sie vor dem Lesen die beiden Seiten mit den Abbildungen aus und
machen Sie sich anschließend mit allen Funktionen des Gerätes vertraut.
GB Assembly, operating and safety instructions Page 5
PL Wskazówki montażu, obsługi i bezpieczeństwa Strona 15
CZ Pokyny k montáži, obsluze a bezpečnostní pokyny Strana 25
DE / AT / CH Montage-, Bedienungs- und Sicherheitshinweise Seite 35
LAMPKA LED Z CZUJNIKIEM
Wskazówki montażu, obsługi i
bezpieczeństwa

A14101504L
1
2
3
4
56
D
8
9
10
5
E14101604L
1
3
4
5
2
C
7
5
9
B
1
2
13
4
5
6
3
F
1
13
2
4
3
5
G
8
10
9
5
11

H14101706L
1
2
3
4
5
I
1
2
13
4
5
3
J
6 5
K910
11
8
5
N
5
6
12
L14101804L
321 5
4
M
2
3
4
1
13
5

5 GB
Introduction
Intended use ........................................................................ Page 6
Scope of delivery ................................................................ Page 6
Parts description .................................................................. Page 7
Technical Data ....................................................................Page 7
Safety
Safety notices ...................................................................... Page 7
Battery safety information ...................................................Page 8
Preparation
Required tools and material ...............................................Page 9
Inserting / replacing batteries ........................Page 10
Mounting the light ...................................................Page 10
Start-up .............................................................................Page 11
Cleaning and Care ................................................... Page 11
Disposal ............................................................................ Page 11
Information
Warranty .............................................................................Page 12
Service address ................................................................... Page 13
Declaration of conformity ................................................... Page 13
Manufacturer .......................................................................Page 13

6 GB
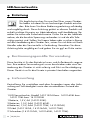
LED Sensor light
Introduction
Congratulations on your new product. You have selected
a high quality product. Please be sure to carefully read
the complete operating instructions. These instructions are
part of the product and contain important information on setup and
handling. Always follow all safety instructions. Before using this prod-
uct for the first time verify the correct voltage and that all parts are
properly installed. Should you have any questions or you are unsure
about operating the product, please contact the dealer or service
centre. Please keep these instructions in a safe place and pass them
on to third parties as applicable.
Intended use
This light is suitable for indoor and outdoor use. Any use other than that
described above or modification to the device is not permitted and
may
lead to damage. This product is intended for private household use only.
Scope of delivery
Check immediately after unpacking that the parts are complete and
that the product is in proper condition.
1 LED Sensor light, model 14101504L or 14101604L or
14101706L or 14101804L
1 battery, 1.5 V, AA (14101504L)
3 batteries, 1.5 V, AAA (14101604L)
6 batteries, 1.5 V, AAA (14101706L, 14101804L)
2 wall plugs (14101504L, 14101604L, 14101706L)
2 screws (14101504L, 14101604L, 14101706L)
2 caps (14101604L, 14101706L)
1 ground stake (14101804L)
1 instructions for assembly and use

7 GB
Parts description
1 Screw (battery compartment)
2 Battery compartment cover
3 Battery
4 Battery compartment
5 Light
6 Sensor
7 Double-sided adhesive tape (14101504L)
8 Wall plugs (14101504L, 14101604L, 14101706L)
9 Mounting plate (14101504L, 14101604L, 14101706L)
10 Screws (14101504L, 14101604L, 14101706L)
11 Caps (14101604L, 14101706L)
12 Ground stake
13 Insulating strip
Technical Data
Model no.: 14101504L or 14101604L or 14101706L or
14101804L (the LEDs cannot be replaced!)
Battery: 1 x 1.5 V , AA (14101504L)
3 x 1.5 V , AAA (14101604L)
6 x 1.5 V , AAA (14101706L, 14101804L)
IP code: IP 54
Safety
Safety notices
Damage due to failure to comply with these operating instructions will
invalidate the warranty! We assume no liability for consequential
damage! We assume no liability for material damage or personal
injury due to improper handling or failure to comply with the safety
instructions!

8 GB
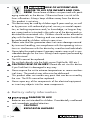
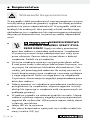
RISK OF ACCIDENT AND
DANGER TO LIFE FOR INFANTS AND CHIL-
DREN! Never leave children unsupervised with pack-
aging materials or the device. Otherwise there is a risk to life
from suffocation. Always keep children away from the device.
This product is not a toy.
This device may be used by children age 8 years and up, as well
as by persons with reduced physical, sensory or mental capaci-
ties, or lacking experience and / or knowledge, so long as they
are supervised or instructed in the safe use of the device and un-
derstand the associated risks. Children should not be allowed to
play with the device. Cleaning and user maintenance should not
be performed by children without supervision.
Please note that the guarantee does not cover damage caused
by incorrect handling, non-compliance with the operating instruc-
tions or interference with the device by unauthorised individuals.
Never take the product apart. Improper repairs may result in con-
siderable danger for the user. Always have repairs performed by
a professional.
The LEDs cannot be replaced.
Do not look directly into the light source (light bulb, LED etc.).
CAUTION! RISK OF INJURY! Please do not use this device
if you find that it is damaged in any way.
Never expose the unit to extreme temperatures or severe mechan-
ical stress. The product may otherwise be deformed.
This product does not contain any parts that can be serviced by
the user. The LEDs cannot be replaced.
Never open any of the components of the electrical equipment
or insert any objects into the same components.
Battery safety information
DANGER TO LIFE!
Batteries are not intended for children. If accidentally swallowed
seek immediate medical attention.
CAUTION!
EXPLOSION HAZARD!

9 GB
Never recharge non-rechargeable batteries and do not short-cir-
cuit and / or open any batteries.
Never throw batteries into fire or water.
Do not exert mechanical loads to batteries.
If the above instructions are not complied with, the batteries may
discharge themselves beyond their end voltage. There is then a
danger of leaking. In the event of a battery leak, immediately
remove it from the device to prevent damage.
Do not let the fluid from a leaking battery come into contact with
your skin, eyes or mucous membranes. In the event of contact
with battery acid, thoroughly flush the affected area with clean
water and seek immediate medical attention.
Avoid extreme environmental conditions and temperatures, e.g.
above radiators, as they may affect batteries.
Remove the batteries from the device if they have not been used
for a long period.
Only use the specified battery type!
When inserting the battery ensure the correct polarity! This is
shown in the battery compartment.
If necessary, clean the battery and device contacts before insert-
ing the battery.
Promptly remove used batteries from the product.
Preparation
Required tools and material
The tools and materials specified are not included. This information and
these values are non-binding and are only provided as a reference.
The nature of the material is determined by the individual local con-
ditions.
- Pencil / marking tool
- Screwdriver
- Electric drill
- Drill bit
- Spirit level

10 GB
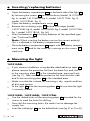
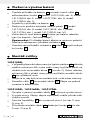
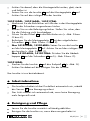
Inserting / replacing batteries
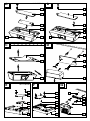
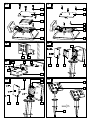
Open the battery compartment
4
on the back side of the light
5
by loosening the screws
1
counterclockwise (model 14101504L:
fig. A, model 14101604L: fig. E, model 14101706L: fig. H,
model 14101804L: fig. L).
Open the battery compartment cover 2.
Remove the insulating strips 13 before first usage (model
14101504L: fig. B, model 14101604L: fig. F, model 14101706L:
fig. I, model 14101804L: fig. M).
Insert the batteries 3. Use only batteries of the specified type
(see “Technical Data”).
Note: When inserting the battery ensure the correct polarity!
This is indicated in the battery compartment 4.
Close the battery compartment 4 again with the battery compart-
ment cover 2 and fix the cover by screwing on the screws 1
clockwise.
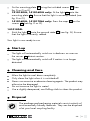
Mounting the light
14101504L
If you choose installation using double-sided adhesive tape 7,
please remove the protective foil from the back first and stick it
to the mounting plate 9 in the intended area, pressing firmly
(see fig. C). Then remove the protective foil from the front side
and fix the mounting plate 9 in the intended area.
Make sure that the surface for mounting is dry, smooth and free
of dust and grease.
Fit the light 5 onto the mounting plate 9. Ensure that the light
is correctly seated.
14101504L, 14101604L, 14101706L
Use the slotted holes of the mounting plate 9 intended for the
screws to mark the holes for drilling.
Now drill the mounting holes. Be careful not to damage the
supply line.
I
nsert the wall plugs
8
into the drilled holes (see fig. D or G or K).

11 GB
Fix the mounting plate 9 using the included screws 10 (see
fig. D or G or K).
14101504L, 14101604L only: Fit the light 5 onto the
mounting plate 9. Ensure that the light is correctly seated (see
fig. D or G).
14101604L, 14101706L only: Press the caps 11 on the
screws 10 (see fig. D or G).
14101804L
Stick the light 5 onto the ground stake 12 (see fig. N). Ensure
that the light is correctly seated.
Your light is now ready to use.
Start-up
The light will automatically switch on in darkness as soon as
the sensor 6 detects motion.
The light will automatically switch off if motion is no longer
detected.
Cleaning and Care
Allow the light to cool down completely.
Only clean the light when it is switched off.
Never use corrosive or abrasive cleaning agents. The product may
otherwise be damaged.
Do not immerse the light in water!
Use a slightly dampened, non-fluffing cloth to clean the product.
Disposal
The package and packaging materials consist entirely of
environmentally friendly materials. They can be disposed
of at your local recycling facility.

12 GB
The symbol of the wheelie bin with the line through it means
that, in the European Union, the product has to be disposed
of in a separate refuse collection. This applies to the prod-
uct and to all components bearing this symbol. Do not dispose of
products bearing this symbol in your normal household waste, but
instead they must be taken for recycling to a collection site for electri-
cal and electronic appliances. Recycling helps to reduce the consump-
tion of raw materials and protects the environment.
Defective or used batteries must be recycled in accordance with
Directive 2006 / 66 / EC. Return batteries and / or the device to the
provided recycling facilities.
Pb
Improper disposal of batteries
can harm the environment!
Never dispose of batteries in your household waste. They may contain
toxic heavy metals and are subject to hazardous waste regulations.
The chemical symbols of the heavy metals are: Cd = cadmium, Hg =
mercury, Pb = lead. Therefore dispose of used batteries through your
local collection site.
Information
Warranty
You receive a 36 month warranty on this product, valid from the date
of purchase. The appliance has been carefully produced under strict
quality control. Within the warranty period we shall rectify without
charge all material and manufacturing defects.
In the event of a defect arising during the warranty period, please
send the device to the listed Service Centre address, making refer-
ence to the following item number: 14101504L or 14101604L or
14101706L or 14101804L.
Wear parts (such as bulbs) and damage caused by improper handling,
non-observance of the operating instructions or unauthorised interfer-
ence are excluded from the warranty. The performance of services
under the warranty does not extend or renew the warranty period.

13 GB
Service address
Briloner Leuchten GmbH
Im Kissen 2
D-59929 Brilon
Germany
Tel.: +49 (0) 29 61 / 97 12–800
Fax: +49 (0) 29 61 / 97 12–199
E-mail: [email protected]
www.briloner.com
IAN 112105
Please have your receipt and the item number (e.g. IAN 12345)
ready as your proof of purchase when enquiring about your product.
Declaration of conformity
This product fulfils the requirements of the applicable European and
national directives (Electromagnetic Compatibility 2004 / 108 / EC,
Low Voltage Directive 2006 / 95 / EC, Ecodesign Directive
2009 / 125 / EC, RoHS Directive 2011 / 65 / EU). Conformity has
been demonstrated. The relevant declarations and documents are
held by the manufacturer.
Manufacturer
Briloner Leuchten GmbH
Im Kissen 2
D-59929 Brilon
Germany

14

15 PL
Instrukcja
Zastosowanie zgodne z przeznaczeniem ..................... Strona 16
Zawartość ......................................................................... Strona 16
Opis części ....................................................................... Strona 17
Dane techniczne .............................................................. Strona 17
Bezpieczeństwo
Wskazówki bezpieczeństwa........................................... Strona 18
Wskazówki bezpieczeństwa dotyczące baterii ............ Strona 19
Przygotowanie
Potrzebne narzędzia imateriały ..................................... Strona 20
Zakładanie / wymiana baterii ................... Strona 20
Montaż lampy .......................................................... Strona 21
Uruchomienie............................................................ Strona 22
Czyszczenie i pielęgnacja ............................... Strona 22
Utylizacja ..................................................................... Strona 22
Informacje
Gwarancja ....................................................................... Strona 23
Adres serwisu ................................................................... Strona 23
Deklaracja zgodności ...................................................... Strona 24
Producent .......................................................................... Strona 24

16 PL
Lampka LED z czujnikiem
Instrukcja
Gratulujemy Państwu zakupu nowego urządzenia. Zdecy-
dowali się Państwo na zakup produktu najwyższej jakości.
Proszę dokładnie przeczytać całą niniejszą instrukcję ob-
sługi. Niniejsza instrukcja obsługi należy do produktu. Zawiera ona
ważne wskazówki dotyczące uruchamiania i posługiwania się pro-
duktem. Zawsze należy przestrzegać wszystkich wskazówek dotyczą-
cych bezpieczeństwa. Przed uruchomieniem proszę sprawdzić, czy
występuje prawidłowe napięcie, i czy wszystkie części są prawidłowo
zamontowane. W przypadku zapytań lub niepewności odnośnie
obchodzenia się z urządzeniem, prosimy o kontakt ze sprzedawcą
lub punktem serwisowym. Proszę starannie przechowywać niniejszą
instrukcję obsługi, a w razie oddania urządzenia osobom trzecim
przekazać ją wraz z nim.
Zastosowanie zgodne z przeznaczeniem
Lampa ta przeznaczona jest do użytku zarówno w pomieszczeniach,
jak i na zewnątrz. Użycie lampy w sposób inny od wyżej opisanego
lub zmiany dokonywane w urządzeniu są niedopuszczalne i prowa-
dzą do uszkodzenia produktu. To urządzenie przewidziano do użytku
w prywatnym gospodarstwie domowym.
Zawartość
Bezpośrednio po wypakowaniu należy sprawdzić, czy zestaw jest
kompletny oraz czy urządzenie znajduje się w nienagannym stanie.
1 Lampka LED z czujnikiem, model 14101504L lub 14101604L
lub 14101706L lub 14101804L
1 bateria, 1,5 V, AA (14101504L)
3 baterie, 1,5 V, AAA (14101604L)
6 baterii, 1,5 V, AAA (14101706L, 14101804L)

17 PL
2 kołki (14101504L, 14101604L, 14101706L)
2 śruby (14101504L, 14101604L, 14101706L)
2 osłony (14101604L, 14101706L)
1 stojak wbijany do ziemi (14101804L)
1 instrukcja montażu i obsługi
Opis części
1 Śruba (komora na baterie)
2 Pokrywa komory na baterie
3 Bateria
4 Komora na baterie
5 Lampa
6 Czujnik
7 Dwustronna taśma samoprzylepna (14101504L)
8 Kołki (14101504L, 14101604L, 14101706L)
9 Płyta montażowa (14101504L, 14101604L, 14101706L)
10 Śruby (14101504L, 14101604L, 14101706L)
11 Osłona (14101604L, 14101706L)
12 Stojak wbijany do ziemi
13 Pasek izolujący
Dane techniczne
Nr modelu: 14101504L lub 14101604L lub 14101706L lub
14101804L (diody LED nie podlegają wymianie)
Bateria: 1 x 1,5 V , AA (14101504L)
3 x 1,5 V , AAA (14101604L)
6 x 1,5 V , AAA (14101706L, 14101804L)
Klasa ochrony: IP 54

18 PL
Bezpieczeństwo
Wskazówki bezpieczeństwa
W przypadku szkód spowodowanych nieprzestrzeganiem niniejszej
instrukcji obsługi prawo do gwarancji wygasa! Za szkody pośrednie
producent nie ponosi odpowiedzialności! W przypadku szkód ma-
terialnych lub osobowych, które powstały wskutek niewłaściwego
obchodzenia się z urządzeniem lub nieprzestrzegania wskazówek
dotyczących bezpieczeństwa, nie ponosimy żadnej odpowiedzial-
ności!
NIEBEZPIECZEŃSTWO
ODNIESIENIA OBRAŻEŃ IUTRATY ŻYCIA
PRZEZ DZIECI! Nigdy nie należy pozostawiać
dzieci bez nadzoru z materiałem opakowania i urządzeniem.
W przeciwnym razie istnieje niebezpieczeństwo utraty życia
przez uduszenie. Zawsze należy trzymać dzieci z dala od
urządzenia. Produkt nie jest zabawką.
Niniejsze urządzenie może być używane przez dzieci od lat
8 oraz przez osoby z obniżonymi zdolnościami fizycznymi, sen-
sorycznymi lub mentalnymi lub brakiem doświadczenia i / lub
wiedzy, jeśli pozostają pod nadzorem lub zostały pouczone w
kwestii bezpiecznego użycia urządzenia i rozumieją wynikające
z niego zagrożenia. Dzieci nie mogą bawić się urządzeniem.
Czyszczenie i konserwacja nie mogą być przeprowadzane przez
dzieci bez nadzoru.
Należy pamiętać, że uszkodzenia spowodowane niewłaściwym
posługiwaniem się urządzeniem, nieprzestrzeganiem instrukcji
obsługi lub ingerencją wurządzenie osób nieuprawnionych nie
podlegają gwarancji.
W żadnym wypadku nie rozbierać produktu na części. Niepra-
widłowo wykonane naprawy mogą być przyczyną poważnych
zagrożeń dla użytkownika. Wykonywanie napraw należy zlecać
wyłącznie specjalistom.
Lampy LED nie są wymienne.
Nie należy bezpośrednio wpatrywać się w źródło światła (ele-
menty świetlne, LED, itp).

19 PL
OSTROŻNIE! NIEBEZPIECZEŃSTWO OBRAŻEŃ CIAŁA!
Urządzenia nie stosować, jeśli posiada on jakiekolwiek uszko-
dzenia.
Nie narażać urządzenia na działanie skrajnych temperatur lub
silnych obciążeń mechanicznych. W przeciwnym razie może
nastąpić zdeformowanie produktu.
Artykuł ten nie zawiera elementów wymagających konserwacji
przez użytkownika. Diod LED nie można wymienić.
Nigdy nie otwierać elementów elektrycznych i nie wkładać do
nich jakichkolwiek przedmiotów.
Wskazówki bezpieczeństwa
dotyczące baterii
ZAGROŻENIE ŻYCIA!
Baterie nie powinny dostać się w ręce dzieci. W przypadku
połknięcia należy natychmiast udać się do lekarza.
OSTROŻNIE!
NIEBEZPIECZEŃSTWO WYBUCHU!
Nie należy ładować baterii nieprzeznaczonych do ponownego
ładowania, nie zwierać biegunów baterii i / lub ich nie otwierać.
Nigdy nie należy wrzucać baterii do ognia lub wody.
Nigdy nie należy narażać baterii na obciążenia mechaniczne.
W przypadku nieprzestrzegania wskazówek baterie mogą zo-
stać rozładowane poza ich napięcie końcowe. Istnieje wówczas
niebezpieczeństwo wycieku. W przypadku wylania baterii na-
tychmiast usunąć je z urządzenia, aby uniknąć uszkodzeń.
Unikać kontaktu ze skórą, oczami ibłonami śluzowymi. W razie
kontaktu z kwasem akumulatorowym, należy natychmiast wypłu-
kać dotknięte miejsce dużą ilością czystej wody i niezwłocznie
udać się do lekarza.
Należy unikać ekstremalnych warunków i temperatur, które mogą
oddziaływać na baterie, np. kaloryferów.
Usunąć baterie z urządzenia, gdy przez dłuższy czas nie były
używane.
Używać wyłącznie zalecanego rodzaju baterii!

20 PL
Podczas wkładania baterii do urządzenia należy zwrócić uwagę
na prawidłowe ułożenie biegunów! Jest ona pokazana w ko-
morze na baterie.
Wrazie potrzeby przed włożeniem baterii oczyścić styki baterii
iurządzenia.
Zużyte baterie należy niezwłocznie wyjąć zurządzenia!
Przygotowanie
Potrzebne narzędzia imateriały
Wymienione narzędzia i materiały nie są częścią zestawu. Są to
jedynie niewiążące informacje i wartości orientacyjne. Właściwości
materiału zależą od warunków w pomieszczeniu.
- ołόwek / narzędzie do oznaczania
- śrubokręt
- wiertarka
- wiertło
- poziomnica
Zakładanie / wymiana baterii
Otworzyć komorę na baterie
4
na odwrotnej stronie lampy
5,
odkręcając śruby 1 w kierunku odwrotnym do ruchu wskazówek
zegara (model 14101504L: rys. A, model 14101604L: rys. E,
model 14101706L: rys. H, model14101804L: rys. L).
Zdjąć pokrywę komory na baterie 2.
Przed pierwszym użyciem usunąć pasek izolujący 13 (model
14101504L: rys. B, model 14101604L: rys. F, model
14101706L: rys. I, model14101804L: rys. M).
Włożyć baterie 3. Należy jedynie stosować baterie podanego
typu (patrz „Dane techniczne“).
Wskazówka: Podczas wkładania baterii należy zwrócić
uwagę na prawidłowe ułożenie biegunów! Jest ona oznako-
wana w komorze na baterie 4.
Seite wird geladen ...
Seite wird geladen ...
Seite wird geladen ...
Seite wird geladen ...
Seite wird geladen ...
Seite wird geladen ...
Seite wird geladen ...
Seite wird geladen ...
Seite wird geladen ...
Seite wird geladen ...
Seite wird geladen ...
Seite wird geladen ...
Seite wird geladen ...
Seite wird geladen ...
Seite wird geladen ...
Seite wird geladen ...
Seite wird geladen ...
Seite wird geladen ...
Seite wird geladen ...
Seite wird geladen ...
Seite wird geladen ...
Seite wird geladen ...
Seite wird geladen ...
Seite wird geladen ...
Seite wird geladen ...
-
 1
1
-
 2
2
-
 3
3
-
 4
4
-
 5
5
-
 6
6
-
 7
7
-
 8
8
-
 9
9
-
 10
10
-
 11
11
-
 12
12
-
 13
13
-
 14
14
-
 15
15
-
 16
16
-
 17
17
-
 18
18
-
 19
19
-
 20
20
-
 21
21
-
 22
22
-
 23
23
-
 24
24
-
 25
25
-
 26
26
-
 27
27
-
 28
28
-
 29
29
-
 30
30
-
 31
31
-
 32
32
-
 33
33
-
 34
34
-
 35
35
-
 36
36
-
 37
37
-
 38
38
-
 39
39
-
 40
40
-
 41
41
-
 42
42
-
 43
43
-
 44
44
-
 45
45


LIVARNO 112105 Bedienungsanleitung
- Kategorie
- Baby Nachtlichter
- Typ
- Bedienungsanleitung
in anderen Sprachen
- English: LIVARNO 112105 Owner's manual
- slovenčina: LIVARNO 112105 Návod na obsluhu
- polski: LIVARNO 112105 Instrukcja obsługi
Verwandte Artikel
-
LIVARNO 321917 Bedienungsanleitung
-
-
-
-
-
-
-
-
-