
Montageanleitung Tischtennistisch
„STOCKHOLM“
Art.-Nr. 7122-500/-700, 7162-500/-700
F
D
GB
NL
Der Umwelt zuliebe: Wir drucken auf 100% Altpapier!

3
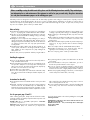
Assembly Instructions
Before assembling or using the table-tennis table, please read the following instructions carefully. They contain impor-
tant information for use and maintenance of the equipment as well as for your personal safety. Keep these instructions
in a safe place for maintenance purposes or for ordering spare parts.
All Kettler products are designed in accordance with the latest safety regulations and undergo a constant process of quality control dur-
ing manufacturing. The knowledge gained in this process is used to constantly improve and develop our products. In order to offer our
customers the very best in product quality, we reserve the right to make technical changes at any time. In spite of this, should you have
any cause for complaint, please contact your Kettler dealer.
GB
Note on Safety
■ The table-tennis table should be used only for its intended pur-
pose, i.e. for playing with suitable table-tennis bats and balls.
■ All other uses are prohibited and may be dangerous. The man-
ufacturer cannot be held liable for damage or injury caused by
improper use of the table.
■ Damaged or worn components may endanger your safety or
shorten the lifespan of the table-tennis table. Replace worn or
damaged components immediately and remove the table from
use until this has been done. Use only spare parts manufac-
tured by Kettler.
■ The table-tennis table complies with all safety regulations. In-
correct repairs, alterations to the design (removal of original
parts, addition of other components etc.) may endanger the
safety of the user.
■ Instruct other persons (in particular children) using the table in
its correct use, and draw their attention to any potential source
of danger, especially when setting up or dismantling the table.
■ When setting up or dismantling the table, stay clear of its fold-
ing radius.
■ When folded up, the table-tennis table presents a large surface
to the wind. For this reason, ensure that it is stored in a shel-
tered position.
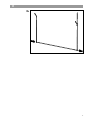
■ The table-tennis table may be pushed only into the transport po-
sition (see p. 16, Fig. 1) because there is otherwise a danger
of injury.
■ The unit complies with the standard DIN 7898-1/10.97.
■ Depending on frequency of use, check all screws, bolts etc.
regularly to ensure that they are in good condition.
■ In case of enquiry, please contact your Kettler dealer.
Handling the equipment
■ Do not use the table-tennis table until it has been fully and cor-
rectly assembled and checked.
■ Ensure that table-tennis tables which are not weatherproof are
not exposed to dampness or rain. Keep them well away from
direct sources of heat. Should the surface become warped, lay
the table on a level surface for a few days.
■ Set the table up on a level surface.
■ Do not cover it with plastic foil, under which condensation may
form. We recommend the weatherproof Kettler tarpaulin, art.
no. 7032.
■ For practising without a partner, the table halves can be fold-
ed up singly.
■ For more information on the sport of table-tennis, you are re-
ferred to the specialist literature on the subject.
■ Do not use corrosive or abrasive materials to clean the equip-
ment. Ensure that such materials are not allowed to pollute the en-
vironment. In most cases, a slightly dampened cloth is sufficient.
■ Please keep original packaging of this article, so that it may be
used for transport at a later date, if necessary
Instructions for Assembly
■ The equipment must be assembled with due care by two adult
persons.
■ Carefully read these mounting instructions before beginning
with the work itself. The individual steps are additionally ex-
plained in the sequenz of figures by means of symbols, in some
cases a text mark indicates that a written explanations is avail-
able. Strictly follow the individual mounting steps to ensure a
safe use and operation of the unit.
■ To ensure that the table-tennis table is properly assembled and
can be safely used, observe the instructions for assembly ex-
actly.
List of spare parts page 18 and 19
When ordering spare parts, always state the full article number,
spare-part number, the quantity required and the inspection num-
ber stamped on the back.
Example order: Art. no. 7122-500 / spare-part no. 94608005
/ 2 pieces / inspection no......
Important: spare part prices do not include fastening material; if
fastening material (bolts, nuts, washers etc.) is required, this
should be clearly stated on the order by adding the words „with
fastening material“.
KETTLER GB Ltd. · Kettler House, Merse Road · North Moons Moat · Red-
ditch, Worcestershire B98 9HL
KETTLER International Inc. · 1355, London Bridge Road · USA-Virginia
Beach, Virginia 23450
www.kettler.net

6
4x M6
2x
2x2x
2x
1x
3x
6x M8x60
6x 3,9x13
2x M6x58
2x
4x
4x
4x M5x65
2x
2x
8x
2x
4x
6x
2x
24x
4x M6x100
6x M6
4x M6x45
2x
4x M6x49
4x
2x
2x
4x
4x
4x
2x
(7162-500/-700)
2x
(7122-500/-700)
2x
2x
2x
4x M8x125
2x
4x
4x M8x110
8x M8
4x M5
10x
ø25
ø16
ø12,5
ø12
4x
5mm
3mm
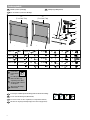
Packungsinhalt
Checklist (contents of packaging)
Liste de vérification (contenu de l’emballage)
Checklijst (verpakkingsinhoud)
GB
F
NL
D
GB
F
NL
Sie benötigen zusätzlich folgendes Werkzeug (Gehört nicht zum Lieferumfang):
You also need the following tools (Not included):
Vous avez besoin de cet util en complément (con compris dans la livraison)
U heeft tevens volgend gereedschap nodig (Is niet in de levering ingesloten):
SW13 SW10
2x 2x 1x 1x
nur für wetter-
feste Tischtennis-
tische
for weatherproof
table-tennis tables only
uniquement pour les tables
de tennis de table résistantes
aux intempéries
alleen voor weerbestendige
tafeltennistafels
4x
GB
D
F
NL

7
Messhilfe für Verschraubungsmaterial
Measuring help for screw connections
Gabarit pour système de serrage
Meethulp voor schroefmateriaal
GB
F
NL

8
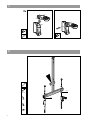
2
2x
M8x125
4x ø16
2x ø25
ø25
2x M8
ø25
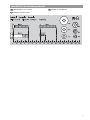
1
2x

9
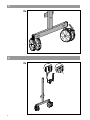
3
4
2x
2x
1x
M8x110
4x ø16
1x M8
1x
M8x110
4x ø16
1x M8

10
6
2x
5
2x

11
8
7162-500
nur für wetter-
feste Tischtennis-
tische
for weatherproof
table-tennis tables only
uniquement pour les tables
de tennis de table résistantes
aux intempéries
alleen voor weerbestendige
tafeltennistafels
2x
GB
D
F
NL
!
2x
7
A
A
B
2x
M6x45
2x
3mm
2x

12
10
2x
M8x60
2x ø25
2x
9
2x
2x
M5x65
2x ø12
2x M5
2x M6

13
11
2x

14
13
2x
2x
5mm
12
2x
M8x60
2x ø25
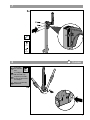
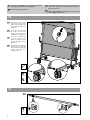
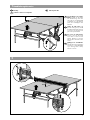
Sichern Sie die Plattenhälfte für die folgenden Montageschritte
unbedingt gegen Abrutschen und/oder Umkippen!
Ensure that it cannot slip or tilt over.
Il est absolument nécessaire de sécuriser les plateaux pour les
opérations de montage qui suivront, afin qu’ils ne puissent ni
glisser ni se renverser.
Blokkeer deze bladhelft voor het volgende deel van de montage
tegen wegglijden en/of kantelen.
GB
D
F
NL
Die Streben des Stützbü-
gels müssen hierbei ein we-
nig zur Seite gebogen wer-
den; gehen Sie hierbei vor-
sichtig vor!
To do this, the braces for
the frame must be bent
slightly to the side. Proceed
with care when doing this.
Pour cela les jambes de
forces du cadre porteur
doivent être pliées un peu
de côté; pratiquer là avec
précaution.
De stangen van het draag-
frame moeten hierbij aan
de kant enigszins gebogen
worden; ga bierbij voor-
zichtig te werk!
GB
D
F
NL

15
15
2x
M6x49
2x ø12,5
2x M6
A
A
B
14
1x
M6x58
2x
M6x100
2x ø12,5
2x
2x
1x M6
B
A
2x

16
A
B
C
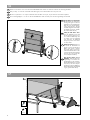
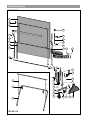
Herunterklappen der Plattenhälf-
ten: Drücken Sie die linke Kippsi-
cherung und legen Sie den Fest-
stellknebel um. Anschließend die
Platte mit einer Hand festhalten,
rechte Kippsicherung drücken
und Platte langsam herunterklap-
pen (Platte unter keinen Umstän-
den einfach fallen lassen!).
Folding the table halves down:
press the left-hand tip lock and
turn the locking toggle into posi-
tion. Hold the table firmly with
one hand, press the right-hand
lock and lower the table-half
slowly into position. Never allow
it to drop down!
Rabattre les plateaux: appuyer sur
la sécurité de basculement de
gauche et inverser la manette de
fixation. Tenir ensuite le plateau
d’une main, appuyer sur la sécuri-
té de basculement de droite et lais-
ser descendre lentement le plateau
(en aucun cas on ne pourra le lais-
ser tout simplement tomber ).
Naar beneden klappen van de
bladhelften: druk de linker kiep-
vergrendeling in en haal de ver-
grendelingsknop naar beneden.
Houd het blad dan met een hand
vast, druk op de rechter kiepver-
grendeling en klap het blad lang-
zaam naar beneden (laat het blad
in geen geval zomaar vallen!).
GB
D
F
NL
17
3x
3,9x13
2x
16
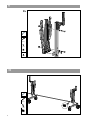
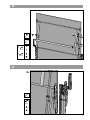
Führen Sie die Schritte 11 bis 15 für die zweite Plattenhälfte durch. Denken Sie auch hier wieder an die Sicherung der Platte!
Carry out steps 11-15 for the second half of the table. Again, ensure that the table cannot slip or tilt over!
Effectuer les opérations 11 à 15 pour la deuxième moitié de table. Là non plus, ne pas oublier la sécurisation du plateau.
Voer de montagestappen 11 tot 15 voor de tweede bladhelft uit. Denk ook hierbij weer aan de vergrendeling van het blad!
GB
D
F
NL

17
2
15cm
A
B
1
Handhabungshinweise
Handling
Indications relatives à la manipulation
Bedieningsinstrukties
GB
F
NL
Zum Hochklappen der Platten-
hälften: Drücken Sie den Hebel
der Standsicherung nach oben
und heben Sie die Plattenhälfte
an. Behalten Sie in der Anfangs-
phase des Hochklappens den
Druck bei.
Folding the table halves up:
press the locking lever up and lift
the table half upwards. Continue
to press the lever during the first
part of the upward motion.
Pour relever les demi-plateaux:
pousser le levier de la sécurité
vers le haut et soulever le demi-
plateau. Maintenir la pression
dans la phase initiale du redres-
sement.
Opklappen van de bladhelften:
druk de linker kiepvergrendeling
naar boven en til de bladhelften
op. In het begin dient u hierbij
druk uit te oefenen.
GB
D
F
NL

18
Ersatzteilzeichnung
21
22
9
32
15
34
26
4
2
1
4
5
14
24
3
30
13
18
17
27
6
163534
19
25
28
8
2
10
5
7
12 11
29
20
31
7
33
7162-500/-700
7122-500/-700

19
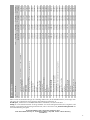
Ersatzteilliste
1 TT-Platte (BITTE UNBEDINGT ARTIKEL-NUMMER DES TT-TISCHES ANGEBEN!) 2 94130000 94130048 94130003 94130058
2 Fußgestell mit Ovalstopfen 2 94110775 94110775 94110795 94110795
3 Ovalstopfen 4 10100062 10100062 10100062 10100062
4 Lagerböckchen 4 94110257 94110257 – –
4 Lagerböckchen 8 – – 10128024 10128024
5 Stützbügel mit Rohrverbindern 2 94110778 94110778 94110794 94110794
6 T-Stück (kpl. mit Stopfen für 40x25mm und Radnabenbuchsen) 2 94110791 94110791 94110791 94110791
7 Stopfen für 40x25mm 6 10100009 10100009 10100009 10100009
8 TT-Rad mit Nocken 4 70130761 70130761 70130761 70130761
9 Radverbinder 2 70130812 70130812 70130812 70130812
10 Rohrschelle 4 94110192 94110192 – –
11 Hebel (mit Sicherung) 2 94110381 94110381 94110381 94110381
12 Hebel (ohne Sicherung) 2 94110380 94110380 94110380 94110380
13 Sperrhebel/Sicherung 2 94110790 94110790 94110790 94110790
14 Verbindungsrohr 3 94110780 94110780 94110780 94110780
15 Schubstrebe mit Rohrverbinder 2 94110781 94110781 94110781 94110781
16 Blende 2 70130982 70130982 70130982 70130982
17 Netzhalter kpl. 2 94110833 94110833 94110833 94110833
18 Netz kpl. 1 94180128 94180128 94180128 94180128
19 Bundschraube M6x49mm 4 10201205 10201205 10201205 10201205
20 Bundschraube M6x58mm 2 10201210 10201210 10201210 10201210
21 Zwischenstrebe mit Rohrverbindern 2 94110787 94110787 94110787 94110787
22 Rohrverbinder für Zwischenstrebe 4 70130832 70130832 70130832 70130832
23 Schraubenbeutel 1 94180151 94180151 94180151 94180151
24 Schubstrebe (kpl. mit Rohrverbindern und Sicherung montiert) 2 94110784 94110784 94110784 94110784
25 Abweisstange 2 70130601 70130601 70130601 70130601
26 Radnabenbuchse für ø8,5mm 8 10116011 10116011 10116011 10116011
27 Adapter 2 70130520 70130520 70130520 70130520
28 Distanzhülse 6 70130525 70130525 70130525 70130525
29 Handdruckplatte 2 70130530 70130530 70130530 70130530
30 Bundschraube M6x30mm 2 10201208 10201208 10201208 10201208
31 Reibschutz-Set (4 Stück) 1 - - 94180145 94180145
32 Radverbinder 2 70130815 70130815 70130815 70130815
33 Spannlasche 2 10128002 10128002 10128002 10128002
34 Bremshebel mit Rändelstift 2 70130816 70130816 70130816 70130816
35 TT-Rad ohne Nocken 4 70130762 70130762 70130762 70130762
Teil Bezeichnung Stück Ersatzteil-Nr. Ersatzteil-Nr. Ersatzteil-Nr. Ersatzteil-Nr.
Nr. für 7122-500 für 7122-700 für 7162-500 für 7162-700
nicht wetterfest nicht wetterfest wetterfest wetterfest
Geben Sie bitte bei Ersatzteilbestellungen die vollständige Artikelnummer, die Ersatzteilbestellnummer, die benötigte Stück-
zahl sowie die auf der Rückseite dieser Anleitung aufgestempelte Kontrollnummer an.
Bestellbeispiel: „Artikelnummer 7162-500/Ersatzteilnummer 94180145/2 Stück/Kontrollnummer. ...”
Wichtig: Zu verschraubende Ersatzteile werden grundsätzlich ohne Verschraubungsmaterial berechnet und geliefert. Falls
Bedarf an entsprechendem Verschraubungsmaterial besteht, ist dieses durch den Zusatz „mit Verschraubungsmaterial” bei
der Ersatzteilbestellung anzugeben.
Heinz Kettler GmbH & Co. KG · Postfach 1020 · D-59463 Ense-Parsit
Kettler Austria GmbH · Elsenwang 119 · A-5322 Hof bei Salzburg • Trisport AG · Im Bösch · CH-6331 Hünenberg
www.kettler.net

Bei Reklamationen bitte diese Kontrollnummer angeben.
In case of complaint, please state this control number.
En cas de réclamation, priére de mentionner ce numéro de
contrôle.
Bij reclamaties dit controlenummer vermelden.
En caso de reclamación le rogamos indicar este número de con-
trol.
D
GB
F
NL
S
E
I
Vid eventuell reklamation anges alltid detta kontrollnummer.
In caso di reclamazione, si prega di indicare questo numero di
controllo.
docu 804g/10.02
-
 1
1
-
 2
2
-
 3
3
-
 4
4
-
 5
5
-
 6
6
-
 7
7
-
 8
8
-
 9
9
-
 10
10
-
 11
11
-
 12
12
-
 13
13
-
 14
14
-
 15
15
-
 16
16
-
 17
17


in anderen Sprachen
- English: Kettler STOCKHOLM Owner's manual
Verwandte Artikel
-
Kettler 07043-700 Benutzerhandbuch
-
-
-
-
-
-
-
-
-