
V1 V2 V3 N
1000V CAT III 600V CAT IV
I1 I2 I3
POWER & ENERGY LOGGER
OL
PEL 104
POWER & ENERGY LOGGER
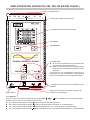
GUIDE DE DÉMARRAGE RAPIDE DES PEL102, PEL103 ET PEL104 (FR)
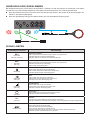
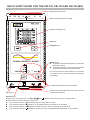
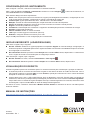
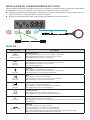
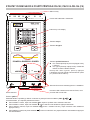
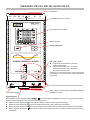
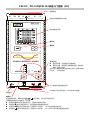
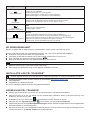
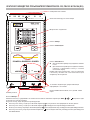
Bornes de mesure.
Boîtier rigide surmoulé en élastomère.
Acheur LCD rétroéclairé.
Touche Entrée.
Touche Navigation.
Bouton Marche / Arrêt.
Pour mettre l’appareil en marche, branchez les
bornes sur le secteur.
Pour arrêter l’appareil, débranchez les bornes
et appuyez sur le bouton pendant plusieurs
secondes.
Vous ne pouvez pas éteindre le PEL tant qu’il est
branché sur une source d’alimentation ou tant qu’un
enregistrement est en cours (ou en attente).
Touche Sélection.
Appuyez sur la touche et maintenez l’appui. Les voyants REC, , et s’allument successivement pendant
3 secondes chacun.
Relâchez la touche pendant que la fonction désirée est allumée.
Si vous le relâchez pendant que le voyant REC est allumé, l’enregistrement démarre ou s’arrête.
Si vous le relâchez pendant que le voyant est allumé, la liaison Bluetooth s’active ou se désactive.
Si vous le relâchez pendant que le voyant est allumé (PEL104 uniquement), le Wi-Fi s’active ou se désactive.
Si vous le relâchez pendant que le voyant est allumé (PEL104 uniquement), la 3G-UMTS/GPRS s’active ou
se désactive.
11 voyants fournissant des informations d’état.
Prise secteur.
Connecteur USB et Ethernet RJ45, logement de la
carte SD et de la carte SIM.

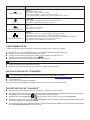
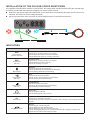
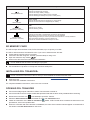
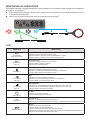
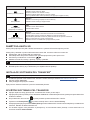
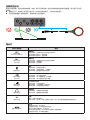
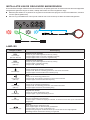
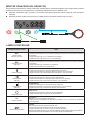
INSTALLATION DES REPÈRES DE COULEUR
Pour les mesures polyphasées, repérez les capteurs de courant, les cordons de tension et les bornes avec les bagues
et pions de couleur fournis avec l’appareil, en attribuant une couleur à chaque borne.
Détachez les pions appropriés et placez-les dans les trous au-dessus des bornes (les grands pour les bornes de
courant, les petits pour les bornes de tension).
Clipsez une bague de la même couleur à chaque extrémité du cordon qui sera branché sur la borne.
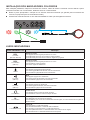
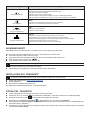
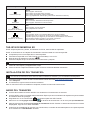
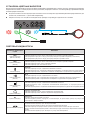
VOYANTS
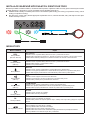
Voyants et couleur Description
REC
Voyant vert
(PEL102 / PEL103)
État de l’enregistrement
Voyant éteint : aucun enregistrement en attente ni en cours
Le voyant clignote une fois toutes les 5 s : enregistrement en attente
Le voyant clignote deux fois toutes les 5 s : enregistrement en cours
REC
Voyant rouge
(PEL104)
État de l’enregistrement
Voyant éteint : aucun enregistrement en attente ni en cours
Voyant clignotant : enregistrement en attente
Voyant allumé : enregistrement en cours
Voyant bleu
Bluetooth
Voyant éteint : liaison Bluetooth désactivée
Voyant allumé : liaison Bluetooth activée, mais sans transmission
Voyant clignotant : liaison Bluetooth en cours de transmission
Voyant vert
(PEL104)
Wi-Fi
Voyant éteint : liaison Wi-Fi désactivée
Voyant allumé : liaison Wi-Fi activée, mais sans transmission
Voyant clignotant : liaison Wi-Fi en cours de transmission
Voyant vert
(PEL104)
3G-UMTS/GPRS
Voyant éteint : liaison 3G désactivée
Voyant allumé : liaison 3G activée, mais sans transmission
Voyant clignotant : liaison 3G en cours de transmission
Voyant rouge
Ordre des phases
Voyant éteint : ordre de rotation des phases correct
Voyant clignotant : ordre de rotation des phases incorrect.
OL
Voyant rouge
Surcharge
Éteint : aucune surcharge sur les entrées
Voyant clignotant : au moins une entrée est en surcharge, un cordon est manquant ou branché sur
une mauvaise borne
Voyant rouge / vert
Carte SD
Voyant vert allumé : la carte SD est OK
Voyant rouge clignotant : la carte SD est en cours d’initialisation
Voyant clignotant rouge et vert : la carte SD est pleine
Voyant vert pâle clignotant : la carte SD sera pleine avant la n de l’enregistrement en cours
Voyant rouge allumé : la carte SD est absente ou verrouillée

Voyants et couleur Description
Voyant orange / rouge
Batterie
Voyant éteint : batterie pleine
Voyant orange allumé : batterie en charge
Voyant orange clignotant : batterie en cours de recharge
Voyant rouge clignotant : batterie faible (et absence d’alimentation secteur)
Voyant vert
Alimentation
Voyant allumé : l’appareil est alimenté par une tension secteur
Voyant éteint : l’appareil est alimenté par la batterie
Voyant vert
(intégré dans le connecteur)
USB
Voyant éteint : aucune activité
Voyant clignotant : activité
Voyant jaune
(intégré dans le connecteur)
Ethernet
Voyant éteint : la pile ou le contrôleur Ethernet ne s’est pas initialisé
Clignotement lent (un par seconde) : la pile s’est initialisée correctement
Clignotement rapide (10 par seconde) : le contrôleur Ethernet s’est initialisé correctement
Deux clignotements rapides suivis d’une pause : erreur DHCP
Voyant allumé : réseau initialisé et prêt à être utilisé
CARTE MÉMOIRE SD
Le PEL accepte des cartes SD et SDHC, formatées en FAT32, jusqu’à 32 Go de capacité.
Le PEL est livré avec une carte SD formatée. Si vous voulez installer une nouvelle carte SD :
Vériez que la nouvelle carte SD n’est pas verrouillée.
Formatez la carte SD à l’aide du PEL Transfer (recommandé) ou à l’aide d’un PC.
Ouvrez le capuchon en élastomère marqué .
Appuyez sur la carte SD qui est dans l’appareil puis retirez-la.
Ne retirez pas la carte SD s’il y a un enregistrement en cours.
Insérez la nouvelle carte et poussez-la à fond.
Replacez le capuchon élastomère pour conserver l’étanchéité de l’appareil.
INSTALLATION DE PEL TRANSFER®
Ne connectez pas l’appareil au PC avant d’avoir installé les logiciels et les pilotes.
Téléchargez la dernière version de PEL Transfer sur notre site web : www.chauvin-arnoux.com.
Lancez setup.exe.
Puis suivez les instructions d’installation.
Pour des instructions d’installation complètes, reportez-vous à la notice de fonctionnement.
OUVERTURE DE PEL TRANSFER®
Branchez les entrées tension du PEL sur le secteur. L’appareil se met en marche.
Raccordez le PEL au PC avec le câble USB fourni. Attendez que les pilotes aient ni de s’installer avant de continuer.
Double-cliquez sur l’icône du PEL sur le bureau pour ouvrir PEL Transfer.
Sélectionnez l’icône Ajout appareil dans la barre d’outil ou dans le menu principal Appareil.
Suivez les instructions de l’assistant Ajouter un appareil. Si PEL Transfer ne détecte pas l’appareil dans la liste
déroulante, cliquez sur le bouton Actualiser.
Lorsque la connexion avec l’appareil est établie, le nom de ce dernier doit s’acher sur le côté gauche de la fenêtre
dans la branche Réseau PEL de l’arborescence.

CONFIGURATION DE L’APPAREIL
Pour congurer votre PEL, sélectionnez l’appareil dans le répertoire Réseau PEL.
Ouvrez la boîte de dialogue Configurer l’appareil en cliquant sur l’icône Configurer dans la barre d’outils, dans
le menu Appareil ou dans la zone État.
Cette boîte de dialogue comporte plusieurs onglets :
Général : comporte des champs permettant d’attribuer un nom à l’appareil, des options d’arrêt automatique, de
réglage de l’acheur LCD, du fonctionnement des boutons, du réglage de l’horloge et du formatage de la carte SD.
Communication : options relatives à la liaison Bluetooth, au Wi-Fi , au réseau Ethernet et à la 3G-UMTS/GPRS.
Mesure : choix du système de distribution, du rapport des tensions et choix de la fréquence.
Capteur de courant : détection des capteurs de courant et choix du courant nominal primaire.
Enregistrement : choix des paramètres d’enregistrement.
Compteurs : réinitialisation des compteurs et options de réinitialisation des compteurs d’énergie partielle.
Alarmes : programmation des alarmes.
Valeurs nominales : dénir les valeurs nominales.
L452 : connecter les Data Logger à l’appareil (PEL104).
Rapport : congurer les rapports et les envoyer par mail.
Cliquez sur OK pour transférer la nouvelle conguration sur l’appareil.
LANCEMENT D’UN ENREGISTREMENT (MARCHE / ARRÊT)
Pour lancer un enregistrement, procédez de l’une des manières suivantes :
Dans PEL Transfer : Sélectionnez l’option appropriée dans l’onglet Enregistrement de la boîte de dialogue
Conguration. L’appareil peut être conguré pour déclencher un enregistrement soit à une date et une heure future,
soit immédiatement après la n de la conguration sur l’appareil.
Sur l’appareil : Appuyez sur le bouton Sélection et maintenez-le appuyé jusqu’à ce que le voyant REC s’allume,
puis relâchez-le. L’appareil démarre l’enregistrement selon les réglages de la conguration précédente.
Pour arrêter un enregistrement, procédez de l’une des manières suivantes :
Dans PEL Transfer : Dans le menu, sélectionnez Appareil > Arrêter l’enregistrement .
Sur l’appareil : Appuyez sur le bouton Sélection et maintenez-le enfoncé jusqu’à ce que le voyant REC s’allume,
puis relâchez-le.
AFFICHAGE DE L’ENREGISTREMENT
Les données enregistrées peuvent être transférées de deux manières sur le PC pour y être achées et pour générer
des rapports :
La carte SD peut être retirée de l’appareil et branchée sur le PC via le lecteur de carte SD fourni. Lancez PEL
Transfer, sélectionnez la commande Ouvrir dans le menu Fichier, pointez le chier ICP portant le numéro de
session souhaité sur la carte SD et sélectionnez Ouvrir.
Connexion directe entre le PC et le PEL (USB, Ethernet, Wi-Fi ou Bluetooth). Lancez PEL Transfer, ouvrez une
connexion vers l’appareil, sélectionnez-le (veillez à ce qu’il soit connecté) dans l’arborescence, puis sélectionnez
Sessions enregistrées. Double-cliquez sur la session d’enregistrement souhaitée. Le téléchargement terminé,
sélectionnez le test téléchargé et cliquez sur le bouton Ouvrir dans la boîte de dialogue Téléchargement.
Dans les deux cas, la session s’ajoute à Mes sessions ouvertes dans l’arborescence. Les données peuvent alors
être achées.
NOTICE DE FONCTIONNEMENT
Rendez-vous sur notre site Internet pour télécharger la notice de fonctionnement de votre appareil :
www.chauvin-arnoux.com
Eectuez une recherche avec le nom de votre appareil. Une fois l’appareil trouvé, allez sur sa page. La notice de
fonctionnement se trouve sur la droite. Téléchargez-la.
03-2023
693779E00 - Ed. 1

V1 V2 V3 N
1000V CAT III 600V CAT IV
I1 I2 I3
POWER & ENERGY LOGGER
OL
PEL 104
POWER & ENERGY LOGGER
SCHNELLSTART-ANLEITUNG FÜR PEL102, PEL103 UND PEL104 (DE)
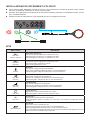
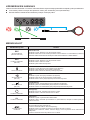
Messeingänge.
Hartes Gehäuse mit Elastomerüberzug
Beleuchtete LCD-Anzeige
Eingabetaste
Navigationstaste
Ein/Aus-Taste
Zum Einschalten des Geräts schließen Sie die
Buchsen an das Netz an.
Zum Abschalten des Geräts nehmen Sie die
Buchsen ab und drücken Sie den Knopf ein
paar Sekunden lang.
Der PEL kann nicht abgeschaltet werden, solange
er an eine Stromversorgung angeschlossen ist und
solange eine Aufzeichnung läuft bzw. programmiert ist.
Wahltaste
Drücken Sie die Taste und halten Sie sie. Die Signallampen REC, , und leuchten hintereinander je 3 Sek. lang.
Lassen Sie die Taste los, während die Signallampe der gewünschten Funktion leuchtet.
Wenn Sie also loslassen, während die Signallampe REC leuchtet, dann wird die Aufzeichnung gestartet bzw. gestoppt.
Wenn Sie loslassen, während die Signallampe leuchtet, dann wird die Bluetooth-Verbindung aktiviert bzw. deaktiviert.
Wenn Sie loslassen, während die Signallampe leuchtet (nur PEL104), dann wird WLAN aktiviert bzw. deaktiviert.
Wenn Sie loslassen, während die Signallampe leuchtet (nur PEL104), dann wird 3G-UMTS/GPRS aktiviert
bzw. deaktiviert.
11 Signallampen als Statusanzeigen.
Netzanschluss.
USB- und Ethernet-RJ45-Anschluss, SD- und SIM-
Kartenschlitz.

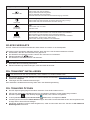
ANBRINGEN DER FARBKLEMMEN
Bei Mehrphasenmessung zuerst jeden Stromwandler, Prüfdraht und alle Anschlüsse mit Farbringen und Stiften
kennzeichnen (im Lieferumfang inbegrien), wobei jedem einzelnen Anschluss eine Farbe zugeordnet wird.
Dazu die Farbklemmen lösen und in die Löcher über den Buchsen stecken, die Großen in die Stromeingänge, die
Kleinen in die Spannungseingänge.
Dann den gleichfarbigen Ring an die Spitze stecken, die zum betreenden Eingang gehört.
SIGNALLAMPEN
Signallampen und Farbe Beschreibung
REC
Grüne LED
(PEL102 / PEL103)
Aufzeichnungsstatus
LED leuchtet nicht: keine Aufzeichnung läuft bzw. ist programmiert
LED blinkt alle 5 Sek. ein Mal: in Bereitschaft
LED blinkt alle 5 Sek. zwei Mal: in Aufzeichnungsmodus
REC
Rote LED
(PEL104)
Aufzeichnungsstatus
LED leuchtet nicht: keine Aufzeichnung läuft bzw. ist programmiert
LED blinkt: Aufzeichnung ist anhängig
LED leuchtet: Aufzeichnung läuft
Blaue LED
Bluetooth
LED leuchtet nicht: Bluetooth ist nicht aktiviert.
LED leuchtet: Bluetooth ist aktiviert aber sendet nicht.
LED blinkt: Bluetooth aktiv, Übertragung läuft.
Grüne LED
(PEL104)
Wi-Fi
LED leuchtet nicht: Wi-Fi ist nicht aktiviert.
LED leuchtet: Wi-Fi ist aktiviert aber sendet nicht.
LED blinkt: Wi-Fi aktiv, Übertragung läuft
Grüne LED
(PEL104)
3G-UMTS/GPRS
LED leuchtet nicht: 3G ist nicht aktiviert.
LED leuchtet: 3G ist aktiviert aber sendet nicht.
LED blinkt: 3G aktiv, Übertragung läuft.
Rote LED
Phasenfolge
LED leuchtet nicht: Drehrichtung der Phasen ist richtig.
LED blinkt: Drehrichtung der Phasen ist falsch.
OL
Rote LED
Überlast
Leuchtet nicht: Keine Überlast an den Eingängen vorhanden.
LED blinkt: Überlast an zumindest einem Eingang, eine Leitung fehlt bzw. ist falsch angeschlossen.
Rot/grüne LED
SD-Karte
Grüne LED leuchtet: SD-Karte ist OK.
Rote LED blinkt: SD-Karte wird initialisiert.
Rote und grüne LED blinken: SD-Karte ist voll.
Hellgrüne LED blinkt: Die SD-Karte wird vor dem Ende der Aufzeichnung voll sein.
Rote LED leuchtet: SD-Karte fehlt bzw. ist gesperrt.

Signallampen und Farbe Beschreibung
Orange/rote LED
Akku
LED leuchtet nicht: Akku ist geladen.
Orange LED leuchtet: Akku ist geladen.
Orange LED blinkt: Akku wird geladen
Rote LED blinkt: Akku schwach und keine Netzversorgung vorhanden
Grüne LED
Stromversorgung
LED leuchtet: Das Gerät wird über die externe Stromversorgung versorgt
LED leuchtet nicht: Das Gerät wird über den Akku versorgt
Grüne LED
(im Stecker)
USB
LED leuchtet nicht: nicht aktiv
LED blinkt: aktiv
Gelbe LED
(im Stecker)
Ethernet
LED leuchtet nicht: Ethernet-Stack oder -Controller wurden nicht initialisiert.
Blinkt langsam (im Sekundentakt): Stack einwandfrei initialisiert.
Blinkt rasch (10 Mal pro Sekunde): Ethernet-Controller einwandfrei initialisiert.
Zwei Mal blinken, danach Pause: DHCP-Fehler
LED leuchtet: Verbindung initialisiert und einsatzbereit
SD-SPEICHERKARTE
Der PEL funktioniert mit FAT32-formatierten SDHC-Karten und mit bis zu 32 Gb Kapazität.
PEL wird mit einer formatierten SD-Karte geliefert. Wenn Sie eine neue SD-Karte installieren möchten:
Sicherstellen, dass die neue SD-Karte nicht gesperrt ist.
Die SD-Karte vorzugsweise mit PEL-Transfer oder mit einem PC formatieren.
Elastomerabdeckung önen.
Die SD-Karte in das Gerät drücken und entfernen.
Achtung: SD-Karte nicht herausnehmen solange eine Aufzeichnung läuft.
Neue Karte bis zum Anschlag einschieben.
Elastomerabdeckung wieder anbringen, damit das Gerät dicht bleibt.
PEL TRANSFER® INSTALLIEREN
Das Gerät erst an den PC anschließen, wenn Software und Treiber installiert sind!
Die neueste Version von PEL Transfer von unserer Website herunterladen www.chauvin-arnoux.com.
Starten Sie setup.exe.
Jetzt folgen Sie den Installationsanweisungen.
Eine ausführliche Installationsanweisung nden Sie in der Bedienungsanleitung.
PEL TRANSFER ÖFFNEN
Die PEL-Spannungseingänge an das Netz anstecken. Das Gerät schaltet sich ein.
PEL mit dem gelieferten USB-Kabel an den PC anschließen. Abwarten, bis die Treiber fertig installiert.
Das PEL-Symbol auf dem Desktop doppelt anklicken, PEL Transfer wird geönet.
In der Symbolleiste das Symbol Neues Gerät wählen bzw. im Hauptmenü Gerät.
Anweisungen des Assistenten Neues Gerät befolgen. Wenn PEL Transfer das Gerät nicht in der Drop-Down-Liste
anzeigt, klicken Sie auf Erneut abfragen.
Sobald die Verbindung mit dem Gerät aufgebaut ist, sollte es links neben dem PEL Transfer im PEL Netzwerk
Baumdiagramm erscheinen.

GERÄTEKONFIGURATION
Das Gerät im PEL-Netzwerk wählen, um die Konguration durchzuführen.
In der Symbolleiste das Symbol Konfigurieren anklicken und das Dialogfeld Gerätekonfiguration önen bzw.
im Hauptmenü Gerät oder im Status.-Bereich.
In diesem Dialogfeld gibt es sechs Registerkarten:
Allgemeines: Gerätebezeichnungen eingeben, Optionen für Abschaltautomatik, LCD-Steuerung, Steuertasten,
Geräteuhr und SD-Karten-Formatierung festlegen.
Datenübertragung: Optionen für Bluetooth, Ethernet, Wi-FI and 3G-UMTS/GPRS festlegen.
Messen: Verteilernetz, Spannungsverhältnis und Frequenz festlegen.
Stromwandler: Stromwandler erfassen und Primärnennstrom auswählen.
Speichern: Optionen für Aufzeichnungswerte festlegen.
Zähler: Die Zähler rücksetzen und Optionen für das Rücksetzen der Teilenergiezähler festlegen.
Alarme: Alarmmeldungen programmieren.
Nennwerte: Die Nennwerte festlegen.
L452: Datenlogger mit dem Gerät verbinden (PEL104).
Bericht: Berichte kongurieren und per E-Mail senden.
Auf OK klicken und die neue Konguration übertragen.
START EINER AUFZEICHNUNG (EIN/AUS)
Es gibt mehrere Möglichkeiten, eine Aufzeichnung zu starten:
Über PEL-Transfer-Software. Im Dialogfeld Konguration, Registerkarte Aufzeichnung, die entsprechende Option
wählen. Das Gerät kann so konguriert werden, dass die Aufzeichnung entweder zu einem bestimmten späteren
Zeitpunkt startet oder sofort bei Übernahme der neuen Konguration in das Gerät.
Am Gerät: Die Taste Wahl solange gedrückt halten, bis die LED REC aueuchtet, dann loslassen. Das Gerät
startet die Aufzeichnung nach der vorgegebenen Konguration.
Es gibt mehrere Möglichkeiten, eine Aufzeichnung zu beenden:
Über PEL-Transfer-Software. Im Menü unter Gerät > Aufzeichnung beenden .
Am Gerät: Die Taste Wahl solange gedrückt halten, bis die LED REC aueuchtet, dann loslassen.
ANZEIGE DER AUFZEICHNUNGEN
Auf dem PC können die Daten angezeigt und Berichte erstellt werden. Es gibt zwei verschiedene Arten, die Daten auf
den PC herunterzuladen:
Die SD-Karte aus dem Gerät herausnehmen und mit dem gelieferten SD-Karten-Laufwerk an den PC anschließen.
PEL-Transfer aufrufen, im Datei-Menü den Befehl Önen wählen. Auf der SD-Karte die ICP-Datei mit der
gewünschten Vorgangsnummer anwählen und Önen wählen.
Direkte Verbindung zwischen PC und PEL via USB, Netzwerk oder Bluetooth. PEL-Transfer aufrufen, Verbindung
mit dem Gerät önen -darauf achten, dass sie auch hergestellt wird-, Verbindung im Baumdiagramm auswählen und
dann Aufgezeichnete Vorgänge wählen. Den gewünschten Vorgang doppelt anklicken. Wenn der Ladevorgang
abgeschlossen ist, kann der geladene Test geönet werden. Dazu wählt man ihn im Dialogfeld aus und klickt auf
Öffnen.
In beiden Fällen erscheint der Vorgang unter Eigene aktuelle Vorgänge im Baumdiagramm. Jetzt stehen die Daten
zur Anzeige bereit.
BEDIENUNGSANLEITUNG
Rufen Sie unsere Website auf, wo die Bedienungsanleitung Ihres Geräts zum Herunterladen bereitsteht:
www.chauvin-arnoux.com
Führen Sie mit dem Namen des Geräts als Stichwort eine Suche durch. Gehen Sie dann zur entsprechenden Seite,
die Bedienungsanleitung bendet sich rechter Hand. Nun können Sie sie herunterladen.
03-2023
693779E00 - Ed. 1

V1 V2 V3 N
1000V CAT III 600V CAT IV
I1 I2 I3
POWER & ENERGY LOGGER
OL
PEL 104
POWER & ENERGY LOGGER
GUIDA DI AVVIO RAPIDO DEL PEL102, PEL103 E PEL104 (IT)
Morsetti di misura.
Scatola rigida di elastomero sovrastampato.
Display LCD retroilluminato.
Tasto Ingresso.
Tasto Navigazione.
Bottone Marcia/Arresto.
Per mettere lo strumento in marcia, collegate i
morsetti alla rete.
Per fermare lo strumento, staccate i morsetti e
premete il bottone per vari secondi.
Non potete spegnere il PEL nché è collegato a una
sorgente d’alimentazione o nché una registrazione
è in corso (o in attesa).
Tasto Selezione.
Premete il tasto e mantenete la pressione. Le spie REC, , e si accendono successivamente per 3 secondi
ciascuna.
Abbandonate il tasto mentre la funzione voluta è accesa.
Se lo abbandonate mentre la spia REC è accesa, la registrazione si avvia o si ferma.
Se lo abbandonate mentre la spia è accesa, il collegamento Bluetooth si attiva o si disattiva.
Se lo abbandonate mentre la spia è accesa (PEL104 unicamente), la Wi-Fi si attiva o si disattiva.
Se lo abbandonate mentre la spia è accesa (PEL104 unicamente), la 3G-UMTS/GPRS si attiva o si disattiva.
11 spie che forniscono informazioni sullo stato.
Presa rete.
Connettore USB e Ethernet RJ45, alloggiamento
della scheda SD e della scheda SIM.

INSTALLAZIONE DEI RIFERIMENTI COLORATI
Per le misure polifasi, identicate i sensori di corrente, i cavi di tensione e i morsetti con gli anelli e perni colorati
forniti con lo strumento, attribuendo un colore a ogni morsetto.
Staccate i perni appropriati e inseriteli nei fori al di sopra dei morsetti (i grandi per i morsetti della corrente, i piccoli
per i morsetti di tensione).
Fissate un anello di colore identico a ogni estremità del cavo da collegare al morsetto.
SPIE
Spie e colore Descrizione
REC
Spia verde
(PEL102 / PEL103)
Stato della registrazione
Spia spenta: nessuna registrazione in attesa né in corso
Spia lampeggia una volta ogni 5 s: registrazione in attesa
Spia lampeggia due volte ogni 5 s: registrazione in corso
REC
Spia rossa
(PEL104)
Stato della registrazione
Spia spenta: nessuna registrazione in attesa né in corso
Spia lampeggiante: registrazione in attesa
Spia accesa: registrazione in corso
Spia blu
Bluetooth
Spia spenta: collegamento Bluetooth disattivato
Spia accesa: collegamento Bluetooth attivato, ma senza trasmissione
Spia lampeggiante: collegamento Bluetooth in corso di trasmissione
Spia verde
(PEL104)
Wi-Fi
Spia spenta: collegamento Wi-Fi disattivato
Spia accesa: collegamento Wi-Fi attivato, ma senza trasmissione
Spia lampeggiante: collegamento Wi-Fi in corso di trasmissione
Spia verde
(PEL104)
3G-UMTS/GPRS
Spia spenta: collegamento 3G disattivato
Spia accesa: collegamento 3G attivato, ma senza trasmissione
Spia lampeggiante: collegamento 3G in corso di trasmissione
Spia rossa
Ordine delle fasi
Spia spenta: l’ordine di rotazione delle fasi è corretto
Spia lampeggiante: l’ordine di rotazione delle fasi è errato.
OL
Spia rossa
Sovraccarico
Spia spenta: nessun sovraccarico sugli ingressi
Spia lampeggiante: almeno un ingresso è in sovraccarico, cavo assente o collegamento errato al
morsetto
Spia rossa/verde
Scheda SD
Spia verde accesa: la scheda SD è OK
Spia rossa lampeggiante: la scheda SD in corso d’inizializzazione
Spia lampeggiante alternativamente rossa e verde: la scheda SD satura.
Spia verde pallido lampeggiante: la scheda SD sarà satura prima della ne della registrazione in corso
Spia rossa accesa: scheda SD assente o bloccata

Spie e colore Descrizione
Spia rossa arancione /rouge
Batteria
Spia spenta: batteria piena
Spia arancione accesa: batteria sotto carica
Spia arancione lampeggiante: batteria in corso di ricarica
Spia rossa lampeggiante: batteria debole (e assenza d’alimentazione rete).
Spia verde
Alimentazione
Spia accesa: lo strumento è alimentato da una tensione di rete
Spia spenta: lo strumento è alimentato dalla batteria
Spia verde
(integrata nel connettore)
USB
Spia spenta: nessuna attività
Spia lampeggiante: attività
Spia gialla
(integrata nel connettore)
Ethernet
Spia spenta: la pila non si è inizializzata (o il controllore Ethernet)
Lampeggio lento (uno al secondo): la pila si è inizializzata correttamente
Lampeggio rapido (10 al secondo): il controllore Ethernet si è inizializzato correttamente
Due lampeggi rapidi seguiti da una pausa: errore DHCP
Spia accesa: rete inizializzata e pronta per l’uso
SCHEDA MEMORIA SD
Il PEL accetta le schede SD e SDHC, formattate in FAT32, no a 32 Go di capacità.
Il PEL è fornito con una scheda SD formattata. Se volete installare una nuova scheda SD:
Vericate che la nuova scheda SD non sia bloccata.
Formattate la scheda SD mediante il PEL Transfer (raccomandato) o mediante un PC.
Aprire il cappuccio di elastomero contrassegnato da .
Premete la scheda SD che è nello strumento e rimuovetela.
Non rimuovete la scheda SD se una registrazione è in corso.
Inserite la nuova scheda spingendola a fondo.
Rimettete al suo posto il cappuccio di elastomero per conservare l’ermeticità dello strumento.
INSTALLAZIONE DEL PEL TRANSFER®
Non collegate lo strumento al PC prima di avere installato i software e i driver.
Scaricata l’ultima versione del PEL Transfer sul nostro sito web www.chauvin-arnoux.com.
Lanciate setup.exe.
Seguite poi le istruzioni d’installazione.
Per istruzioni d’installazione complete, riferitevi al manuale d’uso.
APERTURA DEL PEL TRANSFER
Collegate gli ingressi tensione del PEL alla rete. Lo strumento si mette in marcia.
Collegate il PEL al PC con il cavo USB fornito. Attendete che i driver abbiano nito la loro installazione prima di continuare.
Con un doppio clic sull’icona del PEL sul desktop aprirete il PEL Transfer.
Selezionate l’icona Aggiunta Strumento nella barra degli strumenti o nel menu principale Strumento.
Seguite le istruzioni dell’assistente Aggiunta Strumento. Se il PEL Transfer non rivela lo strumento nel menu a
tendina, cliccate sul bottone Attualizzare.
Quando la connessione con lo strumento è instaurata, il nome di quest’ultimo deve visualizzarsi sul lato sinistro
della nestra nella branca Rete PEL dell’albero.

03-2023
693779E00 - Ed. 1
CONFIGURAZIONE DELLO STRUMENTO
Per congurare il vostro PEL, selezionate lo strumento nella directory Rete PEL.
Aprite la casella di dialogo Congurare lo strumento cliccando sull’icona Congurare nella barra degli strumenti,
nel menu Strumento o nella zona Stato.
Questa casella di dialogo comporta 6 tab:
Generale: comporta campi che permettono di attribuire un nome allo strumento, opzioni di comando di arresto
automatico, di comando del display LCD, di bottoni di funzionamento, di regolazione dell’orologio e di formattazione
della scheda SD.
Comunicazione: opzioni relative al collegamento Bluetooth, alla rete Ethernet, alla Wi-Fi e 3G-UMTS/GPRS.
Misura: selezione del sistema di distribuzione, rapporto delle tensioni e selezione della frequenza.
Sensore di corrente: rivelazione dei sensori di corrente e scelta della corrente nominale primaria.
Registrazione: opzioni di selezione dei parametri di registrazione.
Contatori: reinizializzazione dei contatori e opzioni di reinizializzazione dei contatori d’energia parziale.
Allarmi: programmazione degli allarmi.
Valori nominali: impostare i valori nominali.
L452 : collegare i Data Logger allo strumento (PEL104).
Report : congurare i report e inviarli in e-mail
Cliccate su OK per trasferire sullo strumento la nuova congurazione.
LANCIO DI UNA REGISTRAZIONE (MARCIA/ARRESTO)
Per lanciare una registrazione, procedete in una delle maniere sottoindicate:
In PEL Transfer: Selezionate l’opzione appropriata nel tab Registrazione della casella di dialogo Congurazione.
È possibile congurare lo strumento per attivare una registrazione in una determinata data e ora futura oppure
immediatamente dopo la ne della congurazione sullo strumento.
Sullo strumento: Premete il bottone Selezione e mantenetelo premuto no a quando la spia REC si accende,
poi abbandonatelo. Lo strumento avvia la registrazione secondo le regolazioni della congurazione precedente.
Per fermare una registrazione, procedete in una delle maniere sottoindicate:
In PEL Transfer: nel menu, selezionate Strumento > Fermare la registrazione .
Sullo strumento: Premete il bottone Selezione e mantenetelo premuto no a quando la spia REC si accende,
poi abbandonatelo.
VISUALIZZAZIONE DELLA REGISTRAZIONE
È possibile trasferire i dati registrati sul PC per opportuna visualizzazione e edizione di report. Esistono due maniere:
È possibile rimuovere dallo strumento la scheda SD e collegarla al PC mediante il fornito lettore di schede SD.
Lanciate PEL Transfer, selezionate il comando Aprire nel menu File, puntate il le ICP munito del numero di
sessione voluto sulla scheda SD e selezionate Aprire.
Connessione diretta fra il PC e il PEL (USB, Ethernet, Wi-Fi o Bluetooth). Lanciate PEL Transfer, aprite una
connessione verso lo strumento, selezionatelo (vericate che sia collegato) nell’albero, poi selezionate Sessioni
registrate. Eettuate un doppio clic sulla sessione di registrazione voluta. Alla ne del download, selezionate il
test scaricato e cliccate sul bottone Aprire nella casella di dialogo Download.
In entrambi i casi, la sessione si aggiunge a Mie sessioni aperte nell’albero. È possibile allora visualizzare i dati.
MANUALE D’USO
Visitate il nostro sito Internet per scaricare il manuale d’uso del vostro strumento:
www.chauvin-arnoux.com
Eettuare una ricerca con il nome del vostro strumento. Una volta trovato lo strumento andate sulla pagina corrispondente.
Il manuale d’uso si trova sulla destra: scaricatelo

V1 V2 V3 N
1000V CAT III 600V CAT IV
I1 I2 I3
POWER & ENERGY LOGGER
OL
PEL 104
POWER & ENERGY LOGGER
QUICK START GUIDE FOR THE PEL102, PEL103 AND PEL104 (EN)
Measurement terminals
Rigid moulded elastomer housing.
Backlit LCD display unit.
Enter key
Navigation key.
ON/OFF key.
To put the instrument into operation, connect the
terminals to mains.
To stop the instrument, disconnect the terminals
and press the button for several seconds.
You cannot switch the PEL o while it is connected
to a power source or while recording is in progress
(or pending).
Selection key.
Press the key and hold it down. The REC, , and indicators light one by one, for 3 seconds each.
Release the key while the desired function is lit.
If you release it while the REC indicator is lit, recording starts or stops.
If you release it while the indicator is lit, the Bluetooth link is activated or de-activated.
If you release it while the indicator is lit (PEL104 only), Wi-Fi is activated or de-activated.
If you release it while the indicator is lit (PEL104 only), 3G-UMTS/GPRS is activated or de-activated.
11 indicators providing status information.
Mains plug.
USB connector and Ethernet RJ45, slot for the SD
card and the SIM card.

INSTALLATION OF THE COLOUR-CODED IDENTIFIERS
For polyphase measurements, mark the current sensors, the voltage leads, and the terminals using the coloured rings
and inserts provided with the instrument, assigning one colour to each terminal.
Detach the appropriate inserts and place them in the holes above the terminals (the large ones for the current
terminals, the small ones for the voltage terminals).
Clip a ring of the same colour onto each end of the lead that will be connected to the terminal.
INDICATORS
Indicators and colour Description
REC
Green indicator
(PEL102 / PEL103)
Recording status
Indicator o: no recording pending or in progress
Indicator blinks once every 5s: recorder on standby
Indicator blinks twice every 5s: recording in progress
REC
Red indicator
(PEL104)
Recording status
Indicator o: no recording pending or in progress
Indicator blinking: recorder on standby
Indicator lit: recording in progress
Blue indicator
Bluetooth
Indicator o: Bluetooth link de-activated
Indicator lit: Bluetooth link activated but not transmitting
Indicator blinking: Bluetooth link transmitting
Green indicator
(PEL104)
Wi-Fi
Indicator o: Wi-Fi link de-activated
Indicator lit: Wi-Fi link activated but not transmitting
Indicator blinking: Wi-Fi link transmitting
Green indicator
(PEL104)
3G-UMTS/GPRS
Indicator o: 3G link de-activated
Indicator lit: 3G link activated but not transmitting
Indicator blinking: 3G link transmitting
Red indicator
Phase order
Indicator o: phase order OK
Indicator blinking: phase order incorrect.
OL
Red indicator
Overload
Indicator o: no overload on the inputs
Indicator blinking: at least one input is overloaded, a lead is missing or is connected to the wrong
terminal
Red/green indicator
SD card
Indicator lit green: the SD card is OK
Indicator blinking red: SD card being reset
Indicator blinking red and green: the SD card is full
Indicator blinking light green: the SD card will be full before the recording in progress ends
Indicator lit red: the SD card is missing or locked

Indicators and colour Description
Orange/red indicator
Battery
Indicator o: battery fully charged
Indicator lit orange: battery charging
Indicator blinking orange: battery being recharged
Indicator blinking red: battery low (and no mains power)
Green indicator
Power supply
Indicator lit: the instrument is supplied by a mains voltage
Indicator o: the instrument is supplied by the battery
Green indicator
(built into the connector)
USB
Indicator o: no activity
Indicator blinking: activity
Yellow indicator
(built into the connector)
Ethernet
Indicator o: the stack or the Ethernet controller is not initialized
Slow blinking (once per second): the stack is correctly initialized
Rapid blinking (10 times per second): the Ethernet controller is correctly initialized
Two rapid blinks followed by a pause: DHCP error
Indicator lit: network initialized and ready to be used
SD MEMORY CARD
The PEL accepts SD and SDHC cards, FAT32 formatted, up to a capacity of 32 GB.
The PEL is delivered with a formatted SD card. If you want to install another SD card:
Check that the new SD card is not locked.
Format the SD card using PEL Transfer (recommended) or using a PC.
Open the elastomer cap marked .
Press on the SD card in the instrument and withdraw it.
Do not withdraw the SD card if recording is in progress.
Insert the new card and push it home.
Put the elastomer cap back on to keep the instrument waterproof.
INSTALLING PEL TRANSFER®
Do not connect the instrument to the PC until you have installed the software and the driver.
Download the latest version of PEL Transfer from our web site www.chauvin-arnoux.com.
Start setup.exe.
Then follow the installation instructions.
For complete installation instructions, refer to the user’s manual.
OPENING PEL TRANSFER
Connect the voltage inputs of the PEL to mains. The instrument is turned on.
Connect the PEL to the PC using the USB cable provided. Wait until the driver is fully installed before continuing.
Double-click on the PEL icon on the desktop to open PEL Transfer.
Select the Add instrument icon in the toolbar or in the main Instrument menu.
Follow the instructions of the Add an instrument wizard. If PEL Transfer does not detect the instrument in the
pull-down list, click on the Update button.
When the connection with the instrument is established, the name of the instrument should appear on the side left of
the window in the PEL Network branch of the tree.

CONFIGURING THE INSTRUMENT
To congure your PEL, select the instrument in the PEL Network directory.
Open the Configure the instrument dialogue box by clicking on the Configure icon in the toolbar, in the Instrument
menu, or in the Status zone.
This dialogue box has 6 tabs:
General: Contains elds used to assign a name to the instrument and auto-o command, LCD display unit command,
operating button, clock adjustment, and SD card formatting options.
Communication: Options concerning the Bluetooth link, the Ethernet network, the Wi-Fi and 3G-UMTS/GPRS.
Measurement: Selection of the distribution system, ratio of voltages, and selection of the frequency
Current sensor: Detection of the current sensors and choice of the nominal primary current.
Recording: Recording parameter options.
Meters: Reset of the meters and partial energy meter reset options.
Alarms: programming of the alarms.
Nominal values: dene the nominal values .
L452: connect the Data Logger to the instrument (PEL104).
Report: congure reports and send them by email
Click on OK to transfer the new conguration to the instrument.
STARTING RECORDING (START/STOP)
To start recording, do one of the following:
In PEL Transfer: Select the appropriate option in the Recording tab of the Configuration dialogue box. The
instrument can be configured to start recording either at some future date and time, or immediately after recording
is configured on the instrument.
On the instrument: Press the Selection button and hold it down until the REC indicator lights, then release it. The
instrument starts recording as it was previously configured to do.
To stop recording, do one of the following:
In PEL Transfer: In the menu, select Instrument > Stop recording .
On the instrument: Press the Selection button and hold it down until the REC indicator lights, then release it.
VIEWING THE RECORDING
The recorded data can be transferred to the PC in two ways and then be displayed there and used to create reports:
The SD card can be withdrawn from the instrument and connected to the PC using the SD card reader provided.
Start PEL Transfer, select the Open command in the File menu, point to the ICP le bearing the desired session
number on the SD card, and select Open.
Direct connection between the PC and the PEL (USB, Ethernet, Wi-Fi, or Bluetooth). Start PEL Transfer, open a
connection to the instrument, select the instrument (make sure that it is connected) in the tree, then select Recorded
sessions. Double-click on the desired recorded session. When the download is over, select the downloaded test
and click on the Open button in the Download dialogue box.
In both cases, the session is added to My open sessions in the tree. The data can then be displayed.
USER’S MANUAL
Visit our web site to download the operating instructions for your instrument:
www.chauvin-arnoux.com
Search on the name of your instrument. When you have found the instrument, go to its page. The operating instructions
are on the right. Download them.
03-2023
693779E00 - Ed. 1

V1 V2 V3 N
1000V CAT III 600V CAT IV
I1 I2 I3
POWER & ENERGY LOGGER
OL
PEL 104
POWER & ENERGY LOGGER
GUIA DE INÍCIO RÁPIDO DOS PEL102, PEL103 E PEL104 (PT)
Terminais de medição.
Caixa rígida sobremoldada de elastómero.
Visor LCD retroiluminado.
Botão Entrada.
Botão Navegação.
Botão Liga/Desliga.
Para ligar o instrumento, conecte os terminais
à rede.
Para desligar o instrumento, desconecte os
terminais e prima o botão por alguns segundos.
Não se pode desligar o PEL enquanto este estiver
ligado a uma fonte de alimentação ou enquanto um
registo estiver em curso (ou pendente).
Botão Seleção.
Mantenha premido o botão. As luzes REC, , e acendem sucessivamente por 3 segundos cada.
Solte o botão enquanto a função desejada está ativada.
Se o soltar enquanto o indicador REC estiver aceso, o registo começa ou termina.
Se o soltar enquanto o indicador estiver aceso, a ligação Bluetooth será ativada ou desativada.
Se o soltar enquanto o indicador estiver aceso (apenas PEL104), o Wi-Fi será ativado ou desativado.
Se o soltar enquanto o indicador estiver aceso (apenas PEL104), 3G-UMTS/GPRS será ativado ou desativado.
11 luzes indicadoras fornecendo informações de
estado.
Tomada de alimentação.
Conector USB e Ethernet RJ45, ranhura para
cartão SD e cartão SIM.

INSTALAÇÃO DOS MARCADORES COLORIDOS
Para medições polifásicas, marque os sensores de corrente, cabos de tensão e terminais com as anilhas e pinos
coloridos fornecidos com o instrumento, atribuindo uma cor a cada terminal.
Retire os pinos apropriados e coloque-os nos orifícios acima dos terminais (os grandes para os terminais de
corrente, os pequenos para os terminais de tensão).
Prenda uma anilha da mesma cor em cada extremidade do cabo que será ligado ao terminal.
LUZES INDICADORAS
Luzes indicadoras e cor Descrição
REC
Luz verde
(PEL102 / PEL103)
Estado do registo
Luz apagada: nenhum registo pendente ou em curso
A luz indicadora pisca uma vez a cada 5s: registo pendente
A luz indicadora pisca duas vezes a cada 5s: registo em progresso
REC
Luz vermelha
(PEL104)
Estado do registo
Luz apagada: nenhum registo pendente ou em curso
Luz intermitente: registo pendente
Luz acesa: registo em andamento
Luz azu
Bluetooth
Luz apagada: ligação Bluetooth desativada
Luz acesa: ligação Bluetooth ativada, mas sem transmissão
Luz intermitente: ligação Bluetooth em transmissão
Luz verde
(PEL104)
Wi-Fi
Luz apagada: ligação Wi-Fi desativada
Luz acesa: ligação Wi-Fi ativada, mas sem transmissão
Luz intermitente: ligação Wi-Fi em transmissão
Luz verde
(PEL104)
3G-UMTS/GPRS
Luz apagada: ligação 3G desativada
Luz acesa: ligação 3G ativada, mas sem transmissão
Luz intermitente: ligação 3G em transmissão
Luz vermelha
Ordem de fase
Luz apagada: ordem correta de rotação de fases
Luz intermitente: ordem incorreta de rotação de fases.
OL
Luz vermelha
Sobrecarga
Luz desligada: sem sobrecarga nas entradas
Luz intermitente: pelo menos uma entrada está sobrecarregada, um cabo está ausente ou ligado ao
terminal errado
Luz vermelha/verde
Cartão SD
Luz verde acesa: o cartão SD está OK
Luz vermelha intermitente: o cartão SD está inicializando
Luz vermelha e verde intermitente: o cartão SD está cheio
Luz verde pálida intermitente: o cartão SD estará cheio antes do m do registo
Luz vermelha acesa: o cartão SD está ausente ou bloqueado

Luzes indicadoras e cor Descrição
Luz laranja/vermelha
Bateria
Luz apagada: bateria cheia
Luz laranja acesa: carregamento da bateria
Luz laranja intermitente: carregamento da bateria
Luz vermelha intermitente: bateria fraca (e sem fonte de alimentação)
Luz verde
Alimentação
Luz acesa: o instrumento é alimentado por tensão de rede
Luz apagada: o instrumento é alimentado pela bateria
Luz verde
(integrada no conector)
USB
Luz apagada: sem atividade
Luz intermitente: atividade
Luz amarela
(integrada no conector)
Ethernet
Luz apagada: a pilha ou o controlador Ethernet não foi inicializado
Intermitência lenta (1 por segundo): a pilha inicializou-se corretamente
Intermitência rápida (10 por segundo): o controlador Ethernet inicializou-se corretamente
Duas intermitências rápidas seguidas de uma pausa: erro DHCP
Luz acesa: rede inicializada e pronta para uso
CARTÃO DE MEMÓRIA SD
O PEL aceita cartões SD e SDHC, formatados em FAT32, com capacidade de até 32 GB.
O PEL é fornecido com um cartão SD formatado. Se desejar instalar um novo cartão SD:
Verique se o novo cartão SD não está bloqueado.
Formate o cartão SD utilizando o PEL Transfer (recomendado) ou um PC.
Abra a tampa de elastómero marcada .
Prima o cartão SD no instrumento e remova-o.
Não remova o cartão SD se houver um registo em andamento.
Insira o novo cartão e empurre-o até o m.
Substitua a tampa de elastómero para manter o instrumento estanque.
INSTALAÇÃO DE PEL TRANSFER®
Não ligue o instrumento ao PC antes de instalar o software e os controladores.
Descarregue a última versão do PEL Transfer no nosso sítio Web: www.chauvin-arnoux.com.
Execute setup.exe.
Em seguida, siga as instruções de instalação.
Para obter instruções de instalação completas, consulte o manual de operação.
ABERTURA DE PEL TRANSFER®
Ligue as entradas de tensão do PEL à rede. O instrumento começa a funcionar.
Ligue o PEL ao PC com o cabo USB fornecido. Aguarde a conclusão da instalação dos controladores antes de
continuar.
Clique duas vezes no ícone do PEL no ambiente de trabalho para abrir o PEL Transfer.
Selecione o ícone Adicionar instrumento na barra de ferramentas ou no menu principal Instrumento.
Siga as instruções do assistente Adicionar um instrumento. Se o PEL Transfer não detetar o instrumento na
lista pendente, clique no botão Atualizar.
Quando a ligação ao instrumento for estabelecida, o nome do instrumento deve aparecer no lado esquerdo da
janela no ramo Rede PEL da estrutura em árvore.

CONFIGURAÇÃO DO INSTRUMENTO
Para congurar o seu PEL, selecione o instrumento no diretório Rede PEL.
Abra a caixa de diálogo Configurar o instrumento clicando no ícone Configurar na barra de ferramentas, no
menu Instrumento ou na área Estado.
Esta caixa de diálogo tem vários separadores:
Geral: inclui campos para nomear um instrumento, opções para desligamento automático, conguração do visor
LCD, funcionamento do botão, conguração do relógio e formatação do cartão SD.
Comunicação: opções para Bluetooth, Wi-Fi, rede Ethernet e 3G-UMTS/GPRS.
Medição: escolha do sistema de distribuição, relação de tensão e escolha da frequência.
Sensor de corrente: deteção de sensores de corrente e escolha da corrente nominal primária.
Registo: escolha dos parâmetros de registo.
Contadores: reinicialização dos contadores e opções de reinicialização parcial dos contadores de energia.
Alarmes: programação de alarmes.
Valores nominais: denir os valores nominais.
L452: ligar os Data Logger ao instrumento (PEL104).
Relatório: congurar relatórios e enviá-los por e-mail.
Clique em OK para transferir a nova conguração para o instrumento.
INICIAR UM REGISTO (LIGAR/DESLIGAR)
Para iniciar o registo, faça o seguinte:
No PEL Transfer: Selecione a opção apropriada no separador Registo da caixa de diálogo Conguração. O
instrumento pode ser congurado para iniciar o registo numa data e hora futuras ou imediatamente após a conclusão
da conguração no instrumento.
No instrumento: Mantenha premido o botão Seleção até o indicador REC acender, depois solte-o. O instrumento
inicia o registo de acordo com as denições da conguração anterior.
Para interromper o registo, faça o seguinte:
No PEL Transfer: No menu, selecione Instrumento > Parar registo .
No instrumento: Mantenha premido o botão Seleção até o indicador REC acender, depois solte-o.
VISUALIZAÇÃO DO REGISTO
Os dados registados podem ser transferidos para o PC de duas maneiras para visualização e geração de relatórios:
O cartão SD pode ser removido do instrumento e ligado ao PC através do leitor de cartão SD fornecido. Inicie o
PEL Transfer, selecione o comando Abrir no menu Ficheiro, aponte para o cheiro ICP com o número da sessão
desejada no cartão SD e selecione Abrir.
Ligação direta entre o PC e o PEL (USB, Ethernet, Wi-Fi ou Bluetooth). Inicie PEL Transfer, abra uma ligação ao
instrumento, selecione-o (certique-se de que está ligado) na estrutura em árvore e selecione Sessões registadas.
Clique duas vezes na sessão de registo desejada. Assim que o descarregamento for concluído, selecione o teste
descarregado e clique no botão Abrir na caixa de diálogo Descarregamento.
Em ambos os casos, a sessão é adicionada a Minhas sessões abertas na estrutura em árvore. Os dados podem
então ser exibidos.
MANUAL DE INSTRUÇÕES
https://www.chauvin-arnoux.com/COM/CA/doc/Manual_de_instrucoes_PEL102_103_104.pdf
03-2023
693779E00 - Ed. 1
Seite wird geladen ...
Seite wird geladen ...
Seite wird geladen ...
Seite wird geladen ...
Seite wird geladen ...
Seite wird geladen ...
Seite wird geladen ...
Seite wird geladen ...
Seite wird geladen ...
Seite wird geladen ...
Seite wird geladen ...
Seite wird geladen ...
Seite wird geladen ...
Seite wird geladen ...
Seite wird geladen ...
Seite wird geladen ...
Seite wird geladen ...
Seite wird geladen ...
Seite wird geladen ...
Seite wird geladen ...
Seite wird geladen ...
Seite wird geladen ...
Seite wird geladen ...
Seite wird geladen ...
Seite wird geladen ...
Seite wird geladen ...
Seite wird geladen ...
Seite wird geladen ...
Seite wird geladen ...
Seite wird geladen ...
Seite wird geladen ...
Seite wird geladen ...
Seite wird geladen ...
Seite wird geladen ...
Seite wird geladen ...
Seite wird geladen ...
-
 1
1
-
 2
2
-
 3
3
-
 4
4
-
 5
5
-
 6
6
-
 7
7
-
 8
8
-
 9
9
-
 10
10
-
 11
11
-
 12
12
-
 13
13
-
 14
14
-
 15
15
-
 16
16
-
 17
17
-
 18
18
-
 19
19
-
 20
20
-
 21
21
-
 22
22
-
 23
23
-
 24
24
-
 25
25
-
 26
26
-
 27
27
-
 28
28
-
 29
29
-
 30
30
-
 31
31
-
 32
32
-
 33
33
-
 34
34
-
 35
35
-
 36
36
-
 37
37
-
 38
38
-
 39
39
-
 40
40
-
 41
41
-
 42
42
-
 43
43
-
 44
44
-
 45
45
-
 46
46
-
 47
47
-
 48
48
-
 49
49
-
 50
50
-
 51
51
-
 52
52
-
 53
53
-
 54
54
-
 55
55
-
 56
56


CHAUVIN ARNOUX PEL102 POWER-ENERGY LOGGER Schnellstartanleitung
- Typ
- Schnellstartanleitung
- Dieses Handbuch eignet sich auch für
in anderen Sprachen
- français: CHAUVIN ARNOUX PEL102 POWER-ENERGY LOGGER Guide de démarrage rapide
- español: CHAUVIN ARNOUX PEL102 POWER-ENERGY LOGGER Guía de inicio rápido
- italiano: CHAUVIN ARNOUX PEL102 POWER-ENERGY LOGGER Guida Rapida
- Nederlands: CHAUVIN ARNOUX PEL102 POWER-ENERGY LOGGER Snelstartgids
- português: CHAUVIN ARNOUX PEL102 POWER-ENERGY LOGGER Guia rápido
- svenska: CHAUVIN ARNOUX PEL102 POWER-ENERGY LOGGER Snabbstartsguide
- română: CHAUVIN ARNOUX PEL102 POWER-ENERGY LOGGER Ghid de inițiere rapidă
Verwandte Artikel
Andere Dokumente
-
E-flite C-Go 1 Benutzerhandbuch
-
Nikon L-ENREGISTREUR DE DONNEES MV-1 Benutzerhandbuch
-
 Chauvin-Arnoux CA102134 Bedienungsanleitung
-
Panasonic NV GS17 EG Bedienungsanleitung
-
AUKEY DRS2 Benutzerhandbuch
-
Contour + 1500 Benutzerhandbuch
-
Veho vcc 003 muvi Benutzerhandbuch
-
AKASO 3216558907 Benutzerhandbuch
-
iON Adventure Benutzerhandbuch
