
Save This Manual for Future Reference
Original Instructions
16" Scroll Saws
Operator’s Manual
MODEL NUMBER : 65115 65115A 65115B
SERIAL NUMBER :
Both model number and serial number may be found on the main label.
You should record both of them in a safe place for future use.
FOR YOUR SAFETY
READ AND UNDERSTAND THE ENTIRE MANUAL BEFORE
OPERATING MACHINE
65115B
65115A
65115
TIYA Technologies Co., Ltd.
Hongxiang Industrial ZoneLaizhou,
Shandong 261428, P.R.China

16" SCROLL SAWS
2
GB TABLE OF CONTENTS
INTRODUCTION
Introduction 2
Specifications 2
Symbols 3
Safety 3
Specific Safety Rules 5
Contents Supplied 7
Assembly 7
Know your Machine 8
Features & Controls 8
Operation 9
Maintenance 12
Transport 14
Storage 14
Wiring Diagram 14
Trouble Shooting 16
Parts Schedule 17
Parts List 19
Your new Scroll saw will more than satisfy
your expectations. It has been manufactured
under stringent quality standards to meet
superior performance criteria. You will find
it easy and safe to operate, and with proper
care, it will give you many years of dependable
service.
High performance and powerful variable
speed scroll saw. Suitable for precise or
intricate cuts in wood, plastic, metal, plexiglass
and plaster.
Carefully read through this entire
operator’s manual before using your
new Scroll saw. Take special care to
heed the cautions and warnings.
This scroll saw is designed for operating under
ambient temperatures between +5°C and
40°C and for installation at altitudes no more
than 1000m above M.S.L. The surrounding
humidity should less than 50% at 40°C. It
APPLICATION CONDITIONS
* S2, Short-time duty. After continuous operation
of 10 minutes the drill stops until the device
tem-perature deviates by less than 2 K (2°C)
from the room temperature.
Specifications
Model 65115 65115A 65115B
Light None Double
lamp
Adjustable
hose lamp
Rated Input Voltage 230-240V ~ 50Hz
Power Input 120W (S2 10 min*)
Safety Class I
Protection Category
IP 20
Weight 13 kg 13.1 kg 13.1 kg
Throat Capacity 406 mm
Max. Cutting Height 50 mm @ 90°
20 mm @ 45°
Stroke 19 mm
Stroke Speed 400-1650 SPM
Blade Length 127 mm
Table Size 255×415mm
Table Tilt 0° - 45°
Sound pressure
level (LPA)78.1 db(A)* k=3 db(A)
Sound power level
(LwA)88.6 db(A)* k=3 db(A)
* The noise was measured according to clause
13.2 of EN 61029-1:2009+A11
can be storedor transported under ambient
temperatures between -25°C and 55°C.
RECYCLING AND DISPOSAL
This marking indicates that this
product should not be disposed with
other household wastes. To prevent
possible harm to the environment
or human health from uncontrolled
waste disposal, recycle it responsibly
to promote the sustainable reuse of
material resources. To return your
used device, please use the return
and collection systems or check with
your local authority or local stores
for advice of environmental safe
recycling.

16" SCROLL SAWS 3
GB
SYMBOLS
The rating plate on your machine may
show symbols. These represent important
information about the product or instructions
on its use.
Read these instructions for use
carefully.
Caution! Wear ear-muffs. The
impact of noise can cause damage
to hearing.
Caution! Wear safety goggles.
Sparks generated during working
or splinters, chips and dust
emitted by the device can cause
loss of sight.
Caution! Wear a breathing mask.
Dust which is injurious to health
can be generated when working
on wood and other materials.
Never use the device to work on
any materials containing asbestos!
Caution! Risk of injury! Failure
to keep your hands away from
the blade will result in serious
personal injury.
Unplug power cord before
changing saw blades or marking
adjustment!
Disconnect the mains plug prior
to the repair, cleaning, and
maintenance of the splitter!
Rotating the clamping screw to
"+" to tighten the saw blade, to
"-" to loosen.
Rotating the speed switch to "+"
to increase the saw blade speed,
on the contrary, forward to "-" to
decrease.
SAFETY
General Safety Rules
WARNING! When using electric tools basic
safety precautions should always be followed
to reduce the risk of fire, electric shock and
personal injury including the following.
Read all these instructions before attempting
to operate this product and save these
instructions.
Understand your Machine
Read this manual and labels affixed to the
machine to understand its limitations and
potential hazards.
Be thoroughly familiar with the controls and
their proper operation. Know how to stop the
machine and disengage the controls quickly.
Do not attempt to operate the machine until
you fully understand how to properly operate
and maintain the engine and how to avoid
accidental injuries and/or property damage.
If the unit is to be used by someone other than
original purchaser or loaned, rented, or sold,
always provide this manual and any needed
safety training before operation. The user can
prevent and is responsible for accidents or
injuries that may occur to themselves, other
people, and property.
Do not force the machine. Use the correct
machine for your application. The correct
machine will do the job more efficiently and
safer at the rate it was designed.
Personal Safety
Do not permit children to operate this machine
at any time.
Keep children, pets, and other people not
using the unit away from the work area. Be
alert and shut off unit if anyone enters work
area. Keep children under the watchful care of
a responsible adult.
Do not operate the machine while under the
influence of drugs, alcohol, or any medication
that could affect your ability to use it properly.

16" SCROLL SAWS
4
GB Dress properly. Do not wear loose clothing,
short pants, or jewelry of any kind. Secure long
hair so it is above shoulder level. Keep your
hair, clothing, and gloves away from moving
parts. Loose clothes, jewelry, or long hair can
be caught in moving parts.
Protect eyes, face, and head from objects that
may be thrown from the unit. Always wear
safety goggles or safety glasses with side
shields when operating.
Wear appropriate hearing protection. Wear
respiratory protection to avoid the risk of
inhaling harmful dust.
Always keep hands and feet away from all
moving parts during operation. Moving parts
can cut or crush body parts.
Always keep hands and feet away from all
pinch points.
Do not touch parts that might be hot
from operation. Allow parts to cool before
attempting to maintain, adjust, or service.
Stay alert, watch what you are doing, and use
common sense when operating the machine.
Do not overreach. Do not operate the machine
while barefoot or when wearing sandals or
similar lightweight footwear. Wear protective
footwear that will protect your feet and
improve your footing on slippery surfaces.
Keep proper footing and balance at all times.
This enables better control of the machine in
unexpected situations.
Inspect your Machine
Check your machine before starting it. Keep
guards in place and in working order. Make
sure all nuts, bolts, etc., are securely tightened.
Never operate the machine when it is in need
of repair or is in poor mechanical condition.
Replace damaged, missing, or failed parts
before using it. Keep the machine in safe
working condition. Regularly check to see that
keys and adjusting wrenches are removed
from the machine area before starting it. A
wrench or a key that is left attached to a
rotating part of the machine may result in
personal injury. Avoid accidental starting.
Be sure the motor switch is off before
transporting the machine or performing any
maintenance or service on the unit.
Transporting or performing maintenance
or service on a machine with its switch on
invites accidents. If the machine should start
to vibrate abnormally, stop the motor and
check immediately for the cause. Vibration is
generally a warning sign of trouble.
Electric Safety
Protect yourself from electric shock. Do not
plug or unplug the motor while standing in or
around damp or wet ground. Do not use the
unit in wet or damp areas or expose it to rain.
Prevent body contact with grounded surfaces:
pipes, radiators, ranges, and refrigerator
enclosures. Make sure your fingers do not
touch the plug’s metal prongs when plugging
or unplugging the unit.
Avoid inadvertent starting. Make sure that the
switch is switched off when plugging the plug
into an outlet.
Only use approved and appropriately
identified extension cables for use outdoors.
Only use cable reels in the unrolled state.
Do not use the cable for purposes for which
it is not intended. Do not use the cable to pull
the plug out of the outlet. Protect the cable
from heat, oil and sharp edges.
Have your electric tool repaired by a qualified
electrician. This electric tool conforms to the
applicable safety regulations. Repairs may
only be performed by an electrician using
original spare parts. Otherwise accidents can
occur.
Work Area & Store Area
Insure sufficient lighting in the work area and
the area around the machine.
Keep the work area orderly. Disorder in the
work area can lead to accidents.
Take environmental influences into account.
Do not expose electric tools to rain. Do
not use electric tools in a damp or wet
environment. Make sure that the work area
is well-illuminated. Do not use electric tools
where there is a risk of fire or explosion.
Securely store unused electric tools. Unused
electric tools should be stored in a dry,
elevated or closed location out of the reach of
children.

16" SCROLL SAWS 5
GB
Specific Safety Rules
Intended Use
The contents of the instructions must cover
not only the intended use of the machinery
but also take into account any reasonably
foreseeable misuse thereof.
Safety Precautions
Connect the dust extraction device. If
connections for dust extraction and a
collecting device are present, make sure that
they are connected and used properly.
Operation in enclosed areas is only permitted
with a suitable extraction system.
Machine Use and Care
Do not use low-output electric tools for heavy
work. Do not use the electric tool for purposes
for which it is not intended. For example, do
not use hand-held circular saws for the cutting
of branches or logs. Do not use the electric
tool to cut firewood.
When the saw blade is blocked due to
abnormal feed force during cutting, turn the
machine off and disconnect it from power
supply. Remove the work piece and ensure
that the saw blade runs free. Turn the machine
on and start new cutting operation with
reduced feed force.
Do not remove any cutting residues or other
parts of workpieces from the cutting zone
while the machine is running and the saw unit
is not at rest.
Never remove loose splinters, chips or jammed
pieces of wood while the saw blade is running.
Switch off the machine to troubleshoot or
remove jammed pieces of wood.
Refitting, including adjusting and measuring
works, and cleaning must be carried out only
when the motor is switched off. - Disconnect
the main power plug -
Before switching on again, ensure that keys
and adjustment tools have been removed.
This electric tool generates an electromagnetic
field during operation. This field can impair
active or passive medical implants under
certain conditions. In order to prevent the risk
of serious or deadly injuries, we recommend
that persons with medical implants consult
with their physician and the manufacturer of
the medical implant prior to operating the
electric tool.
Take care of your tools. Keep cutting tools
sharp and clean in order to be able to work
better and more safely. Follow the instructions
for lubrication and for tool replacement.
Check the connection cable of the electric tool
regularly and have it replaced by a recognized
specialist when damaged. Check extension
cables regularly and replace them when
damaged. Keep the handle dry, clean and free
of oil and grease.
Check the electric tool for potential damage.
Protective devices and other parts must be
carefully inspected to ensure that they are
fault-free and function as intended prior to
continued use of the electric tool. Check
wether the moving parts function faultlessly
and do not jam or whether parts are damaged.
alll parts must be correctly mounted and all
conditions must be fulfilled to ensure fault-
free operation of the electric tool. The moving
protective hood may not be fixed in the open
position. Damaged protective devices and
parts must be properly repaired or replaced
by a recognised workshop, insofar as nothing
different is specified in the operating manual.
Damaged switches must be replaced at a
customer service workshop. Do not use any
faulty or damaged connection cables. Do not
use any electric tool on which the switch can
not be switched on and off.
Additional Safety Rules for Scroll Saws
• This scroll saw is intended for use in dry
conditions, and for indoor use only.
• Do not cut pieces of material too small to
hold by hand outside the blade guard.
• Avoid awkward hand positions where a
sudden slip could cause a hand to move into
the blade.
• Always use the blade guard to avoid possible
injury due to blade breakage.
• Never leave the scroll saw work area with
the power, or before the machine has come
to a complete stop.

16" SCROLL SAWS
6
GB • Do not perform layout, assembly or set up
work on the table while the cutting tool is in
operation.
• Never turn your scroll saw on before clearing
the table of all objects: (tools, scraps of
wood, etc) except for the workpiece and
related feed or support devices for the
operation planned.
Maintenance and Repair
Pull out the mains plug for any adjustment or
repair tasks.
The generation of noise is influenced by
various factors, including the characteristics
of saw blades, condition of saw blade and
electric tool. Use saw blades which were
designed for reduced noise development,
insofar as possible. Maintain the electric
tool and tool attachments regularly and if
necessary, initiate repairs in order to reduce
noise.
Report faults on the electric tool, protective
devices or the tool attachment to the person
responsible for safety as soon as they are
discovered.
Check the electric tool for potential damage.
Protective devices and other parts must be
care-fully inspected to ensure that they are
fault-free and function as intended prior to
continued use of the electric tool. Check
whether the moving parts function faultlessly
and do not jam or whether parts are dam-
aged. All parts must be correctly mounted and
all conditions must be fulfilled to ensure fault-
free operation of the electric tool. The moving
protective hood may not be fixed in the open
position. Damaged protective devices and
parts must be properly repaired or replaced
by a recognized workshop, insofar as nothing
different is specified in the operating manual.
Damaged switches must be replaced at a
customer service workshop. Do not use any
faulty or damaged connection cables. Do
not use any electric tool on which the switch
cannot be switched on and off.
Residual Risks
The machine has been built using modern
technology in accordance with recognized
safety rules. Some remaining hazards, how
ever, may still exist.
• Long hair and loose clothing can be
hazardous when the work piece is rotating.
Wear personal protective gear such as a
hair net and tight fitting work clothes.
• Saw dust and wood chips can be hazardous.
Wear personal protective gear such as
safety goggles and a dust mask.
• The use of incorrect or damaged mains cables
can lead to injuries caused by electricity.
lead to injuries caused by electricity, maining
hazards which are not yet evident may still be
present.
• Remaining hazards can be minimized
by following the instructions in “Safety
Precautions”, “Proper Use” and in the entire
operating manual.
• Do not force the machine unnecessarily:
excessive cutting pressure may lead to rapid
deterioration of the blade and a decrease in
performance in terms of finis and cutting
precision.
• Avoid accidental starts: do not press the
start button while inserting the plug into the
socket.
Keep this safety information in a safe place.

16" SCROLL SAWS 7
GB
Blade Guard Assembly
Install the blade guard to the holder. Secure
the screw with a nut and two washers.
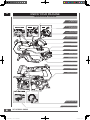
The scroll saw comes partially assembled and is shipped in carefully packed carton. After all the
parts have been removed from the carton, you should have:
1. Main Machine
2. Blade guard
3. Foot Switch (Optional Feature #1)
4. Saw-blade Adapter & Allen Wrench (Optional
Feature #2)
5. Flat Saw-blade (Optional Feature #3)
6. Operator’s Manual
7. Hardware Bag
CONTENTS SUPPLIED
OPTIONAL FEATURE #2
OPTIONAL FEATURE #1
OPTIONAL FEATURE #3
4
7
53
1
2
6
M4 × 25 × 1

16" SCROLL SAWS
8
GB
Optional Feature
#2 & #3
Optional Feature #1 Optional Feature #4
65115A 65115B
KNOW YOUR MACHINE
Features and Controls
Speed Switch
Clamping Screw
ON/OFF switch
Foot Switch (Optional Feature #1)
Saw-blade Adapter
(Optional Feature #2)
Flat Saw-blade
(Optional Feature #3)
Double Lamp
(for 65115A use)
Adjustable Hose Lamp
(for 65115B use)
Air Nozzle
Suction Adapter
Nodal Type Air Nozzle
(Optional Feature #4)
Star Button
Blade Guard
Power Cord & Plug
Angle scale

16" SCROLL SAWS 9
GB
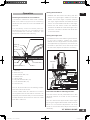
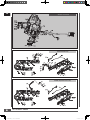
Mounting the machine on a work bench
A workbench made from solid wood is better
than one made of plywood, as interfering
vibrations and noise are more noticeable with
plywood.
The necessary tools and small parts for
assembling the saw on a workbench are
not supplied with the saw. However, use
equipment of at least the following:
1. Machine
2. Bolt M8 (×3)
3. Flat Washer Ø8 (×3)
4. Rubber Pad
5. Work Table
6. Big Flat Washer Ø8 (×3)
7. Lock Washer Ø8 (×3)
8. Nut M8 (×3)
First of all, drill holes into the seating surface
and then Insert the screws.
A foam rubber base for reduction of noise is
not supplied with the saw either. However, we
expressly recommend that you use such a base
to keep vibration and noise to a minimum. Ideal
size 400 × 240 mm.
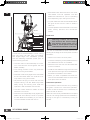
Operation
Horizontal Saw Bench and Diagonal Cuts
The saw bench can be positioned into a 45°
diagonal position or be left in the horizontal
position.
You can read off the approximate slope angle
by using the angle scale located under the work
bench. For more exact adjustment, use scrap
wood for some saw tests; adjust the bench if
necessary.
Bolt M8 (× 3)
Flat Washer Ø8 (× 3)
Rubber
Support Leg
Work Table
Big Flat Washer Ø8 (× 3) Nut M8 (× 3)
Lock Washer Ø8 (× 3)
Min: 0°
Lock Screw
Saw Bench
Angle Scale
Star Button
Setting the Saw Bench
• Release the star button and bring the saw
bench to a right angle in relation to the saw
blade. Use a 90° angle L-square measure
the right angle between the blade and the
bench. The saw blade be at 90° to the angle.
• Close the star button when the distance
between the blade and the 90° angle is at a
minimum. The bench should then be at 90°
to the saw blade.
Setting the angle scale
• Release the lock screw and bring the indicator
to the zero position. Fasten the screw.
Please note: the angle scale is a useful piece
of supplementary equipment, but should not
be used for precision work. Use scrap wood
for saw tests, adjust the bench if necessary.

16" SCROLL SAWS
10
GB
Max: 45°
A scroll saw is fundamentally a “curve cutting
tool“ but which can also carry out straight
and angled edge cuts. Familiarise yourself
with the following important points prior to
commissioning the saw.
• The saw does not automatically cut wood.
You must feed the wood against the saw
blade manually.
• The cutting process occurs only while the
blade is moving downwards.
• Feed the wood slowly against the saw blade
as the saw blade teeth are small and cut
only while moving downwards.
• All persons carrying out work with the saw
require training. The saw blade may break
easily during this training time while the
operator is still unfamiliar with the saw.
• The saw is best suited for sheets of wood
less than 2.5 cm thick.
• Feed the wood especially slowly against the
blade and avoid abrupt curves to prevent
the saw blade from breaking, if you wish to
cut wood sheets thicker than 2.5 cm.
This saw is suited also to inside cuts cut not
starting at the edge of the work piece. Proceed
as follows:
• Drill a 6 mm hole in the work piece.
• Loosen the clamping screw (blade tensioner)
and release the tension in the blade.
• Place the bore hole over the saw blade slot
in the work bench.
• Install the saw blade through the hole in the
work piece and through the work blade slot,
and fasten the blade to the holders.
• When you have completed the inside cut,
remove the saw blade and then remove the
work piece from the bench.
• Saw blade teeth becomes blunt over time,
saw blades must be replaced. The saw
blades are sufficient for 1/2 to 2 operating
time depending upon the type of wood.
• Try and make sure that the saw blade follows
the grain of the wood in order to obtain a
clean cut.
• The saw speed must be reduced to minimum
when cutting precious and non-terrous
metals.
Inside Cuts
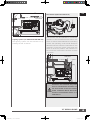
Continuous Operation
It is possible to switch the saw on by pressing
the green "I" button for continuous operation.
In order to switch the saw off, it is necessary to
press the red "0" button.
With the continuously variable electronic speed
control, the cutting speed can be increased by
turning to the right or reduced by turning to
the left.
Warning: Switch off the saw
and remove the mains supply
plug before doing inside cuts in
order to avoid injuries caused by
unintentional activation of the saw.

16" SCROLL SAWS 11
GB
Lighting System (For #65115A & #65115B use)
The lighting system can be switched on by
pressing the red "0" button.
Red “O” button Speed Switch
Green “I” button
The machine can be operated in continuous
operation or with the additional foot switch. The
switch is used to select between the operating
modes. The operating mode should always be
selected when the machine is switched off. The
machine is in the foot switch mode when the
switch is at the "0" position. The machine is in
the continuous mode when the switch is at the
“I" position.
Foot Switch (Optional Feature #1)
Attention! The machine may start
due to unintentional actuation of
the foot switch in the foot switch
mode. Attention! Never leave the
machine unattended while it is
switched on.
“O” postion “-” postion
Pilot Lamp
Mode Switch
Foot Switch

16" SCROLL SAWS
12
GB
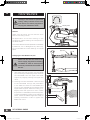
Saw-blade with pin
Clamping Screw
Switch off the saw and remove the
mains supply plug before installing
saw blades in order to avoid injuries
caused by unintentional activation of
the saw.
1. Saw blade removal. Extract the saw-blade
by unscrewing the Clamping screw. Remove
the saw-blade from the upper and lower
support by slightly pressing the upper arm
down.
2. Inserting the new saw-blade. Lead one end
of the saw-blade through the perforation
in the table and insert the saw-blade pins
into the notch. Repeat this procedure at the
upper blade support. Before hooking it in.
Slightly press the upper arm down. Check
the position of the blade pins at the supports.
Tighten the blade by means of the Clamping
screw. Check the blade's tightness. Keep on
rotating clockwise in order to tighten the
blade even more.
Changing the Saw Blade with pins
MAINTENANCE
M
Upper Arm
General
Wipe chips and dust off the machine from
time to time using a cloth.
Re-application of the wax coating on the
workbench makes feeding the workpiece to
the blade easier.
The mains cable should be replaced immediately
if pulled out, cut or damaged in any other way.
Do not lubricate the motor bearings or internal
parts!
Warning! In the interests of operational
safety, always switch off the saw
and remove the mains plug before
carrying out maintenance work.

16" SCROLL SAWS 13
GB
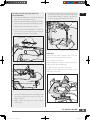
1. Take out the adapter. Fix the saw-blade with
allen screws using allen wrench.
2. Extract the saw-blade by sliding the table's
inlay up, then unscrew the clamping screw.
3. Slightly press the upper arm down.
4. Then remove the saw-blade by pulling it
forward out of the supports and through
the access perforation in the table.
5. Put the saw-blade with the two adapter into
the lower support, the other end into the
upper support.
6. Slight press the upper arm down before
hooking it in.
Changing the flat saw-blade (Optional
Feature#2 & #3)
Adapter (× 2)Flat Saw-blade
Screw M5 × 8 (× 4)
Table's Inlay
Hook
Lubrication
Lubricate the saw arm bearings every 50
hours. Proceed as above figure shown.
Turn the saw to the side.
Apply a generous amount of SAE 20 oil to the
shaft end and bronze bearings.
Let the lubricant oil work in overnight.
Repeat the procedure the next day on the
other side of the saw.
Oil Seal
7. Tighten the blade with the tightening screw
by rotating it clockwise. Check the tightness
of the blade. Keep on rotating clockwise in
order to tighten the blade even more.

16" SCROLL SAWS
14
GB
Store the equipment and accessories in a dark
and dry place at above freezing temperature.
The ideal storage temperature is between 5
and 30°C. Store the electric tool in its original
packaging. Cover the electric tool in order to
protect it from dust and moisture.
TRANSPORT
STORAGE
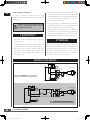
WIRING DIAGRAM
Danger! The carbon brushes should
not be replaced by anyone but a
qualified electrician.
Carbon Brushes Inspection
In case of excessive sparking, have the
carbon brushes checked only by a qualified
electrician.
PCB
MOTOR
SWITCH
Power Supply Cord
230-240V~, 50Hz
SPEED
KNOB
SWITCH
Power Supply Cord
230-240V~, 50Hz
PCB
MOTOR
FOOT SWITCH
TRANSFER SWITCH
POWER
LIGHT
SPEED
KNOB
65115
65115 with Optional Foot Switch
1. Be sure turn off the power and pull out the
plug after use.
2. Pull down the transparent blade guard to
prevent hand cutting during transportation.
3. Disconnect the vacuum cleaner and the
other connecting devices, and remove the
connection bolts between the machine and
the work table.
4. Hold the upper end of the U-shaped arm
with one hand while moving; If the saw-blade
adapter & allen wrench (Optional Feature #2)
is on the top of the U-shaped arm, you can
move it with both hands.
5. If the machine is installed with foot switch
(Optional Feature #1), it is recommended to
store it before moving to avoid tripping.
6. Raw materials or precision-cut semi-finished
products are recommended to be removed
from the worktable before moving, which may
damage the saw blade and its fixing device.

16" SCROLL SAWS 15
GB
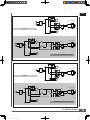
PCB
MOTOR
SWITCH
LIGHT
LIGHT
Transformer
PCB board
Power Supply Cord
230-240V~, 50Hz
SPEED
KNOB
65115A
65115A with Optional Foot Switch
SWITCH
Power Supply Cord
230-240V~, 50Hz
PCB
MOTOR
FOOT SWITCH
TRANSFER SWITCH
POWER
LIGHT
SPEED
KNOB
LIGHT
LIGHT
Transformer
PCB board
PCB
MOTOR
SWITCH
LIGHT
Transformer
PCB board
Power Supply Cord
230-240V~, 50Hz
SPEED
KNOB
65115B
65115B with Optional Foot Switch
LIGHT
SWITCH
Power Supply Cord
230-240V~, 50Hz
PCB
MOTOR
FOOT SWITCH
TRANSFER SWITCH
POWER
LIGHT
SPEED
KNOB
Transformer
PCB board

16" SCROLL SAWS
16
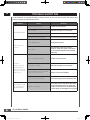
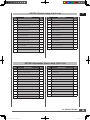
GB TROUBLE SHOOTING
Problem Cause Remedy
Saw blades break
Tension incorrectly set Set the correct tension
Load to great Feed the workpiece more slowly
Incorrect saw blade variety Use the correct saw blades
Workpiece not fed straight Avoid exerting pressure from the side
Motor does not
function
Mains Gable faulty Change faulty parts
Motor faulty
Call customer service. Do not at-
tempt to repair the motor yourself as
this should be carried out by trained
personnel.
Vibration
(NOTE: The saw
vibrates slightly
when the motor is
running in normal
opera- tion.)
Saw incorrectely installed Set the correct tension
Unsuitable underlay Feed the workpiece more slowly
The work bench is not screwed
down or is on the motor Use the correct saw blades
The motor is not secured Avoid exerting pressure from the side
Saw blade swings
out., holders not
aligned straight
Holders not aligned
Losen the screws with which the hold-
ers are fastenedto the arm. Align the
holders so that they are perpendicular
to each other and retighten the screws
In the interests of operational safety, always switch off the saw and remove the mains plug
before carrying out maintenance work.

16" SCROLL SAWS 17
GB
PARTS SCHEDULE
OPTIONAL FEATURE #2 OPTIONAL FEATURE #4
65115

16" SCROLL SAWS
18
GB
65115A Double lamp
65115B Adjustable Hose Lamp
OPTIONAL FEATURE #1

16" SCROLL SAWS 19
GB
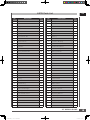
No. Description Q'ty
1 Screw M5×12 8
2 Flat Washer Ø5 11
3 Body Outside Cover 1
4 Base 1
5 Bolt M8×20 2
6 Spring Washer Ø8 2
7 Flat Washer Ø8 2
8 Support Bracket 1
9 Screw M6×12 2
10 Flat Washer Ø6 8
11 Indicator 1
12 Bolt M6×16 4
13 Spring Washer Ø6 4
14 Bolt M6×20 4
15 Press Plate 2
16 Flange Nut M6 4
17 Spring Washer Ø5 14
18 Angle Scale 1
19 Screw M6×25 1
20 Nut M6 1
21 Work Table 1
22 Table Inlay 1
23 Screw M6×40 1
24 Spring 1
25 Locknut M6 1
26 Rubber Plug 4
27 Shaft Sleeve 4
28 Main Frame-Right 1
29 Air Bag 1
30 Star Handle Screw 1
31 Blade Guard Holder 1
32 Protective Bracket 1
33 Lock Washer Ø6 1
34 Connected Net 1
35 Screw M4×10 2
No. Description Q'ty
36 Spring Washer Ø4 6
37 Limit Plate 2
38 Upper Arm 1
39 Screw M4×20 2
40 Lock Washer Ø4 4
41 Upper Clip 1
42 Bushing 2
43 Lower Clip 1
44 Eccentric Bushing 1
45 Screw M8×81
46 Small Shaft Sleeve 2
47 Plastic Bearing Seat 1
48 Bearing 625-2Z 2
49 Bearing Cover 1
50 Screw M5×25 2
51 Screw M4×83
52 Nut M5 1
53 Lower Arm 1
54 Bolt M5×30 4
55 Screw M5×40 2
56 Screw M5×50 2
57 Welded Cover 1
58 Main Frame-Left 1
59
Screw M4
×
25
1
60 Flat Washer Ø4 6
61 Blade Guard 1
62 Locknut M4 1
63 Clamping Screw 1
64 Pin 2.5×16 1
65 Adjusting Block 1 1
66 Adjusting Block 2 1
67 Adjusting Rod 1
68 Rear Cover 1
69 Screw M5×45 1
70 Rear Cover Busing 1
65115 Parts List

16" SCROLL SAWS
20
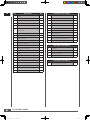
GB No. Description Q'ty
71 Motor 1
72 Rubber Cap 1
73 Middle Cover 1
74 Front Cover 1
75 Screw M4×12 8
76 Cable Gland Strain Relief
Connector 1
77 Power Cord & Plug 1
78 Circuit Board 1
79 Switch Board 1
80 Screw ST4.2×16 4
81 ON/OFF Switch 1
82 Wire Clamp 1
83 Star Button M6x13 1
84 Big Flat Washer Ø6 1
85 Blade 1
86 Air Bag Seat 1
87 Plastic Air Pipe 1
88 Screw M5×61
89 Air Nozzle 1
90 Screw M5×20 1
91 Potentiometer 1
92 Speed control knob 1
OPTIONAL FEATURE #1
60* Flat Washer Ø4 1
90* Screw M5×20 1
119* Indicator Light 1
120* Switch Board 1
121* Switch 1
122* Wire Pressing Plate-Lower 1
123* Wire Pressing Plate-Upper 1
124* Front Cover 1
125* Foot Switch 1
126* Cable Protection Retainer 2
127* Screw ST4.2×9.5 1
OPTIONAL FEATURE #2
93* Adapter 2
94* Screw M5x8 4
95* Flat Saw-blade 1
96* Allen Wrench 2.5 1
OPTIONAL FEATURE #3
97* Nodal Type Air Nozzle 1
Seite wird geladen ...
Seite wird geladen ...
Seite wird geladen ...
Seite wird geladen ...
-
 1
1
-
 2
2
-
 3
3
-
 4
4
-
 5
5
-
 6
6
-
 7
7
-
 8
8
-
 9
9
-
 10
10
-
 11
11
-
 12
12
-
 13
13
-
 14
14
-
 15
15
-
 16
16
-
 17
17
-
 18
18
-
 19
19
-
 20
20
-
 21
21
-
 22
22
-
 23
23
-
 24
24


in anderen Sprachen
- English: Platinum WWSC1410 User manual
Andere Dokumente
-
Scheppach sd1600v Benutzerhandbuch
-
-
Parkside PBS 350 A1 Operating And Safety Instructions Manual
-
-
-
-
EINHELL TC-TS 2225 U Benutzerhandbuch
-
-
-