
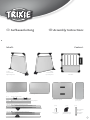
Inhalt: Content:
Assembly Instructions
Aufbauanleitung
rechte
Seitenwand/
right side panel
Rückwand/back panel
Rückwand-Profilstreben/back panel profiles(2 ×)
Türstrebe/door bar(1 ×)
Metallstifte
für Tür/
metal pins
for door
Schrauben/
screws
Schutzkappen/
protective caps
(8 ×)
(4 ×) (2 ×)
Stangen oben/bars for top(1+1 ×)
Stangen unten/bars for base(1+1 ×)
Dach/top plate
Boden/base plate
Frontplatte/
front plate
linke
Seitenwand/
left side panel Tür/door
A
B
C
1

Um maximale Stabilität und Sicherheit zu erreichen, sind alle
Teile der Transportbox sehr genau aufeinander abgestimmt. Dies
erfordert absolut präzises Arbeiten bei der Montage. Nur so
können Sie die Box problemlos aufbauen und ihre hohe Qualität
später voll nutzen. Für den Aufbau werden mindestens zwei
Personen benötigt. Bitte planen Sie für den Aufbau 1–2 Stunden
Zeit ein. Sollten Sie beim Zusammensetzen einen Gummihammer
zur Hilfe nehmen, schützen Sie die Box bitte mit Polstermaterial.
For maximum stability and safety all parts of the transport box have
been compatibly matched with high precision. This requires utmost
precision during assembly. Only that way can the box be assembled
without problems and its high quality will be available to you once it
is finished. You need at least two people for the assembly. Please
reserve 1–2 hours for the assembly. If you use a rubber mallet during
assembly, protect the box with padded material.
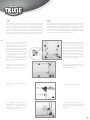
1
2
Legen Sie die rechte Seitenwand auf
den Boden und stecken Sie die vier
Stangen (B und C) ein. Die Türstreben-
Halter müssen vorne sein. Die ge-
schlossene Seite der Stange muss
immer nach vorne bzw. hinten zeigen.
Die Winkel zwischen den Rillen sind
nicht gleich. Dies ist vor allem bei der
in der Abbildung markierten Stange
wichtig. Achten Sie hier besonders
auf die richtige Ausrichtung. Orientie-
ren Sie sich hierfür an der markierten
Kante.
Place the right side panel on the floor
and insert the four bars (B und C). The
door bar holders have to be in front.
The closed side of the bar has to face
towards the front respectively the
back. The angles between the grooves
are not identical. This is especially
important for the bar marked in the
picture. Pay special attention to the
correct alignment of this bar. Use the
marked edge as orientation.
Richten Sie die Box auf, um die
Stangen B lose anzuschrauben. Ver-
zichten Sie zunächst auf die Schutz-
kappen.
Turn the box upright to loosely screw
in the bars B. Do not place the protec-
tive caps on the bars yet.
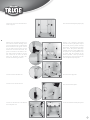
3
4
Schrauben Sie auch die Stangen C
lose an.
Screw also the bars C loosely in.
Die Verbinder für die Rückwand-
Profilstreben sitzen eventuell noch
nicht in der richtigen Position.
Schieben Sie sie falls nötig nach
oben Richtung Stange B.
The connectors for the back panel
profiles might not be in the right
position. Push them up towards bar B
if necessary.
2
B
B
C
C

5
Stecken Sie nun auch die Rückwand-
Streben (A) ein.
Now insert the back panel profiles (A).
6
7
Entfernen Sie den Transportschutz von
den Ecken der Platten. Wichtig: Arbei-
ten Sie beim Einsetzen von Rückwand,
Dach und Boden sehr genau. Setzen
Sie die Platten ganz gerade ein und
drücken Sie sie fest in die Profile, um
spätere Probleme beim Aufbau oder
mit dem fertigen Produkt zu vermei-
den. Setzen Sie als erstes die Rück-
wand ein. Beachten Sie dabei die
korrekte Ausrichtung der Platte.
Remove the transport protection
from the corners of the panels. Impor-
tant: work precisely when inserting
back panel, top plate/roof and base
plate. Insert the panels absolutely
straight and press them tightly into
the profiles to avoid problems later
on either with the assembly or the
finished product. Start by inserting
the back panel. Pay attention to the
correct alignment of the panel.
Setzen Sie dann das Dach ein. Next insert the top panel.
8
9 10
Setzen Sie nun den Boden ein.
Now insert the base plate.
Setzen Sie die Türstrebe und danach
die Frontplatte ein.
Insert the door bar and the front plate.
3
A
A

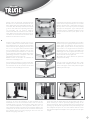
Ziehen Sie alle Schrauben, auch die ggf. zuvor ge-
lockerten, schrittweise und reihum an den verschie-
denen Ecken wieder fest. Durch das Verschrauben
nehmen alle Teile ihre endgültige Position ein, und
die ca. 1–1,5 cm großen Lücken zwischen Verbin-
dern und Gitterstreben schließen sich. Für den
geraden und lückenlosen Aufbau ist es sehr wich-
tig, die Schrauben schrittweise und an allen Seiten
gleichmäßig anzuziehen. Schließlich sollten alle
Schrauben sehr fest angezogen sein.
Hinweis: Drehen Sie auch hier die Schrauben zu-
nächst ohne Schutzkappen ein.
Tighten all the screws, including the ones you have
loosened, step by step going round from corner to
corner. When everything has been screwed to-
gether tightly, all parts will be in their final posi-
tion, and the 1–1.5 cm gaps between connectors
and lattice bars close. To achieve a straight result
without gaps it is vital to tighten the screws step
by step and evenly on all sides. At the end all
screws should be securely tightened.
Tip: tighten the screws without the protective
caps for the time being.
12
13
14
Erst wenn alle Schrauben fest sitzen und die Box
gerade und stabil zusammengefügt ist, lösen Sie
die Schrauben an den oberen Ecken wieder und
setzen diese mit Schutzkappen erneut
ein.
Once all screws are tight and the box is fully
assembled and straight and stable, loosen the
screws in the upper corners and fit them in again
with the protective caps.
15 16
Setzen Sie die Tür in die Scharniere ein und schrauben Sie die
Metallstifte fest. Die Tür sitzt dann korrekt, wenn sie sich mit
leichtem Druck vorne auf den Verschluss öffnen lässt. Dies ist
eine Sicherheitsmaßnahme um ungewolltes Öffnen (z.B. von
innen durch den Hund) sowie Klappern zu verhindern. Öffnet oder
schließt sich die Tür nur schwer, ist dies ein Hinweis darauf, dass
die Schrauben nicht fest genug angezogen sind oder eine der
Wände nicht ganz gerade sitzt.
Fit the door into the hinges and screw the pins tight. The door is
fitted correctly if it can be opened by lightly pressing on the
fastener at the front. This is a security feature to prevent undesired
opening (e.g. through the dog from the inside) and rattling. If the
door is difficult to open or to close, this indicates that the screws
have not been tightened enough or one of the panels is not quite
straight.
4
11
Zuletzt setzen Sie das linke Seitenelement auf.
Drücken Sie bei diesem Arbeitsschritt alle vier
Ecken kräftig und ganz gleichmäßig hinunter. Es
ist normal, dass die Transportbox bei der Monta-
ge dieses Teils stark unter Spannung steht. Dies
ist notwendig, um ein späteres Klappern
während der Fahrt zu verhindern. Sollte sich die
letzte Wand nicht korrekt aufsetzen lassen, ist
es hilfreich die vormontierten Schrauben dieses
Elements an den Ecken zu lockern.
Last add the left side panel. For this press all four
corners down evenly and with force. It is normal
that the transport box is under high tension for
this step. This is necessary to prevent it rattling
when you are driving later. If you cannot fit this
last panel correctly, it might be helpful to loosen
the pre-mounted screws of this panel at the
corners.
-
 1
1
-
 2
2
-
 3
3
-
 4
4


