Bellman Symfon BE1470 Visit Pager Receiver Benutzerhandbuch
- Typ
- Benutzerhandbuch

DESIGN FOR EARS

Manufacturer
Bellman & Symfon Group AB
Södra Långebergsgatan 30
436 32 Askim Sweden
Phone +46 31 68 28 20
E-mail [email protected]
bellman.com
Revision: BE1470_034MAN012
Date of issue: 2020-10-30
TM and © 2020 Bellman & Symfon AB. All rights reserved.

Visit pager receiver
BE1470
Návod k použití CZ
Benutzerhandbuch DE
Brugervejledning DK
User manual EN
Manual del usuario ES
Käyttöopas FI
Mode d'emploi FR
Εγχειρίδιο χρήσης GR
Használati útasítás HU
Manuale utente IT
Gebruiksaanwijzing NL
Brukerhåndbok NO
Instrukcja obsługi PL
Manual do utilizador PT
Bruksanvisning SE
Návod na použitie SK
Installer’s guide EN

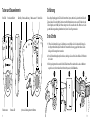
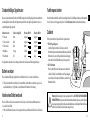
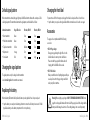
Tasten und Steuerelemente
Funktionstaste
Gürtelclip
Visit-LEDs
Batterie-LED
Batterieauswurf Batteriefach
Optionale Sicherungsschnur mit Klemme
Vorderseiten-Etikett Batterieabdeckung
1.5V AAA
Einführung
Dieses Pager-Empfangsgerät ist Teil des Visit-Smart-Home-Systems, mit dem Sie jederzeit Kontrolle über ihr
Zuhause haben. Es benachrichtigt Sie mit einem sanften Vibrationsalarm, wenn es an der Tür läutet oder das
Telefon klingelt, wenn Ihr Baby nach Ihnen verlangt oder ein Feuer ausbrechen sollte. Bitten lesen Sie die
gesamte Bedienungsanleitung aufmerksam durch, bevor Sie den Pager verwenden.
Erste Schritte
1 Önen Sie das Batteriefach, legen Sie die Batterie ein und schließen Sie das Fach wieder. Befestigen Sie
den Pager mit dem Gürtelclip an Ihrem Gürtel. Für zusätzliche Sicherung gegen Verlust können Sie die
beiliegende Sicherungsschnur verwenden.
2 Um die Funkverbindung überprüfen zu können, benötigen Sie einen Visit-Sender. Drücken Sie Prüftaste/n
des Senders.
3 Der Pager beginnt zu vibrieren und die Visit-LED leuchtet auf. Wenn während des Ladens ein Bettalarm
angeschlossen ist, vibriert dieser Alarm. Wenn nichts passiert, siehe Fehlersuche.
1 2 3
CZ
DE
9 10

11
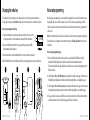
Standardmäßiges Signalmuster
Wenn ein Sender aktiviert wird, leuchtet die Visit-LED am Pager auf und der Pager beginnt, mit einer bestimmten
Geschwindigkeit zu vibrieren. Dies wird Signalmuster genannt. Der Sender gibt das Signalmuster vor, diese ist
standardmäßig wie folgt eingestellt:
Aktivierter Sender Farbe der Pager-LED Vibration, BE1470 Vibration, BE1230
Türsender Grün Langsam Langsam
Taste am Sender Grün Langsam Langsam
Telefonsender Gelb Mitttel Langsam
Babyphone Orange Schnell Schnell
Rauchmelder Rot Lang Lang
Das Signalmuster kann nur an den Sendern geändert werden, siehe separate Bedienungsanleitungen.
Batterie ersetzen
Wenn die Batterie-LED beginnt, gelb zu blinken, ist die Batterie fast leer. So ersetzen Sie die Batterie:
Önen Sie das Batteriefach und drücken Sie die Auswurftaste, um die Batterie zu entfernen. Legen Sie eine
neue Alkaline-Batterie (1,5-V; Typ AAA) ein. Siehe Batteriefach für korrekte Positionierung.
Vorderseiten-Etikett wechseln
Wenn Sie Visit für andere Zwecke verwenden möchten, können Sie das Vorderseiten-Etikett austauschen.
So wechseln Sie das Etikett:
Önen Sie das Batteriefach, ersetzen Sie das originale durch das neue Etikett und schließen Sie das Fach wieder.
12
Funkfrequenz ändern
Wenn Ihr Nachbar ebenfalls über ein Visit-System verfügt, können Sie die Funkfrequenz ändern, um sicherzustellen,
dass die Systeme sich nicht gegenseitig stören. Siehe Funkfrequenz ändern in der Installationsanleitung.
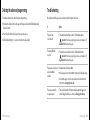
Zubehör
Der Pager kann mit dem folgenden Zubehör ergänzt werden:
BE1260 Pager-Ladegerät
Lädt Ihren Pager über Nacht auf. Sie können es auf dem
Nachttisch platzieren und maximal zwei Bettalarme anschließen.
Bitte beachten Sie, dass der Pager während des Ladevorgangs
nicht vibriert, die Visit-LED funktioniert jedoch wie gewohnt.
BE1270 Bettalarm
Weckt Sie durch Vibrationen, falls etwas passiert, während Sie
schlafen, Schließen Sie den Bettalarm an das Pager-Ladegerät
an und schieben Sie ihn unter das Kopfkissen oder unter die
Matratze Ihres Betts.
Warnung! Bei Verwendung des Pager-Ladegeräts dürfen Sie AUSSCHLIESSLICH NACHLADBARE
NiMH-BATTERIEN im Pager verwenden. Nicht-nachladbare Batterien laufen aus, wenn der Pager in
das Ladegerät eingelegt wird und die auslaufende Batteriesäure beschädigt die Elektronik. Daraus
resultierende Schäden sind von der Garantie ausgeschlossen.
BE1260
BE1270
CZ
DE

Fehlersuche
Die meisten Probleme lassen sich mit den nachstehenden Ratschlägen schnell beheben.
Wenn Lösung
Der Pager scheint
ausgeschaltet
zu sein.
Die Batterie ist leer. Ersetzen Sie sie mit einer Alkaline-Batterie (1,5V; AAA).
Wichtig! Wenn Sie über ein Pager-Ladegerät verfügen, dürfen Sie ausschließlich
nachladbare NiMH-Batterien (1,2V; AAA) für den Pager verwenden.
Die Batterie-LED
blinkt gelb.
Der Batterieladestand ist niedrig. Ersetzen Sie sie mit einer Alkaline-Batterie (1,5V; AAA).
Wichtig! Wenn Sie über ein Pager-Ladegerät verfügen, dürfen Sie ausschließlich
nachladbare NiMH-Batterien (1,2V; AAA) für den Pager verwenden.
Der Pager reagiert
nicht, wenn ein
Sender aktiviert wird.
Überprüfen Sie die Batterien der Sender.
Verringern Sie den Abstand zwischen Pager und Sendern, um sicherzustellen, dass
sie in Reichweite sind.
Überprüfen Sie, ob der Pager auf dieselbe Funkfrequenz eingestellt ist wie
die anderen Geräte im Visit-System, siehe Funkfrequenz ändern in der
Installationsanleitung.
Der Pager wird ohne
ersichtlichen Grund
aktiviert.
Vermutlich ist in der Nähe ein anderes Visit-System installiert, das ihr System
aktiviert. Ändern Sie bei allen Geräten die Funkfrequenz (siehe Funkfrequenz
ändern in der Installationsanleitung).
13 14
CZ
DE
Technische Informationen
Abmessungen H 86mm x B 57mm x T 29mm
Gewicht 70g inkl. Batterie
Strom Netzstrom: 7,5V DC 1500mA mit BE1260 Ladegerät-Zubehör
Batteriestrom: 1 x Alkaline (1,5V; AAA) oder 1 x nachladbare NiMH-Batterie (1,2V; AAA)
Stromverbrauch Aktiv: ≤ 220 mA, Ruhezustand: ≤ 1mA
Betriebsdauer Mit Alkaline-Batterie: 2-3 Wochen, Mit NiMH-Batterie: ca.1 Woche, (wenn vollständig geladen)
Aktivierung Über einen Visit-Sender.
Funkfrequenz 314,91MHz, 433,92MHz und 868,30 MHz, abhängig von der Region.
Reichweite 50 - 250m, abhängig von Funkfrequenz und Gebäudestruktur bzw. -eigenschaften
Im Feld BE1470 Pager, Gürtelclip, Sicherungsschnur und zweites Vorderseiten-Etikett
Zubehör BE1260 Pager-Ladegerät, BE1270 Bettalarm
Umgebung Nur für den Innengebrauch.
Vorschriften Erfüllt CE, FCC & IC, RCM, Der Grüne Punkt
Zusätzliche Informationen
Verwendung,Transport
und Lagerung Informationen nden Sie im Installer’s Guide.
Wartung und Reinigung Wartungsfrei. Reinigung mit einem nur leicht feuchten Tuch. Nicht für den
Wiedereinsatz durch andere Personen vorgesehen.
Sicherheit und Vorschriften Informationen nden Sie im Installer’s Guide.
Service und Support Informationen nden Sie im Installer’s Guide.

99 Installer’s guide
101 Buttons and controls
102 Getting started
103 Using the pager and the accessories
105 Changing the radio key
106 Advanced programming
107 Resetting the pager
107 Testing the connection
108 Troubleshooting
109 Technical information
110 Care and cleaning
111 Important safety instructions
Installer‘s guide
Visit pager receiver in depth information
Installer’s guide 100

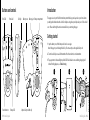
Buttons and controls
Function button
Belt clip
Visit LEDs
Battery LED
Battery eject Battery compartment
Optionl safety cord with clip
Front label
101 Installer’s guide
Battery cover
1.5V AAA
Installer’s guide 102
Introduction
This pager receiver is part of the Visit smart home system that helps you to keep tabs on your home. It alerts
you with gentle vibrations when the doorbell or telephone rings, when your baby needs you or if a re should
occur. Please read through the entire user manual before you start using the pager.
Getting started
1 Open the battery cover, t the battery and close the cover again.
Attach the pager to your belt using the belt clip. For extra security, use the supplied safety cord.
2 To test the radio link you need a Visit transmitter. Press the test button/s on the transmitter.
3 The pager starts to vibrate and lights up a Visit LED. If a bed shaker is connected during charging, it will
vibrate. If nothing happens, see Troubleshooting.
1 2 3

103 Installer’s guide
Default signal pattern
When a transmitter is activated, the pager lights up a Visit LED and starts to vibrate with a certain pace. This is
called signal pattern. The transmitters determine the signal pattern, and the default is as follows:
Activated transmitter Pager LED colour Vibration, BE1470 Vibration, BE1230
Door transmitter Green Slow Slow
Push button transmitter Green Slow Slow
Telephone transmitter Yellow Medium Slow
Baby monitor Orange Fast Fast
Smoke alarm Red Long Long
Changing the signal pattern
The signal pattern can only be changed on the transmitters.
See the Installer’s guide in the transmitter user manual.
Replacing the battery
When the battery LED starts to blink in yellow, the battery is nearly depleted. Here is how you replace it:
Open the battery cover and press the battery eject button to remove the old battery. Insert a new 1.5 V AAA
type alkaline battery, see the battery compartment for correct positioning.
Changing the front label
If you want to use Visit for other purposes, the pager front label can be replaced. Here is how it’s done:
Open the battery cover, replace the original label with the customized one and close the cover again.
Accessories
The pager can be complemented with the following
accessories:
BE1260 Pager charger
Charges your pager during the night. Place it on the
bedside table and connect up to two bed shakers.
Please note that the pager will not vibrate when it’s
charging, but the Visit LEDs will act as usual.
BE1270 Bed shaker
Wakes you with vibrations if anything happens while you
are asleep. Connect it to the pager charger and slide it
under your pillow or mattress.
Installer’s guide 104
Warning! When using the pager charger ONLY USE RECHARGEABLE NiMH BATTERIES in the
pager. Non-rechargeable batteries will start to leak if the pager is placed in the charger and the
battery acid will damage the electronics. The resulting damage is not covered by warranty.
BE1260
BE1270

Changing the radio key
If a neighbor also has a Visit system, you can change the radio key so that your systems don’t interfere.
The radio key is changed on the transmitters and must be set to the same positon on all units in the system.
Here is how you change the radio key
1 Open the transmitter cover and move any radio key switch/es to the up=on position
to change the radio key. See the transmitter user manual for further information.
2 Press and hold the function button on the pager until the green and yellow LEDs
blink alternately. Release the button.
3 Press the test button/s on the transmitter within 30 seconds to send the new radio key.
4 All Visit LEDs blink 5 times to show that the radio key has been changed. It then returns to normal mode.
1 2 3 4
x 5
105 Installer’s guide
On
O
Installer’s guide 106
Advanced programming
By using advanced programming, you can customize the signal pattern from a specic transmitter and event,
displaying the LED colour and vibration pattern of your choice. The advanced programming overrides the
radio key and pairs the units via the serial number. Please note that smoke alarms cannot be programmed for
safety reasons.
Note: The transmitter must be activated as it is intended to be used in the system to generate the right signal.
This means that you can’t always use the transmitter test button, see Default signal pattern for the relevant
transmitter.
Here is how you program the pager:
1 Press and hold the function button on the pager. The green and yellow Visit LEDs will start to blink
alternately. While still holding down the button, activate the desired transmitter as intended.
The yellow battery LED on the pager will light up to indicate that you are in advanced programming mode.
Release the button.
2 Scroll through the dierent Visit LED options by pressing the function button on the pager. Select the desired
Visit LED pattern by holding down the function button until the battery LED goes out and lights up again.
3 Scroll through the dierent vibration options by pressing the function button on the pager. Select the desired
vibration pattern by holding down the function button until the battery LED goes out and lights up again.
4 The pager will now show the new Visit LED colour and vibration pattern. Press the function button briey to
end the demonstration. After a short while, the pager will return to normal mode.

107 Installer’s guide
Deleting the advanced programming
Follow the procedure below to delete the advanced programming:
1 Hold down the function button on the pager until the green and yellow Visit LEDs blink alternately.
Release the button.
2 Press the function button on the pager 3 times in quick succession.
3 All Visit LEDs will light up for ~2 seconds to show that it has been deleted.
Installer’s guide 108
Troubleshooting
Most problems with the pager can be solved quickly by following the advice below.
If Try this
The pager seems
to be turned o
The battery is depleted. Replace it with a 1.5V AAA alkaline battery.
Important! If you have a pager charger, only use a rechargeable 1.2 V
AAA NiMh battery in the pager.
The battery LED blinks
in yellow
The battery level is low. Replace it with a 1.5V AAA alkaline battery.
Important! If you have a pager charger, only use a rechargeable 1.2 V
AAA NiMh battery in the pager.
The pager does not respond
when a transmitter is
activated
Check the batteries in the transmitters.
Move the pager closer to the transmitter to make sure it’s within radio range.
Check that the pager is set to the same radio key as the other units in the
Visit system, see Changing the radio key.
The pager is activated for
no apparent reason
There is probably another Visit system installed nearby that triggers your
system. Change the radio key on all units, see Changing the radio key.

109 Installer’s guide Installer’s guide 110
Care and cleaning
Please note: Failure to follow these care and cleaning instructions could result in damage to the
pager and void the warranty.
Using connectors and jacks
Never force a connector into a jack. Check for obstructions on the jack. If the connector and jack don’t join
with reasonable ease, they probably don’t match. Make sure that the connector matches the jack and that you
have positioned the connector correctly in relation to the jack.
Using the pager
Operate the pager in a dry environment where the temperature is always between 0° and 35° C (32° and 95° F).
If the pager gets wet, it should no longer be regarded as reliable and should therefore be replaced.
Cleaning
To clean the pager, use a soft, lint-free cloth. Avoid getting moisture in openings. Don’t use window or household
cleaners, aerosol sprays, solvents, alcohol, ammonia, or abrasives.
Service and warranty
If the pager appears to be damaged or doesn’t function properly, follow the instructions in this user guide
If the pager still doesn’t function as intended, contact your local dealer for information on service and
warranty.
Additional information
For information about the proper disposal of the pager, and for other important safety and regulatory
compliance information, see the section Important safety instructions on the following page.
Technical information
Dimensions and weight H 86mm (3.4") x W 57mm (2.2")x D 29mm (1.1"). Weight: 70 g (2.5 oz.) incl. battery
Power supply Mains power: 7.5 V DC 1500 mA via the BE1260 charger accessory
Battery power: 1 x 1.5 V AAA alkaline or 1 x 1.2 V AAA NiMH rechargeable battery
Power consumption Active: ≤ 220 mA, Idle position: ≤ 1 mA
Operating time Alkaline battery ~ 2–3 weeks, NiMH battery ~ 1week, fully charged
Activation Via Visit transmitter
Radio frequency 314.91 MHz, 433.92 MHz or 868.3 MHz depending on region
Coverage 50 – 250m (55 – 273yd) depending on radio frequency. Coverage is reduced by
walls, large objects and other radio transmitters.
Accessories BE1260 Pager charger, BE1270 Bed shaker
In the box BE1470 Pager, Belt clip, safety cord and an extra front label
Environment For indoor use only.
Regulatory Fulls CE, FCC & IC, RCM, Der Grüne punkt
Additional information
Operating temperature 0° – 35° C, 32° – 95° F
Transport and storage temp. -10° – 50° C, 14° – 122° F
Relative humidity 15% – 90% (non condensing)
Maintenance and cleaning Maintenance free. Clean with a dry cloth. Don’t use household cleaners, aerosol
sprays, solvents, alcohol, ammonia, or abrasives.
Warranty and service If the product appears to be damaged or doesn’t function properly, follow the
advice in this booklet. If it still doesn’t function properly, contact your retailer for
info about obtaining warranty service.

Important safety instructions
This section contains important information about safety, handling, disposal, recycling and warranty.
Please note: Read all safety information and operating instructions below before using the pager.
Keep the user manual for future use.
Warning!
Failure to follow these safety instructions could result in re, electric shock, or other injury or damage to the
product or other property.
Do not use or store this pager near any heat sources such as naked ames, radiators, ovens or other devices
that produce heat.
Do not dismantle the pager; there is a risk of electric shock. Tampering with or dismantling the pager will
void warranty.
Be aware that alarms can be missed if the batteries run out.
Only refer damaged or faulty pagers to qualied service personnel.
The pager is intended to be used as part of a home alerting system but should not be used as the only
security in life-threatening situations.
The pager has no power switch. In order to disconnect the product, the battery must be removed.
The pager is designed for indoor use only.
Do not expose the pager to moisture.
Protect the pager from shocks during storage and transport.
111 Installer’s guide Installer’s guide 112
Model, type and classication
The information is available inside the pager’s front lid.
Product disposal and recycling information
The symbol to the left means that according to local laws and regulations your product should be
disposed of separately from household waste. When this product reaches its end of life, take it to a
collection point designated by local authorities. The recycling of your product will help conserve
natural resources and ensure that it is recycled in a manner that protects human health and the environment.
Battery disposal information
This symbol indicates that the product contains batteries that according to local laws and regulations
must be disposed of separately from household waste. Take used batteries to a collection point
designated by local authorities.
Support centers
If you have any questions, please contact the Bellman & Symfon support team.

FCC compliance statement
This device complies with Part 15 of the FCC Rules. Opera-
tion is subject to the following two conditions: (1) this device
may not cause harmful interference, and (2) this device must
accept any interference received, including interference that
may cause undesired operation.
Warning: Changes or modications to this unit not expressly
approved by the party responsible for compliance could
void the user’s authority to operate the equipment.
Note: This equipment has been tested and found to comply
with the limits for a Class B digital device, pursuant to part
15 of the FCC Rules. These limits are designed to provide
reasonable protection against harmful interference in a
residential installation. This equipment generates uses and
can radiate radio frequency energy and, if not installed and
used in accordance with the instructions, may cause harmful
interference to radio communications. However, there is no
guarantee that interference will not occur in a particular in-
stallation. If this equipment does cause harmful interference
to radio or television reception, which can be determined by
turning the equipment o and on, the user is encouraged to
try to correct the interference by one or more of the follow-
ing measures:
• Reorient or relocate the receiving antenna.
• Increase the separation between the equipment and
receiver.
• Connect the equipment into an outlet on a circuit dierent
from that to which the receiver is connected.
• Consult the dealer or an experienced radio/TV technician
for help.
Industry Canada statement
This device contains licence-exempt transmitter(s)/
receiver(s) that comply with Innovation, Science and Econo-
mic Development Canada’s licence-exempt RSS(s). Operation
is subject to the following two conditions:
(1) This device may not cause interference.
(2) This device must accept any interference, including inter-
ference that may cause undesired operation of the device.
L' émetteur/récepteur exempt de licence contenu dans
le présent appareil est conforme aux CNR d' Innovation,
Sciences et Développement économique Canada appli-
cables aux appareils radio exempts de licence. L' exploitation
est autorisée aux deux conditions suivantes :
(1) L' appareil ne doit pas produire de brouillage;
(2) L' appareil doit accepter tout brouillage radioélectrique
subi, même si le brouillage est susceptible d' en compro-
mettre le fonctionnement.
This Class B digital aparatus complies with the Canadian
ICES-003.
IC: 6693A-BERX
113 Installer’s guide Installer’s guide 114
-
 1
1
-
 2
2
-
 3
3
-
 4
4
-
 5
5
-
 6
6
-
 7
7
-
 8
8
-
 9
9
-
 10
10
-
 11
11
-
 12
12
-
 13
13
-
 14
14


Bellman Symfon BE1470 Visit Pager Receiver Benutzerhandbuch
- Typ
- Benutzerhandbuch
Verwandte Artikel
Andere Dokumente
-
Motorola LX4 advanced Benutzerhandbuch
-
-
Dogtra iQ cliq Bedienungsanleitung
-
-
-
Creative MuVo T100 Bedienungsanleitung
-
Angelcare AC720-D Benutzerhandbuch
-
FRIEDLAND D918S LIBRA+ Bedienungsanleitung
-
HUMANTECHNIK LSA0002617 Benutzerhandbuch
-
HUMANTECHNIK sinolux Receiver T Benutzerhandbuch