
YMS-4080
EN
Front Surround System
Owner's Manual
• Read the supplied booklet “Safety Brochure” before using the unit.
EN

CONTENTS
NOTICE AND INFORMATION 4
BEFORE USING THE UNIT 6
Features............................................................................ 6
Accessories....................................................................... 9
Using the remote control................................................ 9
Part names and functions............................................. 11
PREPARATION 15
1 Installation............................................................... 15
Installing the unit on a TV stand, etc................................................................................ 15
2 Connecting a TV...................................................... 16
Connecting a TV that supports Audio Return Channel (ARC)................................. 16
Connecting a TV that does not support Audio Return Channel (ARC)................. 17
3 Connecting playback devices................................. 18
HDMI connection with a playback device...................................................................... 18
Analog connection with a playback device................................................................... 18
4 Connecting an external subwoofer....................... 19
Connecting an external subwoofer.................................................................................. 19
5 Connecting the power cord.................................... 19
Connecting the power cord................................................................................................. 19
6 Connecting to a network........................................ 20
Network functions and the MusicCast CONTROLLER app........................................ 20
Wired network connections................................................................................................ 21
Wireless network connections............................................................................................ 21
Connecting with the MusicCast CONTROLLER app (registering the unit as a
MusicCast-enabled device).................................................................................................. 22
PLAYBACK 26
Basic operations............................................................ 26
Basic procedure for playback.............................................................................................. 26
Enjoying your favorite sound....................................... 29
Playback with 3D surround sound.................................................................................... 29
Playback with surround sound........................................................................................... 29
Playback with 2-channel stereo sound............................................................................ 29
Playback of human voices clearly (clear voice)............................................................. 30
Enjoying enhanced bass sound (bass extension)........................................................ 30
Use of a Bluetooth® device........................................... 31
Listening to music stored on a Bluetooth® device...................................................... 31
Useful features for playback........................................ 33
Using a TV’s remote control to operate the unit (HDMI control)........................... 33
Showing audio information and function settings..................................................... 34
Registering favorites with the unit.................................................................................... 35
Play music with AirPlay................................................. 36
Playing iTunes/iOS device music with AirPlay.............................................................. 36
En
2

Play music stored on a media server (computer or
NAS)................................................................................ 38
Playing music stored on a media server (computer or NAS)................................... 38
Listening to Internet radio........................................... 39
Selecting an Internet radio station.................................................................................... 39
Bookmark an Internet station............................................................................................. 39
Listening to streaming services................................... 41
Listening to a streaming service........................................................................................ 41
Play music stored on mobile devices........................... 42
Playing songs stored on your mobile device................................................................ 42
CONFIGURATIONS 43
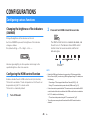
Configuring various functions..................................... 43
Changing the brightness of the indicators (DIMMER)................................................ 43
Configuring the HDMI control function.......................................................................... 43
Configuring HDMI audio output........................................................................................ 44
Setting the auto power standby function...................................................................... 45
Enabling/disabling touch panel control (child lock function)................................. 45
Using wireless speakers (MusicCast Surround function)........................................... 46
Enabling/disabling the network standby function..................................................... 48
Enabling/disabling a wireless (Wi-Fi) connection........................................................ 49
Enabling/disabling the Bluetooth function................................................................... 49
Updating the unit’s firmware.............................................................................................. 50
Initializing the unit.................................................................................................................. 51
Connecting to a network using the WAC function..................................................... 51
Adjusting the levels of the speakers................................................................................. 52
Setting the dynamic range compression........................................................................ 53
APPENDIX 55
When any problem appears (General)........................ 55
When any problem appears (Power and system
function)......................................................................... 55
When any problem appears (Audio)............................ 58
When any problem appears (Bluetooth®)................... 60
When any problem appears (Network trouble).......... 61
Specifications................................................................ 63
Specifications............................................................................................................................ 63
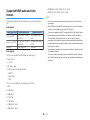
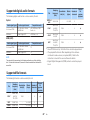
Supported HDMI audio and video formats.................................................................... 66
Supported digital audio formats........................................................................................ 67
Supported file formats........................................................................................................... 67
Information for qualified contractors or dealers........ 68
Mounting the unit on a wall................................................................................................ 68
En
3

NOTICE AND INFORMATION
Information
Indicates notes on instructions, restrictions on functions, and
additional information that may be helpful.
Trademarks
Manufactured under license from Dolby Laboratories. Dolby, Dolby Audio,
Pro Logic, Dolby Vision, and the double-D symbol are trademarks of Dolby
Laboratories.
For DTS patents, see http://patents.dts.com.
Manufactured under license from DTS, Inc. DTS, the Symbol, DTS and the
Symbol together, DTS Digital Surround, and DTS Virtual:X are registered
trademarks or trademarks of DTS, Inc. in the United States and/or other
countries.
© DTS, Inc. All Rights Reserved.
To control this AirPlay 2-enabled speaker, iOS 11.4 or later is required.
Use of the Works with Apple badge means that an accessory has been
designed to work specifically with the technology identified in the badge and
has been certified by the developer to meet Apple performance standards.
Apple, AirPlay, Apple TV, Apple Watch, iPad, iPad Air, iPad Pro, iPhone,
Lightning, and iTunes are trademarks of Apple Inc., registered in the U.S.
and other countries.
App Store
SM
App Store is a service mark of Apple Inc.
The terms HDMI, the HDMI Logo, and High-Definition Multimedia Interface
are trademarks or registered trademarks of HDMI Licensing LLC in the
United States and other countries.
x.v.Color™
“x.v.Color” is a trademark of Sony Corporation.
Windows
®
Windows is a registered trademark of Microsoft Corporation in the United
States and other countries.
Internet Explorer, Windows Media Audio and Windows Media Player are
either registered trademarks or trademarks of Microsoft Corporation in the
United States and/or other countries.
En
4

Android™ Google Play™
Android and Google Play are trademarks of Google LLC.
The Wi-Fi CERTIFIED™ Logo is a certification mark of Wi-Fi Alliance
®
.
Wi-Fi and Wi-Fi CERTIFIED are registered trademarks of Wi-Fi Alliance
®
.
The Bluetooth
®
word mark and logos are registered trademarks owned by
Bluetooth SIG, Inc. and any use of such marks by Yamaha Corporation is
under license.
Blu-ray™
“Blu-ray Disc™”, “Blu-ray™”, and the logos are trademarks of the Blu-ray
Disc Association.
MusicCast is a trademark or registered trademark of Yamaha Corporation.
Yamaha Eco-Label is a mark that certifies products of high environmental
performance.
About content in this manual
• This manual is for the following readers:
– the users of the unit
– the constructor, builder and dealer that mount the unit on the
wall
• This manual uses the following signal words for the important
information:
– WARNING
This content indicates “risk of serious injury or death.”
– CAUTION
This content indicates “risk of injury.”
– NOTICE
Indicates points that you must observe in order to prevent
product failure, damage or malfunction and data loss, as well as
to protect the environment.
– NOTE
Indicates notes on instructions, restrictions on functions, and
additional information that may be helpful.
• The illustrations and screens in this manual are for instructional
purposes only.
• The company names and product names in this manual are the
trademarks or registered trademarks of their respective
companies.
• Software may be revised and updated without prior notice.
• In this manual, iOS and Android mobile devices are collectively
referred to as “mobile devices”. The specific type of mobile
device is noted in explanations as needed.
En
5

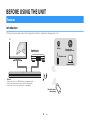
BEFORE USING THE UNIT
Features
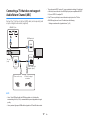
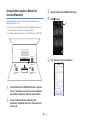
Introduction
This front surround system allows for the enjoyment of dynamic sound with video played on a TV.
The unit
Playback device
(BD/DVD player)
Bluetooth device
(Smartphone)
TV
• Play audio from a TV or BD/DVD player in surround sound.
• Play audio from a Bluetooth device with excellent quality.
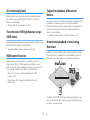
• Play audio over a network with superior sound quality
AirPlay
Internet radio
Streaming service
Wireless router
Computer (NAS)
En
6

3D surround playback
Surround sound can be heard not only from horizontal directions,
but also from varying heights when DTS Virtual:X is used. For
details, see the following:
• “Playback with 3D surround sound” (p.29)
Transmission of 4K high dynamic range
(HDR) video
Enjoy high-resolution video from a cable or satellite set top box, or a
BD/DVD player. For details, see the following:
• “Supported HDMI audio and video formats” (p.66)
HDMI control function
Link functions of a TV and the unit are available using the TV’s
remote control. When a TV that supports Audio Return Channel
(ARC) is used, this ARC-compatible unit can be connected to the
TV via a single HDMI cable. For details, see the following:
• “Using a TV’s remote control to operate the unit (HDMI
control)” (p.33)
• “Connecting a TV that supports Audio Return Channel
(ARC)” (p.16)
Support for playback of Bluetooth
devices
Easily play content from a Bluetooth-compatible smartphone, tablet,
or computer. In addition, our exclusive Compressed Music
Enhancer technology improves sound quality and characteristics,
and can be used to enjoy realistic and impressive sound. For
details, see the following:
• “Listening to music stored on a Bluetooth
®
device” (p.31)
Unrestricted playback of music using
MusicCast
Audio from a server, Internet radio, or streaming services can be
played on this unit. In addition, the unit can distribute content to
other MusicCast-enabled devices for synchronized playback.
The MusicCast CONTROLLER app can be used to perform such
tasks as selecting the input source or song and adjusting volume.
For details, see the following:
En
7

• “Network functions and the MusicCast CONTROLLER
app” (p.20)
Visit the Yamaha website for more information.
Bass extension
The bass extension function boosts low bass levels to enjoy more
powerful sound. For details, see the following:
• “Enjoying enhanced bass sound (bass extension)” (p.30)
Clear voice
The clear voice function makes speech, such as dialog and
narration, clearer. For details, see the following:
• “Playback of human voices clearly (clear voice)” (p.30)
En
8

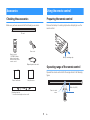
Accessories
Checking the accessories
Make sure you have received all of the following accessories.
DRILL HERE / PERCER CIC
MOUNTING TEMPLATE / GABARIT DE FIXATION
DRILL HERE / PERCER CIC
Power cord
The unit
Remote control
* A CR2025 Lithium
battery has already
been inserted into the
remote control.
Optical digital audio cable
Mounting template
* Use when mounting the unit on a wall.
Quick Start Guide
Safety Brochure
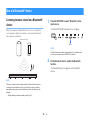
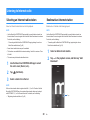
Using the remote control
Preparing the remote control
Remove the battery’s insulating strip before attempting to use the
remote control.
Battery’s insulating strip
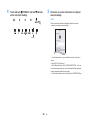
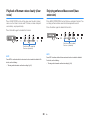
Operating range of the remote control
Operate the remote control within the range shown in the following
figure.
Remote control
sensor
Within 6 m (20 ft)
En
9

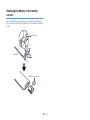
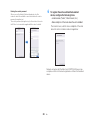
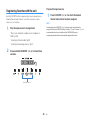
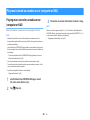
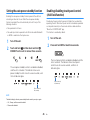
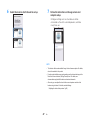
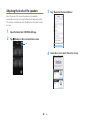
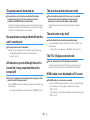
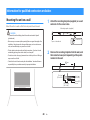
Replacing the battery in the remote
control
Press and hold the release tab firmly in the direction indicated by
[A], and slowly slide the battery holder out in the direction indicated
by [B].
Battery holder
Release tab
CR2025 Lithium battery
En
10

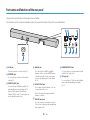
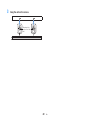
Part names and functions
Part names and functions of the front/top panel
The part names and functions of the front and top panels are as follows.
g
b c d ea
f
f
1
Indicators
The indicators on the top panel flash or glow,
to show the operation and setting status. In
this manual, indicators status, such as off,
glowing, and flashing, are shown as the
illustrations below.
Off
Glows
Flashes
NOTE
The brightness of the indicators can be changed using
DIMMER on the remote control. For details, see the
following:
▪ “Changing the brightness of the indicators
(DIMMER)” (p.43)
2
y (input)
Select an input source to be played back
(p.26).
3
| (mute)
Mute the audio output (p.26). Touch again
to unmute.
4
} / { (volume +/-)
Adjust the volume (p.26).
5
z (power)/CONNECT
Turn on or off the unit.
In addition, use to connect the unit to a
network using the MusicCast CONTROLLER
app (p.22).
NOTE
The unit may automatically turn off when the auto
power standby function is enabled. For details, see
the following:
▪ “Setting the auto power standby function” (p.45)
6
Speakers
En
11

7
Remote control sensors
Receive infrared signals from the remote
control of the unit (p.9).
NOTE
▪ 2, 3, 4 and 5 are touch sensors. Touch icons
with your finger to control functions.
▪ Do not place any objects on the touch panel as
doing so may result in unintended operations.
▪ When touch panel control is disabled, no
operations can be performed using the unit’s touch
panel. This prevents accidental operation of the
unit. For details, see the following:
– “Enabling/disabling touch panel control (child
lock function)” (p.45)
En
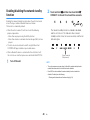
12

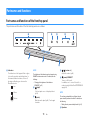
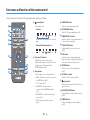
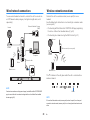
Part names and functions of the rear panel
The part names and functions of the rear panel are as follows.
The illustrations in this manual include labels next to the jacks on the bottom of the unit for easy identification.
a
b
e f g h
c d
1
AC IN jack
Connect the power cord of the unit (p.19).
2
NETWORK jack
For connecting to a network with a network
cable (p.21).
3
HDMI OUT (ARC) jack
For connecting to an HDMI-compatible TV
and outputting video/audio signals (p.16).
When a TV that supports Audio Return
Channel (ARC) is used, TV audio signal can
also be input through this jack.
4
HDMI IN jack
For connecting to an HDMI-compatible
playback device, such as a BD/DVD player,
a satellite and cable TV tuner, and a game
console, and inputting video/audio signals
(p.18).
5
UPDATE ONLY jack
Use to update this unit’s firmware. The jack
is located inside the cover.
Refer to the instructions supplied with the
firmware for details.
6
ANALOG input jack
For connecting to an external device with a
3.5 mm stereo mini plug cable and inputting
audio signals (p.18).
7
SUBWOOFER OUT jack
For connecting to an external subwoofer with
an RCA mono cable (p.19).
8
TV input jack
For connecting to a TV with an optical digital
audio cable and inputting audio signals
(p.17).
En
13

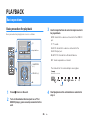
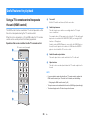
Part names and functions of the remote control
The part names and functions of the supplied remote control are as follows.
a
b
c
d
e
f
g
h
i
j
k
l
m
1
z (power) button
Turn on/off the unit.
Turned on
The indicator for the last input source selected
glows.
Turned off/network standby (p.48)
2
Favorites (1-3) buttons
Register input sources via a network
(Internet radio stations, music files stored on
a media server) as favorites with the
FAVORITE button (p.35).
3
Input buttons
Select an input source to be played back.
• HDMI : Sound from a device connected to
the HDMI IN jack (p.18)
• TV : TV audio (p.16)
• ANALOG : Sound from a device
connected to the ANALOG input jack
(p.18)
• BLUETOOTH : Sound from a Bluetooth
device (p.31)
• NET : Audio acquired via a network
(p.26)
4
SURROUND button
Switch to surround playback (p.29).
5
3D SURROUND button
Switch to 3D surround playback (p.29).
6
SUBWOOFER (+/-) button
Adjust the volume of an external subwoofer
connected to the unit (p.26).
7
CLEAR VOICE button
Enable/disable the clear voice function
(p.30).
8
INFO button
Confirm the type of audio signal being
played, as well as settings for functions such
as the bass extension function (p.34).
9
STEREO button
Switch to stereo (2-channel) playback
(p.29).
:
VOLUME (+/-) button
Adjust the volume of the unit (p.26).
A
| (mute) button
Mute the audio output (p.26). Press the key
again to unmute.
B
BASS EXTENSION button
Enable/disable the bass extension function
(p.30).
C
DIMMER button
Change the brightness of the indicators
(p.43).
En
14

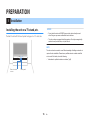
PREPARATION
1 Installation
Installing the unit on a TV stand, etc.
Position the unit with the touch panel facing up on a TV stand, etc.
Remote control
sensor
Touch panel
NOTICE
▪ Do not stack the unit and a BD/DVD player or other device directly on each
other. Doing so may cause a malfunction due to vibrations.
▪ The unit contains non-magnetic shielding speakers. Do not place magnetically
sensitive items (hard disk drive, etc.) near the unit.
NOTE
The unit can also be mounted on a wall. Some knowledge of building construction is
required for safe installation. Please have a qualified contractor or dealer install the
unit on a wall. For details, refer to the following:
▪ “Information for qualified contractors or dealers” (p.68)
En
15

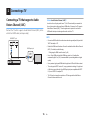
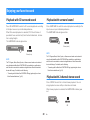
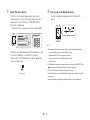
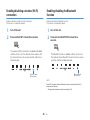
2 Connecting a TV
Connecting a TV that supports Audio
Return Channel (ARC)
Connect the TV, which supports Audio Return Channel (ARC), to the
unit with an HDMI cable (sold separately).
HDMI
(ARC)
HDMIHDMI
HDMIHDMI
HDMI OUT jack
The unit (rear)
HDMI input jack
TV
What is Audio Return Channel (ARC)?
In order for the unit to play audio from a TV, the TV must usually be connected to
the unit via an audio cable as well as an HDMI cable. If, however, the TV supports
Audio Return Channel (ARC), TV audio signals can be input to the unit via the
HDMI cable that outputs video signals from the unit to the TV.
NOTE
▪ Connect an HDMI cable to the audio return channel supported jack (the jack with
“ARC” indicated) on TV.
▪ Enable the HDMI control function of the unit to activate the Audio Return Channel
(ARC). For details, see the following:
– “Configuring the HDMI control function” (p.43)
▪ Use a 19-pin HDMI cable with the HDMI logo printed on it. A cable with a
maximum length of 5 m (16 ft) is recommended to prevent degradation of signal
quality.
▪ Use a premium high-speed HDMI cable for playback of 3D and 4K video content.
▪ The unit supports HDCP version 2.2, a copy protection technology. For playback
of 4K video, connect the unit to the HDMI input jack (one compatible with HDCP
2.2) on an HDCP 2.2-compliant TV.
▪ The TV input jack cannot be used when a TV that supports the Audio Return
Channel is connected to the unit.
En
16

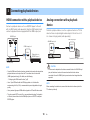
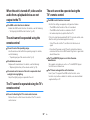
Connecting a TV that does not support
Audio Return Channel (ARC)
Connect the TV to the unit with an HDMI cable (sold separately) and
an optical digital audio cable (supplied).
OPTICAL
HDMI
OO OO
HDMIHDMI
HDMIHDMI
HDMI OUT jack
The unit
(rear)
TV jack
Audio output jack
(digital optical)
HDMI input jack
TV
Remove the cap.1. 2. Check the plug’s
orientation.
NOTE
▪ Use a 19-pin HDMI cable with the HDMI logo printed on it. A cable with a
maximum length of 5 m (16 ft) is recommended to prevent degradation of signal
quality.
▪ Use a premium high-speed HDMI cable for playback of 3D and 4K video content.
▪ The unit supports HDCP version 2.2, a copy protection technology. For playback
of 4K video, connect the unit to the HDMI input jack (one compatible with HDCP
2.2) on an HDCP 2.2-compliant TV.
▪ If the TV has no optical jack, connect the audio output jack on the TV to the
ANALOG input jacks on the unit. For details, see the following:
– “Analog connection with a playback device” (p.18)
En
17

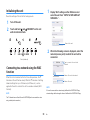
3 Connecting playback devices
HDMI connection with a playback device
Connect a playback device such as a BD/DVD player to the unit
with an HDMI cable (sold separately). Use the HDMI cable to best
connect a playback device equipped with the HDMI output jack.
HDMI
HDMIHDMI
HDMIHDMI
HDMI IN jack
The unit (rear)
HDMI output jack
Playback device
(BD/DVD player)
NOTE
▪ Once the HDMI control function has been activated, video and audio contents from
playback devices can be output from the TV even when the unit is turned off
(HDMI signal pass-through). For details, see the following:
– “Configuring the HDMI control function” (p.43)
▪ Use a 19-pin HDMI cable with the HDMI logo printed on it. A cable with a
maximum length of 5 m (16 ft) is recommended to prevent degradation of signal
quality.
▪ Use a premium high-speed HDMI cable for playback of 3D and 4K video content.
▪ The unit supports HDCP version 2.2, a copy protection technology. For playback
of 4K video, connect the unit to the HDMI output jack on a HDCP 2.2-compliant
BD/DVD player.
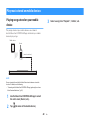
Analog connection with a playback
device
Connect a playback device, such as a game console or a TV that
does not have an optical digital audio output, to the unit via a 3.5
mm stereo mini plug cable (sold separately).
OUTPUT
ANALOG input jack
The unit (rear)
Audio output jack
Playback device (game console)
CAUTION
▪ If volume can be adjusted on the device connected to the unit’s ANALOG input
jack, set that device’s volume to the same level as that of other devices
connected to the unit’s HDMI IN jack to prevent volume from being louder than
expected.
NOTE
When connecting the video device, connect the video device’s video output to the
TV’s video input directly.
En
18

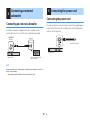
4
Connecting an external
subwoofer
Connecting an external subwoofer
An external subwoofer equipped with built-in amplifier can be
connected to the unit via an RCA mono cable (sold separately).
MONO IN
SUBWOOFER
OUT jack
The unit (rear)
Input jack
Subwoofer quipped with
built-in amplifier
NOTE
A wired connection is not necessary when a Yamaha network subwoofer is used. For
details, see the following:
▪ “Using wireless speakers (MusicCast Surround function)” (p.46)
5 Connecting the power cord
Connecting the power cord
Once all connections have been made, connect the supplied power
cord to the AC IN jack on the unit respectively, and plug the power
cord into an AC wall outlet.
The unit (rear)
To an AC wall outlet
En
19

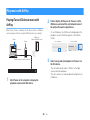
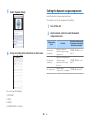
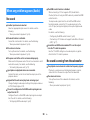
6 Connecting to a network
Network functions and the MusicCast
CONTROLLER app
A network connection allows you to listen to Internet radio stations
or music streaming services, and to use AirPlay to play music files,
or to play music files stored on your computer (media server) via
this unit.
Most playback requires the MusicCast CONTROLLER app for
mobile devices. Install and use the MusicCast CONTROLLER app
on your mobile device to play music files.
Proceed from network connection to playback in the following
sequence.
1
Choose a wired network connection (p.21) or a wireless network
connection (p.21).
2
Use the MusicCast CONTROLLER app to connect the unit to a
network, and register the unit as a MusicCast-enabled device
(p.22).
3
Use the MusicCast CONTROLLER app to play music over a
network* (p.38, p.39, p.41, p.42).
* AirPlay can be used to play music files without using the MusicCast
CONTROLLER app.
NOTE
▪ To use network function, the unit, computer and mobile device must be connected
to the same router.
▪ When using a multiple SSID router, access to the unit might be restricted
depending on the SSID to connect. Connect the unit and mobile device to the
same SSID.
▪ Some security software installed on your computer, or network device settings
(such as a firewall), may block the unit’s access to your computer or Internet radio
stations. Should this occur, change security software and/or network device
settings.
▪ A network connection cannot be established if the MAC address filter on your
router is enabled. Check your router’s settings.
▪ To configure your router’s subnet mask manually, apply the same subnet used by
this unit to all devices.
▪ Use of a broadband connection is recommended when using Internet services.
▪ The unit cannot be connected to a network that requires manual setup. Connect
the unit to a DHCP enabled router.
En
20
Seite wird geladen ...
Seite wird geladen ...
Seite wird geladen ...
Seite wird geladen ...
Seite wird geladen ...
Seite wird geladen ...
Seite wird geladen ...
Seite wird geladen ...
Seite wird geladen ...
Seite wird geladen ...
Seite wird geladen ...
Seite wird geladen ...
Seite wird geladen ...
Seite wird geladen ...
Seite wird geladen ...
Seite wird geladen ...
Seite wird geladen ...
Seite wird geladen ...
Seite wird geladen ...
Seite wird geladen ...
Seite wird geladen ...
Seite wird geladen ...
Seite wird geladen ...
Seite wird geladen ...
Seite wird geladen ...
Seite wird geladen ...
Seite wird geladen ...
Seite wird geladen ...
Seite wird geladen ...
Seite wird geladen ...
Seite wird geladen ...
Seite wird geladen ...
Seite wird geladen ...
Seite wird geladen ...
Seite wird geladen ...
Seite wird geladen ...
Seite wird geladen ...
Seite wird geladen ...
Seite wird geladen ...
Seite wird geladen ...
Seite wird geladen ...
Seite wird geladen ...
Seite wird geladen ...
Seite wird geladen ...
Seite wird geladen ...
Seite wird geladen ...
Seite wird geladen ...
Seite wird geladen ...
Seite wird geladen ...
Seite wird geladen ...
-
 1
1
-
 2
2
-
 3
3
-
 4
4
-
 5
5
-
 6
6
-
 7
7
-
 8
8
-
 9
9
-
 10
10
-
 11
11
-
 12
12
-
 13
13
-
 14
14
-
 15
15
-
 16
16
-
 17
17
-
 18
18
-
 19
19
-
 20
20
-
 21
21
-
 22
22
-
 23
23
-
 24
24
-
 25
25
-
 26
26
-
 27
27
-
 28
28
-
 29
29
-
 30
30
-
 31
31
-
 32
32
-
 33
33
-
 34
34
-
 35
35
-
 36
36
-
 37
37
-
 38
38
-
 39
39
-
 40
40
-
 41
41
-
 42
42
-
 43
43
-
 44
44
-
 45
45
-
 46
46
-
 47
47
-
 48
48
-
 49
49
-
 50
50
-
 51
51
-
 52
52
-
 53
53
-
 54
54
-
 55
55
-
 56
56
-
 57
57
-
 58
58
-
 59
59
-
 60
60
-
 61
61
-
 62
62
-
 63
63
-
 64
64
-
 65
65
-
 66
66
-
 67
67
-
 68
68
-
 69
69
-
 70
70


in anderen Sprachen
- English: Yamaha YMS-4080 Owner's manual
- français: Yamaha YMS-4080 Le manuel du propriétaire
- italiano: Yamaha YMS-4080 Manuale del proprietario
- Nederlands: Yamaha YMS-4080 de handleiding
- dansk: Yamaha YMS-4080 Brugervejledning
- svenska: Yamaha YMS-4080 Bruksanvisning
- Türkçe: Yamaha YMS-4080 El kitabı
- suomi: Yamaha YMS-4080 Omistajan opas
Verwandte Artikel
-
Yamaha YAS-408-BL Benutzerhandbuch
-
Yamaha YSP-2700 Bedienungsanleitung
-
-
-
-
Yamaha RX-S 602 Bedienungsanleitung
-
Yamaha RX-V585 Bedienungsanleitung
-
Yamaha YSP-1600 Benutzerhandbuch
-
Yamaha Audio WXA-50 Bedienungsanleitung
-
Yamaha YAS-106 Bedienungsanleitung