Planex BLW-54SG Quick Installation Manual
- Kategorie
- Router
- Typ
- Quick Installation Manual


2.4GHz IEEE 802.11g 108Mbps WLAN Broadband Router
BLW-54SG
Quick Installation Guide

E
nglish
GGHHzz IIEEEEEEgg MMbbppss WWLLAANN BBrrooaaddbbaanndd RRoouutteerr
Chapter Introduction
Chapter Hardware Installation
Chapter Connecting to the Internet
G
erman
GGHHzz IIEEEEEEgg MMbbppss WWLLAANN BBrreeiittbbaannddRRoouutteerr
Kapitel Einführung
Kapitel Hardwareinstallation
Kapitel Verbinden mit dem Internet
F
rench
RRoouutteeuurr WWLLAANN LLaarrggee BBaannddee GGHHzz IIEEEEEEgg MMbbppss
Chapitre Introduction
Chapitre Installation matérielle
Chapitre Connexion à Internet
CONTENTS

S
panish
EEnnrruuttaaddoorr ddee bbaannddaa aanncchhaa WWLLAANN ddee MMbbppss//IIEEEEEEgg ddee GGHHzz
Capítulo Introducción
Capítulo Instalación del hardware
Capítulo Establecer conexión con Internet
I
tallian
RRoouutteerr BBrrooaaddbbaanndd WWLLAANN GGHHzz IIEEEEEEgg MMbbppss
Capitolo Introduzione
Capitolo Installazione dell’hardware
Capitolo Collegamento ad Internet
D
utch
GGHHzz IIEEEEEEgg MMbbppss WWLLAANNbbrreeeeddbbaannddrroouutteerr
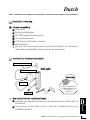
Hoofdstuk Inleiding
Hoofdstuk Hardwareinstallatie
Hoofdstuk Verbinden met het Internet
CONTENTS

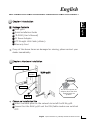
CChhaapptteerr IInnttrroodduuccttiioonn
PPaacckkaaggee CCoonntteennttss
BLWSG
Quick Installation Guide
CDROM (User’s Manual)
AC Power Adapter
UTP Straight LAN Cable (Meter)
Warranty Card
If any of the above items are damaged or missing please contact your
dealer immediately
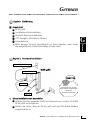
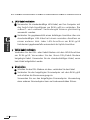
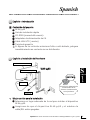
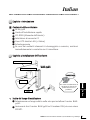
CChhaapptteerr HHaarrddwwaarree IInnssttaallllaattiioonn
CChhoooossee aann IInnssttaallllaattiioonn SSiittee
Select a suitable place on the network to install the BLWSG
Ensure that the BLWSG and the DSL/Cable modem are switched
OFF
English
1
English GHz IEEE g Mbps WLAN Broadband Router
English
E
TToo PPCCss
BBLLWWSSGG
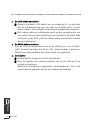
Do not use a power AC
adapter other than that
supplied with the
product
WWAARRNNIINNGG
Existing Connection
DSL/Cable
Modem
UTP Cable

2
CCoonnnneecctt LLAANN CCaabblleess
Use standard LAN cables to connect your computer(s) to the
Switching Hub ports on the BLWSG Both BaseT and
BaseT connections can be used simultaneously
If required connect any port to a normal port on another Hub
using a standard LAN cable Any LAN port on the BLWSG will
automatically function as an Uplink port when required
CCoonnnneecctt WWAANN CCaabbllee
Connect the DSL or Cable modem to the WAN port on the BLWSG
Use the cable supplied with your DSL/Cable modem If no cable was
supplied use a standard cable
PPoowweerr UUpp
Switch on the DSL modem or connect the cable
Connect the supplied power adapter to the BLWSG and switch
the power on
Use only the power adapter provided Using a different one may
cause hardware damage
BLW-54SG
English
E

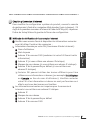
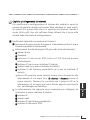
CChhaapptteerr CCoonnnneeccttiinngg ttoo tthhee IInntteerrnneett
To modify the product’s system configuration open the management
console using a standard Web browser (see below) If this is the first
time connecting to the Internet using the BLWSG click on the
Setup Wizard icon on the left of the configuration screen
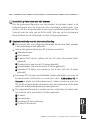
VVeerriiffyyiinngg MMeetthhoodd ooff IInntteerrnneett CCoonnnneeccttiioonn
Please be sure to have the following information ready before using
the Connection Wizard:
Information provided by your ISP (Internet Service Provider):
User name
Password
DNS server IP address (only if your ISP provides this information)
IP address (if you are using a static IP address)
Subnet mask (if you are using a static IP address)
Default gateway IP address (if you are using a static IP address)
Some ISP's may use different terms to refer to the information
above (eg
UUsseerr IIDD
or
AAccccoouunntt
instead of user name Please
contact your ISP if the information above is not provided or is
provided under unfamiliar term(s)
The following information is required for connecting to the Internet if
you are using a static IP address:
IP address
Subnet mask
Default gateway IP address
DNS server IP address
3
English GHz IEEE g Mbps WLAN Broadband Router
English
E

4
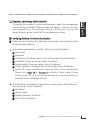
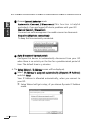
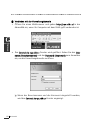
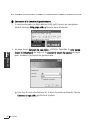
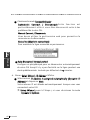
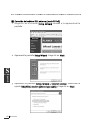
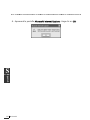
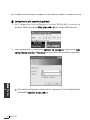
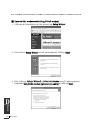
CCoonnnneeccttiinngg ttoo tthhee mmaannaaggeemmeenntt ccoonnssoollee
If your computer is already attached to the BLWSG start a Web
browser and enter
hhttttpp:://////
in the address field
The
CCoonnnneecctt ttoo
screen will be displayed Specify the
login
uusseerr nnaammee
and login
ppaasssswwoorrdd
to access the management
console
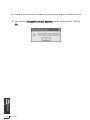
Once the user name and password has been configured the
CCoonnnneecctt ttoo
screen will be displayed instead
BLW-54SG
English
E

[[UUsseerr NNaammee]]
Default settings do not need enter a User Name
Please keep the user name blank
[[NNeeww PPaasssswwoorrdd]]
Enter a new password using to alphanumeric characters The
characters entered in this field will be displayed as ****
Default Password:
Click
OOKK
The
bbRRooaadd LLaannnneerr SSmmaarrtt MMaannaaggeerr
will be displayed
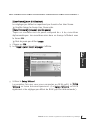
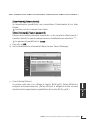
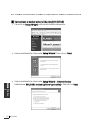
Using
SSeettuupp WWiizzaarrdd
The first time you connect to the BLWSG the Setup Wizard will
automatically run (The Setup Wizard will also run if the BLW
SG’s default settings are restored)
5
English GHz IEEE g Mbps WLAN Broadband Router
English
E

6
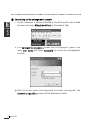
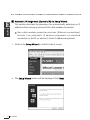
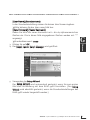
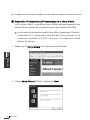
AAuuttoommaattiicc IIPP AAssssiiggnnmmeenntt ((DDyynnaammiicc IIPP)) vviiaa SSeettuupp WWiizzaarrdd
This section describes the procedure for automatically obtaining an IP
address without using an external DSL cable modem connection
Noncable modem connection services (Ethernet connections)
include i) an automatic IP address assignment via standard
connection or DHCP as well as ii) static IP address assignment
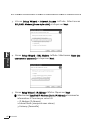
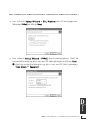
Click on the
SSeettuupp WWiizzaarrdd
on the left side of screen
The
SSeettuupp WWiizzaarrdd
screen will be displayed Click
NNeexxtt
BLW-54SG
English
E

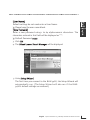
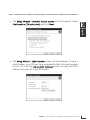
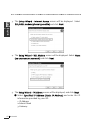
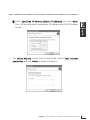
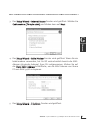
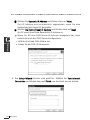
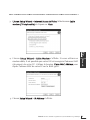
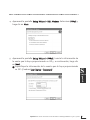
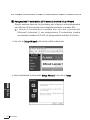
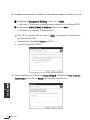
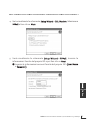
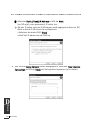
The
SSeettuupp WWiizzaarrdd IInntteerrnneett AAcccceessss ssccrreeeenn
will be displayed Select
CCaabbllee mmooddeemm ((TTVVssttyyllee ccaabbllee))
and click
NNeexxtt
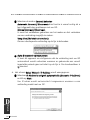
The
SSeettuupp WWiizzaarrdd CCaabbllee MMooddeemm
screen will be displayed If using a
cable modem your ISP may have recorded the MAC (physical) address
of your PC Use the
CClloonnee MMAACC AAddddrreessss
button to copy the MAC
address from your PC to the BLWSG
7
English GHz IEEE g Mbps WLAN Broadband Router
English
E

8
BLW-54SG
English
E
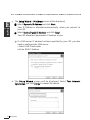
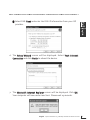
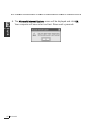
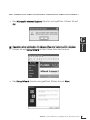
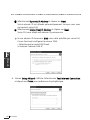
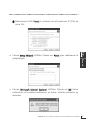
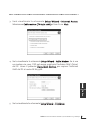
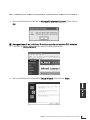
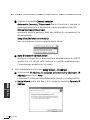
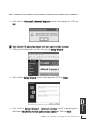
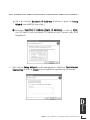
The
SSeettuupp WWiizzaarrdd IIPP AAddddrreessss
screen will be displayed
Select
DDyynnaammiicc IIPP AAddddrreessss
and click
NNeexxtt
Your IP Address is allocated automatically when you connect to
your ISP
Select
SSttaattiicc ((FFiixxeedd)) IIPP AAddddrreessss
and click
NNeexxtt
Your ISP allocates a permanent IP Address to you
If a DNS server IP address has been specified by your ISP you also
need to configure the DNS server
Select DNS Fixed mode
Enter DNS IP Address
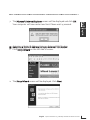
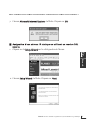
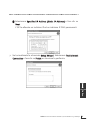
The
SSeettuupp WWiizzaarrdd
screen will be displayed Select
TTeesstt IInntteerrnneett
CCoonnnneeccttiioonn
and click
FFiinniisshh
to reboot the device

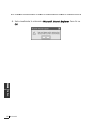
The
MMiiccrroossoofftt IInntteerrnneett EExxpplloorreerr
screen will be displayed and click
OOKK
Your computer will now restart and test Please wait seconds
AAssssiiggnniinngg aa SSttaattiicc IIPP AAddddrreessss UUssiinngg aann EExxtteerrnnaall DDSSLL MMooddeemm
Click
SSeettuupp WWiizzaarrdd
on the left side of screen
The
SSeettuupp WWiizzaarrdd
screen will be displayed Click
NNeexxtt
9
English GHz IEEE g Mbps WLAN Broadband Router
English
E

10
BLW-54SG
English
E
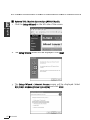
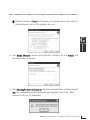
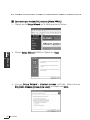
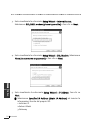
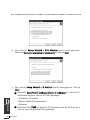
The
SSeettuupp WWiizzaarrdd IInntteerrnneett AAcccceessss
screen will be displayed Select
DDSSLL//AADDSSLL mmooddeemm ((pphhoonneettyyppee ccaabbllee))
and click
NNeexxtt
The
SSeettuupp WWiizzaarrdd DDSSLL MMooddeemm
screen will be displayed Select
NNoonnee
((nnoo uusseerrnnaammee oorr ppaasssswwoorrdd))
and click
NNeexxtt
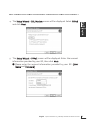
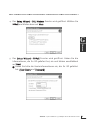
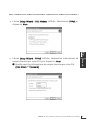
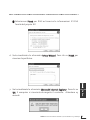
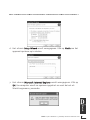
The
SSeettuupp WWiizzaarrdd IIPP AAddddrreessss
screen will be displayed and click
NNeexxtt
Select
SSppeecciiffiieedd IIPP AAddddrreessss ((SSttaattiicc IIPP AAddddrreessss))
and enter the IP
information provided by your ISP
IP Address
Subnet Mask
Gateway

Select DNS
FFiixxeedd
and enter the DNS IP information from your ISP
provider
The
SSeettuupp WWiizzaarrdd
screen will be displayed Select
TTeesstt IInntteerrnneett
CCoonnnneeccttiioonn
and click
FFiinniisshh
to reboot the device
The
MMiiccrroossoofftt IInntteerrnneett EExxpplloorreerr
screen will be displayed Click
OOKK
Your computer will now restart and test Please wait seconds
11
English GHz IEEE g Mbps WLAN Broadband Router
English
E

12
BLW-54SG
English
E
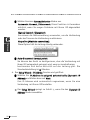
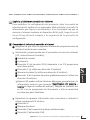
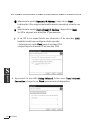
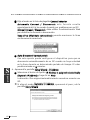
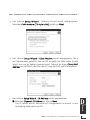
EExxtteerrnnaall DDSSLL MMooddeemm CCoonnnneeccttiioonn ((PPPPPPooEE MMooddee))
Click the
SSeettuupp WWiizzaarrdd
on the left side of the screen
The
SSeettuupp WWiizzaarrdd
screen will be displayed Click
NNeexxtt
The
SSeettuupp WWiizzaarrdd IInntteerrnneett AAcccceessss
screen will be displayed Select
DDSSLL//AADDSSLL mmooddeemm ((pphhoonneettyyppee ccaabbllee))
and click
NNeexxtt

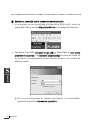
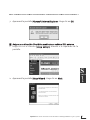
The
SSeettuupp WWiizzaarrdd DDSSLL MMooddeemm
screen will be displayed Select
PPPPPPooEE
and click
NNeexxtt
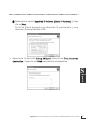
The
SSeettuupp WWiizzaarrdd PPPPPPooEE
screen will be displayed Enter the account
information provided by your ISP then click
NNeexxtt
Please enter the account information provided by your ISP
((UUsseerr
NNaammee
and
PPaasssswwoorrdd))
13
English GHz IEEE g Mbps WLAN Broadband Router
English
E

14
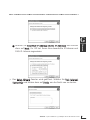
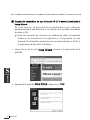
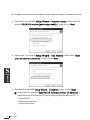
Choose
CCoonnnneecctt bbeehhaavviioorr
mode
AAuuttoommaattiicc CCoonnnneecctt // DDiissccoonnnneecctt::
This function is helpful
particularly if you are logged off due to problems with your ISP
MMaannuuaall CCoonnnneecctt // DDiissccoonnnneecctt::
You must use web management to enable connect or disconnect
KKeeeepp aalliivvee ((MMaaiinnttaaiinn ccoonnnneeccttiioonn))::
To keep the line constantly connected
AAuuttooDDiissccoonnnneecctt ttiimmeeoouutt ppeerriioodd::
Configure this device to automatically disconnect from your ISP
when there is no activity on the line for a predetermined period of
time The default time is minutes
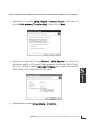
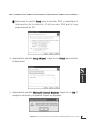
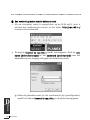
The
SSeettuupp WWiizzaarrdd IIPP AAddddrreessss
screen will be displayed
Select
IIPP AAddddrreessss iiss aassssiiggnneedd aauuttoommaattiiccaallllyy ((DDyynnaammiicc IIPP AAddddrreessss))
and click
NNeexxtt
Your IP Address is allocated automatically when you connect to
your ISP
Setup Wizard will go to step if you choose Dynamic IP Address
mode
BLW-54SG
English
E

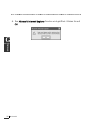
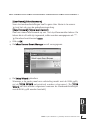
Select
SSppeecciiffiieedd IIPP AAddddrreessss ((SSttaattiicc IIPP AAddddrreessss))
and click
NNeexxtt
Your ISP has allocated a permanent IP Address and DNS IP Address
to you
The
SSeettuupp WWiizzaarrdd
screen will be displayed Select
TTeesstt IInntteerrnneett
CCoonnnneeccttiioonn
and click
FFiinniisshh
to reboot the device
15
English GHz IEEE g Mbps WLAN Broadband Router
English
E

16
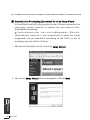
The
MMiiccrroossoofftt IInntteerrnneett EExxpplloorreerr
screen will be displayed and click
OOKK
Your computer will now restart and test Please wait seconds
BLW-54SG
English
E
Seite laden ...
Seite laden ...
Seite laden ...
Seite laden ...
Seite laden ...
Seite laden ...
Seite laden ...
Seite laden ...
Seite laden ...
Seite laden ...
Seite laden ...
Seite laden ...
Seite laden ...
Seite laden ...
Seite laden ...
Seite laden ...
Seite laden ...
Seite laden ...
Seite laden ...
Seite laden ...
Seite laden ...
Seite laden ...
Seite laden ...
Seite laden ...
Seite laden ...
Seite laden ...
Seite laden ...
Seite laden ...
Seite laden ...
Seite laden ...
Seite laden ...
Seite laden ...
Seite laden ...
Seite laden ...
Seite laden ...
Seite laden ...
Seite laden ...
Seite laden ...
Seite laden ...
Seite laden ...
Seite laden ...
Seite laden ...
Seite laden ...
Seite laden ...
Seite laden ...
Seite laden ...
Seite laden ...
Seite laden ...
Seite laden ...
Seite laden ...
Seite laden ...
Seite laden ...
Seite laden ...
Seite laden ...
Seite laden ...
Seite laden ...
Seite laden ...
Seite laden ...
Seite laden ...
Seite laden ...
Seite laden ...
Seite laden ...
Seite laden ...
Seite laden ...
Seite laden ...
Seite laden ...
Seite laden ...
Seite laden ...
Seite laden ...
Seite laden ...
Seite laden ...
Seite laden ...
Seite laden ...
Seite laden ...
Seite laden ...
Seite laden ...
Seite laden ...
Seite laden ...
Seite laden ...
Seite laden ...
Seite laden ...
-
 1
1
-
 2
2
-
 3
3
-
 4
4
-
 5
5
-
 6
6
-
 7
7
-
 8
8
-
 9
9
-
 10
10
-
 11
11
-
 12
12
-
 13
13
-
 14
14
-
 15
15
-
 16
16
-
 17
17
-
 18
18
-
 19
19
-
 20
20
-
 21
21
-
 22
22
-
 23
23
-
 24
24
-
 25
25
-
 26
26
-
 27
27
-
 28
28
-
 29
29
-
 30
30
-
 31
31
-
 32
32
-
 33
33
-
 34
34
-
 35
35
-
 36
36
-
 37
37
-
 38
38
-
 39
39
-
 40
40
-
 41
41
-
 42
42
-
 43
43
-
 44
44
-
 45
45
-
 46
46
-
 47
47
-
 48
48
-
 49
49
-
 50
50
-
 51
51
-
 52
52
-
 53
53
-
 54
54
-
 55
55
-
 56
56
-
 57
57
-
 58
58
-
 59
59
-
 60
60
-
 61
61
-
 62
62
-
 63
63
-
 64
64
-
 65
65
-
 66
66
-
 67
67
-
 68
68
-
 69
69
-
 70
70
-
 71
71
-
 72
72
-
 73
73
-
 74
74
-
 75
75
-
 76
76
-
 77
77
-
 78
78
-
 79
79
-
 80
80
-
 81
81
-
 82
82
-
 83
83
-
 84
84
-
 85
85
-
 86
86
-
 87
87
-
 88
88
-
 89
89
-
 90
90
-
 91
91
-
 92
92
-
 93
93
-
 94
94
-
 95
95
-
 96
96
-
 97
97
-
 98
98
-
 99
99
-
 100
100
-
 101
101


Planex BLW-54SG Quick Installation Manual
- Kategorie
- Router
- Typ
- Quick Installation Manual
in anderen Sprachen
- English: Planex BLW-54SG
- français: Planex BLW-54SG
- español: Planex BLW-54SG
- italiano: Planex BLW-54SG
- Nederlands: Planex BLW-54SG
Sonstige Unterlagen
-
DeLOCK 87514 Datenblatt
-
Sitecom DC-227 Installationsanleitung
-
 StreamLocator Hub Installationsanleitung
-
 ZyXEL Communications P-334WHD Benutzerhandbuch
-
Cisco Systems WAG54GS (EU) Benutzerhandbuch
-
 ZyXEL Communications P-334WH Benutzerhandbuch
-
Longshine IEEE802.11n AP/Router/Client Benutzerhandbuch
-
Linksys WAG54GX2 Benutzerhandbuch
-
Topcom WIRELESS KIT 108MBPS Benutzerhandbuch
-
 ZyXEL Communications P-335WT Schnellstartanleitung


