Acson OM-G8-0501-Acson Operating Instructions Manual
- Typ
- Operating Instructions Manual

Model:OM-G8-0501-Acson
OPERATION MANUAL
Before using your air conditioner, please read this operating
manual carefully and keep it for future reference.
AUTO
ON
OFF
A
M
PM
MIN
HR
F
C
OM-G8-0501-Acson 11/21/05, 10:47 AM8

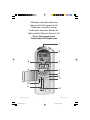
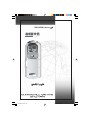
G8 Remote Controller Indication
Indication De Télécommande G8
G8-Remote-Controller-Anzeige
Indicazione Controller Remoto G8
Indicación Del Mando A Distancia G8
Пульт Дистанционного
Управления G8 Индикация
Part No.: A08019025481 OM-G8-0501-Acson
i
AUTO
ON
OFF
A
M
PM
MIN
HR
F
C
C
L
O
C
K
S
L
E
E
P
O
F
F
T
I
M
E
R
S
W
I
N
G
O
N
T
I
M
E
R
SET
CLR
MODE
SET
CLR
1
2
3
7
5
9
11
4
10
6
8
12
OM-G8-0501-Acson 11/21/05, 10:47 AM9

ii
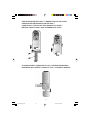
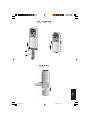
TO INSERT BATTERIES / INTRODUIRE LES PILES / EINSETZEN DER BATTERIEN /
INSERIMENTO DELLE BATTERIE / INSERTE LAS PILAS / УСТАНОВКА БАТАРЕЙ
HOW TO MOUNT ONTO THE WALL / COMMENT INSTALLER SUR LE MUR /
ANBRINGEN DER FERNSTEUERUNG AN DER WAND /
COME FISSARE L’ASTUCCIO DEL TELECOMANDO ALLA PARETE /
MONTAGE SOBRE LA PARED / КАК УСТАНОВИТЬ НА СТЕНУ
AU
TO
ON
OFF
AM
PM
MIN
HR
F
C
AUTO
ON
OFF
AM
PM
MIN
HR
F
C
OM-G8-0501-Acson 11/21/05, 10:47 AM10

1
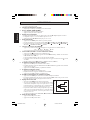
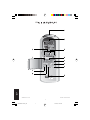
1. Transmission source
• The source where the signal will be transmitted.
2. Signal transmission indication
• Blink to confirm that the last setting has been transmitted to the unit.
3. “ON/OFF” Button
• Press once to start the air conditioner unit.
• Press again to stop the unit.
4. Temperature setting
• To set the desired room temperature, press the ▲ or ▼ button to increase or decrease the set tempera-
ture.
• The temperature setting range is from 16°C to 30°C (Optional setting 18°C to 30°C.)
• Press both buttons simultaneously to toggle ▲ and ▼ from °C to °F setting.
5. Operation mode
• Press the MODE button to select the type of operating mode.
• For cooling only unit, the available modes are: COOL ( ), DRY ( ) & FAN ( ).
• For heat pump unit, the available modes are: AUTO ( ), COOL ( ), DRY ( ), FAN ( ) & HEAT ( ).
6. Fan speed selection
• Press the button continuously will toggle the fan speed in the following order:
Low
–––
: Med
–––
: High
–––
: Auto
• Stop pressing when the desired fan speed appears on the display screen.
7. Turbo function (optional - only applicable to Inverter unit)
• Press for fast cooling or heating operation.
• The temperature will be increased internally if it is in HEAT mode, decreased if in COOL or DRY
mode.
Fan speed will be increased if it is not at maximum speed.
• The temperature & fan speed will resume to user setting if is pressed again or after 20 minutes.
• Available under HEAT, COOL & DRY modes only.
8. ON timer setting
• Press the SET button will activate the on timer function.
• Set the desired on time by pressing the SET button continuously. If the timer is set to 7.30am, the air
conditioner will turn on at 7.30am sharp.
• Press the CLR button to cancel the on timer setting.
9. OFF timer setting
• Press the SET button will activate the off timer function.
• Set the desired off time by pressing the SET button continuously.
• Press the CLR button to cancel the off timer setting.
10. Automatic air swing (optional)
• Press the SWING button to activate the automatic air swing function.
• To distribute the air to a specific direction, press the SWING button and wait
until the louver move to the desired direction and press the button once again.
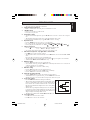
11. Sleep mode setting
• Press the SLEEP button will activate the sleep mode function.
• This is an energy saving option. When the unit is operating under cooling
mode, the set temperature is increased by 0.5°C after the first half an
hour, 1°C after the second half an hour and total of 2°C after the
following 1 hour. This function will prevent excessive cooling during
summer season.
• When the unit is operating under heating mode, the set temperature
is decreased by 1°C after the first half an hour, 2°C after the second
half an hour and total of 3°C after the following 1 hour. This function
will prevent night sweat during summer season.
• This function is available under COOL, HEAT & AUTO mode.
12. Clock time setting
• Press ▲ button to increase the clock time.
• Press ▼ button to decrease the clock time.
OPERATING GUIDE
+2 C
+1 C
- 1 C
- 2 C
0 0.5 1 1.5 2
ENGLISH
OM-G8-0501-Acson 11/21/05, 10:47 AM1

2
MODE D’EMPLOI
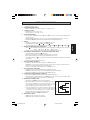
1. Source de transmission
•
La source d’où le signal sera transmis.
2. Indication de transmission de signal
•
Clignotement pour confirmer que le dernier réglage ait été transmis à l’unité.
3. Bouton “ON/OFF” (MARCHE’ARRÊT).
•
Appuyez une fois pour mettre le climatiseur en marche.
•
Appuyez de nouveau pour éteindre le climatisateur.
4. Réglage de la température.
•
Pour régler la température au niveau que vous souhaitez, appuyez sur le bouton
▲
ou
▼
pour l’augmenter ou la baisser.
•
La température se régle de 16°C à 30°C (Possibilité de régler de 18°C à 30°C.)
•
Appuyez sur les boutons
▲
et
▼
simultanément pour passer des °C aux °F.
5. Mode opérationnel
•
Appuyez sur le bouton MODE pour sélectionner le type de mode opérationnel.
• Pour l’unité de refroidissement, les modes disponibles comprennent COOL ( ) (FROID), DRY ( ) (SEC) & FAN ( ) (VENTILATION).
•
Pour l’unité de thermopompe, les modes disponibles comprennent AUTO
( )
(AUTO), COOL
( )
(FROID), DRY
( )
(SEC), FAN
( )
(VENTILATION) & HEAT
( )
(CHAUD).
6. Sélection de la vitesse du ventilateur
•
Appuyez de façon continue sur le bouton pour transformer successivement la vitesse du ventilateur comme suit:
Lent
–––
: Moyen
–––
: Rapide
–––
: Auto
•
Cessez d’appuyer lorsque la vitesse désirée apparaît sur l’écran d’affichage.
7. Fonction turbo (facultatif - concerne seulement l’onduler)
•
Appuyez sur le bouton pour refroidissement ou réchauffement rapide.
•
La température augmente intérieurement si l’appareil est sur le mode de HEAT (Chauffage), et diminue s’il est sur le mode de
COOL (Refroidissement) ou DRY (Sec).
La vitesse du ventilateur augmente si celui-ci n’est par réglé sur la vitesse maximum.
•
La température et la vitesse du ventilateur retourne au régime choisi si vous appuyez de nouveau sur le bouton ou au bout
de 20 minutes.
•
Disponible seulement sur le mode HEAT (Chauffage), COOL (Refroidissement) et DRY (Sec).
8. Programmer la minuterie de mise en marche
•
Appuyez sur le bouton SET pour activer la minuterie de mise en marche.
•
Programmez l’heure désirée en appuyant continuellement sur le bouton SET. Si la minuterie est programmée à 7h30, le climatiseur
se mettra en marche à 7h30 pile.
•
Appuyez sur le bouton CLR pour annuler le programmation de la minuterie.
9. Programmer la minuterie d’arrêt
•
Appuyez sur le bouton SET pour activer la minuterie d’arrêt.
•
Programmez l’heure désirée en appuyant continuellement sur le bouton SET.
•
Appuyez sur le bouton CLR pour annuler le programmation d’arrêt.
10. Oscillation automatique de la ventilation (facultatif)
•
A
ppuyez sur le bouton SWING pour activer la fonction d’oscillation automatique de la ventilation.
•
Pour orienter la ventilation dans une direction précise, appuyez sur le bouton SWING, attendez ensuite que le volet de venti-
lation souffle dans la direction désirée puis appuyez de nouveau sur le bouton.
11. Réglage du mode de nuit
•
Appuyez sur le bouton SLEEP pour activer la fonction de mode de nuit.
•
Ceci est une option anti-gaspillage d’énergie. Lorsque l’unité fonctionne en mode
de refroidissement, la température est réglée de sorte qu’elle monte de 0,5°C au
bout d’une demie-heure, de 1°C au bout d’une heure et de 2°C au bout de la deuxième
heure. Cette fonction permet d’éviter un refroidissement trop élevé en été.
•
Lorsque l’unité fonctionne en mode de chauffage, la température est réglée de sorte
qu’elle descende de 1°C au bout d’une demie-heure, de 2°C au bout d’une heure et
de 3°C au bout de la deuxième heure. Cette fonction permet d’éviter les chaleur
nocturnes excessives en été.
•
Cette fonction est disponible en mode COOL (FROID), HEAT (CHAUD) & AUTO (AUTO).
12. Mettre l’horloge à l’heure
•
Appuyez sur le bouton ▲ pour avancer l’heure.
•
Appuyez sur le bouton ▼ pour retarder l’heure.
+2 C
+1 C
- 1 C
- 2 C
0 0,5 1 1,5 2
FRANÇAIS
OM-G8-0501-Acson 11/21/05, 10:47 AM2

3
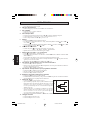
1. Sendungsquelle
•
Die Ausgangsquelle des Signals.
2. Signalübertragungsanzeige
•
Blinkt auf, um anzuzeigen, dass das letzte Signal an das Gerät übertragen wurde.
3. “AN/AUS” schalter
•
Einmal betätigen - das Gerät schaltet sich ein.
•
Nochmals betätigen - das Gerät schaltet sich aus.
4. Temperatureinstellung
•
Um die gewünschte Temperatur einzustellen, den
▲
oder den
▼
Knopf betätigen, so wird die eingestellte Temperatur höher
oder niedriger gestellt.
•
Der Temperatur-Einstellbereich liegt zwischen 16°C und 30°C (Die optimale Einstellung liegt zwischen 18°C und 30°C.)
•
Die beiden Knöpfe
▲
und
▼
zugleich betätigen, um die Gradeinstellung von Celsius auf Fahrenheit zu bringen.
5. Betrieb
•
Zur Wahl der verschiedenen Arten des Betriebs wird der MODE Knopf betätigt.
•
Für die Kühlung kann man COOL
( )
, DRY
( )
oder FAN
( )
wählen.
• Für den Betrieb der Wärmepumpe hat man die Wahl zwischen AUTO ( ), COOL ( ), DRY ( ), FAN ( ) oder HEAT ( ).
6. Wahl der drehzahl-Stufe des kühlgebläses
•
Wird der Knopf kontinuierlich betätigt, dann ändert sich jeweils die Drehzahlstufe des Kühlgebläses in dieser Reihenfolge:
Niedrig
–––
: Mittel
–––
: Hoch
–––
: Automatisch
•
Den Knopf nicht weiter betätigen, wenn die gewünschte Drehzahlstufe des Kühlgebläses angezeigt wird.
7. Turbofunktion (wahlmöglichkeit - nur auf invertergerät anwenbar)
•
Zum schnellen Kühlen oder Erwärmen die Taste betätigen.
•
Die Innentemperatur erhöht sich bei Wärmebetrieb und sinkt bei Kühl-oder Trockenbetrieb.
Falls die Gebläsedrehzahl nicht schon auf Höchstgeachwindigkeit läuft, wird sie erhöht.
•
Bie nochmaligem Betätigen der Taste gehen Temperatur und Gebläsedrehzahl auf die Benutzereinstellung zurück, andernfalls
nach 20 Minuten.
•
Erhältlich nur für Wärme-, Kühl- und Trockenbetrieb.
8. EIN - Zeitschalter-einstellung
•
Die Funktion des EIN - Zeitschalters wird durch Betätigen des SET-Knopfes aktiviert.
•
Den SET-Knopf solange betätigen, bis die gewünschte Zeit angezeigt und somit eingestellt wird. Ist der Zeitschalter auf 7.30
Uhr eingestellt, so schaltet sich die Klimaanlage genau um diese Zeit ein.
•
Zum Löschen der Einstellung des EIN - Zeitschalters wird der CLR-Knopf betätigt.
9. AUS - Zeitschalter-einstellung
•
Die Funktion des AUS - Zeitschalters wird durch Betätigen des SET-Knopfes aktiviert.
•
Den SET-Knopf solange betätigen, bis die gewünschte Ausschaltungszeit angezeigt und somit eingestellt ist.
•
Zum Löschen der Einstellung des AUS - Zeitschalters wird der CLR-Knopf betätigt.
10. Automatische Luftschwingung (wahlweise)
•
Durch Betätigen des SWING Knopfs wird die automatische Luftschwingungsfunktion aktiviert.
•
Damit die Luft in eine bestimmte Richtung bläst, wird der SWING Knopf betätigt, danach warten, bis sich die Lüftungsschlitze
in die gewünschte Richtung bewegen und dann den Knopf nochmals betätigen.
11. Einstellen des Nachtbetriebs
•
Durch Betätigen des SLEEP Knopfs wird der Nachtbetrieb aktiviert.
•
Dabei kann man Energie sparen. Wenn das Gerät auf Kühlbetrieb eingestellt ist,
erhöht sich die eingestellte Temperatur nach einer halben Stunde um 0,5°C, nach
einer weiteren halben Stunde um 1°C und eine Stunde danach um insgesamt 2°C.
Mit dieser Funktion wird übermässiges Kühlen im Sommer vermieden.
•
Ist das Gerät auf Wärmebetrieb eingestellt, dann wird die eingestellte Temperatur
nach einer halben Stunde um 1°C niedriger, nach einer weiteren halben Stunde um
2°C niedriger, und eine Stunde danach um insgesamt 3°C niedriger. Mit dieser
Funktion wird ein übermässiges Erwärmen im Sommer vermieden.
•
Diese Funktion gibt es bei COOL, HEAT und AUTO Betrieb.
12. Einstellen der Uhrzeit
•
Den ▲ Knopf betätigen, um die Uhrzeit vorzustellen.
•
Den ▼ Knopf betätigen, um die Uhrzeit zurückzustellen.
GEBRAUCHSANWEISUNG
+2 C
+1 C
- 1 C
- 2 C
0 0,5 1 1,5 2
DEUTSCH
OM-G8-0501-Acson 11/21/05, 10:47 AM3

4
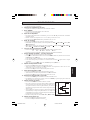
1. Fonte di trasmissione
•
La fonte dalle quale viene trasmesso il segnale.
2. Indicatore di trasmissione
•
L’indicatore lampeggia per confermare l’invio dell’ultimo valore al condizionatore.
3. Tasto “ON/OFF”
•
Premere una volta per accendere il condizionatore.
•
Premere ancora per spegnerlo.
4. Valori di temperatura
•
Per selezionare la temperatura desiderata premere il tasto
▲
o
▼
per aumentare o diminuire la temperatura.
•
I valori di temperatura sono compresi tra i 16°C ed i 30°C (Valori opzionali da 18°C a 30°C.)
•
Premere contemporaneamente i tasti
▲
e
▼
per passare da °C a °F.
5. Funzioni
•
Premere il tasto MODE per selezionare la funzione desiderata.
•
Per condizionatori con la sola funzione rinfrescante “cooling”, le funzioni disponibili sono: COOL
( )
(Fresco), DRY
( )
(Secco) e FAN
( )
(Ventola).
•
Per unità con funzione di riscaldamento, le funzioni disponibili sono: AUTO
( )
(Automatico), COOL
( )
(Fresco), DRY
( )
(Secco), FAN
( )
(Ventola) e HEAT
( )
(Caldo).
6. Selezione velocità ventola
•
Premendo a lungo il tasto la velocità della ventola cambiera’ nel seguente ordine:
Bassa
–––
: Media
–––
: Alta
–––
: Automatica
•
Deprimete il tasto una volta che la velocità desiderata appare sul display.
7. Funzione turbo (facoltativo - solo per l’inverter)
•
Premere per un reffreddamento o riscaldamento veloce.
•
La temperatura aumenterà internamente se il condizionatore è in funzione HEAT (Caldo) e diminuirà se in funzione COOL
(Freddo) o DRY (Secco).
La velocità della ventola aumenterà, a meno che questa non sia già impostata alla massima velocità.
•
La temperatura e velocità della ventola torneranno ai valori impostati dall’utente se il tasto verrà premuto nuovamente,
oppure dopo che sono intercorsi 20 minuti.
•
Disponibile solo nelle funzioni HEAT (Caldo), COOL (Freddo) e DRY (Secco).
8. Impostazione del temporizzatore per l’accensione automatica
•
Premere il tasto SET per attivare il temporizzatore.
•
Impostare l’ora prescelta tenendo premuto il tasto SET. Se il temporizzatore viene settato per le 0730 del mattino, il condizionatore
si accendera’ automaticamente a quest’ora.
•
Premere il tasto CLR per annullare l’orario impostato.
9. Impostazione del temporizzatore per lo spegnimento automatico
•
Premere il tasto SET per annullare il settaggio del temporizzatore.
•
Impostare l’orario prescelto tenendo premuto il tasto SET.
•
Premere il tasto CLR per annullare l’orario impostato.
10. Oscillazione automatica della ventola (opzionale)
•
Premere il tasto SWING per attivare l’oscillazione dell’aria.
•
Per distribuire il flusso d’aria in una direzione specifica, premere il tasto SWING ed aspettare fino a che la feritoia dei ventilazione
si mouva nella direzione desi-erata quindi premere nuovamente il tasto.
11. Funzione di “riposo”
•
Premere il tasto SLEEP per attivare la funzione di “riposo”.
•
Questa èuna funzione per risparmio energetico. Quando il condizionatore opera in
funzione rinfrescante, il valore impostato di temperatura aumenta di 0,5°C dopo la
prima mezz’ora, di 1°C dopo la seconda mezz’ora e per un totale di 2°C l’ora
successiva. Questa funzione impedisce un eccessivo abbassamento di temperatura
durante il periodo estivo.
•
Quando il condizionatore opera in funzione di riscaldamento, la temperatura
selezionata viene ridotta di 1°C dopo la prima mezz’ora, di 2°C dopo la seconda
mezz’ora ed un totale di 3°C l’ora successiva. Questa funzione impedisce
un’eccessiva sudorazione nottura durante il periodo estivo.
•
Questa funzione opera nelle funzioni COOL (Fresco), HEAT (Caldo) ed AUTO (Automatico).
12. Settaggio dell’orario
•
Premere il tasto ▲ per incrementare l’orario.
•
Premere il tasto ▼ per far decrescere l’orario.
GUIDA PER L’USO
+2 C
+1 C
- 1 C
- 2 C
0 0,5 1 1,5 2
ITALIANO
OM-G8-0501-Acson 11/21/05, 10:47 AM4

5
GUÍA DE UTILIZACIÓN
1. Fuente de transmisión
•
La fuente donde la señal será transmitida.
2. Indicación de transmisión de la señal
•
Parpadea para confirmar que el último ajuste ha sido transmitido a la unidad.
3. Botón “ON/OFF”
•
Presione una vez para iniciar la unidad de aire acondicionado.
•
Presione otra vez para parar la unidad.
4. Ajuste de la temperatura
•
Para ajustar la temperatura deseada de la habitación, presione el botón ▲ o ▼ – para incrementar o disminuir la
temperatura ajustada.
•
El alcance de ajuste de la temperatura es de 16°C a 30°C (Ajuste opcional de 18°C a 30°C).
•
Presione los botones ▲ y ▼ simultáneamente para cambiar el ajuste de C° a F°.
5. Modo de operación
•
Presione el botón MODO para seleccionar el tipo de modo de operación.
• En las unidades de refrigeración solamente, los modos disponibles son: COOL ( ) (FRIO), DRY ( ) (SECO) y FAN
( ) (VENTILACIÓN).
• Para la unidad de bomba de calor, los modos disponibles son: AUTO ( ) (AUTO), COOL ( ) (FRIO), DRY ( )
(SECO), FAN ( ) (VENTILACIÓN) y HEAT ( ) (CALOR).
6. Selección de la velocidad del ventilador
•
Presione el botón continuamente dispondrá la velocidad del ventilador en el siguiente orden:
Bajo
–––
: Medio
–––
: Alto
–––
: Auto
•
Presione Stop cuando la velocidad del ventilador deseada aparece en la pantalla de visualización.
7. Función del turbo (facultativo - solo para el invertidor)
•
Apriete para una operación de refrigeración o calefacción rápida.
•
La temperatura se aumentará interiormente si está en el modo de HEAT (Calefacción), reducida si está en el modo de
COOL (Refrigeración) o DRY (Seco).
La velocidad del ventilador se aumentará si no está en la velocidad máxima.
•
La velocidad de la temperatura y del ventilador va a continuar al ajuste del usuario si se aprieta de nuevo o después
de 20 minutos.
•
Válido sólo en los modos de HEAT (Calefacción), COOL (Refrigeración) y DRY (Seco).
8. Adjuste del temporizador en ON
•
Presione el botón SET activará la función del temporizador conectado.
•
Adjuste la hora deseada presionando el botón SET continuamente. Si el temporizador se ajusta a las 7.30 a.m. el
acondicionador de aire se conectará a las 7.30 en punto.
•
Presione el botón CLR para cancelar el ajuste del temporizador conectado.
9. Ajuste del temporizador en OFF
•
Presione el botón SET activará la función del temporizador desconectado.
•
Ajuste la hora de desconexión deseada presionando el botón SET continuamente.
•
Presione el botón CLR para cancelar el ajuste del temporizador desconectado.
10. Oscilación de aire automática (opcional)
•
Presione el botón SWING para activar la función de oscilación automática de aire.
•
Para distribuir el aire en una dirección específica, presione el botón SWING y espere hasta que la paleta se mueva a la
dirección deseada y presione de nuevo el botón.
11. Adjuste del modo de dormir
•
Presione el botón SLEEP activará la función del modo de dormir.
•
Esta es una opción de ahorro de energía. Cuando la unidad está funcionando
en modo de refrigeración, la temperatura seleccionada se incrementa en 0,5ºC
tras la primera media hora, 1ºC tras la segunda media hora y un total de 2ºC
transcurrida la hora siguiente. Esta función evita una refrigeración excesiva
durante el verano.
•
Cuando la unidad está operando bajo el modo de calefacción la temperatura
ajustada disminuye 1ºC después de la primera media hora, 2°C después de la
segunda media hora y un total de 3°C después de la siguiente hora. Esta función
le evitará sudar de noche durante el verano.
•
Esta función está disponible en los modos COOL (FRIO), HEAT (CALOR) y AUTO (AUTO).
12. Adjuste de la hora del reloj
•
Presione el botón ▲ para incrementar la hora del reloj.
•
Presione el botón ▼ para disminuir la hora del reloj.
+2 C
+1 C
- 1 C
- 2 C
0 0,5 1 1,5 2
ESPAÑOL
OM-G8-0501-Acson 11/21/05, 10:47 AM5

6
1. Источник сигналов
•
Источник, откуда сигнал будет передаваться.
2. Индикация передачи сигнала
•
Мигает для подтверждения того, что последняя установка была передана на модуль.
3. Кнопка “ВКЛ/ВЫКЛ” (ON/OFF)
•
Нажмите один раз для включения кондиционера.
•
Вновь нажмите для остановки модуля.
4. Установка температуры
•
Для установки желаемой температуры в комнате, нажмите
▲
или
▼
для повышения или понижения установленной температуры.
•
Диапазон установленной температуры варьируется от 16°С до 30°С (При наличии от 18°С до 30°С.)
•
Одновременно нажмите обе кнопки для переключения
▲
и
▼
от установки °С к °F.
5. Режим работы
•
Нажмите кнопку РЕЖИМ (MODE) для выбора типа режима работы.
•
Только для охлаждения, возможные режимы: COOL ( ) (ХОЛОД), DRY ( ) (ОСУШЕНИЕ) и FAN ( ) (BЕНТИЛЯЦИЯ).
•
Для обогревательного насоса возможные режимы: AUTO ( ) (АВТО), COOL ( ) (ХОЛОД), DRY ( ) (ОСУШЕНИЕ), FAN
( ) (ВЕНТИЛЯЦИЯ) и HEAT ( ) (ОБОГРЕВ).
6. Выбор скорости вентилятора
•
Нажмите кнопку для непрерывного переключения скорости вентилятора в следующем порядке:
Низк
–––
: Сред
–––
: Высок
–––
: Авто
•
Прекратите нажимание, как только на дисплее экрана появится желаемая скорость вентилятора.
7. Функция турбо (выборный - применяется только для конвертирования аппарата)
•
Нажмите для быстрого охлаждения или операции обогрева.
•
Температура повышается в комнате при режиме HEAT (ОБОГРЕВ), понижается при режиме COOL (ХОЛОД) или DRY
(ОСУШЕНИЕ).
Скорость вентилятора повысится, если он не установлен на максимальную скорость.
•
Температура и скорость вентилятора вернутся на установленное функционирование при повторном нажатии или после
20 минут.
•
Возможны только при режимах HEAT (ОБОГРЕВ), COOL (ХОЛОД) и DRY (ОСУШЕНИЕ).
8. Установка включения таймера
•
Нажмите кнопку SET для запуска функции включения таймера.
•
Установите желаемое время включения беспрерывным нажатием кнопки SET. Если таймер установлен на 7:30 утра, то
кондиционер включится ровно в 7:30 утра.
•
Нажмите кнопку СLR для отмены установки включения таймера.
9. Установка выключения таймера
•
Нажмите кнопку SET для запуска функции выключения таймера.
•
Установите желаемое время выключения беспрерывным нажатием кнопки SET.
•
Нажмите кнопку СLR для отмены установки выключения таймера.
10. Автоматический поворот направления жалюзи (при наличии)
•
Нажмите кнопку ПОВОРОТ (SWING) для включения функции автоматического поворота жалюзи.
•
Для распространения воздуха в определенном направлении, нажмите кнопку ПОВОРОТ (SWING) и ждите до тех пор, пока жалюзи
не установится в желаемом направлении, и вновь нажмите кнопку один раз.
11. Установка режима сна
•
Нажмите кнопку СОН (SLEEP) для включения функции режима сна.
•
Эта опция служит для энергосбережения. При работе модуля в режиме охлаждения,
установленная температура повышается на 0,5°С после первого получаса, на 1°С после
следующего получаса и в сумме на 2°С после следующего 1 часа. Эта функция
предотвращает от чрезмерного охлаждения в течение летнего периода времени.
•
При работе модуля в режиме обогрева, установленная температура понижается
на 1°С после первого получаса, на 2°С после следующего получаса и в сумме на
3°С после следующего 1 часа. Эта функция предотвращает от ночного перегрева
в течение летнего периода времени.
•
Эта функция возможна в режимах COOL (ХОЛОД), HEAT (ОБОГРЕВ) и AUTO (АВТО).
12. Установка времени часов
•
Нажмите ▲ для увеличения времени часов.
•
Нажмите ▼ для уменьшения времени часов.
РУКОВОДСТВО ПО ИСПОЛЬЗОВАНИЮ
+2 C
+1 C
- 1 C
- 2 C
0 0,5 1 1,5 2
РУCCKИЙ
OM-G8-0501-Acson 11/21/05, 10:47 AM6

OYL MANUFACTURING COMPANY SDN. BHD.
JALAN PENGAPIT 15/19, P.O. BOX 7072, 40702 SHAH ALAM, SELANGOR DARUL EHSAN, MALAYSIA.
• In the event that there is any conflict in the interpretation of this manual and any translation of the same in any language,
the English version of this manual shall prevail.
• The manufacturer reserves the right to revise any of the specification and design contain herein at any time without prior
notification.
• En cas de désaccord sur l’interprétation de ce manuel ou une de ses traductions, la version anglaise fera autorité.
• Le fabriquant se réserve le droit de modifier à tout moment et sans préavis la conception et les caractéristiques techniques
des appareils présentés dans ce manuel.
• Im Falle einer widersprüchlichen Auslegung der vorliegenden Anleitung bzw. einer ihrer Übersetzungen gilt die Ausführung
in Englisch.
• Änderungen von Design und technischen Merkmalen der in dieser Anleitung beschriebenen Geräte bleiben dem Hersteller
jederzeit vorbehalten.
• Nel caso ci fossero conflitti nell’interpretazione di questo manuale o delle sue stesse traduzioni in altre lingue, la versione
in lingua inglese prevale.
• Il fabbricante mantiene il diritto di cambiare qualsiasi specificazione e disegno contenuti qui senza precedente notifica.
• En caso de conflicto en la interpretación de este manual, y en su traducción a cualquier idioma, prevalecerá la versión
inglesa.
• El fabricante se reserva el derecho a modificar cualquiera de las especificaciones y diseños contenidos en el presente
manual en cualquier momento y sin notificación previa.
• В случае противоречия перевода данного руководства с другими переводами одного и того же текста,
английский вариант рассматривается как приоритетный.
• Завод-изготовитель оставляет за собой право изменять характеристики и конструкцию в любое время
без предварительного уведомления.
OM-G8-0501-Acson 11/21/05, 10:47 AM7

OM-G8-0501-Acson:
AUTO
O
N
OFF
A
M
PM
MIN
HR
F
C
OM-G8-0501-Acson_AR 23/11/05, 11:47 AM2

G8
A
UTO
O
N
OFF
A
M
PM
MIN
HR
F
C
C
L
O
C
K
S
L
E
E
P
O
F
F
T
I
M
E
R
S
W
I
N
G
O
N
T
I
M
E
R
SET
CLR
MODE
SET
CLR
i
OM-G8-0501-Acson Part No.: A08019025481
OM-G8-0501-Acson_AR 23/11/05, 11:47 AM1

AUTO
ON
OFF
AM
PM
MIN
HR
F
C
AUTO
ON
OFF
AM
PM
MIN
HR
F
C
ii
OM-G8-0501/A 11/28/05, 11:26 AM2

•
•
“ON/OFF”
•
•
•
▲▼
•°°°°
•
▲▼°C°F
•
MODE
•COOL ( ))DRY ( FAN ( )
•)
AUTO ()COOL ()DRY (FAN ( ))HEAT (
•
\–––\–––\–––
•
•
•
HEATCOOLDRY
•
•
HEATCOOLDRY
ON
•SET
•SET7.30
7.30
•
CLR
OFF
•SET
•SET
•
CLR
•
SWING
•SWING
•
SLEEP
•
°°
°
•
°
°°
•
COOLHEATAUTO
•
▲
•
▼
+2 C
+1 C
- 1 C
- 2 C
0 0,5 1 1,5 2
OM-G8-0501/A 11/28/05, 11:26 AM3

wÐdŽwÐdŽ
wÐdŽwÐdŽ
wÐdŽ
MEMO(AR) 4/2/04, 1:54 PM2

OYL MANUFACTURING COMPANY SDN. BHD.
JALAN PENGAPIT 15/19, P.O. BOX 7072, 40702 SHAH ALAM, SELANGOR DARUL EHSAN, MALAYSIA.
•
•
OM-G6W-0501_Acson_AR 11/28/05, 3:29 PM2
-
 1
1
-
 2
2
-
 3
3
-
 4
4
-
 5
5
-
 6
6
-
 7
7
-
 8
8
-
 9
9
-
 10
10
-
 11
11
-
 12
12
-
 13
13
-
 14
14
-
 15
15
-
 16
16


Acson OM-G8-0501-Acson Operating Instructions Manual
- Typ
- Operating Instructions Manual
in anderen Sprachen
- English: Acson OM-G8-0501-Acson
- français: Acson OM-G8-0501-Acson
- español: Acson OM-G8-0501-Acson
- italiano: Acson OM-G8-0501-Acson
- русский: Acson OM-G8-0501-Acson