
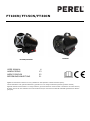
FT10CN/FT15CN/FT30CN
FT10CN/FT15CN
FT30CN
USER MANUAL 4
HANDLEIDING 13
MODE D'EMPLOI 22
BEDIENUNGSANLEITUNG 31
Appliance intended for outdoor use only (suitable for safe operation outside enclosed spaces).
Toestel uitsluitend voor gebruik buitenshuis (geschikt voor een veilige functionering buiten gesloten ruimten).
Appareil destiné exclusivement à un usage extérieur (peut être utilisé en toute sécurité à l’extérieur de locaux fermés).
Produkt, das nur für den Gebrauch im Freien bestimmt ist (für einen sicheren Betrieb außerhalb geschlossener Räume
geeignet).

FT10CN/FT15CN/FT30CN
V. 01 – 20/06/2019 2 ©Velleman nv
FT10CN + FT15CN

FT10CN/FT15CN/FT30CN
V. 01 – 20/06/2019 3 ©Velleman nv
FT30CN

FT10CN/FT15CN/FT30CN
V. 01 – 20/06/2019 4 ©Velleman nv
USER MANUAL
1. Introduction
To all residents of the European Union
Important environmental information about this product
This symbol on the device or the package indicates that disposal of the device after its lifecycle
could harm the environment. Do not dispose of the unit (or batteries) as unsorted municipal
waste; it should be taken to a specialized company for recycling. This device should be
returned to your distributor or to a local recycling service. Respect the local environmental
rules.
If in doubt, contact your local waste disposal authorities.
Thank you for choosing Perel! Please read the manual thoroughly before bringing this device
into service. If the device was damaged in transit, do not install or use it and contact your
dealer.
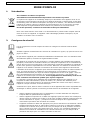
2. Safety Instructions
Read and understand this manual and all safety signs before using this appliance.
The device must be installed according to the local ventilation standards as these can differ
from country to country.
Do not use this mobile heater in occupied spaces of residential buildings. Please consult the
local rules when prior to using this heater in public buildings.
This heater is not intended for use by persons (including children) with reduced physical,
sensory or mental capabilities, or lack of experience and knowledge, unless they have been
given supervision or instruction concerning use of the appliance by a person responsible for
their safety. Keep this device at a safety distance from animals.
The erroneous use of this heater may result in damage and lead to life-threatening risks such
as injuries, burns, explosions, electric shocks or poisoning. The first symptoms of carbon
monoxide poisoning may be confused with those of the flu: headache, dizziness and/or nausea.
These symptoms may be caused by an improper working of the mobile heater. If you
experience one of these symptoms, immediately proceed in the open air. Also, ask a
qualified technician to repair the device.
Any cleaning, maintenance or repair activity involving a dangerous component (e.g.
replacement of a damaged power cable, repair of the burner) must be done by the
manufacturer, its after-sales service or a qualified technician in order to avoid risks, even if the
device has been disconnected from the mains.
Velleman nv cannot be held responsible in the event of damage or injury from (incorrect) use
of this device.
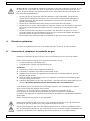
Only use this mobile heater with the fuel, an alternating current and the frequency
specified on the specifications label.
The mobile heater must only be used when an adequate air exchange rate can be
guaranteed. This device must therefore be used in the open air or in a well-ventilated room
only. Install the device following all local regulations, included those with respect to
technical standards and the regulations concerning the prevention of accidents and fires.
The mobile heater needs an adequate airflow to function properly. In fact, it must only be
used in the open air or in a room with sufficient and continuous airflow. Sufficient airflow is
guaranteed when the minimum room volume equals 1 m³ for every 100 W of power. Never
must the total volume of the room be less than 100 m³. Sufficient ventilation is guaranteed
only when the ventilation openings have a total volume of 25 cm² for every kW of thermal
power for a minimum surface of 250 cm².

FT10CN/FT15CN/FT30CN
V. 01 – 20/06/2019 5 ©Velleman nv
The mobile heater must be used only as a gas heater or fan, according to the instructions
in this user manual.
Should you smell gas, the mobile heater may be defective or present a gas leak. In this
case, immediately switch off the device: close the pressure regulator, disconnect the device
from the mains and contact your local dealer.
The flexible hose should never be crimped, bent or handled with brute force when using or
handling the device.
Install the gas cylinder so that it is protected. Install it in the back of the mobile heater and
never place it in front of the hot air output. Never aim the device at the gas cylinder.
Make sure that no object hampers the fan air intake.
Only connect the mobile heater to an earthed mains.
Do not hamper, completely or partially, the air intake at the back and/or the air output at
the front. Avoid using any type of air canalization toward or from the device.
The minimum safety distance is 2 m from walls or any other object.
The mobile heater may only be used on a fireproof surface.
Connect the mobile heater on a levelled, stable and fireproof surface to avoid fire risks.
The mobile heater may not be used in rooms where explosive dusts, gases, liquids or any
other flammable materials are present (fabrics, wood, paper, petrol, etc.).
It is recommended to use a fireproof protection if the mobile heater is being used near
steps, curtains or other covering materials. A minimum safety distance of 2.5 m between
the hot parts of the device and any flammable material (fabrics, wood, paper, petrol, etc.)
or from thermolabile materials (included the power cable) must be observed.
Maintenance and internal cleaning activities may only be commended to a specialised
technician appointed by the manufacturer.
The heater must be disconnected from the mains and from any gas-feeding device if the
heater is to be left unattended and if the safety instructions cannot be observed.
If the heater does not switch on or if it switches on in an abnormal way, disconnect the
heater from the mains and from any gas-feeding device. Check the airflow to the heater
and make sure it is sufficient before trying to switch on the heater.
Never move, manipulate or clean a switched-on heater.
Only replace the gas hose with a similar hose or with a hose which is able to cope with the
used gas pressure. Refer to the local regulations. The used gas hose must be 1.5 m long.
Do not crimp or bend the gas hose.
Do not use a gas hose to canalize hot air.
Disconnect the heater from the mains, cut the gas supply, disconnect the gas hose and
close the gas intake inside the heater if it will not be used for a longer period.
It is recommended to leave the annual maintenance of the heater to a specialized
technician.
Do not use this equipment in basements or premises below ground level.
This device should only be used together with the hose and regulator provided. If the hose
or regulator is damaged, it must be replaced by the original spare part (order code: FT11),
which can be ordered from the manufacturer or service agent.
NOT TO BE USED FOR THE HEATING OF HABITABLE AREAS OF DOMESTIC PREMISES; FOR
USE IN PUBLIC BUILDINGS, REFER TO NATIONAL REGULATIONS.
3. Warning
Asphyxiation hazard.
Do not use in unventilated areas. Lack of proper ventilation will lead to improper
combustion. Improper combustion can lead to carbon monoxide poisoning and serious
injury or death. Symptoms of carbon monoxide poisoning can include headache, dizziness
and difficulty in breathing.
Never obstruct the front and back of the heater.

FT10CN/FT15CN/FT30CN
V. 01 – 20/06/2019 6 ©Velleman nv
GAS ODOUR. Gas has odorants added specifically for gas leak detection. If a gas leak occurs,
you should be able to smell gas. Since LP gases are heavier than air, you should smell for the
gas odour low to the floor. Any gas odour is your signal to go into immediate action.
Do not take any action that could ignite the fuel gas. Do not operate any electrical
switches. Do not pull any power supply or extension cords. Do not light matches or any
other source of flame. Do not use your telephone.
Get everyone out of the building and away from the area immediately.
Close all gas tank or cylinder supply valves, or the main supply valve located at the meter
if you use natural gas.
Leave the area or building and call your gas supplier and the fire department. Stay out of
the area or the building until it is declared safe by the gas supplier and the fire department.
Let the gas supplier and the fire department check for the gas leak.
4. General Guidelines
Refer to the Velleman® Service and Quality Warranty on the last pages of this manual.
5. Connecting and Replacing the Gas Cylinder
Only replace the gas cylinder in the open air, far from any open flame or heat source.
Connect the gas cylinder using following accessories:
1 flexible hose for liquid gas (incl.)
1 pressure regulator for liquid gas (incl.)
Connection
1. Connect the gas hose to the heater without forcing.
2. Install the pressure regulator on the gas cylinder.
3. Check if the connection of the pressure regulator is correctly sealed according to the used
gas cylinder.
4. Open the valve of the gas cylinder or the pressure regulator if the gas cylinder does not
feature a valve.
5. Check if the connection are correctly sealed using soapy water: soap bubbles may point to
a gas leak. Never test for gas leaks with an open flame.
The connections may have a left-handed screw thread. Consequently, they are threaded in a
anticlockwise direction.
Check if there is a clamp between the pressure regulator and the gas cylinder.
It is allowed to interconnect multiple gas cylinders to increase the fuel autonomy.
The feeding pressure is obtained through the pressure regulator and corresponds to the data
on the specifications table.
Only use certified replacement gas hoses.
It is recommended to use gas cylinders of 30 kg providing a thermal power of 30 kW. You are
allowed to use larger gas cylinders if more thermal power is needed.
It is recommended to use gas cylinders with an appropriate capacity to avoid problems due to
partial fuel gasification. The correct pressure (refer to the specification tag on the heater) is
indicated by the included pressure regulator or a similar model.
Make sure the feeding gas hose is in perfect condition. Only use flexible and appropriate
models when replacing the gas hose. Always respect the local regulations. Do not crimp the
flexible hose.

FT10CN/FT15CN/FT30CN
V. 01 – 20/06/2019 7 ©Velleman nv
6. Connecting to the Mains
Before connecting the heater to the mains, check if the used power supply and frequency
match the specifications on the specification tag. Always respect the local regulations when
connecting the heater to the mains.
Only connect the device to an earthed mains.
Disconnect the device from the mains prior to any maintenance or cleaning activity.
Always make sure that the mains is earthed.
7. Switching On the Heater
1. Open the gas valve.
2. Flick the switch to position I.
3. Fully press and hold the gas valve. Operate the ignition several times.
4. The flame burns. Hold the gas valve pressed for 15 seconds to activate the safety
mechanism.
5. Release the gas valve. The flame will keep burning.
The safety mechanism will automatically switch off the heater in a few seconds in case of
an electric power failure. This mechanism will also switch off the heater in case of a gas
shortage. In both cases, follow the explanation above to switch on the heater again.
6. Regulate the gas flow.
7. Avoid operating the ignition for a prolonged period. Check for problems if the heater does
not switch on.
8. Checking a Switched-On Heater
Check a switched-on heater by observing the pilot flame at the air exit of the heater. Make
sure that the pilot light burns steadily inside the burner.
Be careful when checking the pilot light as the air exiting the heater can be extremely hot.
Maintain yourself at a safe distance.
9. Switching Off the Heater
1. Close the gas cylinder.
2. Close the pressure regulator or disconnect it from the gas cylinder.
3. Leave the heater to cool down for at least 60 seconds after the pilot light has died out.
4. Switch off the heater by flicking the switch to the O position.
5. Disconnect from the mains by pulling the plug.
6. Disconnect the flexible hose from the heater.

FT10CN/FT15CN/FT30CN
V. 01 – 20/06/2019 8 ©Velleman nv
10. Using the Heater near Persons or Animals
The heater can be used in a well-ventilated room where the pollutant percentage does not
exceed the allowed levels.
Sufficient ventilation is guaranteed only when the minimum room volume, in m³, is 30 times
the nominal thermal power (in kW) of all the switched-on devices used in that room, and when
the ventilation happens through doors, windows or other openings which have a minimum total
volume, in m³, of 0.003 times the nominal thermal power (in kW) of all the switched-on
devices used in that room.
Do not use the heater to permanently heat stables or other animal housings.
11. Using the Heater far from Persons and Animals
This heater may only be used for heating rooms if the necessary airflow needed for the burning
of the fuel can be guaranteed.
The necessary air volume is guaranteed when the minimum room volume, in m³, is 10 times
the nominal thermal power (in kW) of all the switched-on devices used in that room.
A normal airflow through doors and windows must be guaranteed.
12. Ventilation during the Summer
This heater can also be used as a fan. To do so, disconnect the heater from the gas source,
connect to the mains and flick the switch on the I position.
Follow the correct procedure and disconnect the heater from the mains if it has previously been
used in heating mode. See chapter Switching Off the Heater.
13. Cleaning and Maintenance Instructions Intended for the User
Any cleaning activity involving a dangerous component (e.g. replacement of a damaged power
cable, repair of the burner) must be done by the manufacturer, its after-sales service or a
qualified technician in order to avoid risks, even if the device has been disconnected from the
mains.
Clean the heater after each use and prior to storing the device.
Regularly clean the burner when using the heater in dusty environments.
Check the flexible gas hose and the mains connection prior to using the heater. Contact a
specialised technician if in doubt about the quality of the gas hose.
Never clean a switched-on heater.
Completely disconnect the heater from the mains before any cleaning activity. See chapter
Switching Off the Heater.
Cleaning the heater does not require special tools. Always check for gas leaks in the circuit or
at the connections, and make sure the pressure is correct after and before each cleaning
activity.
Maintenance should be performed at least once a year.
Any repair activity must be performed by qualified personnel only. Never open the appliance
yourself!
Disconnect the gas hose and store the appliance in a dry, clean, dust-free and safe place
outside the reach of children.
Always close the stop valve of the gas cylinder first when the appliance is not in use.
Use with cylinders of approximately Ø 30 cm, H 55 cm.
Only use a gas hose in accordance with EN 16436-1:2014+A1 class 2 with a diameter of min.
6.3 mm and a recommended length of 1.5 m.
Only use this appliance together with an EN 16129 compliant regulator (G31:700 mbar).

FT10CN/FT15CN/FT30CN
V. 01 – 20/06/2019 9 ©Velleman nv
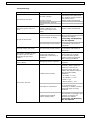
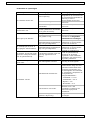
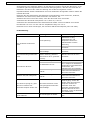
Troubleshooting
problem possible cause possible solution
The fan does not work.
No power voltage.
Check if the heater is
connected to the mains and
the residual-current device or
fuse switch is fine.
The fan is locked. Please contact a technician.
Damaged power cable of
switch. Please contact a technician.
The piezo igniter does not
work.
The electrode is in the wrong
position (distance to the
burner is too large or too
small).
Please contact a technician.
No gas on the burner.
The gas valve is closed. Open the gas valve.
The gas cylinder is empty.
Replace the gas cylinder as
described in chapter
Connecting and Replacing
the Gas Cylinder.
Gas connections badly sealed.
Close the gas supply
immediately and contact a
technician.
Gas leak and/or gas smell. Gas connections badly sealed.
Close the gas supply
immediately and contact a
technician.
The burner switches on but
the flame dies out when
releasing the gas valve
button.
The thermo-element is
insufficiently warmed up or
damaged.
Re-ignite and press the gas
valve button for at least
30 seconds after ignition.
Please contact a technician
with recurring problems.
Too much incoming gas or too
large a flame. Damaged pressure regulator. Replace the pressure
regulator.
The burner dies out.
Insufficient air feeding.
Make sure the fan works
perfectly. Assure optimum
airflow by removing all
objects in front of the air
intake and outtake. Respect
the prescribed safety
distances:
- Air intake > 2.5 m
- Air outtake > 3.5 m
- Sides > 2 m
- Above heater > 2 m
The heater is overheated.
Leave the heater to cool down
for 5 minutes before
switching on. Please contact a
technician with recurring
problems.
Insufficient gas feeding
volume (empty tank).
Check the gas feeding volume
and connect a new/bigger gas
cylinder if necessary as
described in chapter
Connecting and Replacing
the Gas Cylinder.

FT10CN/FT15CN/FT30CN
V. 01 – 20/06/2019 10 ©Velleman nv
14. Servicing Instructions Intended for the Technician
Any maintenance, replace or repair activity involving a dangerous component must be done by
the manufacturer, its after-sales service or a qualified technician in order to avoid risks, even if
the device has been disconnected from the mains.
Warning - Use only original replacement parts. This heater must use design-specific parts. Do
not substitute or use generic parts. Improper replacement parts could cause serious or fatal
injuries. This will also protect your warranty coverage for parts replaced under warranty.
The technician must read this user manual prior to start replacement, repair or maintenance
activities on the heater. Please contact the manufacturer if technical support, information on
spare parts or other information about this heater is needed.
Never operate the heater in a non-authorized manner.
Maintaining, replacing and repairing parts of the heater does not require special tools. Always
check for gas leaks in the circuit or at the connections, and make sure the pressure is correct
after and before each replacement or reparation.
The appliance can be checked for soundness as below. A gas test gauge and gas leak detector
spray is required.
Step 1 - Connect gas test gauge to gas meter.
Connect a zeroed gas test gauge to the testing point of your gas meter.
Step 2 - Open supply valve.
Open the supply valve of the meter until the pressure increases to approximately 10 mbar.
Then, close the valve.
Step 3 - Observe gas test gauge.
Wait for 1 minute and observe the gas test gauge. There should not be any perceptible
movement of the water in the u-tube. If the pressure rises, it demonstrates that the supply
valve is not fully stopping the gas from leaving the meter; it is 'letting-by'. The valve will need
to be checked further. You should spray leak detection spray into the valve to double-check if it
is letting-by. Gas let-by will be indicated by bubbles forming around the supply valve. If a leak
is detected, the supply valve should be repaired or replaced by a qualified gas safe engineer.
Step 4 - Increase pressure.
If, however, there is no let-by, slowly open the supply valve and increase the pressure until the
gas test gauge reads 20 mbar. Then, close the valve.
Step 5 - Wait for another minute.
Allow another minute for temperature stabilization. This is a period of time in which the gas
expands or contracts and adapts to the temperature environment within the pipework.
Following 1 minute, if the pressure has dropped slightly, readjust the pressure to 20 mbar by
opening the supply valve.
Step 6 - Observe gas test gauge.
Observe the gas test gauge over the next two minutes. During this time, there should be no
pressure drop. If a drop has occurred, close the appliance isolation valves on the meter to
confirm that the meter itself is not leaking and the drop is, instead, due to a faulty gas
appliance. No drop is allowed in the system pipework if the isolation valves are closed.
Step 7 - Remove gauge and reseal gas test point.
Following a successful test, remove the gas test gauge and reseal the gas test point on the
meter.
Re-open the inlet supply valve and apply leak detector spray to the test point and all pipework
before the valve to the supply pipe to double check that there is no leak.
Never leave the heater unattended while burning.

FT10CN/FT15CN/FT30CN
V. 01 – 20/06/2019 11 ©Velleman nv
Troubleshooting
problem possible cause possible solution
The piezo igniter does not
work.
Damaged piezo igniter or
electrode.
Check the piezo igniter and
electrodes, and replace the
damaged part if necessary.
No or loose connection
between electrode and piezo
igniter.
Check the connection and
repair if necessary.
No gas. Clogged nozzle.
Carefully clean the nozzle
with pressurized air. Never
use a needle or similar
pointed object.
Damaged solenoid valve. Replace the solenoid valve.
The burner switches on but
the flame dies out when
releasing the gas valve
button.
Damaged thermocouple
and/or thermo-element.
Check the thermocouple and
thermo-element, and replace
the damaged part if
necessary.
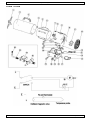
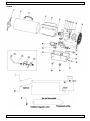
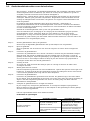
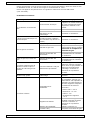
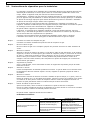
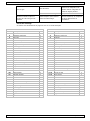
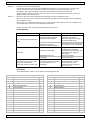
Spare Parts
Refer to the illustrations on pages 2 and 3.
FT10C + FT15C FT30C
No. Description # No. Description #
1 front grill 1 1 front grill 1
2 outer casing 1 2 outer casing 1
3 handle 1 3 handle 1
4 earth wire connection 1 4 inner shell 1
5 inner shell 1 5 insulation shell support 4
6 insulation shell support 4 6 earth wire connection 1
7 burner head assembly 1 7 burner head assembly 1
8 thermal cut-out 1 8 thermocouple 1
9 thermocouple 1 9 thermal cut-out 1
10 fan 1 10 ignition needle 1
11 motor 1 11 fan 1
12 air inlet grill 1 12 motor 1
13 valve fixing plate 1 13 air inlet grill 1
14 power cord 1 14 blade for combustion 2
15 cable fastener 1 15 nozzle support bracket 1
16 regulator 1 16 capacitor 1
17 inlet connection protection cover 1 17 solenoid valve 1
18 bottom base 1 17-1 gas escape valve 1
19 valve filter 1 17-2 solenoid valve 1
20 switch 1 17-3 gas pipe 1
21 dual igniter 1 17-4 gas nozzle 1
22 waterproof cover 1 18 power cord 1
23 solenoid valve 1 19 bottom base 1
23-1 gas escape valve 1 20 inlet connection protection cover 1
23-2 solenoid valve 1 21 cable fastener 1
23-3 gas pipe 1 22 switch 1
23-4 gas nozzle 1 23 dual igniter 1
24 waterproof protective cover 1 24 waterproof cover 1
25 nozzle support bracket 1 25 waterproof protective cover 1
26 ignition needle 1 26 regulator 1
27 capacitor 1

FT10CN/FT15CN/FT30CN
V. 01 – 20/06/2019 12 ©Velleman nv
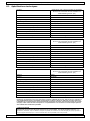
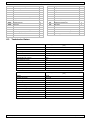
15. Technical Specifications
Product Portable forced convection direct gas fired air heater
(A3)
Trademark Perel
Model number FT10CN
Appliance category I3P
Reference gas G31 (propane)
Country of destination BE, FR, GB, IE, NL
Supply pressure (mbar) 700
Nominal heat input (kW) 10
Gas consumption (kg/h) 0,73
Electrical input 220-240 V~, 50 Hz, 304 mA, 70 W
IP rating IPX4
Air delivery temperature classification Space heating appliances
Product Portable forced convection direct gas fired air heater
(A3)
Trademark Perel
Model number FT15CN
Appliance category I3P
Reference gas G31 (propane)
Country of destination BE, FR, GB, IE, NL
Supply pressure (mbar) 700
Nominal heat input (kW) 15
Gas consumption (kg/h) 1,09
Electrical input 220-240 V~, 50 Hz, 304 mA, 70 W
IP rating IPX4
Air delivery temperature classification Space heating appliances
Product Portable forced convection direct gas fired air heater
(A3)
Trademark Perel
Model number FT30CN
Appliance category I3P
Reference gas G31 (propane)
Country of destination BE, FR, GB, IE, NL
Supply pressure (mbar) 700
Nominal heat input (kW) 30
Gas consumption (kg/h) 2,18
Electrical input 220-240 V~, 50 Hz, 304 mA, 70 W
IP rating IPX4
Air delivery temperature classification Space heating appliances
Use this device with original accessories only. Velleman nv cannot be held
responsible in the event of damage or injury resulting from (incorrect) use of this
device. For more info concerning this product and the latest version of this manual,
please visit our website www.perel.eu. The information in this manual is subject to
change without prior notice.
© COPYRIGHT NOTICE
The copyright to this manual is owned by Velleman nv. All worldwide rights reserved.
No part of this manual may be copied, reproduced, translated or reduced to any electronic
medium or otherwise without the prior written consent of the copyright holder.

FT10CN/FT15CN/FT30CN
V. 01 – 20/06/2019 13 ©Velleman nv
HANDLEIDING
1. Inleiding
Aan alle ingezetenen van de Europese Unie
Belangrijke milieu-informatie betreffende dit product
Dit symbool op het toestel of de verpakking geeft aan dat, als het na zijn levenscyclus wordt
weggeworpen, dit toestel schade kan toebrengen aan het milieu. Gooi dit toestel (en eventuele
batterijen) niet bij het gewone huishoudelijke afval; het moet bij een gespecialiseerd bedrijf
terechtkomen voor recyclage. U moet dit toestel naar uw verdeler of naar een lokaal
recyclagepunt brengen. Respecteer de plaatselijke milieuwetgeving.
Hebt u vragen, contacteer dan de plaatselijke autoriteiten betreffende de
verwijdering.
Bedankt voor uw aankoop! Lees deze handleiding grondig door voor u het toestel in gebruik
neemt. Werd het toestel beschadigd tijdens het transport, installeer het dan niet en raadpleeg
uw dealer.
2. Veiligheidsvoorschriften
Lees en begrijp deze handleiding en de veiligheidsinstructies vóór ingebruikname.
Installeer dit toestel volgens de plaatselijke geldende voorschriften, deze kunnen van land tot
land variëren.
Gebruik dit toestel niet in bewoonbare ruimten van residentiële gebouwen. Raadpleeg de lokale
wetgeving alvorens het toestel te gebruiken in openbare gebouwen.
Dit toestel is niet geschikt voor gebruik door personen (kinderen inbegrepen) met verminderde
fysieke, zintuiglijke of geestelijke capaciteiten of gebrek aan ervaring en kennis, tenzij zij onder
toezicht staan of instructie hebben gekregen over het gebruik van het toestel van een persoon
die verantwoordelijk is voor hun veiligheid. Houd dieren op een veilige afstand van het toestel.
Een verkeerd gebruik van dit toestel kan leiden tot letsels of de dood als gevolg van
brandwonden, brand, ontploffing, elektrische schokken of vergiftiging. De eerste symptomen
van koolmonoxidevergiftiging lijken op symptomen van de griep: hoofdpijn, duizeligheid en/of
misselijkheid. Hebt u deze symptomen, dan is het mogelijk dat het toestel niet correct
functioneert. Als u deze symptomen vertoont, zorg dat u onmiddellijk frisse lucht
krijgt. Laat het toestel herstellen door een vakman.
Alle reinigings-, onderhouds- of reparatiewerkzaamheden (bv. vervangen van een beschadigde
voedingskabel, herstellen van de brander) moeten worden uitgevoerd door de fabrikant, zijn
dienst-na-verkoop of een vakman om gevaar te vermijden, zelfs als het toestel van het lichtnet
ontkoppeld is.
Velleman nv is niet aansprakelijk voor schade of kwetsuren bij (verkeerd) gebruik van dit
toestel.
Gebruik dit toestel enkel met de brandstof, netspanning en frequentie, die op het
typeplaatje zijn aangegeven.
Het toestel mag alleen worden gebruikt wanneer een goede luchttoevoer kan worden
gegarandeerd. Gebruik het toestel alleen in de openlucht of in een goed geventileerde
ruimte. Installeer het toestel volgens de geldende nationale voorschriften en normen met
betrekking tot brand- en ongevalspreventie.
Het toestel heeft voldoende luchttoevoer nodig om correct te functioneren. Het mag alleen
gebruikt worden in de openlucht of in een goed geventileerde ruimte. Een goede
luchttoevoer is gegarandeerd wanneer het volume van de ruimte met 1 m³ per 100 W-
vermogen overeenkomt. Het volume van de ruimte mag niet groter zijn dan 100 m³. Een
g
oede luchttoevoer is
g
e
g
arandeerd wanneer het totale volume van de ventilatieo
p
enin
g
en

FT10CN/FT15CN/FT30CN
V. 01 – 20/06/2019 14 ©Velleman nv
25 cm² bedraagt voor elk kW thermisch vermogen, voor een minimale oppervlakte van
250 cm².
Gebruik het toestel uitsluitend als gasverwarming of ventilator en respecteer de instructies
in de gebruikershandleiding.
Ruikt u gas, dan is het toestel mogelijk defect of is er een gaslek. Schakel het toestel
onmiddellijk uit: draai de drukregelaar dicht, ontkoppel het toestel van het lichtnet en
contacteer uw verdeler.
De flexibele slang mag niet worden gebogen, gekneld of geforceerd wanneer u het toestel
gebruikt of hanteert.
Plaats de gasfles op een goed beschermde plaats. Plaats de gasfles achter het toestel en
nooit voor de warme luchtuitlaat. Richt het toestel nooit naar de gasfles.
Steek nooit objecten in de ventilatieopeningen.
Sluit het toestel alleen aan op een geaard stopcontact.
Blokkeer nooit, geheel of gedeeltelijk, de luchtinlaat (achterkant) en/of de luchtuitlaat
(voorkant). Gebruik geen extra leidingen om de lucht van of naar het toestel te
kanaliseren.
Houd een veiligheidsafstand van minstens 2 m tot muren en andere voorwerpen.
Gebruik het toestel alleen op een hittebestendig oppervlak.
Om brandgevaar te voorkomen, plaats het toestel op een vlak, stabiel en hittebestendig
oppervlak.
Gebruik het toestel niet in ruimten waar explosieve stoffen, gassen, vloeistoffen of andere
ontvlambare materialen (stoffen, hout, papier, brandstoffen, enz.) aanwezig zijn.
Gebruik een brandwerende bescherming wanneer u het toestel gebruikt in de nabijheid van
trappen, gordijnen en andere ontvlambare materialen. Houd een veiligheidsafstand van 2.5
m tussen de warme delen van het toestel en ontvlambare (stoffen, hout, papier,
petroleum, enz.) of thermolabiele materialen (met inbegrip van de voedingskabel).
Laat onderhoud- en reparatiewerkzaamheden door een bekwame vakman uitvoeren.
Ontkoppel het toestel van het lichtnet en van elke gastoevoer als het toestel onbeheerd is
en als de veiligheidsvoorschriften niet kunnen worden nageleefd.
Als het toestel niet inschakelt of als er storing optreedt bij het inschakelen, ontkoppel het
toestel van het lichtnet en van de gasfles. Controleer of de ventilator geblokkeerd is en of
er voldoende luchttoevoer is voor u het toestel opnieuw inschakelt.
Transporteer, hanteer of reinig nooit een ingeschakeld toestel.
Vervang de gasslang enkel door een gelijkaardige slang of een slang die bestand is tegen
de gebruikte gasdruk. Respecteer de plaatselijke voorschriften. De gasslang moet 1.5 m
lang zijn. Zorg ervoor dat de flexibele slang niet gebogen of geknikt is.
Gebruik een gasslang niet om warme lucht te kanaliseren.
Wanneer het toestel gedurende een lange tijd niet wordt gebruikt, ontkoppel het toestel
van het lichtnet, draai de drukregelaar dicht, ontkoppel de gasslang en draai de gastoevoer
dicht.
Laat het toestel jaarlijks onderhouden door een bekwame vakman.
Gebruik dit toestel niet in kelders of ondergrondse ruimtes.
Gebruik dit toestel enkel met de meegeleverde slang en drukregelaar. Indien de slang of
de drukregelaar beschadigd is, mag deze enkel vervangen worden door een origineel
reserveonderdeel (bestelcode: FT11) te bestellen bij de fabrikant of een erkende verdeler.
GEBRUIK DIT TOESTEL NIET OM WOONRUIMTES IN HUIZEN TE VERWARMEN; VOOR
GEBRUIK IN OPENBARE GEBOUWEN, RAADPLEEG DE NATIONALE REGELGEVING.
3. Waarschuwing
Verstikkingsgevaar.
Gebruik het toestel niet in niet-geventileerde ruimten. Onvoldoende ventilatie zal leiden tot
een slechte verbranding. Een slechte verbranding kan leiden tot CO-vergiftiging en ernstige
letsels of de dood. De symptomen kunnen zijn: hoofdpijn, duizeligheid en
ademhalingsproblemen.
Blokkeer nooit de luchtinlaat en luchtuitlaat van het toestel.

FT10CN/FT15CN/FT30CN
V. 01 – 20/06/2019 15 ©Velleman nv
GASGEUR. Om lekken te kunnen detecteren, wordt een geurstof aan gas toegevoegd. Een
gaslek wordt daardoor waarneembaar. LP-gassen zijn zwaarder dan lucht en blijven tegen de
grond hangen. U kunt de gasgeur dicht bij de vloer waarnemen. Een gasgeur vraagt om
onmiddellijke actie.
Doe niets waardoor het brandstofgas zou kunnen ontbranden. Bedien geen elektrische
schakelaars. Ontkoppel geen voedings- of verlengkabels. Gebruik geen lucifers of
aansteker. Gebruik uw telefoon niet.
Evacueer onmiddellijk iedereen uit het gebouw.
Sluit alle toevoerkleppen of de hoofdbrandstoftoevoerklep aan de meter als u aardgas
gebruikt.
Verlaat de zone of het gebouw en bel uw gasleverancier en de brandweer. Blijf weg uit het
gebouw of van de zone totdat deze opnieuw veilig is verklaard door de brandweer en de
gasleverancier.
Laat de gasleverancier en de brandweer een controle uitvoeren.
4. Algemene richtlijnen
Raadpleeg de Velleman® service- en kwaliteitsgarantie achteraan deze handleiding.
5. De gasfles aansluiten en vervangen
Vervang de gasfles enkel in de openlucht, buiten het bereik van open vuur of andere
warmtebronnen.
Gebruik de volgende onderdelen om de gasfles aan te sluiten:
1 flexibele slang voor vloeibaar gas (meegelev.)
1 drukregelaar voor vloeibaar gas (meegelev.)
Aansluiting
1. Sluit de gasfles aan op het toestel zonder te forceren.
2. Monteer de drukregelaar op de gasfles.
3. Controleer of de aansluiting van drukregelaar gasdicht is (volgens de gebruikte gasfles).
4. Draai het ventiel van de gasfles of van de drukregelaar open, als de gasfles geen ventiel
heeft.
5. Controleer met een zeepoplossing of de aansluiting correct afgedicht is: luchtbellen kunnen
wijzen op een gaslek. Gebruik geen open vlam om op gaslekken te controleren.
De aansluitingen kunnen een linkse schroefdraad hebben. Draai daarom in tegenwijzerzin.
Controleer of er een klem tussen de drukregelaar en de gasfles aanwezig is.
U kunt ook een meerdere gasflessen met elkaar verbinden om een grotere autonomie te
verkrijgen.
Regel de druk (zie lijst met technische gegevens) met de drukregelaar.
Gebruik enkel goedgekeurde gasslangen.
Gebruik gasflessen van 30 kg met een thermisch vermogen van 30 kW. Gebruik grotere
gasflessen voor een hoger thermisch vermogen.
Gebruik gasflessen met een geschikte capaciteit, om problemen door gedeeltelijke
brandstofvergassing te vermijden. De meegeleverde drukregelaar of een gelijkaardig model
geeft de correcte druk (zie specificaties) weer.
Controleer of de toevoerslang niet beschadigd is. Gebruik alleen geschikte, flexibele slangen.
Respecteer altijd de plaatselijke wetgeving. Zorg ervoor dat de flexibele slang niet gebogen of
geknikt is.

FT10CN/FT15CN/FT30CN
V. 01 – 20/06/2019 16 ©Velleman nv
6. Aansluiting op het net
Voor u het toestel op het lichtnet aansluit, controleer of de netspanning en frequentie
overeenstemmen met de specificaties op het typeplaatje. Respecteer altijd de plaatselijke
wetgeving wanneer u het toestel op het lichtnet aansluit.
Sluit het toestel alleen aan op een geaard stopcontact.
Ontkoppel het toestel van het lichtnet voor elk onderhoud of reiniging.
Controleer altijd of het stopcontact geaard is.
7. Het toestel inschakelen
1. Open het gasventiel.
2. Zet de schakelaar op I.
3. Houd de gastoevoerknop ingedrukt. Druk meermaals op de ontstekingsknop.
4. De vlam brandt. Houd de gastoevoerknop gedurende 15 seconden ingedrukt om het
veiligheidsmechanisme te activeren.
5. Laat de gastoevoerknop los. De vlam blijft branden.
Bij stroomuitval schakelt het veiligheidsmechanisme binnen enkele seconden het toestel
automatisch uit. Ook bij een gasgebrek schakelt dit mechanisme het toestel uit. In beide
gevallen, volg de bovenstaande stappen om het toestel opnieuw in te schakelen.
6. Regel de gastoevoer.
7. Houd de ontstekingsknop niet langdurig ingedrukt. Zoek naar de oorzaak van het probleem
als het toestel niet inschakelt.
8. Het toestel controleren
Controleer de waakvlam. Controleer of de waakvlam blijft branden.
Wees voorzichtig want de lucht die uit het toestel geblazen wordt, kan extreem heet zijn. Blijf
op een veilige afstand.
9. Het toestel inschakelen
1. Draai de gasfles dicht.
2. Draai de drukregelaar dicht of ontkoppel van de gasfles.
3. Laat het toestel minstens 60 seconden afkoelen.
4. Schakel het toestel uit door schakelaar in de 'O'-positie te zetten.
5. Ontkoppel van het lichtnet door de stekker uit het stopcontact te trekken.
6. Ontkoppel de flexibele slang van het toestel.

FT10CN/FT15CN/FT30CN
V. 01 – 20/06/2019 17 ©Velleman nv
10. Het toestel in de nabijheid van personen of dieren gebruiken
Gebruik het toestel in een goed geventileerde ruimte waar de concentratie schadelijke stoffen
niet overschreden wordt.
Een goede luchttoevoer is gegarandeerd wanneer het volume van de ruimte (in m³) minstens
30 keer zo groot is als het nominaal vermogen (in kW) van alle ingeschakelde toestellen in die
ruimte. Een luchttoevoer door ramen en deuren of andere openingen is gegarandeerd als hun
volume (in m³) van minstens 0.003 keer zo groot is als het nominaal vermogen (in kW) van
alle ingeschakelde toestellen in die ruimte.
Gebruik het toestel niet om stallen of andere dierenverblijven permanent te verwarmen.
11. Gebruik buiten het bereik van personen of dieren
Dit toestel mag enkel worden gebruikt wanneer de nodige luchttoevoer kan worden
gegarandeerd.
Het nodige luchtvolume is gegarandeerd als het volume van de ruimte (in m³) minstens 10
keer zo groot is als het nominaal thermisch vermogen (in kW) van alle ingeschakelde toestellen
in die ruimte.
Een normale luchttoevoer moet gegarandeerd zijn door middel van deuren en ramen.
12. Ventilatie tijdens de zomer
Dit toestel kan ook als ventilator gebruikt worden. Om het toestel als ventilator te gebruiken,
ontkoppel het van de gasfles en zet de schakelaar op I.
Volg de juiste procedure en ontkoppel het toestel van het lichtnet als het toestel reeds eerder
is gebruikt in verwarmingsmodus. Zie hoofdstuk Het toestel uitschakelen.
13. Reiniging en onderhoud voor de gebruiker
Alle reinigings-, onderhouds- of reparatiewerkzaamheden (bv. vervangen van een beschadigde
voedingskabel, herstellen van de brander) moeten worden uitgevoerd door de fabrikant, zijn
dienst-na-verkoop of een vakman om gevaar te vermijden, zelfs als het toestel van het lichtnet
ontkoppeld is.
Reinig het toestel na elk gebruik en voordat u het toestel opbergt.
Controleer regelmatig de brander wanneer het toestel in een stoffige omgeving wordt gebruikt.
Controleer de flexibele gasslang en de netaansluiting alvorens het toestel te gebruiken.
Contacteer een vakman wanneer u twijfelt over de kwaliteit van de gasslang.
Herstel of reinig nooit een ingeschakeld toestel.
Ontkoppel het toestel van het lichtnet voor elk onderhoud, herstel of reiniging. Zie hoofdstuk
Het toestel uitschakelen.
Voor de reiniging van het toestel zijn geen speciale gereedschappen vereist. Controleer altijd of
er geen gaslek is in het circuit of bij de aansluitingen, en zorg ervoor dat de gasdruk correct is
voor elke reiniging van het toestel.
Onderhoud dient minstens 1x per jaar te gebeuren.
Laat reparaties uitsluitend uitvoeren door een vakman. Open het toestel nooit zelf!
Ontkoppel de gasslang en bewaar het toestel op een droge, propere, stofvrije en veilige plaats
buiten het bereik van kinderen.
Sluit steeds eerst de afsluiter van de gasfles wanneer het toestel niet gebruikt wordt.
Te gebruiken met cilinders van ong. Ø 30 cm, H 55 cm.
Gebruik enkel een gasslang conform EN 16436-1:2014+A1 klasse 2 met een diameter van min.
6.3 mm en een aanbevolen lengte van 1.5 m.
Gebruik dit toestel uitsluitend met een regulator conform EN 16129 (G31:700 mbar).

FT10CN/FT15CN/FT30CN
V. 01 – 20/06/2019 18 ©Velleman nv
Problemen en oplossingen
probleem mogelijke oorzaak mogelijke oplossing
De ventilator werkt niet.
Geen spanning.
Controleer of het toestel is
aangesloten op het lichtnet en
de verliesstroomschakelaar of
zekering in orde is.
De ventilator is geblokkeerd. Neem contact op met een
technicus.
Defecte voedingskabel of
schakelaar.
Neem contact op met een
technicus.
De piëzo-ontsteking
functioneert niet.
De elektrode in verkeerde
positie (afstand tot de brander
is te groot of te klein).
Neem contact op met een
technicus.
Geen gas op de brander.
Het gasventiel is dicht. Open het gasventiel.
De gasfles is leeg.
Vervang de gasfles zoals
beschreven in De gasfles
aansluiten en vervangen.
De
gasaansluitingen/verbindingen
zijn niet goed afgesloten.
Sluit onmiddellijk de
gastoevoer en neem contact
op met een technicus.
Er ontsnapt gas en/of er is
een gasgeur waarneembaar.
De
gasaansluitingen/verbindingen
zijn niet goed afgesloten.
Sluit onmiddellijk de
gastoevoer en neem contact
op met een technicus.
De brander springt aan maar
gaat weer uit bij het loslaten
van de gasventielknop.
Het thermo-element werd niet
genoeg opgewarmd of is
defect.
Herhaal de ontsteking en
houd de gasventielknop
minstens 30 seconden
ingedrukt na het aansteken.
Contacteer een technicus bij
blijvende problemen.
Er komt teveel gas binnen, te
grote vlam. De drukregelaar is defect. Vervang de drukregelaar.
De brander valt uit.
Onvoldoende luchttoevoer.
Controleer of de ventilator
perfect werkt. Zorg voor een
optimale luchtcirculatie door
eventuele voorwerpen voor
de aanzuigkant of luchtuitlaat
te verwijderen. Respecteer de
voorgeschreven
veiligheidsafstanden:
- Luchtinlaat > 2.5 m
- Luchtuitlaat > 3.5 m
- Zijkant > 2 m
- Bovenkant > 2 m
Het toestel is oververhit.
Laat het toestel 5 minuten
afkoelen voor u het
inschakelt. Contacteer een
technicus bij blijvende
problemen.
Onvoldoende gastoevoer (de
gasfles is bijna leeg).
De gasfles aansluiten en
vervangen.

FT10CN/FT15CN/FT30CN
V. 01 – 20/06/2019 19 ©Velleman nv
14. Onderhoudsinstructies voor de technicus
Alle reinigings-, onderhouds- of reparatiewerkzaamheden aan gevaarlijke onderdelen moeten
worden uitgevoerd door de fabrikant, zijn dienst-na-verkoop of een vakman om gevaar te
vermijden, zelfs als het toestel van het lichtnet ontkoppeld is.
Waarschuwing - Gebruik alleen originele reserveonderdelen die speciaal voor dit toestel zijn
ontworpen. Gebruik geen generieke componenten. Ongeschikte reserveonderdelen kunnen
ernstige of dodelijke letsels veroorzaken. Het gebruik van originele reserveonderdelen valt
onder de garantie.
De technicus moet deze handleiding lezen alvorens reinigings-, onderhouds- of
reparatiewerkzaamheden aan dit verwarmingstoestel uit te voeren. Contacteer de fabrikant
voor meer technische ondersteuning, informatie over reserveonderdelen of andere informatie
over dit verwarmingstoestel.
Gebruik dit verwarmingstoestel nooit op een niet-geoorloofde manier.
Voor het onderhoud, de vervanging en de reiniging van de onderdelen zijn geen speciale
gereedschappen vereist. Controleer altijd of er geen gaslek is in het circuit of bij de
aansluitingen, en zorg ervoor dat de gasdruk correct is voor elke vervanging of reparatie.
Controleer de goede werking van het toestel zoals hieronder beschreven. Hiervoor hebt u een
gaslekdetector en een gaslekspray nodig.
Stap 1 - Sluit de gaslekdetector aan op de gasmeter.
Sluit een op nul afgestelde gaslekdetector aan op het testpunt van uw gasmeter.
Stap 2 - Open de gaskraan.
Open de gaskraan van de meter tot een druk van ongeveer 10 mbar. Sluit vervolgens de
kraan.
Stap 3 - Controleer de gaslekdetector.
Controleer de gaslekdetector na 1 minuut. Het water in de buis mag niet zichtbaar bewegen.
Stijgt de druk, dan houdt de gasklep het gas niet volledig tegen en lekt deze. U moet de
gasklep verder nakijken. Spuit wat gaslekspray op de gasklep om na te gaan of deze lekt. Bij
een lek vormen er zich belletjes rondom de klep. Bij een lek moet de klep gerepareerd of
vervangen worden door een erkend gastechnicus.
Stap 4 - Verhoog de druk.
Is er geen lek, draai de kraan dan zachtjes open en verhoog de druk tot 20 mbar. Sluit
vervolgens de kraan.
Stap 5 - Wacht gedurende een minuut.
Laat de temperatuur gedurende een minuut stabiliseren. Tijdens deze periode zet het gas uit of
krimpt het, en past het zicht aan de temperatuur binnenin de leiding aan. Na een minuut kunt
u de eventueel gedaalde druk terug naar 20 mbar aanpassen.
Stap 6 - Controleer de gaslekdetector.
Controleer de gaslekdetector gedurende twee minuten. De gasdruk mag nu niet meer dalen.
Bij een daling, sluit de afsluitkraan op de meter om te zien of de meter niet lekt en de daling te
wijten is aan het aangesloten gastoestel. De druk in de leiding mag niet dalen indien de
afsluitkraan is dichtgedraaid.
Stap 7 - Verwijder de gaslekdetector en verzegel het testpunt.
Bij een veilige test, verwijder de gaslekdetector en verzegel het testpunt op de gasmeter.
Open de kraan en spuit wat gaslekspray op het testpunt en alle gasleidingen naar de gasklep
als extra controle op gaslekken.
Laat een ingeschakeld toestel nooit onbeheerd achter.
Problemen en oplossingen
probleem mogelijke oorzaak mogelijke oplossing
De piëzo-ontsteking
functioneert niet.
De piëzo-ontsteking en/of
elektrode is defect.
Controleer de piëzo-
ontsteking en de elektroden
en vervang het defecte
onderdeel indien nodig.
Geen of losse verbinding
tussen elektrode en piëzo-
ontsteking.
Controleer de verbinding en
repareer deze indien nodig.

FT10CN/FT15CN/FT30CN
V. 01 – 20/06/2019 20 ©Velleman nv
Geen gas Het mondstuk is verstopt.
Reinig het mondstuk
voorzichtig met druklucht.
Gebruik in geen geval een
naald of een gelijkaardig
puntig voorwerp.
Het magneetventiel is defect. Vervang het magneetventiel.
De brander springt aan maar
gaat weer uit bij het loslaten
van de gasventielknop.
De thermoschakelaar of het
thermo-element is defect.
Controleer de thermo-
schakelaar en het thermo-
element en vervang het
defecte onderdeel indien nodig.
reserveonderdelen
Raadpleeg de afbeeldingen op pagina 2 en 3 van deze handleiding.
FT10C + FT15C FT30C
No. Omschrijving # No. Omschrijving #
1 rooster 1 1 rooster 1
2 mantel 1 2 mantel 1
3 handgreep 1 3 handgreep 1
4 aansluiting aarding 1 4 binnenste mantel 1
5 binnenste mantel 1 5 beugel binnenste mantel 4
6 beugel binnenste mantel 4 6 aansluiting aarding 1
7 brander 1 7 brander 1
8 thermoschakelaar 1 8 thermo-element 1
9 thermo-element 1 9 thermoschakelaar 1
10 ventilator 1 10 ontstekingsnaald 1
11 motor 1 11 ventilator 1
12 aanzuigrooster 1 12 motor 1
13 bevestigingsplaat klep 1 13 aanzuigrooster 1
14 voedingskabel 1 14 ontbrandingsplaatje 2
15 kabelbinder 1 15 beugel mondstuk 1
16 regelaar 1 16 condensator 1
17 beveiligingskap ingangsaansluiting 1 17 magneetklep 1
18 voet 1 17-1 gasuitlaatklep 1
19 klepfilter 1 17-2 magneetklep 1
20 schakelaar 1 17-3 gasleiding 1
21 dubbele ontsteker 1 17-4 gasmondstuk 1
22 waterdichte afdekkap 1 18 voedingskabel 1
23 magneetklep 1 19 voet 1
23-1 gasuitlaatklep 1 20 beveiligingskap ingangsaansluiting 1
23-2 magneetklep 1 21 kabelbinder 1
23-3 gasleiding 1 22 schakelaar 1
23-4 gasmondstuk 1 23 dubbele ontsteker 1
24 waterdichte beschermkap 1 24 waterdichte afdekkap 1
25 beugel mondstuk 1 25 waterdichte beschermkap 1
26 ontstekingsnaald 1 26 regelaar 1
27 condensator 1
Seite wird geladen ...
Seite wird geladen ...
Seite wird geladen ...
Seite wird geladen ...
Seite wird geladen ...
Seite wird geladen ...
Seite wird geladen ...
Seite wird geladen ...
Seite wird geladen ...
Seite wird geladen ...
Seite wird geladen ...
Seite wird geladen ...
Seite wird geladen ...
Seite wird geladen ...
Seite wird geladen ...
Seite wird geladen ...
Seite wird geladen ...
Seite wird geladen ...
Seite wird geladen ...
Seite wird geladen ...
Seite wird geladen ...
Seite wird geladen ...
-
 1
1
-
 2
2
-
 3
3
-
 4
4
-
 5
5
-
 6
6
-
 7
7
-
 8
8
-
 9
9
-
 10
10
-
 11
11
-
 12
12
-
 13
13
-
 14
14
-
 15
15
-
 16
16
-
 17
17
-
 18
18
-
 19
19
-
 20
20
-
 21
21
-
 22
22
-
 23
23
-
 24
24
-
 25
25
-
 26
26
-
 27
27
-
 28
28
-
 29
29
-
 30
30
-
 31
31
-
 32
32
-
 33
33
-
 34
34
-
 35
35
-
 36
36
-
 37
37
-
 38
38
-
 39
39
-
 40
40
-
 41
41
-
 42
42


in anderen Sprachen
- English: Perel FT10CN User manual
- français: Perel FT10CN Manuel utilisateur
- Nederlands: Perel FT10CN Handleiding
Verwandte Artikel
Andere Dokumente
-
Nilfisk-ALTO Patio Heater Range Benutzerhandbuch
-
Bimar K84.GR Benutzerhandbuch
-
NAPOLEON GPFRE-WNDSCRN Benutzerhandbuch
-
 SunRed DF15 Benutzerhandbuch
-
QLIMA GFA 1010 Benutzerhandbuch
-
Tristar KA-5339 Benutzerhandbuch
-
Toolland FT101 Benutzerhandbuch
-
GGM Gastro GGB879M Exploded View
-
-
